RELICS – DARK HOURS
by
Subdued Games
Walkthrough by Chrissie November 2011
The game launches with a prologue to the story.
The Main Menu consists of Tutorial, New Game, Load Game, Options & Quit.
Click on Options to adjust music and/or voice volume, turn subtitles on or off & alter the brightness.
The Tutorial is useful for anyone new to adventure games. The game is played from a 1st person perspective & the interface is entirely point & click using the left mouse button. Click on arrows + footprints to move in that direction, click on arrows at the sides of the screen to turn left & right & arrows at bottom of screen to reverse view. Click on the eye icon to either close-in on an area/object or evoke a comment, click on the down arrow +footprints to back out of a close-up. Click on the hand icon to either interact with or pick up an object. Click on the door icon to enter & exit unlocked rooms.
At the bottom of the screen is the toolbar which consists of a ‘Relics’ button in the centre – click on this to access a submenu: continue, save game, options & quit. To save a game click on save game, click on one of the 10 slots which can be overwritten.
On the left side of the toolbar are spaces for inventory items. To use an inventory item left click on it then move & click on the area/object – if there is potential for interaction the inventory item will glow although not all places where this happens can be interacted with! N.B. Inventory items can’t be combined.
On the right side of the toolbar are three buttons: Notes where you record some of your findings & can scroll through letters, articles & notes collected by clicking on the arrows. Map will show your location & Think will give you the protagonist’s thoughts. You can skip FMV scenes by right-clicking on the mouse. You can access your desktop by pressing the Windows button on the keyboard.
Tip: Check Notes, Map & Think often to help you progress, particularly Map! Take into account the angles of the corridors & rooms when navigating around & frequently use the arrows to check your surroundings – not all corridors & doors are obvious. To help I have included maps with just a few more reference points & some directional instructions here & there!
Story: After a series of disappearances & deaths in the area, Matthew Hunter suspects that one of the collections of cursed relics responsible for the death of his grandfather & parents may be located at a local school & sets off to hunt it down.
The adventure starts with you playing as Matthew Hunter at the entrance to Ridgecrest High in Pleasanton.
Enter the school
Watch the cut scene. At this point you only have a pouch in your inventory. Click on Notes & scroll through to learn about the pouch, & to read through the newspaper articles.
Go towards door & click on it.
Find the locker room
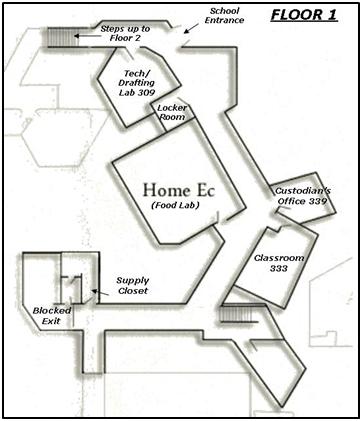
After the scene with Eddie you are in the school on Floor 1 (ground floor) facing a set of steps.
Go forward, turn left, go forward & turn right. Click on door to enter the locker room. Try the 3 padlocks then click on the eye icon on the partially hidden leftmost locker to get a close-up. It’s not locked but jammed. Back out of the view. Click on footprints left of lockers to go forward. Take shirt which you automatically put on. After seeing the ghost..... back out & exit locker room. Eddie gives you a task – this gives you a good opportunity to explore the school.
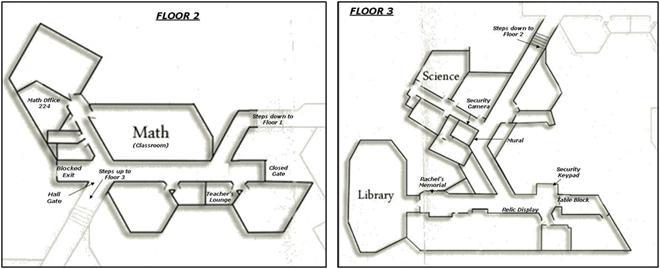
Have a good look around Floor 1 then head up to Floor 2 using the steps by the
entrance & see a ghost en route.
Find someone to talk to
On Floor 2 head towards the room marked Math. Click on Nate to talk to him – he’s not in a good mood & leaves to get coffee. Click on the eye icon on the desk to get a close-up of the drawers. Open the top drawer and take the hairpin. Try the middle drawer – it’s locked. Back out of scene, look around classroom then head back to Eddie’s office on Floor 1 (Custodian’s Office). You talk with Eddie – he mentions a necklace that Nate gave to his late girlfriend Rachel. He then gives you another task to do & tells you that Jason, the security guard, will want to see your ID. Eddie gives you keys to the hall gate but mentions that there is a trick to opening it.
Open the hall gate
Go back up to Floor 2 & head straight down the corridor towards a blocked exit. You have 3 keys marked with different colours & need a clue. Click on the eye icon on the desk to the right. You see a painting of a blackbird, a blood splatter & the sun. Back out of the view & turn right so you are facing the hall gate. Click on the lock & use the keys in order of the colours on the painting – black, red and yellow.
Explore Floor 3
Go up the steps and turn right just before you pass the large colourful mural so you are looking down the corridor leading to the Science room. You will see a security camera on the left hand wall & are not willing to go any further. Turn around, turn right & go past the mural. Head forward until you see the corridor blocked with tables – note the display of relics if you turn to the right. Click on the footprints to the left of the tables & click on the keypad under the security notice. You need a code.
Back out, turn either left or right twice & head towards the library. It’s locked. Turn right & click to close-in on Rachel’s memorial. Click on both the book & Rachel’s photo. Note that the title of the book is Simply Sonnets Vol 1 & that Rachel is wearing the necklace Eddie mentioned earlier. Click on the area just right of the vase & take the mallet - maybe this will help to open the jammed locker.
Turn to go down the corridor past the red lockers – Jason appears so you automatically hide. After he’s gone start making your way down to the locker room. NB Jason was patrolling Floor 2 so you will not be able to go down there until you see him on Floor 3.
When you reach the steps down to floor 1 & you are facing the closed gate you hear Nate yelling. You can’t go down the steps until you find out what’s wrong. Turn to the right & click on the door to enter the Teacher’s Lounge. Talk to Nate – the coffee machine’s not working. Click on the coffee machine. It’s missing a spring. Maybe if you fix it Nate will talk to you but first things first!
Open the locker
Exit the Teacher’s Lounge & go down to the locker room on Floor 1. Click on the eye icon on the leftmost locker for a close-up & use the mallet (found by Rachel’s memorial on Floor 3).
Read the note to Carl from Eddie. It’s a code for the camera in puzzle form & is entered into Notes.
Disable the camera
Go back up to Floor 3 towards the corridor blocked by tables. Click on the footprints to the left of the tables & click on the security keypad. Click on Notes & scroll through to find the note with the puzzle. It’s very simple, just substitute a number for the month e.g. December month 12 minus August month 8 equals April month 4.
Enter 41277 on the keypad.
Explore the Science Lab
Go back to the corridor towards the Science Lab (Turn left just past the mural). Go down the corridor, turn right & click on the door to enter the Lab. Search the room - note the stuffed crow. When you see several boxes full of items (turn right when you’re facing the old computer) click on the table & take the spring.
Fix the coffee machine
Exit the Lab & meet Jason........note that he is carrying a lucky rabbit’s foot.
Talk to ghost ...then go to the Teacher’s Lounge. Use spring on the coffee machine.
Find out more about Nate
Talk to Nate – he gets upset & sits down. Click on eye icon next to coffee machine & take Nate’s keys. Go to Nate’s classroom (Math on Map). Close in on the desk & use keys on the middle drawer. Take the psychic’s calling card. Go back to the Teacher’s Lounge & replace the keys next to the coffee machine.
Find a phone
Talk to Nate about using a phone. There are apparently phones around but you need a code to make an outside call. If you’ve already visited the Food Lab on Floor 1 (marked Home Ec on Map) you may remember seeing a phone there otherwise it’s the only room left where you may find one. Go down to Floor 1 & enter the Food Lab. Look around & click on the phone – yes, you do need a code. Turn to exit the Lab & see a message appear on the wall left of the exit door “time for a lift”.
Exit the room & see numbers & arrows appear on the wall opposite which are entered into Notes.
Use the elevator
While exploring Floor1 you may have come across another set of steps (marked at the bottom right on Map). Make your way to those steps & go up. You seem to be facing an elevator door. Click on the keypad on the left to get a close-up. Click on & look at the latest entry on the 1st page of Notes & see the arrangement of numbers & arrows:
![]()
On the keypad use each number as a starting point then follow the arrow directions to get the code e.g. the 1st number 2 has an arrow pointing right which makes the 1st number of the code 3. Follow the instructions for the other two numbers & enter 375 on the keypad. Click on the door of the elevator & you enter the Art Room.
Explore the Art Room
Use the side arrows to pan around your immediate area. Click on the vase when you see it – it’s missing something. See the poem pinned to the cupboard left of the exit. Click on it to enter it into Notes. Turn around until the exit door is behind you & you see the blank canvas. Click on the footsteps just right of it to go to the back of the Art Room. Click on the screen to see part of a map of the school marked with an X.
Click on the projector to the left of the board to get a close-up then click on the eye icon to the right of it – the cords are locked up, a code is needed. Back out of the close-up & turn left. Click on the hangman picture, note the unfinished word & work out the missing letters by using a process of elimination using the crossed out letters as a clue. Turn to the right, click on the projector then the cords. Using the hangman clue enter the whole word WORTH. The projector lights up & you now see a complete map of the school appear on the screen marked with an X. Click on Map to compare the location & see that that the X mark corresponds with an area just right of the steps leading to the elevator. Turn right & click on the purple ‘bud’ peeping out from the paper roll. Take the tulip. Return to the main room & use the tulip on the vase. Turn left & see a painting that wasn’t there before. Click on it to get a close-up – it shows a trapdoor. Take the coat hanger on the table just left of the painting. Turn around to exit the Art Room & click on the door just left of the cupboard. Enter the Darkroom. Look around then exit the Art Room.
Find the trapdoor
Reverse your view at the bottom of the steps to face them. Click on the door to the right to enter the Costume Room. Click on the trapdoor then use the coat hanger on it. Go down & hear the trapdoor slam shut above you. If you click on Map you will see that you are in the Boiler Room next to the theatre. Pan around there – there is only one place you can move to. Go forward, see ghost....... Turn right, go forward, turn left, go forward, turn left again & go forward towards the door. Click on it to enter the Theater.
Explore Theater
See ghost........ The last words he says is “stage right” so click on the footprints to the right of him. Using the side arrows turn around until you can see a door labelled SHOP. Go forward & click on the door to enter. Click on the orange cable holder to the left & take the screwdriver. After looking around the shop, exit back to the Theater (the door is to the right of the notice about eye protection.) Click on the dummy head wearing the hat to get a close-up, click on the hat & then click on the green note to enter into Notes. Click on Notes & scroll through to read it. Turn right & go towards the Theater seating. Exit the Theater by clicking on the door icon left of the seating. You emerge out of a door opposite the Supply Closet.
Check out the Costume Room
Go to the Costume Room (right of the steps to the elevator.) Click on the note pinned to the jeans then check Notes to read it. The Library is locked so click on Think.
Get the phone code
Go to the Teacher’s Lounge, Jason has lost his rabbit’s foot & asks you to help find it in return for the phone code. While Jason is busy go to the Library on Floor 3, the door is still locked. Turn right to face Rachel’s memorial, notice the book is missing & see Eddie – he asks you to do a task on Floor 2. Go down to Floor 2 & bump into Jason – he’s found his rabbit’s foot. He doesn’t know the phone code anyway but passes on a clue from the science teacher about checking with the ravens. Go to the Science Lab on Floor 3 & click on the stuffed crow twice to get the number 598.
Use the phone
Go down to the Food Lab on Floor 1. Click on the phone & enter 598 to get an outside line then use the psychic’s calling card on the phone keypad. Talk to Madame Bright she won’t tell you where she got the necklace from but mentions it’s a charm necklace.
Talk to Nate
Go to Nate’s
classroom on Floor 2 (Math). On talking to him you learn that Eddie’s had a
miraculous cure after suffering health problems &
Jason had a thing for Rachel. Nate gets defensive when you mention the
necklace. You need more info about Nate & Rachel, maybe you can learn more from
Eddie – you last saw him on Floor 3. Head
towards Floor 3 & see Eddie at the hall gate. You notice his pocket watch. He
gives you the supply closet key & makes some comments about Nate &
Rachel. You need more info.
Check out the Library
Go up to Floor 3 & click on the Library door – it’s unlocked. Enter & go forward to the computer. Click on it to get a close-up then click on it twice – you need an access code. Use the psychic’s calling card on it. Click on the search bar & read the article. Back out from the computer – you should hear a comment about the necklace. NB If you don’t hear the comment access the computer again. Turn to leave the Library - Jason enters & you step out of sight. See him pull out a book from his pocket & start reading, click on the eye icon.
Create a diversion
Turn right to face a corridor, go to the door on the right & click to enter a room. Turn left to face the Fire alarm call point & click on the keypad – yes, you need a code! Click on the pink paper & note the colours purple, orange & green. Reverse your view by clicking on the arrows bottom of screen & click on the yellow paper. Note the numbers which correspond to the colours on the pink paper. Reverse your view again, click on the keypad & enter 469. Leave the room & return to the Library. Jason suddenly leaves...... Exit the Library & realise what book Jason was reading - the one missing from Rachel’s memorial.
Check out Jason.
You decide to search Jason’s locker. Go to the steps down to Floor 2. You accidentally knock into Eddie so hard he drops his pocket watch. He picks it up, he’s irritable but the watch still works – he then gives you another task to do. Carry on down to Floor 1 & go to the Locker Room. Click on the padlock on the right locker – it needs a code, you need more info. Leave the Locker Room & click on Think then click on Think again. Go to Eddie’s Office (Custodian’s Room) & click on the door to the right of it – it’s locked. Use the screwdriver (from the Theater Shop) on it & enter the room to face a filing cabinet. Click on the lock then use the hairpin (from Nate’s desk drawer) on it. Click on Jason’s file – it’s entered into Notes. Go back to the locker room & click on the padlock – you need a 5 letter code. Click on Notes & scroll through to Jason’s file – there are only two possibilities: Jason & story. Spell out STORY on the padlock. Take the necklace. Exit the Locker Room & see Eddie again!
Find a private place.
Move forward down the corridor & see the ghost of Rachel holding what looks like an x-ray? Maybe that’s a clue so go to the Art Room, reverse your view & click on the door left of the cupboard then click to enter the Darkroom. Click the necklace onto the blank white screen. See ghost........ A note has been added so click on Notes & read your latest entries on the 1st page. Exit the Darkroom.
Look for Eddie
Leave the Art Room & see Rachel morph through the door of the Custodian’s Room. Go to the Room & click on the door to enter. Click on the orange star on the wall & the notes on the table. Click on the calendar right of the notes & see a date circled – it was the day Rachel died. Exit the room & see Eddie collapsed on the floor in the corridor. Click on him – he comes round & says that someone tried to strangle him.
You suspect Jason & go to warn Nate. Go to his classroom (Math) on Floor 2 & see him slumped on the table.......
When you leave the classroom Jason appears pointing a gun at you – he’s discovered you’re not the new janitor ......... Eddie appears.......... he goes through the hall gate up to Floor 3.
Follow Eddie
Go up to Floor 3 & follow the corridor round past the mural towards the relic display.
Eddie comes towards you & collapses. Click on the watch and take it.
Find a safe place
You need to go somewhere – click on Think. Go down to the Supply Closet on Floor 1 & use the key Eddie gave you on the lock. You’re looking down on a table – click on it twice then click the watch on it to set it down. Use the pouch from inventory on it..........
Listen to the epilogue.
THE END
This document was provided to GameBoomers.com and may not be distributed without express written permission of the author and the content may not be altered in any way.
![]() GameBoomers
Walkthroughs and Solutions
GameBoomers
Walkthroughs and Solutions