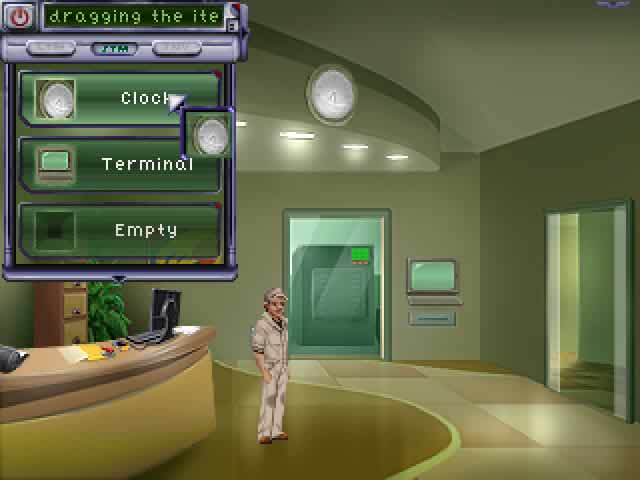
Having dragged the terminal and the clock to the STM slot
Resonance demo walkthrough
You can download the free excellent demo here: http://www.wadjeteyegames.com/resonance.html
Part 1: Your room
As a special bonus you will start the game with 30 points in your pocket! Look at the alarm clock at the floor next to the bed (31). Look at the computer at the right side of the room (32). Examine the hamper by the window. Search your pants to find your cell phone (37). Examine the cell phone in your inventory to find out that it is dead for now (38).
Walk to the next room at the right side. Examine the masking tape on the floor (39). Read the papers next to them on the floor (40). In your inventory read Ed's notes (41). Notice the microwave on the floor at the right back wall of the room. Take the key from it.
Use the key to open the desk's drawers. Search the drawer to find the phone battery. In your inventory put the battery into the cell phone. Use your cell phone and choose 'Use the phone's address book (43). Than choose 'Check the caller ID' (45). Then choose 'Call Dr. Morales'. When the doctor asks you if he woke you up say 'No', 'Yes' or 'Ignore the question'.
When the doctor asks you about the results of your notes click on Ed's notes in your inventory to move them to the conversation bar (50). This will end Part One of the demo. Click on the 6:55 watch at the upper left part of your screen to enter the second part of the demo.
Part 2: The metro
Pick up the coin that Anna dropped on the floor (52). Talk to Anna. Introduce yourself to her. Talk to her again and make a small talk. Talk to her once more and try to pick up a line. Hmmm... the lady surely isn't much interested in you to say the least. To change that give her the coin she dropped. After that exhaust all dialogs.
After she has gone and the metro stops for once and for all you can hassle with the homeless man if you like. But believe me... he took some booze too much to even notice you. Walk to the left and towards the doors of the subway. At the right side of the doors take the loose bar (54). Try to open the doors with your bare hands (55). Use the pipe from your inventory to open the doors of the subway (56). Step into the darkness to end Part Two of the demo. Click on the half past 7 clock at the upper right part of your screen to enter the third part of the demo.
Part 3: The mainframe
In your inventory use Ray's smart phone. First check and read Ray's email. Then read his Memo's. Read about the Antevorta and remember the name of a. batra that is mentioned. After that read your goals. Notice that you already accomplished two goals and read all about your remaining 5 goals! Believe me... some of them are easier said than done!
Close the phone. Click on the green terminal screen and drag it into the empty slot of your STM (short term memory) at the bottom of your inventory screen. Do the same with the clock that is hanging beneath the ceiling.
Having dragged the terminal and the clock to the STM slot
Talk to Emma, the secretary. When she asks you to state your business click on your STM and click on the slot with the green terminal screen so it appears in the dialog bar. Exhaust all dialogs. After that talk to her once more. Click on your STM again and this time click on the slot with the clock. When the lady has left search the trash can and take the empty pop can.
Use the computer on the desk. Notice the login name of Emma Walters is 'ewalters'. Insert the USB stick, alias the password cracker, into the USB port at the bottom left of the computer. Notice the very hard to remember password of Emma. Also remember her login 'ewalters' just in case. When the password is found and typed in, click on enter. Be sure to read the message 'WHAT'S MY USERNAME?' in Emma's inbox and the message called 'Dear idiot' in het Drafts.
In my game my name is Dr. E. Ruiz. Emma has emailed that the login for Antevorta exists of the first three letters of his first name and the first three letters of his last name. Also notice that she emailed that she cannot give him his password because she doesn't know it! Remember that she emails that he can reset the password in case he has forgotten that. Also keep in mind that the username can be different from game too game!
Because my name is doctor E. Ruiz we now know that the second part of his login should be 'rui' without the quotes of course. Now we only have to find out what his full first name is. Just for fun you should read all the other emails of course! After that logout. In the login field type 'eruiz' without the quotes of course and put the password cracker into the USB slot of the computer once more. When the password is found and typed in, click on enter. Be sure to note down the correct password because this is different with each and every username! One thing is for sure... those passwords are really very hard to remember, such as 'password', 'saturday', 'abcdefg' and '12345678'.
Notice his first name on top of the screen, Edmundo. So the first part of the password should be 'edm'. So the complete login ID for Antevorta must be 'edmrui'. Of course you should read all of his emails! After that logout and exit the computer.
Of course if your name in the game is different, you should use the combination of the first three letters of that first name and the three first letters of that last name for Antevorta. So if your name for example is Dr. Alexei Jones, the correct combination for your username is 'alejon'. And if your name is Dr. Andrew MacCormac, the correct combination is 'andmac'. Another name I found is Dr. Stuart Forbes, the correct combination for that name is 'stufor' of course.
Walk towards the green terminal screen. Open the drawer beneath the screen to get some cotton swabs. Click on the green screen. Type the correct Antevorta username (edmrui, alejon, andmac, stufor or any other name that you have been given) and press enter. There where I say press enter this means that you have to press the Enter key on your keyboard! Great... now the terminal asks for your password. Since you don't have it, you have a severe problem...yes? Nope... Now remember that Emma emailed you something about resetting the password! Simply press enter to see the possible instructions.
Type /help and press enter. Hey... great... one of the possible instructions is to reset your password! Nothing goes above security...right!? Type /passreset and press enter. Type the correct Antevorta username ( edmrui, alejon or andmac or any other name that you have been given) and press enter. You now will get the message that the new password is sent to the email address of this person. Exit the terminal. Walk towards the computer on the desk.
Use the computer. Type the correct username (eruiz, ajones, amaccormac, sforbes or any other name that you have been given) and the correct password and click on enter. Read the Antevorta Password Reset email in your Inbox. It says that the password is reset. I can't give you the reset password because it is different every time. So write down this one too!!!. Exit the computer and click on the green terminal screen. Type the correct Antevorta username (edmrui, alejon, andmac, stufor or any other name that you have been given) and press enter. Type the password you just obtained and press enter. Great... now it asks for a DNA sample!?!?!?
In your inventory use a cotton swab with the empty pop can. Put the can swab into the circular opening at the right side of the screen. Type /help and press enter to see the possible options. Type /search and press enter. Type 1 and press enter. Type a. batra and press enter. Note the document number. With me it was of796 each and every time. But keep in mind that it can be different in other games. So in that case note down that file number! Be sure to do so because you are going to need that file number later on! Type /back and press enter. Type 3 and press enter. Put the can swab into the circular opening once more.
Logout and walk towards the file cabinet behind the desk. Open each and every drawer and search for file of796. If the file number is different in your game of course you have to search for that file number! After you have found the correct file use one cotton swab to get a DNA sample of yourself. Click on the green terminal screen once more. Type /search and press enter. Type 3 and press enter. Insert Ray's swab into the circular opening. Log out. This ends the third part of the demo. The strange thing is that you don't get any points for solving this part of the game!?
You'll end up as Anna as a little girl back in her bedroom. Quickly click on the door to lock it (58). Keep in mind that this will only slow down mister nice guy to enter your bedroom. So you have to be quick to avoid being killed by him!!!
Pick up senor bear. Click on the LTM (long time memory) (59). In your inventory right click on the bear to read it's tag (61). Remember that you hold the bear up side down. So the number on the tag is shown up side down too! So the actual number on the tag is 591! Click on 'Back'.
Examine the huge pink chest. Set the dials to 591 and click on 'Open the chest' (63). Click on the LTM and click on Uncle Javi's gift (64). In your inventory right click on the jar with coins. Hide under the bed and use the peso to pry open the vent. If you have done this correct and fast enough, the monster will enter the room and you will disappear though the vent. After that you will wake up by the sound of your alarm clock. If not, just restore your saved game and try again! This ends the third part of the demo. Click on the half past 6 clock at the bottom right part of your screen to enter the fourth part of the demo.
Part 4: Downtown
Examine your wallet in your inventory (66). Walk to the left a little. At the left side of the trash pick up a crumbling brick. Look at the left car mirror. Use the piece of brick to knock off the car mirror. Pick up the broken car mirror (68).
Look at the newspaper vendor. Although it is a totally rip-off use your credit card with the vendor to buy a newspaper (69). If you wish you can read it in your inventory. Enter the alley at the left side of the newspaper vendor. Examine the doors, the fence and the trash. Head back to the street. Walk further to the left. Don't enter the post office! In stead of that sit down on the bench at the bus stop.
In your inventory smash the car mirror with the piece of brick (70). Put the shard of mirror into the newspaper (72). Now read the newspaper... Gotcha! This ends the fourth part of the demo. Don't be disappointed... the demo isn't over yet! You will now be taken to the final part of the demo... The Juno Lab...
Final part: The Juno Lab
Talk to the janitor who is sitting on the grass. If you like you can interrupt him a few times. When the conversation is over walk towards the blocked entrance of the lab. Try to move the stone slab that is blocking the entrance. Click on the stone slab and drag it into the empty slot in your SMT.
Look at the broken window at the wall at the left side of the entrance. Click on it and drag it to an empty slot of your STM too. Head back to the janitor. Talk to him and click on the broken window slot in your STM (74).
Talk to detective Bennet. Tell him to follow you. Head back to the blocked entrance of the lab. Talk to detective Bennet. Click on the stone slab slot in your STM. While he is pushing and pulling the stone slab help him by moving the stone slab together (77). Tell him to follow you again.
Walk towards the broken window. Talk to the detective and click on the broken window slot in your STM (78). Walk to the left and look at the art work on the wall. Look at the grey sketch on the other wall. Search the ash tray. Try to open the door of the maintenance closet. Click on the maintenance door and drag it to the stone slab slot in your STM.
Try to open the ventilation access. Try to open the door to the server room. Click on that door too and drag it to the broken window slot in your STM. Look at the valve next to the server room. Click on the valve and drag it to an empty slot in your STM. Go back outside. Head back to the janitor. Talk to him. Click on the maintenance slot in your STM to get the key for it (80). Click on the server room slot in your STM to find out that he has no access to that room. Click on the valve slot in your STM to learn that he uses his wrench for that and keeps it in the maintenance closet. Head back to the broken window.
Click on the broken window and drag it to the server room slot in your STM. Talk to detective Bennet and click on the broken window slot of your STM. Use Saul's key to open the maintenance closet (81). Get the duct tape and the screw driver from the shelves. No matter how hard you search you will not find any wrench! Take the step ladder (82).
Head back to the janitor once more. Talk to him. Tell him that the wrench is not in that closet. He will keep on telling you that he always keeps it there with no exceptions. Great... now what!?!? Well... this time click on your LTM (long time memory) and click on Saul's story. Oeps... he forgot... he kept the wrench in his pocket (85). Leave the conversation.
Give back Saul's keys. You won't need them anymore and ohhh yeah... you will get 3 points in return (88)! Leave the conversation and walk back to the broken window. Talk to detective Bennet and tell him to follow you. Go through the broken window to end up inside the lab once more and this time accompanied by detective Bennet.
Hand over the monkey wrench to detective Bennet. Use your screwdriver with the ventilation access. Enter the ventilation access. Crawl all the way to the right until you are facing the water leak. While you are still up inside the ventilation shaft switch person with detective Bennet by clicking on his portrait at the right side of your inventory screen. From now on I will just call this switch person.
Switching person by clicking on one of the
portraits...
As detective Bennet walk towards the valve. Use the monkey wrench on the valve. Turn it to the right (89). Switch back person to yourself. Take the rusty pipe in front of you. From your inventory drag the pipe to the missing pipe (91). From your inventory drag the duct tape to the replacement pipe (92). Switch person with detective Bennet. Use the monkey wrench with the valve once more. This time turn it to the left (95). Switch back person to yourself.
Use your screwdriver on the fuse box. Left click on the fuse box to get things right and unlock the entrance doors to the lab. Don't go outside! We are going to use a alternative way to enter the lab by opening the locked heavy door!! Look at the panel on the wall at the right side of the fuse box. Remove the panel cover. Use your screwdriver on one of the screws to remove the destroyed keypad.
Press the red power switch at the top of the panel. Remove the burned wire. Move your cursor over the panel to learn that the upper pin is called the primary pin and the bottom pin the terminal pin. The nine pins between are just called uhhh... pins. It's obvious that the panel has been damaged by the leaking water. Your goal is to shortcut the pins with the loose wires at the bottom of the panel. By connecting the pins in a certain combination you will get the correct amount of power to open the locked heavy door to the lab. This one kept me off the street for many many hours! Why? Because I could not find any clue whatsoever that gave any hint for the correct connection of the pins. Any idea how much combinations are possible with nine pins? Well... sheer endless!!! So... how did I find the correct combination? Well... simply by trial and error for hours and hours and...!!!
Here is the correct combination. Number the upper row of pins 1, 2 and 3. Number the second row 4, 5 and 6. Number the bottom row 7, 8 and 9. Click on the loose wires at the bottom of the panel. Left click once at the primary pin to connect the loose wire to it. Move your cursor, while still holding the wire!!!, along the bottom side of pin 4, along the upper side of pin 5, along the left side of pin 7 and down to the terminal pin. Left click on the terminal pin to connect the wire to it. Click on the red power switch. That's it! (100). It must look like this:
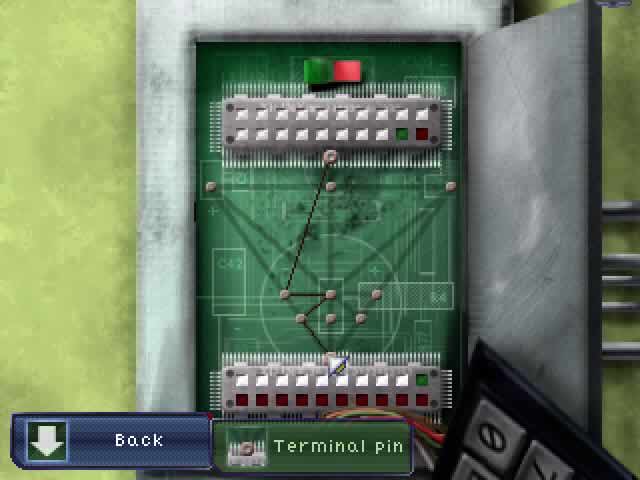
The loose wire connected to the correct pins to open
the heavy door
Enter the opened heavy door to the right. Enter Morals' lab. After the conversation with Dr. Morales in the cabin is over walk to the center of the room. Click on the grey metal beam on the floor and drag it to one of the slots in your STM. Talk to detective Bennet and click on the metal beam slot in your STM. Quickly take the brown book from underneath the lifted beam.
Examine Morales' journal in your inventory. Remember the picture of an angel wearing a diaper and the year 1982 beneath it on the journal's cover. Take the loose paper out of the journal. Click on Back and read the loose paper in your inventory. Notice the PI sign pointing to the security keypad. Click on Back once more.
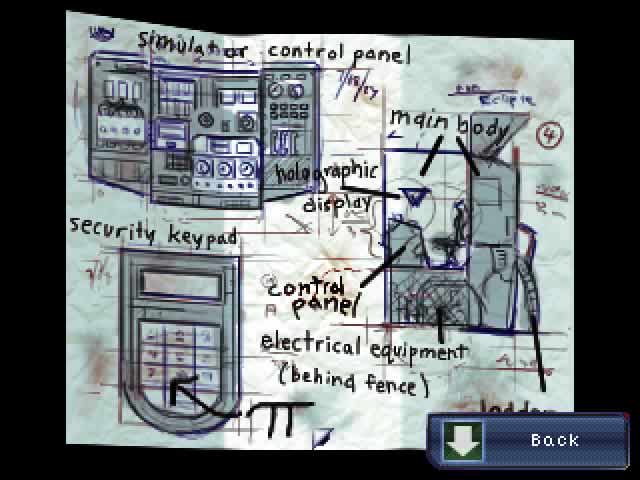
The PI sign pointing to the security keypad
Walk to the left side of the room. Look at the terminal next to the door. Press on 'Utilities'. Press the down arrow once. Press on 'Calculator'. Press on the PI sign and notice the number on the display of the calculator which is starting with 3.141.
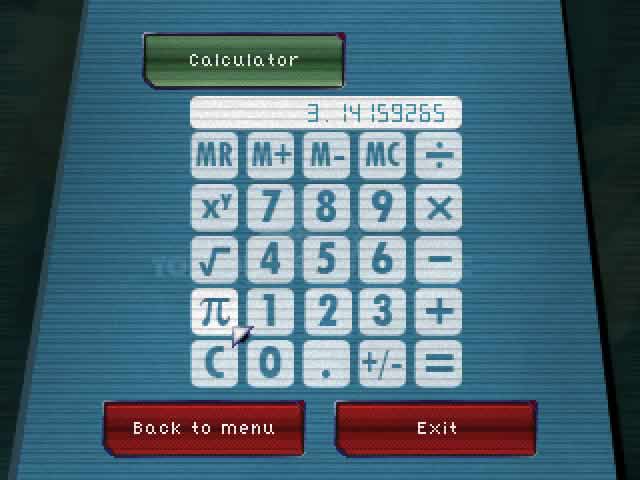
Press the PI sign and look at the number on the
display
Look at the keypad on the simulator at the right side of the lab. Notice that the buttons 1, 3 and 4 are the only used buttons. Now remember the number you saw just on the terminal's calculator. So push the buttons 3, 1, 4 and 1...
In hospital exhaust all dialogs with Anna. When looking at Morales' journal look at Anna's hospital ID badge in your inventory. Note Anna's D.O.B. (day of birth) April 22, 1982. Now remember the picture of an angel wearing a diaper and the year 1982 beneath it on the journal's cover. Of course Anna's day of birth must be the correct code for the lock of Morales' journal. So enter the code 422 and click on the clip of the lock to open the journal. When detective arrives at the scene tell him that someone was after him. You will end up as Anna while she is dreaming and crawling in some sort of maze. Save your game here.
Your goal is to find a manhole to drop down to a lower level three times. I cannot give you the correct solution to solve the maze. Why? Because it differs every time and besides that the screen turns around over and over again randomly. But believe me it is not very hard to solve, it is fun and you will have solved this in just minutes! On your way you will pass a blue light on each and every level. When you click on it you will get a new message in your LTM. Be sure to watch them after having found them! The LTM on the first level of the maze is called 'Hansel and Gretel'. The one on the second level is called 'Where's mama?'. And the one for the last level is called 'Papa'.
Just keep on crawling until you reach an opened manhole. Drop down that manhole. After having dropped down three levels you get a speech bar with two options: 'I... I'm dreaming... Wake up' and 'Keep on dreaming.' If you choose for 'Keep on dreaming' you have to solve another maze. So in stead of that choose 'I... I'm dreaming... Wake up' and in the next speech bar choose 'Wake up' once more.
After that you wake up and you find yourself sitting behind your computer in your room. After a few seconds you will here a loud pounding on the door telling you that you are chased by mister nice guy again. Quickly save your game here! Believe me that you gonna have to restore your game more than once when you are doing your things high up on the roof a little later in the game!
Click on the bookshelf. Push the shelf to the right to block the door. Open the window and step outside. Climb down the ladder at the left side. Look at the green circular mechanism at the right side. Click on the center of it to get the handle. Climb back up the ladder. Climb up the ladder at the right side. Look at the green circular mechanism at the left side. Attach the mechanism handle to it.
Keep on turning the handle to the left until the ladder is firmly in place. Climb up that ladder too. Take a piece of glass from the broken window of the roof access door. Quickly use the broken window on the rope to cut it before mister nice guy gets you... To cut the rope 'just' move the broken window up and down on the rope. I guess you now know what I meant with my statement that you have to restore your game more than once :o)... When you cut the rope quickly enough the good news is that you deal with mister nice guy for once and for all. And not just that... you will also get two more points (102).
The bad news is that it will end this very nice demo. But as a bonus you will be shown some images of the complete game. They look very promising, so I suppose you will buy the complete game just as I will! A final word to the maker of the game. Keep on the good work and pretty please spoil us with more games like this!?