
RESONANCE
by
Vince Twelve & Wadget Eye Games
Walkthrough by Chrissie August 2012
Launching Resonance
After installation you may have to right-click on the game icon & Run as administrator.
This will bring up a box where you have the option to alter settings to be compatible with your system. Click Save and Run at the bottom to launch the main screen.
Main screen
Here you have the options for New Game, Load Game, Credits & Exit.
Game controls
If you click on New Game or Load Game (you can skip the news report by pressing Esc), once the playing area is active, click on the red power switch icon top left of the screen to bring up the Main menu & click on HOW TO PLAY which gives excellent visual examples & saves a lot of written explanation here!
Main menu
Here you can adjust the volume control, choose to show tutorial messages, & show commentary (not recommended on a first playthrough as it contains spoilers!)
You also have the option to RESUME, SAVE GAME, LOAD GAME & QUIT & check on your ACHIEVEMENTS.
SAVE GAME: There are 39 over-writeable slots plus one reserved for an autosave on exiting the game. The saves record the time & date but can be labelled. NB Games saves from the demo can’t be used & will give an error message.
ACHIEVEMENTS: During the course of the game you will automatically gain some achievements – others are optional. Any gained are listed here – hover your cursor over the Locked ones to get a description of what’s needed!
Points & achievements
The game also uses a scoring system. Some achievements can only be gained at the expense of accumulating points. To unlock all of the achievements & get a full final score involves re-playing the game. Achievements gained on completing a game are retained on starting a new game but the score starts at 0!
Hint system
The game employs a very subtle hint system as soon as you reach a part in the game with more than one playable character. You can click on them to get a clue if you’re not sure what to do next!
About this walkthrough
A lot of the game can be played in any order game & using any character(s) providing they have the necessary access and/or items. There are also alternative inventory and/or memories that can be used to achieve the same goal.
The variations are too numerous to mention so this is just one way!
..................................................................................................................................
INTRODUCTION
Watch the breaking news reports from around the world.
60 HOURS EARLIER
Click on the hamper & then on the pants to get Ed’s cell (dead) (+5) - the battery’s dead!
In inventory right-click on Ed’s cell (+1)
Go to the right & click on the drawers – they’re locked.
Click on the papers on the floor to get Ed’s notes (+2) & right-click on the masking tape (+1)
Take the key from the top of the microwave then click & drag it from inventory onto the drawers. Click on the drawers to get the phone battery. In inventory combine it with Ed’s cell (+1) & then click on it.
Click on Use the phone’s address book (+2) Note that the only number is 14A – try calling it of you want. Now click on Check the caller ID (+2) & call Dr Morales to get Morales’ call in LTM. Click through the dialogue & click & drag Ed’s notes from inventory onto the slot in the dialogue box when Morales asks for the results of the equation (+5)
POINTS: 19/TOTAL: 19
...............................................................................................................................................................
A screen now appears with 4 pictures to represent scenarios taking place within the same timeframe as indicated by the clock times. They can be played through in any order. Click on a picture to start.
6.27: THE NIGHTMARE
This scene is timed but automatically rewinds back to the beginning if you fail.
Click on the door to lock it (+2)
Click on Senor Bear on the left – you remember something & get The bear’s key in LTM. Click on it to recall the memory (+1)
In inventory right-click then left-click on Senor Bear to see a tag with a number– note that the number is upside down (+2)
Click on the chest, enter 591 then click on it again to open it (+2) Click Open chest to get Anna’s treasure & remember something to get Uncle Javi’s gift in LTM.
Click to hide under the bed then click on the vent cover.
In LTM click on Uncle Javi’s gift to recall that Anna’s treasure is 365 pesos (+1) Click on the 365 pesos in inventory to get peso (to leave 364 pesos) & use on vent cover.
POINTS: 8/TOTAL: 27
ACHIEVEMENT: GOTTA HIDE – Escape Nightmare.
To unlock:
INSANE ACHIEVEMENT: QUICK ESCAPE – Escape from the monster without locking the door. (It is possible! But lose 5 points)
Click on the chest & quickly enter 5 (up arrow), 9 (down arrow) & 1 (up arrow). click on Open chest (+2) & then again to get Anna’s treasure. Click to hide under the bed & then click on Uncle Javi’s gift in LTM (+1) Click on 365 pesos in inventory to get peso. Immediately open inventory again & use peso on vent cover.
6.55: THE METRO
After the woman boards the train pick up the coin she drops (+2) Keep clicking on Anna to try all dialogue choices. When she won’t talk anymore click & drag the coin from inventory onto her (+3) to get Anna’s lucky coin in LTM. Click through all dialogue choices. Use the memory in LTM if you want.
When the train comes to a halt click on the subway doors. Take the loose bar right of the doors to get pipe (+2) & use on the subway doors (+1) Click on the darkness.
POINTS: 8/TOTAL: 35
ACHIEVEMENT: THAT WENT WELL – Talk to Anna on the subway.
ACHIEVEMENT: “THAT GUY” – Creep on the subway. (If you exhausted all dialogue before giving Anna the coin)
7.05: THE STAKEOUT
Go to the left & click on the crumbling bricks left of the trash to get piece of brick.
See a stripped car further to the left & use the piece of brick on the car mirror to knock it off. Pick up the car mirror (+2)
Click on the newspaper vendor & then right-click on it to see that it has a credit card slot.
In inventory click on Bennet’s wallet to get detective badge & credit card (+2) Use the credit card on the newspaper vendor to get newspaper (+1)
In inventory combine the piece of brick with the car mirror to get shard of mirror (+1)
Check out the alley if you want. It’s not a good idea to enter the Post Office!
Click on the bench to sit down. In inventory combine the shard of mirror with the newspaper to get newspaper with mirror (+2) then click on it & wait to watch the scene behind you to get memory The alleyway door in LTM.
Bennet gets an order for either him or Reggie to check out Juno Labs & receives memory Blackout in LTM.
POINTS: 8/TOTAL: 43
ACHIEVEMENT: MIRROR MASTER – Grow some eyes in the back of your head.
7.30 THE MAINFRAME
In inventory, click on Ray’s smart phone & then on EMAIL to read the messages. Click on X in the top right corner of the phone to go back to a sub-category & click on BACK to return to the main menu.
Click on MEMO & then on ANTEVORTA – you’re in an office on the 7th floor of Aventine City General Hospital. The receptionist leaves at 7.30 sharp. Then click on GOALS 1
Pose as mainframe repair man & Get rid of secretary
Right-click on the clock to check the time, then click & drag its image onto a slot in STM.
Click & drag the image of either the mainframe or the terminal onto the secretary. Click on her & Ask what she’s doing right now. Flirt if you want. Drag the image of the clock from STM onto the dialogue box slot to ask about the time.
Hack into mainframe
Click on the computer on the desk & see that ewalters is already entered. Use the password cracker from inventory on the USB symbol bottom left of the screen to hack the password (+3) then click on enter.
Notice that the Welcome at the top includes the secretary’s full name. NB Ray stores passwords in his smart phone - click on MEMO, ANTEVORTA & scroll down for a reminder.
The Inbox is highlighted so click on all subjects but in particular WHAT’S MY USER NAME? Read the message & note the name of Emma’s boss *The name is one of several used & varies from game-to-game & on subsequent playthroughs!
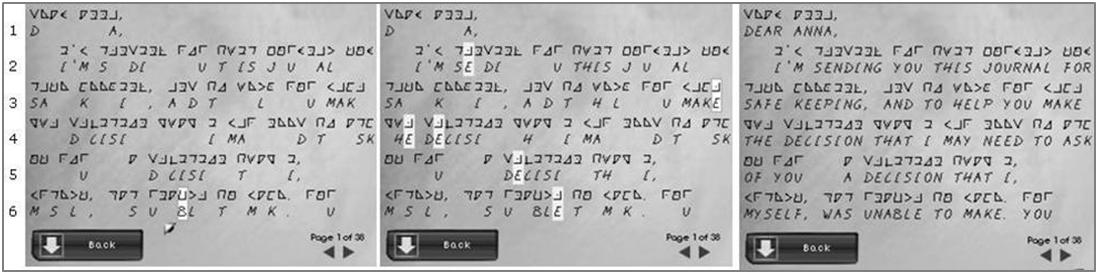
In this example it’s rvaldez* (Pic 1) If you scroll down to the bottom of the message you will see that the person has the title of Dr.
Click on Approved Visitors List for Sunday to see the Dr. is on it.
Click on Drafts on the left & then on Dear Idiot to read Emma’s angry letter (use arrow bottom right to scroll down). Note what she writes about his login name & password (Pic 2) so the Dr’s first name is needed.
Scroll down & note that he throws his aluminium cans in the trash. Click send if you want! (+1)
Click on the Saved box & on the subject headings to read the emails for amusement!
Click Logout at top right. On the login screen enter the name of Emma’s boss e.g. rvaldez* (Pic 3) Use the password cracker on USB port & click on enter. See the doctor’s full name at the top (Pic 4) - in this example it’s Ramon Valdez*.
See Dear Idiot if you sent Emma’s draft!
Click on Antevorta Tech Support to learn that Ray sent the request.
Read the other emails if you want then click on Saved box to read the emails for more amusement!
Back out from the computer.
Click on the trash can & take the empty pop can then click on the drawer below the terminal screen to get cotton swabs (+1)
Click on the terminal.
Using your keyboard, from the info in Emma’s draft type in the first 3 letters of the first name & the first 3 letters of the second name of the Dr. e.g. RAMVAL* for Ramon Valdez* & press enter. Using lower-case letters will automatically be entered as capitals.
You don’t know the password yet so type in any letters &/or numbers & press enter (Pic 5)
Following the instructions on the screen type /HELP under USERNAME (Pic 6) & press enter.
Type /PASSRESET under ENTER USERNAME (Pic 7), press enter, type the user name again & press enter (+3)
A message will appear to say that the password has been sent to the users email address (Pic 8)

Back out from the terminal & login to the Dr’s account on the computer. Click on Antevorta Password Reset & make a note of the password. As with the user name it’s random!
POINTS: 8/TOTAL: 51
ACHIEVEMENT: JUST BECAUSE – Ray’s kind of a jerk. (If you clicked Send to email Emma’s angry letter to her boss.)
Discover purpose of mainframe.
Click on the terminal again & enter the username & password to see a request to insert a DNA sample (Pic 9)
If the password doesn’t work check that you haven’t confused letters like e.g. w & v or o & q which look quite similar!
In inventory combine cotton swabs with empty pop can to get can swab & use on the circular indentation right of the screen.
Enter /HELP under ENTER COMMAND (Pic 10).
Enter /SEARCH (Pic 11).
Enter 3 to search database by sample (Pic 12) & use can swab again on the circular indentation to receive memory of DNA database in LTM
Enter /SEARCH & 3 again.
In inventory combine cotton swabs with Ray’s Smart phone to get Ray’s swab & use on the circular indentation (Pic 13) (+3).

POINTS: 3/TOTAL: 54
Search Antevorta files for “A. Batra”
Enter /SEARCH after Ray’s DNA code (Pic 14).
Enter 1 to search Antevorta project files (Pic 15)
Enter ABATRA (Pic 16) (+2) & make a note of the document reference (Pic 17) The reference is random!

Leave the terminal & right-click on each drawer of the filing cabinet on the left. Left-click on the drawer with a range that contains the file reference, then type it into the dialogue box (+6) to get Antevorta file.
POINTS: 8/TOTAL: 62
ACHIEVEMENT: GET THE SCOOP – Everything on Antevorta.
...............................................................................................................................................................
Watch the cut scene as Ed emerges into a cemetery on his way to meet Dr Morales.
...............................................................................................................................................................
JUNO LABS
Find a way into the building
After he arrives at Juno Laboratory, talk to the janitor to get Saul’s story in LTM.
Click on the building to go nearer & see that the entrance is blocked. Click on the concrete slab – Ed’s not strong enough to move it without help. Click on the broken window – it’s too high. Click & drag the image of the broken window into STM.
Go back to Saul & drag the image of the broken window from STM onto him. Talk to Detective Bennet when he arrives (+2) From this point on you can play as Ed or Bennet – click on their images, right of inventory at the top of the screen, to switch characters. Different characters may glean different information by talking to the same person e.g. if as Bennet you talk to Saul.
As Ed, click on Bennet & ask him To follow me & go towards the building. Drag the image of the concrete slab onto Bennet & then click on the concrete slab to help him move it (+3).
You can’t go through the entrance yet so drag the image of the broken window onto Bennet to get him to help hoist Ed up through the window (+1)
POINTS: 6/TOTAL: 68
ACHIEVEMENT: GOOD LISTENER – Listen to Saul’s whole story without interrupting him.
ACHIEVEMENT: DUO – Gain control of 2 characters (If either Ed or Bennet got the other to Follow me).
Inside the building
See the cut scene of a fire break out & a water leak short-out the control panel of the emergency door leading to the main hallway.
Right-click on the valve to find out it controls the sprinklers & you will need a wrench to turn it.
Click on the door labelled maintenance then click & drag both the image of the valve & the maintenance door into STM.
Click on the sketch left of the door to uncover a No Smoking sign. Exit the building & click through the dialogue with Bennet.
ACHIEVEMENT: NO SMOKING – See no smoking sign.
Find a way of getting Bennet into the building.
Go back to Saul & use the image of the valve from STM on him. He tells you that the wrench is in the maintenance cupboard so use the image of maintenance door from STM on him to get Saul’s keys (+2) Remembering that he said he’d used the wrench to smash the window, use Saul’s story from LTM to remind him. He gives you the monkey wrench (+3)
Go back to the building & drag the image of the broken window onto Bennet to re-enter the building. Try using the monkey wrench on the valve. Use Saul’s keys on the maintenance door (+2) & take the step ladder (+1)
Automatically appear outside with the stepladder placed below the window. You can either click on Bennet & Follow me & click on the broken window or switch characters to each enter the building individually.
POINTS: 8/TOTAL: 76
Fix the Lab’s water system
Inside the building take the duct tape & screwdriver from the maintenance closet. Use the screwdriver on the ventilation access.
Ed’s not strong enough to turn the valve (& Bennet’s too big to go through the vent!) so as Ed, click & drag the monkey wrench from inventory onto Bennet to give it to him.
As Ed, making sure he has the duct tape, click on the ventilation access & go to the right.
As Bennet, use the monkey wrench on the valve & turn it to the right (+2)
As Ed, click on the rusty pipe to remove it, use pipe from inventory on the missing pipe (+1) & then use duct tape on replacement pipe (+1)
As Bennet, use the monkey wrench again on the valve & turn it to the left (+3) Ed automatically comes out of the vent.
Now you can get near the fuse box, use the screwdriver on it & click on it to turn off the electricity supply to the main hallway & entrance.
Ed & Bennet can now access the main hall of the building either by using the laboratory entrance or by repairing the door-opening mechanism for the heavy door.
As Ed, go back to Saul & click & drag Saul’s keys onto him to return them (+3)
To repair the door-opening mechanism enter the building through the window again.
POINTS: 10/TOTAL: 86
ACHIEVEMENT: TEAMWORK: Team up to fix the lab’s water system
Repairing the door-opening mechanism (Optional)
Click on the panel & then on the panel cover to reveal a keypad. It doesn’t work so use the screwdriver on one of the corner screws to reveal the burnt-out wiring grid for it.
The top indicator lights are lit so click on the power switch to turn them off. Click on the burned wire to remove it.
Right-click on the primary pin to learn it feeds electricity to the grid & then right-click on one of the intermediate pins to learn that you only need to wire certain ones to pass the right amount of power to the terminal pin which should then open the door.
The indicator lights show the power levels of the main pins at the top & bottom.
The object is to connect up the right combination of pins to light up only the top row of 10 indicator lights connected to the terminal pin. So you need to work out the power value of each pin.
Start off by working out the values of any pins that can be connected up individually.
Labelling the pins left–right top row: 1, 2, 3, middle row: 4, 5, 6 & bottom row: 7, 8, 9, click on the loose wires connected to the keypad to grab them, and then click on the primary pin at the top.
Drag the wire down, around pin 7 & then click on the terminal pin. Click on the power switch & make a note of the number of indicators that light up on the bottom panel.
Click on the power switch to turn the power off. Click on the loose wires to clear the grid & repeat the process to connect pin 9.
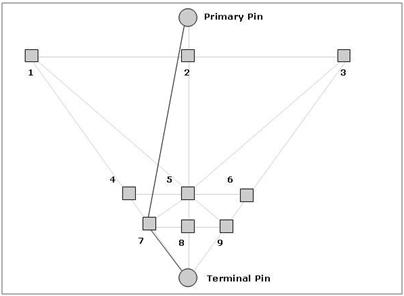
Using the power values of pins no 7 &/or 9 as a reference, gradually introduce & work out the values of the remaining pins.
Working out the power value of each pin:
|
Pin(s) connected |
No of terminal lights lit |
Calculation |
Conclusion: pin = power value |
|
|
7 |
+17 |
|
7 |
+17 |
|
7 & 8 |
+8 |
17 – 8 = 9 |
8* |
- 9* |
|
7 & 2 |
+12 |
17 – 12 = 5 |
2 |
- 5 |
|
7 & 4 |
+11 |
17 – 11 = 6 |
4 |
- 6 |
|
9 |
+12 |
|
9 |
+12 |
|
9 & 8 |
+3 |
12 – 3 = 9 |
8* |
- 9* |
|
9 & 2 |
+7 |
12 – 7 = 5 |
2 |
- 5 |
|
9 & 6 |
+4 |
12 – 4 = 8 |
6 |
- 8 |
|
1, 4 & 7 |
+8 |
17 – 6 – 8 = 3 |
1 |
- 3 |
|
3, 6 & 9 |
+0 |
Inconclusive. Negative power value unknown. |
||
|
3, 4 & 7 |
+7 |
17 – 6 – 7 = 4 |
3 |
- 4 |
|
7, 5 & 8 |
+7 |
17 – 9 – 7 = 1 |
5 |
- 1 |
|
3, 5 & 9 |
+7 |
12 – 4 – 7 = 11 |
5 |
- 1 |
* Pin 8 has a value of –9 in a connection including pins with positive power i.e. pins 7 & 9, but has a value of +10 when connected only to pins with negative power.
Connect the pins that add up to a power value of +10 i.e. pins 4, 5 & 7 & click on the power switch.
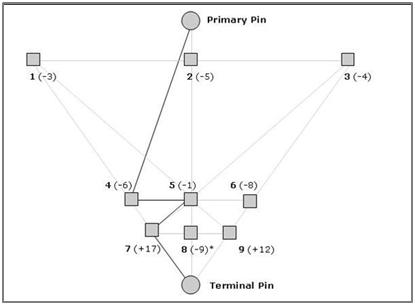
Voila! The heavy door opens (+10)
POINTS: 10/TOTAL: 96
ACHIEVEMENT: WIRED – Rewire the lab door circuit
Find Dr Morales
Click on Morales’ lab door. Click through the dialogue then on the keypad on the side of the simulator.
See that 3 of the keys have fingerprint marks.
If you try randomly entering them you will find that you need 4 numbers so one of them must be used twice!
See that no 1 is more heavily marked, so you can either work out the combination by trial & error, there are 12 possibilities, or otherwise back out & look for a clue.
See a book trapped under a metal beam. As Ed, drag the image of the metal beam onto Bennet & click on the book to get Morales journal (+3). Click on it in inventory to get a close-up.
Click on the loose paper & back out from the journal (+1) Open inventory & right-click on the loose paper to see sketches of the simulator, one with a symbol pointing to a keypad.
For anyone who doesn’t recognise the symbol &/or has forgotten its value, as Ed, click on the terminal on the left. Click on Touch to Start & Utilities. Notice the Thermal Scan facility but use the arrow to scroll down. Click on Calculator to see the symbol (for Pi). Click on it & make a note of the first 4 digits of the number at the top.
Exit the terminal & enter the numbers 3141 on the simulator keypad to release Dr Morales (+5)
POINTS: 9/TOTAL: 105
ACHIEVEMENT: SAVIOUR – Save Dr Morales.
Aventine City General Hospital
See Dr Morales brought into the hospital accompanied by Ed – Anna is already there to receive the casualty.
Afterwards see Anna & Ed in a waiting area.
As Ed, click through the dialogue choices to learn that Dr Morales was being followed & the explosion wasn’t an accident.
Ed shows Anna Dr Morales’ journal. See the picture of the baby angel & the year 1982.
Automatically as Anna, check LTM to see that she has received the memory Morales’ last words. If you remember, just before them, he called Anna his angel.
In inventory right-click on Anna’s hospital ID badge to see her D.O.B. is April 22, 1982.
Enter 422 into the combination lock & click on the clasp (+3) to see the journal written in code & find a note.
If you break the journal open the code will self-destruct & you will lose 3 points + points for de-coding it later.
After reading the note Bennet arrives to ask some questions. As Ed, choose any answer & click through the dialogue.
See Ray on his way to the elevator to get memory Ed & Anna at the hospital in LTM.
POINTS: 3/TOTAL: 108
ACHIEVEMENT: ANGEL – Open Dr Morales’ journal without damaging it.
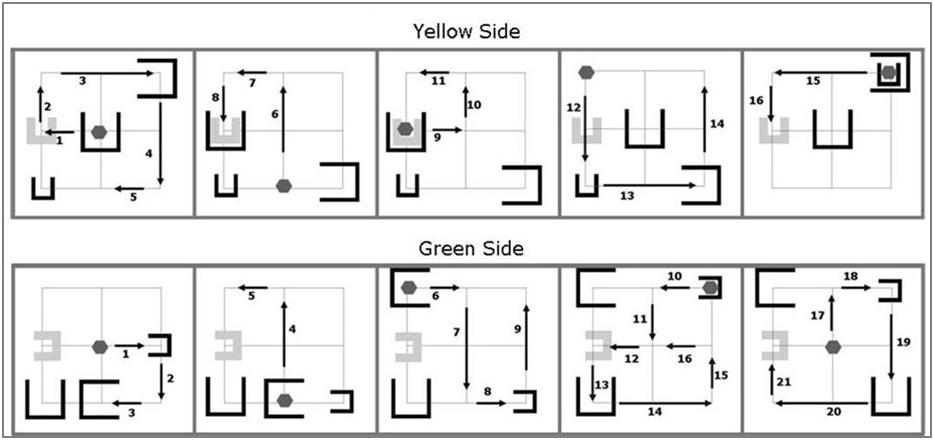
Vent maze
The maze varies on each playthrough!
As baby Anna crawl around by clicking on & dragging the cursor in the direction you want to go. When you come to a blue sphere of light crawl over it to get memory Hansel and Gretel in LTM (+2) & see the blue light appear on a scene showing that the vent has 3 levels.
If you fall down to another level before finding the memory you will have a chance to go back to the level later.
Click on Hansel & Gretel in LTM to recall the memory. In inventory click on 364 pesos. From now on you can click on them to drop pesos to help navigate the maze.
Continue crawling around until you find an open vent in the floor & crawl over it to drop down to the next level (+3)
Look for the blue light to get memory Where’s mama in LTM (+3) & then look for an open vent to drop down to the bottom level (+4)
Here you will find memory Papa (+4) Look for an open vent to either wake up (+5), or choose to continue for another chance to look for any memories you missed.
POINTS: 21/TOTAL: 129
ACHIEVEMENT: DREAM MASTER – Get all the memories from Anna’s dream maze.
Anna’s Apartment
Anna wakes up, remembers something & gets The cypher in LTM (+5)
You won’t get the cypher memory if you either chose to wake up before finding all of the memories in the vent maze or you destroyed Morales’ journal by breaking it open.
She hears an intruder in her apartment
The next scenes are timed but will rewind back to the beginning of each if you fail.
Click on the bookshelf & choose to push the shelf to the right (+2).
Click on the window to open it & climb out.
Click on the ladder on the left to go down & then on the mechanism for the broken ladder on the right to get a close-up. Click on the release button in the centre to get mechanism handle (+2)
Click on the ladder on the left to go back up & then on the ladder on the right to go up.
Click on the mechanism for the ladder on the left to see its handle is missing. Use the mechanism handle from inventory (+2) then click & drag it round anti clockwise to extend the ladder until it’s engaged. Click on the ladder to go up (+3).
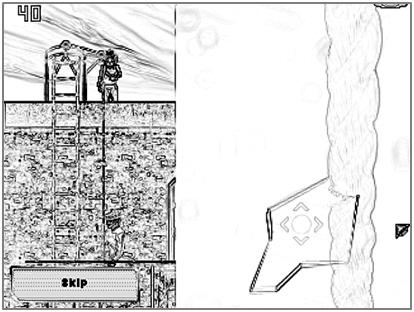
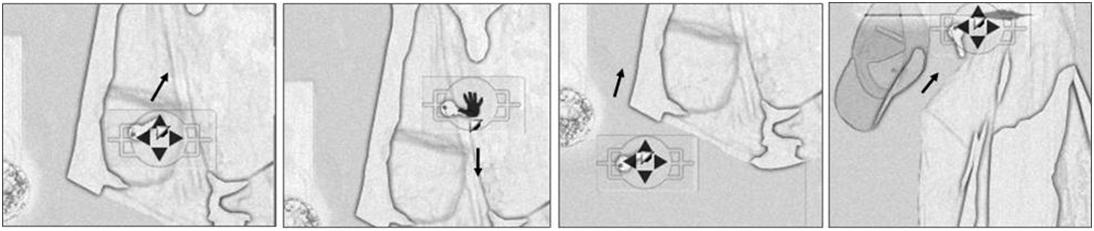
Once Anna’s on the roof click on the broken window to get broken glass (+2) Use it on the rope right of the ladder. The broken glass can only be used in one place on the rope which is almost directly to the right of the glass when you first get the close-up (see Pic). Click & drag the glass to emulate a sawing action to cut through the rope & drop the ladder (+3). You will lose 3 points if you Skip.
See Ed & Bennet burst open the roof-access door.
POINTS: 19/TOTAL: 148
ACHIEVEMENT: CUT THE ROPE
Baseball field
After rescuing Anna in the hope they haven’t been followed, Ed tries to dissuade Bennet from reporting the incident. As Anna, you have to make a choice about whether to trust Bennet or not but it doesn’t matter what option you choose.
As Bennet, ask about Morale’s research (+1) & click through his other questions to find out more.
When Bennet gets Ray to show himself, tell him he looks familiar & use the memory of Ed & Anna at the hospital from LTM (+1)
Everyone decides to work together & re-group the next day. As they’re leaving the field Ray picks up a letter that Bennet drops & glimpses a few sentences before Bennet snatches it back.
POINTS: 2/TOTAL: 150
...............................................................................................................................................................
Baseball field next morning
The group gather to discuss how they can locate & access Dr Morales vault. Each of the 4 members receive Get blueprint, Get financial info & Angelo’s grave in LTM as they decide what’s needed.
You can now play as all 4 characters – click on their image right of inventory to switch between them (+10)
The memory of Anna pursued can be seen in the LTM of Anna, Ed & Bennet & only Ray has the memory of Bennet’s letter in his LTM but from now on any new info/memory stored in LTM is shared.
As Ray, click on Ray’s smart phone, MEMO & GOALS 2 at any time to review them.
POINTS: 10/TOTAL: 160
DECIPHERING DR MORALES’ JOURNAL (Optional)
Work out the cypher
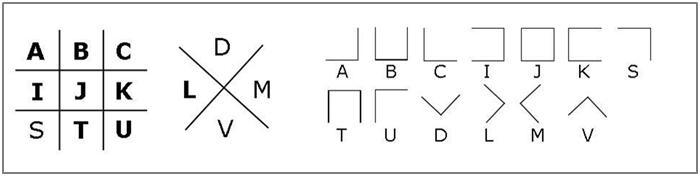
As Anna, click on The cypher in LTM & look at the arrangements of the un-obscured letters.
See that they are in alphabetical order in the first grid which, looking at the middle row continues in the second grid. Fill in the missing letters that fit into the sequences.
Look at the shape of the part of the grid each letter is positioned in to establish its corresponding symbol.
Decipher the journal
In inventory, click on Morales’ journal.
On the first page, look for one of each of the 13 symbols (only one symbol is not present). Click on it & type the corresponding letter which will repeat for each identical symbol throughout the 38 pages of the journal.
You can now fill in the missing letter for each of 2 words that can’t be anything else i.e. Line 2 – THIS & Line 3 - MAKE.
There is now enough info to work out more of the cypher. But the easiest way to decipher the journal, most of which can be done on the first page, is to gradually fill in the letters as the words become obvious e.g. as in the following order: line 4 – DECISION, line 1 - ANNA, DEAR, line 2 – SENDING, YOU, JOURNAL, FOR,
line 3 – KEEPING, line 4 – THE, line 6 – WAS.
On completing the first page, click through the journal to fill in any missing letters i.e. V in JAVI (page 2, line 6), X in EXPERIMENT (page 4, line 5), Z in PULVERIZING (page 8, line 1), Q in FREQUENCY (page 14, line 6).
Working out the rest of the cypher
After completing the words THIS & MAKE look at the symbols for H & E. Compare their shapes to those within the grids in the first part of the cypher. See that E corresponds to the position of A & continues the top sequence. H corresponds to the position of D - so the grid arrangements must be repeated, with the addition of dots. Fill in the letters that fit in with the alphabetical order then work out their corresponding symbols.
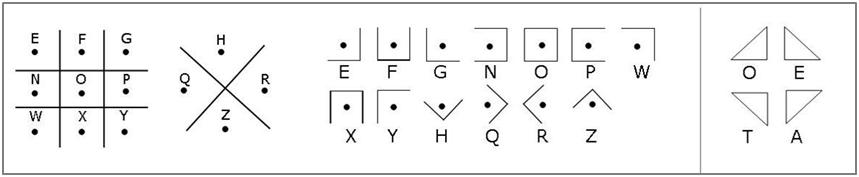
If using the completed cypher as an alternative to deciphering the journal, you will see that there are extra symbols not included, or with any logical connection to the cypher, for O, T, E & A!
Once the deciphering is completed, back out from the journal to hear Anna comment “That’s it. That’s the message” (+10)
Read the journal to learn more about Morales’ research, why he installed a vault & regularly slept in the simulator, & also that a set of Resonance devices went missing. His last entry on April 11 mentions that he will be calling Ed in the morning.
POINTS: 10/TOTAL: 170
SUPER ACHIEVEMENT: DECODER RING – Decode a journal
INVESTIGATE ANNA’S OTHER UNCLE’S GRAVE
As Anna, click & drag memory Angelo’s grave from LTM onto Ed & then click on Let’s go. (She won’t ask anyone else!)
They automatically go to the cemetery & look at the headstones of Anna’s parents (note that her father’s name is Dante) & her other uncle. Angelo (+3) They return to the baseball field.
POINTS: 3/TOTAL: 173
GET MORALES FINANCIAL RECORDS
If you want to adhere strictly to the (optional) goal mentioned in Ray’s Smart phone to Take group to NCS to meet Ozzy, as Ray, click on the other three members of the group in turn & ask them to Follow me. Exit the baseball field to see a map with the location marked.
National Credit Systems
Click on the red curtain. If all 4 members of the group are there, Ozzy is uncooperative & says he’s too busy doing law - abiding things. Take the hint & as Bennet, exit NCS.
As Ray, click on the red curtain again, click on the dialogue choices & then use Get financial info from LTM. Click through the dialogue - Ozzy needs a FTTN (Financial Transaction Tracking Number) & wants $10000.00! Get Ozzie’s terms in LTM (+1) Pick up the empty pill bottle (if you didn’t pick one up earlier).
In inventory, right-click on the empty pill bottle to see a prescription for Comfocil which is not in Ozzie’s name.
As Ray, click on Ray’s smart phone, MEMO & GOALS 2 to see the additions.
FTTN numbers seem familiar so as Ray, click on DNA database in LTM to recall the memory. A DNA sample was needed to access it, so get Anna to go with him to the hospital.
POINTS: 1/TOTAL: 174
ACHIEVEMENT: QUARTET – Gain control of all 4 characters (if all 4 characters went to NCS)
Find Dr Morales’ FTTN
Outside the hospital, click & drag the cotton swabs from inventory onto Anna (alternatively Anna can get them from the drawer below the terminal on floor 7).
As Anna, click on the hospital entrance, use her hospital ID card from inventory on the card reader (+1) & click on 9 to go to the morgue. Click through the dialogue (+2) then take the death certificate & the ultra-sonograph by the body bag on the right. Click on Morales body & through Anna’s words (+3)
Use the cotton swabs on Morales’ body to get Morales’ swab.
Leave the morgue & click on 1 to go to the lobby exit. Click & drag Morales’ swab onto Ray.
As Ray, go to floor 7 of the hospital then click & drag the image of either the mainframe or the terminal into STM. Click on Emma & ask Don’t you work the morning shift? If you sent her draft she will mention she got fired! (+2) Use either the image of the mainframe or terminal on her to remind her who you are.
Click on Ray’s smart phone when he gets a mail alert, Click on EMAIL & Antevorta to read the latest message from A Batra.
Click on the terminal, enter /SEARCH then 3 to search by sample & use Morales’ swab on the circular indentation to get Morales’ FTTN.
Return to National Credit Systems, click on the red curtain & use Morales’ FTTN from inventory (+2) Ozzy tells him to come back when he’s got the money.
POINTS: 10/TOTAL: 184
Bribe Ozzy
As Anna, go to the ICU on floor 2 of the hospital & go to the left.
See the Autopharm then right-click on each of the patient folders on the left until you see a name with a prescription for Comfocil. Make a note of the patient’s name & ID reference.
Click on the Autopharm & use hospital ID card on the card reader bottom right (+1)
Click on the numbers 8468 for Denise Boye, & then on E to enter the suffix. You can either click Confirm to get Comfocil or Options & Fill with Placebo (for an achievement) to get prescription meds (+2)
Go to National Credit Systems & use the prescription meds on the red curtain (+3) Anna will make a comment if she substituted placebos (+1)
She receives Morales’ credit. Right-click on it in inventory to see a transaction to Tortoise Security which will now be marked on the map (If Bennet has not looked at the certificate in Police Administration).
POINTS: 7/TOTAL: 191
ACHIEVEMENT: SEE THE WIZARD - Find Morales financial information.
ACHIEVEMENT: HIPPOCRATES – Keep Anna’s professional integrity intact (If she gave Ozzy placebos)
GET INFORMATION ABOUT VAULT DESIGN FROM TORTOISE SECURITY & FOLLOW UP ON PICTURE
As Anna, go to Tortoise Security. Either ring the bell or touch anything to set off an alarm. Talk to Tortoise about all subjects to learn that he is passionate about making ornate safes & puzzle boxes & draws your attention to one on the right.
Use Morales credit on him but he won’t give out any information without a will & a death certificate - receive Get will and death cert. in LTM (+3)
Click on the ornate safe & try to solve the puzzles if you want (more about them later!)
POINTS: 3/TOTAL: 194
Getting the will
As Bennet, go to Police Administration & automatically talk to Officer Berry. Note what's said about using the interrogation room. (Right-click on Berry to learn the reason for his nickname).
Go up the stairs & to the left to automatically talk to Officer Johnsen & ask about the blueprint. He tells you that it is probably high security but offers to try & retrieve it anyway. Note that he has to find & request the document using the archive computer.
Click on the city archive & then on Scan Index Finger. No go! (+1)
Right-click on the certificate on the left wall to see that the city archive was designed by Tortoise Security which will now be marked on the map (If Anna has not yet looked at Morales’ credit).
Click & drag the image of the city archive into STM.
Click on Johnsen & through all dialogue choices to find out what he does, about the automated arm retrieval system for the archive & the types of documents it stores.
Use Get will and death cert. from LTM on Johnsen & note that he will give you a second copy if needed.
Click on the city archive & on Scan Index Finger. See on the arm cam that the retrieval arm starts from CURRENT BOX M20 & note the reference of the box it’s seeking which is random – in this case it was K06. Receive Morales’ will (+2)
Before leaving, right-click on the copy room door to learn that it takes Johnsen hours to help Bennet use the copier!
Go back to Tortoise Security & click & drag Morales’ will onto Anna.
As Anna, click on the bell & use Morales’ will then death certificate. Tortoise gives some info about the vault including that it has 2 sets of encoded fingerprints & might be found through tracing its heat signature. He can’t tell you what it is & confesses to losing all of Dr Morales’ files due to a theft. He hands over a security cam picture (+5)
POINTS: 8/TOTAL: 202
Follow up on picture
As Anna, use the security cam picture on Bennet. When you switch to Bennet click on The alley way door in LTM to trigger the memory - Bennet takes the security cam picture.
Bennet & Anna arrive in the alleyway (+1) As Bennet, click on The alleyway door in LTM again & take note of the sequence of knocking. Click on the middle door & click on knock twice, knock once, knock three times & stop knocking. Bennet enters leaving Anna outside.
Click through Bennet’s dialogue with the woman who mutters a few words in Japanese & gives Bennet a paper swan (+2) Bennet & Anna automatically go to the baseball field. As Bennet, click on the paper swan in inventory to get vault plans. Right-click on them to see a plan of the vault & a temperature circled.
Get Bennet & Anna to go to Tortoise Security & use the vault plans on Tortoise. He recognises them as part of Dr Morales’ stolen file. It shows the heat signature of the vault’s internal battery but a thermal image scanner would be needed to trace it.
POINTS: 3/TOTAL: 205
Juno Labs
Remembering where there was a thermal scan facility, as Ed, go to Morales’ lab. Click on the terminal & Touch to Start, Click on Utilities & then Thermal Scan. Click on the down arrow on the left to reduce the temperature to 185%.
Click on SCAN FOR ANOMALIES on the present level. Use the down arrow on the right to scroll down & scan each level below until you get an UNIDENTIFIED HEAT SIGNATURE on level B8. You now just need the blueprints to find a way in.
ACQUIRE BLUEPRINTS OF JUNO LABS
Find a way to crack the city archives
There are a few ways this can be done!
Either:
As Bennet, solve the ornate safe puzzles first then use the image of the city archive in STM to automatically get a *master keycard from Tortoise.
For a character other than Bennet to get the image of the city archive in STM, see how under the later section Retrieving the blueprint.
or:
As Bennet, talk to Tortoise & use the image of the city archive in STM to trigger it as a dialogue subject for all characters. Tortoise will now give the *master keycard to anyone who either solves or has solved the ornate safe puzzles & asks him How can I crack the city archives?
or:
As either Bennet (or Anna if you haven’t followed up on the picture yet), & only if he/she hasn’t solved the ornate safe puzzles first, click on Tortoise & How can I crack the city archives? Use the security cam picture to get the *master keycard (& an achievement).
On getting the *master keycard (+5) Tortoise will explain that it can be used to access the city archive & re-calibrate the arm that retrieves the documents. It will think it’s grabbing a non-restricted document but if it’s deliberately aligned incorrectly it will grab a different document regardless of its security level.
POINTS: 5/TOTAL: 210
ACHIEVEMENT: BLACKMAILER – Gain Tortoise’s help by resorting to blackmail
Solving the ornate safe puzzles
(Optional if Tortoise was blackmailed but lose 8 points if you don’t solve them).
Click on the ornate safe & choose one of the sides to get a close-up. See a grid with 4 squares & a button in the centre. The button can be moved around the grid by clicking & dragging on it & it is possible to unlock some of the sides by doing this randomly.
Back out of the close-up to learn that there seems to be some mechanisms inside but you can’t see them.
As Anna, right-click on the ultra-sonograph in inventory - if it’s calibrated correctly you can use it to see through almost anything. The sonograph can be used by Anna or given to any other character by clicking & dragging it onto them.
Use the ultra-sonograph on the ornate safe (+3) & choose one of the sides. Click & drag the edge of the gadget across the puzzle to see the mechanism inside.
The object is to use the button to move the small black shape onto the white slot. If you back out, the puzzle on that side will reset.
Solve the puzzles on all 4 sides (+5)

POINTS: 8/TOTAL: 218
ACHIEVEMENT: SAFECRACKER – Crack Tortoise’s safe
INSANE ACHIEVEMENT – SAFE SEER – Open Tortoise’s safe without using any ‘vision aids’ (If you didn’t use the ultra-sonograph lose 3 points)
Retrieving the blueprint
The archive computer will need to be hacked first, so arrange for Bennet, Ray plus either Ed or Anna to go to Police Administration. Make sure that Ray has the master keycard.
As Bennet go up the stairs & opt to bring Ray to the interrogation room. Go to the left & drag the image of the copy Room onto Johnsen (+2)
As Anna or Ed, drag the image of the control Panel onto Officer Berry (+2)
While Berry’s distracted, as Ray, leave the interrogation room & go to the left (+2) Ray can also sneak to the left, without Anna/Ed’s help, if he waits for Officer Berry to answer the phone but you will lose 2 points.
Click on the archive computer & then on the left slot underneath the screen to expose the USB port. Use the password cracker on it (+1) & then click on Enter.
Click on Recent Documents & make a note of the reference letter & number for JUNO LAB; BLUEPRINTS:*I11 & MORALES, JAVIER; WILL:*KO6 – Ray will store them in his smart phone. Some of the letters may look similar e.g. O & Q!
*The reference letter & numbers are random – they vary from game-to-game & on subsequent replays!
Click Back & Logout.
Use the master keycard on the city archive & click Retrieval Arm Manuel Alignment.
See that the arm cam is still focused on the box with the will & note the instruction: To Calibrate: Target M20 and Save. The arm was calibrated to M20 to get the will so to get the blueprint the arm needs to be re-calibrated to think its targeting the will.
To do this, using the reference letter & number of each, work out where the blue print is positioned in relation to the will i.e. how many letters up/down & numbers left/right it is. Use the same amount of letters up/down & numbers left/right of M20 to work out the letter & number needed to re-calibrate the arm. See following examples.
Example 1
|
Actual locations of Will (W): K06 & Blueprint (BP): I11 |
||||||||
|
L04 |
L05 |
L06 |
L07 |
L08 |
L09 |
L10 |
L11 |
L12 |
|
K04 |
K05 |
K06 (W) |
K07 |
K08 |
K09 |
K10 |
K11 |
K12 |
|
J04 |
J05 |
J06 |
J07 |
J08 |
J09 |
J10 |
J11 |
J12 |
|
I04 |
I05 |
I06 |
I07 |
I08 |
I09 |
I10 |
I11 (BP) |
I12 |
The blueprint is 5 numbers to the right of the will & 2 letters down. So the arm needs to be calibrated to 5 numbers to the right & 2 letters down from M20 to K25
|
Arm calibration for retrieval of Will (W): M20 & Blueprint (BP): K25 |
||||||||
|
N18 |
N19 |
N20 |
N21 |
N22 |
N23 |
N24 |
N25 |
N26 |
|
M18 |
M19 |
M20 (W) |
M21 |
M22 |
M23 |
M24 |
M25 |
M26 |
|
L18 |
L19 |
L20 |
L21 |
L22 |
L23 |
L24 |
L25 |
L26 |
|
K18 |
K19 |
K20 |
K21 |
K22 |
K23 |
K24 |
K25 (BP) |
K26 |
Example 2
|
Actual locations of Will (W): N28 & Blueprint (BP): Q20 |
||||||||
|
Q20 (BP) |
Q21 |
Q22 |
Q23 |
Q24 |
Q25 |
Q26 |
Q27 |
Q28 |
|
P20 |
P21 |
P22 |
P23 |
P24 |
P25 |
P26 |
P27 |
P28 |
|
O20 |
O21 |
O22 |
O23 |
O24 |
O25 |
O26 |
O27 |
O28 |
|
N20 |
N21 |
N22 |
N23 |
N24 |
N25 |
N26 |
N27 |
N28 (W) |
The blueprint is 8 numbers to the left of the will & 3 letters up. So the arm needs to be calibrated to 8 numbers
to the left & 3 letters up from M20 to P12
|
Arm calibration for retrieval of Will (W): M20 & Blueprint (BP): P12 |
||||||||
|
P12 (BP) |
P13 |
P14 |
P15 |
P16 |
P17 |
P18 |
P19 |
P20 |
|
O12 |
O13 |
O14 |
O15 |
O16 |
O17 |
O18 |
O19 |
O20 |
|
N12 |
N13 |
N14 |
N15 |
N16 |
N17 |
N18 |
N19 |
N20 |
|
M12 |
M13 |
M14 |
M15 |
M16 |
M17 |
M18 |
M19 |
M20 (W) |
Once you’ve worked out the letter & number you need to target, use the small up/down arrows to go up/down a letter, the centre left/right arrows to scroll through the numbers & the up/down arrows to centralise the arm so that the box in the centre lights up green. Click Save.
As Bennet, click Interrupt (it doesn’t matter if Ray gets caught!) When he’s back behind his desk, ask Johnson for another copy of the will by using Get will and death cert. from LTM. Click on the city archive & on Scan Index Finger to get lab blueprints in inventory (+4)
POINTS: 11/TOTAL: 229
ACHIEVEMENT: BLUEPRINT SNATCHER – Nab the blueprints from the police archive.
ACHIEVEMENT: ARCHIVE MASTER – Get the blueprints on your first try.
...............................................................................................................................................................
DR MORALES’ VAULT
Baseball field
All 4 characters automatically meet on the baseball field. Ed looks at the blueprints to get Vault location in LTM. There is a service tunnel leading to it with an entrance nearby.
Super collider magnets
The group automatically enter the first section of one of the tunnels below the lab’s decommissioned super-collider. The scene pans across to show the path is blocked by a metal crate, so they need to use the powerful magnets in the ceiling to clear the way.
The magnets, when active, focus only on the section they’re above but no-one can pass under them while carrying anything metallic.
Ed has a metal plate in his shoulder & offers to hold anything in case they contain metal & receives Ray & Anna’s inventory items. Bennet won’t let him take charge of his gun!
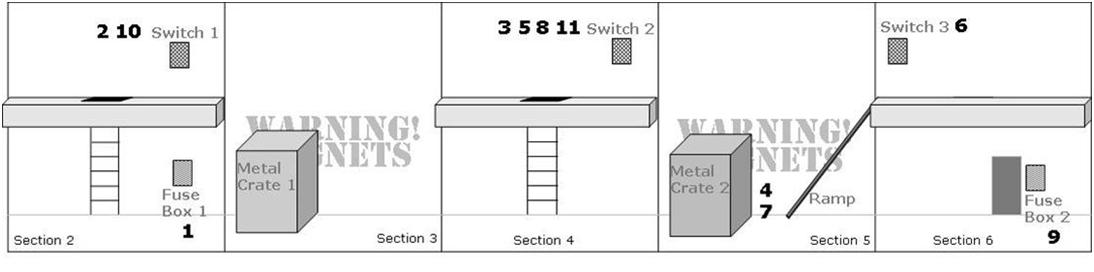
In section 2 of the tunnel the magnet control fuse-box right of the ladder powers the switches above the platforms in sections 2 & 4 which activate magnets above sections 3 & 5 respectively.
In section 6 the walkway control fuse-box next to the door powers the switch above the platform which retracts & extends walkways between the platforms.
The object, of course, is to manipulate the magnets & walkway control to clear the path of obstacles for all members of the group to safely reach the vault. See diagram. There are a few ways in which this can be done - this is just one example:
1 As anyone, click on Fuse Box 1 (magnet control) Click on switch.
2 As Ed/Bennet, click on the ladder in Section 2 to climb up & click on Switch 1 to raise Metal Crate 1 (+1)
3 As Anna/Ray, walk under the crate to Section 4, click on the ladder & click on Switch 2 to raise Metal Crate 2 &
Ramp in Section 5 (+1)
4 As Ray/Anna walk to section 5 & stand under the N’s in ‘Warning! Magnets’.
5 As Anna/Ray, click release for Switch 2 to drop Metal Crate 2 & Ramp.
6 As Ray/Anna, walk up Ramp & click Switch 3.
7 As Ray/Anna, walk down Ramp & stand in position under N’s between Crate 2 & the Ramp.
8 As Anna/Ray, click Switch 2 to raise Metal Crate 2 & Ramp.
9 As Ray/Anna, walk to Section 6 & click on Fuse Box 2 (walkway control) then click on switch to engage
walkways under Metal Crates 1 & 2 (+1)
10 As Ed/Bennet, click release for Switch 1 to drop Crate 1 onto the walkway.
11 As Anna/Ray, click release for Switch 2 to drop Metal Crate 2 & Ramp onto the walkway.
On clearing the route get all members of the group to walk to the door. As anyone, click on it – inventory items are automatically returned.
POINTS: 3/TOTAL: 232
ACHIEVEMENT: MAGNETIC PERSONALITY – Manoeuvre everyone through the super collider.
Getting into the inner vault
The group enter a control room for the vault (+3) Ed sees some papers & passes one of them to Anna. She looks at the close-up to get Uncle’s key in inventory, & sees a scrap of paper to get Morales’ note in LTM. The note triggers a scenario which includes Ray picking up a pipe & concludes with Ed talking to Anna (+3)
Click on Bennet to get his detective badge & credit card.
Click on the door controls on the left wall (+1) then click on the bars to get a close-up of the vault interior. Click on the fuse on the floor – it’s out of reach. Click Release to back out.
As Ed, give Ray the duct tape from inventory or Ray can give Ed the pipe! As Ray, combine the duct tape with the pipe to get pipe with tape (+1) Click on the bars & use it on the fuse (+1)
Click on the fuse panel to the right of the consol. Click on the fuse to remove it & see what happens.
Take the pencil & small box. Click on the small box in inventory to get another fuse. Use the fuses with the slots on the fuse panel. One of them doesn’t fit. Right-click on it in inventory & click on the bent pin to straighten it (+1) See that the fuse is marked 3 & use on the slot (+1) Try to use the fuse on the slot before straightening the pin.
Check the numbers on the other 2 fuses & note their positions on the fuse panel.
Click on the yellow paper pad to get a close-up & use the pencil on it (+1) Click & drag the pencil over the pad to reveal a set of numbers.
Click on the small code panel. See a row of unlit indicator lights at the top & a diagram of the fuses each showing a connection to one of 3 touch panels.
Use the positions of the fuses on the fuse panel to number the touch panels e.g. if the fuses were inserted from top to bottom 3, 2, 1 the touch panels will be numbered from left to right 3, 1, & 2. Click on the panels following the sequence on the paper pad: 31322133 to light up all of the indicator lights (+2) & retract the bars.
POINTS: 14/TOTAL: 246
ACHIEVEMENT: ACCESS GRANTED – Gain access to the inner vault.
Accessing the vault computer
See Bennet start to come-to as Ed & Anna enter the vault (+5) Click on the vault computer & on Touch to Start. It needs a key phrase.
Ed reminds Anna Your uncle hold the key & urges her to try & remember something she may have forgotten.
As young Anna click on the stairs to recall her memories, then see her at the cemetery by Angelo’s grave. Paying attention to the last memory & the name of her father, walk to the right & use Uncle’s key from inventory on father’s grave. Click & drag the pencil to reveal the phrase.
Enter TE PROMETO (Portuguese/Spanish for I promise) into the boxes & click OK on the vault computer screen.
See a video file for Anna ready to play (+3)
Anna locks herself in the vault. Click Play the Video
Anna now has to make a choice to Destroy Vault or Open the Vault. Click on one or the other – it doesn’t matter (+3)
Meanwhile back in the control room see the scene again of Bennet as he comes-to. As Ray, click through the dialogue in the following order to learn something surprising about Bennet. It was hinted at in a comment made by Officer Johnsen earlier in the game! :
What do you want with the Resonance research?
What do you want with the Resonance research? (Yes! Ask him again!)
Explain the note.
Use Bennet’s letter from LTM.
You learn that it was sent from a friend 5 years ago:
“....the last two years of my life. And trust me, I know it was no picnic for you!
I wish I could tell you this was not an easy decision, but it was. I have to get away. I just need some space. Somewhere where my life can become my own again.
Maybe some day we can pick up where we left off all those months ago, but you’ve still got your career, your privacy. And I know that nothing matters like the job.
I guess the lesson here is never trust a journalist. Bastards.... I know he has been poking around your precinct too. So, if the reporter is following you, get rid of him. He’s probably looking for the next pulp-gossip article. He didn’t even run a good picture of me!”
When Ray mentions another unexplained note (+5) use Morales’ note. When Bennet starts to realise something use Ed and Anna at the hospital from LTM then use the subway map from inventory (+3)
Back in the vault watch the scene as Anna makes the choice. As Ray, click on the fuse panel.
POINTS: 19/TOTAL: 265
ACHIEVEMENT: I PROMISE YOU – Your uncle holds the key
ACHIEVEMENT: CLOSE TO HEART – Learn Bennet’s secret.
...............................................................................................................................................................
Baseball field
As Bennet, click through all dialogue choices when Reggie appears, Use The alleyway door from LTM as proof after clicking on You know I didn’t do those things (+3)
Use The alleyway door from LTM again to receive paper crane in inventory & Reggie’s number in LTM (+2)
Exit the baseball field & go to the only location marked on the subway map.
From now on Ray & Bennet will automatically go everywhere together.
POINTS: 5/TOTAL: 270
Edgetown
Go to the right to arrive in the alleyway. As Bennet, click on the paper crane in inventory to get haiku & then right-click on it to see a riddle.
Click on door XI & using the clue from the haiku, knock once, knock four times, knock twice & stop knocking (+2)
Go through the door to meet a familiar character. Click through all dialogue choices except Arrest them
Let Ray talk & as Ray, click on the dialogue choice then use DNA database from LTM (+3) to get The Eleven Foundation in LTM
Let Bennet talk & as Bennet click on Arrest them then use the security cam picture from inventory (+3)
Click through all dialogue choices until you learn that the Resonance devices that killed Dr Morales were placed 4 kilometres away on either side of the lab. Batra hands Ray something before they exit to the alleyway.
As Ray click on inventory to see that he has received a drafting compass. Combine this with the subway map.
Click on the scale at the top of the map to get a close-up & click on the 4 kilometre mark to move the pencil point there.
On the map click the compass point on the small hand-drawn circle marked LAB to get the location of one of the Resonance devices (+3) Exit the alleyway & go to the left of the Post Office to leave the area.
POINTS: 11/TOTAL: 281
ACHIEVEMENT: FINDING NORTH – Use a compass to find a new location
...............................................................................................................................................................
FIND THE RESONANCE DEVICES
Ed’s Apartment
Click on the camera tripod to get 14B number in LTM & Resonance device B in inventory (+3)
In inventory click on Resonance device B to see a cell phone attached. Check text messages to get 14A number in LTM (+3)
Click on either the cabinet or the drawers & Take All to get Morales Journal & any other items that Ed has discarded (it will vary depending on what inventory items was carrying).
As Ray, in inventory, click on Ray’s smart phone & then on PHONE. Use Reggie’s number from LTM to call him. Click on the dialogue choices & use either the 14A or 14B number from LTM. Reggie can’t trace it but can help! (+1) Another location appears on the map.
POINTS: 7/TOTAL: 288
Trace the 14A number
Go to Police Administration (+1) & then up the stairs to the tech room right of the copy room. As Bennet use his credit card from inventory on the door (+1) & click on it to enter.
Right-click on the electronic lock & make a note of the number (it’s random!). Go down to the front desk & click on the control panel. Click twice on MANAGE at bottom left corner, type in the serial code of the electronic lock (+3) & click on the padlock symbol.
Go back to the tech Room & click on the electronic lock to open the cage door. Use screwdriver from inventory on the magnet on the cage door to get small magnet (+1)
Click on the terminal screen (+1) & use the 14A number from LTM to get a new location on the map (+1) Exit the building.
POINTS: 8/TOTAL: 296
ACHIEVEMENT: TECHNOPHILE – Find a new location using fancy technology
Warehouse
There’s no sign of a Resonance device so switch to Ray. He gets a mail message alert so click on Ray’s smart phone, EMAIL & Where are u? to read the message. Go back to the MAIN MENU & click on PHONE. Use the 14A number from LTM. The sound is coming from upstairs (+1)
Click on the fork-lift – it needs a key. Right-click on the sticky note attached to it to find out where the key is.
Click on the lockers to find out which one is Todd’s (+1) & get a close-up. Pan up & down & notice a gap in the top vent of the door.
As either Ray or Bennet, making sure they also have the small magnet, use the sonograph on the close-up of the locker & click & drag the edge of the gadget across it to see inside. Move down & see the key in the coat pocket.
Use the small magnet on the key. The object is, by clicking & dragging the magnet, to lift the key up out of the pocket & manoeuvre it down, around to the left side of the coat & up through the narrow channel to the gap in the vent.
The trick is to attach the key to the left directional arrow of the magnet which then makes the task quite straightforward! Get forklift key (+5)
Making sure that Bennet has the forklift key, as Ray, step onto the platform in front of the forklift.
As Bennet, use the forklift key on the forklift truck (+1) & then again to close-in on a set of controls.
See a red lever on the left which can be moved up or down & a green lever on the right which can be moved up to either a middle position marked in green or a position at the top marked in blue
Click & drag the right lever to the middle green position.
Drag the left lever up & hold it until the platform has stopped halfway.
Drag the right lever to the top blue position & then drag the left lever up & hold to raise the platform to the floor above.
As Ray, step off the platform & click on his smart phone, PHONE & use 14A number from LTM to see the Resonance device flashing in one of the pipes to the right.
Click on the pipe to get Resonance device A (+3) & step back onto the platform.
As Bennet, click on the forklift & then click & drag the left lever down & hold, the right lever to the middle green position & the left lever down again to lower the platform.
As Ray, click on Resonance device A in inventory to see a cell phone connected & click on Check text messages to get Cellfish number in LTM (+2)
POINTS: 13/TOTAL: 309
ACHIEVEMENT: KEY NABBER - Remove the contents of a locker without opening it
Trace the Cellfish number
Go back to the tech Room in Police Administration, click on the terminal screen & use the Cellfish number from LTM. The signal’s too weak so Bennet suggests calling the number to keep Ed talking long enough for Bennet to trace his location.
As Ray, click on What do I say, to get an idea of tactics to use, & then on I’m calling him right now.
Following Bennet’s advice to hammer away then switch tactics when he’s on the defence there are a few variations to how you can keep Ed talking. The trick is to keep changing from being aggressive to interrogative & avoid unconstructive threats such as You’re on his tail (he will suss out that you’re tracing the call) or You’re going to kill him. Whatever sequence you try Bennet will always get a trace when you have the option to ask about Amul & Reno.
The following is just one example of the sequence of tactics & dialogue choices you can use:
Be aggressive
Command him to stop
Call him a murderer
Go interrogative
Ask him why he did it
Ask about Amul and Reno
Bennet has a trace on the number.
When Ray says he knows what he’s planning, use either the Antevorta file from inventory or the DNA database from LTM (+2)
POINTS: 2/TOTAL: 311
ACHIEVEMENT: PHONE TRACER – Track the movements of a killer
Find the Resonance devices
Go to the hospital & up to floor 7. As Ray, use either the DNA database from LTM or image of the mainframe on Emma (+3) & click through the dialogue.
Exit & go to floor B, the basement. Ray comments there’s no signal. As the Resonance devices are activated by cell phone the device must be in an area with a signal.
Click on Ray’s smart phone, SETUP, ALERTS & click SIGNAL to turn it ON.
As Ray, click on each of the maintenance doors until one gives an audible alert from his smart phone. Choose to kick it in (+1)
If you don’t turn the signal on you can check for a visual signal top left on Ray’s smart phone.
You can also choose to try & search the rooms by trial & error by kicking the doors in but you won’t get very far before you get caught by security!
Click on the Resonance device in the corner to get Live resonance. The other Resonance device must be on the top of the building (+1) As there’s is no access from within the hospital exit to the front.
Save game here if you want to play through the alternative endings!
Click on the wire gate to the left & then click on the TV to watch the breaking news reports (+2) (It must be 60 hours later!) Ray & Bennet automatically use the elevator to access the top of the building.
When Ed appears see where he places the Resonance device.
POINTS: 7/TOTAL: 318
...............................................................................................................................................................
Ending 1: Stop Ed
As Ray, click look around to double-check the location of the Resonance device. Notice that the grating they’re standing on has 4 panels.
As Ray is holding the other live Resonance device the objective is to get Ed to move into a position half-way between the two before he activates them. Ed needs to be standing on the join between the 2 shades of grating & Ray needs to be in the opposite corner to the Resonance device.
You can manoeuvre Ed by Bennet taking up to 3 steps forward. Ray needs to take a step back.
The following is just one example of the sequence of actions & dialogue choices you can use:
As Ray, Then educate me on Antevorta (+2)
Let Bennet do the talking.
As Bennet, Step forward (Ed takes a step back).
What happens now?
Step forward (Ed take another step back).
“We?”
Let Ray say something.
As Ray, Step back.
Let Bennet do the talking.
As Bennet, More murder, Ed?
Step forward.
Can’t you see the irony?
Let Ray say something.
As Ray, You’re delusional
See what happens & watch the breaking news of Vice President Bruckman addressing the nation.
Retreating to the baseball field, Ray has to choose whether to Publish or Delete his article. Either decision will give an alternative newspaper headline (+5)
POINTS: 7/TOTAL: 325
ACHIEVEMENT: THE NEW WORLD ORDER – You stopped a killer but let the big fish go free
...............................................................................................................................................................
Ending 2: Don’t stop Ed
As for the first ending the following is just one example of the sequence of actions & dialogue choices you can use:
As Ray, Then educate me on Antevorta (+2)
You’re a sociopath
How do we stop them?
Show him the device in your pocket (but don’t use it!)
No, I won’t betray Bennet (don’t click on this dialogue choice but use News report from LTM instead).
See Ray in the baseball field make a decision (+5)
POINTS: 7/TOTAL: 325
ACHIEVEMENT: LESSER OF TWO EVILS – You sided with an enemy to stop a greater foe
After the credits see your final score to include (+15) on completion of the game & your total number of achievements.
POINTS: 15/TOTAL: 340
SUPER ACHIEVEMENT: HIGH SCORE – Finish the game with a full score of 340
ACHIEVEMENTS: 36/38
Achievements not included:
ACHIEVEMENT: INDEPENDENT – Finish the game without asking another character for a hint
ACHIEVEMENT: LISTEN TO US - Play the entire game with commentary mode active (Recommended on a second playthrough as it contains spoilers, but offers a lot of interesting background info about the making of the game as well as including some bloopers)
...............................................................................................................................................................
Watch the credits, while listening to the haunting ‘I will be there’ sung by Louiza Sofianopoulou, to see the newspaper headlines relevant to the choices you made.
THE END
This document was provided to GameBoomers.com and may not be distributed without express written permission of the author and the content may not be altered in any way.