
A CD-ROM Commentary & Walkthrough
by
Soren Andersen
Commentary
Following are some personal observations I have about this game; it is to be hoped there are no mistakes contained therein, nothing misinterpreted or missed.
Schizm is a very good game with particularly stunning graphics, interesting and clever action, and a good interface. You can play it using only your mouse, though there can be a tendency to overshoot when panning. You can use the left and right keyboard arrow keys, in which case the turning is instantaneous rather than panning. The ability to adjust the background music is a plus, as it the option to have spoken words printed, though most--not all--of the character speak clearly. Inventory presents no problem because there are no more than two items there at any one time. Let's just say that it is an all around very good game, but there are a couple of shortfalls worthy of note.
Several of the characters have speeches of some length, and there is no way to skip these once you have heard them, or repeat them for content review.
Adventure gamers are always urged to store often as they proceed through a game, but in this game you are given only sixteen slots for storage, by no means enough for a game of this length. Moreover, there is no provision for a descriptive indication of the storage point, only a thumbnail (fairly large) and an automatically applied time tag. It may be prudent to keep a cross reference list of the time tags and a description of the action. You may record over a previous store, but this is no substitute for the provision of continuously saving at many points along the game.
There is a way around this dearth of storage if you wish to go to the following small trouble. Find the folder where the saved games are stored (Program Files?). They are stored as files Schizm.sNN, where NN goes from 00 to 16. Somewhere convenient open another folder, say Savgam or Schizsav, and under that create as many folders (Set1, Set2...) as you will need to save sets of 16 saved games. You can then move sets in and out of the game folder as required. You can use the Alt-Tab keys to switch between the game and Windows Explorer, the latter being a convenient place to shuffle stored game sets by dragging them with the right mouse key. Take reasonable care when doing this. Should you go for this extra storage, don't forget to be sure it is deleted when you uninstall the game.
The distinction between the Wanderer and the Good Servant is not clear, nor what are the features of each. Santo indicates that they are the same, just older and newer names, but an Argilan lady appearing in Matiana says Sam must choose between them. The opportunity to do this is not apparent...What exactly is, or is in, that ball removed from what I assume is the Wanderer.
As is frequently the case in Adventure games, the ending has the feeling of being rather contrived, as though the designers ran out of ideas and/or ambition (or money?) and just decided to quickly wrap things up and quit, and in so doing not everything is completely clear.
One always has to expect and accept some things that ordinarily might not occur, at least not without explanation. When the island ship arrives at a destination, you move between the island ship and the destination on a chair (probably better described as a seat) transporter that is supported by what appears to be a large heavy beam. There is no indication of how this beam is withdrawn and extended when leaving and arriving at a new location. And the chair is always waiting, no matter which end you approach. Trivial, perhaps, but curious...When working the gas collector puzzle, pressing a lever to release a unit of gas will inflate a small instrument balloon, the same gas unit when sent to a large transportation balloon will increase its size a very appreciable amount. Just accept it.
On the other hand, I have a major problem with the surveying instrument setup: once the triangle used for the Temple calculations is accepted, the mathematics is correct, but I can't reconcile how the physical setup is represented by the triangles. Among other things, the location of the measuring instrument in the triangle base is out of place.
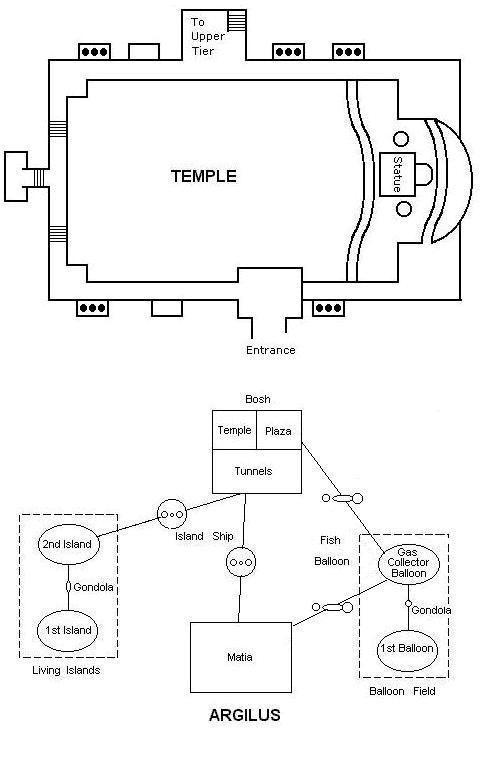
There is much traveling back and forth between sites in this game, and also within the temple. As a possible help in keeping track of where you are a couple diagrams have been provided; although they are included at the end of the walkthrough diagrams and screenshots, these are by no means spoilers, they are just intended as aids, however successful they may or may not be as such.
As stated in the accompanying walkthrough, it is for the CD version of the game, unfortunately not the DVD version that was unavailable to me. In it note that the terms Bosh and Bosh Tunnels are used interchangeably, as are Matia, Matia Island, and Matia Zone, and also Living Ships and Island Ships, pretty much following game usage. Answers to puzzles are sometimes provided in the text, sometimes separately, but they are there where non-variable solutions are possible. You must make notes where indicated.
Soren Andersen, Dec 01,
2001
WALKTHROUGH
It is important to note here at the outset that this walkthrough is for the CD-ROM version of Schizm, which is less intricate and has less puzzles than the DVD version. For example, you can find mission logs lying about; in the DVD version they have messages on them, but in this CD-ROM walkthrough some of them are blank, in which case you are not directed to them.
The game begins with a series of briefing statements, outlining the story line situation that is covered in more detail on pages 11-14 of the jewel case game booklet, which of course you should carefully read. Really, you should. You will be playing Schizm alternately as either Hanna Grant or Sam Mainey, switching between the two using the portrait icons at screen lower right. Schizm is a linear game in which puzzles must be completed for action to proceed. This walkthrough describes one path of how Sam and Hanna do this, but in fact either of them in many situations could be the one to provide the solutions. This is particularly the case in the latter part of the game where they are in the same location and are working together. Cases in point are the railroad puzzles and the houses puzzle in Matia, or the cooperative bridge puzzle.
You begin playing as Hanna, who is separated from and out of communication with Sam, and is on some sort of island, or group of them, which the Map of Argilus in the game booklet calls Living Ships. They appear to be deserted, but everything is in working order. There are several floors to this island, each not very extensive in area, all but the first two of them richly detailed. You move between them by means of ramps and elevators, and it pays to keep track of them and on which one you are operating. From this bare first floor at the surface of the sea, there is only one place to go, up a ramp to the second floor. Upon arriving you see a mysterious "optical effect" that is a brief flash of bright light. Again, nothing to do here but take the ramp that goes up to the third floor.
Upon arrival there will be two forward cursors spaced close together; take the left one, which will bring you to an elevator (the right one leads to a blank mission log). Enter the elevator and click on the control to go up to the fourth floor. When you exit you will be facing a second elevator (though not the entrance to it), to the right of which is a call button for a gondola transporter to another island; this is for later, don't press the button at this time or you will be taken to this other island and will just have to come back. For now, move to the left around the second elevator, where there is another ramp, and a suspension bridge to another island. A closeup of the bridge shows it to be useless because it is missing many of its floorboards.
Now there is a chance for some confusion, because both the ramp and the second elevator go up, but to different floors (two fifth floors). Start with the ramp, because it goes to a floor with no other access, call it floor five-R. Here you encounter some bees; ignore them. To the right is a pear-shaped container almost filled with a liquid. When you get to it, click the magnifying cursor to the right of it to see what is behind it: a picture of a bee and also a blue bottle connected to the container.
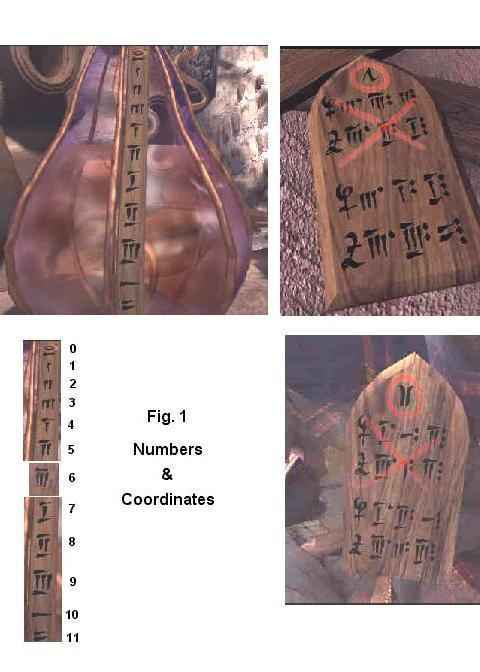
Back off, then click the cursor on the container to get a closeup of the vertical scale within it. This scale must be used to measure liquid level, and as such it will be a progressive series of "numbers". Examine it: starting at the top, the first number is 0, since there the container would be full, then there are numbers in groups of three, the first group vertical marks as in Roman numerals, | || |||, then these are repeated with a bar across the top, then repeated again with bars across top and bottom, bringing the numbers to 9. The tenth digit is a horizontal mark and the eleventh two horizontal marks. (As will be seen later, 12 is three horizontal marks.) However, with this groups of three system, the digit representing 6 is missing from the scale (making the scale erroneous) so it will be added, giving the corrected set of numbers as shown in Fig. 1. (This addition is for number system illustration; clearly, it cannot be added to the scale inside the container.)
Turn about and go back down the ramp to the fourth floor and the second elevator next to the unusable bridge. Take the elevator up to the next floor, call it five-E. More bees, and a green pool. To the right is another suspension bridge, also missing flooring. Go past the bridge, past an ascending ramp, and around the corner. Here on a pedestal is what appears to be a lantern; click the plunger on the top to make three carrot-like spikes in the wall go in and out. That's all they do, in and out. Use your grabber cursor to put the lantern into inventory, where it appears even more to be one because it is illuminated. Go back to the ramp you just passed and use it to go up to floor six. Again two forward cursors close together, and again take the left one to a ramp leading to floor seven. (The right one again goes to a blank mission log.)
Go up the ramp to another optical effect, but this time within it is one of the missing scientists. He gives you fragmentary messages: "...Find the plaques. They were deliberately scattered so we couldn't get back to Bosh...navigational coordinates for operating the living ships, but they change all the time. Old ones won't work now...new ones, the new coordinates. Please help us! We're trapped in..."
Look around this floor. Objects of interest are several large black tulips growing out over the edge of the floor. Approach the tulips, and when they are all in a line you can click on the nearest one to have a look inside it; however, there is nothing in it but what you might expect in such a flower. Now you must go up one more time, this time on a long circular stairway that you can find behind the fountain. Go all the way to the top, on the way passing a panel of five dials. At the top you will find one of the headstone-shaped plaques about which the trapped scientist spoke. It is at the bottom of the screen. This is probably plaque 1, as there is a vertical mark in a circle at the top. It is reproduced in Fig. 1; more about it later.
Return down the steps to panel of five dials and get a closeup of it. You can see the row of tulips down below. Press one of the dials; improbable as it may seem, something is tossed from one tulip to another. Press another dial, whatever it is is tossed to another tulip. Play like this for a while, it is fun to do; it resets when you have pressed all five dials, or if you back off. The object is to get the thing tossed into the first tulip, the one that you can look into. The dial sequence to do this is 3, 1, 4, 2, 5. Go down to see what the thing is that is in the tulip; it is plaque 2, also shown in Fig. 1.
It is time to return to the fourth floor, the one where the two elevators meet, and around to the gondola transporter terminal that you saw when leaving the first elevator. Push the button to summon the gondola, which takes you to another island and deposits you next to what looks like an elevator, but if it is, you can't get into it. You can, however, take a ramp up to another floor, where if you use your magnifying cursor, you can see a wall with a row of about a dozen of those carrot-like spikes. To the right between a couple torches is another ramp to walk up, and behind the three curlicues is another pedestal.
It is pretty obvious that you are to take the lantern from inventory and put it on the pedestal. There are 14 marks on the edge of the pedestal, one for each of the spikes in that row of them, and a pointer indicating the rightmost, mark #1. You are to turn the lantern to a mark, push down the plunger on top of it in order to move some spikes in and out, and repeat until all the spikes are extended. Inasmuch as spike movements are interconnected and each lantern pointer position provides two sets of spike extensions, this is next to impossible to figure out, but if you wish to give it a try, here is a hint: after you move the pointer to a starting position, the movement of the pointer is progressive in one direction, there is no moving back and forth. Another hint: there are nine pointer positions needed. Removing the lantern resets the pointer, but it doesn't reset the spikes; moving back to the other side of the curlicues and then forward to the lantern again will make a complete reset and give you a fresh start for another attempt. Success in this endeavor is evidenced by brief electrical discharges appearing between the fully extended set of spikes. The correct sequence is shown in Fig. 2.
With all spikes extended you can walk across them, then across a second spike set to arrive at another transporter, this one using a chair rather than a gondola. The chair is folded up against the bottom of the transporter beam; click on it for a closeup, click on it again and it unfolds, and off you go to be deposited on another island. This is the island ship, to which Sam and Hanna will go and come many times. Other than go back, all you can do is go down a ramp, then up an elevator. When you get off the elevator you can examine something to the left that looks like a carnivorous plant, or perhaps an anenome, but there is nothing to be found in its center. Later, more than likely. From here you move down to some consoles, of which only the group of three on the left is accessible.
Now is the time to consider those two plaques in Fig. 1. Each has two sets of positional coordinates, and on each the top set is crossed out, so they may be ignored; presumably they are the old ones mentioned by the trapped scientist, and the lower sets are the new ones. Traditionally, geographic position is given by latitude and longitude expressed in degrees, minutes, and seconds, and this is what the Argilan number sets on the plaques represent. A line with the first symbol that looks like the Greek letter phi with a line across the stem will be latitude, and the symbol that resembles the numeral 2, also with a line across it will be longitude. Of the three Argilus numbering symbols following these latitude and longitude symbols, the first is followed by a dot, the second by two dots, and the third by three dots, and thus degrees, minutes, and seconds are designated.
If you get a closeup on the center of the three consoles you will see an open hand icon and a single lit green indicator. Pressing the hand results in nothing but a brief faint flash and hum. Get a closeup of the left console and examine it: in the center is the latitude symbol, the outer ring of Argilus numbers each has a dot for degrees, the next ring has two dots for minutes, and the inner ring three dots for seconds. (Note from this console that the Argilus system has 12 minutes per degree and 12 seconds per minute.) The numbers that are illuminated are those for the new latitude of plaque 1; a closeup of the longitude console on the right with the longitude symbol in the center shows illuminated numbers for plaque 1 new longitude. The next move is pretty clear: set the latitude and longitude of plaque 2 into the left and right consoles. Having done this, click on the hand icon for a video of the island sailing away. A second light on the hand console lights up, and you have presumably arrived at Bosh.
Return to the elevator, take it down to the ramp, and up the ramp to the chair transporter. Somehow the far end of the large transporter beam has now become attached to the new location, Bosh, so get in the chair and take off. At the end of the ride go along the suspended walkway and through the tunnel into a cavernous space with much scaffolding. This place is really big and pretty dark. The Bosh Tunnels.
Go forward a couple times and you will be next to a large statue of a shrouded seated figure with a beam of light projecting from its head. You can climb a couple of ladders to get closer to the top of the statue, where you will see a metal ring attached to its face. On the way down the ladders you will see the beam is illuminating a tablet on the floor. Going to this tablet shows an oval with a new symbol at the top and blank spaces for latitude and longitude.
Go back a step toward the entrance tunnel and turn right to head along a corridor. One step along the corridor and another optical effect may occur, this one containing a young woman who says something in a foreign tongue, then hands you an article that automatically goes into inventory, where it appears to be a flat rectangular object with a red symbol on it.
Continue along the corridor as far as you can, where on the left you will come upon a stone structure with wooden stairs going up the right side. On top of the structure is a console that has in several ways the appearance of a parlor organ, though there is no conventional keyboard. Perhaps it is some sort of computer. You can play around with it, but there is no indication of exactly what to do. You can have Hannah look all around this place, but there seems to be nothing else for her to find or do. It is time to see what Sam is up to, so click on his image at lower right.
Sam's pod came down on balloon that is one of a vast field of these giant devices, many of which resemble jellyfish. They are floating several thousand feet above the surface of Argilus, all devoid of people as were Hannah's islands. He finds that he cannot make contact with her. Immediately look down at a compass on the deck in which the cardinal and ordinal positions are indicated by eight unfamiliar symbols. The pointer swings to one of them. Note this symbol or its equivalent standard direction.
Turn right toward a large daisy-like device with reversed petals (or perhaps eight light bulbs in a circle) to be seen in the building, to the left of which is a video mission log on a stand; click on the latter for a warning from one of the missing scientists. Leave the daisy for the moment and move down the corridor and through the tunnel, watching all the time for more compasses on the floor near the edge of the platform. You will pass another gondola transporter, a more elaborate enclosed one this time (don't get in it), on your way to finding the fifth and last compass of a series. On each of the five compasses you have to note the direction indicated by the pointer (these positions change for each new game). Turn right from the last compass to another video mission log; click on it for a message from a scientist, Dr. Frances Bremmer.
Return back down the corridor to the daisy and click the five petals with the symbols indicated by the compass pointers in the order that you found them. When you have done this the center disk will open to collect nine small blue spheres for you to place in inventory. Turns out they are pearls. Each of the directions has a spoken word in the Argilan language, and pressing the yellow petals allows you to hear them. In Fig. 3 is an attempt of questionable success to reproduce these names phonetically. Unfortunately, as spoken they are none too clear, and there is some interfering background noise. It may well be that there are not any English letters or combinations thereof that truly represents an Argilan sound. You may wish to make your own interpretation.
Return to the gondola transporter. Enter it, click on the dashboard arrow, and enjoy the ride to another balloon. (Many of the balloons have a curious resemblance to jellyfish.) When you disembark, find a disk on a pedestal that shows heretofore unencountered symbols arranged in the outermost of several concentric circles as shown in Fig. 4. You will need to refer to this in a little while. Follow the walkway into the structure all the way through to the platform at the other end. Turn left, go the edge, and look down to see an ornate balloon that rather resembles a fish (this more clearly later). It appears to be steaming. You have to raise this balloon so that you can gain access to it.
Go back into the structure to the center where there is a short cross walkway with an elaborate circular apparatus on each end. These are identical, and the only way to distinguish between them is that one has steam escaping next to it from below. Get closer and examine this unit, then go to the one opposite. Another optical effect occurs in which Dr. Bremmer appears with a message: "...one gas can be used...two times stronger than the other gasses in the collector that gets it from the atmosphere. The collector is unstable so you can't know which pipe carries the correct gas...measure lifting power. Just one try because the pattern changes each time. I wish I could..."
The circular devices opposite each other are the gas collectors cited by Dr. Bremmer, and from the message fragments you may gather that you need to select a particular gas that is twice as buoyant as the other that is available, and you must do this in just one attempt. Save your game here so that you can investigate these collectors to see how they operate, after which you can then start anew for your one attempt to find the buoyant gas in each.
When you get close to a generator you will see 10 handles that release gasses when depressed, all but one of the same buoyancy. In the center of the device is a bidirectional valve with an arrow that indicates the direction of gas flow, and can be observed turning to point to the right as you initially approach the collector. Though you have no way of knowing it, the larger pipe to the left of this valve leads to the fish balloon; to the right the gas goes through a smaller coiled pipe to a small balloon next to a round gauge that measures buoyancy by the lift movement of the balloon. The gauge has two indicators, a black outer one at 12 units per division, and an inner vernier at 1 unit per division.
Try it out: press one of the collector handles, then press the center valve. The gas goes to the right to the rising balloon, which moves the center gauge indicator 1 division. Turn back to the collector, where the center valve now points to the left. The only way to turn it back to the right is to push on one of the handles, sending gas to the fish balloon; there is a brief video of this balloon from a distance, in which the fish inflates somewhat, then deflates again (assuming that you have not by chance used the handle controlling the more buoyant gas). Try this sequence some more, counting the times that you press a handle, then press the center valve to get a buoyancy reading. If you press more than 12 times the outer gauge indicator will move as well as the inner one.
Now you are ready to determine which of the handles controls the extra buoyant gas. Since you've messed with the collector and Dr. Bremmer said in effect that you could not do that, restore your game. Select a reference handle, any one will do as long as you note which one. Press that one once, then move to the next handle (either way) and press that one twice, the next one three times, and so on one by one around to the tenth, pressing that one ten times. Press the center valve sending the collected gas to the small balloon by the meter. If all the gasses had the same buoyancy the meter would read 55, the number of times that you pressed handles, but since one gas has a buoyancy twice that of the others, the value will be higher than that. Subtract 55 from the reading you get, and you will know which handle controls the extra buoyant gas. (Work it out.)
Turn back to the collector, where the center valve now points to the left. Press the handle that you have determined controls the extra buoyant gas, and if you have made the correct determination you will see the fish balloon inflate and rise half way. Now go to the other collector and repeat the process in order to bring the fish balloon the rest of the way up to the platform, where you will see it become attached. The mouth opens so that you can enter the balloon. Go to the end platform and do that.
Go up the steps into the fish, where you will find that you cannot proceed further into the fish body. About face and go into the head. On both sides are sets of controls, the ones on the left being unlit and inoperative. There is, however, on the seat a CD that you can place in inventory. Go across the aisle to another set of controls, these with illuminated sets of symbols and handles that may be turned. Examine the symbols; you should recognize them as those on the disk you saw right after you got to this balloon on the gondola transporter. Therefor the thing to do is to go now to that disk, shown in Fig. 4.
When you get a closeup of the disk the cursor indicates the use of an inventory item, which is of course the CD. Click the cursor and the CD goes to the disk. There are 3 symbols in a radial row at the right of the CD; click on the first of them, the CD spins, and a symbol is highlighted in the upper and in the lower arcs of symbols. Make a note of this set, then repeat for the other 2 of the radial symbols so that you have a listing of 3 sets of 3 symbols.
Return to the fish balloon and to the right side controls in its head. It is pretty clear how to set the controls from your just noted symbol sets, but you might want to save your game here in case you err. Set the left handle with the first of the three radial symbols, the indicator on the arc of symbols above the handles to the symbol from the upper arc on the disk, and move the right handle so the symbol from the disk lower arc is at the pointer. Do the same for the other two radial symbols on the left handle, then press the button that is on the control post between the handles, and take pleasure from the flight of the fish balloon to the Bosh Tunnels, where it automatically docks at a mooring station.
Leave the balloon; Sam goes to the end of a walkway, where he is now able to contact Hannah since they are both in the same location. He then starts to explore. Look down, then go down the steps. Walk around the base of the mooring dock to a catwalk that leads into a domed gray unit that turns out to be an elevator. In the elevator, pull the handle at top left to descend, then go out the opening in front of you. Proceed along the long walkway to a large ledge in the rock and up to a 3-lumped cloverleaf gate; it is partly open, but you can't get through. Go the left where there is another of these gates, get a closeup of the gold colored pipe on the right, and press the button. The gate opens.
Go through this gate to a scene of many rocky islets in a sea of mist and covered with many interesting structures. Ahead you can see in the distance bridges and stairs where you will be going. Just keep moving forward, across another walkway to a rock plateau, onward over the bridges and up the long wide stairway, where you will be in a small plaza looking at a large dark square tunnel with a monorail going into it.
More exploring is indicated. Turn right and step forward. You will see a large yellow T-shaped symbol on a stone wall; turn right again and move to a catwalk leading out over the abyss to a platform containing a greenish domed shape. You will want to experiment with this instrument to see what may be learned about it.
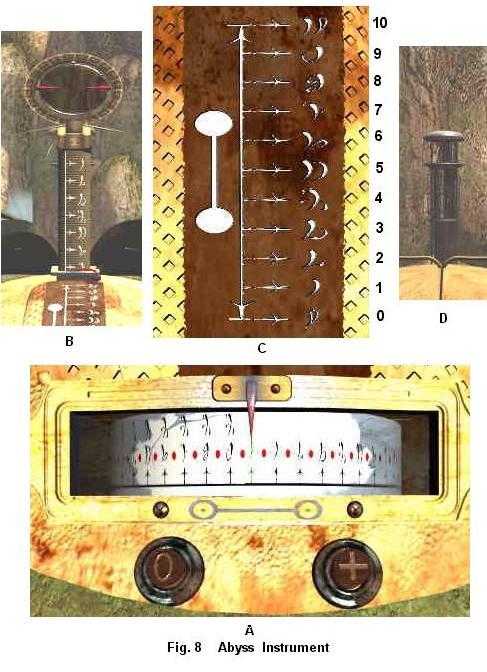
Click your magnifying cursor on the dome in order to climb into the attached seat. You will find that the whole unit may be rotated so that it is looking alternately at five different posts, one of which is illustrated in Fig. 8D, and also at the T-shaped symbol on the stone wall. Look down and click on the handle to open the dome. A sight with red index pointers pops up, Fig. 8B, that may be dragged upward in seven discrete increments. Training the indices on the tops of the poles will give an angular measurement of their heights. Below this is a vertical scale, Fig. 8C, that introduces a new set of Argilan numerals, not too easy to read.
The numerals on the dial of Fig. 8A are of course the same as those in Fig. 8B but are compressed so that they are much harder to read, though it can be done with concentration; for instance, the numeral for 5 is relatively easy to pick out, and you can count in both directions from that. Though there is no indication of its function, a crafty inference will lead you to the fact that this unit is also used to measure distance to the poles. (The units atop of the posts look as though they might have a mirror for laser reflection, or the units might have transponders.) Train the instrument on a pole, press the 0 button to set the dial to the zero reference, then press the + button to get the dial to register a distance reading for that pole. You can build a table of angular heights and linear distances for the five poles.
The two dumbbell-shaped symbols of Fig. 8A and 8C undoubtedly have some significance. The application of the table of measurements from this instrument will likely be revealed soon, but now go back to the tunnel entrance with the monorail going into it. Turn left and step across the monorail. Sam says the scene ahead is the Science Base, but there is no access; he thinks it has been deliberately cut off. Turn left, move ahead, and turn about to see a pillar with a control lever mounted on it. Click on the lever and a monorail car comes rolling up, extending a seat and controls. Approach the car to get in the seat, then lift the only control lever that is not broken and you will be off on a noisy ride over the abyss and into a tunnel on the far side.
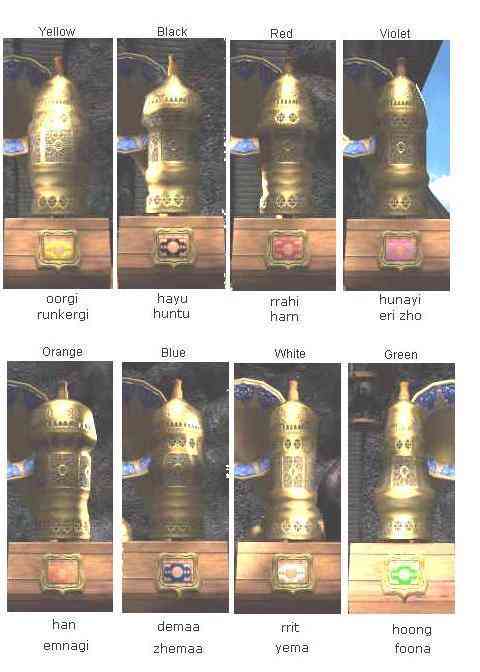
When the monorail lets you off move ahead into the darkness and you will come out in a room where there is a circle of eight of what Sam calls prayer grinders, large gold colored pillars, each with its own unique shape and surface pattern. They are mounted on wooden stands with different colored displays in the face of the stands below the grinders. By dragging these display panels up or down with your mouse, each of them may be individually rotated to the eight different patterns that are shown. If you click on a grinder it rotates and a double utterance is heard from the horn behind it. Upon playing with grinder and panel combinations you will find that the first part of the sounds are characteristic of the grinder and the second part is characteristic of the particular panel that is displayed. Fig. 5 shows these eight grinders and panel pairs as they appear when you first move into the room, each identified by the panel color surrounding its center disk. Below each is an attempted phonetic rendition of the utterance pairs; unfortunately the speech pacing and word accenting cannot be indicated by simple spelling. As with the balloon field compass directions, you may wish to provide your own.
You can't do anything here other than observe and listen, so go back to the monorail, climb aboard, and lower the control lever to return to the rock plaza and continue exploring. After you are put off the railcar return once more to the tunnel with the monorail, and this time go through it.
You have now entered the temple. This is a two-tiered colonnaded set of corridors around a large rectangular pool with a statue at one end. Turn left and proceed along the corridor next to the pool. You will soon see recessed in the wall on the left a set of the prayer grinders; in a closeup you will find that they rotate with only a faint sound if any at all, and dragging on any of the display panels moves them all at once instead of individually. Continue along the corridor to a crossing, where the only way to proceed is to turn right and go up some stairs to the second tier. From here turn left and go down steps into a room in which there is a poster of an oriental man. In front of it on a stone tablet is an etching of a bee, the same as Hannah saw behind the pear-shaped container on the floating island, and looking upper left, another etching in which the significant element is the Floating Island symbol for the numeral 9 to be seen in the center.
Go back to the upper tier corridor, turn left, and proceed down the steps. At the bottom the only way you can go is to the right and continue around the pool, where you again find on the left a second set of grinders such as the first ones you saw. Keep going beside the pool and you will shortly see a curving stairway on the left. Go up these stairs, and when you stop, turn right twice so that you can get off the stairs, then go ahead to the edge of the upper tier next to the pool. So far you have been going cw around the pool, now go ccw. You will very soon come to a dark room on the right; enter this room.
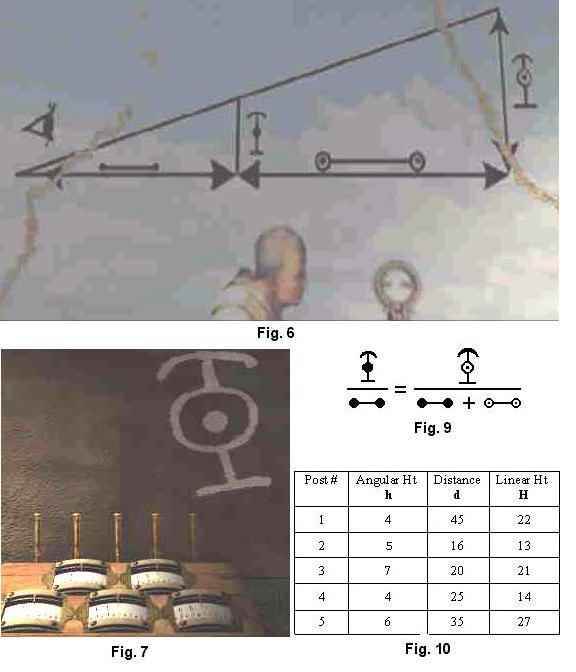
On the right wall is a drawing of a man looking at a device that could only be the one on the pedestal in the abyss, particularly as there is one of the posts to be seen on the right. Above his head is a diagram of an eyeball sighting along a couple of congruent right triangles, Fig. 6, in which are the dumbbell-shaped symbols of Fig. 8. On the opposite side of this room are a group of five meters, Fig. 7, similar to the one in Fig. 8A, with miniature post replicas aligned behind each meter. On the wall is a another T-shaped diagram, this one with a dotted circle. If the wall diagram of Fig. 6 is to be believed (and there is some doubt about that, spatially), the congruency allows the simple proportion of Fig. 9. You want to solve the proportionality for the numerator of the right side as indicated by the wall symbol in Fig. 7; this presumably is the post height in linear units above the measuring device.
From Fig. 8C the dumbbell shape with solid ends has a value of 10. Call the T-shape numerator on the left of the Fig. 9 proportion h, the value that you get from reading Fig. 8B for each post, for which the corresponding distance measurement is represented by the dumbbell shape with the dotted ends, Fig. 8A--call that d. Finally, call the symbol in the Fig. 9 right hand numerator H, the value you that you wish to calculate. Thus from Fig. 9, H = h(d + 10)/10, and you can complete your table of measurements, Fig. 10. Call the post next to the yellow wall symbol #1 and go cw to #5. Finally you must by carefully dragging the meter dials of Fig. 7 enter the five values that you have calculated for post height H. The meter on the left corresponds to post #1. Success in this picky endeavor will be signified by a drawer below the meters popping open, and which contains a disk for you to place in your inventory, where it turns green.
Leave this room, beyond which are couple things significant for the DVD game version, and return down the stairway to the first tier. Turn left and continue your cw passage around the pool, where you will see a third and fourth grinder set. At the latter, turn to the pool and a walkway beneath a fallen beam leading out across the surface of the water in front of the statue. Move forward once and you will get a good view of the statue. It will be a good idea to save your game at this point so that you can repeat a subsequent passage.
Move past the statue, whereupon your view will swing toward it and a priest will appear behind it with a message, then disappear under a lotus petal that rises in back of the statue. This message is what you will in all likelihood wish to repeat from the game you just saved. You have heard before the six words that the priest says, it was in the room with the eight prayer grinders. Look at Fig. 5 as you listen to him speaking and you should be able to pick out the grinders and display panels to which he refers. His message is: hoong huntu oorgi yema han foona. These words alternately designate grinders and panels, and they thus form three pairs.
Continue along the walkway into the building, turn right, and move ahead to see the fifth grinder set. Had you been looking closely you would have observed that the grinders in the first four sets are all lined up in the same order, but the order of these in the fifth set is different. It must be that this fifth set is special. Again referring to Fig. 5, you can see that the pairs in the set before you are: hoong grinder is #6 in the row and the huntu color is black; the oorgi grinder is #3 in the row and the yema color is white; the han grinder is #8 in the row and the foona color is green. Drag a panel so that any one of pairings is met, and the others will also be correctly paired. Now click on the grinders in the above order, 6 3 8, and the priest's pronouncement is again heard. A short video shows the lotus leaf behind the statue rising, just as it did for him when he pronounced the six words. Back off from the grinders, turn left, and move forward. You will end up behind the statue, where under the raised leaf you will see a stairway leading downward.
Go down these stairs and you will be hurried along to end up in the Bosh Tunnels at the stone structure holding the organ/computer where Hannah was left. She and Sam are in communication, they confirm that they are in the same place, and though they can communicate they cannot see each other, which Sam attributes to "alien interference". He says they should continue exploring.
Turn left and go as far as you can, turn left again and move to the seated statue. Climb the ladders and put the green disk from inventory in the bracket in front of the statue's face, then go back down and over to the previously blank tablet, where the green disk has caused values for latitude and longitude to appear. Probably better make note of them.
Sam's stated intention to explore does not confine him to the Bosh Tunnels. Turn left from the plaque in front of the statue, and in the distance you can see the tunnel through which Hannah entered this place. Have Sam retrace her steps out, cross to the island ship on the chair transporter, and go to the travel control console. Bring up the central hand icon console and click on the first green button so as to recall the coordinates of the Living Ships where Hannah's pod put her down, then press the hand icon to go there. It must be a long trip because the island ship leaves in daylight but arrives at night.
Take the elevator down, the ramp up, and the chair transporter across to the island. Move along the extended spikes and down the ramp to the gondola terminal. Take the gondola across to the game's original island. (As you approach, notice the two elevators, the first on the left going down, the second on the right going up.) Walk around the second elevator and to the ramp that goes up to the floor with the pear shaped container of liquid. As you step off the ramp, a door opens and a man steps out with some rather enigmatic things to say to you, and these are: "Some of us finally learned your language. Matia tried to prevent it for so long. And those of us who have made it back from sanctuary have been imprisoned again. I can only appear here in the middle of nowhere. Matia has, well, lost its way. Sees us as contaminated too. If it isn't done correctly now the Good Servant will simply complete what it has begun. There will be no Wanderer. No chance. I am to offer you precious oil in return for pearls. One unit of oil for one pearl. You will use the balance to measure the exact number you require, then you will take it to the temple." He retreats back through the door.
The liquid in the pear-shaped container to the right must be oil. The scale must be or be part of the balance. Get a closeup of the container and click on the scale; the marker at the top of the scale will slide down to 9 and go back up, gurglings are heard though there is no change in the oil level, and the blue pearls disappear from inventory. Look behind the container and pick up the blue bottle. Well, the man said to take it to the temple, the picture of the bee next to the bottle indicating your destination to be the room in which you saw this same etching of the bee. By this time you should know the way back; the second green button by the hand icon on the center travel control console recalls the Bosh coordinates. When the living ship takes you there, go to the stairs under the pool statue, up and all the way around the pool to the other end of the temple and the room with the poster of the oriental man.
A priest appears, and he seems unhappy. By his gestures you are short one unit of oil. But you had only nine pearls, and the scale marker moved down to 9; did the missing digit 6 on the scale have anything to do with this? Perhaps you can get an explanation from the man who gave you the instructions to exchange the pearls for oil. Go back and talk to him, and take Hannah along for support and possible assistance. Though you cannot see each other, you can communicate; assume she agrees. The alternation between Sam and Hannah to do this is up to you; following is one way.
Leave the room with the oriental poster, go back below the temple to the Bosh Tunnels, and out to the chair transporter. Take the chair over to the island ship and go down the ramp, up the elevator, and down to the coordinate consoles. Switch to Hannah, who is in the Bosh Tunnels, and have her go to the chair transporter, where somehow the chair is waiting even though Sam just took it across. Send her across on the chair and have her wait when she gets off the chair. Switch to Sam and push the upper green button on the hand icon console to set the coordinates for the Living Ships, press the hand icon, and you're off.
When you arrive go back to the chair transporter where Hannah is (invisibly) waiting. Take the transporter across the water, go along the extended spikes to the gondola terminal, and use the gondola to cross to the floor where the two elevators meet. Switch to Hannah and have her make the same short trip. Now you both are where the two elevators have terminals (as does the gondola).
As Sam, go up the ramp to the oil container floor. The man comes out again with a couple comments: "No accusations? Good. You grasp how it is. Now go to the elevator. The pearl is there." Some confusion as to whether one of the nine pearls was removed--there were nine when the exchange was made--or whether in fact ten units of oil were required. No matter, go to the second elevator and look at the base. Sure enough, there is the pearl, wedged in so you can't get it. Not to worry, have Hannah take the elevator up and you can then put the pearl in inventory. Go to the oil container, replace the blue bottle to the connection behind it, click the pearl on the scale to get one more unit of oil, and retrieve the bottle. Go back to the door and the man comes out again and says, "We have been forced to be a careful people, too. Matia has always required it of us, and now more than ever. You are learning that we value how as much as what. There may be time. You'll need the balloon. The Good Servant may yet be convinced to stay its hand if you choose right [...]" This time he disappears in an optical effect rather than going back through the door.
Have both Sam and Hannah travel the familiar path back to the control panel on the island ship. Sam has to take the oil back to the priest, so have him press the lower green button on the hand icon panel, then press the hand to go to Bosh. Upon arrival, take the chair transporter to the Bosh Tunnels beneath the temple, up the steps to the temple, and around to the Chinese poster room where the priest is. Now he is satisfied with the oil; he takes the bottle and gives Sam a CD, which looks the same as the one he used to get symbols to sail the fish balloon to Bosh. So it appears Sam will have to get back to the balloon field to use this CD.
When the priest fades away, leave the room and turn right, go down the stairs and turn left, and go along the corridor to the temple entrance. Leave the temple and go down the stairway and over the arched bridges. When you come to the second one Angela Davies appears, fading in and out as she delivers the following message: "[...]longer I can get through like this. I'm convinced these anomalies have their source in Matia's zone. You must go there. It's crucial for all of us that you try. [...] new coordinates for getting there. You've probably seen how everything is so ritualized here by now, like prayer grinders for opening gates. [...] Hormat's Pillars and the model in the temple were used for such ritual calculations, and it may even be the key to the Heavens I've been reading about [...] possible to get off this world after all. But remember that they haven't been adjusted recently, [...] be used to retrieve navigational coordinates. So measure them and see what you can get. You must go to Matia's zone! There[...]". Then Dr. Hovis appears and says you should not listen to her, that Matia can impersonate anyone, and not to trust anyone! Sam wonders about the name Matia that he keeps hearing.
So keep moving ahead through the tunnel and out across the long runway to the elevator. After you exit the tunnel, be sure and close the lumpy cloverleaf doors. Go up the elevator and around the mooring platform and into the fish balloon. Sit in the driver's chair. Just as with the island ship controls, this balloon has buttons for recalling destination instructions, in this case a series of five buttons at lower left. Two are illuminated; press the leftmost, then the center button between the handlebars on the control post, and you will return to the gas collector balloon. Exit and go through the latter to the disk on the pedestal, onto which you should put the CD from the priest. Get the three sets of 3 symbols as you did before by spinning the CD, and note them so they may be entered in the fish balloon controls, which you should now do, just as you did previously. Now there is a third lit button in the array at lower left. Assuming that you have done all this correctly, the balloon takes off on an overnight trip to a new destination. As you approach it you can see turrets on each side of a U-shaped notch in a sheer cliff, and in the center of the notch an elevator running down the face of the cliff. The fish balloon anchors at the top of the elevator.
Leave the balloon. You will come immediately to a gate, but it is not locked. Look to the right to see a cabinet, and on an arch to the left of the cabinet an almost invisible key. Turn the key and the cabinet doors open to display the set of symbols used to get the fish balloon to this place. It's a good thing that you don't need them inasmuch as they are indistinguishable. Turn the key again to close the cabinet doors, and the key goes into inventory.
Turn back to the gate, open it, and enter the elevator. The control is on a post in the center of the elevator. This is the first elevator encountered with stops at more that two floors. It has four, and you access them by raising and lowering the control rod at the top of the post. The top elevator stop where you now are is only the balloon anchor, the other stops take you to some off-limits residences, to a walkway attached to the face of the cliff and a dam (rust abounds), to a tunnel, dam overlook, and a drawbridge. You can explore all this if you wish--it really might be a good idea by way of locale familiarization, and it is indeed interesting, but it does not seem to lead anywhere, though on the third level from the top you travel along a walkway fastened to the cliff and the dam until you come to some railway tracks. Hannah might be able to turn up something. Go back to the elevator and switch to her.
Hannah is at the control console of the island ship which is at Bosh. You could have her go and get the coordinates on the plaque in front of the statue, but assume Sam has given them to her. Enter them in the left and right controls and press the hand. Nothing happens. Well, Angela Davies fragmentary message about Matia's Zone included "new coordinates for getting there" and "remember that they haven't been adjusted recently"; recalling also that the two coordinate tablets found had two sets of coordinates, one old and one new, it is likely that those on this tablet are old ones, and must be converted to new ones.
Check the previous tablets
to see if there is any consistency in those conversions. The decimal values
of the Argilan digits in the coordinate readings that follow come from
the scale shown in Fig. 1
Tablet I
Tablet II
Old Lat 3° 6' 2" 7° 10' 5"
Lon 6° 8' 7" 9° 1' 5"New Lat 3° 4' 7" 7° 8' 10"
Lon 6° 9' 11" 9° 2' 9"Diff Lat 0° -2" +5" 0° -2' +5"
Lon 0° +1" +4" 0° +1' +4"So there is indeed a consistency in the changes between the old and new coordinates, a correction of -2' 5" in latitude and 1' 4" in longitude (no change in degrees). Apply these corrections to the presumed old coordinates of the plaque in front of the statue.
Lat 10° 1' 9" (old)
Adding the latitude correction of -2' 5" gives 10° -1' 14", but in the Argilan system of 12" in 1' (unlike the Earth system of 60" in 1'), 14" is 1' 2", which converts the new latitude reading to
Lat 10° 0' 2" (new)
Now for longitude, the reading from the plaque in front of the statue,
Lon 3° 12' 10" (old)
12' on the longitude dial is the same position as 0' (see note), so the longitude reading is 3º 0' 10". Adding the longitude correction of 1' 4" gives 3° 1' 14"; again 14" is 1' 2", resulting in the new longitude
Lon 3° 2' 2" (new)
[Note: while the above calculations result in a value of 3° for the new longitude value, in point of fact it should be 4º because when making the equivalency of 12' to 0' you are increasing the reading by 1º; i.e., 12'=1º. However, if you enter 4º for the new longitude value it won't work; the island ship will not move.]
Enter the newly calculated
coordinates, and when the hand icon is pressed, the island ship is off
to a new destination. A third green button on the hand icon console is
illuminated.
As you approach you can see that it the same rocky shore with buildings and arches that Sam saw, so he is here somewhere. This must be Matia. Take the chair transporter over to it. As soon as you get out of the chair the same fellow you first saw appears again with more informative though fragmented messages: "[...] thank God! You must help us. Matia is not just a defence system. It's a custodian device. The cultural heart of these people [...] doing the right thing. Matia was meant to bring the Argilans home, once the possibility of contamination [...] that hasn't happened. Some Argilans didn't want to be isolated, they wanted contact with other worlds. They found a way to link through to us in this prison zone [...] We never realized that Matia would now see them as contaminated too, that the whole population is tainted [...] a desperate last resort. The Wanderer isn't a treasure. It may be a doomsday device after all. Matia doesn't seem to understand that we weren't plundering and pillaging, that we were studying, trying to help, trying anything to make contact. It doesn't know that the Argilans [...]"
The only thing that you can do now is climb aboard the rail car in front of you. Click on the pedestal, it swings around, and you are facing a tunnel in the cliff face. The unit on the pedestal has two buttons and a window displaying a new symbol, which resembles a skewed letter X. A handle next to the window will change the display; move it up and the next symbol resembles the letter I, a third one is U-shaped with a squiggle in it, and a fourth symbol has no alphabetic comparison. Amuse yourself by seeing what the car does as you change symbols and press buttons. (The left button is apparently non-functional.) You can only go so far before the car comes back part way. Presumably there is a fault in the track. Ultimately you will end up just outside a tunnel where you can leave the car and find a path and walkway on the face of a dam and that will take you to the Matia elevator, the one where Sam anchored when he arrived with the fish balloon.
On the way to the elevator are two doors in the face of the dam, each with red symbols near the door top that you should note, and each door also has a combination lock of four symbols. On one of the doors the symbols are all the same and the door is locked; on the other the symbols are different and the door is not locked. Make note of these symbols. Go through the unlocked door and you will see the continuation of the railway, and in the distance its terminus at a very large black prolate spheroid.
At the end of a walkway to the right is a despicable railway puzzle. You are to place track sections so that you have a complete path from one side to the other as a wretchedly clever Matia computer raises gates to impede this process. Most of the time the computer wins, but when you finally do succeed you will see a section of the railway rise half way to the track level. You must do the puzzle again to bring the track all the way up; the catch is that you cannot fail between the attempts or the track sinks down again. Two wins in succession, and you can't store the game after the first win. One strategy is to try to place tracks with alternate ways to complete the crossing so that when the computer blocks one you can use the other. It has been suggested that you concentrate more on foiling the computer rather than on track completion; don't let it build a complete wall of gates from top to bottom, and in the course of doing this the opportunity for a complete horizontal track will present itself. It will take time and practice but you will eventually be successful, at which point save your game, return the walkway on the dam face, and head for the elevator.
Presumably Sam is at the top of the elevator, if that is where he went after his initial exploring after arriving. In any event, now he and Hannah must work invisibly together. Bring Sam to the bottom elevator stop. Enter the tunnel to a room overlooking a pool, across which is a barred opening through which you should briefly see somebody moving. You could get over there if you could shut off the water that keeps the pool full. Have Hannah take the elevator down to this bottom level, then take the path to the right of the tunnel to its end overlooking the dam. Turn left to a wheel valve and turn it cw one click and the noise of running water stops. She has to stay there by the valve, presumably holding it, or the wheel reverts and the water starts running again. Back to Sam, where the pool is now suddenly empty and he can go the bars, whereupon a man comes to the other side and gives a rather lengthy speech as follows:
"You can't free me. Don't even try. I'm Charles Santo. I was on Tomlin's team. Started it all, persuaded them to take things. It wasn't looting. You have to understand. We were getting nowhere. We didn't know about Matia then, but I agreed with Tomlin, with all this tech, there had to be watch systems. We had to do something, make them act. Should have known better. Angela's texts said the Wanderer was called the treasure beyond price. I knew 'treasure' translated as 'ultimate gift'. That's its older name, the Good Servant, might well refer to a doomsday function. Save the planet, save the people, or destroy everything. Well, you got this far. You might still have a chance. Richard Hovis came here too. Couldn't free me but found out a lot. This village—Matiani—makes dimensional shifts, if you can find the right transfer sequence. Shifting the village is an important approach protocol, Hovis said. They're the words he used. Said it's something to do with the houses. You have to enter each one twice, but exit only once. He was very pleased with himself. Very excited about it. Enter twice, exit once. He said he finally worked out how to get through to the Wanderer, there, on the other side of the dam. Said he knew the special safety measures for approaching and unlocking it. He wouldn't say what they were. He said the rest of us were wrong. Didn't understand that unlocking the Wanderer would destroy us all. Well, I'm still not convinced. I say unlock it, find out one way or another. Hovis promised to come back, but he never did. At least you're able to go over there and find out for yourself. If you succeed, come back for me. Promise you'll come back." He leaves back into the darkness.
Some nuggets of information there. As to the houses mentioned, there are several along a path to the left of the tunnel on the other side of a raised drawbridge. Send Sam over there to try to lower the bridge by pushing the plunger on the control that is on the post to the right of the bridge. The bridge moves a little, then returns to its original position. On either side of the tunnel are two more wheel valves. Have Hannah, the wheel valve expert, turn the right one a click cw, then have Sam try the bridge again; it moves a little farther before going back. Repeat this procedure until the bridge is again moving only a little. Have Hannah turn the wheel a notch ccw so the bridge is at its greatest movement, then repeat these steps using the wheel valve on the left side of the tunnel. You should be able to lower the bridge all the way.
Go across the bridge and save your game. You are in the village of Matiani. On the left there are four houses in a row on the short street, on the right there is one house. Number the left houses 1 to 4 as you come to them, for convenience call the right one house X. You are now faced with the house puzzle: as you learned from Santo, you must enter each of the four houses twice and exit it once. If you start up the street clicking on the door handles of each house on the left, you will find that you enter blackness, hear a short intense humm, and are back outside facing the street. In the course of these trials a priest will appear and hold out an item that goes into inventory; it is a rectangular plate like the one Hannah got in the Bosh Tunnels, but with a very slightly different symbol on it. If you try the door of house X, when it opens the interior becomes intensely bright, and the door closes.
However, if you don't enter the houses in 1 2 3 4 order you will find that you may exit from a different one than you entered. If you start by entering house 2 you will exit house X; if you enter house 3 you will exit house 4. But things change: if you first enter house 2 and exit house X, then enter house 3 you will exit house 1 instead of 4. There has been no indication, but as it happens entering house X resets the puzzle, so don't enter it unless that is what you want to do. By much trial and error, and using a table of houses vs entrances and exits (don't enter a house again after you have done so twice), you could satisfy the requirements of 2 in and 1 out for the four houses. (House X is not involved unless resetting.) When you finally wish to use a spoiler, here it is: in order, enter houses 2, 4, 1, 1, 3, 3, 4, 2.
At the conclusion of the puzzle you will exit house X into a world where night has fallen, street lights are on, house windows show interior lights. Sam says it all feels different, must be the dimensional shift Santo mentioned. He has lost contact with Hannah. Go toward the drawbridge and a woman appears. She speaks to Sam: "I'm glad you came. Some of us, a few of us, have learned your language. You are on the doorstep of our sanctuary. The decision is yours: the Wanderer or the Good Servant. Which will it be?" She fades away. Before and after this speech she stares up at the top of the dam. Look there and you will see a dozen objects that resemble nothing so much as bottles with glowing caps; if your memory is good, you will recall that they also resemble the row of similar shaped objects atop the organ/computer on the platform in the Bosh Tunnels. Some are higher than others, a pattern that is surely important, so make a note of it.
Reenter house X and come back out to your original dimension, to daylight, and to communication with Hannah. Go across the drawbridge and back to Santo's prison room. Turn to the left to see four closely spaced horizontal pipes. Get a closeup and you will see on these pipes squares that may each be slid back and forth so they occupy one of five positions. In the course of this, should your cursor wander to the top edge of the top square it will change to the grabber form; click it and the rectangular plate given to Sam by the priest in front of House X jumps to that location and one by one symbols appear in the squares. These symbols are of the general form that Hannah found in the door combination locks she saw on the damfront pathway as she came down it from the railcar, and which you have of course duly noted as instructed.
Slide the squares until you have made a match, top to bottom, of the symbols that were noted, left to right, in the unlocked door. Now for each of the four squares, note which of the five positions on the pipes results from this matching. Remove Sam's plate, back off, and switch to Hannah. Have her come in and place her plate at the top of the pipe rack where Sam's was; symbols appear in the squares as before. Slide the squares to the positions that gave Sam's match and note the new symbols that appear. Remove Hannah's plate.
Switch back to Sam, go to the elevator, and go up two stops. Go along the walkway to the locked door, move the settings of the combination lock to the just noted symbols, and press the plunger on the door, which slides up so that you can go through. You can see the see the railway as before, and you can also see that one of the track sections is still below the rest of the track. Uh-oh. Look to the left; another of the dreaded railway puzzles, and this time the computer goes first. Nothing to do but work at it until you get the track up in two successive attempts, same as before. Save your game.
Go back out to the pathway and go up to the railway. There is a pedestal there showing one of the railcar symbols; press the button on it below the symbol and the car comes scooting up the tracks. Climb aboard and choose a symbol that will take you along the now continuous track to the terminus below the big spheroid. Leave the car and walk ahead until you see a closed panel pair hanging below the spheroid. Stand in front of the panels and find a place on the supports that will accept the key you have in inventory. Turn the key and the panels open to display a set of symbols used to direct the fish balloon. Get a closeup of these symbols and write them down.
Turn around and you will see a plunger valve where two pipes come together. Press the plunger, the scene shifts to the spheroid, and faint noises are heard as if something wants to move but is restrained. Something more is needed. Move back toward the railway a step and you can find on either side of the path a locked Matia domed house from which are coming pipes having a section showing eight up or down buttons, but at this point there is no indication how to set them.
Hannah is still in the reservoir room where Santo is a prisoner. She needs to talk to him, so you need to stop the water keeping the reservoir pool full. Go back to where you left the railcar at the end of the track, use the call button to get the car, get in and click on the pedestal, and choose the drive icon to go to the cliffside path to the elevator. When you get there go the wheel valve that shuts off the pool water and move it a click. The pool is empty and Hannah can now go talk to Santo. He says if you are going to unlock the Wanderer, two operations are necessary back at Bosh: 'ossa' and 'dissa'. From this you get the idea that the Wanderer is the black spheroid, rather than a person.
So it's back to Bosh for Hannah. Go up the elevator and the path to the railway. Call the car and return to the terminus where you can use the chair transporter back to the island ship. At the hand icon control center console use the second lit green button to sail to Bosh. Use the chair transporter to get to the Tunnels and to the organ/computer on the platform to the left. Set the row of twelve plunger switches along the top to the same up and down pattern that Sam saw on top of the dam when in the parallel dimension while in Matiani. From Fig. 3 pick out the directional symbol corresponding to the ossa and dissa as directed by Santo. (There is little question about ossa being W, but dissa could be NE or SE; NE is probably closer.) Press the ossa button, resulting in some interesting sounds (pretty ancient computer} and buttons light up in the two groups of eight along the bottom. Press the dissa button, more sounds and the light patterns change. Make a record of these final two group patterns.
There is nowhere else but the buttons on the pipes by the houses near the spheroid that have this pair of configurations of eight, so Hannah has to travel to them. Go back again to Matia, reversing the trail she just took, using the third green button the island ship hand icon console. When you get off the railcar at the spheroid, go to one of the pipes with the eight buttons. Which of the two patterns from the organ/computer to use? Try one here, the other pattern on the other pipe buttons, then push the plunger opposite the fish balloon setting panel below the spheroid; if nothing happens, reverse the pipe button settings and try again. Whichever is correct, you get a video of the top of the spheroid opening like a flower, then closing.
The woman that Sam saw by the dam in Matiani appears. "So that's your decision. Well, so be it [...] there's still time to save your friends, but you must hurry. Get to the balloon and [...] Matia will do what it must. Think well of us. And remember we tried to[...]" Hannah wonders what they have done. Sam says they have done all they can, they just don't know enough.
Have Hannah go back to Santo. Have Sam go to the fish balloon at the top of the elevator and enter the latest control symbols from the panel under the spheroid and push the takeoff button on the control post. You are treated to spectacular views of Matia as the balloon soars to the spheroid, which opens again. A hook is lowered into it from the balloon and retrieves what appears to be a metal ball. The balloon then flies to the island ship and lowers the ball into it. There are some poorly seen changes to the superstructure and the red and blue material disappears from the sails. The balloon returns to the top of the elevator.
Take the elevator all the way down and once more stop the water from filling the pool. Have Hannah go to the bars to talk to Santo. He says, "You did come back. You kept your word. Keeping faith is what matters. Looking after one another. You and your friend. You must stay together, do you understand? We can go now." He disappears into an optical effect.
Bring both Sam and Hannah to the coordinate console on the island ship. (The colored sails have returned.) when they are both there a priest appears and gestures to that bunch of tentacles that you looked at when Hannah came here the first time. Look at the center of whatever it is and see a golden sea star, or perhaps a stylized representation of the sun. Whatever, click on it for a rather startling concluding video in which Sam and Hannah are finally seen together, and Angela Davies appears to tell them (without ever directly looking at them) what went on, and give a somewhat lame wrapup to the game story.
Who are "the three of you"?
copyright
© Soren Andersen