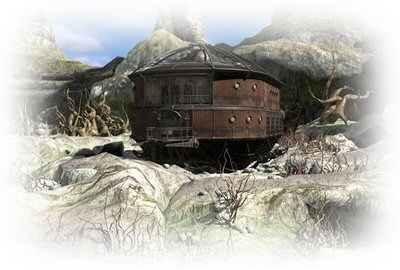
NIKIFOR'S HOUSE | ||||||||||||||||||||||||||||||||||||||||||||||||||||||||
| ||||||||||||||||||||||||||||||||||||||||||||||||||||||||
| After regaining consciousness Umang finds himself as a guest in Nikifor's house. | ||||||||||||||||||||||||||||||||||||||||||||||||||||||||
| And so your adventure begins... | ||||||||||||||||||||||||||||||||||||||||||||||||||||||||
| Open the cabinet in the Bedroom to find a book with details of various animals and objects. Each of the pictures has a description and meaning ascribed to it. | ||||||||||||||||||||||||||||||||||||||||||||||||||||||||
| Explore the house carefully, taking note of the symbols above certain of the doors. | ||||||||||||||||||||||||||||||||||||||||||||||||||||||||
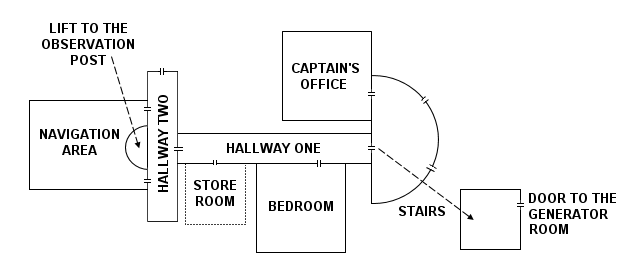
MAP OF THE HOUSE | ||||||||||||||||||||||||||||||||||||||||||||||||||||||||
| ||||||||||||||||||||||||||||||||||||||||||||||||||||||||
CAPTAIN'S OFFICE | ||||||||||||||||||||||||||||||||||||||||||||||||||||||||
| Look around carefully as there's quite a lot to see and do in the Captain's Office. | ||||||||||||||||||||||||||||||||||||||||||||||||||||||||
| Move the parchment in the 3rd last cubicle on the 3rd row of the shelves on the left to find a cabinet key. Use this key to unlock the cabinet in the 2nd cubicle on the 3rd row. The page inside reads: | ||||||||||||||||||||||||||||||||||||||||||||||||||||||||
I depend only on myself | ||||||||||||||||||||||||||||||||||||||||||||||||||||||||
Decisiveness is more important than eloquence | ||||||||||||||||||||||||||||||||||||||||||||||||||||||||
It belongs to the grazer, instead of the reaper | ||||||||||||||||||||||||||||||||||||||||||||||||||||||||
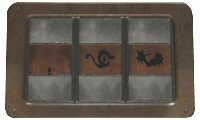
| Do these quotes sound familiar? They are extracts from the book you read in the Bedroom, relating to the following animals and objects: | ||||||||||||||||||||||||||||||||||||||||||||||||||||||||
| ||||||||||||||||||||||||||||||||||||||||||||||||||||||||
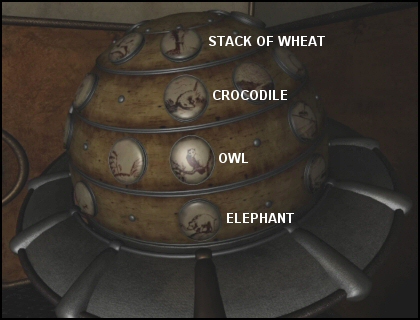
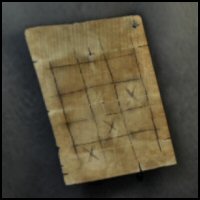
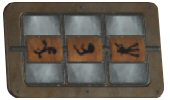
Examine the wooden globe in the corner, noting that the pictures on the buttons are identical to the ones in the book in the Bedroom. Rotate each of the four rings on the globe to see that the pictures of the three items above only appear once: | ||||||||||||||||||||||||||||||||||||||||||||||||||||||||
| ||||||||||||||||||||||||||||||||||||||||||||||||||||||||
| Rotate the top, third and bottom rings so that the correct buttons are aligned in the centre, then use 'trial and error' to find the animal or object for the second row. When the 'Crocodile' is aligned in the centre the globe opens and you can take the four Generator Room keys. | ||||||||||||||||||||||||||||||||||||||||||||||||||||||||
| ||||||||||||||||||||||||||||||||||||||||||||||||||||||||
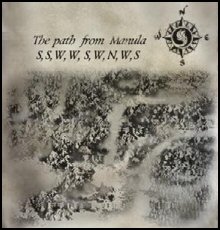
| Read the Captain's diary on the desk, noting that it depicts the topography and directions of the trip from Manula Valley to the 'land of the forgotten'. This triggers a cut scene in which Nikifor enters the office and Umang tells him he thinks that the house is a vehicle of sorts. | ||||||||||||||||||||||||||||||||||||||||||||||||||||||||
| Inside the roll top box on the desk you find five pages of notes that contain clues to various puzzles in the game. Most importantly, you learn that the generator directs power from battery crystals to all the mechanical devices and each mechanical device requires a different number of crystals to run. The contents of the notes are transcribed into your journal at the bottom right of your inventory. | ||||||||||||||||||||||||||||||||||||||||||||||||||||||||
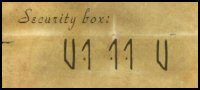
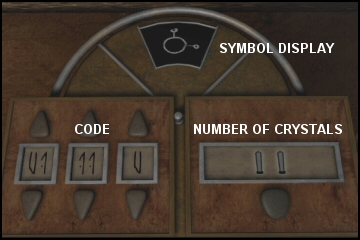
| The last page of the notes shows a 'code' for the security box, which is in the corner near the door. | ||||||||||||||||||||||||||||||||||||||||||||||||||||||||
| ||||||||||||||||||||||||||||||||||||||||||||||||||||||||
| Set the display on the left of the security box to the 'code' as shown in the notes. Click the button on the right to scroll through all six symbols, noting the number of crystals attributed to each one. | ||||||||||||||||||||||||||||||||||||||||||||||||||||||||
| ||||||||||||||||||||||||||||||||||||||||||||||||||||||||
GENERATOR ROOM | ||||||||||||||||||||||||||||||||||||||||||||||||||||||||
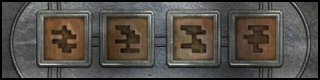
| Exit the Captain's Office and go down the stairs. The door on the left leads to the Generator Room. Inserting the four generator room keys in the keyholes activates the door puzzle. Study the symbols carefully to see that they 'interlock' with one another. The symbols can be rotated by clicking on the buttons below each one. Arrange the symbols as follows: | ||||||||||||||||||||||||||||||||||||||||||||||||||||||||
| ||||||||||||||||||||||||||||||||||||||||||||||||||||||||
| An easy way of doing this is to insert the keys in reverse order, i.e. 1st key into 4th keyhole, 2nd key into 3rd keyhole, 3rd key into 2nd keyhole and 4th key into 1st keyhole. | ||||||||||||||||||||||||||||||||||||||||||||||||||||||||
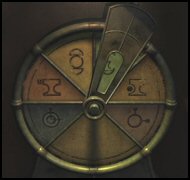
| The 'wheel' device at the bottom of the metal staircase can be set to any of six positions. When set to the green symbol (as shown in the graphic below) a cut scene of the wall panel in the Navigation Area is displayed in which the green circuit has been activated. | ||||||||||||||||||||||||||||||||||||||||||||||||||||||||
| ||||||||||||||||||||||||||||||||||||||||||||||||||||||||
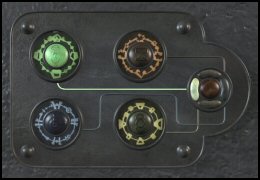
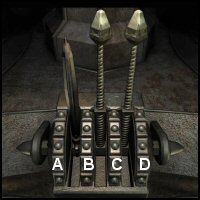
| Go through the door to get to the actual generator. The generator is activated by adjusting the three levers (one of which is missing) to their correct settings. Take the wrench from the shelf next to the door. The diagram on the wall above the shelf indicates the required settings for the 3 levers. Insert the wrench into the empty slot on the lever mechanism. | ||||||||||||||||||||||||||||||||||||||||||||||||||||||||
| ||||||||||||||||||||||||||||||||||||||||||||||||||||||||
To adjust the levers to their correct settings click the rings (marked A - D in the graphic) as follows: | ||||||||||||||||||||||||||||||||||||||||||||||||||||||||
| ||||||||||||||||||||||||||||||||||||||||||||||||||||||||
| There's another 'wheel' device in the room which activates the yellow circuit on the wall panel in the Navigation Area when set to the yellow position, i.e. 3rd position from the left. | ||||||||||||||||||||||||||||||||||||||||||||||||||||||||
| The crystal that powers the generator is to the left of the shelf, but you cannot interact with it yet. | ||||||||||||||||||||||||||||||||||||||||||||||||||||||||
| Go back through the door and along the metal walkway in the engine section to the crystal controls. Although it has six slots, there are only two crystals inside the crystal control panel. To activate the mechanical devices powered by one crystal, click one of the crystals as well as the white button at the top on the left. When you leave the engine section another cut scene with Nikifor is triggered. | ||||||||||||||||||||||||||||||||||||||||||||||||||||||||
STORE ROOM | ||||||||||||||||||||||||||||||||||||||||||||||||||||||||
| Do you recall seeing the symbol representing 1 crystal above the locked door next to the Bedroom? | ||||||||||||||||||||||||||||||||||||||||||||||||||||||||
| ||||||||||||||||||||||||||||||||||||||||||||||||||||||||
| After setting the control panel in the engine section as detailed above, the door next to the Bedroom will be unlocked allowing access into the Store Room. | ||||||||||||||||||||||||||||||||||||||||||||||||||||||||
| Inside the metal cabinet you find a crystal capsule and an oil can. Also take the waterlamp found on the barrel and the rope hanging on the pipes. | ||||||||||||||||||||||||||||||||||||||||||||||||||||||||
| Open the porthole, attach the rope to the metal rungs below the porthole and climb outside. Pick up the crowbar lying on the ground and then go back inside. | ||||||||||||||||||||||||||||||||||||||||||||||||||||||||
HIDDEN ROOM | ||||||||||||||||||||||||||||||||||||||||||||||||||||||||
| Return to the crystal control panel in the engine section. Change the settings so that two crystal are lit and click the black button at the top on the right. At this point in the game you won't find a symbol representing 2 crystals, so again try any doors, cabinets or locks that you couldn't open previously. | ||||||||||||||||||||||||||||||||||||||||||||||||||||||||
| Did you notice the button in the centre of the bookcase in the Navigation Area? If you tried clicking it previously you would've found that it was locked. When two crystals are activated inside the crystal control panel, pressing this button reveals a Hidden Room. | ||||||||||||||||||||||||||||||||||||||||||||||||||||||||
| The symbol representing 2 crystals is on the wall next to the skeleton and the symbol representing 6 crystals is on the mechanical device in the room. | ||||||||||||||||||||||||||||||||||||||||||||||||||||||||
| Pick up the crystal on the crate next to the mechanical device. Open the lid of the crate and remove the parchment. Note that the parchment won't be in your inventory, but the diagram on it will appear in the journal. The diagram on the parchment is dealt with later in the walkthrough. | ||||||||||||||||||||||||||||||||||||||||||||||||||||||||
OBSERVATION POST | ||||||||||||||||||||||||||||||||||||||||||||||||||||||||
| Pull the lever on the wall next to the lift in Hallway Two and note that the mechanism above the lift is jammed. Leave the house by going through the door at the end of the hallway. When outside on the metal walkway close the door and then climb up onto the roof. Use the crowbar to dislodge the rock that's jamming the mechanism. | ||||||||||||||||||||||||||||||||||||||||||||||||||||||||
| Take note of the symbol representing 5 crystals on the outer hull that covers the engine section. | ||||||||||||||||||||||||||||||||||||||||||||||||||||||||
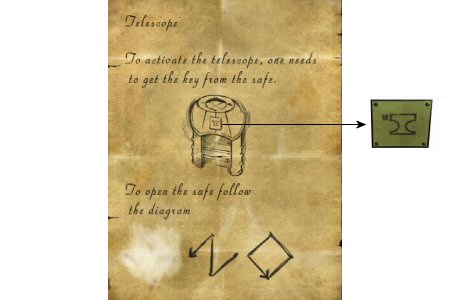
| Go back inside and pull the lever on the wall to summon the lift, then use it to go to the Observation Post. Inside the room is another 'wheel' device, a telescope and the safe that you should recognize from the notes in the Captain's Office. The safe has the symbol representing 3 crystals on it. | ||||||||||||||||||||||||||||||||||||||||||||||||||||||||
| ||||||||||||||||||||||||||||||||||||||||||||||||||||||||
| Again return to the crystal control panel in the engine section to insert the 3rd crystal. To do this you must hold the crystal capsule (not the actual crystal) over an empty slot and then click. Ensure that all three crystals are lit and also click the yellow button (2nd from the top on the left) before coming back to the Observation Post. | ||||||||||||||||||||||||||||||||||||||||||||||||||||||||
| The drawings at the bottom of the note illustrate the combination to open the safe. They indicate the sequence in which the four buttons on the safe must be clicked. Unfortunately the first drawing has been erased so you need to find it by 'trial and error'. | ||||||||||||||||||||||||||||||||||||||||||||||||||||||||
| ||||||||||||||||||||||||||||||||||||||||||||||||||||||||
| Starting with the top button try all the various combinations of the four buttons. Note that if you enter an incorrect sequence the safe will reset. The correct sequence for the first drawing is: | ||||||||||||||||||||||||||||||||||||||||||||||||||||||||
| ||||||||||||||||||||||||||||||||||||||||||||||||||||||||
| Remove the telescope key from the safe. | ||||||||||||||||||||||||||||||||||||||||||||||||||||||||
| To avoid having to do it later in the game, set the 'wheel' device to the orange position (2nd position from left) before using the telescope. Note that the orange circuit on the wall panel in the Navigation Area is only activated after you've used the telescope. | ||||||||||||||||||||||||||||||||||||||||||||||||||||||||
| Open the panel on the control box and insert the telescope key. Look through the telescope to view the arrival of the Shadow Legion. | ||||||||||||||||||||||||||||||||||||||||||||||||||||||||
STEALING THE CRYSTALS | ||||||||||||||||||||||||||||||||||||||||||||||||||||||||
| First go to the crystal control panel and reset it activate the Store Room door, i.e. only 1 crystal and the white button. You can now climb out through the porthole in the Store Room as you did before. | ||||||||||||||||||||||||||||||||||||||||||||||||||||||||
| As it is possible to 'die' during the next part of the game, I strongly suggest saving your position. | ||||||||||||||||||||||||||||||||||||||||||||||||||||||||
To get to the Shadow Legion vehicles, follow these directions: | ||||||||||||||||||||||||||||||||||||||||||||||||||||||||
| ||||||||||||||||||||||||||||||||||||||||||||||||||||||||
| The flaps on the vehicles are rusty and need to be oiled (with the oil can) before opening them. Use the crystal capsule to remove the crystals. The same procedure applies for both vehicles. | ||||||||||||||||||||||||||||||||||||||||||||||||||||||||
To return to the house, follow these directions: | ||||||||||||||||||||||||||||||||||||||||||||||||||||||||
| ||||||||||||||||||||||||||||||||||||||||||||||||||||||||
NAVIGATION AREA | ||||||||||||||||||||||||||||||||||||||||||||||||||||||||
| The symbol representing 4 crystals can be seen above both doors leading into the Navigation Area. | ||||||||||||||||||||||||||||||||||||||||||||||||||||||||
| ||||||||||||||||||||||||||||||||||||||||||||||||||||||||
| Go to the crystal control panel in the engine section and insert the 2 crystals that you removed from the Shadow Legion vehicles. Activate four crystals and press the bottom left button to supply power to the Navigation Area. | ||||||||||||||||||||||||||||||||||||||||||||||||||||||||
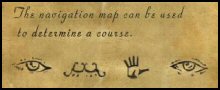
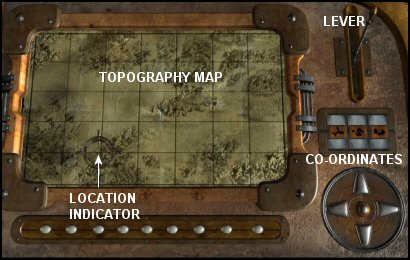
| The table next to the bookcase in the Navigational Area is actually a navigational map. Approach the table to swivel it, then set the symbols to correspond with the notes from the Captain's Office: | ||||||||||||||||||||||||||||||||||||||||||||||||||||||||
| ||||||||||||||||||||||||||||||||||||||||||||||||||||||||
PLOT A COURSE TO MANULA VALLEY | ||||||||||||||||||||||||||||||||||||||||||||||||||||||||
| From the Captain's diary you know he travelled from Manula Valley to here and that it was to be his last journey. To return to Manula Valley that journey must reconstructed and reversed. | ||||||||||||||||||||||||||||||||||||||||||||||||||||||||
| Examine the helm at the front end of the Navigation Area, noting the symbols displayed on it. These symbols are the last co-ordinates entered by the Captain to get him to here. | ||||||||||||||||||||||||||||||||||||||||||||||||||||||||
| ||||||||||||||||||||||||||||||||||||||||||||||||||||||||
| The navigational map has a similar display, so set it to these co-ordinates. Note that the 1st symbol on the helm is missing, so you can only set the 2nd and 3rd co-ordinates. | ||||||||||||||||||||||||||||||||||||||||||||||||||||||||
| ||||||||||||||||||||||||||||||||||||||||||||||||||||||||
| After doing this the location indicator will have moved to the position shown in the graphic. | ||||||||||||||||||||||||||||||||||||||||||||||||||||||||
| The lever (top right corner) changes the topography map. Scroll through the maps until you find one that resembles the illustration in the Captain's diary. Look carefully at the top right area of the maps. Note that the correct map is reflected in the graphic above. | ||||||||||||||||||||||||||||||||||||||||||||||||||||||||
| ||||||||||||||||||||||||||||||||||||||||||||||||||||||||
The diary also gives the directions followed in the journey from Manula Valley to here: | ||||||||||||||||||||||||||||||||||||||||||||||||||||||||
| ||||||||||||||||||||||||||||||||||||||||||||||||||||||||
For the trip back to Manula Valley use the buttons at the bottom right to enter the reverse directions: | ||||||||||||||||||||||||||||||||||||||||||||||||||||||||
| ||||||||||||||||||||||||||||||||||||||||||||||||||||||||
| Lastly, take note of the co-ordinates displayed on the navigation map and enter them on the helm. | ||||||||||||||||||||||||||||||||||||||||||||||||||||||||
| ||||||||||||||||||||||||||||||||||||||||||||||||||||||||
THE GREAT ESCAPE | ||||||||||||||||||||||||||||||||||||||||||||||||||||||||
| There's another 'wheel' device next to the helm at the front end of the Navigation Area. When set to the 1st position on the left the blue circuit on the wall panel is activated. Note that this circuit is only activated after you've correctly plotted the course to Manula Valley and entered the co-ordinates on the helm. All four circuits should be activated. If not, this must be done now as described previously in the walkthrough. | ||||||||||||||||||||||||||||||||||||||||||||||||||||||||
| The handle on the left of the helm is used to get the vehicle moving. However, Umang realizes that something is still missing. Do you recall seeing the symbol representing 5 crystals on the outer hull that covers the engine section? It's a clue to powering up the engines! | ||||||||||||||||||||||||||||||||||||||||||||||||||||||||
| Go to the crystal control panel to activate all 5 crystals and click the green (middle right) button. | ||||||||||||||||||||||||||||||||||||||||||||||||||||||||
| Return to the Navigation Area and pull the handle next to the helm. Sit back and enjoy the trip! | ||||||||||||||||||||||||||||||||||||||||||||||||||||||||
SEALING THE PASSAGE | ||||||||||||||||||||||||||||||||||||||||||||||||||||||||
| From the notes found in the Captain's Office you know the house can self-destruct. Also, the actual symbol representing 6 six crystals depicts an explosion, meaning that the mechanical device in the Hidden Room (with this symbol on it) activates the self-destruct. | ||||||||||||||||||||||||||||||||||||||||||||||||||||||||
| As you only have 5 crystals, another one must be found. Did you notice the crystal next to the shelf in the Generator Room? You no longer need the generator, so you can remove this crystal with the crystal capsule and insert it in the crystal control panel. Activate all 6 crystals (in the crystal control panel) and click the red button at the bottom right to power up the mechanical device in the Hidden Room. Note that activating 6 crystals also allows access to the Hidden Room. | ||||||||||||||||||||||||||||||||||||||||||||||||||||||||
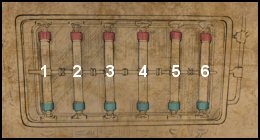
| Enter the Hidden Room and take the spyglass from the desk to reveal a large gold button. Click this button to open the self-destruct mechanical device. From the parchment you found inside the crate you learn that all 6 tubes must be positioned with the red ends at the top to trigger the self-destruct. | ||||||||||||||||||||||||||||||||||||||||||||||||||||||||
| ||||||||||||||||||||||||||||||||||||||||||||||||||||||||
| Tube 2 (second from the left) is upside down and must be swivelled around. Click each tube to see which tubes are affected. The tubes react as follows: | ||||||||||||||||||||||||||||||||||||||||||||||||||||||||
| ||||||||||||||||||||||||||||||||||||||||||||||||||||||||
| ||||||||||||||||||||||||||||||||||||||||||||||||||||||||
| After the explosion wrecks his house, Nikifor walks off and the next part of your adventure begins... | ||||||||||||||||||||||||||||||||||||||||||||||||||||||||
| ||||||||||||||||||||||||||||||||||||||||||||||||||||||||