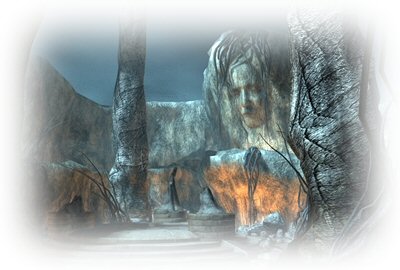
KEEPER'S PALACE | ||||||||||||||||||||||||||||||
| ||||||||||||||||||||||||||||||
| ||||||||||||||||||||||||||||||
SHADOW LEGION GUARD | ||||||||||||||||||||||||||||||
| The road through the large archway leads to a guard post. Don't go beyond the point where Umang says 'This doesn't look safe'. Take note that between the archway and the guard post there are two overhead stone bridges that cross the road. | ||||||||||||||||||||||||||||||
| From the portal walk forward twice to the archway, then look left to find a path leading to a vine you can climb to get to a mountain path along the left side of the road. Follow the path to the first bridge, then cross over to the path along the right side of the road. Now go to the second bridge and cross back over to the left path. Continue with this path to the large stone gnome directly above the guard. Note that the stone gnome has a hotspot in the centre and another at its base. Use the crowbar on the hotspot at its base to dislodge the gnome and knock out the guard. If you use the hotspot in the centre the guard sees and captures you. | ||||||||||||||||||||||||||||||
MOUNTAIN CAVE | ||||||||||||||||||||||||||||||
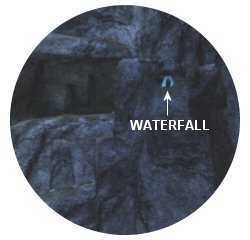
Before returning to the portal, explore the places that the mountain paths lead to. After knocking out the guard turn around and continue straight with the path instead of crossing over the stone bridge. At the point where the path is blocked, turn to the right and zoom in on the crevice in the rocks. Use the spyglass to view the Palace and the cave Michael told you about. Look carefully to see there's a waterfall nearby the cave entrance. | ||||||||||||||||||||||||||||||
| ||||||||||||||||||||||||||||||
| Return back along the path and make your way to the portal. You can now take the road all the way to the guard post. Pick up the sword lying on the ground where the guard stood. From here another road leads toward the Palace. Walk along this road until Umang says 'This doesn't look safe'. From here turn left and keep going until you reach a clump of dead trees. Note that you can only go to the left if you looked through the spyglass as described previously. | ||||||||||||||||||||||||||||||
| Finding the waterfall and cave is somewhat tricky, so read and follow the directions below carefully. | ||||||||||||||||||||||||||||||
| ||||||||||||||||||||||||||||||
| Have you noticed that the waterlamp in your inventory is empty? You'll need a source of light inside the cave, so fill the waterlamp at the waterfall. | ||||||||||||||||||||||||||||||
| ||||||||||||||||||||||||||||||
| Walk through the cave, using the refilled waterlamp where necessary. The cave leads to the rafters inside the Palace. Make your way along the rafters until the cut scene of the Shadow Legion guards in the corridor below you. At this point change direction and go along the rafters leading to the right, towards an opening in the right corner. Go through this opening to enter a cavern that has a hole in the wall. Look through the hole to activate a cut scene showing Bargul talking to Gugon. During the cut scene Umang falls through a trapdoor and lands inside the torture chamber. | ||||||||||||||||||||||||||||||
MAP OF THE KEEPERS' PALACE | ||||||||||||||||||||||||||||||
Click the icon below to view a detailed map of the Keeper's Palace | ||||||||||||||||||||||||||||||
| ||||||||||||||||||||||||||||||
TORTURE CHAMBER | ||||||||||||||||||||||||||||||
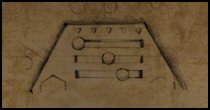
| Approach the gold sarcophagus (against the wall) from the left and examine the base to see a lock. The top half of the lock resembles the drawing on the torn sheet of paper you found in Fird's room. | ||||||||||||||||||||||||||||||
| ||||||||||||||||||||||||||||||
Set the lock sliders to the positions shown on the torn sheet of paper to open the sarcophagus. | ||||||||||||||||||||||||||||||
| ||||||||||||||||||||||||||||||
| This releases Trey's soul, who wants your help to get Mila's forgiveness. When his soul disappears take the sheet of paper lying at the bottom of the sarcophagus. The sheet of paper (transcribed into the journal) illustrates a similar locking device. | ||||||||||||||||||||||||||||||
The lock mechanism on the large door is identical to the drawing on the sheet of paper found in the sarcophagus, so set the lock sliders to the following positions: | ||||||||||||||||||||||||||||||
| ||||||||||||||||||||||||||||||
| You can now open the door and go to a corridor with three prison cells. | ||||||||||||||||||||||||||||||
PRISON CELLS AREA | ||||||||||||||||||||||||||||||
| At the left end of the corridor you find a mechanism with 3 levers, the middle one of which is broken off. Pull the left lever to open the cell nearest to the levers and the right one to open the farthest cell. Enter the nearest cell and take the shackles on the floor. Read the note lying on the floor inside the farthest cell to learn that Mila knows a way out of the labyrinth. | ||||||||||||||||||||||||||||||
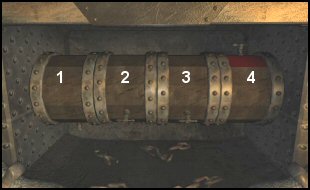
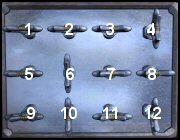
| At the extreme right of the corridor stairs lead down to a chamber with a large hole in the middle of the floor. Open the roll top cabinet on the wall to reveal a mechanism consisting of four barrels. | ||||||||||||||||||||||||||||||
| ||||||||||||||||||||||||||||||
| The two outer barrels can be rotated. Rotate them to learn that each barrel has one red panel. Note the T-shaped hinges on the barrels. The broken chain links below the barrels are a clue on what to do to solve this puzzle. Although you don't have a chain you can use the guillotine inside the Torture Chamber to cut off the ends of the shackles. Go to the Torture Chamber and place the shackles in the hole on the guillotine. Turn the handle on the right to drop the blade and cut off one end. Repeat this process to cut off the other end, leaving you with just the chain. | ||||||||||||||||||||||||||||||
| The aim of this puzzle is to line up the red panels on all four barrels. Note that the left barrel rotates upwards and the right one downwards. Both inner barrels are rotated by connecting one of them to an outer barrel. To do this, line up the T-shaped hinges on an outer and inner barrel, then attach the chain to the hinge on the inner barrel. Take note that an inner barrel rotates in the same direction as the outer barrel next to it. The barrels are identified by the numbers 1 to 4 as per the above graphic. | ||||||||||||||||||||||||||||||
SOLUTION | ||||||||||||||||||||||||||||||
| ||||||||||||||||||||||||||||||
| A pillar rises up inside the hole in the floor and lowers you down into the labyrinth. | ||||||||||||||||||||||||||||||
LABYRINTH | ||||||||||||||||||||||||||||||
| Trey's soul appears again and says 'You'll have to find something to show you the way'. Also, from the note you found in the prison cell you learnt that Mila knows a way out of the labyrinth. These are clues on navigating a way through the labyrinth. Hold Mila's amulet and it 'glows' when you're facing the correct doorway to go through. | ||||||||||||||||||||||||||||||
| Make your way through the labyrinth to a short, winding corridor with two doors at the end. The door to the right (with two rods in the locking mechanism) leads into a Shrine and the other to the bottom of the main stairwell inside the Palace. | ||||||||||||||||||||||||||||||
SHRINE | ||||||||||||||||||||||||||||||
| Trey's soul briefly appears to tell you he can feel that Mila is somewhere nearby. Do you remember Nafal telling you that Mila was buried alive inside a wall? Examine the walls to find the hotspot, then use the crowbar to dig a hole. Use Mila's amulet on the skeleton inside the wall to trigger Mila's soul appearing. She says that Gugon's curse can only be removed by using the magical orb he keeps in a room behind the door with a spider's sign. Take a stone from the table below the hole in the wall. | ||||||||||||||||||||||||||||||
STAIRWELL | ||||||||||||||||||||||||||||||
| On the first level of the stairwell the door to your left (it also has two rods in the locking mechanism) leads back to the prison cells.. The stairs leading up from here are blocked off by a gate, which can be raised by turning the cog wheel on the floor. To prevent the gate from closing, jam the cog wheel with the stone you found inside the Shrine. | ||||||||||||||||||||||||||||||
LIFT TOWER | ||||||||||||||||||||||||||||||
| From the second level of the stairwell go through the door and along the long corridor. At the end of the corridor is a Large Hall with a damaged spiral staircase in the centre. There are two other doors in the Hall. The locked door to the right has a spider emblem near the top and is the door Mila's soul spoke about, but you can't open it until later in the game. Go through the other door (straight ahead) to get to the Lift Tower. | ||||||||||||||||||||||||||||||
| Take note of the cross-shaped keyhole on the locked door at the top of the stairs in the Lift Tower. | ||||||||||||||||||||||||||||||
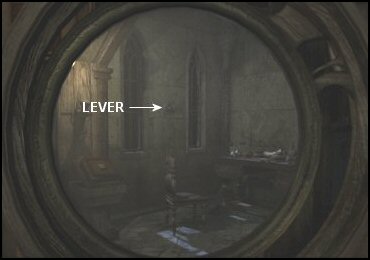
| Go down the stairs to the base of the Lift Tower. There's an exit leading to the Guard Rooms. From Umang's thoughts about 'being more careful' you know you can't go there yet. Pull the lever in front of the lift to call the lift. This triggers a cut scene showing the guard approaching the room you're in. After the cut scene go towards the stairs (left of the lift) and Umang runs upstairs. Watch the guard enter the room below and get into the lift, then use the sword to cut the rope holding the lift! | ||||||||||||||||||||||||||||||
| After disposing of the guard return to the base of the Lift Tower and go through the exit to the Guard Rooms. Listen very carefully outside the first two doors to hear guards talking inside. You obviously mustn't enter these rooms. You don't hear any voices coming from the next two doors, so enter the room on the right. Take the spear leaning against the wall. | ||||||||||||||||||||||||||||||
| At the far end of the corridor a door leads into the Library. This part of the Palace is dealt with later. | ||||||||||||||||||||||||||||||
PALACE ROOF | ||||||||||||||||||||||||||||||
| Return to the main stairwell and make your way up to the Palace roof. Climb up the short staircase on the left, then pan to the left to see a tower with the a light on in the turret at the top. Look directly upwards from here to see the end of a rope hanging from above. | ||||||||||||||||||||||||||||||
| Climb the wooden ladder against the wall to the palisade above. The turret at the top of the tower is again visible from left of the winch. Look at the turret through the spyglass to see Gugon (the mage) inside. After seeing Gugon, turn the handle on the winch twice to lower the rope. | ||||||||||||||||||||||||||||||
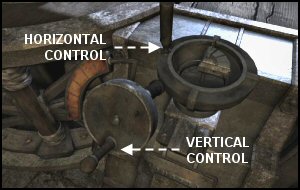
| Go back down the ladder and zoom in on the two controls used to adjust the large crossbow. | ||||||||||||||||||||||||||||||
| ||||||||||||||||||||||||||||||
| Turn the vertical control three times to point the crossbow in the direction of the turret, then adjust it to point directly at the turret by turning the horizontal control once. | ||||||||||||||||||||||||||||||
| Now go up the short staircase, grab the end of the rope and attach it to the crossbow. Walk around to the rear of the crossbow, take dead aim and fire! | ||||||||||||||||||||||||||||||
| From the corner where the tower is visible, hook the spear onto the rope and away you go! | ||||||||||||||||||||||||||||||
MAGE'S ROOM | ||||||||||||||||||||||||||||||
| Look through the turret window to trigger a cut scene in which you see Gugon leave the room to go see Bargul. Climb through the window and go to the podium between the two flames. Page through the spell book until you find the pages containing the stone ritual. | ||||||||||||||||||||||||||||||
SPELL BOOK | ||||||||||||||||||||||||||||||
| ||||||||||||||||||||||||||||||
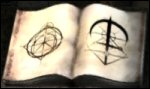
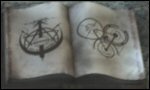
| The diagram on the left page shows all the books in the room and indicates a specific sequence in which the other books must be used. Take note of the symbol on the right page, then go to the first book in the sequence (Book 1) and page through it until you find this same symbol on the left page. Again note the symbol on the right page of Book 1 and find it on the left page of Book 2. Repeat this process with all six books. The relevant pages of the six books are as follows: | ||||||||||||||||||||||||||||||
| ||||||||||||||||||||||||||||||
| When successfully done, go towards the spell book to trigger Gugon's return. Hide behind the pillar in front of the books on the right and watch the stone ritual take effect. | ||||||||||||||||||||||||||||||
| Unlock the door at the end of the room, noting that you now have the spider key in your inventory. | ||||||||||||||||||||||||||||||
| The door in the Mage's Room (with a cross-shaped keyhole) is the one at the top of the stairs in the Lift Tower. From there make your way to the door with the spider sign in the Large Hall. | ||||||||||||||||||||||||||||||
SPIDER ROOM | ||||||||||||||||||||||||||||||
| Use the spider key to unlock the door and enter this room. Click the hotspot (left frame) on the large round mirror to slide it along the bookcase, towards the door. Study the reflection in the mirror very carefully and compare it to what you see in the room. You've seen part of the reflection many times on the main game screen, so you should spot an anomaly quite easily. In the reflection you can see what looks like a lever on the wall between the two windows. | ||||||||||||||||||||||||||||||
| ||||||||||||||||||||||||||||||
| Although there's no hotspot, click the lever (on the mirror) and you hear an eerie sound. After doing this the actual part of the wall where the lever should be now has a hotspot. Click the hotspot and one of the bookcases on the left recedes, revealing eight receptacles with orbs inside them. | ||||||||||||||||||||||||||||||
| Slide the mirror back to it's original position, then look at the reflection of the eight receptacles in the mirror to see that the orb in the bottom left receptacle has a blue glow. Click this orb (on the mirror) and you again hear the eerie sound. Remembering that the glowing orb is a mirror image, you must remove the orb (containing Mila's soul curse) from the bottom right receptacle. | ||||||||||||||||||||||||||||||
| Look around the room to find a valve and library card on the desk. | ||||||||||||||||||||||||||||||
FREE MILA'S SOUL | ||||||||||||||||||||||||||||||
| Make your way to the Shrine and use the magical orb (containing Mila's soul curse) on the skeleton in the wall to call Mila. She tells you to 'dispel it on the wind', so you must find somewhere to do this. | ||||||||||||||||||||||||||||||
| Return to the main stairwell and go all the way up the stairs to the roof. Climb the wooden ladder to get to the parapet and trigger a cut scene in which Umang frees Mila's soul. Pay careful attention to what Mila says as you get important information needed at the end of the game. If you missed what she said, replay the cut scene (first one, sixth page) in the 'Video' section of the main menu. | ||||||||||||||||||||||||||||||
LIBRARY | ||||||||||||||||||||||||||||||
| It's time to do some research, so make your way to the Library. | ||||||||||||||||||||||||||||||
| Try placing the library card on the pedestal of the 'insect' device in the middle of the Library to learn that there's a second library card. Turn around to face the door you came through and climb up the staircase on your right. You find the second library card on the window sill in the nearest alcove. | ||||||||||||||||||||||||||||||
| Go back downstairs and open the panel at the front end of the 'insect' device. Insert the valve in the empty slot to activate the control panel. Clicking a valve rotates all the valves in the same horizontal and vertical rows. The aim is to rotate all the valves into horizontal positions. | ||||||||||||||||||||||||||||||
| ||||||||||||||||||||||||||||||
Click the following valves: | ||||||||||||||||||||||||||||||
| ||||||||||||||||||||||||||||||
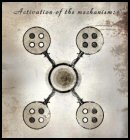
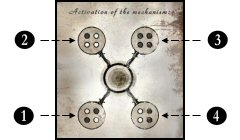
| When the valves are set correctly the 'insect' buzzes briefly. Go to the rear of the 'insect' and place the library cards on the pedestal. The 'insect' flies off to fetch a book for each library card. From the first book you learn that the Sacred Rings were created in the Laboratory. There's also a sketch of the mechanism that serves as the guidance system and an activation diagram. | ||||||||||||||||||||||||||||||
| ||||||||||||||||||||||||||||||
| The second book gives a short description of six different worlds, each represented by a symbol. | ||||||||||||||||||||||||||||||
| Note that the contents of both books are transcribed in the journal. | ||||||||||||||||||||||||||||||
SACRED RINGS LABORATORY | ||||||||||||||||||||||||||||||
| Have you tried going through the door on the third level in the main stairwell? There's a guard at the top of the stone stairs that you need to get rid of. Mila also told you she'll forgive Trey if he helps you reach your goal, so perhaps he can get rid of the guard for you. | ||||||||||||||||||||||||||||||
| Head back to the Torture Chamber, where you first encountered Trey's soul. Click the inside of the gold sarcophagus to get him to appear again. He agrees to distract the guards and in the cut scene that follows you see the guard at the top of the stone stairs being scared away by Trey's ghost. | ||||||||||||||||||||||||||||||
| You can now go through the door (on the third level in the main stairwell) and get to the Laboratory. The large circular hall has two doors that you can go through. The double doors straight ahead lead to the actual portal and the one on the left leads to the guidance system area. | ||||||||||||||||||||||||||||||
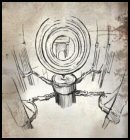
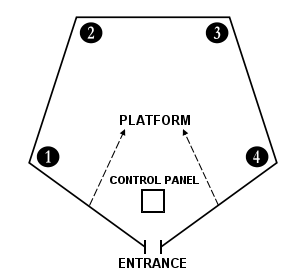
| Go through the door on the left to the guidance system area. From the entrance a walkway leads to a control panel with a circular receptacle. There's a pentagonal corridor around the entire perimeter of the area. Along the corridor are stairs leading up to a platform (on either side of the control panel) and access to four devices, each of which has four protruding rods. | ||||||||||||||||||||||||||||||
| ||||||||||||||||||||||||||||||
| Go to the control panel and insert the tetrahedron in the circular receptacle. Do the devices with the protruding rods remind you of something you've seen? They are illustrated in the activation diagram you saw in the first book in the Library. Examine the diagram in your journal, noting that certain rods are white and others are black. The black rods are the ones that must be pushed down. | ||||||||||||||||||||||||||||||
| ||||||||||||||||||||||||||||||
| Work your way around the corridor and adjust the rods in the devices as indicated in the diagram. | ||||||||||||||||||||||||||||||
| Next, go up to the platform and pull the handle to activate the guidance system. | ||||||||||||||||||||||||||||||
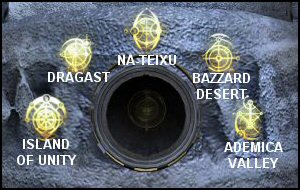
| The control panel down below now has the symbols representing five of the worlds described in the second book in the Library on it. The sixth one, Dangan, is where you are and is not reflected. From this you deduce that the symbols are used to select a destination for the portal. | ||||||||||||||||||||||||||||||
| ||||||||||||||||||||||||||||||
| Before selecting your destination, think carefully about Mila's advice to 'use the tetrahedrons to trick the Shadow Legion'. Escaping through the portal won't achieve anything, so what about tricking the Shadow Legion into going through instead? To put your plan into motion you should select the least desirable destination. From reading the second book in the Library you know the Bazzard Desert is a lonely and desolate place where no one wants to stay, so click it as the destination. | ||||||||||||||||||||||||||||||
| After getting back the tetrahedron return to the circular hall and then go through the double doors to the portal. Walk around the portal to the spiral pedestal on the opposite side. Take note that there's a balcony behind the pedestal. Insert the tetrahedron into the receptacle on the pedestal to activate the portal. Now for a bit of trickery! Don't go through the portal, turn around and hide on the balcony! | ||||||||||||||||||||||||||||||
| Your final act in the game is to smash the tetrahedron in the receptacle on the spiral pedestal. | ||||||||||||||||||||||||||||||
| ||||||||||||||||||||||||||||||