MANULA VALLEY | ||||||||||||||||||||||||||||||||||||||||||||||||||||||||||||||||
| ||||||||||||||||||||||||||||||||||||||||||||||||||||||||||||||||
| Look around the explosion site to find an iron bar wedged between the rocks. | ||||||||||||||||||||||||||||||||||||||||||||||||||||||||||||||||
KEEPERS' PORTAL | ||||||||||||||||||||||||||||||||||||||||||||||||||||||||||||||||
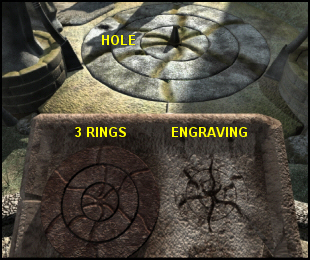
| Make your way through the valley to the mountain edge, then along the path and through the rocks to reach the Keepers' portal. Climb up the stone stairs and approach the stone podium overlooking the portal below to trigger a cut scene in which you meet Michael, the guardian of the portal. | ||||||||||||||||||||||||||||||||||||||||||||||||||||||||||||||||
| The 3 rings on the podium are a replica of the portal below and must be positioned as shown in the carved engraving next to them. Note that the graphic below shows them in their correct positions. | ||||||||||||||||||||||||||||||||||||||||||||||||||||||||||||||||
| ||||||||||||||||||||||||||||||||||||||||||||||||||||||||||||||||
Clicking the inner ring rotates only that ring, but the middle and outer rings rotate together. Go down to the actual portal and insert the iron bar into the hole on the outer ring to jam it in place. Return to the podium and click the rings as follows: | ||||||||||||||||||||||||||||||||||||||||||||||||||||||||||||||||
| ||||||||||||||||||||||||||||||||||||||||||||||||||||||||||||||||
| After unsuccessfully trying to activate the portal, Michael tells you to find another energy source and that you must have the Shadow Legion's sign. He also gives you the ferry key. | ||||||||||||||||||||||||||||||||||||||||||||||||||||||||||||||||
FERRY AND MONORAIL | ||||||||||||||||||||||||||||||||||||||||||||||||||||||||||||||||
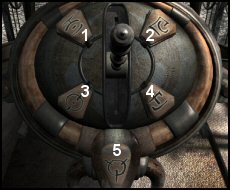
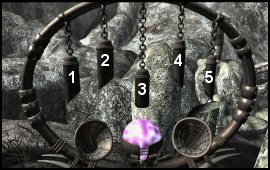
| Go back down the mountain path to the ferry. Open the control box in the centre, insert the ferry key and turn the wooden handle to activate the ferry. Climb onto the ferry and turn the wooden handle to cross the gorge. The monorail on the other side is used to travel to all the various locations. Enter a location by pressing the buttons (1 to 5 in the graphic below) and then pull the lever in the middle. | ||||||||||||||||||||||||||||||||||||||||||||||||||||||||||||||||
| ||||||||||||||||||||||||||||||||||||||||||||||||||||||||||||||||
| ||||||||||||||||||||||||||||||||||||||||||||||||||||||||||||||||
| For those who enjoyed Riven, your monorail trips should evoke fond memories! | ||||||||||||||||||||||||||||||||||||||||||||||||||||||||||||||||
ABANDONED MINE | ||||||||||||||||||||||||||||||||||||||||||||||||||||||||||||||||
| Take the monorail to the abandoned mine area. Talk to Nafal, the man outside the house, and enter the house (climb the wooden ladder) to talk to Sarah, his wife. Initially neither will be very helpful. | ||||||||||||||||||||||||||||||||||||||||||||||||||||||||||||||||
| Continue along the path to the abandoned mine. Zoom in on the device with the musical pipes (next to the well) to trigger additional conversation topics with Nafal and Sarah. | ||||||||||||||||||||||||||||||||||||||||||||||||||||||||||||||||
| Return to the house and again talk to Nafal. He tells you the story about Fird, the former executioner of the Shadow Legion. Enter the house and again talk to Sarah, who tells you about her headaches and that she hasn't had her medication (a tincture called Lukerii) for over a year. Take the bottle on the small table behind the curtain next to her bed. | ||||||||||||||||||||||||||||||||||||||||||||||||||||||||||||||||
ALCHEMIST | ||||||||||||||||||||||||||||||||||||||||||||||||||||||||||||||||
| Use the monorail to go to the alchemist's house. Take note of the chord on the right of the door and the box on the left. Listen carefully when you pull the chord to hear the box on the left open. Put the amulet into the box to enter the house. | ||||||||||||||||||||||||||||||||||||||||||||||||||||||||||||||||
| After talking to the alchemist (Himus) he leaves, allowing you to take Himus' book from his desk. | ||||||||||||||||||||||||||||||||||||||||||||||||||||||||||||||||
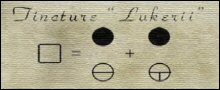
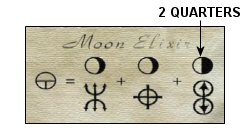
| The book on the shelf behind the curtain contains the formulae for various elements. Sarah told you that her medication is a tincture called Lukerii, so study the formula for mixing it: | ||||||||||||||||||||||||||||||||||||||||||||||||||||||||||||||||
| ||||||||||||||||||||||||||||||||||||||||||||||||||||||||||||||||
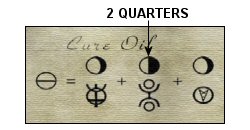
| The symbols at the bottom represent what it's made up of, namely Cure Oil and Moon Elixir. These formulae are also in the book. Note that the circles above the elements indicate the amount of each to be included, measured in quarters. | ||||||||||||||||||||||||||||||||||||||||||||||||||||||||||||||||
| ||||||||||||||||||||||||||||||||||||||||||||||||||||||||||||||||
| The dispensing device on the workbench is used to mix the elements. Fill either of the two tubes in the middle with the elements for Cure Oil and the other tube with the elements for Moon Elixir. Both tubes must be filled with 4 parts (or quarters) so use 2 lots of the elements as shown in the graphic above. Also, the elements must be added in the same order as in the formulae. Empty the contents of both tubes into the bowl near the bottom. Finally, insert the bottle (from Nafal and Sarah's house) at the very bottom of the device and empty the bowl into the bottle to get a bottle with elixir. | ||||||||||||||||||||||||||||||||||||||||||||||||||||||||||||||||
| Take note of the luminous butterflies in the jar on the workbench - they're a clue to a later puzzle. | ||||||||||||||||||||||||||||||||||||||||||||||||||||||||||||||||
ABANDONED MINE | ||||||||||||||||||||||||||||||||||||||||||||||||||||||||||||||||
| Go back to the abandoned mine area and give the bottle with elixir to Sarah. In return, she gives you a musical sphere to contact Fird. | ||||||||||||||||||||||||||||||||||||||||||||||||||||||||||||||||
| Go to the device with the musical pipes and insert the musical sphere in the middle container at the bottom. Click the musical sphere to hear it play 6 musical chords. Each pipe plays a different chord and they must be clicked to reproduce the chords played by the musical sphere. | ||||||||||||||||||||||||||||||||||||||||||||||||||||||||||||||||
| ||||||||||||||||||||||||||||||||||||||||||||||||||||||||||||||||
Clicking the pipes in the following order activates the elevator rising up in the well to the left: | ||||||||||||||||||||||||||||||||||||||||||||||||||||||||||||||||
| ||||||||||||||||||||||||||||||||||||||||||||||||||||||||||||||||
Go down the well in the elevator to talk to Fird, but he chases you away. | ||||||||||||||||||||||||||||||||||||||||||||||||||||||||||||||||
| On the way back check in on Sarah to learn that the medication has not helped her. Take the bottle with elixir that she's again left on the small table behind the curtain next to her bed. | ||||||||||||||||||||||||||||||||||||||||||||||||||||||||||||||||
SORCERESS | ||||||||||||||||||||||||||||||||||||||||||||||||||||||||||||||||
| Your next trip in the monorail is to the sorceress. Follow the path to the bridge that has a stone ring at the top. The control panel in front of the bridge changes the settings inside the ring. Stargate fans can think of them as the Chappa'ai (Cha-Pa-Eye) and a Dial-Home-Device. | ||||||||||||||||||||||||||||||||||||||||||||||||||||||||||||||||
FOR STARGATE FANS | ||||||||||||||||||||||||||||||||||||||||||||||||||||||||||||||||
| ||||||||||||||||||||||||||||||||||||||||||||||||||||||||||||||||
Experiment with the buttons on the control panel to learn how they affect the ring. Take note of what Umang says when you click the blue (second from the left) button: | ||||||||||||||||||||||||||||||||||||||||||||||||||||||||||||||||
| ||||||||||||||||||||||||||||||||||||||||||||||||||||||||||||||||
Clicking the blue button causes a solid sheet of ice in the ring and from what Umang said you work out that it can be shattered with the crowbar, allowing you to pass through. | ||||||||||||||||||||||||||||||||||||||||||||||||||||||||||||||||
| Continue along the path to a door leading into the sorceress' home. Note the large frog emblem on the door, which is a clue on how to get inside. | ||||||||||||||||||||||||||||||||||||||||||||||||||||||||||||||||
| ||||||||||||||||||||||||||||||||||||||||||||||||||||||||||||||||
| Listen carefully to the background sounds to hear a frog croaking. Wait until you hear the frog croak before opening the door. If you try entering before hearing the frog croak you end up outside again. | ||||||||||||||||||||||||||||||||||||||||||||||||||||||||||||||||
| Talk to Reina (the sorceress) three times. Note that you can only talk to her a third time after having been down the well at the abandoned mine. She tells you to bring her the ashes of Fird's son and a book of alchemy. She also says that a butterfly in the fields will provide a hint. | ||||||||||||||||||||||||||||||||||||||||||||||||||||||||||||||||
| Before leaving, look around the room and take the bottle of phosphorous on the shelves. | ||||||||||||||||||||||||||||||||||||||||||||||||||||||||||||||||
| On your way back to the monorail, immediately before crossing the bridge, go left toward a swamp area. Click the white butterfly on the reeds and then watch very carefully as it changes colours. You need to pan upwards to follow it's flight to insure you see all the colours. Make a note of the colours and the order in which they appear: | ||||||||||||||||||||||||||||||||||||||||||||||||||||||||||||||||
| ||||||||||||||||||||||||||||||||||||||||||||||||||||||||||||||||
| Did you notice the luminous butterflies in the jar on the workbench at the alchemist? The butterfly in the field must be a hint for something at the alchemist. | ||||||||||||||||||||||||||||||||||||||||||||||||||||||||||||||||
CEMETERY | ||||||||||||||||||||||||||||||||||||||||||||||||||||||||||||||||
| The cemetery is the obvious place to look for the ashes of Fird's son. Unfortunately the gravedigger won't allow you to enter. | ||||||||||||||||||||||||||||||||||||||||||||||||||||||||||||||||
ALCHEMIST | ||||||||||||||||||||||||||||||||||||||||||||||||||||||||||||||||
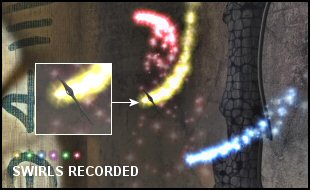
| Return to the alchemist and climb the stairs through the alcove. Inside the room at the top is a table with a large pink jewel. Pan to the right and take the wand to activate the puzzle with multi-coloured swirls. These colours are identical to the butterfly in the swamp area. You have to click the swirls in the same colour sequence as the butterfly changed into. Position the knob near the top of the wand on a swirl (as shown in the graphic) and then click. If you successfully click a swirl you hear a gong sound and the colour of the swirl is recorded near the bottom left corner. You need to be extremely patient as the swirls constantly change colours. Wait for the right colour swirl to come close to your wand then click it. This is far easier than frantically chasing the swirls all over the screen. | ||||||||||||||||||||||||||||||||||||||||||||||||||||||||||||||||
| ||||||||||||||||||||||||||||||||||||||||||||||||||||||||||||||||
The swirls must be clicked in the following colour sequence: | ||||||||||||||||||||||||||||||||||||||||||||||||||||||||||||||||
| ||||||||||||||||||||||||||||||||||||||||||||||||||||||||||||||||
| ||||||||||||||||||||||||||||||||||||||||||||||||||||||||||||||||
| After clicking the swirls in the correct sequence the pink jewel opens revealing a sheet of paper and the book of alchemy. Take both items, noting that the sheet of paper won't be in your inventory, but the contents are transcribed into the journal. | ||||||||||||||||||||||||||||||||||||||||||||||||||||||||||||||||
| To exit the room place Himus' book (found on his desk) on the stand. If you don't have Himus' book then replace the book of alchemy on the stand so you can go downstairs to fetch it. | ||||||||||||||||||||||||||||||||||||||||||||||||||||||||||||||||
SARAH'S MEDICATION | ||||||||||||||||||||||||||||||||||||||||||||||||||||||||||||||||
| Read the middle paragraph of the sheet of paper (in the journal) to learn about adding a flower from the sorceress' swamp to Sarah's medication. | ||||||||||||||||||||||||||||||||||||||||||||||||||||||||||||||||
| Return to the sorceress to trigger a cut scene of the flower blooming. Go to the swamp (where you found the butterfly) and take the lukeria flower. | ||||||||||||||||||||||||||||||||||||||||||||||||||||||||||||||||
| Bring the lukeria flower back to the alchemist. Did you notice the mixing device on the shelf behind the curtain? Put the bottle with elixir at the bottom of the mixer, open the lid, insert the lukeria flower and turn the handle to make a bottle with lukerii elixir. | ||||||||||||||||||||||||||||||||||||||||||||||||||||||||||||||||
| Take the bottle with lukerii elixir to the abandoned mine area and give it to Sarah. Exit the house and speak to Nafal. He tells you about Salan (the gravedigger) and Fird visiting the cemetery every day. Note that you can only do this after giving the bottle with lukerii elixir to Sarah and having previously tried to get into the cemetery. | ||||||||||||||||||||||||||||||||||||||||||||||||||||||||||||||||
CEMETERY | ||||||||||||||||||||||||||||||||||||||||||||||||||||||||||||||||
| Put Umang's sinister plan into action by going to the cemetery. After Salan leaves you can enter the cemetery. At the circle with the large statue in the centre take the left path to get to a mausoleum. | ||||||||||||||||||||||||||||||||||||||||||||||||||||||||||||||||
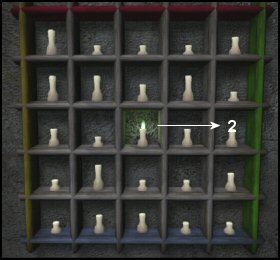
| Study the puzzle on the mausoleum door carefully noting the coloured outside borders, the different length candles and that the flame tip of the lit candle is coloured. To light all 25 candles they have to be clicked in a specific order. Note that the initial candle is randomly generated and might not be as shown in the graphic below. The sequence is always identical even if you begin at a different point. | ||||||||||||||||||||||||||||||||||||||||||||||||||||||||||||||||
| ||||||||||||||||||||||||||||||||||||||||||||||||||||||||||||||||
The colours of the flame tips (red, green, blue or yellow) are the same as the outside borders. This indicates the direction of the next candle in the sequence: | ||||||||||||||||||||||||||||||||||||||||||||||||||||||||||||||||
| ||||||||||||||||||||||||||||||||||||||||||||||||||||||||||||||||
The different lengths of the candles indicate how far away the next candle in the sequence is: | ||||||||||||||||||||||||||||||||||||||||||||||||||||||||||||||||
| ||||||||||||||||||||||||||||||||||||||||||||||||||||||||||||||||
| In the above graphic the candle in the middle is initially lit. From the green tip of the flame you know that the next candle in the sequence is to the right towards the green border. As this is a medium sized candle you skip one candle to the next candle in the sequence, marked '2' in the graphic. | ||||||||||||||||||||||||||||||||||||||||||||||||||||||||||||||||
The complete sequence for lighting all 25 candles is as follows: | ||||||||||||||||||||||||||||||||||||||||||||||||||||||||||||||||
| ||||||||||||||||||||||||||||||||||||||||||||||||||||||||||||||||
| There are eight memorial candles inside the mausoleum, but you don't know which one is for Fird's son. Nafal told you that Fird visits the cemetery every day so you need to establish which candle he goes to. After entering the mausoleum go forward once, then pan to the left to find a lever that turns the lights on and off. Can you think of something in your inventory that might be useful in the dark? | ||||||||||||||||||||||||||||||||||||||||||||||||||||||||||||||||
| One of the most common attributes of phosphorous is that it glows in the dark. Exit the mausoleum and examine the floor below the candle puzzle to find a hotspot. Pour the phosphorous on the floor to trigger a cut scene showing Fird going into the mausoleum. After this, enter the mausoleum and pull the lever to turn the lights off. Fird's footprints are clearly visible leading to the second candle on the right. Turn the lights back on and take the urn in the small alcove behind this candle. | ||||||||||||||||||||||||||||||||||||||||||||||||||||||||||||||||
| Return to the circle with the large statue in the centre. From here take the left path to get to another mausoleum. The locking mechanism (on the wall to the right of the entrance) consists of a wooden block with a horizontal handle through the centre and five stone tiles, one of which is in the wooden block. Read the riddle above the device to get a clue as to which tile must be inserted in the block: | ||||||||||||||||||||||||||||||||||||||||||||||||||||||||||||||||
A dumb person wrote these words, and a blind person read them. A mute person repeated them. | ||||||||||||||||||||||||||||||||||||||||||||||||||||||||||||||||
| The answer to this riddle is 'nothing' or 'blank', so remove the tile from the block and pull the handle to open the door to the mausoleum. | ||||||||||||||||||||||||||||||||||||||||||||||||||||||||||||||||
| Open the coffin inside the mausoleum and remove the staff. | ||||||||||||||||||||||||||||||||||||||||||||||||||||||||||||||||
| When you have both the urn and the staff you can leave the cemetery. After going through the gate you see Salan arrive in the monorail. To avoid a premature end to your adventure you have to hide. Turn around to face the gate, then go to the left and hide behind the rocks. | ||||||||||||||||||||||||||||||||||||||||||||||||||||||||||||||||
FIRD THE EXECUTIONER | ||||||||||||||||||||||||||||||||||||||||||||||||||||||||||||||||
| Go to the sorceress and give the book of alchemy and the urn with the ashes of Fird's son to her. In return she offers to assist you in getting to meet with Fird. | ||||||||||||||||||||||||||||||||||||||||||||||||||||||||||||||||
Return to the abandoned mine and enter the house to learn that Sarah's headaches are now cured. She gives you another musical sphere to use at the device with the musical pipes. Put the musical sphere in the middle container at the bottom and click the pipes in the same sequence as before. | ||||||||||||||||||||||||||||||||||||||||||||||||||||||||||||||||
| ||||||||||||||||||||||||||||||||||||||||||||||||||||||||||||||||
| Again go down the well (in the elevator) to talk to Fird. He agrees to give you the sign of the Shadow Legion if you promise to free Mila's soul. He gives you Mila's amulet to help you. Look around to find a torn sheet of paper on the shelf, the contents of which are transcribed into the journal. | ||||||||||||||||||||||||||||||||||||||||||||||||||||||||||||||||
ACTIVATING THE PORTAL | ||||||||||||||||||||||||||||||||||||||||||||||||||||||||||||||||
| Do you remember Michael (guardian of the portal) telling you to 'Ask the sky' for an energy source? | ||||||||||||||||||||||||||||||||||||||||||||||||||||||||||||||||
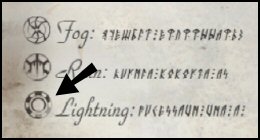
| Return to the sorceress and ask her to 'call lightning'. If you haven't already done so, read the spell book on the shelves to see an entry about changing the weather. Note that this part of this entry will also be transcribed into the journal. | ||||||||||||||||||||||||||||||||||||||||||||||||||||||||||||||||
| ||||||||||||||||||||||||||||||||||||||||||||||||||||||||||||||||
| Climb up to the room at the top of the sorceress' house to find the altar with three plates. The plate on the left has five mood statues on it. Note that the plate on the right has the symbol for lightning on it. This is a variation of the 'Tower of Hanoi' puzzle in which the mood statues have to be moved from the left plate to the one on the right. The mood statues are all different sizes and you can't put a smaller statue on top of a larger one. | ||||||||||||||||||||||||||||||||||||||||||||||||||||||||||||||||
| There's a standard solution for solving Tower of Hanoi puzzles, so move the statues as follows: | ||||||||||||||||||||||||||||||||||||||||||||||||||||||||||||||||
| ||||||||||||||||||||||||||||||||||||||||||||||||||||||||||||||||
| After completing the puzzle you hear Umang say 'Success'. Go back downstairs and talk to Reina, who says that she'll call lightning when you're ready. | ||||||||||||||||||||||||||||||||||||||||||||||||||||||||||||||||
| Use the monorail to return to the valley and go to the balcony overlooking the portal. Stand to the left of the podium and look directly upwards. Insert the staff (it makes for an excellent lightning rod) into the hands of the large stone statue. | ||||||||||||||||||||||||||||||||||||||||||||||||||||||||||||||||
| Finally, go back to Reina to tell her that you're ready. This triggers the cut scene in which Umang is teleported to the Keepers' Palace. Take note of Michael's advice to Umang. | ||||||||||||||||||||||||||||||||||||||||||||||||||||||||||||||||
| ||||||||||||||||||||||||||||||||||||||||||||||||||||||||||||||||