 |
|
|
Spring, 2001
Jump to the
links
Safecracker is a highly non-linear game. You are free to explore rooms and solve puzzles in your own sequence, up to a point. The exceptions are safes containing actual keys to open other safes; (you must obviously open the safe containing the key before you can use it;) or safes containing clues to other puzzles (you don't necessarily have to have found all the clues if you decide to cheat). Also, the entire house is not accessible in the beginning.
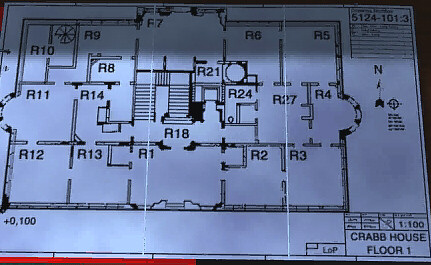
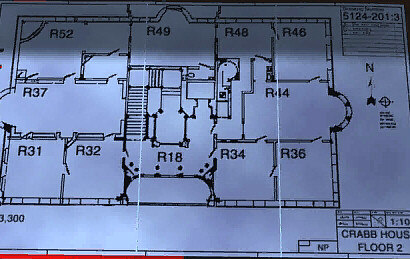
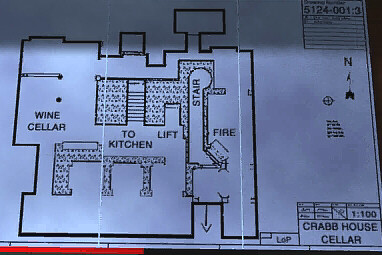
Because you can go in many directions, I am going to present the rooms in numerical order, NOT in sequence. I will attempt to cross-reference as accurately as possible, to help you connect which puzzles relate to which others. The room numbers are the same as found on the maps found in the Reception Room (Rm. 1).
WARNINGAfter you open each safe, be sure you remove all the contents before backing away. You cannot re-open a safe, and anything you leave in it will be locked in forever. |
The game begins in a phone booth in the street outside the mansion. Answer the telephone and get the clue to open the front door, 1923. Make your way to the front gate, and open the padlock by aligning the three musical symbols. If you don't recognize musical symbols, click five times on each tumbler.
Enter the reception room and explore around both sides of the desk. You will find the book with clues for the Braille safe, how to do "Indicator Lamp" safes, information about the Flower Safe, and maps for all three floors. Next to the computer is a page showing solutions to two Switch-Safes. Try the computer. Click on it once to get close-up and click on the screen to turn it on. It gives you a playable Minesweeper. On the top shelf is a page showing a diagram of the coffee grinder, which will open the door to the basement.
Click on the links to jump to any room.
Click to see the maps:
Room 1 - Reception
There are two safes in the room: One is a slider puzzle. Ouch! Was that somebody screaming in panic? Here is another document to help with Sliders.
If you would rather not get a Doctorate in sliders, click here for the ultimate cheat. Opening this safe gives you two keys (Rm. 6 and Rm. 27) and a photo, (Rm. 10).
The other safe, the blue one is easy to figure out. Click on the handle and watch the lights. When you get a light to give a long green, the dial is correct. Keep trying the dials until all three lights are green, and the safe will open. (the code is three-one-four) You will receive seven coins and a piece of the elevator code for access to the second floor. Suggest you go to Room 2 from here; you can go the other way if you want. Back
A word of warning about keys:Some safes require three or four keys to open them. Be sure you have found all of the keys for a particular safe, and have inserted all of them into the keyholes before trying the handle. Trying to open a safe with partial sets of keys can lock up the game. |
Room 2 - Small Showroom
There are three safes in here. The one
farthest from reception is another indicator-light
safe, and the principle is the same as the first one in
Reception. Just test the handle and watch for long green
flashes. One of the dials is correct before you start. The code
is three-two-three-one. Your reward is a crank. Turn around and
see the "Pyramid Scheme" safe. Each
number is the sum of the two numbers just above it. Can't figure
it out? From the top down, two, ones, six, fives, twenty. There
isn't much in this safe, just a clue to the t-1000.
Closest to the Reception Room door is a switch-safe. Opening it
yields an unmarked key, and a clue to the Liberty Safe.
You can crack this safe by brute force: find out which keys stay
on in the correct sequence. The solution. You can
read a company brochure on the table for a few pointers about the
Voice Safe and the Slide Safe.
Room 3 - Designers Room
Checking the desk and file cabinet yields nothing. We gamers are used to opening drawers and snooping through offices, and it feels funny to get no results here. The "Safe" is the jukebox. It takes a 50c coin, which comes from a strongbox. It also takes a substantial clue from a room in the cellar. Come back to the jukebox. You have to solve anagrams for popular songs and their performers. It will contain a code for the final safe.
Room 4 - Coffee Room
No safes in here. If you have played Drowned God, the music is familiar. It's also playing in the Library upstairs.
Room 5 - Constructor's Office
Try the computer. Click on it once to get close-up and click on the screen to turn it on. Fun only, not useful. You already have a hint at solving the Liberty Safe. If that is not enough, there is a stronger clue coming. You will get a key and a "Diapictures Disc." Remember those little stereo viewers when you were a kid?
| Be sure to examine the blueprint on the drafting table. It gives you the solution to the 16-key Safe in Room 27. | 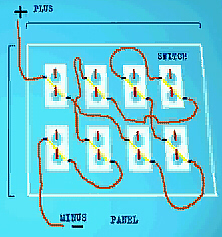 |
Room 6 - Chief Engineer
Find the table in the corner and examine the conversion chart for changing Celsius temperatures to Fahrenheit and Kelvin. There is a file drawer you can get to, but it's locked. You have one unmarked key which fits the lock, but does not unlock it. Check your key labeled Rm. 6. Get the diagram for the clock. Now we have some idea where that crank goes. It's a good idea to save your game here, since there are reports of lockups with the next safe. Go to the Picture Safe and use the Diapictures Disc. The left button changes the 35mm slides, the right button changes the disc, the center button changes both. Cycle one or the other until a coherent picture appears, then use the middle button to view all the pictures in their complete form. Get a clue for the elevator.
Room 7 - Big Showroom
To the right, the red safe needs three keys. See the box above for a stern warning! Don't say I didn't warn you. Come back when you have all three keys. They come from rooms 5, 7, and 9. You will receive a piece of the elevator code and a diagram of the cellar door lock (coffee grinder.) To the left is a safe that has the combination written on it in Braille. We have to find a decoder to read Braille with our eyes. The combination is R1, L5, R4, L2. You get a key to Rm. 13, and a final safe code. The silver safe takes a special key that is locked in the refrigerator, of all places. The Flower Safe is one we can open. You get an Egyptian Cipher, and a t-1001 clue. The way to keep the flowers coordinated is to click each one 1-2-3, 1-2-3, etc. If you get bollixed up, back away and start over. They have to match the Red-Yellow example.
Room 8 - Cloak room.
No safes in here. Cloaks only, no daggers. You can check out the bulletin board, if you like.
Room 9 - Security Guard
There is a keybox on the wall. The key comes from a strongbox in the closet in Technical Design, room 27. It contains keys for rooms 7, 13, and 52, and a clue for the clock in room 34. The filing cabinet in the hallway has a diagram of the Hand Dryer, room 24.
Room 10 - Secret Room
You can't get to this room until the end, and you have done everything else. Turn around at the bottom of the stairs to find the gadget in the photo clues. It is alphabetical, sort of. O, then P, then Q. Followed by N. Take the Large Dispenser key and use it on the bars. Go to the t-1001 and - - oops - - do you only have nine clues when 10 are required? Not to worry, you can do it! I have faith in you. You are a Safecracker. Not? then click here for the cheat.
Room 11 - Customer Support
On the desk is a letter tray. Find the Dictaphone and use it on the Voice Safe. (hit Speak on the safe, and Play on the Dictaphone.) You get a Final clue, a key, and an important clue to the Radio Puzzle.
Room 12 - Sales & Export
The safe is another easy switch-safe. If you just can't do these, use one, six, five, two. It gives you one of the Final Safe codes. Be sure to try the computer. There is fun there, Easter eggs at least! There is also a file drawer we can't get to yet.
Room 13 - Administration
There is a three-key safe. See the box above for a stern warning! Don't say I didn't warn you. Come back when you have all three keys. Put them in and turn the keys. You get a code for the final safe.
Room 14 - Sick room
There is a cabinet on the wall with an elevator codekey. Use your other codekeys to fill it out, as the cabinet is locked. In the ante-room, there is a book on the table with two clues: the full spelling of Lafayette, if you didn't know it, and the Braille alphabet. I suggest you learn to spell "Left" and "Right" and the numbers from 0 to 9. There is also a closet that appears to need a key. Actually, you can't get in there.
Room 18 - Stairwell
Go up the stairwell to the landing and find the armor. "In combat, first your head, then your eyes, then your limbs will bring you victory." How many heads do you have? Receive the key to the hand dryer (Room 24, and a t-1001 code. Go to the top of the stairs and examine the painting on the wall behind you. You cannot unlock the gate; there are two ways to get upstairs; the elevator, which must be opened with a code, and a secret passage from the basement.
Room 21 - Kitchen
Look around. You need to solve a temperature puzzle. You found the conversion chart in Room 6. The Temperature you need to use is in the coffee box on the shelf. If you can't do the algebra, the temps are 49°F, 9.5°C, and 282.5°K. The Fridge opens. Two important items are the Block Key for the silver safe in Room 7, and a t-1001 code. The food is there in case you are getting hungry. The coffee grinder will open the door to the cellar.
Room 24 - W.C.
Go in and turn on the hand dryer. While it is running, use the #24 key on it to retrieve the t-1001 clue inside.
Room 27 - Technical Design
The 16-key safe can be solved with the diagram from the Constructor's office (Room 5) or by peeking at the answer here. It contains codes for the final safe and the t-1001. Go into the closet and use your #27 key on the strongbox. It contains coins (jukebox and jester) and a key to the security guard's keybox (Rm. 9.)
Room 31 - Dept. Chief Export
This safe is a real toughie, if you don't get it right at first. The clue is the large portrait on the stairwell wall. Twist the three outer rings until the correct sections appear in the upright position. There is no "reward sound" when you have it right; I guess you're just supposed to recognize it. Be careful: the image is flipped horizontally from the original. When you think it's right, click on the lever on the left side, which slides open, then click on the handle. Get the t-1001 clue. Hint: keep it simple. The puzzle resets when you back away and restart. The final answer here.
Room 32 - Dept. Chief Marketing
Here's the Jester. Put in 3-pence coin and try to reset ears and tongue retracted, and eyes straight. The shortest combination is Pear, Banana, Pear; all on the same side. Clue to final safe.
Room 34 - Purchasing
The clue for the clock was in the keybox in the security guard room. It reads: "The time is at hand to point out the solution. From three to seven and seven to one. An open and shut case." Find the clock, and just click on the three, seven, and one numerals on the dial. Final safe clue and Egyptian cipher No. 2.
Room 36 - Company Psychologist
Find the short-wave radio and refer to the clue (note from voice box) Here's how to use it: Press L (long-wave) and tune in Radio 1. Press S (short-wave) and tune Radio 4. Press M (medium-wave) and tune in Star. Press S, tune in Luxembourg. Press O, and take final safe clue and t-1001 clue. You won't hear anything playing on the radio, but you can tell the tuning is correct when it clicks into place. Sort of.
Room 37 - Library
There are books on the tables and in the carrels to read, but they all turn out to be fun nonsense. Nothing essential. Find the corner with the bell-pull that says "Do Not Pull." Of course you can't resist. You have found a shortcut you may or may not have wanted to find. Look to the right of the bell-pull and see some special books. Find your way into Crabb's office that way. That scamp! All this time we thought the #52 key would get us in.
Room 44 - Conference room
The clue to read the flags is in the
marquetry desk, Rm. 32. It doesn't show the complete alphabet,
but enough to figure out what the flags say. They read:
RIGHTTWOLEFTFOURRIGHT2RETURNTO5. Get a t-1001 clue for your
efforts.
Room 46 - Music room
Poke around. The piano appears to be the puzzle, where is the solution? Find the tape recorder and play it. If the tape runs off the reel, and you want to hear it again, back away and it will be ready to play again. Americans know this tune as "Twinkle, Twinkle, Little Star." The French know it as "Ah! Vous je Dirais Maman," other titles abound. Don't panic on me now, somewhere in your life there is a six-year-old who knows how to play this piece on the piano. Just be sure she plays it in G major, not C. Go find your granddaughter and have her solve it for you. Check all the instruments - strum the guitars, tap the drums, ring the gong. Nothing useful, just fun. Check out the big painting near the piano. Behind it is a color decoder in case your granddaughter isn't around. Open the piano and find a final safe code and Egyptian Cipher No. 3. (Rm. 49)
Room 48 Secretary's Office / Hall
No safes in here. There is a secret passage in the hallway that takes you to the cellar through the fireplace. You can return here by winding the clock motor.
Room 49 - Egyptian room
You have three ciphers, only the third one works. Align the pyramid sections to match the hieroglyphs. The birds can be confusing. Two items: a photo with code, and a final safe clue.
Room 52 - Crabb's Office
That great big steel job is the Final Safe. Use your codes to open it. What's that? you only have nine codes? Well, you are an expert safecracker by now, right? If you just want to give in, here is the complete solution. Go in and take the chesspiece. Put the queen on the board to open the spiral stair. Use the clue from the barrel. The queen goes next to the black king.
Room 55 - Cellar
One barrel can be unlocked with the Heavy Key from room 58. It contains a "Photo with code," a diagram of a chessboard, and a partial bottle of whiskey, in case you're thirsty.
Around the corner, past the key room and the chest room is a clock motor. Use the crank, start the clock, to open a secret door in the fireplace. The spiral stairs take you up to the second floor, to the hallway by the Secretary's office. This way, you can get upstairs before you know the code for the elevator. You can get back down the same way.
Room 58 - Key Weighing room
Find the book on the shelf for instructions. Save your game before you use the key-weighing machine to find the one key that is heavier than the others. This puzzle may give you some grief. Do it by eliminating half, and half again. Be sure to take the key from the chute before you back away. The key will fit the barrel in the cellar, Rm. 55. The fourth key is the one to choose.
Room 59 - Chest
Open the chest to examine a clue for the jukebox. You can't see the whole thing, but it helps.
This document
may only be distributed with the express written permission
of the author, Tally Ho
The content of this document may not be altered in any way
without the permission of the author.
Any proposed changes or additions to the walkthrough may be
submitted to Tally Ho.
copyright 2001 © GameBoomers
![]() GameBoomers Walkthroughs and
Solutions
GameBoomers Walkthroughs and
Solutions
| Room 31: Click on the outer ring five times, the middle ring six times, and the inner ring four times. |
Room
2: Click on the switches in this sequence.
|
16-key safe
Room
27:Click on the switches in this sequence
|
Jukebox: Room 3
Match the numbers (1-1, etc.) the sequence doesn't matter, just select artist, then song.
Jimi Hendrix - Purple Haze Red Hot Chili Peppers - Give It Away The Rolling Stones - Satisfaction The Beach Boys - California Girls David Bowie - Let's Dance Crash Test Dummies - Mmmm mmm Guns and Roses - Paradise City Elvis Presley - Hound Dog The Beatles - She Loves You Bruce Springsteen - Born In The USA Michael Jackson - Billie Jean Whitney Houston - How Will I Know |
|
| A-5, B-8, C-4, D-3, E-7, F-9, G-0, H-1, I-2, J-5, K-6, L-3 |
| 1-J, 2-P, 3-J, 4-I, 5-E, 6-P, 7-L, 8-H, 9-N, 10-P |
I gave you this one only because you were
good enough to use my walkthrough.
Thanks, come back often.
Slider Puzzle
| You don't really have to do the slider. Hold down the Alt key and click on the safe's handle. (This is the only safe you can bust into this way, sorry.) |
Elevator code: 1812 Back
This document
may only be distributed with the express written permission
of the author, Tally Ho
The content of this document may not be altered in any way
without the permission of the author.
Any proposed changes or additions to the walkthrough may be
submitted to Tally Ho.
copyright 2001 © GameBoomers