Secret Files: Sam Peters
By Deep Silver
Walkthrough by MaGtRo October 2013
Gameplay:
The main menu has new game, load game, options and
quit.
The options menu has sound, graphics and game
selections. The sound options are music, atmo, voice output and effects
volume adjustments. The graphics options are shadows, full screen videos and
animated texture selections. The game options have subtitles, game help and
inventory selections.
Onscreen explanation of the Game Guide is at start
of the game.
Point and click to move.
Active spots or items are shown by the hovering
mouse cursor. Left mouse button turns green when an action is possible and
the right mouse button turns green when an object can be examined.
The inventory bar is at the bottom of the screen.
The inventory items can be examined or combined.
Right corner of the inventory bar has magnifying
lens, gear, diary and question mark.
The magnifying lens shows all the active spots and
exits in the game screen. Pressing the spacebar also shows the active spots.
The gear accesses the game menu where you can
load-save the game. At bottom right of gameplay menu; icons for options and
quit are available.
The diary has game guide and summary of the game
events.
The question mark shows the task that is needed to
be done.
Meet Sam Peters. Sam works for "Uncharted". They
report on excavations in and to the remotest corners of the world.
Sometimes, Sam's experiences are hairy. Like the
time in Indonesia to check an ancient temple complex in the jungle.
Terrorists have kidnapped her team members. Her old friend Max freed Sam
after she herself was kidnapped. Sam is now supposed to inform the
Indonesian authorities. She lost track of Max when the volcano erupted.
Sam's task is to escape from the island and bring
help from the mainland.
Bali, Indonesia
Find a way to make the inflatable boat seaworthy:
On the beach at Bali, Indonesia; Sam finds the
inflatable boat not inflated.
The Game Guide explanations follow. The Game Guide
can also be accessed in the diary right of inventory bar.
Check the volcano and the mainland.
Examine the inflatable dinghy:
See that there is a bullet hole at front side of the boat and the front part
of the dinghy is deflated.
Metal crate: Check Max'
metal crate in the boat.
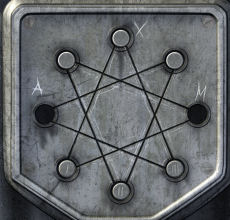
See the close up of the lock.
See holes marked MAX.
The object of the puzzle is to place the round
switches marked 1, 11 and 111 at the appropriate holes. 1 for M, 11 for A
and 111 for X.
Click to select a switch and then click on the
empty hole you want to move it to.
Move 1 to M hole.
Move X switch to bottom left hole.
Move 111 switch to X hole.
Move top right switch to A hole.
Move A switch to bottom right hole
Move 11 switch to top right and then to A
hole.
The crate is opened. Get yellow rubber boots, socks
and air pump parts.
Get a patch for the bullet hole:
Check the dead crab by the large rock
at left to get crab claw.
Take the message in a bottle on the sand
right of the boat. Check the bottle in inventory to see that Sam can't open
it.
Use the bottle on the rock at left. Pick up the glass fragments.
Read the message in inventory. It is in
Indonesian or Malaysian.
In inventory combine the glass fragment and the
rubber boots to get cut rubber boots and piece of rubber.
Leave the beach at right side of screen.
Examine the arrangement of stones at top. See that
it is an arrow.
Check the animal skeleton to get one bone.
Heat the piece of rubber: Take the
path at bottom of screen across the skeleton.
See the lava flow and a burning bush.
In inventory combine piece of rubber and crab
claw.
Use the crab claw with piece of rubber with
the bone from animal skeleton.
Use the rubber in crab claw on a stick on
burning bush to get sticky rubber in crab claw on a stick.
Go back to beach.
Apply the patch to hole:
Clean the bullet hole with the socks.
Use the sticky rubber in crab claw on a stick on
hole.
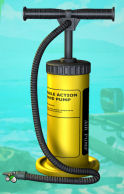
Put together the air pump:
Examine the air pump parts in inventory.
Place the large yellow tube body on the yellow
base at left.
Cover it with the screw cap.
Place the small vertical tube on top.
Place the large horizontal handle on top of the
vertical tube.
Attach the rubber hose to the hole of the
horizontal handle.
Attach the nozzle at other end of rubber tube.
Get a working air pump.
Use the air pump on the front part of the dinghy.
Berlin Germany
Sam has another assignment. She is to go to Berlin
and meet with Prof. Hartmann of Humboldt University. He is leading an
expedition to check a sensational find in Africa.
Humboldt University Biological Institute:
The gate is locked. Sam talks to the doorman via the intercom.
Learn that Prof. Hartmann is away and left for the
expedition. He left this morning. The secretary Ms Muller might know but she
left for the weekend. The guard would not give staff info. The only number
of Hartmann he has is his office number.
Get inside the university:
Inventory: Open the red
wallet in inventory to get: photo of dream sailboat, 2 Euro coins,
airport locker key where Sam's luggage are stored and credit card.
Trash collection: Check
the sign and letters in the letterbox right of the gate. It states that the
paper wastes are picked up first; followed by the biological wastes. The
bulky stuff are picked up tomorrow.
See the paper waste picked up the truck. The
security camera pans to the truck.
Examine the orange bio bin, blue paper waste bin
and the bulky trash bin. Pick up the carpet on the bulky stuff bin.
Divert the security camera: Examine the wall right of gate. Use the carpet on
wall and Sam will say to wait because of the security camera.
Examine the kerb stone in front of the gate.
Move the orange bin to the kerb stone - away from
the wall that Sam checked.
Few minutes later; the trash collector truck
arrives. Automatically, Sam places the carpet over the spikes on the top of
the wall and climb up and over.
Get into Professor Hartmann's office:
Look around: Check the
main entrance door.
Examine the plastic toolbox on the bench left of
the main entrance door. Take the garden shears and protective
gloves.
Take the rake propped on the signpost at corner.
Check the garden hose that has solid clamp. The
hose cannot be taken off.
Check the open window at upper floor.
Take the folding ladder at left.
Check the sign on the horse chestnut tree at left.
It is fastened with 4 screws. Use Euro coins on sign. That didn't work.
Make a long ladder: Use
the ladder on the open window. It's too short.
Use the garden shears on the ladder to remove the
chain holding the folded ladder.
Use the ladder on the open window. It's too
flimsy.
Use rake with ladder. Still too flimsy.
Use the garden shears on clamped hose to get
garden hose.
Combine the garden hose with the rake and ladder
to make a sturdy long ladder.
Use the sturdy long ladder on open window. Climb
up.
Open Prof. Hartmann's door:
Check Prof Hartmann's office at right. It is locked.
Use the credit card on the door. That didn't work.
The credit card snapped.
Check the snack machine. Use the Euro coins on
machine. Get a snack-bag of crackers and one cent.
Exit through window. Go to the horse chestnut
tree. Use the one cent coin on sign to get the sign.
Go back up the ladder. Use the sign on Hartmann's door. The door is
opened. Enter the office.
Find info about the expedition:
Look around the desk and bookcase.
Check the waste can and get the torn papers.
Look at torn paper in inventory.
Torn fax: Put
together the torn pieces of paper.
Left click to pick up the piece. Place the
piece on the turn arrow at top of screen and click to turn it.

The expedition sent a fax to Hartmann about
finding an unknown life form.
The only info to the location on the fax is a
reference number: GHN - 7531.
Reference books: Check
the bookcase ring binders. Locate the GHN at bottom middle bookcase.
Read the picked binder in inventory. It is in
Ghana.
Lake Bosumtwi: The
coordinates of Lake Bosumtwi, in the Ashanti Region of Ghana in Africa. The
lake lies in a meteorite crater. It is 1 million years old and is the newest
impact crate on Earth.
Turn the page to read more about the ecosystem.
Near Lake Bosumtwi, Ghana
Hut:
After flying in and is at the landing strip, Sam gets a bad feeling when she walked by a hut near Lake Bosumtwi.
Inventory has fax, mobile phone,
camera, pocket knife, lighter and voice recorder.
Raid the shack and pick up old batteries,
megaphone and lemonade.
Check the pole of the hut and take the cap.
Expose scratches on the pole and a coat hook which is screwed tight.
Use the pocket knife to unscrew the coat hook.
Check the cat. See that wire ropes hold the wind
sock pole upright.
Check the wooden crates that has provisions.
Swamp in jungle:
Enter the jungle via the path right of the hut.
See an overhead view of the path to the camp at
top right.
Warthog: Go forward to
the dense trees on the path. See a warthog.
Use the megaphone on the warthog and Sam makes cat
noises. That didn't work.
Go back to the landing strip. Use the voice recorder on the cat. Go back to the
warthog at the swamp.
Combine the voice recorder and megaphone. Use the
voice recorder with megaphone and recording on the warthog. That
didn't work either.
Use the old batteries on the voice recorder with
megaphone and recording to get batteries from megaphone.
Use the voice recorder with megaphone and
recording and old batteries on the warthog.
The weird sound drives the warthog away.
Tree trunk: Examine the tree
trunk. Take the branch. The removal of the branch excited the ants.
Repair the hanging bridge:
Hanging bridge:
Go deeper in the jungle until the hanging bridge.
The right rope is frayed and held only by wire.
Tool bag: See a tool bag
below at right side of the cliff.
Use the pocket knife with the cap to get thread.
In inventory combine the long branch and the
thread. Add the coat hook taken from the hut to get long hook.
Use long hook on tool bag. Examine the tool bag to get tool bag,
wrench, measuring tape, paint brush and pencil.
Fix the rope: Go back to the landing strip.
Look close at the wire rope holding the wind sock.
Use the wrench on the rope connector.
Go back to the bridge. Look close at rope.
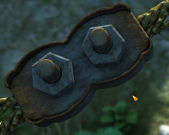
Use the rope connector on snapped rope.
Place the connector body first. It is placed
under the rope and the rope is twisted on the screws.
Cover it with perforated body.
Hold it tight with the nuts.
Camp:
Continue to the camp. See a destroyed camp. The
roof of the hut is caved in.
Look around. See stands around the camp. The
crate is hung up the tree to protect from fauna.
Locker: Look beneath the
hut. See rotten floorboard. Use the wrench to break the rotten floorboard.
See a fallen locked locker. Take the metal pipe at
right.
Lower the crate:
Examine the crate and the winch holding it up. The crank of the winch is
missing.
Use the wrench on the winch. It fits but Sam is
not strong enough.
In inventory combine the metal pipe with the
wrench.
Use the extended wrench on the winch. The
crate is lowered.
Check the crate to get sleeping bag,
small key, solar modules, 120 deg sensor and 75 deg
sensor.
Open the locker: Go beneath the
hut again.
Use the small key on the locker. Get laptop,
90 deg sensor, first aid and letter.
Find out information from laptop:
Charge the laptop:
Examine the laptop and see that the power is drained.
Put together the solar modules:
Look at the solar modules.
Left click to pick up parts. Place the parts
on the turn arrow at top of screen and click to turn it.
The charging regulator is in fixed position -
so work around it.
Place the connecting cable right of the
charging regulator and the adapter cable at bottom.
Place power supply at end of the adapter
cable.
Place power cable at bottom of the power
supply.
Arrange the solar panel with black knob to the
connecting cable.
Position the other solar panels so that they
are connected by their teeth.
Get a solar battery set.

Combine the drained laptop with the solar battery
set. Place them on the hot rock at foreground.
Password for laptop: Check the
laptop and see that it needs a password.
Use the pocket knife on the adhesive tape at
bottom left of the screen. See wedding rings.
Read the letter taken from the locker. It is a
letter for Hartmann from his wife on their 22nd wedding anniversary. It is
dated 2nd April '08.
So their wedding was 2nd April '86.
Enter using the laptop keys the password 020486.
Press enter key. If error is made, use the laptop's delete (back) key.
Documents: Learn that
based on the lake snail's adaptation to the fresh water algae; they think
that evolutionary leaps can be caused by viruses.
Read about the mysterious happening at the camp.
Based on Ashanti legend there are vampire like beings that roam through the
tree branches overhead. They are looking for human prey. They were attacked
and one of his colleagues showed flu like symptoms. They left to go to
Christian Mission.
Maps: Study the map of
the camp. Note the positions of the motion sensors.
Check the next map to see the mission Hartmann mentioned
at left.
Check the music, weather and e-mail.
Protect the camp:
Fire: Get firewood
from under the hut. Place the firewood on the fireplace. Use the lighter to
get a roaring fire.
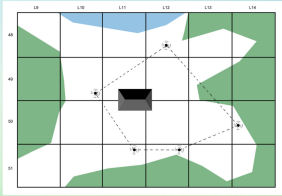
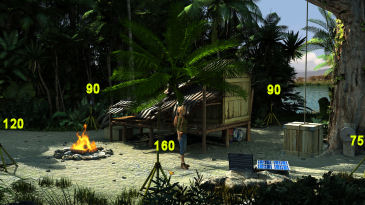
Arrange the sensors: Using the
map as guide, install the sensors on top of the stands around the camp.
Pick up the 160 deg sensor from the ground
at left foreground.
Place 160 deg sensor at bottom middle.
Place 120 deg sensor at left.
Check the 90 deg sensor left of hut (already
placed).
Place 90 deg sensor at back of hut.
Place 75 deg sensor at right of hot rock.
Now that everything in the laptop is checked
(especially the map to the mission) and the sensors are up, Sam decides to
sleep.
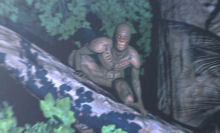
Visitation:
Sam is awakened by noise. See the red-eyed
vampires of the Ashanti legends.
Examine the camera in inventory. It has top notch
flash. Use the camera on the vampire eyes.
The next day, check the camera to see if the
vampires were caught by the camera. See the vampire.
Mission Church:
Exit the jungle and go west to the mission. Sam
knocks on the door and talks to the nun.
Sam is told that the group are in quarantine and
Sam is not allowed to see them because she might get infected.
Learn that the professor was taken by the men
during the attack. They were attacked by the Asanbosam of the Ashanti
legends. They come from above the trees. They suck the blood of their
victims. Sam ill mannerly pushes for more answers. The Asanbosam take their
victims to their caves.
Father Samuel's diary:
The nun gives Father Samuel's diary to Sam. It has information on the
Asanbosam. Read the diary.
Learn about the Ashanti shaman Kunabe. The
Asanbosam are guardians of the forest and attack only the intruders. The old
shamans control the Asanbosam as well as help protect the Asanbosam from the
disease they carry. The priest looked for the antidote.
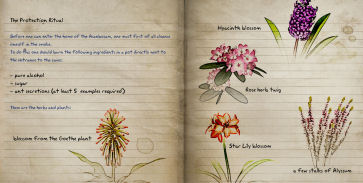
The priest studied the inscriptions written by old
shamans outside the cave. It describes a ritual of burning certain
ingredients in a pot next to the entrance of the caves before entering. The
smoke cleanses them before entering.
The ingredients needed are pure alcohol, sugar, at
least 5 ant secretions, herbs and plants.
The route to the cave is not known. A loose paper fell off the diary.
Find the route to the cave:
Graveyard: Go to the
graveyard left of the mission. Read the gravestones.
Father Samuel's grave:
There is no epitaph, no date of birth or death. See 9 symbols chiseled into
the stones - like lines and trees.
Use the blank paper on Father Samuel's tombstone
to get paper with symbols.
Pick up the clay bowl left of the
tombstone.
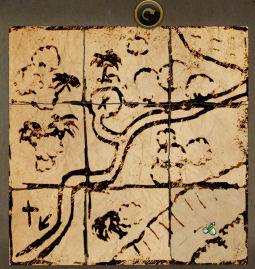
Map: Use the pocket knife
to cut the paper with symbols.
Piece together the scrap of papers with ornaments
to get the route to the cave.
Collect Ingredients:
Grassy area: Go to the
grassy area right of the path to the mission. Pick up Star Lily,
Goethe plant, alyssum, hyacinth and rose herb.

Camp: Go back to the
camp. Make a fire in the fireplace.
In inventory combine the lemonade and the clay
bowl.
Place the clay bowl filled with lemonade on the
fire to get clay bowl filled with syrup.
Collect ants: Go back to the
jungle and then swamp.
In inventory combine clay bowl filled with syrup
and paint brush to get sticky brush.
Look close at tree trunk. Use-click the sticky brush to
catch 5 ants.
First aid box: Check the first
aid box. Get aspirin-pain killers, pure alcohol, bandage
and empty first aid box.
Asanbosam cave:
Go to the cave of the Asanbosam. Look around.
Cleansing: Use the Star
Lily, Goethe plant, alyssum, hyacinth and rose herb on the pot left of
the entrance.
Add the pure alcohol, 5 ants and the bowl of
syrup on the pot also. Use the lighter on the bowl.
Enter the cave.
Maze: See an Asanbosam
crawl away.
The aim of the maze is to light wall
drawings with chunks of resins.
How to light lamp and what to do in the maze
- place resin in clay bowl hanging from the ceiling and
use the lighter.
The light will focus a beam on a square of the wall
drawing.
Take note of what is drawn on the focused
square and the row it
is seen.
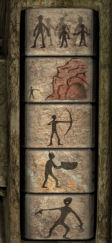
Maze: L is left, M is middle and R is right.
From *outside, go: *L - M - pick up chunk of
resin - R
- wall drawing (light bowl and see row #1
man with children) - L - wall drawing - M - M - R
- wall drawing and resin here (light bowl and see row #5 transformed man with arm spread ) - R - L - L -
growl heard/wall drawing - L - get resin - L
- wall drawing (light bowl and see row #4
man with bowl) - M - R - resin - R
- room with 5 drawings panel - R - #4 - R
- R
- wall drawing (light bowl and see row #2 man entering cave) - M - L - resin in dead end - out - R - #2 - R
- R
- wall drawing (light bowl and see row #3 man with bow arrow) - M - L - #2 - L - L - #4 - M - R - R - room with 5 drawings
panel .
Panel with 5 drawings:
Look close at the panel right of the closed door.
Turn the drawings to show the drawings focused
on by the beam of light from the clay bowls.
The drawings should be in the same order from
top to bottom.
Press the button at left. The door opens.
Professor in the Asanbosam lair:
See the Asanbosam on the professor.
Use the camera on the Asanbosam with the
professor.
The professor is in pain. Give him pain
killer-aspirin. Use the bandage to stop him from bleeding.
Click to take him out of here.
Decision time: Talk to the
professor and hear his theory about the virus and Asanbosams.
Save game here! Make your decision.
This document may not be
distributed without express written permission of the author and the content may
not be altered in any way.
For Questions or Comments
on this Walkthrough,
Please write to:
MaGtRo
Copyright © 10/2013
MaGtRo
 GameBoomers
Walkthroughs and Solutions
GameBoomers
Walkthroughs and Solutions