| ||||||
EXPLORING THE GROUNDS | ||||||
| As the weather is clear you can go outside and explore the grounds. Before this there are two things that need to be done inside. | ||||||
| Did you note that it has gone incredibly cold in the house? The fireplace in the living room still has some wood in it, so use your matches to light a fire. You also need to call Jerry to tell him about the events of the previous night. | ||||||
GARAGE | ||||||
| The silver key (found on the workbench in the room with paintings) is used to unlock the padlock on the garage doors. Remove the screwdriver and pliers from the toolbox on the workbench. Also pick up the crowbar propped up against the right edge of the workbench. | ||||||
| Look around carefully as there are other items that are useful later in the game. | ||||||
GREENHOUSE | ||||||
| The door to the greenhouse is stuck as the hinges have rusted. Apply some oil from the oil can onto the hinges and then open the door. | ||||||
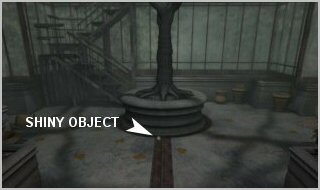
| Study the layout and design of the greenhouse carefully as they are important. Below the grating at the base of the large round concrete planter housing the tree you can see a small shiny object. | ||||||
| ||||||
| At the opposite end of the planter base (next to the metal stairs) is a tap, but the water is currently not running. If the water supply was resumed then perhaps the small shiny object could be 'washed' through the drainage to where it flows out of the greenhouse. Do you remember seeing a valve in the basement? If you tried previously, it could not be opened by using your bare hands, but you now have some tools! | ||||||
| Return to the basement, insert the crowbar (found in the garage) into the valve and use the hammer to open the valve. Don't forget to take the crowbar with you when you leave as it's needed again later. | ||||||
| When you now open the tap at the base of the round planter (inside the greenhouse) water flows into the drain. Examine the drainage system in the greenhouse to find that a potted bush has fallen over, blocking one corner of the drain. Go to the walkway at the top of metal stairs and take the shears from the right drawer of the small table. Use the shears to cut off some branches and leaves on the fallen bush to unblock the drain in the corner. Explore the surrounding area to find another path that leads to a small pool of water below an arching tree. The tree has a small hole through which water runs into the pool. The shiny object should now be visible in the pool (at the edge nearest to you) and you can pick it up, learning that it's a small key. | ||||||
| There is more to do in the greenhouse, but this will be dealt with later in the walkthrough. | ||||||
CRYPT | ||||||
| The thick wire securing the door to the crypt can be cut with the pliers. Take note that after cutting the wire it's added to your inventory. | ||||||
| Look inside the two coffins on the ground level, noting that the one at the back is empty. There are two plaques side by side in front of the coffins so you cannot identify whose coffin is empty. While in close up view of the plaques pick up the rock lying on the ground. | ||||||
| Go down to the lower level where you find a number of other coffins. Most of the plaques beneath these coffins are badly eroded, but the one below the baby's coffin (top shelf on the left wall) is not as bad as the others. It's too dark to read the inscription, so you need to find a source of light. Go back upstairs and examine the dome ceiling, noting that there's a faint light shining through. Perhaps the light would be better if you could find a way to break the window. While standing just inside the crypt entrance, throw the rock at the window. You won't hit it first time and will have to try again. If you listened carefully after the first throw you would have heard the stone rolling down the stairs, so you find it in the corner near the stairs down below. Fetch the stone and again throw it at the window while standing in the same spot as before. Although the light coming through the broken window is brighter the downstairs area is still too dark to read the plaque. Look around and note that the light is shining directly onto the lamp at the top of the stairs. | ||||||
| ||||||
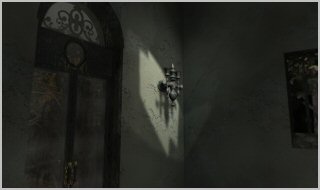
| Can you think of a way to 'deflect' the light towards the lower area? There are a number of mirrors in the manor, but only one of them can be taken and used. If you examined the mirror on the side table in the main bedroom you would have found that it swivelled. Go to the main bedroom and loosen the mirror with the screwdriver, then attach the wire from the crypt door to it. Return to the crypt and hang the mirror on the lamp above the stairs to deflect the light downstairs. Examine the plaque beneath the baby's coffin, but the only thing you can make out is the letter 'R' on the far left - obviously the first letter of the baby's name. | ||||||
MAID'S LETTER | ||||||
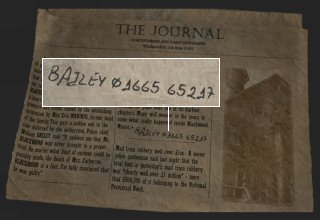
| Go back inside and telephone Jerry to tell him about what you discovered in the crypt. During the conversation he mentions that James Blackwood died in June 1963. This triggers another newspaper edition you can look at in the attic. The article is about James Blackwood's death and there's a name and telephone number written on the page. | ||||||
| ||||||
| Use the telephone (select the 'I dialled another number' option) and dial 0 1 6 6 5 6 5 2 1 7 (the number written on the newspaper) to speak to William Bailey, the police chief, who investigated the murder. You learn that the body of Catherine Blackwood was never actually retrieved. Having this conversation with William Bailey triggers a reply to the letter you sent to Barbara being in the mailbox. | ||||||
| Open the mailbox (at the front gate) and read the translation Barbara has sent back. From it you learn that the maid, Eva Mariani, secretly took pictures and hid them under a loose floorboard beneath her bedside table. | ||||||
| Go to the maid's room and remove the loose board beneath her bedside to find a photo of James Blackwood in the act of burying Catherine. Study the photo very carefully, in particular the exact location where she is buried, the lighting and the effect it has on the photo. | ||||||
STUDY | ||||||
| When examining the desk in the study you should have noticed that the top right drawer was locked. The small key you retrieved from the pool near the greenhouse can now be used to unlock this drawer. Inside it is a letter from Dr. Milton to Catherine and a wooden strongbox with a 5-digit combination lock. As a rule, people tend to use either dates or names as combinations, so bear this in mind in trying to open the combination lock. There are only 5 digits so it's unlikely to be a date. If a name was used, each letter would need to be associated with the corresponding number. Do you remember seeing anything with letters and numbers on it? | ||||||
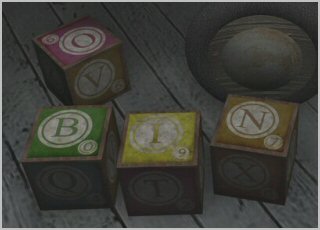
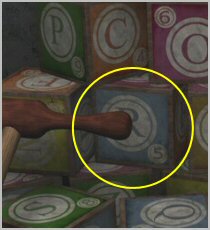
| The toy blocks in the nursery each have a letter and number on them. Note that you can get a close up view of the blocks in the toy cart and the ones scattered on the floor. Examine the blocks on the floor, noting that four of them are grouped together. From the plaque in the crypt you know the name of the Blackwood's baby began with the letter 'R' and there's also a block in the toy cart with the letter 'R' on it. | ||||||
| ||||||
| These five blocks (or letters) are an anagram of the baby's name - ROBIN. The corresponding numbers on the blocks are the combination to the lock on the wooden safety box. Note that the numbers always appear at the bottom right, so the number on the 'O' block (facing away from you) is a 9 and not 6. | ||||||
| Set the numbers on the combination lock to 5 9 0 9 7 and then open the safety box. Although the box appears to be empty, there's actually a second locking mechanism that must be figured out. | ||||||
| ||||||
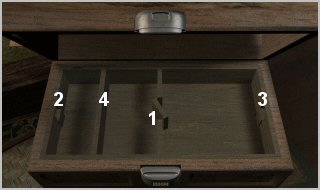
| Begin by turning the centrepiece on the wooden slat in the middle to the left - (1) in the diagram above. This will allow you to unlock the left clip - (2) in the diagram. Next, turn the centrepiece to the right and unlock the right clip - (3) in the diagram. Now open the box by pulling the wooden slat on the left - (4) in the diagram. Inside the bottom compartment is an ornate gold key. | ||||||
CHAPEL | ||||||
| The ornate gold key (from the safety box) is used to unlock the door to the chapel. Once inside the chapel, go up the spiral staircase where you find a small wooden cabinet. Open the cabinet, pull out the drawer at the very top (it's a bit difficult to spot) and remove the bible. Page through the bible until you find a heavy nail inserted in one of the pages. | ||||||
| Downstairs, one of the slabs on the floor between the crucifix and the granite table has a metal ring attached to it. Pull the metal ring with the crowbar to lift the slab. Note that if you left the crowbar in the basement after you opened the valve, you need to go fetch it. | ||||||
| Next, stand directly in front of the crucifix, look upwards and examine the INRI sign, noting how it's positioned. Incidentally, the letters 'INRI' are the initials of a Latin inscription that Pontius Pilate had written above the head of Jesus Christ on the cross - in John 19:19. These words were 'Iesvs Nazarenvs Rex Ivdaeorvm'. Latin was the official language of the Roman Empire and makes use of an 'I' instead of the English 'J' and 'V' instead of 'U', so the inscription is Jesus Nazarenus Rex Judaeorum. Translated into English this means Jesus of Nazareth, the King of the Jews. Early churches adopted the initials as a symbol and through the centuries INRI has appeared in many paintings of the crucifixion. | ||||||
| At the bottom of the crucifix, in the right foot, is a noticeable orifice. Insert the nail (found in the cabinet drawer up the spiral staircase) into the orifice. Note that the orifice is pixel-sensitive and the centre of the nail must be held over it. You won't be able to insert the nail if the head or point is held over the orifice. | ||||||
| ||||||
| After inserting the nail look up at the INRI sign, noting that the left side is tilting downwards. Use the crowbar to push the sign back to a horizontal position. This causes a chain mechanism to open a section of the floor that leads down to a secret room. | ||||||
| At long last you actually find a candle! Light the candle in the secret room with the matches. On the tiny desk are more of James Blackwood's notes, a letter from him to Dr. Martin and an odd shaped branch. Read James Blackwood's notes very carefully as they contain important details about the curse. | ||||||
EVICTION | ||||||
| After your latest discoveries you need to once again telephone Jerry. This time his attitude is a lot different and he's adamant that you must leave the manor. This conversation triggers the delivery of an eviction notice in the mailbox. Go the front gate and read the eviction notice. | ||||||
| If you previously tried doing something about the car's battery by opening the trunk, Michael's thoughts were to give Jerry a chance. Clearly this is no longer viable, so you must find a way to leave. Open the trunk of the car and remove the dead battery. Have you seen a source of power to charge the battery? Did you play around with the bicycle in the garage? The device attached to the rear wheel is a dynamo, which is activated by rotating the pedal. There are cables connecting the dynamo to the headlamp, which lights up when power is generated. Put the car battery on the small crate next to the bicycle, then 'click' the dynamo to connect the cables to it. When you now rotate the pedal power is diverted to the battery. | ||||||
| Pick up the charged battery and replace it in the trunk of the car. Next, get in the car and 'click' on the ignition. You should 'click' the ignition four times to read all of Michael's thoughts on why he cannot leave yet. Note that you have to try leave the manor before certain of the remaining puzzles can be solved. | ||||||
AMULET | ||||||
| James Blackwood's notes in the secret room inside the chapel contain explicit instructions on how to make an amulet. Two main elements are required, one belonging to the victim and one to the victimizer, which the notes state must be organic. These elements (provided they are not too solid) are then blended with a plant native to South Africa. Lastly, the branch of a particular tree is used as a holder of the blended items. | ||||||
| The only possible victims are James and Catherine Blackwood. Unfortunately there's nothing you can take from the corpse in the crypt, so you need to dig up Catherine's body. The photo hidden under the loose board by the maid shows where James Blackwood buried his wife and you also know from her letter that she stayed in town during the day, only returning to the manor at about four o'clock. The exact location shown in the photo can be identified by the sand path, the tree and the position of the steeple's shadow. Note that everything dealt with in the walkthrough up to this point has to be completed to get you to 4PM on Monday (the time the maid returned from town) before the steeple's shadow will be visible. You also need to fetch the shovel from the greenhouse if you haven't done so already. | ||||||
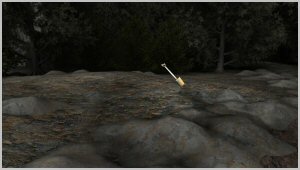
| The shovel is stuck in the soil on the walkway at the top of the metal stairs. A hose is lying on the floor next to the shovel. Insert one end of the hose in the soil around the shovel, and throw the other end over the railing. Go back down the stairs, then examine the tap at the base of the round planter to find the end of the hose. Attach the hose to the tap to wet and soften the soil around the shovel, allowing you to remove it. | ||||||
| The area where Catherine's body is buried is on the left along the sand path leading to the chapel. The easiest way to recognize it is by the large tree with two branches sticking out to the right. There are various hotspots in the area and you need to find the exact spot to dig, so be prepared for some of pixel hunting. Take note that in the photo James Blackwood is digging at the apex of the steeple's shadow, whereas you need to actually dig at the top of the dome's shadow. This small inaccuracy can be quite frustrating! | ||||||
| ||||||
| When you find the corpse take note of the teeth, one of which can be removed with the pliers. You now have an organic item belonging to a victim. | ||||||
| You have to now find an organic item belonging to the victimizer. The notes in the secret room describe the god as a 'feline figure with claws'. In the gallery is a bust with a lion's claw on a necklace. Use the pliers to take the claw - this is the victimizer's organic item. | ||||||
| The plant needed for blending with these two elements is on the small table on the walkway in the greenhouse. Use the shears to cut a few leaves off it. | ||||||
| From James Blackwood's notes you know the two main elements (the tooth and claw) must not be too solid so they cannot be blended together while in their current state. Did you see the old-fashioned grinder on the table in the kitchen? It can be used to grind the two elements into powder form. To do this, open the gold receptacle at the top, insert the element, close the receptacle and turn the handle on the right. The ground element will be inside the small compartment at the bottom. Note that the receptacle will not open unless the compartment is closed. After grinding the tooth and the claw, first combine them in your inventory and then add the leaves. | ||||||
| The odd shaped branch you found on the table in the secret room can be used as holder for the blended items. You won't find any glue or adhesive to attach the items to the holder, so some 'out-the-box' thinking in required. How would a primitive tribe like the Dhalmaar do this? Heat is often used for bonding items and there's a small gas burner in the workshop. A few components are missing from the gas burner, so you need to find them. | ||||||
| Examine the pile of bricks in the room next door (upper bathroom) very carefully to find a metal rod. The rod is the missing support strut and fits into the gas burner. If you didn't take it previously you need to fetch the lid of a can that's on the workbench in the room with paintings. After fitting the support strut, place the lid of a can on the top and the combined elements on the lid. Light the gas burner (just below the lid) with the matches to melt the elements, transforming them into a green stone. You can now assemble the amulet by attaching the green stone to the branch. | ||||||
ENDING | ||||||
| Use the amulet to perform an exorcising ritual on the mask inside the storeroom in the gallery. You're not quite done yet as you again hear the 'scratching' noises coming from the fireplace in the living room. | ||||||
| Take note that the fire has died and when you examine the fireplace a grating (previously hidden by the logs) is visible. Open the grating and go down to a hidden passage. There's a door that must be unlatched and opened to enter an underground lair. Look around and examine everything. After examining the teddy bear lying on the ground, try going through the large hole in the wall... | ||||||