Secret Files 3
By Deep Silver & Animation Arts
Walkthrough by MaGtRo September 2012
Gameplay: A selection for
personalized main menu is asked.
The main menu has new game (foosball), load game
(bar), options (electric panel), cinema (screen), credits (menu) and exit
(sign).
Options menu has Sound (music ambient noise,
speech and sound effects) volume adjustments, Graphics (shadow, full screen
videos and animated textures) selections and Game (subtitles, game help,
inventory and main menu) options.
Load-save game (in-game menu) page has frames that
show the screen capture of the saved game, load, save, delete, date-time
done and location in the game. A blank new game slot is also available. The back to screen-continue arrow, options tools icon and
end game-exit door icon are seen at bottom right of screen.
During gameplay, the mouse when moved to an active
item or character shows left mouse click for action and right mouse click
for description.
Pressing the space bar or clicking on magnifying
glass at bottom right shows all the active spots in the game screen.
The inventory bar is accessed when the cursor is
moved to the bottom of the game screen. Items collected are on the left.
Left mouse click takes the item and the right mouse click describes the
item. Items can be combined when an item is clicked over another item.
At bottom right of the game screen are the examine scene magnifying
lens icon that shows the hotspots in the game, tasks icon that describes
what needs to be done and gives a back story and the tools icon of the
in-game (main) menu. If you check the tasks continuously, you might get
The Brain achievement.
After playing the game, statistics of minutes
played; usage of use, look, magnifying glass icons and meters walk as well
as number of saves are shown.
The Bonus feature is opened after the end of the
game. It has achievements, what happened to the characters clips and artworks
(with the pictures of the developer crew).
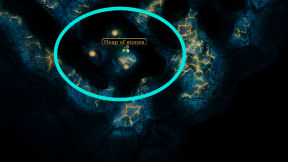
Alexandria 48 BC
The city of Alexandria is in the midst of
the Ptolemaic War. Master thief Menis-Ra is given 40 debens; half of the payment
by robed men. The robed men wear medallions with a face that looks familiar. The master
thief is to destroy a series of scrolls in the Library of Alexandria.
Go to the scroll room:
Inventory has map, bag of gold,
incendiary agents, rope and grappling hook. Look at (right
click) the map and learn where the scrolls are located.
Climb the wall: Menis-Ra
automatically goes to the wall to scale it. Click on wall.
Press the space bar or click on magnifying glass
at bottom right of screen to see where the hotspots are located.
Click on a crack on the wall to get Menis-Ra to
climb it.
The end location is at top left. Slowly move your
way up at center; slightly to the right, then to the left (when the window
is seen at top of the screen) and up to the wall edge.
Distract the guard: Menis-Ra
is by the door to the chamber and beside the stables.
Look around. Take the leather bag hanging on wall
left of the master thief and the stable window.
See a snake at foreground behind the barrels and
crates. Go to the snake and Menis-Ra sneaks at right side hidden by the
shadows.
Use the leather bag to take the snake and get
snake in bag.
Go back to the shadows by the stable window.
Use the snake in bag on stable window. The
horses make noise.
The guard checks the stable and Menis-Ra automatically
enters through the doorway.
Get to door where the scrolls are located:
Menis-Ra is up on the rafters. The door to the scrolls is across the way. 2
guards meet below him.
Walk the rafters quietly to get to the other side.
Do not use the beams that make noise. They are seen as beams with cracks.
Go right, down, right and up until the ledge.
Take the banner-linen cloth on the wall.
Go down at right beams. Turn right at second beam
and then up.
Enter the storage room:
Check the window above the door to the storage room.
In inventory combine the rope and the grappling
hook to get rope with grappling hook. It will still make noise on the
window.
Combine rope with grappling hook with linen cloth
to get muffled grappling hook.
Use muffled grappling hook on window. Master thief
jumps down in front of the door.
Do the task: Click on the
clay pots-scroll and Menis-Ra is curious enough to check what the scrolls
contain. They have numbers and drawing but all have the royal seal.
Hear the guards. They are alerted to the presence
of an intruder. The guard says that not even one amphora with scroll should
fall into the hands of the intruder. Menis-Ra burns the scrolls.
One of the amphorae that hold scrolls rolls down
the drainage opening to the sewer.
Nina's Wedding
Nina scooters to the church. She is late for her own
wedding. Nina enters the church and sees no guest. She rushes to the altar where
Max is waiting. The wedding ceremony of Nina Kalenkov and Max Gruber starts. The
priest recites a passage from the Apocalypse. The wall of the church collapses
and the church is on fire.
Nina loses consciousness and wakes up to find that
Max is gone.
A robed man walks out of the fire and waves to Nina to
follow him. The man goes through the wall of the church.
Follow the robed man:
Find a way out: Look
around.
Check the tapestry at right wall. Nina has to
remove it to see what is on the other side.
Take the mop left of the tapestry. Use the mop on the flames at left wall.
Use the burning mop on the tapestry. See an
opening at top of the tapestry. It is the way to the bell tower.
Climb the statue: Try to
climb the statue of St. Peter left of the opening.
Check the wall joint left of the statue. The
mortar is crumbling.
Take the robe and the clothes hanger
right of the pews.
Check the nail on the corner pillar right of the
burning shelves. Use the clothes hanger on nail to get nail.
Check the burning shelves left of the nail.
Go to the baptismal font at bottom center; take
the chalice. Use the chalice on baptismal font to get chalice with
water. Use chalice with water on burning shelves.
Take a shelf that survived the fire.
Go back to the wall joint left of the statue.
Use the nail on the wall joint to widen the wall
joint. You might win the Maverick award here.
Use the shelf on the widened hole. Climb-click on
statue.
Swing to the opening:
Select the difficulty of this mini-game. If you select the more difficult
level on all puzzles in the game, you might get the Master achievement.
See left and right arrows.
Click on one arrow
and as soon as the statue leans farthest to that side immediately click on
the opposite arrow to make a wide swing.
Do this until Nina leans to the right and
automatically climbs the opening. You might win the Acrobat award here if
done perfectly.
Nina meets the robed man. He points to the burning
city.
Nina wakes up. Max worries about her apocalyptic dreams since
Tunguska. Max reads the apocalyptic passage from the bible.
Berlin, Germany
Masked soldiers enter the bedroom and take Max away. Max
tells Nina I'll miss our honeymoon. The guard tells Nina that Max is
arrested because of terrorist activities.
Nina returns from looking for information about Max.
She says that there is no record of Max'
arrest.
Look for clues in Max' apartment:
Look around the apartment. Learn that red is Max'
favorite color.
Go to the Bulletin board left of bookcase. Nina
notes a sport team list: Mainz 05 is on top and Schalke 04 is at bottom.
Backpack: Take Max'
backpack from the floor. In inventory, examine the back pack to get
Australia book.
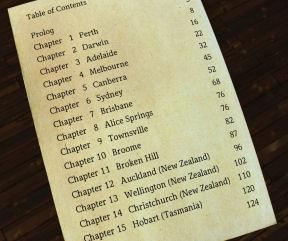
Examine Australia book to get: 4 small red
flags. The book has chapters 3, 7, 10 and 15 torn off and the table
of contents is loose.
Bedroom: Go to the
passage-bedroom at right. Look around and learn about Nina's opinion
concerning Max' taste in decorations.
Map: Examine the
map of Australia on the wall.
Study the table of contents from the Australia
book and see that chapter 3, 7, 10 and 15 are: Adelaide, Brisbane,
Broome and Hobart in Tasmania.
Place the 4 red flags on the circles that mark those cities in Australia.
Bed: A secret compartment
opens under the bed.
Nina takes the 2 keys. One key is labeled
Museum office.

Museum Office:
The security camera sees the arrival of Nina at
the museum.
Look around the office completely.
Painting: Study the
painting on the wall. It depicts a volcano in a stormy sea. There is a crack
running at the center of the picture.
Take the stucco tool on top of the crate at
left.
Check the air conditioner-heater beside the file
cabinet. It has a thermostat that regulates air flow and heat settings based
on the room temperature.
Drawer: Go to the desk
drawer below the aquarium. Use the keys to open the desk drawer. Examine the
contents.
See a city map of Urfa, photos of
excavation at Potbelly Hill in Turkey and book.
See the written 0504 at
bottom of drawer. Those are the same numbers in the sport list at Max' apartment.
Learn that the excavation photos show a complex
that was built 11000 years ago.
The book states that prehistoric people at
Potbelly Hill built a gigantic complex 6000 years before the Egyptians. They
disappeared 9000 yrs ago.
Open the secret compartment:
Remember that the painting shows a volcano in a stormy sea.
Let's make a sea. Turn on the light of the
aquarium.
Let's make lava from a volcano. Turn on the lava lamp on
top of the refrigerator. (Note - do not turn on the desk lamp).
Let's make stormy sea and hot lava. Place the
stucco tool in the refrigerator. Use the ice-cold tool on the
thermostat. Now it blows air and heat.
Secret compartment: The
picture separates at the center. Nina checks the contents of the secret
compartment.
Max is working on the inscriptions found on the
dig at Potbelly Hill. Nina recognizes the face carved on the
monoliths. It is the face on the medallion of the robed men she met in
Tunguska that kidnapped her father.
Cell phone: Look
close at cell phone in inventory.
The cell phone needs a PIN to activate it. Use
the number from the drawer and the sports list.
Enter 0504; press OK. (Thanks, Tom)
A voice message is heard from Emre Dardogan.
Some people want to silence them because of what they
found at the dig site. Emre warns Max to be careful.
Potbelly Hill, Urfa, Turkey
Someone uses a satellite to track Nina from Berlin,
Germany to Istanbul, Turkey and then Urfa.
Contact Emre:
Parking lot: Nina feels
an earthquake when she arrives in Urfa. Look around. See and check the Jeep
beside Nina's rental car. Check the signpost.
Take the chain from the posts.
Trailers: Go forward to
the trailers.
Check the trash can left of the left trailer to
get a bike wheel spoke.
The door of the left trailer has Mehmet Terim's
name. Check the window.
Check the right trailer and see it has Emre
Dardogan's name. Check the window and door.
Check the gap at bottom of door. Use the bike
wheel spoke on gap of door to get shreds of paper.
Look at shreds of paper in inventory. Put
together the pieces of papers to form a letter.
Left click to pick paper.
Move the paper to arrow at top of screen and
then left click the arrow to turn the paper clockwise.
Left click to place the paper down.
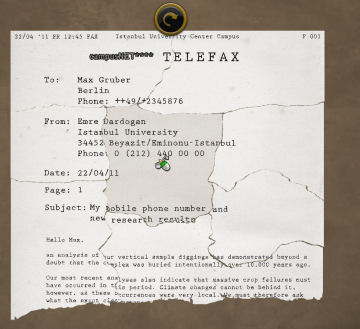
It is a telefax from Emre to Max with his cell
phone number and search results. The complex was buried on purpose 10000
years ago. The crop failure at that time occurred only around the
complex.
Contact Emre: Use the cell
phone on the fax to call Emre.
Learn that Emre is cut off the surface because of
the earthquake. He has the only key to the elevator that is at excavation
site C. There is a map at his jeep.
There's a drill around that can make a hole to enable him to give the elevator key to Nina.
He made a video of the room he is in; so that Nina
can recognize some characteristics of the area he is in. He also smells oil. Emre sends the MMS
to Nina's cell phone and then his battery loses power.
Automatically, Nina gets the excavation site
map from Emre's jeep.

Find Emre:
Points of interest where Emre is located:
Use the cell phone to watch Emre's MMS. The video shows tree roots, rock
door, face on door and rock wall.
See that bat sounds, smell of oil,
rubble heap, engine sounds, wall relief and tree
roots icons are in inventory.
Look for Emre's site: With the
characteristics seen on the video check all the sites in the map.
Go to the excavation site and see a close up of the
map.
Click on a lettered site and you can jump there.
P is for the parking lot and A, B, C, D and E are
the excavation site.
Excavation site C: Jump
to excavation site C by clicking on the lot. Look around.
Find the different characteristics of Emre's
video.
Use the tree roots icon on tree. Check the rock, rock
slab and puddle of water. Check the elevator.
Leave lot.
Excavation site A: Jump
to excavation site A by clicking on the lot. Look around.
Find the different characteristics of Emre's
video.
Check the bush, rock slab, column, pump and
puddle of oil.
Use engine sounds icon on pump and smell of oil
icon on
puddle of oil.
Leave lot.
Excavation site B: Jump
to excavation site B by clicking on the lot. Look around.
Find the different characteristics of Emre's
video.
Check the big rock, rock slab, pump, sign, red
earth and column.
Use engine sounds icon on pump.
Take some red earth from right wall.
Leave lot.
Excavation site D: Jump
to excavation site D by clicking on the lot. Look around.
Find the different characteristics of Emre's
video.
Check the rock drill, rock slab, pump, sign, bush
and column.
Use engine sounds icon on pump.
Click on rock drill to get an icon in
inventory so that Nina can get it when needed.
Leave lot.
Excavation site E: Jump
to excavation site E by clicking on the lot. Look around.
Find the different characteristics of Emre's
video.
Use engine sounds icon on pump and smell of oil
icon on
puddle of oil. Click the tree roots icon on tree.
Nina agrees that this is the only logical place
where Emre might be located.
Use the rock drill icon on the rock slab on the
ground.
Emre: Nina talks to Emre.
Use the chain from the parking lot on the drill
hole of the rock slab.
Get the elevator key.
Join Emre:
Elevator: Leave lot. Jump
to excavation site C by clicking on the lot.
Use the key given by Emre on elevator at right.
Take the mining helmet right of elevator
and the wooden crate left of elevator.
Wooden crate: Check
the wooden crate in inventory and see that it is locked.
Press the red button left of elevator to open
the elevator.
Place the wooden box in elevator.
Press the red button of elevator again to
crush the wooden crate.
Press the red button again to open the
elevator.
Check the smashed wooden crate to get
wrench, hammer and empty plastic bottle.
Ruined bridge: Continue
to the tunnel at left. See the ruined bridge. Look around.
See a crevice at ceiling of the cave. It goes up
to the surface.
Check the high pressure cleaner with attached hose
and pressure gun. Check the reliefs on wall.
Mark the site: Use the hammer
with red clod of earth to get fine red sand.
Use the pipe wrench on pressure gun to get a
separated pressure gun.
Combine the pressure gun with the fine red sand to
load the pressure gun and get pressure gun with paint. (You can also
wet the sand with plastic bottle filled with water).
Use the pressure gun with paint with hose of the
high pressure cleaner.
Use pressure gun with crevice on ceiling.
Turn on-click the high pressure cleaner.
Go back to the elevator at right and then go up to
surface.
Look for site: Go to
different sites to see where the marking is located.
Jump to lot D. See the rock slab has color
marking.
In inventory combine the chain with the hammer to
get chain with hammer.
Use chain with hammer on color marking on rock
slab. The chain is lowered to the crevice.
Get to other side of ruined bridge:
Go back down the elevator at lot C.
Go left to tunnel. See the chain hanging from the
crevice.
Now click on chain to swing to the other side and
meet Emre.
Reason for Max' kidnapping:
Max found radioactive material here but was not believed. Max is looking for
further evidence to prove his theory.
Nina sees the familiar face on the gate.
Open the gate with the face:
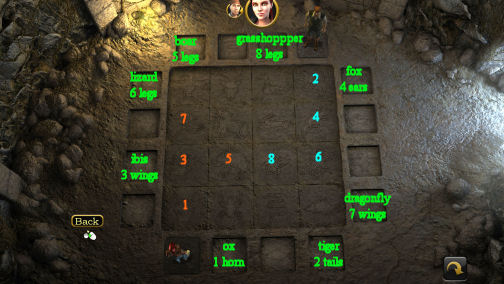
Emre stands on a blank slab at top corner. He explains about the slabs with
etchings.
The space at center is surrounded by slabs of
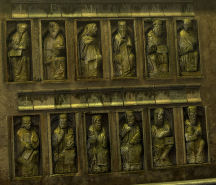
etched animals. Some of the animals are erroneously drawn.
Stand on blank slab at bottom left. The floor
opens up and see slabs with etched animals.
Study and take note of the anomalous etched
animals on the slabs that surrounds the active slabs at center.
Note the numbers of those anomalies.
See Nina and Emre's icon at top of screen.
Interchange each character to step on the
slabs of creatures in the order of anomalies.
The gate opens.
Cistern (as Emre): Emre
wants to use the Geiger counter to measure the radioactivity down the
cistern.
Use the knife to cut roots in front of him.
In inventory combine the roots with the Geiger
counter.
Use Geiger counter with roots on the
cistern. Emre gets what he needs.
Escape:
At the surface, they hear the baddies arrive. The
two run to the car to make their escape.
Driving away from the excavation site in Emre's
jeep; Emre tells Nina that Max has a box of notes about his study of ancient
civilization at the back of the jeep.
Watch as the baddie shoots Emre. He slumps to the
wheel. Nina takes the wheel and bumps the baddies' car off the road. The
jeep also flies off the road.
Exit the jeep: Nina is
stuck in the jeep in the dark. Turn on the light switch at bottom right.
See Nina upside down inside the overturned jeep.
Look around. Emre is not here.
Open the sunshade by Nina's hand. Take the comb
and parking disc.
Use the comb on the locked glove compartment in
front of Nina.
Take the folding ruler. Use the folding
ruler on the lunch box outside the vehicle.
Check the lunch box in inventory to get
sandwich, fork and knife. Use the knife on safety belt.
Roughbook - Max' notes: Nina
is out of the jeep. Take Max' metal box. Check the metal box in
inventory to get Emre's notes, roughbook and empty metal box.
Read Emre's notes and check the roughbook. Max has
been studying cultures that have disappeared.
See the close up of monitor of the notebook.
Check the e-mails. See e-mails sent by Cicero63.
Cicero wants to meet with Max to discuss Nebra skydisk. Read Cassandra's
statement. Cicero63 is Michael Anderson, a restorer from San Francisco's
Palace of Fine Arts. They are to meet 2 days from now - August 12.
Florence, Italy
Nina is on the plane to San Francisco. She reads Max'
notes. She learns of the burning of the library in Alexandria. Max found a diary
about the recovery of one of the amphora by an Arab merchant. The brother of the
merchant - An-Nasir went to Florence, Italy to sell the amphora. The brother
still has not returned.
Nina falls asleep and dreams.
In her dream, she is in 1477 Florence. She watches
but cannot be seen. An-Nasir talks to the male servant of the wealthy
merchant about the amphora. The boy says that the master wants to check the
amphora first before deciding to buy it. Since the Arabian merchant trusted the
master, he gives the amphora to the servant.
Guards arrive; the servant runs away. The guards
arrest the Arabian stating that he stole the amphora. They want to know where
the amphora is. Nina follows the guards to a building.
Free the Arabian merchant from prison:
Prison: Look around the
area. See barrels across the prison window and clothes line across the prison
and an herb shop.
Look for items to use:
Marketplace: Go back to
bottom screen to the marketplace. Look around.
See a sack on top of the wooden platform and a
statue with a sword on the second floor of the building.
Check the sack: Move the
cart at right under the platform by removing the wooden wedge holding
the front left wheel.
Click on the wooden platform and Nina climbs on
the cart up to the platform.
Open the sack to get salt.
Get the sword: Try to get
to the metal balcony at left and Nina says it's too far to jump.
Check the hoist on the third level of the
building. It is also too high.
Click on the cart to get Nina to go down
Turn the wooden wheel on the first level of the
building. It is covered by ice.
Use salt with wooden wheel. Turn the wheel now.
The hoist is lowered.
Click on the wooden platform again to climb up.
Cross over to the balcony. Take the sword
from the statue. Climb back down.
Check the cat by the frozen fountain at bottom
left. The cat looks starving.
Cargo: Use the sword on
the cargo covered with a net to get net.
Enter the prison:
Go back to the prison at left screen.
Window: Check the window
of the prison. Nina can't get the shutters opened.
Check the barrels at right and see they are tied
by thick rope.
Use the sword on the rope holding the barrels. That opened the window. A guard checks the window.
Nina enters the prison. Listen to the
interrogation of the Arab merchant.
Learn that cloaked freaks will pay them well for
getting the amphora. The commandant plans to kill the merchant after being
paid. Commandant leaves to talk to the ones that want
the amphora.
Nina wants to free the merchant to follow him to
the one that bought the amphora.
Free the merchant:
Look around the prison hallway.
Take the torture devices from the shelf right of
the cell door: iron mask, poker and mouth spreader.
Take care of the guards:
Check the guards. They will notice if Nina opens the cell door.
Exit the prison. Use the sword on the curtain that
covered the broken window.
The guards begin to get cold. They start a
fire. See the chimney emit smoke.
Check the small herb shop across the
way. It is made of reinforced iron.
Use the mouth spreader on the small shop. Nina
takes: yellow henbane, lavender and chamomile blossoms.
Check each herb in inventory and learn that henbane is poison. Hmmm...
Check the hooks left of the prison door. Use the
net on the hooks.
Climb the net by clicking on the roof.
While balancing on the roof; check the clothes
line. The knots are frozen. Use salt on clothes line.
Nina unknots the clothes line. Go down by clicking
on the net.
Cut clothes line with the sword to get clothes
line.
Combine the clothes line with the poker to get
poker with clothes line.
Climb the net again by clicking on the roof.
Use the poker with clothes line with the chimney.
Click on chimney to get closer. Click the henbane
on the chimney.
Click on roof to go to the edge of roof. Take the
poker with clothes line again to get poker and clothes line.
Go back down by clicking on net.
Enter the prison and check on the guards. Ha! They
are asleep. The guards do not have the key to the cell door.
Take ashes from ash pan right of the
guards.
Open the cell door: Check
and try to use the cell door. Learn that the door is on hinges.
Check the recess on the floor in front of the cell
door. Use the wooden wedge on that recess.
Use the poker on cell door. Nina lifts the cell
door to remove it from the hinges.
Follow An-Nasir #1:
Wake up An-Nasir: Enter
the cell and check An-Nasir.
Take the wooden bucket right of the cell
door.
Exit the prison. Use the wooden bucket on any pile
of snow outside the prison to get wooden bucket with snow.
Go back to An-Nasir. Use the now melted wooden
bucket with water on An-Nasir.
An-Nasir wakes up and sees the door open. He runs
out.
Automatically, Nina follows him and loses him in
an alley with 3 exits.
Nina says she wants to turn back time and it did.
Nina is back at time just before waking An-Nasir.
Follow An-Nasir #2:
Get bait: Maybe we can get
someone faster to follow An-Nasir.
Go back to the narrow alleyway left of prison.
Look around.
Check the shop sign, sign on wall and bench.
The wall sign states - No street musician after
nightfall. Take the potato and cabbage from the trash on the bench. Seems
this fishmonger throws trash from the window.
Where can we find music? Use the cell phone on the
wall sign. Nina turns on her ringtones. This wakes the fishmonger and he
throws fish offal out of the window.
Catch the cat: Go to the
cat by the frozen fountain at the marketplace.
Combine the fish offal with the iron mask. Nina
left some fish guts in inventory.
Use the iron mask with fish with the cat to
get captured cat.
Prime An-Nasir: Go back
to An-Nasir in prison. Use the fish guts on An-Nasir. Wake him up with the
bucket of water.
Go to the narrow alleyway left of prison. Release
the captured cat on one exit in the alley and see that the cat runs toward
the center exit.
Follow cat and see that both cat an An-Nasir is
nowhere to be seen. Again there are 3 exits to check.
Nina turns time again.
Follow An-Nasir #3:
Go back to the alleyway where An-Nasir
disappeared. Look around.
Take the ladder leaning by middle archway.
Slow down An-Nasir: Check the
hollow on the ground of the alleyway path. It runs the width of the
alleyway.
Use the bucket of water on the hollow on the
alleyway. Later it will be an ice puddle.
Go back to prison.
Use bucket with a snow pile outside the prison to
get bucket with snow.
Wake up An-Nasir again and then follow him to the
alleyway.
He took the right exit. Follow him and see that
again he is gone and there are 3 closed gates.
Follow An-Nasir #4:
Mark the gates: Go back
to the 3 gates where An-Nasir disappeared to.
Use ashes from prison on one of the 3 gates. Nina
does all the 3 handles of the 3 gates.
Go back and wake up An-Nasir. Follow him again.
Check the gates. See that there are fingerprints
on the leftmost gate handle.
Go through the gate and see that again there are 3
paths that An-Nasir might have taken.
Follow An-Nasir #5:
Mark the path: Go back to
the 3 paths. Look around.
See that the roof of the eave-porch of the center
exit is covered with snow.
Prop the ladder left of the center arched path by
clicking the ladder on the eave-porch with snow.
Clear the snow off the roof. See that snow covers
the intersection of the 3 paths.
Go back and wake up An-Nasir. Follow him again.
At the snow-covered intersection, check for footprints. An-Nasir went right.
Rich lord's household: Go
right to follow An-Nasir.
Eavesdrop on the conversation between the An-Nasir
and servant. An-Nasir got his gold.
Leonardo da Vinci's workshop:
Eavesdrop on the conversation between the servant and
his master.
The servant is very inquisitive but has loose tongue.
The scroll has Archimedes' solution to a mathematical problem.
Because of Leonardo's memory problem, the clue where
the scroll is hidden is stored here at the workshop. The scroll is hidden in a
safe place so that it can be found centuries from now. So being a genius,
Leonardo took care and placed the clue in his latest construction - the
cylinder,
Nina realizes that this is Leonardo da Vinci's workshop.
Make light:
Look around. Take the jack right of Nina.
Check the amphora at foreground. Read the
documents left of the amphora. It is correspondence between da Vinci and his
old teacher, Verrocchio. Take the tool-lighter left of the documents. Examine
the tool in inventory and see that it is flint and can produce sparks.
Check and take the book left of the door. It is a
book about the de Medici family.
Check the Master diploma above the door. It is
Verrocchio's.
Take the walking stick right of the door.
Check the Madonna Benois hanging on the shelf
right of door. Check the wrapped paintings below the Madonna.
Take the red paint pot from the
table at right.
Vehicle: Check the
vehicle at center of room.
Check the oil lamp at front right end of the
vehicle. Use the lighter on oil lamp. It's a headlamp. It is still dark.
Use the jack on the vehicle to raise it. It lights
up the back wall and the scale.
Find the cylinder:
Scales: Check the scales
on the wall.
Check the left arm of the scale. There's a
cylinder up there. The left arm is raised.
Examine and try to move the right arm of the
scale. It is locked in place.
Take a chisel left of the scale.
Use the chisel on the right arm of the scales. The
left arm lowers when the right arm is released.
Take the cylinder from the box on the left
arm.
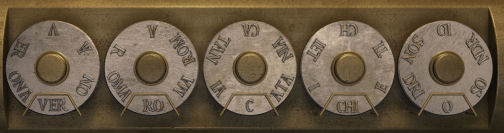
Look close at mechanical cylinder in
inventory.
See that there are 5 wheels. Press the central
buttons to place a syllable at bottom.
Form the code that will open the cylinder: VER-RO-C-CHI-O,
Leonardo's old teacher.
Automatically have the diary page in
inventory.
Someone is at the door. Leonardo talks to Signore
Lorenzo de Medici downstairs. De Medici picked up the commissioned Madonna
Benois. Leonardo gives the painting and goes with him to his villa.
Decode the diary page:
Read the diary page and see that it is in code.
There must be a decoder here somewhere.
Bring out the symbols on the cane:
Examine the cane taken from vase right of door. It has curious carving with
symbols similar to that of the diary.
Use the diary with the cane and Nina says it is
difficult to read the carving in reverse and also symbols on a cane.
Combine the red paint pot with the walking
cane to get walking stick with paint.
Use walking stick with paint on the
blank canvas at corner of room.
Decode: Use the diary
page with the canvas with decoder.
Nina decodes the symbols - Greek safely
concealed in the painting of The Magnificent.
Use the book-Chronicle of the de Medici family
with the deciphered diary page. Lorenzo de Medici is called The Magnificent.
He just picked up the Madonna Benois painting that must have the scroll.
Nina faces robed men while her dream falls down around
her.
San Francisco
Nina wakes up from her dream. She will land in San
Francisco soon.
The satellite is still tracking Nina.
Nina arrives at the Palace of Fine Arts and finds it
closed. Nina talks to the officer in the police car and learn that there has
been a fire. Michael Anderson has been missing since the fire. Leonardo da
Vinci's painting is safely stored in a fire-proof archive in the basement.
Nina checks the banner-poster on the lamppost. It
shows da Vinci's Madonna Benois.
Get in the museum:
Kiosk: Talk to the
shopman.
Later ask for drink and learn that he does not
have alcoholic beverage. Get iced tea instead.
Pick up the piece of glass left of the
kiosk.
Pick up the empty bottle from the curve and
the magazine right of the bench. Check the cover of the magazine and
see that cover is of a bottle of whiskey.
Create a diversion to take care of the officer:
Talk to the officer about buying alcohol now that you talked to
the shopman. Learn that alcoholic beverages can only be bought at liquor
store.
In inventory combine the empty bottle with the
iced tea to get bottle with iced tea.
Use the piece of glass with the magazine to get
label.
Wet the label on the puddle of water below the
poster.
Combine damp label with bottle with iced
tea to get whiskey bottle with iced tea.
Place whiskey bottle with iced tea with the right
display of the kiosk.
Talk to the officer about violation of the
ban in alcohol.
The officer goes to kiosk and the kiosk is closed.
Open the patrol car's trunk and get bolt cutter
and can with diesel.
Check the museum:
Go to the museum. See the padlocked metal door of
the emergency generator.
See a burned window at top right of the building.
Enter the museum. Look around and see niches that
once held paintings.
Burned office: Go
upstairs. Check the office door.
Go out through the window at right.
Click on burned window to enter the office. See
the burned state of the office.
Pick up the frame of glasses on the floor beside
the burned desk.
Check the locked drawer. Use the frame of glasses
on locked drawer. Automatically, take the keycard inside.
Take the watering car at left.
Exit the office through window and back through
the other window. Go downstairs.
Enter the archive:
Archive office: Go
downstairs to the basement.
Check the fireproof door. It needs the keycard but
there is no power.
Check the fuse box on the wall. Click on the power
fuse at the bottom. No power.
Get power: Exit the
museum and go to the emergency generator outside.
Use the bolt cutter from the patrol car on the padlocked
metal door of the generator. It is opened.
Try to turn it on and see that there is no fuel.
Use the can with diesel on the generator. Nina
says it will pour all over the place.
Use the can with diesel with the watering can.
Use the watering can with diesel on generator.
Turn the generator on. Go back to the basement of
the museum.
Open the fuse box and click the power fuse. Note
that you cannot have both light and power on.
Get light in archive office:
Use the keycard on fireproof archive door.
Enter and see that it is dark.
Go back to the fuse box and click on light which
in turn turns off the power.
Go back inside the archive. Look around.
Take the lamp from the bookshelf.
Go to the right and use the lamp on the socket
right of the archive storage double doors.
Go back to the fuse box and click on the power
fuse.
Go back inside the archives office.
Madonna Benois:
Go to the right and see that the lamp shines near
the computer and X-ray machine.
Do a fast search where the painting is located:
Now that the power is on, check the computer.
Right click the computer and then do a search.
Click on Artist: select Leonardo da Vinci.
Click on Title: select Madonna Benois.
Click on Year: select 1477.
Click on Confirm button.
Nina automatically takes the Madonna Benois
painting.
Check the painting for its secret:
Use the painting on X-ray machine at right.
After Nina turns the machine on; the computer
screen shows data.
Nina is taken back to a scene in Alexandria.
Archimedes talks to the King. He informs the King about the circumference of the
circle - pi. Pi is the formula to eternity. It can be calculated to its last
decimal place but it will take time. One that knows that information will know the secret of the
world. This conversation is heard by a robed man hidden at left.
Cassandra: A voice talks
to Nina. Anderson disappeared with Max. The voice asks Nina if she knows
that she is being monitored. Nina is asked to come to the voice.
Click on the monitor and right click to note a QR
code.
Use the cell phone on the monitor to analyze the
code.
See a map of
Alcatraz and it shows that Cassandra is there. Cassandra is a mythology
figure that foretells disasters but is not believed.
Alcatraz
The satellite that has been tracking Nina states -
Connection lost.
Nina arrives in Alcatraz and enters the building. She
is greeted by Cassandra's voice but immediately Nina is locked in. The voice says that it
has been hacked and Cassandra will try to take care of it.
Check the place:
Look around. Check the locked door, the air
conditioning above the door, cable on wall and showcase.
The showcase has a clothes hanger. Take it.
Check the loudspeaker and cells.
Open cell: Enter the open
cell. Look around.
The placard is made of horse dung. Take the mug
from the carvings on the shelf.
Take bricks from floor and blanket
from bed.
Check the toilet and the placard by window.
Outside: Check and then
look out the window.
See the cable that connects from this building to
an outbuilding. See a courtyard below.
Check the outbuilding and see the Vitruvian man
drawn by da Vinci on the wall. Cassandra is there.
Get to the outbuilding:
Go back inside the cell.
Get the cable: Inside the
open cell, use the mug to get water from the toilet - mug with water.
Exit the cell and check the cable that leads to
the air conditioning on the wall. It is live.
Use the mug of water on the air conditioning above
the exit door. That short circuits the AC.
Use the bolt cutter on the now dead cable.
Open the window: Go back inside
the open cell.
In inventory combine the blanket and the bricks to
get blanket with bricks.
Use the cable with blanket of bricks to get sack
of brick.
Look out the window to see the view of the
buildings.
Use the sack of bricks on the bars of the window.
Nina starts over automatically to empty the sack and then put sack outside.
Then she fills it with bricks.
Click the sack and it will be on the cursor. Click
the sack of bricks cursor on the courtyard floor.
Nina pushes the window and the bars are off.
Go to the outbuilding:
Exit through window.
Use the clothes hanger on cable. Nina will slide
down to the other building.
Cassandra: Nina enters
the outbuilding and talks to Cassandra who is behind a locked metal door.
Learn that Cassandra is a member of
cyber-explorers aka hackers. They control million of computers.
A combat robot named Murphy comes out and
threatens Nina. Murphy is under enemy
control. Cassandra says that it is trying to get the system back under its
control.
Fight Murphy:
Murphy blocks the way to Cassandra's door.
Enter the metal door behind Nina.
Get your own combat robot:
Look at and take the combat robot on the floor. One of its arms can
hold a weapon.
Check the scrap heap at right. Get drill,
buzz saw, flame thrower and taser. Wow - nice selection
of weapons.
Fit your robot with the weapon of your choice;
then exit to do battle. You cannot change or add weapon outside.
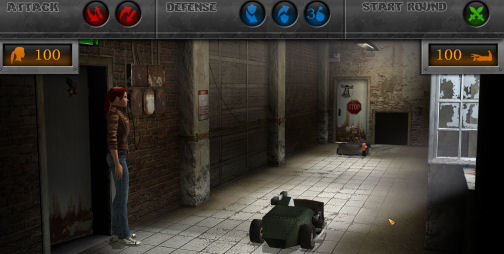
Battle:
Click your weapon fitted (your choice) combat
robot on Murphy to start the battle puzzle.
Select bottom or top attack at
left and bottom or top defense at middle of top panel. Also you can use one of 3 limpet mines.
Each fighter has 100 points to start with. The aim
is to bring the enemy to zero before you do.
If you lose, you can always repair your combat
robot, change weapon and start another battle.
Note what weapon Murphy is holding. He has a
flame thrower.
Select your attack, defense and if you want to
use a mine. Click on Start Round. Good luck.
You can save after each battle. SAVE GAME here
- so you can replay before the cutscene.
When you win, Cassandra comes out and talks to Nina.
They enter Cassandra's workroom with a bank of computers and monitors.
Anderson is her uncle. Anderson came to her about pi that he found in the
scroll. She is a math wiz. She used her computers to calculate pi. The numbers
after the decimal points are pure chaos but near the quadrillionth decimal place
which no one has calculated, it started to make sense. It now shows 1 and zeros.
It is a blueprint for a machine. Max must have found another anomaly and that is
why he was taken by the enemy.
The enemy is here. The helicopter landed and they are
locked in.
Decision: You have a
choice of either giving Cassandra time to open the door or leave Cassandra
to save yourself.
If you selected to leave Cassandra, both Nina and
Cassandra are taken by the guards.
If you selected to give Cassandra time to open the
door; only Nina is taken by the guards.
This decision affects the "what happened to the
characters" clips at the ending.
Cadiz, Spain
Nina is brought to an aircraft carrier.
Nina starts to wake up in a chamber. She hears that
they are in Cadiz, Spain. The soldiers are picking up cargo here and then go to
the headquarters to deliver replacement parts. Nina is given another dose to put her back to
sleep.
Find a way out:
Nina wakes up in the dark. Pick up the green light
and see that it is a spray paint for marking. The only other thing in
inventory is the keycard.
Check the ventilation cover. It cannot be removed.
Combine the keycard with the spray paint to get
keycard with color.
Use keycard with color on ventilation cover. Nina
inserts it outside and it reflects faint light into the room.
Take the broken cell phone at bottom center
of screen. Take the plastic up close to the right.
Check and take the
threaded bar that holds the door.
Use the threaded bar on the ventilation cover.
Exit the container.
Look around for clues as to where the headquarters is
situated:
Cargo check: Max might be
at headquarters and Nina has to find where HQ is. The soldiers mentioned
that they are delivering parts to HQ.
Take the clipboard and scanner at a
wall panel at left. Read the clipboard in inventory.
Learn that the cargos are colored coded for
discharge at certain ports: orange is for Cadiz, magenta is for Le Havre,
white is for Rotterdam and cyan stays on board.
Check the color markings of the cargos on board.
The bottom cargos are 3 magentas for Le Havre and one white for Rotterdam at
the bottom. The 2 on top are cyan colored.
The white coded cargo at bottom right is blocked.
Move the blockage of the white cargo:
Exit through the door at top right and be in a balcony outside the aircraft
carrier. See that this is the USS Ronald Reagan. Oh.
Climb the ladder at left. Take the large working
gloves, measuring instrument and screwdriver at left.
Use the plastic cup on grease on airplane to get
mug with grease. See that the grease is yellow.
Exit to the stern at right and be at the balcony.
Check the lamp on the wall. Use the screwdriver to
take the lamp, lamp holder and red glass.
Enter through door.
In inventory combine the mug with yellow grease
with the red glass from the lamp to get an orange and sticky greased glass.
Use the orange greased glass on the magenta colored mark of the
rightmost cargo that is blocking the white one at right. Now it
marked to be unloaded here in Cadiz.
A worker arrives and calls someone to pick up the
orange marked cargo. It is removed.
Check the white cargo for Rotterdam:
Check the door of the now unblocked white marked cargo. It is sealed with a
thin cable.
Use the threaded bar on the container door to open
it.
Check the parts inside the container.
Select the difficulty level of the puzzle.
The object of the puzzle is to place the parts
at right to form the symbol.
On easy level, note that there are shadows to
mark certain parts in the frame. There are no shadows in difficult
level.
Left click to take or drop the part.
Place the part over the turn arrow at top
center and then click the arrow to rotate. Good luck.
CERN in Switzerland
See a test run of an accelerator. The test failed.
Jane Cunningham says that it needs deterrium to work.
Nina is here and talks to Van Rijn, the head of the
facility. Nina bluffs that she has insurance; an encrypted message left with
a friend to be released to the police and press if Nina doesn't report.
At the site hospital, Max is taken out of the cooling
chamber.
Chief of Research Jane Cunningham arrives and talks to
Nina. Jane knows all about Nina's dreaming of the guardians. She asks Nina to
contact the guardians and get deterrium that is not found here on earth. It
might mean endless source of energy. Nina doesn't think these people should be
the one to have the monopoly of that power source.
Max wakes up groggy. Talk
to Max.
Look at the other 2 cooling chambers. If option 1
is selected at Alcatraz, see that one is empty and the other has Michael
Anderson. If option 2 is selected at Alcatraz, see that the right chamber
should be where Cassandra is; the other chamber has Anderson.
Look around. Check the desk and the computer
screen.
Go right in the room behind the curtains and take Max' clothes from bottom wall
cupboard.
The guard brings Max and Nina to the control panel
room.
An alarm is heard. Cunningham says the guardians have
taken the antimatter. The antimatter is a by-product of their experiments. A
massive explosion will occur if antimatter comes in contact with matter.
Nina exclaims that the guardians want to destroy the
world. They have to find out where the Guardians are hiding. To do that, Nina has
to find them in her dream.
Nina's dream
Nina is put to sleep and she has to find the
guardians.
Go forward until the door at end of hallway. You can
turn back to wake up. Go through door and be in a destroyed world. You might
win the Daredevil award here if you walk into the light without turning around.
Back at CERN, Nina is clinically dead. Anderson and
Max watch over Nina. She has 3 minutes to contact the guardians before she is
revived. Nina always wakes up when fire occurs so she needs to
power down to get through.
Find the guardians:
Nina sees the end of the world - a destroyed
city. Look around.
Sign of the guardian: Look at
the wall at left and see the familiar face - symbol.
Take the teddy bear - plush toy on the
ground.
Look around for another sign of the guardian.
Go to the building across the way. Check the
poster left of the shop window.
Check the shop window. Take stone from
the heap of stones right of the shop window.
Use the stone on the shop window. Do these 3
times to break the window.
Take the camera with telephoto lens.
Use the camera with telephoto lens on the center ruins in the background.
Nina sees the guardian sign-symbol on the ruined
building. She wants to go there.
The near building collapses and the roads are
blocked by debris and fire.
Check the balcony of the collapsed building. Get
an iron bar.
Go to the ruined building with guardian sign:
Get to subway: Check the
subway entrance and see that it is blocked.
Check the air duct grating under the car.
Open the car door. Look inside the car and release
the handbrake.
Nina automatically pushes the car off the grating.
Use the iron bar on the air duct grating. Enter
the air duct.
Go to the street:
2 minutes to go.
Nina gets farther in at the subway but it is now blocked
by a destroyed subway car.
Look around. See gasoline seeping on the wall of
the subway from above.
See a precariously held bus above the subway car.
Use the plush toy - teddy bear with the gasoline
on wall
to get Teddy saturated with gasoline.
Go back through hole on wall and be out where you
started from.
Combine Teddy saturated with gasoline with iron
bar.
Use Teddy saturated with gasoline on fire on the
road to get burning Teddy.
Go back down the air duct and be at end of subway.
Use the burning Teddy on gasoline on wall. The bus
falls down over the subway car.
Click on the ruins above to automatically enter
the bus be up.
Get to the guardian:
Nina sees a guardian at roof of a burning
building. They are separated by a crack and fire on the roof. Look around.
Check the cable roller beside Nina to get steel
cable.
Check the elevator and hand wheel at right
(exposed by hole on wall).
Check the steel cable holding the billboard. Nina
is not strong enough to bring it down.
Use the steel cable with the billboard's steel
cable.
Pick up the steel cable from floor. Tie the steel
cable on elevator wheel.
Use the hand wheel to pull the billboard and it forms a
platform over the fire.
Get the defibrillator ready!
Nina asks the guardian where to find them here. The guardian writes something on the ground.
Nina asks him why they are destroying the world. He
talks about the Fermi paradox. The universe is infinite and the Milky Way should
be populated in millions of years but as of right now; there has been no contact
with another.
When asked about pi connection; the guardian was about
to explain about the machine when Nina was woken up.
Back in CERN.
As Max:
Nina asks for something to write on. Go to desk left of door and get pen and paper.
Give Nina the pen and paper. Nina writes down the
coordinates.
Use the computer terminal.
Use the note with coordinates on the search
engine bingle's input field. :) Click search icon.
Find out that the coordinates point to the island of Santorini.
Santorini, Greece
They sailed to the island of Santorini.
Find the gate to the guardian's home:
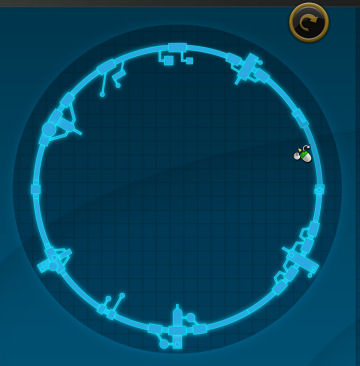
Select your puzzle difficulty. In easy mode, you
can click on a location and the submarine can travel there directly. In hard
mode, you have to traverse the path and can get blocked or go with the ocean
current to get where you need to be. You cannot go against the current.
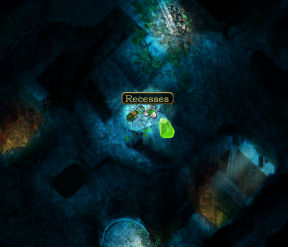
The aim of the puzzle is to find 4 locations that
hide crystals and then place the crystals on the recess close to the gate
of the complex.
The three are now in a submarine.
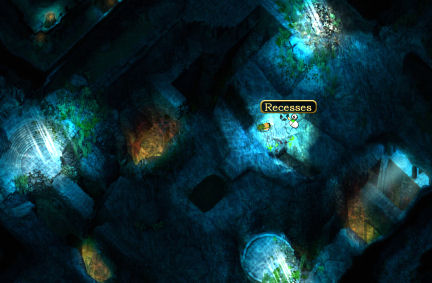
From the start, go diagonal right and see an
amphitheatre and recesses at right. The recesses are where you place the
collected crystals.
The rectangular black area left of the recess
is the entrance to the temple.
Take note of the locations of the recesses -
they point to the location where the crystals are hidden.
From recesses, go straight up until a heap of
stone right of a very bright area. Click to get a crystal.
From recesses, go diagonal right to another
heap of stone. Click to get a crystal.
From the recesses, go diagonal left to another
heap of stones. Click to get a crystal.
From the recesses, go down to the lava field
and another heap of stones. Click to get a crystal.
In hard mode, this area is the
hardest to reach.
Study the flow of the current and see which
one you can use to coast to the heap of stone.
Start close to recesses or gate and then go
southeast (as shown below). Then follow the flow as shown by the
lines.
Click hold move the submarine to guide it
through the path you want it to go.

Open the gate: Go back to recesses and place the crystals in
the recesses.
The gate opens at left.
Max is absorbed by the archeological items at the
gate. There is a picture that showed the guardians being tortured.
Nina is absorbed by the functionality of the items and
sees escape pods.
Jane wants to open the door immediately. Priorities,
priorities...
Open the temple gate - as Jane Cunningham:
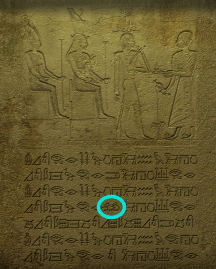
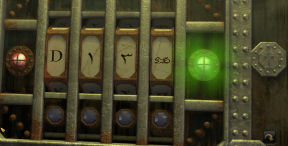
Terminal: Check the
terminal panel left of the gate. See that it has 4 icons: letter, 2 glyphs
and an animal. The guardian's medallion face is at right.
Hieroglyphs: Check the
panel right of the gate. Cunningham says there might be something particular
about one of the glyphs.
Note that the lion at center is only shown once.
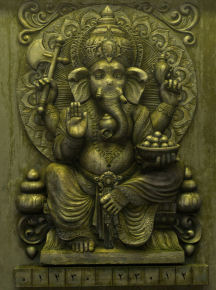
Indian Ornaments: Go to
the terminal beside Nina.
See the God Ganeesha and symbols at the bottom. 2
of the symbols are missing.
Take note that the symbols are repeated after the 4th
symbol. So the 2 missing symbols can be deduced.
Stone figures: Check the
middle ages occidental relief.
See 12 statues with alphabet above it. The 12th
one has no alphabet.
Take note that the letters correspond to the first
letter of the months of year - J F M A M J J A S O N. So D for December is missing.
Terminal: Go back to the
leftmost panel.
Look close at panel. Enter the anomalies seen on
the other 3 panels by pressing the button below each column.
Left is D for December.
The second and third columns should have the 2
missing glyphs under the depiction of Ganeesha.
The rightmost is the lion which is shown only once
at the center of the hieroglyphs.
Press the guardian-alien face button at right. The gate
opens.
Deterrium:
Enter through door.
See that the deterrium powering the whole place is
within a force field.
Nina wants to find the antimatter. Jane Cunningham
injects Max with a poison.
The whole thing - antimatter, attack... was a lie.
Max has only 20-30 minutes left before the poison takes over.
Nina is given a walkie talkie.
Find the place to deactivate the force field:
Compass door: Go left and
see a big compass face with several hands. Each hand has an icon.
Look at the mural above the compass face. It is a depiction of events that happened in the past, present and maybe the
future.
From left to right, see: Archimedes, Cleopatra,
Menis-Ra master thief, Leonardo da Vinci, Max, Nina, Jane Cunningham and 4
Horsemen of the Apocalypse.
Take note of the position of the hands.
Arrange the symbol on the compass hands to
correspond to the position of the matching character's hands or where
they are pointing to.
Archimedes (S - compass), Cleopatra (E - eye of
Horus), Menis-Ra (SW -dagger), daVinci (W - paintbrush), Max (SE - man), Nina (N
- woman), Jane Cunningham (gun - NW)
and the 4 Horsemen (NE - skull).

The door opens.
Guardian: Enter and see a
guardian suspended inside a capsule.
Nina talks to the guardian. He wants Nina's help.
Learn that their brotherhood's mission is to protect humanity. They were
given deterrium but have a directive. They are to prevent mankind from going
over their technological limit. The guardians have been persecuted during
the Middle Ages and nearly became extinct.
Whenever any civilization progresses to having
computers and discovers the secret of pi; they inevitably build the machine.
The machine if built will destroy everything. It
is a means to limit the expansion of the worlds and not be a threat to
others.
Decision: As a sign of
trust, Nina is given access to the station power supply. SAVE GAME HERE.
The control panel left of the guardian shows a
choice:
This decision affects the "what happened to the
characters" clips at the ending.
If the option -
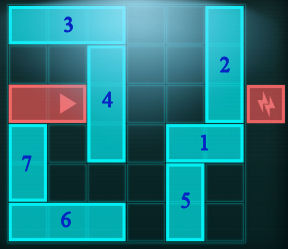
Deactivate the force field and save Max is
selected: If this option is selected, see a slider
puzzle.
The aim of the puzzle is to move the bars out
of the way of the red bar so that it can reach and make contact with the
power at right.
|
Move the numbered bars:
1 - left once
2 - down once
3 - right 3 times
4 - up once.
1 - left once
5 - up once
6 - right 3 times
7 - down once
1 - left 2 times
4 - down 3 times
red bar - right 3 times
4 - up once
6 - left once
2 - down 2 times
red bar - right to power. |
|
 |
Once the force field is down, Jane Cunningham
takes the deterrium and leaves Max and Nina behind.
If the option - Leave the force field on and
save the world is selected:
Get a call from Jane and Nina tells her off.
Go to the doorway and Jane comes in. Jane
punches Nina unconscious.
Jane deactivates the force field herself and
takes the deterrium.
Continuation of both options:
Exit and see that Jane Cunningham left the bag
behind by the door. Take the bag.
Check the bag in inventory to get antidote
and another walkie talkie. If the option in Alcatraz was to
leave Cassandra, Jane's CERN keycard is in inventory.
Use the antidote on Max.
Nina asks about the escape pod that she saw by
the gate.
CERN in Switzerland
Jane Cunningham and the assistant in a wheelchair do
the experiment with the deterrium. It's working. The network is hacked and
security is disabled. It does not affect the test. Anyone can now access the
facility.
Max and Nina enter the control room. Nina talks to
Jane to stop this experiment. Jane is overpowered and tied to a chair. Nina
tells the assistant that the guardians told her about the machine destroying the
world.
The assistant says that there is a way to stop the
test and that is to deactivate the magnetic field. This might cause reversal of
time or a black hole. The assistant needs someone to switch off the firewall
power supply. Once the firewall is down, the assistant can reprogram the machine
to stop the experiment.
Max says that he will take care of the firewall. The
assistant gives him his access card to get to the transformer station via
the elevator. He also warns Max to be careful not to be caught by the guards.
The assistant needs to go to the server room-data
center soon. Nina gives Max one of the walkie talkies.
Look around for usable items:
As Nina: Look
around. See the fusion chamber
Open the drawer beside Nina to get remote
control flying saucer - model UFO; a hobby of the assistant.
Take the partially burnt cigar of Van Rijn's.
See that Cunningham wrecked the console, the key
is broken off. There is a red telephone on the console.
Check the wastebasket left of the assistant to get
poster strip and pencil.
Deactivate laser grid:
Clean room: The assistant
says the security system has been activated.
There are invisible laser beams that if triggered will
hermetically seal the room and release deadly gas.
The laser beams can be deactivated at the console
on the wall but the assistant does not have the keycard to use it.
Make the laser beams visible:
Look around.
Check the console on the wall and sensor at the
ceiling.
Check the 2 lab coats to get key with lighter
key ring, lipstick and pocket mirror.
In inventory light the cigar with the lighter.
Place the smoking cigar on the empty table
at left wall. See the laser grid.
Get the keycard:
Check the table on wall in the hallway. It has a
keycard. It might the one that is needed to deactivate the lasers.
Check the pocket mirror in inventory and see that
it is double sided.
Combine the pocket mirror with poster strips.
Use the mirror with poster strip on laser grid.
Nina separates the mirror and places one on the wall and another that points to the
laser beam. See a small opening in the grid.
Attach some poster strips on the model UFO.
Use the model UFO with poster strips on the table
with the keycard in the hallway.
Nina asks the assistant to fly the UFO model to
get the keycard. Betty, the UFO model gets the keycard.
Get to transformer station above ground:
As Max: The elevator
stops. Van Rijn thinks it's Nina that is in the elevator. Max talks to Van
Rijn.
Check the slab on the ceiling. It is held by
screws.
Take the keycard from the elevator panel.
Use the keycard on the slab to unscrew the panel.
Exit to the ceiling.
Max is now above the elevator. Take the metal
pin on the floor at right side.
Climb the ladder and the elevator is soon
traveling down.
Use the metal pin on the guide wheels at left to
jam it.
As Nina (continued):
Hospital Ward: Use the
keycard to enter the hospital ward at right.
Go to the right behind the curtain. Use the key
with lighter on the locked top wall cupboard to get dressing material,
disinfectant, laser pointer and defibrillator.
Laser grid: Exit the hospital.
Use the keycard on the console right of the
hallway. The laser grid is now off.
Go to data center.
Take care of the guards:
See 2 guards by the data center door.
Look around and see pipes and sprinkler system
above the heavily armed guards.
Nina talks to the assistant. Hahahahaha.
Use the laser pointer on the sprinkler system
above the left guard. The sprinkler sprinkles. ;) The right guard leaves to
check the sprinkler system.
The remaining guard stays by the door and the water - puddle
is pooling under him.
Use the defibrillator on the puddle. Ouch.
Data Center: Enter the
data center. The guard is now trying to get in with the torch.
Look around. Check the overhead pipes and Nina
says it contains liquid nitrogen to cool the servers.
Check the fire cabinet and see that it is locked.
Use the defibrillator on the fire cabinet.
Take the axe. Use the axe on the overhead
pipe. The pipe releases the gas just in time for the incoming guard to be
hit.
Nina takes the dropped gun.
As Max (continued):
Use the ladder to go above ground.
Check the transformer building and the door. It is
locked and the keycard does not work.
Use the walkie talkie by clicking it on Max. Max
calls Nina and asks if the transformer building can be opened from the control center.
Nina says yes if Max can give the identifier of
the door.
Look close at the lock of the door. See that the
panel is held by screws.
Use the keycard on the screws. Click on the
identifier number at bottom - XJ-3486.
Click the walkie talkie on Max again to give the
identifier to Nina.
The
2 choices offered at Alcatraz lead to 2 different
choices at force field event (so 4 different endings). The differences are seen in the
"what happened to the characters" clip at the ending.
Playing the different choices will also get the 4 different
achievements when the game is finished: Partner, Party animal, Good Samaritan
and Hero. Playing all variables-choices will garner the Perfectionist
achievement.
End
This document may not be
distributed without express written permission of the author and the content may
not be altered in any way.
For
Questions or Comments on this Walkthrough,
Please write to:
MaGtRo
Copyright © 09/2012
MaGtRo
 GameBoomers
Walkthroughs and Solutions
GameBoomers
Walkthroughs and Solutions