The first use of the PPA
Sinking Island walkthrough
©
January 2008
This
walkthrough may not be sold and may not be used for any commercial purposes.
Neither is it permitted to publish this walkthrough in any way without the
written permission of the author
Day 1: Friday, June 9th
Click on the Start button. Click on the Create a profile button. Enter a name and click on OK. Click on New game. Click on Adventure because if you choose Race against time... it really is. I suggest you play the game as Adventure first and play it as a Race against time after that!
Fair
warning:
Although you play the game as Adventure it still is time based somehow. From
time too time you receive phone calls from your wife. You also get sometimes the
message that you are hungry. When you get a phone call from your wife, you'll
end up in your own suite to answer the call. After such phone call is over you
have to go back to the game where you left it. When you are hungry the game
takes you to the lounge to have dinner. After that you have to go back to the
game where you left it also. And not only that! There are some things you cannot
do before you get such messages!! If you are playing the game to quickly these
messages will only occur near the end of a day. This means that there are some
things you cannot do or might be different as mentioned in my walkthrough.
Therefore I strongly recommend that you do things exactly as mentioned in my
walkthrough. While moving around you can run by clicking your left mouse button
twice. You also can skip or end conversations by clicking your right mouse
button during conversations. In my walkthrough I always run from one screen to
another. So it's fine with me if you do the same. But beware... don't ever skip
or end any conversation to avoid these "too late" phone calls or
hungry messages!!! By the way... don't blame me for this. I probably hate it as
much as you to listen to interminable stories!
You'll end up with Hubert De Nolent near the dead body of Walter Jones. Examine the body. Take a photo of the face of poor Walter. Close the window. Talk to Hubert de Nolent. Click on the "Walter Jones' Affairs" file three times to exhaust all dialogs. Then ask him if Walter Jones's death was accidental.
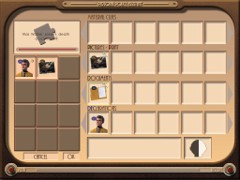
When the conversation is over click on the big brown map at the right top of your screen to open your Personal Police Assistant (PPA). Listen carefully to the explanation of this PPA. When finished click on the Progression button. Place your cursor on the left top yellow puzzle piece to answer the question if Walter Jones's death was accidental. Click on the Return button. Click on the Clues database button. Click on the Hubert De Nolent declarations to open all the declarations he has made. If you want, you can move your cursor over the text. Notice that the shape of the cursor changes into a little speaker. By left clicking you can here a declaration having been spoken.
Now place the cursor on the top (third) picture of Hubert's face. Notice that the shape of the cursor changes into a hand. Left click and drag this third declaration "Nolent explains that no natural causes could be responsible for W. Jones' death." to the left side and drop it onto the DEC square. In this walkthrough I will not only mention the number of the declaration to use but also the declaration itself. Because the numbers of the declaration is depending on the order in which you question the persons during the game. So the numbers of the declarations may be different in your game. Be sure to use the correct declaration each and every time! Close the declaration window. Now click on the "Picture of Walter Jones's face" and drag it to the left side and drop it onto the PIC square. Click on OK.
The first use of the PPA
After this Jack calls his boss Reeves to inform him about the latest news. He will do this every time after a major progress. Talk to Hubert once more. Ask him what the cause of W. Jones was. Climb up the ladder that is hanging down from the cliff. On top of the cliff Hubert gives you a list of all persons on the island and an access key card for your hotel suite.
Take a photo of the skidmarks of Walter Jones' wheelchair and of the chaotic footprints. Pick up the pearls that are laying on the ground at the right side. Close the window. Click on the PPA. If you click on the Clues database you can examine the photos you just have taken. You also can examine the pearls you just picked up. Remember that you should do this each and every time you collect something. I will only mention this if this really is crucial! Read the Walter Jones affair file. Also read the list of people on the island Hubert just gave to you. Click on the Return button and enter the Characters database. Here you can read some very useful information about the people on the island. And more important you can also see in what hotel suites people are staying! When finished exit the PPA.
Notice the red wheelchair parked on the lower cliff. Go there. Examine the wheelchair. Pick up the golden chain fragment from the ground. Examine the armrest of the wheelchair to find out that a piece is missing. Examine the fingerprints on the grip of the wheelchair.

The fingerprints on the wheelchair
Take a photo of the bloodstain at the rock. Close the window. Climb up the cliff. Walk one screen up to end up in the next screen with the wheelchair tracks. Go down one screen to follow these tracks. Don't follow these wheelchair tracks any further yet. In stead of that go to the left near the palm trees.
Go to the left over there
Walk all the way to the left. Pick up the piece of clothe from the rock. Go one screen to the right. Follow the tracks of the wheelchair one screen to the left. Go another screen to the left. Now you'll end up at the arbor of the boulevard. Before you go any further examine the ground beneath the arbor.
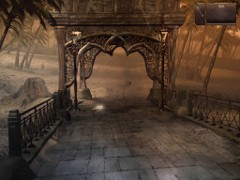
Examine this part of the arbor
Take a photo of the footprints. Close the window. Walk down the boulevard. As soon as you enter the next screen you see a girl walking away. You'll end up on top of the stairs leading down to the beach and you listen to the conversation between Lorenzo Battaglieri and Sonia Jones. Talk to Lorenzo. After you have taken a photo of his shoes talk to him once more. Exhaust all dialogs.
Talk to Sonia. After the photo of her hands talk to her once more to take a photo of her shoes. After that talk to her once more and exhaust all dialogs. Then talk to Lorenzo once more to ask him about Sonia. Then talk to Sonia once more to ask her about Lorenzo. Go up the stairs. Walk one screen up. Again this girl takes off. Go one screen to the right.
Walk towards the girl at the right side of the boulevard. Once again she takes off. Go one screen to the right. Walk up the beach. Go four screens to the right to end up in front of the hut of Kolio Jumhu and his daughter Baïna, the girl who took off all the time. Talk to Baïna. After the photo of her hands talk to her once more. She won't let you take a photo of her feet. Talk to Kolio. After the photo talk to him once more and exhaust all dialogs.
Open your PPA.
Click on the Clues database.
Click on the bottom right compare button.
Click on the "Photo of Walter Jones's face" on the left side.
Click on the "Picture of Baïna's hands" on the right side.
Click on Compare.
Exit the PPA. Examine the ground in front of the stairs leading up to the hut. Take a photo of Baïna's footprints. Close the window. Open your PPA.
Click on the Clues database.
Click on the Compare button.
Click on the photo of the "Bare footprints which seem to follow the wheelchair tracks" at the left side.
Click on the "Photo of Baïna's footprints taken from near her place of residence" at the right side.
Click on Compare.
Exit the PPA. Talk to Baïna once more. Exhaust all dialogs. Take a photo of the strange pyramid. Enter the hut. Examine the brown boxes at the right side. Open the left box which belongs to Kolio. Take the letter which accompanies a gift from Walter Jones to Kolio. Read the letter in your PPA. Exit the PPA. Open Baïna's box. Take the pearl necklace and the huge diamond. Close the window. Open your PPA.
Click on the Clues database.
Click on the Compare button.
Click on the "Beads found on the Tortoise Belvedere" at the left side.
Click on "A necklace in very bad shape found in Baïna's trunk" at the right side.
Click on Compare.
Exit the PPA. Walk to the right part of the hut. Hmmm... nothing of interest. Go down one screen and exit the hut. Talk to Baïna once more. Exhaust all dialogs... that is... Talk to Kolio and exhaust all dialogs. Now it's time to head back to Lorenzo and Sonia at the beach. So go down one screen and four screens to the left. Step onto the boulevard and go to the left. Go down the left side of the boulevard. Walk up the left side of the boulevard. Go down to the beach at the left side of the boulevard. Talk to Lorenzo and exhaust all dialogs. Do the same with Sonia.
Go up the stairs. Go up one screen. Go to the right and enter the hotel. Go to the right. Walk to the back wall towards the counter. Examine the counter. Take the menu and the tourist pamphlet from the counter. Read the pamphlet in your PPA. Close the window. Walk towards the two red lights. Read the sign in front of the elevator. Close the window. Walk to the right two screens. Go up the stairs.
Go up the stairs to the left. Read the sign in front of the elevator. Close the window. Go down one screen. Talk to the man standing at the right side of the kitchen. This is Martin Abruzzi, Sonia's husband. After the photo of her shoes talk to him once more and exhaust all dialogs. Walk towards the man who is wiping the floor. Open the top drawer of the kitchen cabinet next to the washing machine to take a sharp kitchen knife.
Talk to the man Billy Jones. After the photo of his shoes talk to him once more and exhaust all dialogs. Talk to the girl who is sitting at the table, Clara Jones. After the photo of her shoes talk to her once more and exhaust all dialogs. Go down one screen. Go to the right. Walk towards the bar. Don't go up to the bar yet but remember you can find it here.
Go one screen to the right. Go one screen up. Go down three screens. Go two screens to the right. Talk to the woman Christina Bromski. After the photo of her shoes talk to her once more and exhaust all dialogs. Do the same with the man Marco Jones. Go two screens to the left. Go up one screen. Enter the elevator at the right side. Go to the 18th floor. Go to the right into the Heliport Lounges. Go to the left and walk towards the elevator. Enter the elevator and go to the 22nd floor.
Enter Lorenzo Battaglieri's office. Look at the bookcase at the left side of the door. Take the biathlon gold medal from the upper shelve. Close the window. Look at the bookcase at the right side of the door. Take Lorenzo's ripped jacket. Open your PPA.
Click on the Clues database.
Click on the Compare button.
Click on the "Scrap of grey fabric" at the left side.
Click on the "Jacket in grey-colored fabric" at the right side.
Click on Compare.
Exit the PPA. Close the window. Go down the little stairs. Go one screen down. Examine the desk. Take the pencil from the desk. Take the notebook at the right side of the screens. Look at one of the screens. Open the top drawer beneath the desk. Take the file on the Sagorah tower. Read it in your PPA. Exit the PPA. Close the upper drawer. Open the bottom drawer. Take the file on the tower employees' dismissal. Read it in your PPA. Exit the PPA. Close the drawer. Put the pencil into the pencil sharpener. Turn the little handle of the sharpener. Open the bottom compartment of the sharpener. Take the box of graphite powder. Close the window. Head back to the elevator. Enter the elevator and go to the 21st floor.
Enter the library. Walk towards Hubert behind his desk. Talk to him. After taking a photo of his shoes, talk to Hubert once more to exhaust all dialogs. Halfway your interrogation you tell yourself it's time to eat. So the game takes you down to the dining room. If this doesn't happen in your game just read what I've mentioned about this in my fair warning at the top of my walkthrough. After you have had dinner go down one screen. Talk to Hubert who is sitting at a table with Lorenzo. Exhaust all dialogs. Talk to Lorenzo. Exhaust all dialogs. While talking to Lorenzo you'll receive a phone call from your wife. You go to your suite to answer her call. After the phone call exit your suite to the left. Go to the elevator. Enter the elevator and go to the 17th floor. You enter the Mechanical Workshop. Talk to Lorenzo and exhaust all dialogs. Talk to Sonia and exhaust all dialogs.
Walk two screens to the right. Take the welding gloves from the little ladder. Pick up the blowtorch from the floor next to the drilling machine. Pick up the screwdriver from the working bench. Take the welding goggles from the little cupboard. Examine the paper shredder. It seems out of order. Close the window. Go two screens to the left. Enter the elevator. Go to the 18th floor. Go to the right through the glass door. Go to the left. Walk towards the elevator. Enter the elevator and go to the 21st floor. Enter the library. Wait until Hubert finishes his phone call. Open your PPA.
Click on the Clues database.
Click on the compare button.
Click on the photo with the "Tracks found under the arbor" at the left side.
Click on the "Picture with Hubert de Nolent's shoe soles" at the right side.
Click on Compare.
Exit the PPA. Talk to Hubert once more. Ask him about the picture of his shoeprints under the arbor. Exit the library to the right. Enter the elevator and go to the 18th floor. Go down one screen. Go the left through the glass doors. Enter the elevator and go to floor L1.
Go to the right. Go down three screens. Exit the hotel. Go to the left. Go down the path to the left. Go up the path to thee left side. Keep on walking until you reach the area with the wheelchair. Go down the cliff towards the wheelchair. Examine the wheelchair. Use the graphite powder on the grip of the wheelchair. Take a photo of the fingerprints. Close the window.

Take a photo of these fingerprints
Now head back all the way to the hut of Kolio and Baïna. Talk to Baïna to take her fingerprints. After that talk to her once more and exhaust all dialogs. Open your PPA.
Click on the Clues database.
Click on Compare.
Click on the photo with "A fingerprint on Walter Jones's wheelchair" at the left side.
Click on the photo with "Baïna's fingerprints" at the right side.
Click on Compare.
Exit the PPA. Talk to Baïna once more to ask her about her fingerprint on the wheelchair. Talk to Kolio and exhaust all dialogs. Head back into the hotel. Go the left. Walk towards the elevator. Enter the elevator and go to the 14th floor. Knock on the door of suite 141. Talk to Marco and exhaust all dialogs. Talk to Christina and exhaust all dialogs. Go down one screen. Take the invitation cards from the desk. Read them in PPA. Exit the PPA. Go down one screen. Ask Marco and Christina about the invitation cards. Exit the suite to the right. Knock on the door of Martin's and Sonia's suite number 142. Hmmm... no one there.
Enter the elevator. Go to the 15th floor. Knock on the door of Billy's and Clara's suite 152. Talk to Clara and exhaust all dialogs. Exit the suite to the left. Enter the elevator. Go to the 18th floor. Go to the right through the glass door. Go up the first stairs. Go to the right. Exit to the helicopter platform.
Go outside there
Talk to Martin who is standing on the platform. Exhaust all dialogs. Re-enter the Heliport Lounges. Go down one screen. Go up the stairs. Enter the elevator and go to the 21st floor. Enter the library. Talk to Hubert. Head back to the elevator. Enter the elevator and go to the 18th floor. Go down one screen. Go to the left through the glass doors. Enter the elevator and go to floor L2. Notice that someone is playing the piano in the bar on top of the stairs. Go there. Talk to Billy behind the piano and exhaust all dialogs.
Open your PPA.
Click on Progression.
Click on the puzzle piece "Who was at the Belvedere of the Tortoise on the night of Walter Jones's death?"
Click on Return.
Click on the Clues database.
Click on the Hubert de Nolent declarations.
Click and drag his 4th declaration "Nolent clearly saw Lorenzo running from the belvedere last night" to the left side.
Click and drag his 9th declaration "Nolent saw Baïna and Lorenzo outside last night" to the left.
Close the declaration window.
Click on Lorenzo Battaglieri's declarations.
Click and drag his 6th declaration "Lorenzo affirms that he saw everything and that W. Jones tried to attack Baïna" to the left.
Click and drag his 7th declaration "Lorenzo did see Nolent on the night of W. Jones death" to the left.
Close the declaration window.
Click and drag the "Beads from Baïna's necklace" from the material clues to the left.
Click and drag the "Picture of Nolent's shoeprints under the arbor" to the left.
Click and drag the "Picture of Baïna's fingerprint on wheelchair" to the left.
Click and drag the "Picture of Baïna's footprints under the arbor" to the left.
Click and drag the "Scrap from one of Lorenzo's jackets" from the material clues to the left.
Click on OK.
Head back to the 21st floor. So go two screens down. Enter the elevator to the right. Go to the 18th floor. Go right through the glass doors. Go one screen to the left. Walk towards the elevator. Enter the elevator and go to the 21st floor. Go to the right to enter the library. Talk to Hubert to ask what happened between Walter Jones and Baïna on the Belvedere of the Tortoise. Also ask him about the relationship between W. Jones and Baïna. Open your PPA.
Click on Progression.
Click on the puzzle piece "What happened between Walter Jones and Baïna on the Belvedere of the Tortoise?"
Click on Return.
Click on the Clues database.
Click on Lorenzo Battaglieri's declarations.
Click and drag his 6th declaration "Lorenzo affirms that he saw everything and that W. Jones tried to attack Baïna" to the left.
Close the declaration window.
Click on Hubert de Nolent's declarations.
Click and drag his 10th declaration "Nolent saw Baïna push Walter Jones off of the cliff" to the left.
Close the declaration window.
Click and drag the "Beads from Baïna's necklace" from the material clues to the left.
Click and drag the "Picture of Walter Jones's face" to the left.
Click and drag the "Picture of skidmarks from Walter Jones's wheelchair" to the left.
Click and drag the "Picture of chaotic footprints" to the left.
Click on OK.
End of day 1.
Day 2: Saturday, June 10th
Go down one screen. Open the doors at the back wall. Exit your suite to the right. Enter the elevator and go to the 18th floor. Go to the right to enter the Heliport Lounges. Go to the bottom left. Walk towards the elevator. Enter the elevator and go to the 21st floor. Enter the library. Walk to Hubert to pick up the fax. When Hubert has left, open your PPA. Click on the Clues database. Read the fax of the autopsy report. Page through the report. Click on Return. Also read the rogatory commission.
Click on Return twice.
Click on Progression.
Click on the puzzle piece "What was the cause of W. Jones's death?"
Click on Return.
Click on the Clues database.
Click and drag the "Fax of autopsy report" to the left.
Click on OK.
Examine Hubert's desk. Open the upper drawer of the desk. Take the renunciation. Close the upper drawer. Open the middle drawer. From the middle drawer take the letter from W. Jones to Nolent. Close the middle drawer. Open the bottom drawer. From the bottom drawer take the conciliation. Read these three new documents in your PPA. Exit the PPA. Close the window. Look through the window behind your back. Look at the windowsill. Take a photo of the woodchips. Take the woodchips from the windowsill. Close the window.
Go one screen down. Talk to Hubert. Exhaust all dialogs. Walk one screen to the left. Examine the fourth shelf from bottom of the bookcase at the left side of the doors. Notice that you can move up and down and from the left to the right. Don't touch anything yet but remember that you can find these books here! Close the window and open the doors to enter Walter Jones' office.
Notice the huge painting of good old Walter on the wall at the left side of the door. Take a photo of that painting. Open your PPA. Click on the Clues database. Look at the picture of Walter Jones' painted portrait. Notice his necklace with the key around his neck. Exit the PPA. Go down one screen. Examine the weapon cabinet against the left wall.
Open the left drawer at the bottom of the cabinet. Rummage through the boxes of ammunition until you find the correct box of 7.03 mm caliber Winchester cartridges. Close the drawer. Open the right drawer. Take the rag. Open your PPA and use the small pad of paper on the bottle in the drawer to get a flax oil stain. Take the bottle of flax oil. Close the drawer. Open the doors of the riffle cabinet. Examine the riffles.
Use the rag on the upper 270 Winchester riffle. Also use the rag on the upper 22 long riffle. Use the rag on the bottom 270 Winchester riffle. Use your graphite powder on the upper 270 Winchester riffle near the trigger. Take a photo of the fingerprint. You also take a photo of the scratch on the riffle. Take the upper 270 Winchester riffle. Open your PPA.
Click on the Clues database. Click on Compare.
Click on the "Shards of wood found on the library windowsill" at the left side.
Click on the "Linear bolt-action carbine riffle with a 270 WSM chamber" at the right side.
Click on Compare.
Exit the PPA. Close the window. Examine the desk. Take the safari photo from the desk. Open the upper right drawer. Open the middle drawer. Hmmm... nothing of interest! Open the bottom drawer. It seems empty too... Wrong!!! Use your kitchen knife to open a secret compartment. Take the W. Jones' file on the heirs. Read it in your PPA. Page through the file. Exit the PPA. Try to open the left drawers. Close the window. Examine the left front side of the desk.
Examine this part of the desk
Remove the four screws with your screwdriver. Try to open the upper drawer. Remove the other four screws with your screwdriver. Open the middle drawer. Take Marco Jones' electoral campaign press book. Read it in your PPA. Click on Return twice. Click on Progression. Click on the puzzle piece "What was the crime weapon?" Click on Return. Click on the Clues database. Click and drag the "Rag stained with burned powder" to the left. Click and drag the "Telescopic bolt action riffle" to the left. Click and drag the "Fax autopsy report" to the left. Click op OK.
Open your PPA.
Click on Progression.
Click on the puzzle piece "Where was the shot fired from?"
Click on Return.
Click on the Clues database.
Click and drag the "Fax autopsy report to the left.
Click and drag the "Picture of library windowsill with woodchips" to the left.
Click and drag the "Picture of scratch on the murder weapon" to the left.
Click and drag the "Woodchips" from the material clues to the left.
Click on OK.
Examine the left front part of the desk once more. Open the bottom drawer. Hmmm... nothing of interest! Close the window. Exit Walter's office. Walk to the right and talk to Hubert. When you have taken a photo of his fingerprints question him again. Exhaust all dialogs. Open your PPA.
Click on the Clues database.
Click on the Compare button.
Click on the riffle at the left side.
Click on Hubert de Nolent's fingerprints at the right side.
Click on Compare.
Exit the PPA. Talk to Hubert once more to confront him with his fingerprints on the murder weapon. Exhaust all dialogs. Exit the library through the doors to the right. Enter the elevator. Go to the 22nd floor. Enter Lorenzo Battaglieri's suite. After Lorenzo gave you the key card talk to him. Exhaust all dialogs. Go back to the elevator Enter the elevator and go to the 18th floor. Go one screen to the right. Go one screen to the left through the glass doors. Enter the elevator and go to the 15th floor.
Knock on the door of suite 152. Use the high-level access card to unlock the door. Enter the suite. Go down one screen. Enter the doors to the bedroom. Walk towards the bed. Examine the suitcases. Darn... locked! Exit the suite. Use the high-level access card on Hubert's suite 151. Enter the suite. Go down one screen. Open the doors to the bedroom. Examine the safe at the left wall.
It's good you learned the combination of this safe earlier, isn't it? Nope... it isn't!! You never learned the combination for this safe!!! It's good you found that blowtorch earlier!!! So... just use the blowtorch on the safe to open it. Use the graphite powder on the key inside the safe. Take a photo of the key. Take the key. Close the window. Open your PPA.
Click on the Clues database.
Click on the Compare button.
Click on the key at the left side.
Click on Hubert de Nolent's fingerprints at the right side.
Click on Compare.
Exit the PPA. Leave the suite. Enter the elevator. Go to the 14th floor. Use your high-level access card on the door of suite 142. Enter the suite. Go down one screen. Enter the bedroom. Enter the door to the right to enter the bathroom. Open the right drawer beneath the sink to get a hairpin. Exit the bathroom. Walk towards the bed. Examine the suitcases at the right side of the bed. Open the left suitcase with your hairpin. Take the turtle box and the wedding rings from the suitcase. Examine the wedding rings in your PPA. Exit the PPA. Close the window. Open the upper drawer of the right nightstand to take Walter Jones' wedding speech and the wedding invitation. Reed the speech in your PPA and look at the wedding invitations. Exit the PPA. Exit the suite.
Unlock the doors of suite 141 with the high-level access card. Enter the suite. Go down one screen. Enter the bedroom. Examine the trashcan at the left side of the door. Take the one-way airline ticket "Atlanta - Moscow", the return airline ticket "Moscow - Salé", the Goum's gloves receipt of purchase and the Goum pharmacy receipt of purchase. Examine these in your PPA. Exit the PPA. Close the window. Walk towards the bed. Examine the suitcase at the left side of the bed. Open the suitcase. Take the opened box of Russian condoms. Close the window. Talk to Christina. After you have taken her fingerprints, question her and exhaust all dialogs. Do the same with Clara. Exit the suite.
Enter the elevator and go to the 17th floor. Talk to Sonia. After having taken her fingerprints, question her once more. Exhaust all dialogs. Enter the elevator. Go to floor L2. Go down one screen. Go to the left one screen. Talk to Baïna. Talk to Kolio. After having taken his fingerprints, question him once more. Exhaust all dialogs. Go one screen to the left. Talk to Marco. After having taken his fingerprints, question him once more. Exhaust all dialogs. Go two screens to the left. Go two screens up.
Go one screen to the left, one screen up, one screen to the left and two screens down to enter the kitchen. Walk towards Billy Jones. Talk to him. After having taken his fingerprints, question him again. Exhaust all dialogs. During the interrogation it is time for soup. So the game takes you to the dining room once more. After having finished supper go one screen to the right. Talk to Billy who is standing at the table with Martin and Sonia. Exhaust all dialogs. Go one screen to the left. Go one screen to the right. Talk to Martin. After having taken his fingerprints talk to him again and exhaust all dialogs. Go down one screen.
Walk towards Hubert de Nolent who is sitting at the table. Talk to him and exhaust all dialogs. At this moment you receive another phone call from your wife. So off you go to your own suite to answer the phone call. When the phone call is over, open your PPA.
Click on Progression.
Click on the puzzle piece "Was the chain that W. Jones wore around his neck stolen? If so, by whom?"
Click on Return.
Click on the Clues database.
Click and drag the "Fragment of W. Jones' chain" from the material clues to the left.
Click and drag the "Picture of W. Jones painted portrait" to the left.
Click and drag the "Fax of autopsy report" to the left.
Click and drag the "Picture of Nolent's print on W. Jones' key" to the left.
Click on Billy Jones declarations.
Click and drag his 4th declaration "Billy confirms the information about the chain" to the left.
Close the declaration window.
Click on Lorenzo Battaglieri declarations.
Click and drag his 12th declaration "W. Jones wore his chain, as always" to the left.
Close the declaration window.
Click on Sonia Jones declarations.
Click and drag her 10th declaration "Sonia confirms that W. Jones was wearing his chain" to the left.
Close the declaration window.
Click on Hubert De Nolent's declarations.
Click and drag his 16th declaration "Nolent pretends that he took the key only to help W. Jones" to the left.
Click on OK.
Exit the suite to the left. Enter the elevator and go to the 18th floor. Go right through the glass doors. Go one screen to the left. Walk towards the elevator. Enter the elevator. Go to the 20th floor. It is possible that Kolio is outside Walter Jones' suite. If that is the case you will enter the suite with Kolio. If Kolio isn't there, open the door to the right with W. Jones' key. Enter the suite. Examine the safe at the right wall. Did you bring your blowtorch along!?!? Just kidding... open the safe with W. Jones' key. Surprise... nothing at all!?!? Close the window. You can go up to the right to enter Walter's bathroom. Believe me... nothing of interest there. You also can go up to the left to admire a painting of Anna Jones. You can't do anything with it right now but remember that you can find it here! Go down one screen. Take the agreement for social domiciliation and the Maladivian nationality agreement from the table at the right side of the room. Exit the suite.
Enter the elevator and go to the 18th floor. Go to the right through the glass doors. Go up the stairs. Go to the right and go outside to the helicopter platform. Talk to Marco. Re-enter the building. Go one screen down. Go down the stairs. Walk to the right through the glass doors. Enter the elevator. Go down to floor L2. Go up one screen, one screen to the left, one screen up, one screen to the left and two screens down into the kitchen. Walk towards Clara who is wiping the floor now. Talk to her. Open your PPA.
Click on Progression.
Click on the puzzle piece "What did W. Jones's safe contain? Is Nolent responsible for the theft?"
Click on Return.
Click on the Clues database.
Click on Sonia Jones declarations.
Click and drag her 7th declaration "Sonia explains the circumstances under which she stole the items from the safe" to the left.
Close the declaration window.
Click on Billy Jones declarations.
Click and drag his 6th declaration "Billy confirms what Sonia says regarding the safe and Nolent" to the left.
Close the declaration window.
Click on Hubert de Nolent declarations.
Click and drag his 17th declaration "Nolent confirms that he opened Walter Jones's safe" to the left.
Close the declaration window.
Click and drag the "Wedding rings" from the material clues to the left.
Click and drag the "Turtle box" from the material clues to the left.
Click and drag the "Wedding invitations" to the left.
Click and drag "W. Jones' speech" to the left.
Click on OK.
Open your PPA.
Click on Progression.
Click on the puzzle piece "Who seems to be a good marksman?"
Click on Return.
Click on the Clues database.
Click on Hubert De Nolent's declarations.
Click and drag his 14th declaration "Nolent admits to having participated in the safari" to the left.
Close the declaration window.
Click and drag the "Biathlon gold medal" from the material clues to the left.
Click and drag "Marco Jones' electoral campaign press book" to the left.
Click on Sonia Jones declarations.
Click and drag her 8th declaration "Sonia admits to having participated in the safari" to the left.
Close the declaration window.
Click and drag the "Photo of family safari" to the left.
Click on Billy Jones declarations.
Click and drag his 5th declaration "Billy admits to having participated in the safari" to the left.
Close the declaration window.
Click on Marco Jones declarations.
Click and drag his 4th declaration "Marco admits to having been a good marksman, even he seems to have lost his touch nowadays" to the left.
Click and drag his 5th declaration "Marco admits to having participated in the safari" to the left.
Close the declaration window.
Click on Lorenzo Battaglieri declarations.
Click and drag his 10th declaration "Lorenzo admits to having been a good marksman, even he seems to have lost his touch nowadays" to the left.
Click on OK.
Here ends day 2. Just before going to sleep, Hubert tells you that he has some crucial information for you. He won't tell you right now but he promises you to do that first thing the next morning.
Day 3: Sunday, June 11th
Walk one screen to the right. Well... one thing is for sure... everybody is thrilled by the idea of escaping with the hot air balloon! Go down the stairs. Go down the other stairs. Go to the left through the glass doors. Try to call the elevator. Take the piece of a letter to Isabelle Jones from beneath the plant. Read the letter in your PPA. Go to the right. Go up the stairs. Go up the stairs to the right. Go one screen to the right. Go all the way to the right at the back wall.
When Marco and Martin have left, examine the left suitcase. After Christina gave you her permission examine the suitcase once more. Open the suitcase at the right side. Take the altar diagram and the Walter Jones - Marco relation file. Read the file in your PPA and page through it. Look at the altar diagram. Exit the PPA. Close the window. Talk to Christina and exhaust all dialogs. Walk one screen to the left. Talk to Sonia and Martin and exhaust all dialogs. Go two screens to the left. Go down one screen. Go to the left.
Go to the left at the back wall. Question Kolio and Baïna. Exhaust all dialogs. Go one screen to the right. Go one screen down. Go down the left stairs. Go down the little stairs. Go right through the glass doors. Go one screen down to enter the garden. Question Marco. Exhaust all dialogs. Go back inside. Enter the door next to the elevator. Go down to the 17th floor. Open the door. Walk all the way to the right. Talk to Billy and Clara and exhaust all dialogs. Head back to the door next to the elevator. Enter the door and go up to the 18th floor. Open the door.
Go to the right through the glass doors. Go to the left. Walk towards the elevator. Enter the elevator and go to the 21st floor. Enter the library. Walk behind Hubert's desk. Examine his dead body. Take a photo of Hubert's head. Take the letter he is holding in his left hand. Read it in your PPA. Exit the PPA. Take the piece of Walter's wheelchair from Hubert's pocket. Take a pen from the penholder on his desk. Use the pen on Hubert's right hand. Use the graphite powder on the gun. Take a photo of the gun. Take the gun.
Open your PPA.
Click on the Clues database.
Click on the Compare button.
Click on the "Letter written by Nolent" at the left side.
Click on the "Part of a ripped letter" at the right side.
Click on Compare.
Exit the PPA. Close the window. Go down one screen. Go to the left and enter Walter Jones's office. Go down one screen. Examine the desk once more. Use the remote control on the red blinking light on top of the left drawers. Open the drawer. Push the button in the opened drawer. You'll see how a secret compartment of another statue in the room opens. Go to the left. Look at the statue at the left side of the room. Take the piece of paper with the code from the statue. Read it in your PPA. Exit the PPA.
Exit the office. Walk to the right and exit the library. Enter the elevator and go to the 22nd floor. Enter Lorenzo's suite. Go down the stairs. Go forward and you handover the code to Lorenzo. Open your PPA.
Click on Progression.
Click on the puzzle piece "Who were the last people to go into the library before the murder?"
Click on Return.
Click on the Clues database.
Click and drag the "Print-out of consultation for the library lock from 9-11:59 PM" to the left.
Click on OK.
Talk to Lorenzo. After having taken his fingerprints talk to him once more. Exhaust all dialogs. After he gave you the print-out of Simbi Laktar's keycard movements talk to Lorenzo once more. Head back to the elevator.
Enter the elevator and go to the 18th floor. Go to the right. Go left through the glass doors. Open the door next to the elevator. Go down to the 17th floor. Open the door and walk two screens to the right. Examine the paper shredder once more to find out it still is out of order. Close the window. Head back to Lorenzo's suite on the 22nd floor. So... go two screens to the left. Open the door next to the elevator. Go up the stairs to the 18th floor. Open the door. Go one screen to the right through the glass doors and one screen to the left. Walk towards the elevator. Enter the elevator and go to the 22nd floor. Enter Lorenzo's suite.
Go down the stairs and go forward. Notice the papers beneath the steering wheel. Pick them up to get an allen wrench. Head back to the elevator. Enter the elevator and go to the 18th floor. Go to the right. Go left through the glass doors. Open the door next to the elevator. Walk down to the 14th floor. Open the door. Enter suite 142. Enter the suite. Go down and enter the bedroom. Walk towards the bed. Examine the right side of the bed. Notice the opened condom package on the floor. Use the graphite powder on the package. Take a photo of the package.
Open your PPA.
Click on the Clues database.
Click on the Compare button.
Click on the "Prints found on a condom wrapper" at the left side.
Click on "Martin's fingerprints" at the right side.
Click on Compare.
Exit the PPA. Close the window. Exit the suite. Enter the door next to the elevator. Walk up to the 17th floor. Open the door. Walk two screens to the right. Examine the paper shredder. Use the allen wrench on the top bolt. Use the allen wrench on the bottom bolt. Open the front of the paper shredder.
From the bottom of the paper shredder take the shredded gloves. Examine the white access card at the top of the opened shredder. Use the graphite powder on the access card. Take a photo of the access card. Open your PPA.
Click on the Clues database.
Click on the Compare button.
Click on the "Fingerprint on ex-employee Simbi Laktar's keycard" at the left side.
Click on "Marco's fingerprint" at the right side.
Click on Compare.
Click on the "Pieces of size 9 beige leather gloves" at the left side.
Click on "Some flax oil poured onto a piece of paper" at the left side.
Click on Compare.
Exit the PPA. Close the window. Head back to the elevator. Enter the door next to the elevator. Go up to the 18th floor. Open the door. Go one screen down into the garden. Talk to Marco and exhaust all dialogs. Go back inside.
Go to the right through the glass doors. Go up the stairs. Go up the stairs to the right. Go to the right. Go to the right at the back wall. Go to the right and talk to Martin and Sonia. Exhaust all dialogs. Walk to the right and talk to Christina. Exhaust all dialogs. Head back to the elevator at the left part of the Heliport Lounges. Enter the elevator and go to the 22nd floor. Enter Lorenzo's suite. Go down the stairs and go forward. Talk to Lorenzo and exhaust all dialogs. Open your PPA.
Click on Progression.
Click on the puzzle piece "What is Simbi Laktar still doing on the Island?"
Click on Return.
Click on the Clues database.
Click on Lorenzo Battaglieri declarations.
Click and drag his 13th declaration "Lorenzo says that Simbi Laktar is an ex-employee, who was fired15 days ago" to the left.
Close the declaration window.
Click and drag the card with "Movements of Simbi Laktar's keycard during the night of the murder" to the left.
Click and drag the "Picture of Laktar's keycard with Marco's prints" to the left.
Click on Lorenzo Battaglieri declarations.
Click and drag his 15the declaration "Lorenzo believes that he misplaced the keycard" to the left.
Click on OK.
Open your PPA.
Click on Progression.
Click on the puzzle piece "Was Hubert de Nolent's death really a suicide?"
Click on Return.
Click on the Clues database.
Click on Lorenzo Battaglieri declarations.
Click and drag his 14th declaration "Lorenzo claims that Nolent is not a suicide type" to the left.
Close the declaration window.
Click and drag the "Letter from Nolent to Isabelle Jones divided into two pieces" to the left.
Click and drag the "Picture of Nolent's face" to the left.
Click and drag the "Picture of pistol without prints" to the left.
Click on OK.
Head back to the elevator. Enter the elevator and go to the 20th floor. Open the door to the right. Now remember the painting of Anna Jones you saw earlier. So go the left part at the back of the room. Use the remote control on the panel beneath the painting. Go down by moving the cursor at your feet and left click. Walk towards the altar. Pickup the four statues at the base of the altar. Examine the altar.
Place the fertility statuette 1 on the back tile on the altar. Place statuette 2 on the left tile. Place statuette 3 on the front tile. Place statuette 4 on the right tile. If you have done this correct two doors beneath the altar will open. Take the marriage certificate from behind the opened doors. Read the marriage certificate in your PPA. Exit the PPA. Close the window. Go down one screen. Use the remote control on the blinking red light at the panel. Exit the suite.
Enter the elevator. Go to the 21st floor. Enter the library. Go one screen to the left. Examine the books on the fourth shelf from bottom of the left bookcase. As before, don't touch any of the books until you know what to do. With the correct books you have to spell Walter Jones' first name. Here we go:
Move your cursor to the right and
click on the second book from the right "Deep Ocean Tragedy" by W.
Sean Kimer.
Move your cursor to the left and click on the sixth book from the left
"Human destiny and violence" by Amartya D. Sunny.
Click on the fifth book from the left "Plan8: a planet in trouble" by Lester
J. Jackson
Click on the first book at the left "Drop" by T.C. Richter.
Click on the ninth book from the left "Le quotidien est une douleur" by
Eric Royon.
Click on the third book from the right "Les 40èmes rugissants" by R.
Daniel.
If you have done this correct, a secret panel opens. Examine this panel. Take the most right bottle of water from the fourth shelf from bottom at the right side. Now another secret panel at the right side of the bookcase opens. Take the files on Hubert de Nolent from that panel. Open your PPA to read the files.
Click on Return.
Click on Progression.
Click on the puzzle piece "Are there one or more irrefutable pieces of evidence of Marco's quilt?"
Click on Return.
Click on the Clues database.
Click and drag the "Return airline tickets 'Moscow - Salé'" form the material clues to the right.
Click on Christina Bromski declarations.
Click and drag her 4th declaration "Christina identifies the gloves as belonging to Marco" to the left.
Close the declaration window.
Click and drag the "One way airline ticket 'Atlanta - Moscow'" from the material clues to the left.
Click and drag the "Goum's gloves receipt of purchase" to the left.
Click and drag the "Bottle of flax oil" to the left.
Click and drag the "Pieces of Marco's stained gloves" to the left.
Click on OK.
Exit the PPA. For me it was time to eat once more. So... off I went into the dining room. After dinner go to the right. If it's no time to eat, just walk to the elevator. Enter the elevator and go to the 22nd floor. Talk to Lorenzo who is outside his office about the file on Hubert de Nolent. After this last question open the door to Lorenzo's suite and...gamesover!
~ The End ~