THE SACRED RINGS
AURA II
by
Streiko Graphics
The Adventure Company
walkthrough by
Witchen
September 2007
With special thanks to MaGtRo for her most welcome assistance.
Opening Notes:
1. Once successfully installed, The Sacred Rings may be played without a CD in the drive.
2. Use the Space Bar to skip cut scenes.
3. Use the Escape key to exit to the Main Menu
4. Save often! Be aware that there are only eight save game slots. Use them wisely.
5. Right click to control the appearance of the inventory bar.
6. Reading "The Prologue" below is essential if you want to get a good grip on the story line.
7. Questions regarding this walkthrough may be addressed to Witchen at
gjan1@aol.com
The Prologue:
The mystical Keepers Clan has known since the beginning of time that the tetrahendrons, together with the Sacred Rings, bring powerful and mystical forces together.
Evil Durad, leader of a rival clan, is defiantly opposed to the Keepers benevolent plan to use the power of the precious artifacts to maintain unlimited power and immortality in a peaceful world. Durad wants the rings and the tetrahedrons for himself. To this end, Durad calls upon Gugon, an evil sorcerer in his employ. Gugon is powerful in his own right and can control the souls of hapless men who fall under his influence.
In following Durad's orders, Gugon instigates a rebellion incorporating the Shadow Legion in the effort. The Shadow Legion is led by Bargul. Under the overall direction of Durad, the Shadow Legion is ordered to find and steal the sacred artifacts.
Arakon, the leader of the Keepers Clan, hears of the rebellion and knowing Durad's intent, he calls upon his top student, Umang, to find and safeguard the two tetrahedron artifacts. Umang journeys to the worlds of Ademiko, Dragast and Na-Tiexu to find the artifacts.
On the Isle of Unity Umang is advised by another member of the Keepers Clan that the rebellion is strengthening and Gugan, the sorcerer, has discovered Umang's whereabouts there on the island. Umang uses a portal to escape to another world where he believes he'll be able to hide until the rebellion is quelled. Little does Umang know that his challenging, and often life threatening, adventure has barely begun.
In the opening cutscene Bargul, the leader of the Shadow Legion, is shown spying on Umang in a magic orb. Bargul plots with Gugon and tosses a member of the Shadow Legion a silver amulet, to help guide the Legion to Umang. Gugon now controls Durad's soul and he plots with Bargul to find the artifacts and depose Durad as the leader of the clan opposing the Keepers, but time is running out.
We see Umang enter the portal on his way to safety and, in a fall from the portal and the very sky, he is knocked unconscious. Hearing a startling noise outside, the occupant of a nearby metal structure, Nikifor, comes out to find Umang and brings him inside. Nikifor thinks of the structure as his "house." After cursory introductions, Nikifor wants Umang to open a big, iron door and do various odd jobs needed around his house. Having issued these instructions, Nikifor goes off to his cabin to take a nap.
EPISODE ONE - THE VEHICLE
1. Nikifor's Cabin
Look around Nikifor's quarters. Click on the sleeping Nikifor to find that he may not be disturbed. He will come to you at various critical times, but you cannot wake him. Turn around and click on the cabinet behind you. Open the door and take a look at the book on the right. Spend a bit of time familiarizing yourself with the various symbols and accompanying descriptions. Exit the scene and turn right to leave the cabin.
Turn right, go through the double doors and go down the stairs in front of you. Go outside and have a look around. The landscape is unusual to say the least, and there is no sign of life. You can enter the circular elevator ahead of you, but it isn't operable yet. Turn around to reenter. Go to the door on the left side of the stairs. Click on it to see that you need some sort of code and/or key to open the door. Back out and go up the stairs. At the top, turn right, go forward once and enter the circular door at the left.
2. The Den
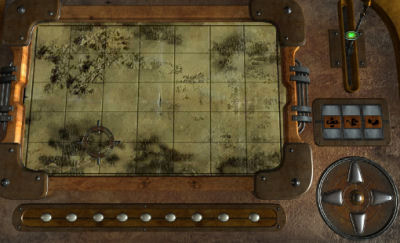
Go forward and find the hot spot above the step ladder. Under a map there you will find a CABINET KEY. Exit the close up, turn left and use the key from your inventory on the locked compartment with a keyhole. Discover a note that is immediately recorded in your journal, in your inventory bar to the right. Exit and go to the back right corner of the room. Turn around and go to the desk in front of you. Click on the Captain's Diary to read of the Manula Valley, "the land of the forgotten." The route to the valley is shown: S, S, W, W, S, W, N, W, S
Exit the diary. Nikifor appears and Umang tells him he thinks that his house is some sort of huge vehicle. Nikifor thinks Umang is crazy and tells him to make himself useful. Nikifor leaves. The directions to Manula Valley are recorded in your journal.
As you look at the Captain's Diary on the desk, pan upward from it and click on the little roll top compartment. You find more graphics and information concerning power crystals which are necessary to generate power to various devices on the "ship." Ah! So this structure definitely is some kind of vehicle. Exit the desk. Turn around and go to the globe on a stand in the right corner of the room. Click on it to see four rings with familiar symbols. Click on the rings to see that they rotate separately. Think about that book with identical symbols in Nikifor's cabin. Recall that each symbol has a description, three of which are now stored in your journal. Look in your journal to find the three appropriate phrases:
- I depend only on myself
- Decisiveness is more important than eloquence
- It belongs to the grazer, instead of the reaper
Exit the den. Turn right and enter the double doors. Turn left and enter Nikifor's cabin again. Go to the cabinet and find the description in the book that has the identical phrase as shown above. This way you can identify which symbol matches.
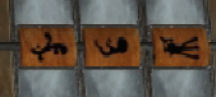
- "I depend only on myself" - Find it on the first page, entry number 1. Its the ELEPHANT.
- "Decisiveness is more important than eloquence" - Find it on page two, entry number 7. Its the OWL.
- "It belongs to the grazer, instead of the reaper" - Find it on page five, entry number 17. Its a stack of WHEAT.
Exit Nikifor's cabin. Go right through the double doors and left, back through the circular door to the den. Go back to the globe stand in the right corner.
GLOBE PUZZLE SOLUTION:
Top ring: Center the stack of WHEAT
Third ring: " " OWL
Fourth ring: " " ELEPHANT
Second ring: Turn the ring to show the ALLIGATOR.
The globe whirs and buzzes, finally opening to reveal four GENERATOR ROOM KEYS.
Remember reading about the crystals and the generator? Turn around and look again at the graphic in the roll top compartment on the desk.
- The generator directs the power from battery crystals to all mechanical devices on the ship.
(See a crude drawing of the generator.)
- Each mechanical device requires a different number of crystals to run.
(See a drawing of a crystal.)
- They can be found......***
Oh well, we'll find them!
Exit the desk and go forward to the door. Before you go out, turn left and go forward to the pedestal in the corner.
SECURITY BOX PUZZLE SOLUTION:
Examine the symbols. Click on the lower left three buttons to change the numeric symbols. Look in your journal to find the three symbols needed to solve the puzzle.
V.1 .1.1 V
Set the symbols at lower left to match those in your journal. Now, press the button opposite on your right. Click on that button to determine the symbol for each number of the crystals shown on the panel. Note and remember that each is a different color. (You can draw the symbols below ( on a print copy) if you wish. However, I found the colors were all that is necessary.)
1 crystal = WHITE
2 crystals = DARK BLUE (may appear black)
3 crystals = YELLOW
4 crystals = LIGHT BLUE
5 crystals = GREEN
6 crystals = RED (may appear purple)
With this new knowledge, let's see what we can do with those four generator room keys. Exit the den. Go right and then left, down the stairs. Go right and around to the door.
THE GENERATOR ROOM DOOR PUZZLE
Insert the four keys left to right from your inventory, in the slots of the lock. Click each button below one time, displaying the appropriate code in symbols. Umang will say "Success!" when the door unlocks. (If you fail, just start over using exactly the same process.)
Open the door, turn right and go down the stairs. In front of you, see a pedestal with various symbols. These symbols and colors denote the numbers of crystals needed to power up various components of the vehicle, as shown on the Security Box in the den.
Pan left and go down the corridor to the silver object with lighted disks at the end. It should remind you of a graphic from the desk in the den. Here it is, the driving heart of the vehicle! Umang exclaims that the object "looks like an engine." And, indeed it is.
Go forward and open the panel to see the engine's crystal compartment. There are already two crystals installed in the top positions. As you don't know yet quite what action to take here, turn around and go back down the corridor. Nikifor appears and speaks with Umang his discovery of the engine and the need for batteries, i.e., the crystals. Continue down the corridor and enter:
3. The Compressor Room
Turn to the right and take a look at the chart on the wall. You might want to make a quick sketch. Pan down and pick up the WRENCH from the work table. Swing slightly left and go forward to a close up of what looks like another crystal installed in some sort of peripheral device (remember its position). Turn left to see a huge compressor in the middle of the back wall. See the control panel with three lever positions and only two levers, one of them is broken. Umang remarks that "....there must be something around here I can use to get this contraption going."
THE COMPRESSOR PUZZLE
Use your wrench from inventory to replace the missing lever in the left position, and using the wall chart as reference:
- Move the wrench lever to the lowest position.
- Move the next middle lever to the second from the bottom position.
- Move the third and last lever to the third from the bottom position.
If you have successfully set the levers the compressor will begin to operate. Well good. We're making some progress!
Now that some of the power appears to be working, go to the pedestal to the right of the door. (The large machine to the left of the compressor is not operable.) At the pedestal, move the lever upward to the third yellow position and see a still photo showing that the yellow symbol has been activated on a panel somewhere in this vehicle. Enough with the pedestal. Move back twice and out out the door.
Now, turn right and see another pedestal. Let's see if we can activate another section of the vehicle. When you click on the green, fourth, symbol you'll be shown a still shot of the green symbol being activated on the distant panel, along with the yellow one from the pedestal in the compressor room. Turn around, go forward and go up the stairs. Turn left and exit through the door. Go across to the main staircase. Pass through the double doors. Go forward once past Nikifor's cabin and pan left to see another door with a familiar white symbol just above the frame. Click on the door to find it locked. Hmmm.... I'll bet you can figure out how to unlock it, right? Remember the Security Box in the den identifies a single crystal corresponding with this white symbol? Where did you see crystals in place all ready to be powered up? Down we go to the generator room and back to the engine.
Turn around and go back downstairs through the double doors. Turn right, go through the generator room door, down the stairs, turn left and go to the engine. At the engine, open the panel. Activate one crystal by pressing it. Then press the WHITE button on the top left of the upper panel. Back out. Turn and go down the corridor, right, and then back up the stairs. Go left at the top, out through the door. Go up the main staircase, through the double doors to the room at the end, on your left, with the white symbol.
4. The Storeroom
Find the door now unlocked and you are in a dark storeroom. Pan left and see a blue/white cylinder in the left corner. Go over there and pick up a WATERLAMP for your inventory. Pan left and pick up the coiled ROPE hanging to the right of the door. Come out of the closeup and pan slightly left to see a forward cursor. Go there and pan up to see a closed port hole. Open it to see daylight and a bit of the landscape. Pan down left and use your rope on the short ladder attached to the metal wall. The rope will be deployed out the port hole and down the side of the vehicle. Climb down. Pan down and right to pick up a CROWBAR. Climb back up the rope. Pan left past the entry door and see a forward cursor indicating a cabinet on the right of the port hole. Go forward and open the cabinet. Take the CRYSTAL CAPSULE and an OIL CAN for "lubricating machinery."
That's all you can do in the storeroom for now, so exit through the door and go left through the second set of double doors. Directly ahead of you is a single person elevator. Use the controls at right on the wall to determine that the elevator is not working properly for some reason. The elevator platform will not descend. Leave the elevator for now, but keep it in mind. Go right one click and then left through the door to the right of the elevator controls.
5. The Bridge
Go down the steps to the upper platform housing the wheel, the helm of the vehicle, and other instruments necessary to power and operate it. On the wheel pedestal, note the control panel and symbols. The controls are inoperable as yet. Pan back and try to pull the lever on the floor at left. "I must have missed something," is the response to your attempt. We have a number of actions to complete yet. Turn further left and click on the now familiar pedestal with the symbols for the power crystal requirements. This is the third pedestal. Come out of the close up. Pan right to see the lighted indicator on the side wall, reflecting your action to activate the first two pedestals in the below decks corridor and the compressor room. Turn around. Go forward and right to the side table. Check it out to find it also is not yet operable. Swing left. Go forward to the tall center bookcase. See that a book has fallen to the floor, revealing a latch. Click on the latch to hear, "Its locked." Looks like we need to make another trip down to the engine.
Pan left or right to go up a set of side stairs and turn around to exit to the upper stairs and the bridge. In the corridor, go through both sets of double doors, down the stairs, around to the right, through the generator room door, and down the stairs. Go left to the engine. Open the panel, light the second crystal and press the upper right DARK BLUE button on the top panel. Remember in reasoning out this action, that to open the latch in the bookcase on the bridge, the color for two crystals is dark blue, as depicted at the Security Box in the den. So far, you only have two of the required number of crystals to work with.
Exit the engine area and retrace your steps out of the engine room, up the main staircase, through both double doors and left or right past the elevator. Then through the side door to the bridge area. Go down the stairs to the lower area in front of the bookcase.
6. The Secret Room
Press the latch and Umang enters a small, circular secret room behind the bookcase. Go forward to see the skeleton of (perhaps) the former captain of this strange vehicle. Swing left and note the dark blue plaque on the wall with the appropriate symbol for two crystals. This discovery corroborates the action you already took at the engine to power up the second crystal, unlocking the secret room. Pan down left on the desk top and pick up the SPYGLASS. Press the big, brass button which was under the spyglass and watch a panel descend on a large piece of equipment across the room. Go over there and look in close up at the six tubes inside. Keep the location of this essential piece of equipment in mind.
Exit the close up of the panel and pan down right. Go forward. Pick up a THIRD CRYSTAL laying on top of the small trunk. Open the trunk and take the note inside. It bears a drawing (look closely) of the tubes inside the panel to your left. The drawing will transfer to your journal. Note: If you had time to notice, or could actually see it (I couldn't), there is a red sun burst symbol on the front of this equipment denoting that you will need six crystals, the maximum, to power it.
Leave the secret room. Leave the bridge going up the stairs. In the corridor, turn left and go out the single door to the outside. After viewing the landscape and waterfall, come back to the door and close it without entering. Pan up to the top of the ladder on the roof line and climb up to the roof. Take note first of the green plaque on the engine housing at left, denoting the need for five crystals to power it. Look down and right to see that a rock has been placed under a gear box, which obviously operates the elevator. No wonder its disabled! Use your crowbar to dislodge the rock. Climb down the ladder. Go back into the vehicle. Go to the elevator controls on the right. Pull the handle. The working elevator descends. Climb aboard and press the round button in front of you. Umang rises to:
7. The Telescope Dome
Step out to the right of the elevator and see a mechanism on the floor with a yellow icon on the front, denoting that three crystals are required for power. Click on it to see a vague image on the screen, but "It doesn't work." Turn around and go back through the elevator to the pedestal at left. Set the arm at the second yellow position with the same icon as is displayed on the machine across the room. The lighted panel on the bridge wall will display yellow. Check out the console to the right with the dome top. You can open the front panel, but something more is required. Pan right. Take a look at the telescope. Now you need to power up all the mechanisms in the telescope dome. Go around to the elevator, descend to the corridor, using the button at the right. Go out through both double doors, down the main staircase and right down the stairs to the engine.
Open the front panel and use the crystal capsule from your inventory to place the third crystal from the secret room. Press the crystal to activate it. Three crystals should be glowing. Now press the YELLOW button on the upper control panel.
Go back upstairs, up the main staircase, through the double doors to the elevator. Get on the elevator and press the button. Get off the elevator to the right. Go to the console with the round image on the front. The image appears to be vague outline of a space ship separated into four pieces.
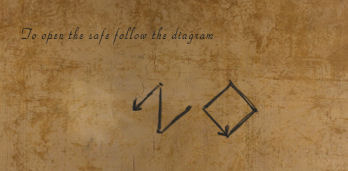
THE SPACE SHIP SAFE PUZZLE
There are four buttons at N, S, W, and E positions around the image. The object of the puzzle is to place all four wedges, which are three layers deep, in the correct position to drop the wedges out of sight and reveal a valuable hidden object. The clue to this puzzle is in your journal.
Click on the buttons as follows:
N, S, E, W
E, S, N, W
S, E, N, W
The safe reveals its prize. Take the TELESCOPE KEY.
Turn around. Go back through the elevator. Stop at the little console on your right and open the front panel again. Place the telescope key in the receptacle and watch a cutscene of the telescope being activated and positioned to view the outside landscape.
Click on the eyepiece and watch the arrival of three members of the Shadow Legion! Oh gad! This is definitely not good news. In a cutscene Umang rushes to tell Nikifor about this perilous development. The urgency to get this vehicle moving accelerates! Nikifor goes outside to deny Umang's presence in the vehicle and to exchange banter with the soldiers. The Shadow Legion soldiers decide to wait out the situation, hoping to capture Umang. "You have to come out sooner or later." Nikifor and Umang collaborate in the face of not having all the crystals necessary to get the vehicle moving. Nikifor reasons that the Shadow Legion's vehicles must also operate with crystals. Umang then suggests they wait until dark and try to go out and steal them.
8. Stealing the Crystals - Thieves in the Night
After night falls, Umang awakens in Nikifor's cabin. You will need to access the storeroom again, so you can sneak out the port hole and find your way to the Shadow Legion camp, their vehicles and the crystals. However, since your last visit down to the engine you've reset the crystals, so you'll have to reset them again to unlock the door to the storeroom.
Leave the cabin and turn right to access the main staircase through the double doors. Turn right and go to the generator room door. You're literally able to find your way in the dark by now. Go down to the engine. Open the panel and turn off two crystals; just one crystal is lit. Push the WHITE BUTTON on the top panel. Retrace your steps up to Nikifor's cabin, passing it to stop at the storeroom door on your left. Click on the door to enter. Go to the port hole and use your rope from inventory on the ladder on the wall beneath the port hole.
Ready? Take a deep breath and out you go down the rope. SAVE YOUR GAME!
Go forward twice and swing right until your cursor highlights. Get out your waterlamp now to find your way.
Go forward twice. Pan right. Go forward once. Pan slightly right.
Go forward under the large roots. Go forward under the stone arch.
Go forward twice and when you click to go forward again you'll get a warning from Umang, "Better be careful."
Immediately ditch your waterlamp in inventory, so the Shadow Legion soldiers do not see you. If you continue without doing this, sudden death will be your consequence. Pan slightly right and go forward three times. You have arrived in the meadow where the soldiers have parked their vehicles.
Click on the left vehicle. A warning will let you know that the panel, housing the power crystal, is rusty. Use your oil can on the lid to keep it from squeaking and alerting the sleeping warriors. Open the lid. Remove the FOURTH CRYSTAL using your crystal capsule.
Exit the scene and turn to the right vehicle. Use your oil can on the lid and then open it. Use your crystal capsule to remove the FIFTH CRYSTAL.
Back out. Turn around. Go forward once. Pan left. Go forward once.
Your cursor will highlight. Use your waterlamp.
Go forward four times, then pan left to go under the roots. Go forward twice.
Pan left and go forward. Ditch your water lamp when you are warned. Go forward once.
Turn left. Go forward twice and climb the rope back to the storeroom.
Whew! Good going, Umang! If I were there with you I'd be high-fiving you big time!
As you leave the storeroom Nikifor will appear and suggest that a good night's sleep is in order. Umang responds, "It sounds like a plan."
Morning comes. Let's get back down to the engine to install those two stolen crystals. Nikifor is already out and gone. Leave the cabin and turn right. Go out the double doors and go back down to the engine. Install the two new crystals with the crystal capsule. Click on the crystals to activate four of them and press the corresponding LIGHT BLUE button on the upper panel.
Go back out, up the main staircase, through both sets of double doors. Use one of the doors on either side to reenter the bridge.
9. The Bridge at Last - Fini
Go to the wheel platform up front and approach the pedestal on the far left. Place the lever in the light blue, first, position. The panel on the bridge wall will activate. Back out and go right to the steering wheel. Look at the symbols displayed on the control panel. Make a note or remember what they look like. The symbols depicted there now illustrate the current position of the vehicle. But, we want to get the heck out here!
Go down the steps and over to the right to that tall table we couldn't operate earlier.
THE NAVIGATION PUZZLE
In closeup, the metal plate will open to show four identical symbols. Access your journal to find four symbols lined up horizontally. The four symbols are:
- an open eye
- a character resembling a curly W
- an open hand
- another open eye
When you enter the four symbols correctly, the panel will close and the table will rotate displaying a vague map. Umang says, " I need the exact coordinates." You have them in your journal. But first we need to establish a starting point, which is our current location. On the small panel at right, enter the last two of the three symbols you just saw up on the steering wheel control panel. The first position will not activate. Note that the indicator on the map moves to our current location.
Now we need to find the Manula Valley where the Keepers' portal is located. (The Captain's Diary in the den has an illustration of the Manula Valley topography.)
To find the Manula Valley, pull the top lever three times. You should see the Manula Valley map as depicted in the diary. Now, remember (or check) the directions from the Manula Valley to "the land of the forgotten" That is, S, S, W, W, S, W, N, W, S. From this position we can figure out how to get from here to the Manula Valley, so the directions are backwards: N, E, S, E, N, E, E, N, N. Umang is elated. "Got it! Excellent! Now we have the coordinates."
Clever you! Now, using the dial at the bottom right on the map panel, enter these coordinates. When entered correctly, Umang will let you know. Take note of the symbols above the dial for the Manula Valley. Make a note of them if you need to. Go to the steering wheel and enter the three symbols on the control panel. When entered correctly you'll be automatically taken out of the close up.
Okay, good! The next step is in the engine room again as we'll need to fire up the other critical engine installed on the roof of the vehicle. I'm absolutely positive you can find your way down to the engine with no problem! Once there, open the panel. Light up the fifth crystal. Press the GREEN button (middle on the right) on the top panel.
Go back up to the bridge and the steering wheel platform. Pan down left and pull the lever on the floor.
NOTE: If nothing happens, and you get a message from Umang that you've missed something, read through this walkthrough, so far, to make sure you've completed all actions and have acquired all inventory items (in red ink). Also, if you have incidentally picked up the last (sixth) crystal from the compressor room and/or have already installed it in the generator panel, return it to the machine in the compressor room. Then, check the engine panel to make sure you have five crystals lit and the green button pushed. Picking up and/or installing the sixth crystal before it is needed will keep the vehicle from operating.
As you pull the lever next to the steering wheel, the engine comes alive in a cutscene. Wheels, gears, joints, belts and pistons move and fire. The vehicle rises, sprouts insect-like legs and begins creaking and clanking to move toward its plotted destination. The vehicle summarily snuffs out one of the Shadow Legion warriors as it goes.
Early on, and while rounding a corner in a narrow canyon, Umang is unable to successfully navigate the awkard vehicle through a narrow cut in the rocks. The vehicle is caught, crippled and it stalls.
Nikifor announces "Well, here we are." But, the two of them don't have much time. More of the Shadow Legion warriors will soon arrive and they have to find a way to "...seal the passage." Nikifor charters Umang to come up with a plan!
10. Run Like a Rabbit!
Leave the bridge and take the main staircase down to the compressor room. Time to extract that sixth crystal. When you get there, use your crystal capsule to take the crystal, from the machine against the wall to the right of the compressor, and return down the corridor to the engine. Install the crystal. Light the last crystal making sure all six are glowing. Now, click on the bottom right RED button. This button activates the vehicle's self-destruct system! If you check your journal you'll see:
Self destruct
Use with extreme caution
at the proper time.
When activated, ...... RUN!!!
SAVE YOUR GAME.
Go immediately back to the bridge via the main staircase and the two double doors. In the lower area of the bridge, access the bookcase again by pushing the latch to enter the Secret Room.
Push the button on the desk to open the large cabinet opposite. In close up, Umang says, "I have no other choice!"
Check your journal to see the chart that shows that all the tubes must have their red bands postioned at the top, the object of the puzzle.
THE SELF DESTRUCT PUZZLE
Note that when you click on one of the six capsules, the action prompts the revolution of at least two other tubes.
The puzzle is not difficult.
Click capsule numbers (left to right) 2, 5, 6 and 3 RUN!
When the puzzle is successfully completed, the vehicle's self destruct system activates in a cutscene and Umang and Nikifor run to safety just in the nick of time!
As the scene settles, Nikifor is absolutely furious with Umang for blowing up his "house." He raves and rants, ultimately telling Umang that he is out of there exclaiming "Get lost!"
EPISODE TWO - THE MANULA VALLEY
SAVE YOUR GAME
When Umang recovers from the loss of both the vehicle and Nikifor, turn around to see the vehicle foundered among the rocks. Pick up the IRON BAR. Turn to the right and continue through the canyon going forward five times. When you reach the edge of a cliff, seeing mist off to your right, turn right. Go up the path four times and pan left to see a small cable transport system leading to an area on a central rock pinnacle in the canyon. Stop. Go forward and check out the transport system's controls. Open the lid of the lower compartment and see the imprint of some sort of tool or odd key.
Turn around to go back to the trail. Go left and forward up the hill until you see a large, circular stone platform. Go on up to the edge of the platform, a Keepers Clan's portal, and see that the center is comprised of three concentric rings. Pan down right to see a hole in the stone. Click on it to get a message from Umang that something is needed there to stop the stone from moving. What do you have in your inventory that might just do the job? Yup, the newly acquired iron bar from the vehicle's wreckage.
Pan up and look at the statues around the platform and the way a pipe extends down from a statue, and a pinkish colored pedestal, above you on the right. Recall this scene from the drawing of a Keepers' portal from the Captain's Diary in the vehicle's den.
Turn around. Go back down the hill three times and pan left to see a stone staircase. Climb it. When your each the top, turn left and walk out on the little balcony. Pan up over your right shoulder to check out the stone statue with a globe in its hands and the pipe's downward path. Pan down and click on the stone podium at the edge of the balcony.
In a cutscene Michael, the caretaker of this broken Keepers' Portal arrives. He's been waiting for Umang, the "Chosen One." He tells the story of the Keepers, the artifacts and, in using the tetrahedrons for exploring other worlds, how they mistakenly opened the world of the warlike Shadow Legion. The world where the portal is located was the Keepers' home, but the Shadow Legion gained control of the portal and was able to infiltrate the Keepers' world. Eventually, after a long and bloody war, the Keepers had to abandon this world to the Shadow Legion. Now, the Shadow Legion wants the rings and the tetrahedrons in order to pursue the Keepers Clan. As the Chosen One, Umang must find the Sacred Rings, now in the palace in the lair of the Shadow Legion, and protect the artifacts, as Arakon asked of him. He's to make sure the Shadow Legion is not ever again able to continue their evil quest to find the Keepers and steal the artifacts. But first, Umang must figure out how to restore this portal to get to the Shadow Legion's lair at the palace!
THE PORTAL PUZZLE
When Michael disappears, go to the podium and study the pattern of the stone rings on the right side. This is the correct alignment of the rings. Achieving the correct alignment is the object of the puzzle.
You've already placed the iron bar in the hole near the edge of the rings, so:
- turn the middle ring on the left side of the podium 5 times.
- turn the small inside ring 4 times.
Oh boy! That cannot be good! In a cutscene, the portal powers up and then abruptly subsides. Something isn't right. Michael reappears to inform you that you need another energy source as powerful as this one was. Michael says you must "....ask the sky," and you must find the Shadow Legion's sign. Michael gives Umang the FERRY KEY. Oh! So that little conveyance down the hill is a ferry. Kind of a "mid air ferry," I guess. ;) Anyway, it looks like Umang will now be able to operate it. Go back down the stairs, turn left and go down the trail to the ferry.
Approach the platform and, in close up, open the lower compartment and insert the key from your inventory. Turn the upper wooden handle to bring the ferry car over to your side of the canyon. Climb aboard. Turn left and pan down to turn the handle which propels the car across the cable system. On the other side, go to the platform at the other end of the trail. Turn left and climb into the rail car which has been resting here unused for a very long time. Umang hopes "...this still works."
1. THE FAIRY WORLD
Click on the bottom left button on the console and pull the lever. After a remarkable ride, you arrive in a green, rainy world. Leave the rail car and go along the path to see a pedestal in front of an arch bridge, with an active portal. You can go up onto the bridge, but you will not be able to pass before solving the puzzle on the pedestal.
THE BRIDGE PUZZLE
Approach the pedestal. In closeup see four stone buttons: (left to right) purple, blue, gray/green, and yellow
They represent fire, ice, smoke and electricity. Press the buttons. When the blue button is pressed Umang will say, "Let me through or I will break you." This is the obvious clue to solving the puzzle. After you press the blue button again, go up on the bridge and use your crowbar from inventory to break the ice in the portal. The crowbar returns to inventory. When the ice shatters, follow the trail across the little wooden foot bridge and up to the house. This is the home of Reina, the resident fairy, who has an ill-natured personality and considerable magical powers.
Look closely at the frog and globe emblem on the door of the house. Note that there are three rods, or rays, emanating from the globe. This is a clue to gaining entry. Go through the door and end up back outside. Hmmm. ..That's weird. Reenter the door twice more and you will gain entry. Three rays on the frog and globe emblem = three attempts to enter.
Its very dark in here, but there's a door straight ahead and a bit left of you. Use your cursor to guide you into Reina's inner sanctum. Go forward and left to see Reina seated at a tall desk. Click on her. She introduces herself as a kind fairy. (She's also likely a sorceress.) Click on her again. Umang asks if she knows of the sign of the Shadow Legion and if she knows about the Keepers' portal. Reina is not very helpful. Click on her a third time. She has no more to say right now.
Swing to your right and investigate the book shelf. Take the bright green bottle of PHOSPHORUS on a shelf high at your left. Find the book of magic spells at the end of the second shelf. Open it to see descriptions and symbols for three essential weather spells fog, rain and lightening. On the facing page, read what more may be needed - the correct placement of mood statues on the altar to cast the required spell. The three weather symbols are recorded in your journal.
Turn to your right and leave the room. Climb the steps and then the ladder ahead of you. On the roof, see three round trays. The first tray holds a chubby statue. The second and third trays are empty and display two of the three weather symbols from Reina's book of magic spells. No action is available yet, but this must be the altar where Reina performs the weather spells.
Turn around. Go down the ladder, the steps and turn left to exit the door with the globe to the outside. Looks like we've accomplished all we can here for now, but we'll be back shortly. Follow the pathway, across the wooden and stone bridges, back to the rail car. Choose the lower button on the right at the controls. Pull the lever.
2. THE MINE WORLD
Wow! What a lovely, green park-like location. The bright sunshine feels pretty good for a change. Go on down the trail and speak with Nafal, the old man sitting on a bench in front of his home, a hut on stilts. Umang tells him of the need to fix the broken Keepers' portal and asks if he knows about the sign of the Shadow Legion. Nafal knows very little. He's only just heard of the Shadow Legion.
Climb the ladder and enter the hut. Go forward, then right and talk to the sick old lady in her bed. Umang asks her about the portal, but she doesn't know anything. Turn around, go forward, then left to see a stylized kitchen counter. Scan it left to right to pick up an empty BOTTLE. Back out of the close up and go right and forward to exit the hut.
Outside, go forward up the hill and along the path. At the end you reach what appears to be an abandoned mine entrance. Be sure to go forward to have a good look at the bells hanging in the oval metal frame. Ring the bells if you wish. You can't accomplish anymore now. Go back down the hill and speak with Nafal again before leaving.
FIRD'S STORY:
Umang wants to know how to get down in the mine. Nafal reveals that the mine is the exile home of Fird, the Shadow Legion's executioner. Umang thinks Fird might likely would know plenty about the Shadow Legion. Nafal tells Umang Fird's sad story:
Mila, the concubine of the Shadow Legion leader, Bargul, was deeply in love and having an affair with Rizan, Fird's good and beloved son. Trey, an advisor of Bargul, learned of the affair and told Bargul. As punishment, Bargul ordered Fird to encase Mila in a wall while she was still alive and he ordered Fird to execute his own son, Rizan. When Fird refused, Bargul ordered Gugon (his evil sorcerer) to cast a spell on Fird, making it impossible for Fird to disobey. So, and sadly, Fird carried out the order to bury Mila alive and he executed his own son. Trey, the advisor who betrayed Mila and Rizan, was so guilt stricken by what he had done to Mila and Rizan, in causing their deaths, that he committed suicide. It was said that Mila's ghost was haunting him.
Further, Nafal tells Umang that Fird was given his son's ashes and, having gone mad, he aimlessly wandered the world for some time after that. Finally, he settled at the bottom of the abandoned mine. Nafal mentions that his wife, Sarah, takes food to Fird each day up at the mine.
Go back up into the hut and speak with Sarah again about going into the mine to see Fird. Sarah tells Umang she's been out of her headache medicine, "tincture of Lukerii" for over a year. Its patently obvious that Umang will get no cooperation from Sarah unless he can find the medicine for her. Turn right. Leave the hut. Go right and then go down the path back to the rail car. Climb in and click on the top left button. Pull the lever and you're off to:
3. THE ICE WORLD
Go up the ramp to the metal door. Click on it to hear that the door is locked. Pan to your right to see a decorative cord. Pull it. Pan extreme left to see that a small box has opened in the wall next to the door. Obviously you need to present some sort of identification or token before you'll be allowed to enter. Take the red amulet from your inventory and place it in the box. Hurry up, its freezing cold out here! Now, click on the door to enter the abode of the alchemist, Himus.
Go forward and talk to Himus. He wants more than the amulet to do anything for Umang. He won't help for "nothing." He records an I.O.U. for Umang in his ledger. The number for Umang's debt is 247. Himus tells Umang to serve himself while he's there, but "...try not to break anything."
Go up behind Himus' desk and take his book from the desk top. Turn and go down behind the screen to Himus' laboratory area. Look at the dispensing machine in the middle of the work table. Look closely at the books on the shelves at left. Click on the book laying flat on the shelf.
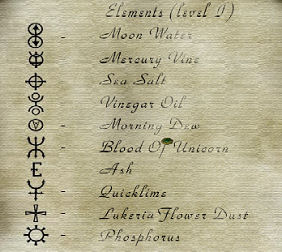
- The first page illustrates names and symbols for Elements Level 1
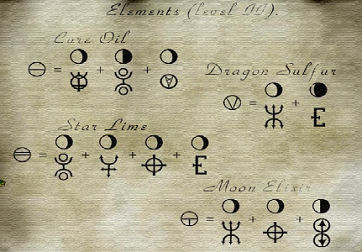
- The second page displays Elements Level II, which indicates apparent formulas for Cure Oil, Dragon Sulphur, Star Lime and Moon Elixir.
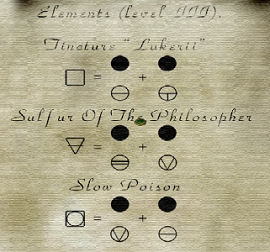
- The third page displays Elements Level III, which shows an extension of Level II elements and develops the formula for (BINGO! ) Tincture of Lukerii, Sulphur of the Philosopher and Slow Poison.
|
|
|
|
|
|
Look closely at the formula for Tincture of Lukerii and see that by comparing the two bottom symbols of the formula with those symbols illustrated on the prior Elements page, that the Tincture of Lukerii is comprised of equal parts Cure Oil and Moon Elixir. As you'll recall, this is the medication we need for poor, old Sarah's debilitating headache.
Now that you have cleverly extracted the formula, go back to the dispenser on the right. There are three sections to the dispenser. Note that each section highlights separately:
- Click the top to rotate the capsules where the various elements are stored.
- The center portion of the dispenser holds the two measurement containers.
- The bottom section contains the receptacle where the elements are ultimately combined.
THE LUKERII PUZZLE
Be sure to add the ingredients in the correct order as shown in the graphic formula.
(You might want to save your game here.)
For one part CURE OIL:
1. Find the symbol at the top for Mercury Vine on the upper spigot and click once to deliver 1/4 dose to the measurement container in the middle.
2. Find the symbol at the top for Vinegar Oil and click twice to deliver 1/2 dose to the measurement container in the middle.
3. Find the symbol at the top for Morning Dew and click once to deliver 1/4 measure to the middle container.
4. Open the middle spigot to deliver the completed Cure Oil element to the bottom receptacle.
5. Now, use the middle highlighted cursor to move the center tube to the right to start fresh.
For one part MOON ELIXIR:
1. In the upper section, find the symbol for Blood of the Unicorn. Click once to deliver 1/4 dose to the middle chamber.
2. Find the symbol for Sea Salt and click once to deliver 1/4 dose to the middle chamber.
3. Find the symbol for Moon Water and click twice to deliver 1/2 dose to the middle chamber.
4. Open the middle spigot now to deliver the completed Moon Elixir to the bottom receptacle.
Take your empty bottle out of inventory and place it under the cup holding the completed formula.
Click the bottom spigot to release the Tincture of Lukerii into the bottle.
If you haven't completed the formula successfully you'll see a cutscene where Umang witnesses the formula sparking and then fizzling out. If you've been successful, click on the bottle and you'll see a BOTTLE OF ELIXIR in your inventory!
Turn around and go up the stairs. Open the door to find three vertical obelisks with odd symbols and a luminous portal below. If you turn to your right and click the forward arrow, you'll pick up a wand and see a colorful light show. Keep this spot in mind, you'll be back.
Exit the close up and turn around. Exit Himus' hut, going down the stairs and to the right of the lab screen. Go down the icy ramp to return to the rail car. In the rail car, click on the bottom right button and pull the lever to return to the Mine World.
When you arrive, go forward to the hut where Sarah lies in her bed. Give her the bottle with the elixir. She will reward you with a magical MUSICAL SPHERE which she says will help Umang with his attempt to contact Fird, the remorseful executioner.
Leave the hut and go left on up the hill to the mine. Go across the entry area to the metal frame holding the five bells:
THE BELL PUZZLE
Place the newly gotten musical globe in the basin under the middle bell. Click on the globe to hear its music. You need to copy the five notes by striking the bells. Play the melody with the globe and then try to identify which bell emulates the sound of one or more of the bells:
From left to right strike bells: 4, 5, 4, 2, 5, 1
When completed correctly an elevator rises from the depths of the vertical mine shaft. Turn to your left and get on the elevator. See a cutscene where Fird threatens you and wants you to go away! Uh oh! This isn't working out very well; not quite like you planned. The elevator will take Umang back up top. Let's take a little stroll back down the hill and check again with Sarah.
Back at Sarah's bedside, click on her to find out the medicine is "worthless." She's one angry old gal. The Lukerii wasn't correct somehow. Leave the hut, but stop in the kitchen area first, off left, and pick up the BOTTLE OF ELIXIR once again. It looks like we need a consultation with Reina.
Leave the hut, turn right and return along the trail to the rail car. Click on the bottom left button and pull the lever to go back to the Fairy World. Go up across the arch bridge to Reina's home again. You should be able to enter the house with no problem on the first try. Go forward and left to Reina's perch at her desk. Click on Reina. In a cutscene Umang learns he must find the ashes of Fird's son, Rizan. She also must have Himus' Book of Alchemy (which is not the one you already have). Reina says that a butterfly that can be found in the glade will help you, as the butterfly is the "key" to the alchemy book.
Leave Reina and find the outside door to the right of the stairs. Go down the trail again and turn left before crossing the arch bridge. Go forward twice and pan down right to see a white butterfly in the long grass. Click on it and watch its color change as it flies from white to yellow, to green, to blue, to pink, to green, to red. The butterfly will be white only when it is resting in the grass.
Go back to the rail car. Click on the top left button and pull the lever to head back to the Ice World. Go up to Himus' house. Go through the door, across the room and on up the stairs. Enter the room at the top where you previously saw the obelisks, the luminous portal and the dancing lights.
THE DANCING LIGHTS PUZZLE
Pan down right to see a lever on the floor. Pull the lever. A light show of miniature comets appears! Move your cursor around to see that you have the wand in your hand. The object of the puzzle is to strike the broadest part, the front of each little comet, with the wand in the same color order as the butterfly displayed to you in the glade:
- Yellow
- Green
- Blue
- Pink
- Green
- Red
As you proceed, you will see a string of colored indicators in a small gauge at the lower left of your screen. If you do not get the color combination entered correctly, just pull back from the close up and start over. Be patient. You have plenty of time.
When you succeed in solving the puzzle, the luminous portal will reveal a rising pedestal with a compartment which opens to reveal the Book of Alchemy. Hmm, the book Reina wants. More formula requirements for the making of the Lukerii elixir are added to your journal. Check out the last page of your journal for this and additional information indicating:
- You may need lightening
- You need a flower from the sorceress' swamp to perfect the cure for Sarah's headache
- The sorceress' tried to borrow Himus' Book of Alchemy, but he didn't give it to her. Then, one of his butterflies mysteriously disappeared.
Remove the BOOK OF ALCHEMY from the compartment and replace it with Himus' book you've been carrying around; the one you took from his desk. Return out the door, down the steps and out into the cold. Go back to the rail car. Click on the bottom left button. Pull the lever to return to the Fairy World.
When you arrive, see a cutscene where a lovely lavender flower spontaneously blooms. I'll bet you figured out right where to find that flower. Cross the arch bridge. Turn right, go forward once and hear Umang exclaim that he might be seeing the Lukerii flower. Take the LUKERII FLOWER. You can click on the (Himus' missing) butterfly, but the butterfly will only show off its colors again.
Leave the glade and return to the rail car. Click on the top left button and pull the lever to return to the Ice World.
Go up the ramp and into Himus' abode. Go around the screen to your right to access the lab again. Find the grinding machine on the shelf to the right of the formula book. Put the bottle with the elixir at the base of the grinder. Then open the upper lid and take the Lukerii flower from inventory. Place it in the grinder. Turn the handle to see a flash of light added to the elixir's concoction. Check your inventory for BOTTLE WITH LUKERII ELIXIR.
Okay, done! Back to the rail car on the double! Sarah has suffered long since with that awful headache. At the rail car click on the lower right symbol and pull the lever, to return to the Mine World.
Get on down to the hut, climb the ladder and click on Sarah with the bottle of Lukerii. Sarah doesn't trust you now and thinks you may be trying to poison her. For what reason, who knows! Maybe the pain of the headache has rattled her thinking. She relents and consents to give the medication a try but needs a bit of time to determine if it actually works. While you are trying to pass the necessary time, go back to the rail car and click on the lower left button. Don't forget the lever.
Back at the Fairy World, go up to Reina's hut. Give her the Book of Alchemy. She's only too happy to accept the book which will keep her entertained on those long, rainy evenings. Go back to the rail car. Click on the top right button and pull the lever.
4. THE GRAVEYARD WORLD
Whoa! This is one dark, creepy place! Go down the trail where you'll arrive at two gates. Gad! What is that hideous growling? Approach the smaller gate on the left side. Click on the gate to exchange a few words unsatisfactorythe words with the surly gravedigger, Salan. Well, we've definitely been here long enough, though I expect we'll have to come back, big time. I don't think you'll need much encouragement to get back to that rail car. Click on the bottom right button and pull the lever to go back to the Mine World.
On your way to the hut, stop and speak with Nafal. He tells you Salan won't let anyone into the cemetery except Fird, who comes to visit the grave of his son, Rizan, every night. The only time that Salan leaves the cemetery himself, is when he has to go out to pick up a body for burial. Continue on up the ladder and check with Sarah to see if she has yet begun to feel better. Oh darn. She still hasn't made any progress. "Go away, " she says. Return to the rail car. Click on the top right button and lever to return to the Graveyard World. You're going back sooner than you could have anticipated.
At the graveyard, and now that you know that Salan will leave if someone has died, perhaps Umang can cook up a plan to trick Salan into leaving, so as to gain access to Fird. Go back to the side gate and click on it. In a cutscene Umang skillfully leads Salan to believe that Sarah has died. That is, without actually telling a total lie. When Salan leaves to pick up Sarah's body, slip in through the gate.
Go forward till you see a round platform with a double stone statue at the top. Go up and around the right edge of the platform and up the path, until you see a stone arch ahead of you. Just before you reach the arch, turn left. Enter the tomb. Pan around to see a monument with an inscription on the top. Umang explains that the strange symbols are the language of the Keepers. The inscription says:
" A dumb person wrote these letters. A blind person read them. A mute person repeated them."
THE TILE PUZZLE
This is the easiest puzzle in the game. Look down to see tiles with five different symbols. And, there is already one tile already inserted in the niche above. Remove it. Pull the round handle beside the tile niche and see a stone door lower into the floor, revealing a separate room. Approach the casket, open it, take the STAFF. That's all we can accomplish for now.
Go back out of the tomb and down the path to the area with the two statues. Go around on the right side again and go down the new path until you see a tomb on the right (about three clicks forward). Go forward to see:
THE CANDLE PUZZLE
There are 25 niches containing candles of three varying lengths.... short, medium and tall.
The object of the puzzle is to light all the candles simultaneously...all lit at once. You must click on one candle, then click on another. If both stay lit, click on a third. If the third stays lit, click on a fourth. Proceed until all are lit. If you choose the wrong candle, you'll have to start over:
The Rules
If you click on a tall candle = next one is 3 spaces away
If you click on a medium candle = next one is 2 spaces away
If you click on a short candle = next one is 1 space away.
Red flame = next candle is above
Yellow flame = next candle is left
Green flame = next candle is right
Blue flame = next candle is below
------------------------------------
Help Shortcut (this is what I used):
RED = above
YELLOW = left
GREEN = right
BLUE = below
SHORT = 1 space
MEDIUM = 2 spaces
TALL = 3 spaces
--------------------------------------
EXAMPLE:
If the candle you light is short and the flame is blue, the next candle you light is one space below.
If the candle you light is tall and the flame is red, the next candle you light is three spaces above.
If the candle you light is medium and the flame is yellow, the next candle you light is to the left two spaces.
If the candle you light is short and the flame is green, the next candle you light is to the right one space.
When you have all the candles lit, the door to the tomb's inner sanctum will open. But, before you proceed, there's another priority. Turn around and click forward to go outside. Turn around again to find an active hot spot on the ground just outside the tomb door. Use the bottle of green phosphorus on the hot spot. You will witness a cutscene where Umang hides along the side of the tomb as Fird comes along for a visit with Rizan's ashes. Also, see a scene where Bargul of the Shadow Legion is laying out to his soldiers the consequences of not capturing Umang within five days. Gugon makes it clear that Durad is having difficulty maintaining his current power in the Keepers Clan.
Now, go ahead into the tomb to see a semi circular array of candles. Hard to see here, but go forward once down the steps. Turn extreme left to see a stand with three lit candles. Click on the stand and the candles will go out. Now it is pitch black.
Pan down left to see luminous footprints. Fird's footprints, which confirm that the soles of his shoes were coated with the phosphorus you dumped outside the tomb. The footprints appear to make a circular pattern showing Fird's path. Turn extreme left (as you are facing the candle array) and find the hot spot where the candle stand is. Click on it. Turn back to the candle array again to see the niches where the urns containing ashes of loved ones are laid away. Go to the second candle from the right. Take the URN with Rizan's ashes. Umang says, "This is what I need." Leave the tomb. Go left down the path. Go left around the statue platform and down toward the side gate.
SAVE YOUR GAME AT THE GATE!
Go through the gate and forward to see a cutscene of Salan returning. Uh oh! Umang exclaims that he needs somewhere to hide. Pan right quickly and click up off to the right of the path between the two tall rocks.
NOTE: If Salan catches you he'll take back what you've found at the cemetery including Rizan's ashes.
When Salan passes by without discovering Umang, go up to the rail car. Click on the bottom left symbol and hit that lever. We're off to the Fairy World with Rizan's precious ashes.
When you arrive in the Fairy World, go up to Reina's house. Give the urn with Rizan's ashes to Reina. She allows that Umang deserves her assistance as a reward for bringing the ashes of Fird's son. She tells Umang to go back to Fird. He will be more receptive this time. Click on Reina again and ask about her creating lightening in a cutscene. She tells Umang to go upstairs and make everything ready. First, go to her spell book on the bookshelf to find that you must place all the mood statues correctly to cast the spell. Go out the door, up the stairs and the ladder to the roof of the house.
THE MOOD STATUE PUZZLE (This is a Hanoi Tower type puzzle)
There are five statues. the object of the puzzle is to move them all to the tray on the right side. But, you can only place a larger over a smaller statue.
The moves are:
Moving statue from ________ to ________
left to right middle to left
left to middle middle to right
right to middle left to right
left to right middle to left
middle to left right to middle
middle to right right to left
left to right middle to left
left to middle middle to right
right to middle left to right
right to left left to middle
middle to left right to middle
right to middle left to right
left to right middle to left
left to middle middle to right
right to middle left to right
left to right
When you beat the puzzle Umang will exclaim "Success!"
Go back down and click on Reina. She's impressed with your success at solving that tough puzzle. She'll create the necessary lightening as soon as you are ready. But wait! You haven't spoken with Fird yet. Nor do you know how Sarah is doing.
Go back to the rail car and see in a cutscene, that Reina casts a powerful spell revealing the ghost of Rizan to his father, Fird, down in the mine. At the rail car, click on the bottom right button and pull the lever to go back to the Mine World.
Go up to the hut. Find Sarah standing to the left near the windows. Click on her to find, to your relief, that she is feeling much better. She gives you another glowing sphere, a MUSICAL SPHERE. Leave the hut and climb the left trail to the mine. Place the sphere in the ring of bells and mimic the same tones as before:
bells 4, 5, 4, 2, 5, 1
The elevator appears. Get on the elevator and go forward at the mine's bottom to talk to Fird. You'll see him slumped over, seated to your left. Go click on him. He is glad to see you this time! He tells you Rizan has forgiven him. Rizan told his father he should help Umang. And Umang tells Fird he needs the sign of the Shadow Legion. Fird warns that this is very dangerous and the sign will keep him safe for only a short time. Also, Umang will never be able to get rid of it. Umang is given a medallion, MILA'S AMULET. Fird places his hands on Umang's head to receive the sign of the Shadow Legion. Umang must find Gugon and break his evil spell on Mila's soul, so she and her beloved Rizan can be joined together in happiness for eternity.
Go to the work table left of Fird and pick up the scrap of paper. It will be read into your journal and will prove to be very valuable in Umang's later harrowing adventures. Now we're ready for some lightening to regenerate the Keepers' portal. We have the sign of the Shadow Legion. Go back to the rail car, click on the bottom middle button and pull the lever to return to the Manula Valley portal.
Turn right and follow the path to the ferry. Get on the platform to pull the lever. Go up and left to the Keepers' portal. Just before you get there, go up the stairs to the right and make your way to the controls again. Click on the central console to hear Umang say the "Its broken." Uh oh! Now what? I thought we had it made here. Turn right and up to hands of the statue. When you see the hot spot, place your staff from inventory there. We can guess the purpose of this move. Now, go back down the hill and take the ferry across to access the rail car again. Push the lower left button and pull the lever to return to the Fairy World. You know your way up to the house by now, but be heartened, this is your last trip!
Click on Reina. In a cutscene, she goes to the roof and casts the lightening spell. She throws huge bolts of energy to the shaft at the portal and the Keepers' Portal is opened again! At the portal, Umang is rejoined by Michael who gives him instructions on how to reach the Keepers and warns him of the dangers of the Shadow Legion. He admonishes Umang to be wary of the caves and of their "many passages." It will be difficult and dangerous for Umang in finding his way.
EPISODE THREE - THE KEEPERS' WORLD
From the center of the portal, where Umang arrives, pan around to see a path and a stone arch ahead of you. See an impressive sculpture high on a nearby cliff wall. This must be the image of an honored Keeper, perhaps one of the ancients of the Clan. Let's have a look around. You might remember this world is no longer the home of the Keepers, but the stronghold of the vicious and predatory Shadow Legion, of which Umang is the primary quarry.
SAVE YOUR GAME
Go forward down the path, under the arch, seven times. Stop short on your eighth step when Umang announces, "This doesn't look safe." If you continue down the path you'll be captured. Ahead of you there appears to be some sort of camp or small settlement. Perhaps, and most likely, it is a guard outpost for the Shadow Legion. Let's see if we can find a safe detour. Turn around and go back up the path, going forward five times. Pan right and go forward twice. Turn right to see some dark, ropey vines hanging over the cliff's edge. Climb them. Turn right and go forward four times. Pan right and cross the stone bridge (remember the arches beneath?) to the other side of the canyon. Go forward five more times, going past the second stone bridge at your left. Turn left and pan down to see a faithful Shadow Legion soldier standing vigil. Turn left, go back one step. Turn right and cross this bridge also. On the other side, turn right and go forward to the odd black statue.
SAVE YOUR GAME
Pan down the back of the statue to see there are two hot spots. Use your crow bar on the lower of the two hot spots. See Umang pry the statue loose and eliminate the guard! Note: If Umang uses the crow bar on the top portion of the statue he will be captured when the guard is alerted by a piece of the falling statue.
Turn right and go down the path until you see that a small landslide is blocking your way. Pan right to see daylight between two tall rocks. Go forward and use the spyglass you got from Nikifor's vehicle. A view of a palace tower is revealed. The cutscene shows a back-lit figure standing in a cave entrance. Then, panning left, see the cave Michael told Umang about, where he should "...be able to enter the palace undetected."
Well, now that the guard has met an early demise down below, perhaps you can find your way to the cave via that route across the cliffs. Turn right, go forward along the cliff three times. Turn right and cross the bridge. Turn right again and follow the path to the other bridge. Cross the bridge. Turn left. Go forward five times. Turn left to climb back down the vines to the canyon floor. Pan left and return around the edge of the portal to the main path. Follow the path under the stone arch, going forward seven times into the guard station area. Pan down right and pick up the SWORD. You'll be needing it! Move left around the standing torch. Pan left to see a large day lit arch. Go through the arch to see a massive stone fortress rising skyward in front of you. This must be the current enclave of the Shadow Legion forces! Intimidating though this palace may be, pan left to see the gallows with the poor, wretched bones of some unwary soul. Now that is intimidating! Its obvious that this bony sentinel is posted here to warn away any curious traveler.
To the right of the skeleton you'll see the way forward to go up into the cliffs. Go forward until you see several scary looking dead trees and a large white rock. Pan to the right of the rock. Go up the path, then turn left and go forward, turn right and go forward. Here you'll be facing the cliff wall.
Turn left and go to what appears to be a dead end. Swing clear around until you see a forward cursor at the edge of the cliff. Go forward. Swing around right again and see a forward cursor back toward the cliff. Go forward to the dark hole above the small ledge. Look for the hot spot and click on it. You'll hear Umang say "Its too high." Using your newly acquired sword, scan the cliffs above you and to the right until the sword highlights. Click on it to bury it in the rock and then, using it as a foothold, scale the cliff to the next higher level. Be sure to turn around and immediately retrieve your sword! You're definitely going to need it! Turn back around and go forward up the ledge twice. Turn left and go forward. Turn a quarter turn right and go forward. You should see dark vines hanging down. Use your sword to clear the path.
SAVE YOUR GAME
Go forward twice. You should hear water gurgling here. Pan right and see a large rectangular rock protruding out over the cliff edge. Go to it. Pan down right to see a waterfall. Go to the waterfall. Pan right and use your water lamp on it. Turn to your right. Go up. Go to your left. Pan down and around to your left until you see a dark vertical slot, an entry hole. Go forward. Now, continue going forward four more times. Turn left and go up. Go left. Go forward twice. Go left. Go forward to hear the surprising flapping of leathery black wings.... you're in
THE CAVE
Go forward. When your cursor highlights get out your now active water lamp. Use it once to go forward. You don't need it anymore so put it away. Go forward, swing left and look down on a corridor of the castle itself. Go forward. Pan up and go forward three times on the walkway between the arches. Look down to see a contingent of guards march through below. Pan right and go forward once. Look down to see a soldier standing guard beside a closed door. Swing to the right and enter the dark hole revealing a large break low in the ceiling. Go forward twice, then pan left and go forward once. Look through the hole. Yikes! Be very quiet. You are directly above Bargul's power chamber.
In a cutscene see Bargul expound on his impatience and that of his warriors, who are eager for action. Bargul asks Gugon about Durad's progress in finding a way to enter the Keepers' world. Gugon explains that Durad's power is weakening and he knows no way to enter the Keepers' world without the tetrahedrons. Bargul wants to know the status of the laboratory experiments. Gugon responds that he needs more time. Bargul gives him an unqualified warning that he must work quickly as time is running out.
Oooops! Umang has fallen through a hole and the sound caught Bargul's momentary attention. But inevitably, Umang is not discovered and he finds himself looking down on what appears to be
THE TORTURE CHAMBER
Drop down into the chamber. Go around the chamber starting at your left. Look at the configuration of the lock on the chamber door. We'll come back to it. Turn right to the guillotine. In close up, turn the wheel upper right and see that the guillotine works just fine. Continue walking around the room past the bones of the poor prisoners bound and caged to the very end. See a mummy case standing up, off to your right. Go there and pan down to the bottom to see a forward cursor. Click on it. Hmm. Another familiar looking lock. Look in your journal to find the scrap of a note you got from the work table in the Manula Valley mine. Ah, there's the illustrated combination.
MUMMY CASE LOCK PUZZLE
There are five positions for the lock bolts across the top of the lock. Just move the bottom two bolts to the third and the fourth positions respectively.
The mummy case opens and the ghost of the "great Trey" appears suddenly! Umang tells Trey he's here to free Mila's soul. Trey is trapped here until Mila forgives him. Trey is guilt ridden for snitching on Mila and Rizan's secret love affair and eventually causing their untimely deaths. He begs Umang to help him gain Mila's forgiveness and offers to help Umang in return. Trey abruptly disappears, after telling Umang that the guards had taken Mila to the vault and he'd not seen her ever again.
Pick up a SCRAP OF PAPER laying in the bottom of the mummy case. It will go into your journal and it bears the lock combination to the torture chamber door. Come out of the journal, then the close up. Go around to the left of the turnstile to the chamber door.
TORTURE CHAMBER DOOR PUZZLE
Move the bolts (top to bottom) to positions:
1, 3, 4, 4, 2, 5, 1
Open the door and walk out
into the cell block of the castle dungeon. You'll be facing three locked
cells. Pan left to see the locking mechanism. Go forward twice and look down
to see two working levers and one (middle) that is broken. In close up, click
on the two side levers. Turn around and go into the open cell on your left.
Click on the SHACKLES
beside the skeleton
on the floor, to take them. Leave and go down the corridor to the last cell on
your left. Pick up and read the note on the floor of the cell:
" Soon they will do
away with me the same as everyone else. The guards will throw me into the
labyrinth to wander lost, hungry and alone. Today I heard a young woman's cry
from the cell next to mine.
I think it is Mila, Bargul's concubine. Like me, she is waiting for her time to come. She whispered to me that she knows a way out of the labyrinth. So an exit from the underground does exist. I just hope they throw us in there together.
They are taking her away. But they are not going to the labyrinth. Perhaps Bargul has had mercy on her?
And now I am alone again. Tomorrow they will throw me in the labyrinth, just like all the other prisoners. I hope I will be able to find the exit."
Leave the cell. (You can't take the note.) Turn left, go forward. Turn left and go down the dark stairs. Go forward, through the door and look down at a dark shaft in the floor. Pan up right to see some sort of apparatus affixed to the wall. Go there. You can't do much yet after you open the puzzle. You can merely move the first and last turning drum.
THE RED BAR PUZZLE 1
The object of the puzzle is to get all four red bars aligned across the drums. We'll need some way to move the two drums that are currently immovable.
Leave the puzzle and pan right to the door. Go out. Turn left and go up the stairs. Turn right. Go two clicks down the corridor. Turn left to reenter the torture chamber. Go left to the guillotine. See a hot spot down at the blade. Turn the wheel at the top right to raise the guillotine blade. Lay the shackle from your inventory near the blade. Turn the wheel to cut one handcuff off the shackle. Place it in inventory. Raise the blade again. Place the remaining part of the shackle near the blade. Turn the wheel and pick up the CHAIN.
Come out of the close up. Turn around and exit to the corridor. Turn right. Go forward twice. turn left. Go down the stairs. Turn right and go forward through the door and back to red bar puzzle.
THE RED BAR PUZZLE II
Turn the far right drum until its handle lines up with the one next to it. Then use the newly created chain on the handle of the drum to the left. This will connect the two drums. Turn the last drum two times and click on the drum to its left to take back the chain. Put the chain in your inventory.
Turn the left most (first) drum so its handle is lined up with the handle on the drum to the right. Use the chain on this drum, the second one. The first and second drums are now also joined. Turn the first drum twice. See that the third drum is also turned. Take the chain from the second drum and put it in your inventory. Turn the right end drum so that its handle is even with the one beside it. Get the chain. Use it on the second drum from the right. The last two drums are joined. Turn the last drum twice. The first three red bars are now lined up.
Take the chain again from the third drum (just click on the drum) and place it in your inventory. Now, turn the last drum 10 times to line up all four red bars. A simple elevator rises from the hole in the floor behind you. In a cutscene the ghost of Trey reappears. He tells Umang that...."no one is living here," and Umang needs to find something to show him the way. Umang says, "Thanks for nothing."
SAVE YOUR GAME
THE LABYRINTH
Before you continue ahead randomly, recall what the note in the cell revealed about Mila, ".....she whispered to me that she knows a way out of the labyrinth." You have Mila's amulet in your inventory. Take it out. Scan the four archways with the amulet until it highlights. Go forward. You'll see Umang walking forward in a cutscene. When its finished, scan the archways again. Go forward. Repeat this two more times. Ditch the amulet in inventory. You end up at a left turn in a corridor. The labyrinth was easy with Mila's amulet to guide the way. Keep going around to the end and enter the door on the right. Trey appears and exclaims, "Its Mila!" He says he can feel her presence somewhere nearby.
THE CHAPEL
Go close to the right wall and scan it with Mila's amulet. When it highlights, put it back in your inventory and use the crowbar on the wall. See Umang knock a hole in the wall. Enter the hole. See Mila's skeleton in close up. Use her amulet to cause Mila's lovely ghost to appear. In a cutscene Mila explains that she doesn't know Umang but the name Rizan perks her right up and gets her immediate attention! Umang tells her Rizan has sent him to release her soul from Gugon's curse. She asks Umang if he knows how to break the curse. He doesn't, of course. Mila tells Umang that Gugon's curse is implemented with a magical orb. This magical orb is kept behind the door with the spider sign. Remember this important little tidbit of information.
Come out of the close up and turn right. Before you leave the chapel, pick up the STONE on the bench. Pan down to see it. Pan up again and go forward twice to find yourself back out in the corridor. Turn right and go through the door at the end. Turn slightly left and begin to climb the watchtower stairs. Go forward twice to see an iron gate. There is no visible way to open it. But, pan down right to see the winch that operates the gate. Click on it to see that it raises the gate, but it doesn't stay up long enough for you to squeak through. Use your stone from inventory on the winch. Go on up the stairs now to the next landing and enter the door on the left.
SAVE YOUR GAME, if you haven't recently.
You've arrived in the gallery of the gargoyles. Aren't they incredibly ugly? If you turn left to look out the windows, you'll see you are high up in the guards' watchtower among the castle parapets. Turn right and enter the door at the end of the balcony. Its fairly dark in here, but take a second to notice the enormous spiral staircase in the center of the room. The staircase is badly damaged. Go forward once to the base of the staircase. Pan right to see a door in an alcove. Go there. See that this is the spider door Mila spoke of by observing the emblem at the top of the door. Its locked though, so we'll have to move on for now.
Turn around. Come out of the alcove and turn right. See another alcove with a second door off to your right. Go there. Open the door and enter a small room with a circular elevator in the center. Go forward on the right side to access two sets of stairs, one going up (right) and the other going down (left). Go down the stairs and, at the bottom, see a cylindrical structure...the elevator shaft. Go around it on the right side.
SAVE YOUR GAME HERE.
Pull the lever on the floor in front of the elevator. Be alert! At this point a cutscene reveals that a guard has heard the elevator in action. When you see Umang standing in the opening and you get control of him, quickly pan right and race back up the stairs. Use your sword from inventory to cut the elevator cable! The elevator and the guard will plummet to the bottom of the shaft. If you miss your chance, and the guard survives, go back down the stairs and begin to go through the door opposite the elevator. A cutscene will start which shows the guard coming back to check on the noise. Again, when you get control of Umang, quickly go right and back up the stairs. Cut the elevator cable with your sword. Umang is "sorry" for the deadly result.
Now, go back down the stairs and go through the door opposite the elevator shaft. Go down around the corner to a corridor. The first door on the left is the guard's relief room. Do not go in there! The door on the right is locked. Go one click down the corridor. Click on the door on your right and enter a small armory. Take the long spear leaning against the wall on the right. Umang says, "This could be useful." (I should hope to shout!)
THE LIBRARY
Leave the armory and go right up the steps to another door. Enter a circular library. In the middle of the room is a metal apparatus. Click on it to see that it is intended to hold a library card. Click forward to go to the back side and open the door to the apparatus' controls. Looks like one wing nut is missing. Back out of the close up and go up the stairs you see to the right of the door where you came in. You'll find a LIBRARY CARD on a window sill. That's all you can do here for now, so go back down and out to the corridor and follow it back around to the elevator. Go up the stairs to the room where you first came into this area and climb the stairs off to the left. You'll find a locked door at the top, with a strange cross shaped key hole.
Go back down and go out the door (behind the staircase that goes down) and on the other side of the room. You're back in the large central room with the broken spiral staircase, where you saw the spider door. Go through the room and out the opposite door. Keep going through the gargoyle gallery. Go through the door at the end. Swing left and go up the stairs to the next landing. Click on the door at left. See a guard standing watch. Umang says he needs to get past him. Swing right. Go on up the stairs and go through the door at the top.
THE BALLISTA PARAPET
Go right to see a control mechanism. It is not yet functional but obviously controls the large central machine, which appears to be some sort of weapon. Go left and climb the short steps. Pan left and you'll see a tower with a light on the left side. This could be Gugon's tower room that we saw earlier from the canyon floor. Swing up to see a white rope hanging down from above. Go back inside and climb the ladder opposite the control mechanism to the left of the door. At the top, turn and go left to see a winch system where the rope you saw below is hanging over the edge. Go there. Swing to the left till you are facing the light in the tower opposite. This is definitely where Gugon (the terrible) hangs out. When your cursor highlights, use the spyglass on the tower. You'll see Gugon in:
THE MAGE'S ROOM
Turn right and get a close up of the winch on the ledge. Click on the long handle at left two times to lower the rope. Back out. Go down the ladder, up the side steps and see the rope hanging within reach. It has a ring at the bottom. Go inside to the main control panel. Turn the big wheel with the orange gauge on it to see, if you haven't noted earlier, that this is a powerful turnstile which controls a huge crossbow loaded with a menacing looking arrow. This apparatus uses torsion to propel the missile and it is called a ballista. A weapon similar to this was used by the ancient Greeks as far back as 400 B.C.
Turn the wheel so the arrow on the orange gauge is at the far left.
Look above the controls to see a second vertical lever above a round receptacle. Use the lever to turn the wheel and lower the ballista into place. Go back up the steps at left and take the ring dangling at the end of the white rope. It will change to a rope and ring icon. Turn around and click this on the base of the weapon behind you. Walk clear around the front of the weapon to its rear. Click on the vertical lever on the upper left. Its hard to see, but the cursor will highlight. Umang shoots the rope to Gugon's Mage Tower. Walk around to where you can see the rope extended to the tower window. Take your spear from inventory and click it on the rope. You will slide over to the tower window.
Click forward to see a page call Gugon to see Bargul. When he leaves, jump in the room and go to the extreme right. See the Spell Book on the pedestal ahead of you. Click on it.
THE SPELL BOOK PUZZLE
Flip through the pages until Umang tells you you've found the "stone ritual." Casting this spell turns the user of the spell to stone! Look at the lines on the symbol on the left page. They indicate seven stations, or seven books to complete the spell. This spell book is Book number 1, which is circled in the graphic. Turn around and take a step forward. Turn around. You are looking at Book 1 on the pedestal. Book 2, according to the graphic on the left page of the spell book is directly to the right. To connect Book One with Book 2 (and subsequent books) the image on the left page of Book 2 must replicate the image on the right page of Book 1.
When you have set the left page to look like the right page of Book 1, study the left page of Book 2. To find that image on the right page of Book 3, swing around and go to the second pedestal on the left side. Find the correct page and then study the image on the right page. You'll find it in Book 4 on the last pedestal on the right side. Find the page with the correct symbol on the left page. Study the right page's symbol. Find it in Book 5 directly left of this pedestal. Establish the symbol on the left page. Study the symbol on the right page. Find it in Book 6 on the left side of the main pedestal on the far end. Study the right page's symbol. Find it in Book 7 up at the front. The first pedestal on the left. SUCCESS! (says Umang)
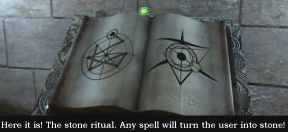 |
||
| Book 1 | ||
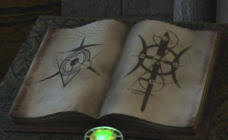 |
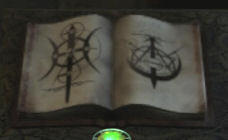 |
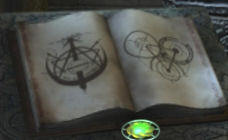 |
| Book 2 | Book 3 | Book 4 |
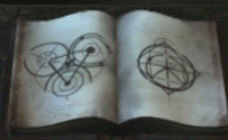 |
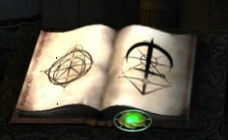 |
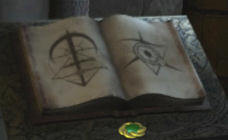 |
| Book 5 | Book 6 | Book 7 |
SAVE YOUR GAME
Go up to the main pedestal with the spell book. You will see Gugon coming back! When you get control of your cursor, pan right and go forward to hide behind the pillar there. Gugon enters and cleverly proceeds to cast the stone spell on himself! Hooray! So long Gugon, we won't be missing ye!
Go down the center of the room to the door and take the SPIDER KEY from the lock. Exit and turn around to see that you've been in the tower room with the strange cross shaped lock you saw earlier. Go down the now familiar stairs. Go through the door behind the other set of stairs to reenter the room with the broken staircase. Go forward and left into the alcove to the spider room door.
THE SPIDER ROOM
Use the spider room key to enter. Turn to your left and get the second LIBRARY CARD and VALVE (wing nut) components you need for the apparatus in the library. Turn left and go to examine the alcove with the cot and overhead shelves. Looks like there's no action here.
Go deeper into the room between the bookshelves. At the end of the room, turn right to confront a large, dark circular mirror. Click on the left side hot spot and see the mirror move down to the opposite end of the bookcase. Go down there and click on the mirror's image. See the image of an emblem on the wall between the two tall windows behind you. Click on the mirror image of the emblem. Turn around and look at the actual space between the windows to see that this emblem does not appear there. Go over to the window wall and click on the hot spot appearing between the two windows. A large bookcase descends into the floor at the left end of the bookcase row.
Go down there and go in for a close up. Umang says "Strange." You'll see an array of nine small niches each containing a dark, transparent orb. Go back to the mirror. Click on its left frame edge to move it back to its original position. Go look into the mirror. It appears that the lower left orb is glowing. But, remember this is a mirror image: so reverse. Click on the mirror image to hear a musical tone. Turn around. Go to the orbs again in close up. Pick up the bottom right orb and see the bookcase rise into position again. Look in your inventory to see that you have the magical orb containing MILA'S SOUL (curse).
Leave the spider room. Go left and forward to the next alcove on your left. Go through that door and across the gargoyle gallery. Open the door at the end. Go all the way down the stairs past the next landing. Go through the door on the right. Open the first door on the left and enter. You are back in the little chapel. Go to the hole in the right wall and click Mila's magical orb, containing Gugon's curse, on her skeleton. Mila appears and tells you to use wind to free her of the curse. Go out the chapel door. Go right and follow the stairs all the way up to the top of the tower. Open the door at the top and climb the ladder on the back wall, to the parapet.
In a cutscene see Umang release Mila from Gugon's curse. She appears once again and she graciously thanks Umang for freeing her soul. She can now be rejoined with Rizan! Mila tells Umang that he must find the place where the Sacred Rings are and where the tetrahedrons were created. And, if Umang is clever, he can trick the Shadow Legion. When Umang asks about Trey, Mila says she will forgive him only if he helps Umang with the Shadow Legion.
Go back to the library: From the roof and the ballista, go down the stairs to the second landing. Go through the door on the right and across the gargoyle gallery to the room with the spiral staircase. Go out the door on the opposite side of the room, to the room with the elevator. Go around the elevator shaft and down the stairs. At the bottom, go through to the guard's quarters and follow the corridor around to see the door to the library at the far end. Go there.
THE LIBRARY PUZZLE
Use the library cards on the front of the center apparatus. Nothing will happen because there's no power yet. Go forward to get to the back of the machine. It appears now that is a sort of robotic librarian. Open the compartment door and insert the valve (wing nut) from inventory.
Turn valves: 4, 11, 9, 6
to power up the machine.
Go forward to the front again and use your library card from the right side in your inventory. The flying robotic librarian will retrieve a critical book. See a rendering of the Sacred Rings laboratory. Go to the next page to see a drawing of how to set the mechanisms surrounding the Sacred Rings to determine the world you wish to visit. These pages are added to your journal.
Use the second library card. The flying robot will collect a book containing the symbols and descriptions for all six worlds to which the Keepers have journeyed:
1. Dangan - Where the Keepers' castle is located
2. Ademica Valley - The place of research and rituals
3. Dragast - The mechanical world of snow and ice
4. Na-Teixu - The esoteric world with four regions
5. Bazzard Desert - A lonely desolate place...no one wanted to stay there
6. The Island of Unity - A lovely island concealed in an underground chamber.
Click out of the close up to place these pages in your journal.
Turn and leave the library. Go back through the elevator area, up the stairs, through the elevator room (to the right). Go straight across the staircase room, across the gargoyle gallery, to the tower stairs. Turn and go down the stairs to the door on the right at the first landing. Open it. Go forward and enter the first door on your right: the torture chamber. Go right to the mummy case where Trey's ghost is imprisoned. Click on the hot spot midway up the case. Trey appears. He's happy to hear Mila's "...soul has been set free. But what about me?" Umang tells Trey that Mila will forgive him if he helps Umang by distracting the guards, so Umang can make his way at last to the sanctuary of the Sacred Rings. In a cutscene Trey scares the holy peawadden out of the guard (and probably you too, huh?) :)
Leave the torture chamber. Turn left and go to the end of the cell block. Enter the door on the left. Turn left. Go up two flights of stairs (the landing below the top of the stairs). Open the door on the left and recognize the flight of stairs where Trey so effectively terrified the guard. Go on up the stairs to see a circular amphitheater type room. Go around to the left to the tall double doors you see ahead. Go through the doors. You'll see another set of stairs with daylight visible at the top, through what appears to be another portal. Don't hang back. Go on up. Walk around the portal and get a good feel for the place. If you play your cards right, you'll be back and soon! (Check out your journal and review the page on the Island of Unity.)
Go back to the stairs and down to the circular room. Go to the smaller wooden door on your right. Enter. Go forward and pan up. You're in the
CHAMBER OF THE SACRED RINGS
Go forward once more. WOW! This is an impressive laboratory and it represents the culmination of a long and arduous journey for Umang. This is the birthplace of the tetrahedrons. Before going the rest of the way up the stairs to the rings themselves, pan left. Walk around the circular walkway surrounding the massive rings. There are four alcoves with control panels. Their appearance should instantly remind you of one of the last graphics in your journal - "Activation of the Mechanism."
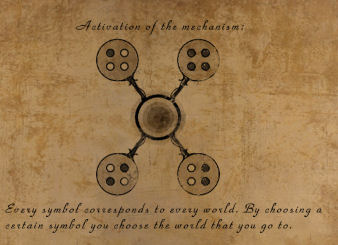
The entry of the configuration is between the bottom two (circles) panels.
Make your way around to the front stairs again, facing the rings. See that there are stairways going up from either side to the center of the rings. Turn right and go one click forward. Pan left to climb the stairs. At the top, look down from the center of the rings to see a large lever. Click on it to hear Umang say "It needs something else." Climb down the stairs. Go right around to the front of the rings again and climb up that last set of stairs. "Hmm....some kind of strange mechanism," says Umang, as he faces a huge black button on the base of the support holding the rings aloft. Click on the button to reveal that it is likely the receptacle for the tetrahedron you've been lugging around for a long time. But first let's get those four control panels on the four surrounding pedestals set properly according to the graphic in your journal.
ACTIVATING THE MECHANISM
Turn around and go forward twice down the stairs. Turn right. Click forward three times. Turn right to approach the first control pedestal. Press down the upper right and lower left rods. Turn and descend the stairs. Pan right. Go forward twice. Turn right, climb the stairs and, at the control pedestal, depress the upper left rod. Turn around. Descend the stairs. Turn right. Go forward twice. Ascend the stairs to the pedestal and press down all four rods. Turn around. Descend the stairs. Turn right and go forward twice. Go up to the pedestal and depress the two rods on the right side. Turn around and go down the stairs. Continue going right until you have completed the circle and are once again standing at the entrance to the rings, where you can see the support base with the black button. Go up there. Open the black button receptacle and place the tetrahedron inside.
Turn around. Go down the steps. Pan left and go forward once. Turn left and climb the upper stairs. Pull that big central lever below the rings. AMAZING! The powerful rings come to life in an impressive display of sound and light! This was really worth waiting for!
We're not through yet, though. Umang must still deal harshly with the evil Shadow Legion, in order to complete his mission to protect the tetrahedrons, which was set out for him by Arakon, Leader of the Keepers Clan. Go back down the stairs and right around to the front of the rings again. Go up and SAVE YOUR GAME. Click on the tetrahedron now encased in the base. Umang asks "What should I choose?" The symbols for the six worlds appear, left to right:
Island of Unity
Dragast
Na-Teixu
Bazzard Desert
Ademika Valley
Dangan
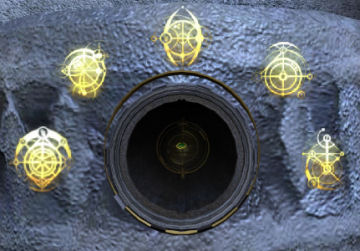
You may choose any world here to see what happens, using your save game to return to this point and start again. However, the Bazzard Desert is the destination you must choose in order to pull a clever and diabolical trick (as Mila suggested) on the Shadow Legion and send them to the Bazzard Desert where they will deservedly remain imprisoned and isolated forever.
Click on the Bazzard Desert symbol, the fourth from the left. The tetrahedron is returned to you. Turn around and go straight ahead five times to the circular room. Pan left and go to the big double doors. Go up the stairs to the portal. At the top, facing the portal, go right around to the back side three times. Pan left to see an ornate gray pedestal rising from the floor. Go over to and stand behind the pedestal. Place the tetrahedron on the pedestal.
SAVE YOUR GAME JUST IN CASE!
When you hear Bargul and his band of Shadow Legion soldiers approaching, and you get control of the cursor, turn clear around and run out to the end of that balcony you see ahead of you. In a cutscene, Umang will hide. Bargul brags to his men about outwitting the boy and he's unabashedly jubilant about finding what he believes is the portal to the long sought Keepers' World. He and his warriors rush into the open portal! So long Shadow Legion!
Go up to the pedestal and click on the tetrahedron to see Umang destroy it and condemn Bargul and his gang to their fate. Justice is done.
In the final cutscene, see contankerous but faithful Nikifor arrive in a clanking new vehicle to rescue a tired Umang. Nikifor provides him with safe harbor and a well-deserved rest.
Congratulations, gamer! Thanks for insuring Umang's success along the rugged way. Good job!
----------------------------------------------------------------------------------------------------------------------------------------------------------------------
This walkthrough may not be copied or posted to another website without the express written permission of the author, Witchen, at gjan1@aol.com or webmaster@gameboomers.com
The content of the walkthrough may not be altered in any way and sites offering the content must also provide a link to www.gameboomers.com
Questions or comments regarding the content of The Sacred Rings walkthrough may be submitted
to Witchen at gjan1@aol.com
copyright© 10/2007 GameBoomers