Sterling's Gift
by White Rabbit
Adventure Games
Walkthrough by
MaGtRo February 2007
April 1865. After reading, click on mirror to start the game.
1. Go to front door.
2. Look at mailbox right of door. Open mailbox and take and read letter.
Take paper clip.
3. Enter and look around each room.
a. Left sitting room - Check picture in a frame at table. Move cursor to
right of frame to turn the frame over. Remove clips and the back cover. Look at
the names of the people pictured.
4. Go forward to the back room where the concert piano is located.
5. Pan left and enter the meeting room.
Go to small table by window. Use paper clip on box. Push the button at
right. Raise lid. Look inside.
Read 2 mails, back of Tom Custer's picture and the diary. Turn pages by
moving hand cursor at right of paper.
6. Go outside and enter the basement and top floor of the white house
across the yard. Turn the lights on at basement using the switches beside the
door. Upstairs, see the ghost of Sterling in bed. Go back inside the main
house.
7. Go upstairs. Check all bedrooms.
Enter back bedroom on left. Move child's bed at foot of bed. Open floor
board. Take plan tube. Put back floor board and child's bed.
Enter bedroom on front right. Take mirror from table.
8. Go downstairs to the meeting room at back of house.
Plans - Place the plan tube on the long table at front of room. Open plan
tube. Place the cursor at bottom left of the plan to move the pages to the left.
Look close on plan 11. Click on mirror to make it fuzzy. Then click on the
pencil markings at bottom left of the plan. Click until the big mirror's legs
are in place and a sound is heard.

Click on mirror at top left to remove big mirror on plan. Pull back.
Put the plans into one pile again by clicking at bottom right of the plans
or click at top left page of the left pile of plans.
Mirror - Click the mirror at top left and it will be placed on the table.
Look close at mirror. Place cursor on the flowers at top right of mirror to see
the back. Take the hook. Turn the mirror over and click on the elbow of
the lady. This hangs the hook on the elbow.
9. Pull back and go to the dining room right of the stairs.
Move the fan fireplace cover aside. Look close at back of the fireplace.
Remove the 2 stones and take the silver locket. Open locket by placing
cursor right side of locket. Close locket and pull back. Place rocks back and
then place fireplace cover back where it belongs.
10. Go back to the meeting room.
Look close at the mirror with the hook
in place. Use the silver locket on hook. Watch. Take the silver locket.
11. Go to the music room which is the room back of the one with the piano
or left of the stairs.
Look close at the armoire. Place cursor at top left of the armoire and get
a key. Look close at key hole. Use key on keyhole.
Pull side bars from both sides of top drawers. Place cursor at top right
of the desk cover to open writing desk.
Open center compartment. Pull out the drawer twice to place it on the
desk.
Click inside of the compartment and push button on the top.
Place cursor on top of the compartment to slide the whole compartment out.
Take the Beautiful Dreamer music sheet.
Pull back and push the compartment back, return the drawer, push drawer
and close door.
Place the lid back up and the side bars.
12. Go to the meeting room again. Face the small table by the window. Click
the music sheet and it will be placed on table.
Look close at music sheet.
Front Cover:
52 - u, 51 - t, 20 -1, 45 - u, 7 - l, 46 - m, 35 - o, 48 - n, 43 - 0, 38 -
t, 39 - h, 10 - l, 1 - t, 49 - t, 28 - n, 33 - p, 24 - h, 21 - n, 23 - t, 11 - o
From diary:
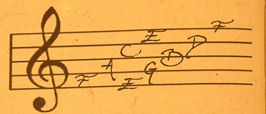
Decode the music sheets using the scale above:
First page: 3 - e, 37 - space, 29 - d, 34 - space, 31 - c
Second page: 27 - e, 19 - space, 16 - space, 41 - space, 32 - a, 5 - g, 42
- d
Third page: 40 - e, 30 - space, 25 - e, 4 - space, 53 - b, 36 - f, 9 -
space, 50 - space
Fourth page: 47 - e, 54 - e, 14 - e, 12 - c, 9 - space, 26 - space, 22 -
space, 44 - c, 8 - d
Back page: 13 - k, 15 - t, 2 - h, 6 - o, 18 - s, 17 - i.
Arrange the letters 1 - 54: the gold locket is in the cap of
the document tube
13 Go to long table.
Look close at cap of the document tube. Click to turn
sideways. Look inside cap. Take the gold locket.
Open and close the locket. Put the cap back upright.
14. Place gold locket on the hook on the mirror. Watch.
15. Turn the mirror over. Move the clips to remove the back cover. Take and
read letter.
The End
This document may not be
distributed without express written permission of the author and the content
may not be altered in any way.
For Questions or Comments
on this Walkthrough, please write to:
MaGtRo
Copyright © 2/2007
MaGtRo
 GameBoomers
Walkthroughs and Solutions
GameBoomers
Walkthroughs and Solutions