| Normal | Hard |
 |
 |
The Book of Unwritten Tales
THE CRITTER CHRONICLES
By KING Art Games
Walkthrough by MaGtRo
Normal mode - December 2012; Hard mode - January 2013
Gameplay: This is a third person point and click game.
The main menu has continue game, save game (later), new game, load game, settings and quit game.
The main menu is accessed during gameplay by the ESC key.
The setting has monitor resolution, graphics quality, edges smoothing, music volume, sound effects, language volume, subtitles and hotspots selections.
There are 2 levels of gameplay difficulty: normal and hard. The hard level are for those that played the Book of Unwritten Tales and thought it was much too easy. :)
To save, click on empty saving slot, enter a name and click on 'save'. Saved game can be overwritten.
The inventory bar is seen when the cursor is placed at bottom of screen. Some items that are not needed are removed at end of a chapter. Items can be combined by clicking one item over another item. Right click will return the picked item to the inventory bar. Combinable items are indicated by a red cursor and message seen at bottom edge of screen. Right click of an item also describes the item.
To switch main character; click on the picture of the other character seen at top left of the screen.
Hints: A dialogue or cutscene can be skipped by clicking on the skip (arrow-door) icon.
Double clicking on an exit (door) icon will transfer to next location immediately.
The ESC key also skips a dialogue.
Right click on an item to learn information about it.
The spacebar shows all the active spots in the screen.
Talk to characters often; they might have new info.
Examine active spots several times and check the descriptions of the items picked up.
Read the manual - it's funny.
This walkthrough is played on Normal difficulty. The red colored text are actions seen on Hard difficulty level.
Thanks to Ludwig for some special help!
Chapter 1: Freedom
Nathaniel "Nate" Bonnett is aboard the airship Mary which he won in a card game. Here flies in Ma'Zaz, the Orcish bounty hunter ready to board the Mary and take Nate back to the Red Pirate.
Try to shoot Ma'Zaz out of the sky:
Deck:
Cannon: Look around. Check the cannon. There is no ammo or gunpowder.
Check the keg left of the cannon to get empty powder keg.
Check the chest right of the cannon. Get confetti, horns and Mardi Gras thing.
Wheel: Check the wheel and the coffee mill.
Steam Engine: Check the cage beside the steam engine.
Take the corkscrew from the empty bottle by the steam engine.
Look and take the rubber hose right of the steam engine.
Check the rope ladder swinging above.
Captain's Cabin:
Go down to the captain's cabin.
Talk to Mary, the wooden figure to learn the history of the ship.
Desk: Check the desk. Read and take the document to get the paper clip.
Check the locked box on the desk and the ship in a bottle.
Pick the lock with the paper clip.
Use the paper clip on the locked box. See the straightened paper clip.
Insert the paper clip through the tumblers until the metal ball at right is reached.
Get a cigar.
| Normal | Hard |
|
|
|
Makeup table: Check the mirror on the makeup table at right.
Take the makeup utensils: cotton balls and powder. Get sulfur also.
Wardrobe: Check the wardrobe at left. Take the skeleton arm.
Barrel: Check the cork at bottom of the barrel.
Use corkscrew on cork and gunpowder (saltpeter) pours out.
Use the empty powder keg on the gunpowder to get powder keg with gunpowder (saltpeter).
Oven: Open the oven at left and see smoldering piece of wood.
Use skeleton arm from wardrobe on ashes in oven. The charcoal drops on the floor and skeleton hides under the wardrobe.
Pick up the charcoal from the floor.
Light the cigar: Use the cigar with the oven. Nate burns his face.
Use the hose with the cigar and then use it with the oven to get a glowing cigar.
Fire the cannon:
Go on deck to the cannon.
Use the charcoal on the coffee mill to get finely ground charcoal. Place the ground charcoal in powder keg with saltpeter.
Add sulfur o powder ket with saltpeter/charcoal mixture to get powder keg with gunpowder.
Use powder keg with gunpowder on cannon. Use confetti on cannon. Light the cannon with the lit cigar.
That didn't work. Let's try again.
Use powder keg with gunpowder on cannon. Use cotton balls on cannon. Light the cannon with the lit cigar.
That didn't work either but Ma'Zaz's cannon ball drops on the deck. Take the cannon ball.
Use powder keg with gunpowder on cannon. Use cannon ball on cannon. Light the cannon with the lit cigar.
That worked with an ending twist.
Free yourself from cage:
Look around the cage. See that the top and bottom of the cage is made of wood.
Use the corkscrew on the rivets of board on top of the cage. A small amount of gap is made.
Chain: Look at the chain above the cage.
In inventory tie the corkscrew to the hose. Try to use the hose with corkscrew on chain. Nate says that it will make a lot of noise and make Zazi mad.
Call Mary for help: Click on open hatch to get help from Mary. LOL.
Plug Zazi's ears: Talk-chat with Ma'Zaz several times. Are we there yet?
Zazi finds ear plugs by the wheel and uses it.
Take down the chain: Now that Zazi's ears are plugged; use the hose with corkscrew on chain. Nate picks up the chain.
Open the cage: Use the chain on grate of cage. Then click on the chain again to pick it up and click it on the flywheel at right.
Nate goes down to the captain's cabin and locks himself there.
Find an exit:
Talk to Mary. She tells about secret cargo hold that leads to the hull.
Move the purple rug at foreground. See a locked hatch. Look close at the lock and see that it has a cheat sheet.
Pull back by moving the cursor at edge of the screen.
Under the ship: Check the ship in the bottle right of the desk.
Take the ship and Nate breaks the bottle.
Look at the stand holding the bottle. It has a symbol - square with a circle inside.
(Smear) Symbol in the mirror: Look at the mirror.
Use the powder on the mirror and see a symbol - an X with a circle above it.
Age of the Mary: Talk to Mary. Captain Olos had the lock installed 12 years ago.
Use the dialogue - look so young. Mary is 81 years young. 81 less 12 is 69. So 69 is the symbol when the lock was made.
Lock: Look close at the lock and turn the symbols to show from left to right: square with a circle inside, an X with a circle above it and 69.
Get Ma'Zaz' axe:
Go through open hatch and be at the hull standing on a tank. See Zazi using her axe on the hatch. It is best to take that away.
Look and take the rope with grappling hook on the railing.
Use the rope with grappling hook on the swinging rope ladder above.
Climb up the ladder to the balloon. Look at the red flag. The flag is tied with heavy rope.
Check the repair box. Nate takes adhesive tape.
Go back down the rope and be at the tank.
In inventory combine the horn with adhesive tape. Then combine the Mardi Gras thing with the horn with adhesive tape to get funstrument.
Use the funstrument on the tank Nate is standing on. The sound made by the funstrument distracts Ma'Zaz and she checks it out.
Nate automatically takes the axe left on the hatch.
Throw Ma'Zaz overboard:
Enter the hatch. Climb the rope again to the balloon above. Use the axe on the red flag.
Go down the rope ladder. Take the rope with grappling hook now that you are done up there.
In inventory combine the red flag with the rope with grappling hook.
Use the rope with flag on Ma'Zaz. Zazi is pulled by the parachute like flag.
Pry off fingers. The ship hits a floating island.
Meet the yeti:
Hear a voice that says Nate fell in a Nature Reserve protected by Petra.
Nate wakes up hanging upside down in a home of a yeti. Look at the yeti.
Look at the cylinder (light saber) in the ice beside the snowshoes. Try to take the handle. You might need to do this twice until Nate curses.
The yeti stuffs an apple in Nate's mouth to stop the curses.
Use the apple on the oil lamp above the yeti. It hits the salt shaker instead.
The yeti trips on the salt shaker and falls unconscious.
The yeti is a costumed researcher named Cornelius Montgomery Happleflapp.
Cornelius trips again and wakes up as the yeti. Nate is now in the pot.
Critter sneaks in and will help Nate.
Chapter 2: Marooned
Make sure that Layla gets her ball back:
Earlier at the sanctuary:
Critter holds a tube while sighing for the love of his life - the leader's daughter Layla. An accident happens and the leader scolds Critter. They speak the local language except for Critter.
The leader takes Layla's globe away from her and places it on the table beside his chair.
Look around the workshop. Check the alarm light and conveyor belt. Talk to Egrofal at left. Egrofal talks about heart and that sand are enemy of gears.
Look at and take the antenna left of the exit door. Exit to outside.
Workshop:
Look around. Check the cable left of the door. Look at and take the adhesive tape from the worktable at foreground.
Check the barrel and the penguin. Look at the crate left of the generator to get straw.
Check the generator.
Ice sheet:
Go right to be at ice sheet. Talk to Ulus fishing. He would not give his fishing string since he is hungry and is catching his food. Fatts.
See penguins and strange woman. Talk to strange woman. She is Petra that protects critters; even the ugly ones.
Yeti cave:
Go to Yeti cave at far left. Look around.
Check the gong above the firewood. Take the scales at foreground.
Search the backpack to get balloon. Play with the lampshade by chair.
Examine the stocking hanging by fireplace. Look at to take ball of yarn on chair.
Check the bodiless head and the cooking pot in the kitchen.
Get apples for Ulus: Take the kitchen knife from the hutch right of the fireplace. Check the apples in the net. Fatts.
In inventory use the adhesive tape with antenna and then with knife.
Use the knife on the antenna on the net with apples to get apples. Exit the cave.
Make distraction at sanctuary:
Ice sheet: Use the apples on Ulus or talk to him to get baited line.
Talk to Petra and Critter snatches the Petra cap. Give the ball of yarn to Petra and she knits something for Critter. It takes time for her to knit.
Workshop: Go left to workshop area.
In inventory combine baited line and Petra cap. Use the Petra cap with fish on the line on the penguin.
The penguin follows the hanging bait and enters the sanctuary.
Sanctuary: Go back inside and see the penguin going around and around.
While the leader is distracted, take Layla's globe from table.
Critter gives the globe to Layla but is tripped by penguin. The globe is broken and Layla is saddened.
Cheer up Layla with stars:
Bouquet: Go back inside the sanctuary. Go to right side and take the colored notes on the wall by the ramp.
In inventory tear up the notes to get colored strips of paper. Use the colored strips of paper with the straw from the crate to get assembled bouquet.
Go outside and give the assembled bouquet to Layla. She is still sad and says lights, beautiful.
Talk to Layla again and learn she wants stars.
Get parts for observatory: Go right to ice sheet. Talk to Petra. Petra might now be finished knitting a stocking. Petra gives the stocking.
Talk to Petra. She wants a stick to hold her protest sign up.
Give Petra the antenna. Critter takes the knife off before giving the antenna to Petra. Critter asks for something in return and gets a colander.
Go back to the sanctuary. Use the green lever beside the ramp to turn off the power outside.
Use the knife on the alarm light. Take the alarm light. Exit.
Use the knife on the cable left of door.
Go to yeti cave and hear Santa deliver presents. Hang the stocking on the hook on the fireplace. Go to the exit and hear Santa.
Check the stocking on the fireplace to get package and stocking. Open the package in inventory to get hourglass and wrapping paper.
Go back to the sanctuary and remember what Egrofal said about sand and gears. Use the hourglass on the gears beside the conveyor belt.
Egrofal replaces the conveyor belt. Take the broken conveyor belt from right wall.
Assemble Layla's stars: Go outside.
Place the alarm light on top of the crate behind Layla.
Place the colander on the alarm light.
Use the cable to connect the alarm light to the generator.
Place the conveyor belt next to generator.
Use the stocking to connect the conveyor belt and the generator.
Now we need one to power it. Click on the treadmill-conveyor belt. The penguin is placed on it.
Talk to Layla. Lokhto.
He's coming. Munkus arrives and demands his weapon. The agreement was for one of the critters' invention for the heart. Munkus wants a weapon and he gives the blueprint.
Find help:
Go outside to the ice sheet and hear the arrival of Nate from the sky. The yeti takes Nate.
At the workshop, try to take the quadrapod on the worktable in front of Ulus.
Use the third dialogue down - Chesaarah-booyak that distracts Ulus to look behind him. Critter takes the quadrapod.
Enter the sanctuary and take the paint pot from floor at left work area beside the new conveyor belt.
Go to Ice sheet and fill balloon with water from the fishing hole on the ground to get water balloon.
Free the human from the pot:
Contraption: Go to the yeti cave and see Nate in the pot.
Take a hook from fireplace and the salt shaker from the floor.
Look at wooden log below the gong. Place the red wrapping paper between the wooden logs.
Place the quadrapod on top of the wooden log.
Put the water balloon on the quadrapod. This produces fire.
Put scales on the sheet of ice left of the wooden logs.
Put paint can on the scales.
Put salt shaker on scales.
Screw the hook into the ice wall.
Place the end of the string on the hook.
Tie the salt shaker to string.
Distract the yeti: Go right. Use the lampshade to hide from the yeti. The elaborate setup made a noise and the yeti goes to check it.
Use the knife on rope that binds Nate. The yeti looks for the hidden guys.
Critter asks Nate for help. Nate exits and finds out what happened to his airship.
Chapter 3: Friend and Foe
Find allies:
Petra: Talk to Petra completely. Learn that she is a vegomaniac.
Ask for the piece of leather as a memento.
Look at the debris right of Critter. Take the wooden plank.
Workshop: Go left to the workshop. Pudalup. Upon seeing the machineries, Nate wants them to help him and he will help in return.
Leader: Go to the door of the sanctuary and talk to Critter.
The leader talks to Nate through the intercom. Learn about Munkus' return and that he stole the "heart".
Learn about them being scientists and observation is their mission.
To convince the leader - select I'm a skilled thief.
Prove that Nate is skilled thief:
Nate has to take the antenna from Petra. The leader calls Critter inside the sanctuary. Nate has to do this alone.
Go right and talk to Petra. She is hungry. Nate has to get rid of her.
Get food for Petra:
Change the yeti to Cornelius: Go to yeti cave.
Check the scarf on the chair. Take the loose thread from scarf.
Take the pickaxe in front of the frozen solid backpack.
Look at the ice wall left of the gong. Use the pickaxe to smooth the ice wall.
Use the leather rag from Petra to polish the wall. Look at the reflection on the wall.
Call the yeti by pulling the string. Watch as the yeti sees himself and Cornelius sees the yeti.
Take items: Go right and check the horseshoe on the fireplace. Take horseshoe.
Check the clay pot right of fireplace to get sugar. See a greasy pan left of Cornelius.
Sandwich: Talk to Cornelius and learn that he is making a vegetarian sandwich.
To get the sandwich select the dialogue - Hmmm....
Get the critter baby:
Remember what Petra stated about her being vegomaniac and not eating anything from an animal.
Go to the workshop and see a critter baby playing in front of the sanctuary.
Talk to the technician and the critter baby. The baby repeats everything he hears in the voice he hears it in. LOL.
Talk to the critter baby 3 times to get a screwdriver.
Get candy for baby: Go to the yeti cave.
Use the sugar from clay pot on the frying pan left of Cornelius.
Use the screwdriver on the lump of sugar in the frying pan to get homemade lollipop.
Go back to the critter baby and try to give the lollipop. Daddy says "no sweets".
Try to take or pick up baby and Daddy says too dangerous.
Another contraption: Look at the metal plate in front of the refrigerator.
Take the spring left of the purple barrel at foreground.
Place spring on metal plate.
Place the wooden plank on top of the spring.
In inventory tie the thread with horseshoe.
Use horseshoe with thread on wooden plank.
Place lollipop on top of wooden plank.
Try to pull the thread of the contraption.
Talk to critter baby. After the critter baby is launched, pick up the lollipop from the snow beside the wooden plank.
Sandwich: Exit to ice field and see the critter baby in the snow. Take baby. Give the lollipop to the critter baby.
Put baby critter in the sandwich. Give the critter sandwich to Petra. Take the sign-antenna.
Go back to sanctuary door. Layla talks to Nate. Nate shows the antenna. The leader will have his best people fix the airship while Nate gets the heart. Critter will help him and report to the leader.
Nate and Critter pictures are now at top left. You can change character by clicking on the picture.
Take a look around:
Go to the wrecked airship and look around.
Check Petra's chest and take the glass water bottle.
Submarine: See the submarine at center of the ice field.
Go to submarine. See 2 Black Guards and a penguin.
Take the small canister by the crates. It is a canister - cleaning solvent with a yellow label.
Airship: See that work has started on the airship. Talk to the technician.
They need steam engine piston and finest machine oil.
Get finest machine oil:
Go to yeti cave and talk to Cornelius. Learn why he needs a code word and that the code word is Mellon.
Ask for machine oil but Cornelius will only give it if the yeti is caught. (But the yeti IS Cornelius).
Catch the yeti: Look at the cell at right and lock yourself in. Nate walks in and closes the door.
Talk to Cornelius. Cornelius asks for the code word. Give him the wrong code word (Bratburger liverwurst) which the yeti will not know.
That was too easy for Cornelius. See that Cornelius is now in the cage.
Nate takes the finest machine oil right of stove.
Give the machine oil to the technician fixing the airship.
Get the steam engine piston:
Go to the submarine. Try to enter the submarine. The Black guard asks who you are.
Answer - My name is irrelevant. Nate will make Munkus an offer. Enter the submarine.
Munkus: Enter the door at left. Look around. Talk to Munkus completely.
Learn about Munkus' history, the heart. Nate trades access to sanctuary for a piston.
See the heart on the table beside Munkus. Nate goes up and talks to Critter.
Piston: Go back inside the sub. Enter through right door to the engine room. Only personnel are allowed in the engine room.
A piston is given by the guard that is hiding something.
Go to the airship and give the piston to the technician.
Steal the critter's heart from Munkus:
Join the Black Army:
Go to the submarine and look-talk to the Black Guard. Nate says to move freely in the sub; he has to join the Black Army.
Talk to the Black Guard. Learn that all positions are full. Maybe we can get rid of the other guard.
Look at the other guard at right and the penguin.
Get rid of a Black Guard:
Airship: Go to airship and see that the technicians have finished fixing it.
Fishing hole: Use the cleaning solvent canister in water hole. The label falls off.
Use the label on the glass bottle to get glass bottle with yellow label.
Give the water bottle with yellow label to Critter.
Change to Critter.
Sanctuary: As Critter, enter the sanctuary.
See the bottle of brandy given to the leader by Layla is similar to the glass bottle with yellow label that Critter has.
Exchange the 2 bottles to get bottle of brandy. Exit sanctuary.
Penguin at submarine: Go to submarine. Get the penguin drunk on brandy. Hahahahahaha.
Then talk-goad the penguin. Watch what happens. The other guard falls in the hole.
Change to Nate.
Black guard: As Nate, talk to the Black guard.
Look at poster. Talk to guard.
Take a number. Talk to guard and then wait to be called.
Talk to guard when number is called.
Select answers:
I let him kill my mother in law and then I shoot him.
I claim I know where the gunpowder is and receive princely sum as a reward for information.
I let the child eat the lollipop. He'll see what he gets out of it.
Nate is accepted as an intern. One of his duties is making coffee in the engine room.
Look for a way to the heart:
Get bottle with yellow label: Change to Critter. Go back to the sanctuary and swap bottle of brandy with bottle with yellow label.
Give the bottle with yellow label to Nate.
Munkus' room: Change to Nate.
Enter the submarine. Enter Munkus' room at left. Look around.
See that the heart is beside a pipe that runs throughout the submarine.
Take the newspaper close to the door.
Engine room: Enter the engine room at right. The guard is hiding something.
Look around. See the pipe goes through here also. There is a torpedo tube right of the coffee maker.
There is a lever by door.
Porthole: Check the porthole and see that it very dirty.
Check the bottle with yellow label in inventory. Use the bottle with yellow label on porthole since Nate says that it is now vinegar.
Then use the newspaper on window.
Now that you have the newspaper, use the cleaning solvent on the porthole.
Now we need someone to look through.
Critter: Go upstairs and talk to the Critter. Convince him to help watch the engineer.
Critter jumps in the water hole while Nate knocks on the engine door.
Talk to a shivering Critter again and learn about something hidden in the pipe.
Take care of engineer: Go back to engine room.
Look behind the pipes for what were hidden - dirty magazines.
Place the dirty magazines in torpedo tube.
Talk to the engineer about the magazines. Watch what happens.
Take the heart:
Take cup of coffee from coffee maker.
Use the lever by door and see that it opens the hatch upstairs-outside.
Critter: Go outside and give the cup of coffee to Critter.
Talk to Critter about the open hatch and getting the heart.
Critter and Nate meet at the engine room. Critter enters the pipe and Nate will distract Munkus.
Munkus: Talk to Munkus while Critter tries to take the heart.
Engine room: Nate takes the heart from Critter and leaves him in the pipe.
Layla: Outside, Layla confronts Nate about the heart and being a thief.
Sanctuary: The heart change to Munkus. Munkus tricked them and is now inside the sanctuary. Layla and the leader are imprisoned while Critter and Nate is to be taken to the submarine.
Chapter 4: Madness
Ma'Zaz drops in the Black Guard and tries to take Nate. Critter saves them and they run to the airship.
Mary, Nate and Critter fly to Seastone to see the Archmage. They are going to ask for his help.
Zazi climbs up from below the airship and is also at Seastone.
Find a way up the tower:
Look around: Nate and Critter talk to the portrait of the Archmage. The tower has its own security system.
Talk to portrait again. The portrait also wants a painting of something to eat and drink.
Look around. See an easel for the portrait's painting.
Check the table with a turntable on top of it at foreground.
Try to climb the stairs and see that the first few steps flip.
Check the fireplace and see a copper kettle. Take the bellows from the side of the fireplace.
See flying flower pot at top of the room.
Use the bellows on Critter - blow up Critter. Critter floats to the balcony above.
Balcony: As Critter, look around at the balcony. See a fountain at balcony and a painting of planet on the wall.
Stairs area: Go right to the passage and see that rooms are placed in different angles.
See Nate standing by the fireplace, the flying flower pot and a corner with a palm tree and black hole.
Basin room: Go through the passage down the stairs at right to be in another room with a circular basin at the center.
Take the flute on the wall right of the entryway.
Gallery: Go right and be in a gallery. Look around.
At the central square walls, see a pig, optical illusion and angel paintings on one side.
The other side has strange picture and a sad clown.
Across the central square is a platform with a circular puzzle.
Find a way to get Nate into the gallery:
Get the black hole: Click several times on the strange picture to search the secret hiding place.
Critter gets a black hole and places it on the wall. He can go through and be in another black hole like the one by the palm tree with basket.
Go back down to Nate; from gallery pass the different rooms and the stairs.
Give the flute to Nate.
Change to Nate and blow up Critter again with the bellows. Up goes Critter.
As Critter; go to the Gallery and enter the black hole to be at the palm tree corner.
Change to Nate. In inventory, play the flute. See that the rope comes out of the basket by the palm tree.
Change to Critter at palm tree corner. Peel off the black hole from wall.
Climb the rope that came out of the basket and Critter is flipped to the basin room.
Go back down to Nate by the fireplace.
Use the portable black hole on the wall right of the fireplace.
As Nate, enter the black hole and be at the gallery. Go back through the black hole again to be back at the fireplace area.
Look for suitable tools in front of the tower:
Exit the tower left of the Archmage portrait. Nate forms a plan to keep Zazi busy while Critter checks the airship.
See Ma'Zaz chase Nate around the fountain.
As Critter: Take the ladder at right and a bunch of grapes. Take the rope on top of the barrel at foreground.
Enter the captain's cabin of airship.
Rummage through wardrobe. Hahahaha - get a white glove.
Take the landing net right of the wardrobe.
Take the quill and wine bottle from the desk.
Use the landing net on the skeleton arm under the wardrobe. Use the glove on the skeleton arm that moved behind the desk. Take the skeleton arm.
There is a metal bar on top of wardrobe that Critter can't reach.
Talk to Mary.
Check the rug and see the locked hatch.
Trap Ma'Zaz:
Go back outside and try to enter the mage tower. This will get Zazi to stop chasing Nate and be back at the airship.
Prepare the trap: As Critter, go outside from cabin. Zazi sees Critter and follows him to the cabin.
Immediately use - throw the skeleton arm at Zazi. Zazi drops her axe and leaves.
Take the axe. Use the axe on the lock of the hatch.
Critter opens the hatch and then covers the hole with the rug.
Ma'Zaz again: Pick up the skeleton arm again by using the landing net and then the glove on the arm.
Peek out of the cabin again and this will bring Zazi to the cabin.
Use the skeleton arm on Zazi again. Zazi falls into the hole and is locked in by Critter.
Go to the mage tower.
Nate: Change to Nate and go to the airship. Enter the cabin.
Take the metal bar from the top of the wardrobe.
Talk to Mary. Nate learns that he has a good heart.
Go back to the Mage Tower.
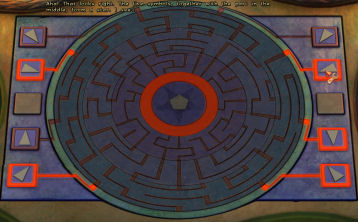
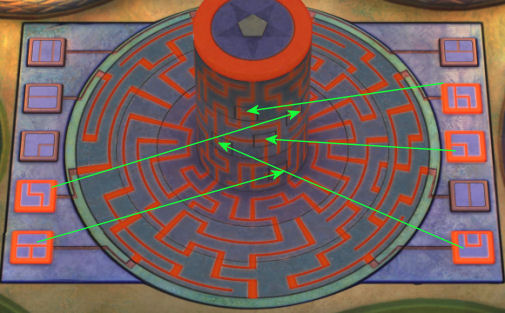
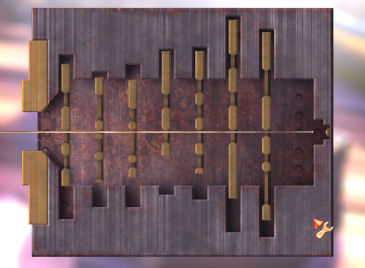
Disk Puzzle:
Go through black hole to be at the gallery. Go to the platform at left that has a disk puzzle.
- See buttons on the side with wedges. Press or light up the buttons with wedges that resemble and at same position as the points of the star at the center.
The center ring turns red.
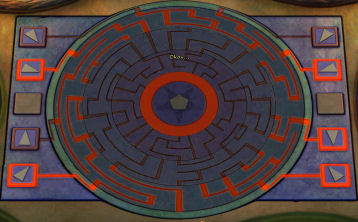
- Turn the outer ring 6 times until the lines turns re on that outer ring and Nate says "okay". Turn the outer ring to show the lines similar to the picture. The Hard mode lines do not turn red.
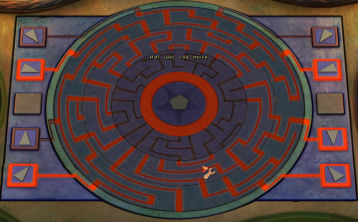
- Turn the middle ring once and the lines turns red. Turn the middle ring 5 times to show the line connection similar to the red lines in the picture. The Hard mode lines do not turn red.
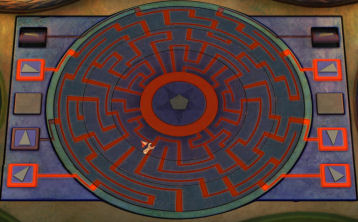
- Turn the inner ring once and the lines turns red. Turn the inner ring 5 times to get the lines similar to the picture. If done correctly, the lines turn red.
- A central cylinder rises up. Take the central cylinder and see that the surface is dull and tarnished. It needs to be cleaned.
Go through black hole to be by fireplace.
Check the kettle with boiling water in the fireplace. Place the tarnished cylinder in kettle. Nothing happened. Nate says this calls for chemical reaction.
Change to Critter. Give the axe to Nate.
Change to Nate. Exit and go to the ship. Check the transport crate by the air ship. The nails are not hammered in all the way. Use the axe on crate. Get iron nails.
Go back to the tower and the fireplace that has the kettle with the cylinder.
Place the iron nails in the kettle with the tarnished cylinder. The oxidation cleaned the cylinder to get a reflecting cylinder.
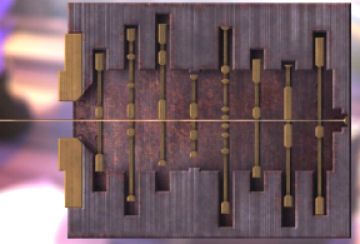
Go back through the black hole. Put the cylinder in the hole on the table. Look at table.
See buttons with lines at the edges. The central cylinder has squares that frame lines similar to that outside.
Look for similar lines on the cylinder and press the matching button outside.
Turn the disk to see more lines in a square.
Turn the disk 7 (3) times. Select the matching buttons. When 5 of those buttons match, the cylinder opens a secret compartment.
Take the odd shaped-angular piece of metal.
Go back down to the main floor. Place the odd shaped piece of metal on the table at foreground. One more hole is missing a piece.
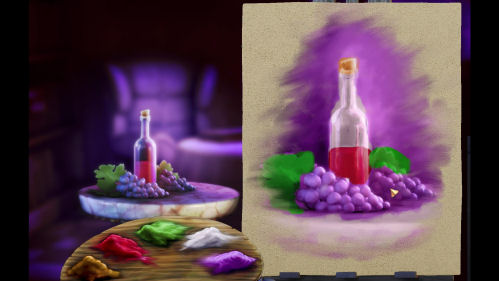
Paint food and wine for the portrait:
Talk to Archmage painting. Ask for angular piece of metal if Nate will paint him food and drink.
Still Life: As Critter, place the grapes and bottle of wine on the table left of the easel.
Give the ladder, quill and axe (done already in hard mode) to Nate.
Get a brush: Change to Nate.
Take the rag hanging on the easel to get a thread.
Use the axe on Critter to get Critter hair.
In inventory combine thread, quill and Critter hair to get Critter hairbrush.
Get canvas: Go through the black hole to be at the Gallery.
Check the paintings to see which one we can use as canvas.
Check the pig, optical illusion and the angel painting. Try to take the angel painting. It holds on to the frame.
As Nate, scare the pig at left using the flute. See the pig jump to the optical illusion painting and then back to the left.
Bring Critter to Gallery. Give the axe to Critter.
As Critter, try to take the angel painting. Exit the gallery and go to the balcony with the fountain. Use the axe on the planet painting on the wall beside the stairs. Pick up the planet painting. Go back to the gallery.
Use the planet painting on the optical illusion painting at center.
Change to Nate. Scare the pig again using the flute. See that it jumps to the planet painting and is thrown to the angel painting. The angel is hit by the planet and is removed from the painting.
Take the blank white canvas.
Paint the Still Life: Go back to the easel. Place the canvas on easel. Use the critter hairbrush on easel.
Look at the still life subject matter on table.
Take the paints hanging on easel.
The painting does not need to be meticulously done.
First paint the whole background with purple paint.
Paint the bottle and the table white.
Paint the wine red.
Paint the cork yellow.
Paint the leaves green and the grapes purple.
Exit the close-up at left of the screen.
Nate shows the painting to Archmage and he says not half bad and accepts it.
The angular piece of metal is with the clown painting by Menet.
Insert the metal pieces on table:
Go to the gallery and check the clown painting at far right on the right wall.
Open the secret compartment. Tell the clown the code word. Hahahahaha. Get the last angular piece of metal.
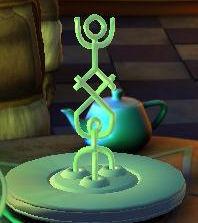
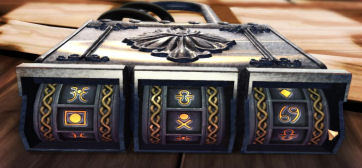
Place the piece of metal on the table at main floor.
Turn the table until it forms 3 symbols one on top of the other.
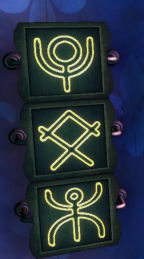
Enter the Archmage office:
Go back to the gallery. Look at the upside down door at back wall of the gallery.
Use the ladder on the balcony above the bolted door.
Climb the ladder. See a close up of the door and the 3 symbols on the left.
Select the 3 symbols shown by the arrangement of the 3 angular piece of metal on the table.
The Archmage door opens. Enter.
Find a way pass the guard plant:
Office: Look around. See the scepter on left side of the room.
The way is blocked by a guard plant.
Look at the guard plant and Nate says that it hears his steps clearly.
Fix the hearing of the guard plant: Look at the knitting on the chair in front of the balcony door. Take 2 balls of yarn.
In inventory combine the balls of yarn with the metal bar taken from the wardrobe at airship to make earmuffs.
Use earmuffs on guard plant. Now it can't hear.
Try to get to the scepter and the plant still blocks the way.
Look at guard plant and learn that it now has keen sense of smell.
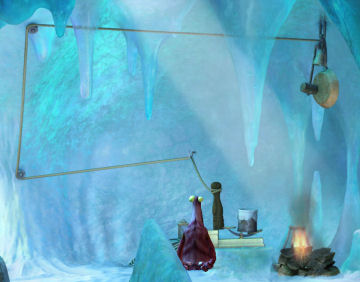
Fix the sense of smell of the guard plant: Take the pipe hanging at top of the cabinet by door. It is a plant whistle.
As Critter, go to the balcony with the fountain. This is the closest location to get the flying flower pot.
Use the rope to lasso the flower pot. Nate says the plant is too far away.
As Nate; go to the fireplace area while Critter is at the fountain balcony.
Use the plant whistle on flower plant to lure the flying flower pot.
Change to Critter. Use the rope to lasso the flower pot now that it is closer.
Nate and Critter got some blossoms from the flower pot.
Go back to Archmage office. Use the blossoms on the apparatus at right to get perfume - Obsession #1.
Give the perfume to Nate.
Use the perfume to spray Critter with the blossom extract. Nate ends up being sprayed.
As Nate, check the guard plant. The plant is all over Nate while Critter takes the scepter.
Ma'Zaz enters and Nate uses the scepter on her.
Chapter 5: End and Beginning
Infiltrate the sanctuary:
Mary: Talk to Mary up the ladder. She drops the wardrobe.
Check the clothing and the wardrobe. Get a metal hanger, purple wig and clown nose.
Guard: Use the scepter of time on the guard blocking the way to workshop.
Make a disguise: Go to workshop. Check the box by the refrigerator to get black dishes (mouse ears). Take the wool from the workbench.
As Critter, try to enter the sanctuary and he is not allowed in.
Give the wig, clown nose, ears and wool to Critter. As Critter, wear those items and talk to guard. See if you can pass as a friend of Munkus. That didn't work.
Make a better disguise: As Nate, go to the yeti cave.
Take the curtain right of the cooking pot. Talk to Cornelius.
Check the lamp left of the fireplace. Use the scepter of time on the lamp twice until the lampshade is like a green beehive. Take the green lampshade.
Go back to the workshop. Use the metal hanger on machine that is penguin powered. The metal hanger glows.
Use the lampshade on glowing metal hanger to get 4 green dishes.
Use the white curtain from yeti cave on purple barrel at foreground to get purple curtain.
Give the green dishes and purple curtain to Critter.
As Critter, combine the purple curtain and the green dishes to make homemade disguise. Use homemade disguise.
Critter takes off the old disguise and uses the homemade disguise.
Sanctuary: Go to and enter the sanctuary door and is checked by the guard.
Critter passes as Tentacle and is allowed in.
Sanctuary:
Munkus gloats about his machine.
Take the flat pipe left of Critter and the door.
Take the pipe wrench by the machine.
Talk to Layla and prisoners. Learn that it takes 2 to open the cage at the same time. The switches at either side of the cage have to be opened simultaneously.
Bring Nate inside the sanctuary:
Intercom: Check the pipe that runs across the top of the exit door.
Using the pipe wrench unscrew the intercom.
Exit the sanctuary. Give the flat pipe to Nate.
As Nate, use the scepter on the flat pipe to get repaired pipe. Give repaired pipe to Critter.
As Critter, go back inside the sanctuary and place the repaired pipe on the intercom.
Get Munkus' voice copied: Talk to Layla twice until Critter asks about baby critter. Get baby critter.
Use baby critter on Munkus. Munkus talks to Critter-Tentacle and baby critter.
Use baby critter on intercom. Hahahahaha.
Nate takes care of the guard and wears its uniform. A new guard arrives.
As Nate - guard, go inside the sanctuary.
Open the cage door:
Use the 2 switches at either side of cage and Critter and Nate open the cage door.
Munkus has them cornered. The guard was called inside the sanctuary.
Nate and Critter and the rest are now outside now.
Lure Munkus outside:
Layla has a plan. She wants Nate to lure Munkus out of the sanctuary and she will fight him.
At the workshop, pick up the apple core thrown by the guard.
Look at the chair left of the entrance and behind the penguin.
Use the scepter of time on chair and it becomes pile of dirt.
Place apple seeds - apple core in the dirt.
Use scepter of time on the planted apple seeds. Pick some apples.
Go left and look at the fan left of the sanctuary door.
Place the apples in front of the fan. Use the scepter of time with the apples.
Munkus: Munkus comes out with his new machine.
Munkus has Nate and Critter cornered close to the generator.
Pull the red cables of the generator and use it on the robot - Munkus.
Not so fast! Is that all?
Farewell. Criv- cootuss.
This document may not be distributed without express written permission of the author and the content may not be altered in any way.
For Questions or Comments on this Walkthrough,
Please write to: MaGtRoCopyright © 1/2013 MaGtRo