The Book of Unwritten Tales 2
By King Art Games
Walkthrough by MaGtRo February 2015
Gameplay: This is a third person point and click game.
Click on the screen to open the book.
The main menu has continue game, save game (later), new game, load game, credits, settings and quit game.
The main menu is accessed during gameplay by the ESC key or the book at bottom right.
The setting has graphics quality, screen resolution, full screen, speech volume, sound volume, music volume, spoken text and subtitles selections.
To save, click on empty saving slot, enter a name and click on 'save'. Saved game can be overwritten.
The inventory bag is at bottom right of the screen. Some items that are not needed are removed at end of a chapter. Items can be combined by clicking one item over another item. Right click will return the picked item to the inventory bag. Right click of an item also describes the item.
To switch main character; click on the picture of the other character seen at top left of the screen.
Hints: A dialogue or cutscene can be skipped by clicking on the skip (arrow-door) icon.
Double clicking on an exit (door) icon will transfer to next location immediately.
The ESC key also skips a dialogue.
The spacebar key shows all the active spots in the screen.
Talk to characters often; they might have new info.
Examine active spots several times and check the descriptions of the items picked up.
Chapter 1
In Aventasia, there is war between the dark army of the Shadows and the Alliance of free people. An archeologist finds an artefact that could end the war. Munkus and Mortroga want that artefact. They were stopped by a band of heroes - Wilbur, Ivo, Critter and ah... Nate Bonnett.
As Nate:
Nate Bonnett's predicament:
Press the spacebar to see active areas in the screen.
Hold on to the rock face. Nate gets on to the large rock at left.
Climb up the rock face. Automatically jump on the broken jetty.
Look at jetty and then walk the jetty to move to the front of the jetty closer to the rope.
Climb up the rope. Nate automatically moves to a log.
Take the oil lamp floating at top left. Nate automatically rubs the lamp to talk to Benny the genie. Benny is not confident in what he does and goes back inside the lamp.
Nate moves to another jetty. Take the carpet. Aha, something Benny can do.
Nate rubs the lamp and apologizes to Benny. He wants a flying carpet.
The jetty is hit and breaks into pieces. Nate flies to the floating island and sees that it is "strange".
Critter hits Nate.
Tutorial:
See the intro and a tutorial follows. Follow the instructions while viewing the credits.
Princess Ivo.
Princess Ivo's predicament:
At the Elf castle, Princess Ivo talks with her mother the Queen. The queen thinks Ivo is gaining weight. Learn that Ivo is to marry Prince Lalilos. He is coming next week.
The queen leaves but locks Ivo in her room.
Check inventory. Right click Prince Lalilos' picture.
Talk to Cheep-cheep. Ivo admits that she has not been feeling well. There must be something in the library to help her.
Bedroom: Look around at the water jug and empty bowl on the table and bed twice.
Examine the red flower on the table.
Open the musical box at small table at bottom right and play it. There's a figurine beside it.
Check the knitted hat on the couch Wilbur gave Ivo for her birthday twice.
Check Critter's painting on the easel and the see the other paintings.
Get rid of Cheep-cheep:
Examine the mirror, Cheep-cheep and the jewelry box.
Talk to Cheep-cheep. Cheep-cheep does not want to move off the box. The bird is mother's spy.
Balcony: Go out to the balcony. Check the telescope three times to learn Ivo's thoughts.
Examine the sunflowers and take some sunflower seeds.
Get Cheep-cheep off the jewelry box: Go back to the bedroom.
Place the sunflower seeds on the empty bowl on the table.
Examine the jewelry box while Cheep-cheep is eating the seeds.
Take the mirror. Cheep-cheep goes back to his perch after seeing there is no mirror.
Take care of Cheep-cheep: Prop the mirror on the figurine in front of the music box at bottom right.
Cheep-cheep lands on the musical box to see himself on the mirror again.
Open the musical box. Cheep-cheep is now inside the box and promptly falls asleep.
Explore the garden:
Get off the balcony: Go to the balcony. Get more sunflower seeds.
Exit through bottom right exit.
Garden: Look around. Examine the happy willow twice.
Check the pond and the water plants. Take water plants to get a cut reed and reed head.
Go right and check the waterfall and the door to the throne room.
Examine the empty bird bath at left.
Arbor the gardener: Examine and talk to Arbor the bonsai Ent at left. Learn about the Elfburrow seasons (always autumn), mother and theorist father.
They looked at one flower given to the queen. It is the only one that is not well.
More of garden: Look at the bush that has red flowers to learn that grandmother was the one that gave names to most of the plants.
Examine the shallow bowl-magic mirror that mother uses to check on the land. It needs water.
Look at the bee's nest on the tree.
Sick lovelily: Check the sick flower that Arbor is studying. Talk to Arbor.
Take the stone - Arbor's sheep dog where Arbor was at.
Go to the library:
Go to the library under the balcony. Look at everything.
Check the dice, helmet, stuffed monster, dragon's head and swords at center of room.
Talking elf medicine book: Check the book shelf at bottom of screen.
Get the Almanac of Elf Medicine. Talk to the book. The book diagnoses Ivo of having a broken heart.
The Seastone book wants Ivo to make a potion to be sure.
The ingredients of the potion are: green fruit of Metus bush, honey and red herring.
Get green fruit of Metus bush:
Go back to the garden and ask Arbor about the Metus bush. The bush has red fruits. Learn that it gets green fruits as defense mechanism when it is scared.
Go back to the library and examine the trumpet like flower at bottom right of the library. Learn that it is used for declaration of war. Look again to take a flower.
Go back to the Metus bush. Use the flower to scare the bush. Pick green Metus fruits.
Get red herring:
Talk to Arbor again about the potion. Borrow his fishing rod.
Examine the pond and learn that the fishes are red herrings.
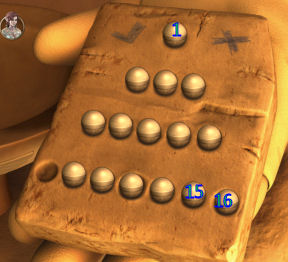
Use the fishing rod on the pond. See that the fishing skill is now 1.
Go back to the library and read the fishing book at bottom left shelf.
Go to Arbor's pot and take worms. Use worm with fishing rod. Ivo will add the bait whenever the rod is used.
Fish the pond again until fishing skill is at least 4.
Go back to library and read the fishing book again. Learn what there is to know about fishing.
Go back and fish again (skill jumps to 15) until a red herring is caught (fishing skill - 16 or 24).
Get honey:
Talk to Arbor again about potion. Learn about honey and smoke used to calm the flowers.
Arbor will not rest and have a smoke unless the sick flower is cured.
Cure the flower: Go back to the library. Look at right book shelf. Read the plant book of Aventasia.
See the sick flower illustrated at bottom left of the book. It is a lovelily. The lovelily usually does not survive separation from its partner.
Go to the bedroom through the stairs under the dragonhead.
Look at and automatically take the beautiful flower on the table.
Go back to the sick lovelily in the garden. Show the lovelily the flower stem from the bedroom. Ivo sheds tears.
Bees: Arbor can rest now. He sits on the bench and smokes.
Examine the beehive. The bees are calmed down.
Use the reed on the beehive. Get sweet honey on leaf.
Examine the flowers. Look at and take Arbor's spade on the ground.
Potion and diagnosis:
Make the potion: Go back to the bedroom.
Put Metus fruit, red herring and honey in the empty nut bowl on the table.
Take the jug of water beside the bowl and pour water in bowl.
Use the stone (Arbor's sheep dog) to pound the mixture.
Ivo pours the medicine into the glass.
Book: Go back down to library and talk to the medicine book.
Cheep-cheep flies in and inquires what's happening.
Drink the medicine. Congratulations, Ivo. You are pregnant.
Ivo's declarations: Nate and Ivo have never had sex.
She must be cursed. They have to go to Arch Mage Alastair at Seastone for answers.
Cheep-cheep does not know today's password and they have to find transport.
The queen's magic mirror should know today's password.
Get information:
Talk to the medicine book again about sex and pregnancies. It takes 4 years for elf pregnancies. Ivo is now on her 6 months of pregnancy. Being in the human world will hasten elf pregnancies.
Go outside and talk to Arbor. Learn about how the magic mirror works. The queen pours 3 vessels of water and mumbles something.
Magic mirror: Look at the magic mirror stand twice.
Look at the 3 droplet symbols on the bowl-vase. One droplet has a line under it, another has line above it and the third has a circle around it.
These lines are seen in the throne room.
Throne room: Enter through the door right of the waterfall.
Queen: The queen talks to Ivo. There is an epidemic in Seastone. Objects and beings are being changed. Terrible power is creeping throughout the kingdom. The power is pink.
Look at the stone tablets-symbols on the 3 columns. Talk to the queen about the symbols.
The symbols represents the 3 forms of water: water that falls from sky, water that springs from earth and water bathed by moonlight.
King: Talk to the king sleeping on the ground leaning on the trunk of the tree.
Ivo being pregnant not by natural means - must be magic.
Collect the waters for the magic mirror:
Collect moon water: Look at the moon well right of the queen.
Exit through exit icon at bottom right corner of screen.
Go back to Ivo's bedroom. Take the jug from the table.
Go back to the throne room.
Talk to the queen again after checking the moon water well.
Ivo needs it for a potion - a beauty potion.
Go down to the magic mirror. Pour the moonwell water into the bowl. One of the symbols is glowing.
Collect water that falls from the sky: Use the jug on the waterfall.
Go to the magic mirror. Pour the waterfall water into the bowl. Two of the symbols are now glowing.
Collect water that springs from the earth: Talk to Arbor about a certain kind of water.
He gives water that came from him.
Go to the magic mirror. Pour the ground water into the bowl. All symbols are now glowing.
Get password from the magic mirror: Ivo talks to the magic mirror.
The magic mirror doesn't like stagnation; it gives someone a shove to move them in the right direction.
Ivo will be involved in the fight against the epidemic in Seastone. Good fights evil.
Things repeat themselves. The mirror does not want to talk about sex.
Ivo guessed the password. It is Mellon.
They will see each other again in a flying town.
Get info about transport:
Pond: Look at the pond. Ivo says there are many things accumulated there. Maybe there is something useful.
Fish in the pond until the fishing score is ~22 to reach 1000. Get a Master Angler fishing hat. Ivo wears it. You can remove it in inventory.
Transport: Go to the library and talk to Cheep-cheep. The bird shows a flight magazine to Ivo.
The article is about hippogriffs at Blue Mountain. The hippogriffs price is a pot of gold.
Get a pot of gold:
Carpentry book: Take the carpentry book at top left shelf of the bookcase. Read and then take the Working with Wood book. It shows how to build furniture.
Show the carpentry book to Arbor at the garden. It's a horror story for the Ent.
Happy willow: Look at the happy willow. Part of it is covering the waterfall already.
Use the carpentry book on the willow. Ivo reads a tree horror story. The willow is not happy anymore. Its branches droop down and the waterfall is exposed to the sun producing a rainbow.
Rainbow: Look at the rainbow.
Look at the end of the rainbow on the ground by the Metus bush.
Use the Arbor's shovel to dig at the end of the rainbow. Get a pot of gold.
Talk to Arbor about the spade and hole. If Ivo is wearing the hat, learn that Arbor has been trying to get one for years.
Get Cheep-cheep able to carry the pot of gold:
Give strength to Cheep-cheep: Talk to Cheep-cheep about the pot of gold. The bird cannot carry the heavy pot. Ivo says they have to make Cheep-cheep stronger.
Go to the throne room. Talk to father. Ask about Cheep-cheep. If you don't have sunflower seeds, get some from the plant at the balcony.
Talk to father and show him the sunflower seeds. He sends a white ball into the seeds.
Go back to Cheep-cheep at the library. Give the bird the magic sunflower seeds.
Cheep-cheep flies around and takes the pot of gold. He flies out to the Hippogriff at Blue Mountain.
Hippogriff: Exit to the garden. See Cheep-cheep fly back with a box. The bird drops it on the balcony.
Go to the balcony. Talk to Cheep-cheep. Look at the box. The stud has the hippogriff already in the box when the bid got there.
Open the box and see a small pink hippogriff.
Look at the demolished box. Talk to Cheep-cheep.
Ride the hippogriff. Ivo picks up a newspaper littering the floor of the box. She reads that the Arch Mage was murdered by Wilbur Weathervane. Someone is responsible for the epidemic and is trying to hurt our friends. Ivo flies to Seastone.
Professor Weathervane.
Wilbur Weathervane's predicament:
A few days earlier at Seastone, Professor Wilbur meets the students at the Magic Academy.
The young boy is rude to Wilbur. The young girl in pink dress likes Wilbur but her mother does not.
Wilbur is asked questions that he cannot answer; like the name of the famous gnome magician.
Bedroom: Wilbur automatically goes to the bedroom and have a panic attack.
Look at the old shoe by the "home" rug by door twice. Take the loose pages that was inside the shoe.
Look at the ear trumpet on top of the door. Look around at the junk.
Look at and take the package of pet food.
Look at and open the magic set. Look at the magic contract under the window twice.
Look at the family photo above the bed several times and the aviator glasses on right wall.
Examine the teddy bear and the bed. Examine the magic stove. It is hot.
Look at and take the magic wand beside the magic ball.
Look at and use the magic ball to talk to Master Markus. Wilbur calls the wrong number.
Get Fridolin off the notebook:
Look at Fridolin the rabbitsheep 3 times. He's eating the notebook that has Master Markus number. Try to take the notebook.
Give Fridolin some pet food. He still would not get off the notebook.
Use the pet food on the bed. Wilbur spreads some pet food to lure Fridolin to get the pet food. The smart rabbitsheep jumps to get the food to fly to him.
Wilbur reads the empty box and realizes the food should have been soaked before feeding. Get empty dry food package.
Take the bowl of water and give Fridolin a drink. Fridolin inflates. Roll Fridolin to the side to take the nibbled notepad.
Read the notebook in emergency. It has Master Markus' emergency number.
Face the class:
Master Markus: Use the magic ball. Wilbur calls Markus.
Master Markus gives motivational talk to Wilbur. Arch Mage Alistair is up for reelection. Asks about the gnome magician that held off the dragon Gremar. The gnome's name is unknown. Markus sold the magic school and is going on vacation to enjoy role playing games.
Teach: Exit the room to go the classroom. As advised by Master Markus, Wilbur does magic. Wilbur takes the fairy spell from the podium, made magic and releases 5 "fairies". He dismisses the class. The boy leaves.
The mother of the young girl in pink outfit shoots one of the "fairies". She is running against Arch Mage Alistair at the election. She is the Merchant Council leader. Headmaster Horatius Bloch will expose Wilbur's incompetency.
She pushes campaign brochure on Wilbur.
Learn that the "fairies" he produced are flying kobolds. Cybil Van Buren takes her daughter out of the school.
Explore the classroom:
Chantal's desk: Look around. Look at the campaign brochure left by Cybil on the left desk. Check the desks to learn about Chantal and Timmy.
Look and open the desk flap. Look at and then try to take Chantal's fairy tale book.
Timmy's desk: Search Timmy's desk. See an automation spell etched inside the desk flap. Wilbur copies the spell.
Fish tank: Look at the fish skeleton inside the dry tank. Take a sharp pointed fishbone from the fish skeleton.
Look and then open the treasure chest. Get old coins from the chest.
Look at the diagram on the board right of the exit.
Carnivorous plant: Look at the plant around the post and water pipe several times. It grabs a flying kobold. It also tries to take Wilbur. Try to approach the plant. It releases a gas cloud.
Oven: Look at the oven twice and get loose book pages. It seems that 5 more pages are missing.
Look at the chemistry area by the oven and the cages suspended on the ceiling. Look at the flying kobold.
Podium: Look at the book on the podium. Look at and read the roll book. Take the magic wand from the podium.
Magic apparatus: Look at the magic apparatus right of the blackboard. It is the apparatus that corrupted Allerdyce.
Look at the roll book again for reference about Allerdyce. Learn that Allerdyce made the fire maker apparatus and he was committed to an asylum because of that.
Check the roll book again and learn that earlier they confiscated his papers and sent him the dungeon. His papers should be around yet.
Get information from Arch Mage Alistair and Rémi:
Exit the classroom through the door at left. See Arch Mage Alistair and Rémi, the former King of Thieves.
The Arch Mage has sensed something evil-dark magic at the school, at lower town and upper town. Headmaster Bloch is Council Leader Van Buren's man.
Rémi talks privately to Wilbur about an attempt on the Arch Mage's life. Rémi, the appointed Head of the Secret Service wants Wilbur to keep an eye out.
They will meet at inn afterwards.
Entrance Hall: Check the floor and suit of armor.
Look at the tapestry behind the armor several times. Get old magic thread.
Look at the 2 levers left of the tapestry and armor. Use the lever(s) and see that they open and close the windows above the stairs.
Look at the sheet of paper at left corner to get another loose page.
Look at the 2 kobolds at top of the stairs.
Take the loose dry boards from the stairs.
Classroom: Enter the classroom again and check the desk. See a package on the podium.
Take the package. It is a magic slate. Wilbur thinks that the A on the card means the Arch Mage sent the package.
Headmaster Bloch:
Go right to the staff room and meet Headmaster Bloch. He doesn't think Wilbur has the proper credentials.
After finding Wilbur's faults, he explains his tasks. Tomorrow Arch Mage Alistair will inaugurate the school. Wilbur is to help the caretaker hired by Van Buren to make the school presentable. Wilbur is to clean the floors and remove cobwebs; also get rid of the flying kobolds.
Then he is to locate the missing library. Wilbur thinks this is the perfect opportunity to help Rémi.
File cabinet: See a file cabinet in front of Bloch's desk.
Click on the alphabets to read the files on the students and employees in the school.
Click on A and check Allerdyce file. Get a yellowed design drawing from his file.
Look at the drawing in inventory. It says that you fill the fire maker with flammable gas and then ignite it using complicated technology.
If you want read all the files.
Open loops spell: Talk to Headmaster Bloch about the notes with small holes.
Wilbur says that he has a binder for his spells. Bloch gives Wilbur an open spell to archive.
Read the new spell in inventory to learn that it is for opening tabs, loops and the like.
Staff room: Look around.
Look at the locked display case. The pride of place is for a Broom Ball tournament. Broom Ball is played with broomstick.
Look at the clock with 10 hands above the fireplace.
Look at the diagram right of the fireplace to learn about the Fireplace Travel Network, It shows which fireplaces are connected. One can travel from one fire to another fire. It shows that the staff room fireplace is connected to the library fireplace. Wilbur needs fire and fireplace travel powder to use the network.
Take the bellows below the diagram. There is firewood left of the fireplace that he is not allowed to use because they are school property.
Look at and take the paper swan beside the door to get another book page.
Get rid of the kobolds:
Troll: Look at and then talk to the troll. The troll is a difficult creature. He found a penny on the door. He didn't like that because it wouldn't open.
Kobolds at entrance hall: There are 3 kobolds left. Out of the 5 released, one was fried by Van Buren and the other was eaten by the plant in the classroom.
Kobold 1: Talk to the troll again about the kobolds. The kobold sitting on the banister lands on the back of the troll. The troll hits his back smashing the kobold.
Kobold 2: The other kobold is located high above the entrance hall.
Use the levers on the wall to open the window. The left lever opens the top window and the right lever opens the bottom window.
Open the bottom window using the right lever. The kobold will fly and land on the top closed window. Pull the left lever to open it and the kobold will be flipped to the open bottom window. Bye!
Kobold 3 in the classroom: Go to the classroom. See that the kobold is kissing the picture of the princesses in Chantal's fairy tale book.
Wilbur takes the fairy tale book.
Use the fairy tale book on Chantal's desk to lure the kobold into a trap. Wilbur calls the kobold and places the book in the desk flap. The kobold is inside the trap.
Talk to the captive kobold. Wilbur opens the lid and was bitten. He inadvertently stuns the kobold. Wilbur places the kobold in the pencil case.
Sweep the floor:
Door: Go back to entrance hall. Look at the front door at left. The door is made up of 3 doors: for large creatures, regular size and smaller creatures.
Unlock the display cabinet to get a broom: Use the old coin on the door to jam a coin on the door.
Talk to the troll. The troll looks at the door. While he is checking the door, use the opening loops spell paper on the key ring on his belt.
Wilbur casts the spell and the key ring drops on the floor. Pick up the key ring.
Go to the display case in the staff room at right.
Use the heavy key ring to unlock the display case. Take the broom.
Sweep the floor: Go back to the entrance hall.
Use the broom to sweep the floor. Wilbur realizes the problem inherent in manually sweeping the floor. He drops the broom on the floor.
Use the automation spell with the broom to enchant the broom. Look at the broom.
Get the fireplace travel powder:
Remember that the staff room fireplace is next to the library fireplace. Wilbur needs fire and fireplace travel powder to use the Fireplace Travel Network.
Go to staff room and talk to Bloch about the caretaker and then the tasks.
The floor are swept and the kobolds removed.
Ask about the fireplace map concerning the Fireplace Travel Network.
Bloch shows his fireplace travel powder but would not give it to Wilbur.
Use the bad tempered kobold in the pencil case on Bloch. Bloch swats the kobold.
Wilbur takes a pile of fireplace travel powder.
Make a fire at the fireplace.
Prepare the fireplace: Try to use the firewood in the fireplace and Bloch stops Wilbur from using the school's property.
Use the dry boards taken from entrance hall stairs in the fireplace.
Answer Bloch: They're just a few old boards. Better to burn them than throw them away.
Put empty dry food package into the fireplace. All it needs is fire now.
Broom: Go to entrance hall and try to stop-disenchant the broom. Right click and try to disenchant the broom.
Get fire: Go to the classroom.
Review Alledyce's yellowed design drawing. It says that you fill the fire maker with flammable gas and then ignite it using complicated technology.
Get flammable gas: Approach the carnivorous plant on the column. It releases the green stinky gas.
Use the bellow from the staff room on the green gas.
Activate the fire machine: Use the gas-filled bellows on the fire machine. Start-activate the machine.
Use the nibbled notepad on the apparatus. Wilbur cuts the notepad into pieces. One of the strips is lit.
Light the fireplace: Double click the exit of the classroom.
Double click the exit to staff room. Light a paper when the paper seems to be burned out. Walk a few steps towards the room. Light another paper and so on until the fireplace. (Thanks mbday630!)
Take the lit strip in inventory and use it to light the prepared wood-paper in the fireplace. A fire is made.
Explore the missing library:
Travel through the network: Use the fireplace travel powder on the fire.
The fire turns green and is cool. Enter the fireplace and be in the library. Owl, worm rat...
Books: Wilbur hears something in the library. He's held down by talking books.
Talk to the books on top of him. The books are acting confused and scared.
Wilbur stands and the books are flung away. Wilbur wants to find out what is wrong.
Explore: Look at and take the fire spell note from the mouth of the bear rug on the floor.
Take the doily from the box right of the bear rug.
Check the drawer of the desk to see that it is empty.
Look at the books on the shelves and then speak to the books by the desk.
Look up to check the other books at upper floor.
Look at the wall that looks like a door.
Fix the loose book pages:
Desk: Look twice at the desk to get a close up of the desk.
Look at the jellyglowfish that is the source of light at top left.
Take a loose book page at bottom right.
Look at the broken book and get another loose page.
Wilbur decides to fix the book to prove to the other books that he means no harm.
Check the loose pages in inventory to see how many pages are still missing. There is one page still missing.
Magic slate: The magic slate gives information. The pages can be sewn together to form quires. Then they are glued together using paste, glue or troll snot.
Make a new fire to exit the library: Take the empty drawer and place it inside the fireplace.
Add nibbled notepad to the fireplace.
Use the fire spell on the fireplace to light the wood.
Add the travel powder. That was the last of the powder. Exit the library.
Get paste or snot: Go to entrance hall.
Talk to the troll. Use the doily on troll. Wilbur used reverse psychology to get sticky troll snot.
Get the last loose page: Go back to staff room.
Talk to Bloch about tasks and the library. Bloch wants the library to be accessible through a door. Bloch has a loose page to return to the library.
Continue to talk to get a loose page.
Fix the loose pages: Go back to the library through the fireplace. Look close on the desk.
In inventory combine the sharp fishbone with the red old thread to get needle and thread.
In inventory combine the needle and thread with the loose pages to make quires-stitched together book pages.
Combine the stitched together book pages with the rest of the broken book on the desk to get Wilbur to automatically make a repaired book.
Wilbur reads Gulliver Travels.
Books: The repaired book wants Wilbur to continue to read. The rest of the books asked to be read. Wilbur starts reading.
Wilbur exits the library through the door left of the entrance hall stairs.
Take care of the cobwebs:
Go back inside the library via the door. Look at the new library.
Old Law book: Look at the book on left bookshelf. Read and then take the Laws of Aventasia. There's a law that prohibits persons less than 1.5 meters from working on heights more than 3 meters.
Bloch: Go to Bloch at staff room and talk to Bloch about the cobwebs and the law book. That takes care of the cobwebs.
Books:
Info on books: Go back to library. Look at the book on the fireplace steps to learn that the books woke up from sleep and remember the contents of their books.
Learn why the library went missing and the need to be read.
Sorcerer Apprentice: After talking to the book on the fireplace, talk to the Sorcerer Apprentice book by the bear rug to learn how to send the broom back where it belongs. It recites the spell.
Rotten books: Go back to the library. Look at the rotten books at bottom left. It became rotten because of leaky roof. The fireplace book says that the rotten books are ruined but the time travel book on the desk says otherwise.
Emmett the Time travel book: Talk to the blue time travel book on the desk. The book recognizes Wilbur.
The book thinks that time travel can be done without magic. Imagine the time you want to go and you are there.
Fix the leaky roof:
Wilbur wants to travel to the past.
Back in time: Look around at the library shown in a pixelated screen.
Talk to the books on the shelf. Examine the desk. The librarian is not here.
Look at the pile of books right of the bear rug.
Look at rotten books by fireplace. Wilbur has not gone back far enough in the past.
Look at the desk twice to get nails.
Talk to the books on the shelf again. Learn about the hole in the roof and the time travel book.
Hear the time travel book under the pile of books. Free the time travel book.
Go back further in time.
Further back in time: Ah memories. Look around in this graphic-text adventure.
Look at and open tool box. It is locked.
Look at books on the shelves.
Look at the books close to the fireplace. Talk to the intact books. They do not want to move. They believe the roof leak will be fixed.
Look at the ladder. Climb the ladder. Without tar paper and such, Wilbur cannot fix the roof.
Talk to the newly bound time travel book on the desk. It leaves the library after finding out about time travel.
Talk to the intact books by fireplace to reminisce about the past.
Text adventure way way back in time: Read the text. Select these dialogues:
Look at...
...the workman.
Use...
...the flap opening spell...
...the leather cord.
Take...
...the key.
Look at...
...the library.
Take...
...the roofing paper.
Talk to...
...the old books.
I have to travel to the future.
Further back in time: Be forward a bit in time
Open the toolbox. Automatically take the hammer.
Fix the leaky roof: Now that all items are collected, climb the ladder. Wilbur fixes the leaky roof.
Talk to the intact books.
Present time: Wilbur reads the note left by the time travel book. The book left a stylish paper hat for Wilbur.
Look at the formerly rotten books and the fireplace. Exit the library.
Finish the tasks:
Stop the broom: Go back to entrance hall.
Disenchant the broom. Back now, broom into the closet! Be thou as thou wert before!
Pick up the broom.
Bloch: Talk to Bloch. Bloch gave more tasks: clear the rubbles from other floor, fix the holes on roof and take care of food before tomorrow.
Bloch goes to the exit door and leaves. The troll also leaves.
Leave the school. The magic slate states that the golems can do the work.
Another Bloch exits the staff room and talks to the door.
Chapter 2
Somewhere in Aventasia, Nate is being interrogated. Nate tries to recall what happened to him; from being hit by Critter and the transformation of the place that happened later. Nate complains of fragmented memories. Everything was blurred.
Hangover - As Nate:
Tavern with Red Pirate:
A drunken Nate talks to drunken Red Pirate. Talk to Red Pirate that formerly owned the airship Mary that Nate won in a card game (Critter Chronicles).
The bounty hunter at left bound and brought Nate here.
The Red Pirate is a collector of Magical artefacts. He wants the Artefact of Divine Fate that the heroes retrieved in TBOUT 1.
Try to hit the bounty hunter by clicking the fist on the all dialogue bubbles.
The bounty hunter takes Nate outside to sober him up.
Nate and the bounty hunter are in cahoots to get the magic lamp from the Red Pirate. Nate observes something is wrong in the place. Everyone is gone. Only the Red Pirate and his men are here.
Nate collapses into the water trough.
As Critter:
Get Nate sobered up:
Outside the tavern: Notice the statues, pillories and notices on the board.
Take the pan from the statue by the tavern entrance.
Inside the tavern-palace: Look around.
Look at the sword on the stone. Try to pull the sword.
Look at the cornucopia in the pool.
Look at the Red Pirate and the cloth he is holding.
Look at the compass right of the divan and the oil lamp under glass at bottom right. This is the lamp Nate and the bounty hunter want. Try to take lamp but the monkey bartender screeches an alert.
Take old peanuts from the bartender's counter.
Bartender recipe book: Look at the book on the counter.
Click on a recipe and Critter will sound the name out: Mojito, Baboon's bottom, Burning Mary, Grog XD.
Turn the pages by clicking the edge of the pages.
The last page has a hangover cure. Tear out the page.
The ingredients are milk, salt and peppermint.
The shake moves are 1. Beep Boop, 2. Mangnag, 3. Donkadonk, 4. Freak out.
Order the different drinks and then watch the Monkey wearing a fez bartender do the moves.
Peppermint: Order Mojito (GlugMo-chii-to). Watch the bartender do the shakes to see the first 2 moves: Mangnag and Beep Bop.
Drink and then take the glass with peppermint leaves.
Order and watch the first 2 moves of Burning Mary (Glug brunsala Maaary). They are: Donka Dong and Freak out.
Note that Burning Mary has fire and the monkey removes his fez.
Milk: Go outside and show the hangover cure paper to the bounty hunter.
He shoots down the coconut from the tree. Take the coconut.
Enter the palace. Split the coconut on the sword in the stone to get coconut shell with milk.
Salt: Use the pan from statue on the water pouring out of the cornucopia to get pan with salt water.
Exit the palace. Go to the jetty.
Look at the bitt (stone stand) left of the barrel with a strange bird. Place the pan with salt water on the bitt.
Go to the mirror and click on it twice to heat the pan with salty water. Take some salt from the pan.
Shake moves: In inventory, pour the coconut milk in the glass with peppermint.
Pour salt into the glass.
Use the half coconut on the
Shake the hangover healer. Select moves from L-R: 3 - 1 - 6 - 5. Get Hangover Healer.
Sober up Nate: Go back to Nate outside the tavern. Pour the Hangover Healer down Nate's throat.
As Nate:
Lamp and the bounty hunter:
Talk to the bounty hunter. Learn that they are going to split the lamp's 3 wishes: one for the hunter, one for Nate and one to sell to highest bidder.
The Mary is chained to dock with a magic padlock.
Take care of the monkey bartender:
Look around and check the notices, statues, souvenir shop and palm tree. Look at the bounty hunter.
Go to the jetty. Look around The Mary.
Look at the burning mirror used to stop airships.
Look at the magic padlock and the parrot raises the alert.
Take care of the parrot - strange bird:
Change to Critter by clicking on the character icon at top left of screen.
Go to the jetty. Use the old peanuts from the bar on the pirate parrot twice.
Go back to the jetty when the bird flies and follows Critter.
Change to Nate. Take the stained blanket off the barrel.
Take the lid off the barrel.
Put stained blanket over the open barrel.
The parrot flies in and lands on the blanket. It drops inside the barrel.
Use the lid on the barrel.
Crate: Inspect the crate right of the barrel. Get a fez.
Bartender: Go back to town and inside the tavern.
Change to Critter and bring him inside to the bar.
As Critter, order Burning Mary (Glug brunsala Maaary). See the monkey remove his fez.
Change to Nate. Replace the monkey's fez with the one from the crate. It is too big and covers his eyes-head.
Get the lamp: The bounty hunter laser cuts the glass dome of the lamp.
Critter hits the bounty hunter and Nate takes the lamp.
Benny the djinn:
Nate and Critter are by Mary. Nate rubs the lamp to call the djinn.
Meet Benny. Ah - Benny is not a powerful djinn. Benny opens the barrel instead of the magic padlock and releases the parrot that raises the alarm.
Benny is ordered to open or break the magic padlock and he tries. The bounty hunter and Red Pirate arrive to stop Nate.
The rock and jetty starts to show some action. It breaks off and that is the start of the introduction to the game.
Seastone - As Wilbur:
Wilbur sees Cybil Van Buren give an interview to Mr. Fox the newspaper editor about the monthly lottery that will give a single lower towner access to upper town.
Look at the Mage School, mage tower and lottery barrel.
Smuggler: Look at crane, goods and brandy barrel by Bill. Talk to Bill the trader.
Learn about the protesters. Bill does not pay taxes. The crane is used to lower his goods without paying bribes.
Go down at exit at right.
Gate: Look at barred window in the alley. Talk to the prisoner, Mr. X. He's a political prisoner.
Look at the bakery at right. They sell cakes and chocolates.
Look at the shield and the posters. Read the notices on the poster board.
Look at the statue on the alcove behind the town guard.
Negotiate the key to Upper gate:
The gate to the town is closed.
Talk to Mr. Shieldhand the town guard. He's the only member of the guards. Permit is needed to exit upper town after curfew.
The statue is that of Black Guard.
Talk to him about Bill's bribe. The guard has no need to be bribed if the crane lowers the goods straight to lower town.
To check the "smuggling"; mark a barrel, order the barrel and see if it goes to lower town without a bribe - tax being paid.
In return, ask for a pony. Reverse psychology makes Shieldhand promise to give the key to the gate to Wilbur. Shieldhand gives a chalk to mark the barrel.
Mark the barrel: Go back to the right to Main Square and use the chalk on the barrel beside Bill.
Go down and talk to the town guard.
Order the brandy barrel:
Upper town gate: Exit through gate.
Look at Bill's padlocked privy, Bill's stall and loading platform.
Talk to Bill by clicking on his stall.
Learn that you need a password and that the inn owner knows it.
Tool box: Open the tool box under the "do not touch" sign and get a hammer.
Lower town barricade: Go further down at left.
Look around outside the inn. Look at cart, drain, fireplace at left, bucket with water and the barricade.
Protesters: Knock on the hatch and meet the protesters that build the barricade to the lower town.
Chez l'Ogre inn: Enter the inn. Look around.
Rémi: Look at the jacket on the chair at bottom center.
Look at and then talk to Rémi. Rémi agrees that Wilbur should build a golem to serve as the Arch Mage's bodyguard.
Rémi left his glass. Take the small glass marked 2 cl.
Two-headed Ogre: Talk to Blout and Zloff. Learn about Bill's monopoly. They agree to try to get one over Bill.
The password is "gold won't make you happy". Zloff gives a bag of silver to pay for the brandy.
The jacket is the jailed protester's.
Jacket: Take the battered pin badge on the jacket.
Headmaster Bloch: Talk to Blochy. Learn that he is Van Buren's election treasurer. The gold that he is counting are donations for her election campaign.
Look at the converted role-playing machine and stairs.
Look at the notice right of the fireplace. Read the licensing laws.
Jump to postcard: Look at the postcard right of fireplace. Take the postcard.
It is a map of Seastone that can be used as a "jump to" map. Click on a location and be there.
Use the postcard to jump to the Upper gate.
Young boy: Go to Upper town gate.
Talk to the young boy playing by the gate. He is not the young boy at Mage School.
The boy is reenacting the battle at Black Tower. He doesn't have a place to sleep. Wilbur invites him to sleep in his room but he can't go to upper town. Maybe the young boy will win the lottery.
Order from Bill: Talk to Bill by clicking on his stall. Wilbur places the bag of silver on platform and the marked barrel is lowered.
Get back at Shieldhand and Bill:
Knock on the gate. Wilbur tells Shieldhand through the gate about the delivered mark barrel. Shieldhand left to talk to Bill but did not let Wilbur through the gate.
Inn: Go back to the inn. Talk to Zloff and then Blout.
Reporter: Talk to the reporter drinking at the table at left. Learn that Van Buren asked the reported to look for dirt on Wilbur.
Wilbur tells Mr. Fox about Bill and Shieldhand.
At the crane area, overhear the discussion between Bill and Shieldhand. Fox negotiated to get his drinks at regular prices and arranged the distribution of the corruption.
Shieldhand gives Wilbur the key to the gate.
Build a golem:
What is needed: Use the magic slate to learn how to build a golem. They are made of clay or stone. Commands written in magic ink are inserted in their mouth.
The golem's body needs torso and strong arms and strong legs. The head with mouth is made of clay.
Magic ink is made up of 2 cl crocodile tears, twelveteen drops of dragon sweat and one Seastone ounce of soot.
Get info: Talk to Bill about twelveteen. Learn that it means "it doesn't really matter".
Get the door code:
Staff room door: Enter the Mage School.
Look at the mop and bucket. Take the mop with troll spit.
Look at and talk to staff room door. A code is needed to enter the staff room.
Timmy the young rat: Go to the inn. Outside the inn see Timmy the little rat on the railing.
Talk to Timmy. He will go to the office and get the door code.
Get Blout's secret:
Go to the inn-pub. Talk to Zloff. He doesn't want t talk about golems.
Blout whispers to Wilbur. Zloff doesn't like whispering. Learn that Zloff likes the chocolates from the uptown bakery.
Talk to Blout again. This time learn that Zloff has alcohol intolerance. Exit the inn.
Timmy: Talk to to Timmy again on the railing. He found a note about door: 4 60 9 41
Wilbur takes Timmy with him to help.
Chocolate: Go to the bakery by the town guard. Look at shop window and see there are 2 kinds of chocolates - with or without alcohol.
Look at the drainage grate beside the window. Use Timmy on the drainage grate. Ask for chocolate wrapped in red. Timmy gives a chocolate wrapped in red.
Go back to the inn. Give the chocolate wrapped in red to Zloff. He says it has alcohol.
Go back to bakery and get Timmy to get chocolate wrapped in blue. Timmy gives a chocolate wrapped in blue.
In inventory, click one chocolate unto the other to swap the wrappings.
Go back to the inn and give the chocolate wrapped in blue (contains the red wrapped chocolate) to Zloff.
They missed catching the chocolate and Zloff hits his head on the counter.
Golem secret: Talk to Blout. Learn all about Zloff's experience with golem. Blout shows Wilbur the golem parts.
Wilbur agrees to build one and give it to them after he uses the golem to clean the school and guard the Arch Mage.
Look at the golem parts and see that it is a torso. Look again and read the old commands in the box.
Get golem legs:
Jump to Bill the trader. See a hopping box beside Bill. Open the hopping crate.
A pisspot jumps out the crate. Search the crate. Read the paper to learn the company that makes them.
Talk to Bill again. Learn about the Better Works factory. They recycle the helmets, swords, etc.. from the war to something else.
Go down to Upper gate. See the pisspot hiding behind the rubbish. It runs away.
Follow the pisspot. Talk to the helmet with legs. The pisspot agrees to be the legs of the golem.
Get clay and make golem head:
Protesters: Knock on the hatch of the protester's barricade.
Wilbur can use the clay to strengthen the barricade with clay.
Wilbur shows the jacket badge to prove that he is one of them. They want the hand signal now. Ah..
Prisoner: Go to X the prisoner in the jail by the town guard.
Talk to X. Ask about the hand signal - you first!
Go back to the barricade by the inn.
Knock on hatch and do the secret sign. From left to right: select 5 - 4 - 3.
They give posters to hang around town. Get clay. Wilbur used some clay to seal the barricade.
Make head: Sculpt a golem head from the clay in inventory. Select any shape you want and it will be correct.
Look at the fireplace left of the railing.
Use the magic wand on fireplace to make fire.
Place the soft golem head on the fireplace to get fired golem head.
Get golem arms:
Remember the Black Guard statue by the town guard.
Get chisel: The hammer was already taken from the tool box at Bill's stall.
Go back to X the prisoner. Ask about the chisel.
Learn that he got a chisel in the cake. It can help the prisoner escape.
I'd have to know exactly what kind of hammer you want.
The whole building could cave in.
Wilbur after all those "talk" gets the chisel.
Distract the town guard: If you haven't taken the mop from the bucket in the school, do so.
Use the mop with troll spit on the poster board to paste up the board.
Use a flaming poster on the board with paste.
Talk to Shieldhand about the protester's poster.
Use the chisel or hammer on the Black Guard statue. Get arms.
Combine the golem parts:
Go to the inn. Use the head, arms and pisspot on the torso of the golem.
Enter the staff room:
Go to the school. Talk to the door.
The door code is: 4 60 9 41. Correct. The door doesn't know Wilbur and would still not let him in. The code should be said by Bloch.
Magic slate: Use the magic slate. It can imitate voices. It can also record and play back certain recorded parts.
Find the numbers: We need to record Bloch saying 4 60 9 41.
Enter the classroom. Search the shelves left of the blackboard. Get an old photograph. Look at the photo in inventory and see that it is the class of 1462.
Record numbers: Go to the inn and talk to Bloch.
Can you say 9? Then ask about dwarven ale after reading the licensing law on the wall left of fireplace. Get 9.
Ask about the old photo. Get 60.
Ask about treasurer, then math champion and problem. Select: 65 + 23 - 47. Get 41.
Ask about drinking. He drinks warm water. He drinks 2 glasses a day. 4 glasses is too decadent. Get 4.
Use magic slate to verify that you got all 4 numbers recorded.
Enter staff room: Go to Mage School. Talk to magic door. Let Bloch and Wilbur in.
Find ingredients for and prepare magic ink:
Magic ink is made up of 2 cl crocodile tears, twelveteen drops of dragon sweat and one Seastone ounce of soot.
Enter the staff room.
Desk: Look at the desk. Search the drawer. Read the note in the drawer. By banning poster campaign in schools, it seems that Bloch is more concerned about law and order.
Look at the small red flask. It is dragon sweat.
Take the quill from the desk.
Soot: Go to the classroom. Examine the oven left of the alchemy corner.
Alchemy corner: Look at the alchemy corner. It is the perfect spot to make the magic ink.
Crocodile tears: See a bottle of dried crocodile tears in the flask. We need 2 cl of tears.
Jump to inn. Exit and see a bucket of water (melted by the heat) beside the fireplace.
Use the small glass marked 2 cl that is used by Rémi on the bucket of water. Get 2 cl glass with water.
Mix the ingredients: Go to the alchemy corner in the classroom.
Use the flask of dragon sweat on the pot.
Use the 2 cl glass with water on the dried up crocodile tears in the flask at bottom of screen. Add crocodile tears to the pot.
Look at the weight in the slot of the scale at left. Set the 3 Seastone ounces weight on the left pan.
Right click the chocolate in inventory to see that it is 2 Seastone ounces. Place the chocolate on the right pan.
Add soot on right pan until the scale balances and get one ounce of soot. Place the soot into the pot.
Mix the magic ink.
Bring the golem to life:
Write the spell: Combine the quill and the magic ink.
Wilbur writes down the spell dictated by the magic slate on the notepad.
Wake up the golem: Go to the inn to look at the golem.
Use the golem spell on the golem. The golem lives.
The ogres are impressed. The golem follows Wilbur to the Mage School. Muahahahaha.
The dark force's intrigue:
Wilbur wakes up hanging in the classroom beside the cage with the skeleton.
See another Wilbur with the golem. He has the magic wand.
Learn that Munkus is the dark force sensed around here.
The golem has additional order from his true master other than live. The slate is from him.
Munkus cannot break the magic wand and throws it.
Free Willy:
Look at the skeleton in the cage.
Cage: Swing over to the cage. Try again twice. Get heavy skull and hook shaped bone.
Wear the white hat given by the Time Travel book.
Get shackle key: See the shackles key on the podium-desk.
Timmy walks in.
Look at the bedroom curtain and have Timmy pull out a thread.
Throw the hook shaped bone down to Timmy.
Get Timmy to make a grappling hook.
Have Timmy climb the desk-podium.
Look at ruler. Have Timmy move the ruler.
Let Timmy take the key.
Throw the skull to the ruler.
Timmy stands at the end of the ruler.
Timmy unlocks the shackles.
Timmy runs to tell Rémi about Munkus, the golem and the Arch Mage.
Take the magic wand from the floor.
The Arch Mage:
Go to the office to warn the Arch Mage. Wilbur zaps Shieldhand guarding the door.
Munkus-Wilbur is already in the office with the golem. Wilbur stops Munkus. The golem attacks the Arch Mage. The Arch Mage zaps the golem. Munkus changes back after being hit by the Arch Mage.
Cybil Van Buren and daughter Chantal arrive. Chantal picks up the magic wand. She zaps the Arch Mage into a frog and changes some items into pink colored.
Munkus sneaks out. Shieldhand arrives. Van Buren orders Shieldhand to arrest Wilbur for murdering the Arch Mage. She is now the leader replacing the Arch Mage.
Rémi arrives and calls Wilbur. He tells Wilbur to wear the ring and Wilbur shrinks.
Van Buren tries to zap Wilbur with the magic wand but it doesn't work for her.
Wilbur relates the events to Rémi. Wilbur thinks that all the magic is from the wand - that he is not a mage.
Chapter 3
Wilbur is in a severe self-pity. Rémi returns and reports that the Resistance has fallen. The Van Buren girl is changing everything to pink and removes everything that is in the way of her mother.
Wilbur decides to leave and go back to White Ridge Mountain. Rémi takes the magic ring from Wilbur's finger. Wilbur is back in his own size now. Rémi leaves to go down the entrance where he got the wand. He is going to find more about the wand.
Underground.
Rat's den:
Look at the cook. Talk to Ethel. She was a lab rat for a mad alchemist. She gnawed her leg off to run away from the monster down in the caves.
Look around at the rat's den. Take the water rubber hose from the bed. Try to take the candle. Look at the pipe and the glow worm.
Try to take the plates and clean tea towel behind Ethel.
Scrap yard - outside the rat's den:
Look around. Take the cloth thing-empty bag from bottom left.
Look at the dirty dishes, sewage pipe and mine wagon. Examine the cables and belt at ceiling.
Look at the rubbish heap at right. Take the fur collar.
Rubbish heap:
Climb the rubbish heap at center of room.
Look at the wooden figure of Wilbur's favorite knight nee story. He throws it away. Pick up the cloak.
Look at the light beam above. Look at and ring the bell.
Talk to Bill. Get Wilbur's wanted poster. Learn about the town. Bill will not help unless he makes a profit.
Lit area - Workshop:
Look around at the workshop. Check the cuckoo clock on the floor by Wilbur. Look at the machine at bottom of screen.
Throw the switch of the wooden box. Turn the tap on the get water.
Look at the sparkly black stones. Check the electric cables by the water tap. Look at the wooden boards and electric cables at right side of work table.
Look at large machine at bottom right. Look at junk-refrigerator door at left. Exit the workshop.
Cave:
Rémi: Go to the cave at right. Talk to Rémi who is getting ready to go down the hole.
The hole is where Rémi got Wilbur's wand. A terrifying ghost drove him away. Rémi wants to find out whose wand it is so that he can destroy it. Wilbur reasons that the magic wand is extremely powerful. It amplifies the magic and is source of magical energy. Wilbur advices to think about it and not rush into things. Rémi believes the ghost is still down there. Courage and conviction.
Explore the cave: Look around the cave. Look at the pipe, construction and ancient symbol on the wall.
Look at the discoloration in the stone and learn that it's coal vein. There's a bongo below coal vein.
Take hamster wheel left of the entrance.
Exit the cave and fall into a trap. It was made by a robot.
Get out of the trap: The robot looks to see if Wilbur is like the rat in the paper he is holding.
The robot beats Wilbur with a stick. Wilbur takes the stick.
Look at and talk to the robot. Try to take the rope on the ground. Use the stick to bring the rope closer and get the rope.
Throw the rope on the pipe above. That didn't work.
Throw the stick at the robot. It throws a stone at Wilbur. Pick up the stone.
Combine the stone and rope. Use the rope with weight on the pipe above. Pull yourself out of the hole.
Take the rope. Exit the cave.
Workshop:
Zombie: Go to the workshop again. See the monster Ethel talked about.
Wilbur makes a noise that alerts Gulliver. Talk to the zombie.
Learn that he and Esther are friends of Captain Nate. They met Nate at the Wild Lands. The zombies believes that they owe Bill for their chance in bettering themselves in Seastone. Gulliver makes magic slates for Bill.
The magic slates are made from intelligent rocks that have fallen from the sky, cut thin and given strong electricity.
They do not have power to make the last slate delivery. When they finish the delivery, they will go up above ground and start a new life.
Gulliver does not like the rats because they tried to eat his wife Esther. N8 the robot is their son. N8 is a great inventor.
The machine that N8 built seen below is supposed to make Gulliver's job quicker.
Look at and take the roll of double sided tape on the floor at left.
Get electricity:
Rat's den: Talk to Timmy who is upset at Wilbur. The inn is not there anymore. Ethel is the best alchemist around.
Talk to Ethel.
Build a waterwheel: Look at the hamster wheel in inventory. Hmm...
Combine the fluffy fur with the hamster wheel. Need something to attach it.
Use the double sided tape on hamster wheel. Wheel has tape inside and outside.
Now use the fluffy fur with the wheel.
Inflate the rubber hose. Place the inflated rubber hose inside the hamster wheel with fur.
Go to Ethel the cook. Ask for bowl of stew. You can see what Ethel does when you taste the stew and give your comment.
Use the empty plate on the water wheel.
Wilbur will automatically get more stew and empty plates and attach them on the wheel. Get a homemade water wheel.
Workshop: Go to workshop.
Put the homemade water wheel under the tap. Turn the tap on.
Talk to Gulliver about the electricity.
Learn about the new problems. Bill's new order is for fluffy and pink slates. Learn also that it will take 2-3 weeks to finish Bill's order of 80 slates.
Zombie's den:
Enter through the now opened door to the den left of workshop.
Esther: Talk to Esther. She is not making covers; she is trying to make fluffy pink paint. She needs a good alchemist.
Learn what happened between the zombies and Ethel and how Ethel lost her leg.
To speed up production they can fix the Constructor that N8 made for his father.
Explore the den: Look around. Look at the model of Aventasia made by N8. Take the socket wrench on the model.
Take the mounting stand left of door and the scales right of door.
Look at the breakfast making machine under the hood and the painting on the wall.
Look at the empty bird cage for N8. Use the empty little sack to take sand from the bird cage to get a sandbox.
Go to the right of Esther and look at the bottle. Take bottle to get musketeer hat.
Workshop:
Go to the workshop and Gulliver talks to Wilbur about the Constructor made by N8. It needs a fan belt and coal for the steam machine.
Take the long board and short boards right of Gulliver.
Get the intelligent rock from Gulliver's left.
Cuckoo clock: Look at the cuckoo clock on the floor.
Use the handy socket wrench from the Aventasia model on the clock. Set the cuckoo clock's time.
Take the bird that popped out and a dropped feather.
Bird: Go back to the zombie den. Place the bird in the empty cage.
Convince Ethel to help Esther:
Ethel: Go to Rat's den. Talk to Ethel about alchemy help. Ethel is told by Rémi to help others.
She said that if Monsieur deDumas says so, she will help.
Timmy: Talk to Timmy. Convince Timmy by asking him to help the zombies.
Make a disguise: Make a Rémi disguise.
In inventory, use the cloak with Timmy. Wilbur tells Timmy about using the disguise to get Ethel's help.
In inventory, combine the feather + musketeer hat. Add cloak to the musketeer hat with feather to get the complete disguise.
Check the disguise: Look in the rat's den.
In inventory, combine Timmy and disguise. Uh oh! That didn't fool Ethel.
Try to take the tea towel behind Ethel. Ouch!
Blurry and unfocused: Remember that Ethel cleans her glasses when the stew tasting comment is "could be hotter".
Let Timmy take the tea towel. They decide to distract Ethel.
When Ethel talks to Timmy, take the tea towel.
Use the tea towel with the dirty greasy dishes at the foreground.
Put back the now dirty towel on the towel holder behind Ethel.
Talk to Ethel and ask for stew. When asked - say "could be hotter". Ethel wipes her glasses with the greasy dirty towel.
Now put Timmy on Ethel. With Wilbur talking as Rémi, Ethel is convinced to help the zombies.
Esther: Go to the zombie den.
Introduce Ethel to Esther. They apologize to each other. Talk to Ethel and Esther.
Get belt:
Go back to the scrap yard by the rat's den.
Look at the V-belt hanging at ceiling.
Use the rope with weight on the belt to learn that the belt is hanging on a hook.
Seesaw: Put the long board on the sewage pipe to make a seesaw.
Talk to N8 to do some seesawing. N8 enjoys that.
Timmy: Place Timmy on the seesaw. Seesaw with Timmy. It's boring.
Climb onto the mining wagon. Jump unto the seesaw. Timmy was shot too low. Timmy thinks it's awesome.
Place Timmy on the seesaw again.
Talk to and take N8 for added weight. Climb onto the mining wagon. Jump unto the seesaw.
Timmy drops the belt and is caught by N8. Take the belt.
Get coal:
Collect fireworks:
Cave: Go to the cave. Check the coal vein. They need to get the coal out.
Take fireworks from the box of little something right of the entrance. Get gunpowder.
Scrap yard: Go back to the scrap yard outside the rats' den.
Take fireworks from where the dirty dishes were, box left of seesaw and at bottom right. Get gunpowder.
Zombie den: Go to zombie den.
Look at left side and at right side of entrance for fireworks. Get gunpowder.
Work shop: Look left of cuckoo clock for fireworks. Get gunpowder.
Look at the Constructor machine at bottom of screen. Take fireworks from floor to get gunpowder.
Rubbish heap: Take fireworks from left side and right side of floor to get gunpowder. Wilbur says that is enough to make a stick of dynamite.
Make dynamite: Combine the poster with the heap of dynamite to make a homemade stick of dynamite.
Make a fuse: Go back to the cave.
Place the explosive into the gap of coal vein.
In inventory, combine the metal stand with the broken scale to get mounting with scales.
Throw the rope with weight on the construction pipe above.
Put the mounting with scales on the bongo under the coal vein with dynamite.
Go to rat's den and take the candle. Wilbur lights it in the fireplace to get a burning candle.
Go back to cave. Use the burning candle on the scales atop the bongos.
Knot the sack filled with sand on the now hanging rope with weight.
Use the socket wrench to stab a hole on the sand bag.
They take cover while Wilbur punctures the sand bag.
The candle tilts and N8 adjusts it. The dynamite explodes and N8 is thrown.
Wilbur after being urged by Timmy does the engineers' secret to fix N8.
Collect coal.
Start the Constructor:
Use the v-belt with the flywheel.
Pack the small boards and intelligent rock into the Constructor's funnel.
As soon as the cursor becomes active - do the next step.
Open the oven door. Shovel coal in the oven. Close oven door.
Click levers to tell N8 to pull levers.
Open the oven door. Shovel coal in the oven. Close oven door.
Click oil can to get N8 to oil the gears.
Open the oven door. Shovel coal in the oven. Close oven door.
Click oil can to get N8 to oil the gears again.
Open the oven door. Shovel coal in the oven. Close oven door.
Click oil can to get N8 to oil the gears again.
By George, we got it!
Greed:
Gulliver and Wilbur deliver the last batch of slates to Bill. Gulliver mentions the Constructor to Bill. Bill leaves them underground to make more slates.
Timmy runs in saying that Princess Ivo is here.
Resistance - As Ivo:
Ivo's arrival:
Ivo flies in on Buttercup and talks to Bill.
Learn that Wilbur and the King of Thieves fled to the underground. Bill does not want to say where the entrance to the underground is located.
Town: Ivo flies to town.
Talk to Fox putting up the wanted poster. Fox informs Ivo about the terrorists.
Cybil overhears what Fox said. Cybil whispers to Chantal and Chantal magics ding-a-lings above Fox' head. Every time he swears, it rings.
Chantal wants and gets Buttercup.
Talk to Fox again. The Arch Mage is kept at the Mage School. Fox gives Ivo the upper town key.
Look around. See that the inn is now a toy shop and sweet stall. Check the flowers and the fireplace.
Upper gate: Go right to Upper gate. Look at Bill's stall, wall, rubbish and the privy.
Town Guard: Ivo asks to talk to the councilwoman.
Mage School: Ivo is brought to the staff room at Mage School. Hear a frog croak.
Talk to Van Buren. She will go talk to the fairy queen. Van Buren orders Shieldhand to place Ivo in jail. Chantal shows her fairy book to Ivo. Her favorite story is the frog king.
As Timmy:
Free Ivo from jail:
Shieldhand watches and checks Mr. Fox putting up wanted posters.
Timmy Mausowitz talks to Ivo through the bars.
Wait and then take a poster that Fox has placed paste on.
Pick up the charcoal beside the grill.
Use the charcoal to improve the poster.
Wait until Shieldhand stands up from the chair to give Fox a hard time; then stick the poster with glue and the resistance symbol on the back of the chair.
Fox chases the resistance sympathizer.
Pick up the keys from the ground. Talk to Ivo to give her the keys.
Ivo is freed. Timmy runs to tell the underground people about Ivo.
As Ivo:
Find the underground entrance:
Go up to Bill's crane area and see that he is not there. Look around.
Go down and exit through the gate.
See Bill come out of the privy carrying boxes of fluffy pink slates. Talk to Bill.
Enter the privy.
As Wilbur:
Ivo is now fully informed. Timmy informs Ivo that Wilbur was going to run away.
Wilbur and Ivo decide to split the plan. Ivo and the zombies will look for the Arch Mage and try to free him. Wilbur will follow Rémi and try to find how to destroy the magic wand.
Investigate the dark hole:
Cave: In the cave, take the rope on the ground. Tie the rope on the rock Timmy is standing on.
Automatically, Wilbur goes down into the darkness. Talk to the voices. There are 3 of the so called gods.
It's dark down here. We need light. Climb up the rope.
Scrap yard: Go to rubbish heap. Look at the fluffy toys - rubbish at foreground. Search the rubbish to get hand mirror.
Look at deserted workshop.
Talk to Ethel at Rat's den.
Rubbish heap: Go to rubbish heap at center of cavern.
Talk to Ivo completely by clicking on ceiling. Tell her about needing a light.
As Ivo:
Get light source:
Change to Ivo by clicking on her icon at top left of screen.
Zombies: Talk to the zombie sweethearts.
Look around outside the town hall and jail.
Mage School: Go to Mage School by the Main Square.
Talk to Grumder Klimpus the troll. He is guarding the school while Van Buren is off to Elfburrow.
N8: Go to town pass the gate. Check the wanted poster. Talk to N8 to learn that he's an inventor.
Zloff and Blout: Talk to the 2 headed ogre. Zloff has given up magic and is now not a mage.
Zloff does not need his clicker that can capture starlight. Do not ask about disguise.
Go to Main Square at upper town.
Capture starlight: While standing by Bill's crane, use the clicker on the sky and capture starlight.
Wilbur: Go to the privy by the gate. Talk to Wilbur.
Ivo gives the clicker to Wilbur. Ivo asks about getting to the Mage School. Wilbur mentions the fireplace in the library and the need for fireplace powder.
As Wilbur:
Meet the Gods:
Change to Wilbur. Go down and go to the cave. Go down the hole in the ground.
Release the starlight by using the clicker on the darkness.
Gods: They are gods trapped in statues.
Meet the God of Riddles; Jerry the God of Humor; Avene the Goddess of Arts and Hybnis the God of Good Stories.
Talk to the god statue at foreground. Learn about the power derived from their worshippers.
Alcove: Look at the alcove at left and learn about the Nameless One. He was banished to the dungeon dimension and replaced with little gods like Murphy for people to blame their problems to.
Ring: Go right and pick up Rémi's ring.
Lake and Island: Look at the lake. The gods can only explain how to cross the lake.
Ask one of the gods for help. Give 3 of them an offering before they will reveal how to cross the lake to the Temple of the Nameless One.
God Of Good Story: Talk to Hybnis, the God of Good Story at foreground.
Select any dialogue that makes a story. Get his vote.
God of Riddles: Talk to the God of Riddles on the ground.
Answer the riddles:
1) What has roots nobody can see, towers beyond the tallest tree, never grows to get this high but reaches up towards the sky? A mountain.
Ask a question.
2). Thirty white horses on a red hill, first they champ and they stamp, then they stand still. Teeth.
Ask a question.
3). Voiceless it cries, wingless flutters, toothless bites, mouthless mutters. Wind.
Ask a question.
4). Something that consumes us all: from the mighty to the small. Eats into iron and grind down stone, dulls every sword, breaks every throne. Defeats kings, turns their castles to dust, waits for no man, for pass it must. Time.
Can you think up a question that's so difficult that you are not able to answer it? Get the favour from God of the Riddle.
God of Humour: Talk to Jerry. The task he gave was to make the God of Humour laugh.
Goddess of Arts: Talk to the Goddess of Arts. She wants a tuning fork, cowbell or something that makes a sound.
Look for jokes:
Climb the rope.
Jokes: Talk to Timmy. Ask Timmy for a joke.
Go to rat's den and talk to Ethel. Ask Ethel for more jokes.
Mage School: Wear the ring and enter the school through the pipe.
Get what the Gods want and more:
Mage School: Look at doll at the foreground twice. Headmaster Bloch picks it up and throws the doll. Bloch notices Wilbur.
Talk to Bloch. He left for the day but not expose Wilbur.
Look around. Check Buttercup.
Take the doll, glockenspiel and slate. The user name of the one that programmed the slate was MunkusRulez1337.
Look at the Arch Mage inside the preserving jar that is held by thick chains.
Check the desk. Take the little box of fireplace powder from the desk.
Enter the underground through the rat hole.
Ivo: Go to the rubbish heap. Talk to Ivo. Ask her to find out any good jokes.
Give her the magic slate, doll and fireplace powder.
As Ivo:
Look for jokes:
Change to Ivo. Talk to Esther and Gulliver and get a joke.
Go down to the left. Ask the ogre for a joke. Blout tells the statue joke. Hahahah. Do not ask about disguise.
Go back to the privy and tell Wilbur the jokes.
Learn how to use the fireplace powder and the symbols - owl, worm, rat.
As Wilbur:
Gods:
Change to Wilbur. Go back to the underground and the gods.
Goddess of Arts: Talk to the Goddess of Arts to give her the glockenspiel. Get her favor.
God of Jokes: Talk to Jerry. Tell the jokes learned from friends. The other gods really enjoyed the statues and gods joke.
Tell Jerry his old jokes. He laughs at his own joke.
God of Story: If you do God of Story favor, select any dialog choice to make a complete story. Get his favor.
Laurel Wreath of Hybnis: Give all 4 Gods what they want and they give Wilbur a gift - the laurel wreath of Hybnis.
Lake and Island:
The lake is frozen, so Wilbur can just walk across the lake. Go to the island.
Ghost: See Rémi in a rat trap. He stops Wilbur and warns that it is a trap.
The ghost-gatekeeper appears and demands that Wilbur bring the wand back to it. The wand is the key to the prison of the Nameless one.
Get help: Climb the rope. Talk to Timmy.
Talk to Ethel at rat's den. She will prepare a strong healing potion.
Climb the rubbish heap. Talk to Ivo about the ghost. She will try to find how to take care of the ghost.
As Ivo:
Enter the Mage School:
Change to Ivo.
Troll: Go to the Mage School and enter. The troll nearly hit Ivo with his axe. Have a delivery for Chantal Van Buren.
The troll is scared of the doll. He couldn't stand the sweetness and covers his ears so he can't hear anything.
Fireplace: Go back to the Ogre's sweet stall. Look at the fireplace.
Use the powder on the fireplace. Think of owl, worm and rat.
Find how to control ghosts:
Library: The books talk. Look around and check the upper library, fire, rug and desk.
Talk to the books again about casting a spell on ghosts. Learn about the magic symbol (square, circle and triangle) that can trap the ghost.
Free the Arch Mage-frog and Buttercup:
Enter the staff room: Exit the library. Now that the troll has plugged his ears, go to the door.
Use the slate on the door.
Staff room: Look around. Check the hippogriff several times, fireplace, junk clothes and rat hole.
Take the Arch Mage: Ivo studies the jar and chains. She unscrews the jar and takes the frog.
Make laws: Look at the desk. The signet ring of the councilwoman is here. Ivo can make laws and use the seal.
Click on desk again and make all 3 laws: smoking dried leaves, respect for pregnant elves and only marry for love laws.
Exit the staff room. Ivo tells Buttercup to be quiet. Naaaagh!
Outside, Ivo scolds Buttercup. Ivo had to fight the troll.
Get magic symbol amulet:
Go to the ogre's stall.
Talk to the ogres about the amulet. Blout doesn't want to give up his amulet. Don't ask about disguise.
Enter the fireplace again to go back to the Mage School library.
Go back to the staff room.
Make a new law by clicking on the desk. Ban the wearing of protective amulet.
Exit the staff room. Enter the library. Go through the fireplace. Go back to the ogre stall.
Talk to the ogres about committing a crime. Ivo confiscates the amulet.
Wilbur: Go to the privy and talk to Wilbur. Give the amulet.
As Wilbur:
Take care of the ghost:
Go down to the underground; then sneak to the island.
Look around. Look at the machine. It must be the lock of the wand key.
Look at the abyss, beam of moonlight and mirrors. Look at Rémi and the ghost.
Trap the ghost: Use the pocket mirror to replace the broken one beside Wilbur.
Turn the mirror. It is now focused on the ghost.
Use the amulet on the mirror to cast the symbols on the ghost.
Rémi: Time is running out for Rémi. Talk to Rémi.
Learn about 2 sorcerer brothers. One was insane and left town. The one remaining brother placed all his power in the wand before his death.
Only one of his blood can unleash the power in the wand. The ghost that protects the machine is Rémi's grandfather. He only exists to protect the wand.
Chantal got her grandfather's powers but not his knowledge.
The wand can be destroyed. The insane brother that left town went to the Dark Woods and wrote a book of spells to destroy the wand. Find the book and destroy the wand.
He made Wilbur the leader of the resistance. He gave his hat for Timmy. Rémi passes away.
Parting of friends:
Gulliver and Esther are taking care of Timmy.
Ivo and Wilbur say goodbye to each other. Wilbur will go to Dark Wood and focus on the book and wand while Ivo will work on getting Arch Mage back.
Ivo was told by an Oracle to help a friend who doesn't know what to do and then look for a flying pirate island with a room with no corners.
Gulliver calls Wilbur to leave now. The others are by the gate.
Oh no! Munkus. Muahh ha ha harr.
Chapter 4
Cloud City - As Ivo.
Flying Island:
Ivo and Buttercup land on the flying island of Tugator. Ivo is getting bigger. Buttercup collapses from exhaustion.
Jetty: Look around. Check Buttercup.
Look at and try to take the purple snails from one of the metal posts. The snails emit a smelly substance to defend themselves and are used as dye.
Examine the broken jetty and the abyss. Look at the Mary, the flying ship. Ivo realizes that Nate is here.
Pick up the frying pan propped on wall on the jetty. It is battered and has salt.
Outside the tavern-palace: Go forward to town and see a trial.
Nate (who is trying to scratch his back) and Critter are held by pillories. Critter greets Ivo and pats her tummy - fatura.
The monkey bartender is the prosecutor and Red Pirate is the judge.
Talk to Red Pirate. The 2 heroes are charged for stealing the magic lamp and abused the Red Pirate's friendship who just wants to be left alone in the island.
The oracle is in the round building at right.
Nate notices that Ivo is pregnant.
Observatory: Examine the observatory at right. It must be where the oracle is located.
Examine the device and hatch on wall.
Ivo opens the hatch and the device flips to show 3 things that Ivo needs to enter the building.
Examine the offering symbols: energy drink, potato crisps and toilet roll. Ivo takes an empty energy drink bottle from the hatch. The label says it contains water, sugar and coloring.
Courtyard: Look around. Examine the water trough, locked door to palace, bulletin board and building on the left,
Examine the red pirate, the stock key on the judge table and the monkey.
Examine the useless prisoner Nate and Critter several times.
Statues: Examine the statues.
Examine the cloth behind the Red Pirate twice. It is the head of Medusa. So that is what happened to the pirates - statues.
Talk to Red Pirate about the hatch and observatory. Learn about offerings and the trial.
Rag shop: Take the rope on the ground of the courtyard by the building on the left.
Go to and examine the Golden Hook Shop at left twice. Get a hook from box.
Get the ingredients for the offerings:
Water: Use the empty bottle on water trough. Get bottle with dirty water.
Potatoes: Look at plants under the tree at right corner. Harvest plants to get potatoes.
Go to harbor and jetty.
Coloring: Take snails. Ivo uses the bottle with water on purple snails. Now the coloring is in the bottle.
Go to Mary: Combine the hook and rope in inventory to make a grappling hook. Use the grappling hook on Mary.
Look around aboard the ship Mary.
Examine and take the cloth - Nate's headscarf on the wheel box at left.
Look at and take the knife on the deck. Look at wheel, cannon and cage.
Examine and take the pot of fat by the steam engine.
Mary: Go down to Captain's cabin.
See and talk to Mary. Learn that Nate was going to propose to Ivo. He even had a ring. 30 minutes later, he returned a broken man.
Learn about the reason Nate is here at Tugator.
Sugar: Look at and take sugar from the box left of the wardrobe.
Check the wardrobe, desk and the make up mirror. Look at the oven and see that it has coal.
Prepare the offerings:
Energy drink: Use the sugar on the bottle with water and coloring (snail). Get energy drink of dubious origin.
Potato crisps: Use blunt knife with shriveled potatoes to get potato slices.
Use potato slices with frying pan.
Grease pan with potato slices with pan with fat.
Fry the potatoes by using pan with greasy potato slices with oven.
Use salt with pan with fried potato slices to get salted potato crisp.
Oracle:
Enter the observatory: Exit the ship and go back to observatory in town.
Use the energy drink, potato crisp and Nate's lucky headscarf on hatch.
LOL. Watch Ivo get mad when the Oracle wants more offerings. Ivo opens the door.
Meet the Oracle: While talking to Ivo, see that the Oracle also checks other events in the multitude of mirrors it is watching.
Talk to the Oracle. Alistair is now the frog. There is still a weak bridge connecting him to this world.
Ivo needs magic compass (to guide Alistair), the Book of the Dead and spark of life to keep him alive.
Ivo needs Nate and Critter to do this task.
The Book of the Dead is in the City of Lorem Ipsum located in the Umzu desert.
How to clear Nate and Critter: Ivo needs to win the court hearing. The right defense strategy is to make the judge believe that Nate is controlled by a higher power.
Mirrors: Examine the mirrors (left and right side of Oracle) several times.
Leave the observatory.
Clear Nate and Critter:
Go to the courtyard. Talk to the Red Pirate. Take over the defense. Nate doubts that he wants to be defended by Ivo.
Prove that Nate is an imbecile. It is proven that Nate is an idiot.
Prove that Nate is bad through and through. Proven.
A higher power is responsible for his actions... and for all of us!
Be a higher power: Move the jar.
Click on coconut tree.
Three (or any number) fingers.
Red Pirate gets scared and hides inside the palace.
Release Nate: Take the key from the table and use it on Nate's pillory.
Nate and Ivo fight. Critter cries. Ivo tells Nate about the Arch mage and Wilbur.
The spark of life is at Elfburrow with Ivo's father.
Ivo meets mother:
Ivo goes to the garden. Critter follows.
The Queen joins Ivo and sees that she is pregnant. Learn that the Queen is the one that told Nate to go away.
Critter is held by vines.
As Nate.
Release Critter:
Ship: Look around. Examine the Elfburrow view.
Examine the wheel and wooden planks. Take wooden plank.
Look at hippogriff. She must be missing her rider or hungry or both.
Look at cannon, cage and steam engine. Leave the ship.
Critter: See that critter is held by vines.
Garden: Go left and examine the beehive and red flower. Take the ball of string left by Arbor.
Go back to the pond and look at the sad willow and pond several times. Look at and take reed from pond.
Bedroom: Enter the library and use the stairs to go to the bedroom.
Nate eavesdrop on the Queen telling a sleeping Ivo what she did to Nate and why. Nate now realize that Ivo doesn't know about why he left and also knows that leaving was a mistake.
Look at Ivo's mother, Tschief-tschief and Ivo.
Library: Look at the bookshelf and sword. Examine the green top hat at right.
King - Bob: Enter through the door of the throne room by the pond.
Talk to Ivo's father - Bob. Feodora needs to be convinced that Ivo needs to make her own decision and it would be the best path for Ivo. Learn that the Queen used Nate's cold feet to convince him to leave.
Learn why he wanted the magic lamp - he wants to be immortal for Ivo.
Alistair needs to be returned back quickly because great evil is stirring.
Bob will give the spark of life to Ivo when she wakes up.
The King gives the direction to Lorem Ipsum, the sunken town under the Umzu Desert. The city is west of Bhrem' Enn.
The vine holding Critter is ticklish especially under the arm.
Look at the Tree of Life, Elfburrow, moon well and desk. Nate reads the scroll about letting the Mary come and go in the elf realm.
Critter: Go back to Critter at the garden. Tickle the vine to release Critter.
Fly the Mary:
Go on board Mary.
Mary: Go down to the Captain's cabin. Talk to Mary.
Set a course: Examine the desk. Set a course and see the map.
See Elfburrow at the bottom of left large island - Elfenhain. Tugator is the small island right of the island at left.
Seastone is left of the compass rosette at center.
The Black Tower is at bottom of the island at right.
Find the location of Lorem Ipsum:
Map: Look at Umzu Desert at top right of the right island.
Nate pulls out a more detailed map of the desert.
See Bhrem' Enn. Nate wants to know more info how far west is the lost city.
Book: Pull back and look at chest right of the desk. Search the chest to get a book about Lorem Ipsum.
Read the text and script.
Translate the hieroglyphs: Go back to the library. Check the right book shelf.
Click the symbols seen on Nate's book on the library book: gem, desert, foot, three and mountain. The jewel of the desert lies at the foot of three mountain.
Cast off: Go back to the ship and look again at the map at the cabin.
Look at the 3 mountains on the map of the Umzu Desert. Nate marks the place in the big map.
Fly to Lorem Ipsum.
Great Voyage - Lorem Ipsum:
Mummy: See a mummy digging in the sand. Look and talk to the mummy.
The mummy wants Mortimer (the archeologist that wrote the travel book in BOUT1).
He was born here at Lorem Ipsum. The Book of the Dead is on the desk of the last pharaoh - the mad Tut Tut.
Flagstone: Look at and take the flagstone right of Critter. It is covered by hieroglyphs.
Talk to the mummy. Show the flagstone to the mummy. The mummy translates it. It is the pyramid manual in 3 languages.
To open the pyramid: obelisk + socket + pedestal. At 3 o'clock in the afternoon, the pedestal points to the stone that opens the secret entrance.
Stone pedestal: Look at the stone pedestal right of Nate. Nate removes the rotten wood at center of the pedestal.
Look at the obelisk on the ground and the depression at side of the stone pedestal.
Nate wants a replacement wooden pin for the obelisk.
Talk to the mummy again about a wooden pin. Ask about the ugly superbronze.
For the good of Lorem Ipsum, let us examine the metal.
The mummy enters his sarcophagus and takes out the metal rod. He never forgets anything.
The depression is the sun clock. The stick on the depression will point to the time that is required.
Fix the sun clock: Use the solid metal tube on the depression at center of the pedestal.
Use the thin reed from Elfburrow pond on the side of the pedestal to put the shaft on the clock.
Change to Critter. Climb back to the ship. Look at and take the rope at side of the ship.
Throw the rope overboard.
Change to Nate. Use the rope. Tie the rope to the obelisk.
Mary raises the obelisk and the obelisk is placed on the pedestal.
Find the secret entrance: Read the time shown on the side of the pedestal.
At 3 o'clock, press the stone at tip of the obelisk's shadow. The secret entrance opens.
Explore the pyramid:
Try to enter the pyramid. The mummy warns of traps, lots of traps. The mummy know about the traps.
Use all dialogue. Nate carries the mummy.
Grave goods: Look around.
Look at the Ibis statue on the floor. Take the mirror. It is the first mirror ever made.
Examine the canoe at right. Nate takes seeds from the sack.
The Book of the Dead was commissioned by Pharaoh Tut Tut.
Look at the oil press by the canoe.
Exit the pyramid. Nate leaves the mummy in the corner.
Get the magic compass:
Fly to Tugator by selecting it in the map in inventory. Go to town. Critter is left on the ship.
See that everything is now pink and the Van Burens are here.
Lady Van Buren wants the elf and is trying to enter the palace. Chantal is sitting by the table waiting for tea party.
Lady Van Buren: Go to the now pink door of the palace. Talk to Lady Van Buren.
Nate as an insurance agent wants to get in the palace. Van Buren can't get in because of the head of Medusa.
Nate sweet talks Lady Van Buren. Enter the palace.
Red Pirate: Talk to Red Pirate. The statues (William, Pierre), Martha the bird and the monkey are in here with the pirate.
Nate will get rid of the Van Burens in exchange for the usage of the magic compass. Exit the palace.
Chantal: Look at and talk to Chantal. She got her ideas from her book.
Chantal's guests are the mad hatter and white rabbit. She will get presents from them.
Her mommy will join them when her guests arrive.
The mad hatter wears a top hat and a colorful neckerchief.
Pink courtyard: Look around.
Examine and take the flower-bloom below the mushrooms at right of screen.
Look and take the hammer from the table.
Look at and take the brightly colored cloth on the post at bottom of screen.
Examine the building and the treats left of door. Examine the laid table.
Prepare the mad hatter and the white rabbit:
Hat: The cloth taken from the post can be the colorful neckerchief.
Go back to the ship. Use the map in inventory. Go back to Elfburrow. Cast off.
Exit the ship. Go to the library. Take the top hat from the stand at right.
Captain's cabin: Go back to the ship and down to the cabin.
Look at the dressing table. Take something from the dressing table. Get white powder and then empty perfume atomizer.
Look at mealbox left of wardrobe. Take empty tin cans (tinned peaches).
Look at and then search wardrobe. Get rabbit costume.
Mad Hatter at Teatime: Use the map to fly back to Tugator.
In inventory, put the top hat and the neckerchief on.
Exit the ship and talk to Chantal.
Get presents:
Telephone: After the discussion about presents, combine the tin cans and Arbor's string to make homemade telephone.
Talk to Chantal again about the telegraph. Chantal doesn't like the cables. She changes it to wireless telephone. She didn't like this present.
Perfume: Go back to the Mary. Fly to Lorem Ipsum.
Go inside the pyramid. Use the huge bloom from Tugator on the oil press. It's sticky and smell strong.
Leave the pyramid and the mummy.
Fly to Elfburrow. Go to the pool. In inventory, combine the oil with the empty atomizer.
Use the atomizer with fragrance with the pool to fill it up and dilute the fragrance oil. Get sweet perfume.
Fly to Tugator. Exit the ship and talk to Chantal. Give her the perfume. She likes it.
Parrot: We need another present for the white rabbit. Go back inside the palace.
Speak in behalf of the parrot. That did not work.
The parrot sits on William. Use the telephone on the statue William at left.
Nate insults the Red Pirate by mimicking the parrot's voice. Red Pirate points his gun at the parrot and the parrot flies away. The Red Pirate regrets that he has no one to talk to now.
Exit the palace after Nate picks up the telephone.
Use the shrivelled seeds on the parrot sitting atop a mushroom. Get the pirate's parrot.
Get the white rabbit: Go back to the Mary.
Give Critter the bunny costume. Nate uses the white powder with Critter.
Automatically be at the tea party. Nate gives the parrot to Chantal.
Chantal demands a present from her mother and throws a tantrum. They return to Seastone.
Collect the magic compass:
Enter the palace and talk to the Red Pirate. The Red Pirate did not give his pirate word to seal the deal and refuses to give the magic compass.
The monkey points the gun to get Nate leave the palace. The monkey guards the door.
Wake up Ivo:
Oracle: Go to the observatory. Talk to the Oracle.
Try to take the mirror showing Ivo's bedroom left of the door. Oracle collects mirror.
Talk to the Oracle about the first mirror taken from Tut Tut's pyramid. They agree to the exchange. Nate gets the magical receiver mirror.
Look at the happy children mirror below Ivo's bedroom mirror. Nate thinks about Ivo's mother's missing out on her grandchildren.
Feed Buttercup: Go to the pile of treats. Eat and take some treats.
Go back to Mary. Feed the hippogriff with the treats. Tell Buttercup about the pile of treats by the palace.
Go to the palace and see Buttercup ate nearly half of the pile of treats. Talk to Buttercup.
What a dung heap! Take two good handfuls of glittery dung.
Bedroom: Fly to Elfburrow.
Go to Ivo's bedroom. Look at and then take Ivo's mirror.
Get Ivo's mother to relent about Ivo's future: Go back Tugator and to the Oracle's observatory.
Use Ivo's mirror on the happy children mirror.
Fly back to Elfburrow. Go to Ivo's bedroom. Use the receiver mirror with Ivo's mother to show her the future that she will miss.
The Queen saw the happy children. Feodora magics the mirror to show Ivo's future. She sees her grandchild asking for a story. She relents.
The Queen awakens Ivo. See you later, mother.
Get the Book of the Dead:
Ivo arrives at the ship after getting the Spark of Life from her father. (Change to Ivo to check her inventory.)
Fly to Lorem Ipsum. Leave the pyramid. Ivo is impressed.
Enter the pyramid. Ivo recognizes the mummy she released in Mortimer's house (TBOUT1). Nate carries the mummy.
Explore: Look around.
- The left room has a hole in the wall. The mummy says that there could be a lever or a trap that will cut the arm off.
- The hall at center has a weird column that pushes out when the trap on the floor is triggered. This will push the person right into a pitfall at center of the floor.
- The pitfall has spikes and some dung beetles.
- There is a large ball at the end blocking the entrance to the pharaoh's tomb. Mortimer must have triggered it the last time he was here.
- The right room is pitch black.
Block the column in the alcove:
Left room - Machine room: Look at the hole on the wall left of the door.
Use the hole and Nate pulls the lever. The door is broken and opens only slightly.
Change to Critter. Slip underneath the door. Look around.
- See another hole on the wall left of door.
- Examine the alcove on the left wall with holes on the posts and lever on door. Pull the lever and marbles comes out of the holes on the posts.
- Look at and take the chisel from the table at bottom right.
- Examine the stone chest at bottom left. The lock is made up of musical buttons.
- Examine the big hamster wheel at left.
Exit the machine room.
Change to Nate. Remove hand from hole.
Change to Critter. Give the chisel to Nate.
Column: Change to Nate. Go to center hall. Use the chisel on the column that pulls out - jam the piece on the wall.
Explore the hall. Examine the pitfall and the stone ball.
Get light on at right pitch black room.
Dung beetle room: Change to Nate. Place hand in hole of machine room.
Change to Critter. Slip underneath the door.
Run in the big wheel to turn it.
Change to Nate. Remove hand from hole and look at the right pitch black room.
There is now light. See the floor is full of dung beetles.
Examine the light - torch on wall. See a wheel on the wall.
See the dung beetles go in and out from the square entrance on the left wall to be at the pitfall trap at alcove.
Remove the dung beetles from right room:
Throw some hippo dung on the floor with dung beetles. They really like it.
Ball: Smear hippogriff dung onto the ball at center hall.
The dung beetles concentrate on the entrance to the pitfall trying to get to the ball.
Use the heavy wooden plank on pitfall. It will be placed at an angle to the ball.
The dung beetles congregate on the ball and rolls it on the pitfall. The way to the door is now unblocked.
Stone gate to burial room: Examine the door.
See that 2 pins prevent the disc that opens the door from turning.
Explore the right room:
Enter right room now that the beetles are gone.
Go down the floor. Look at enclosure and see the basilisk skeletons.
Examine and take the wheel right of enclosure.
Push the lever left of the enclosure. Something happened. Exit the room.
Pull the lever in the machine room:
Hold the machine room door open: Change to Critter. Get Critter out of the machine room.
Change to Nate. Give Critter the wheel taken from the right room.
Change to Critter. Bring Critter back inside the machine rom.
Use the wheel on the hole left of the door. Critter opens the door.
Change to Nate. Enter the machine room.
Chest: Look at stone chest. The mummy gives the code to open it: yellow, red, red, blue and green.
Get a time manipulator.
Lever on left wall: Try to push the lever and the trap is triggered.
Use the time manipulator on the holes on the wall. The poisoned marbles are held in place. Access to the lever is blocked.
Give the time manipulator to Critter.
Change to Critter. Since Critter tested this trap already earlier, use the time manipulator on the holes on the wall. The poisoned darts are held in place. Access to the lever is blocked.
Critter moves to the other side of the poisoned marbles. Pull the lever.
Enter the burial chamber:
Change to Ivo. Go down to the right room. Push the lever left of the enclosure.
Change to Nate. Go to the stone gate of the burial chamber. Turn the stone disk now that both levers are held. That's it.
Burial Chamber:
Enter the tomb. See the golem of Tut Tut - ugly fellow. Nate tries to take the Book of the Dead but is prevented by the golem.
The mummy is venerable Tut Tut. King Tut is back. He doesn't want to give the Book of the Dead to Nate.
Look around. Check the wall paintings.
Another exit: See the tunnels made by Mortimer to exit the pyramid. Exit to check where it leads.
Go back to the burial chamber via the regular way or through the lighter panel at right corner of the screen.
Look at the board with 16 marbles.
Look at and talk to Tut Tut.
Play the 16 marbles game: The Nim-game is Tut-Tut's favorite game. The wall painting is the rule of the game.
Remove any number of marbles from one row. Whoever takes the last marble loses.
Play the game. Select one or more balls in a row. Then click on the check mark. You lose.
- You can play to win or cheat. The solutions are below.
Cheat: Give the hammer to Ivo.
Exit the chamber. Take the chisel from the column beside the pitfall. Give the chisel to Ivo.
Go back to the burial chamber.
Play again with Tut-Tut. Select Yes. And Ivo? Why don't you take a bit of a look around in the meantime?
Change to Critter. Move very near the Book of the Dead. See that the golem's head follows Critter. Be sure that Critter stands at right side of the chamber and that the golem's head looks at him.
Change to Ivo. Read the wall painting. Use the chisel on the wall painting to change the rules of the game. (If mummy is not distracted, he will warn Ivo.)
See that the bottom wall painting has anow a thumbs up instead of the original thumbs down. Sorted.
Change to Nate. Play the game and take the last marble. You win!
Nate takes the Book of the Dead.
Play to win: Talk to Tut Tut and then play the game. Get him to start the game.
Numbering the marbles #1 at top, 2-3 second row, 4-9 on third row and 10-16 at bottom row.
- Tut Tut takes #10.
- Take #1 at top. Tut Tut takes #11.
- Take #2, 3 and 4 from second row. Tut Tut takes #5.
- Take #12. Tut Tut takes #6.
- Take #13. Tut Tut takes #7.
- Take #14. Tut Tut takes #8.
- Take #15 and 16. Tut Tut takes #9. Tut loses.
Exit through the main door or through the hole in the wall.
Change to Critter. Give the time manipulator to Nate.
Get the magic compass for good:
Change to Nate. Fly to Tugator. Nate leaves Critter and Ivo in the ship.
Monkey guard: Look at the monkey guard. He is playing with the key of the door.
Use the time manipulator to stop time. Take the key from the guard. Nate scares the monkey with magic talk.
Scare the Red Pirate: Enter the palace.
Use the time manipulator on Red Pirate. Move the statues bit by bit. Start with William on the left.
Do this 3 times and Nate will automatically do the rest.
The statues fall on Red Pirate. They demand that you give me the compass that you promised to me!
Take the spirit compass right of the divan. Now they have everything to bring back the Arch mage.
Bring back the Arch mage:
At the observatory of the Oracle, Ivo recites the words to return the Arch Mage.
Use the Spark of Life on the frog.
The Arch Mage talks but is still a frog. The frog says it needs a kiss by virgin princess.
Kiss the frog. The Arch Mage is back in his body but is terribly weak.
Nate is very confused. The Arch Mage explains about the effect of the Artefact on Ivo. She carried it for a while and the magic lingered to fulfill a wish. Nate wanted to start a family with Ivo. Ivo kisses Nate. Nate proposes.
Arch Mage is updated with what happened. Wilbur is in the Dark Woods to find a book. The arch Mage knows that Wilbur was tricked by the Nameless one.
Munkus must be stopped. They have to get Arch Mage's wand back from Seastone.
Councillor Van Buren:
Councillor Van Buren comes out of the palace holding the head of Medusa and looking for the elf. Nate protects Ivo and is turned to stone.
Critter pulls and takes Ivo away to protect her.
The weak Arch Mage tries to reason with Van Buren. There is no cure after being turned to stone.
The Arch Mage turns himself to a spirit to stop Van Buren who is trying to turn him to a stone. He destroys the Medusa head and tries to take Chantal's wand. Chantal opens a portal and flees to Seastone. He tells Van Buren that he is now more powerful than you can imagine. Van Buren also flees to Seastone.
Parting of the friends again:
Nate with butterflies flying around is again in front of a tribunal.
On the ship, Arch Mage tells Ivo to continue the fight at Seastone. Munkus must not be allowed to open the machine at the temple.
Alistair has little power left and his time here is limited. He will try to warn Wilbur at the Dark Woods.
Chapter 5
Dark Woods.
Camp:
Wilbur leaves Esther, Gulliver, N8 and Timmy in a camp above the Dark Woods. Wilbur will check the village.
Village:
Look around. Check the houses at left, the craftsman house at right and the graveyard.
Swords and Potions Store: Look at the illuminated building. Knock on door.
Talk to the scared shopkeeper. Wilbur enters the store and is shot with a crossbow. Keep on talking to Mr. Tim Whale, the mayor and all other professions here at Somberville.
Learn that Sorcerer Van Buren has been quartered and buried by paladins and knights 20 years ago.
Learn that in Somberville; it is always night and always full moon.
Whale mentions bounty hunter to look for the headless horseman. He doesn't want to lead Wilbur to the castle.
Look around in the store. Check the armor at left, door frame, barrel and skull above the door.
Take the iron bolt above the door. Look at the crossbow on the counter and shelf behind the counter.
Examine the female armor, armor, fireplace and the spell circle around the mayor's chair. Look at mayor.
N8: Try to leave the shop. Hear the thunderstorm. Learn about the PKE that spiked.
Someone knocks on the door - N8. There was a knight with a sword? A monster too? Werewolf. Gulliver lost his head? Esther?
Bounty Hunter: The bounty hunter that was with Nate and Critter at Tugator enters the store. It says it will take care of the horseman, werewolf and whatever crosses it's path. It will keep an eye out for Esther and Timmy.
The source of the evil is the heart of the woods. The mayor will pay the bounty. The bounty hunter leaves.
Find out what happened to friends:
Camp: Go to the camp. N8 places the head back on Gulliver. Talk to Gulliver.
They need to find the heart of the wood; uncover the secret of the woods and go to the castle to find the book.
Search the camp: Look at N8, Gulliver, fire and glowing coal.
Look at luggage to get woolen blanket.
Look at depository. Take the mug in the sand.
Look at the piece of fur on the vine at left and the footprints on the path.
Get more info about the woods:
Outside store: Go back to the village. Look at the boards and the bedsheet right of the general store.
Take the white bedsheet. The washing line's knot is unreachable.
Mayor: Go inside and talk to the mayor. There are spiders, mine and sewer system in the woods.
Heart of the wood has a dead tree at the center. The mayor does not want to lend the ghost detector - PKE.
Any weapon made of silver will work with a werewolf. The light crossbow on the counter costs 10 wolfskins. The mayor does not want zombies in his store.
Explore the woods:
Explore the woods. Enter the woods and look around. Check the exits and special items seen in each location by pressing the spacebar.
Start:
Items: Take the axe.
Exits: Left, right and back to town at bottom right.
Go left.
Stick, werewolf furs and eyes:
Items: Take Timmy's scarf from the branch. See eyes at right side, broken bush and furs.
Exits: Top left, bottom left, top right and bottom right.
Go bottom left.
Large bush:
Items: See the large bush shaking. Lunge the bush with the axe.
Talk to the woman. She is the bride of Count Vladi at the castle. There was a witch that scared her and her horse. Vladi is very rich and very old.
Exits: Top left, bottom left, top right and bottom right.
Automatically, Wilbur takes the woman to the mayor.
Continue exploration:
Go back to the woods after leaving the woman at the store.
Start: At the start of the woods, go right this time.
Bounty hunter trap:
Items: Trap laid by bounty hunter. See a stick with a bloody scrap of cloth. The werewolf trap is triggered.
Talk to the gnome bounty hunter. Learn that the bounty hunter is scared of spiders.
Exits: Top left, bottom left, top right and bottom right.
Go top left.
Stone head
Item: Stone head at bottom right.
Exits: Top left, bottom left, top right and bottom right.
Go top left.
Tunnel: See a tunnel.
Item: Try to enter the tunnel to go deeper in the woods. Howling sounds are heard. It scares Wilbur. Wilbur wants a weapon.
Exits: Left, bottom left, right and bottom right.
Go right.
Mine:
Items: Examine the broken kiln. Take the broken press for bricks.
Go left and look at prospects. Take lump of loam - clay.
Exit right.
Exit the woods: From the tunnel; (just one way) go left to be at where the werewolf furs are seen.
Go bottom right to be at start of woods.
Go bottom right to be in the village.
Get crossbow:
Go to the store. The mayor wants 10 wolfskins for the crossbow.
Get silver: The woman has a wolfskin from the box to warm herself.
Talk to the young woman. Wilbur says he can contact the Count if he has silver.
The bride gives her silver jewelries.
Get wolfskins: Ask her for the wolfskin she has in her lap.
Offer the blanket from Esther's luggage in return for the wolfskin. The wolfskin looks strange and is not fashionable.
Pay for the crossbow: Give the wolfskin to the mayor. Need 9 more.
Exit the store. Use old axe on the boards of the window of the store.
Look through the hole in the shop. Take the wolfskin.
Go back inside and give the wolfskin to the mayor. Need 8 more.
Automatically, do the whole 10 and get the crossbow.
Get silver arrow:
Loam press: Go back to the camp. Talk to Gulliver.
Get Gulliver to fix the press from the mine. N8 fixes the press laid left of the campfire.
Loam Mold: Use the clay-loam on the fixed press to get clay brick on the ground.
Use the iron bolt on the clay brick to get a cast of the iron bolt.
Fire the loam block in the fire. Try using the loam block on the piece of coal. It gets distorted.
Sand Mold: Press the sand in the loam press.
Use the iron bolt on the sand brick in the press to get a cast of the iron bolt.
Melt silver: In inventory, put the jewelries in the dwarven stone mug.
Melt the silver in the mug in the fire.
Arrow: Pour the molten silver onto the sand mold. N8 pours the silver. Get silver arrow.
Get the PKE:
Go to the village.
Wilbur ghost: In inventory, right click the white bedsheet from clothes line to dress up like a ghost.
Wilbur automatically tries to scare the mayor. That did not work.
Line: Use the axe on the washing line right of the store.
In inventory combine the stick with the washing line to get fishing rod.
Gulliver ghost: Talk to Gulliver at the camp.
Gulliver offers his head as ghost. Use the white bedsheet on Gulliver's head.
Use the fishing rod on bedsheet covered head of Gulliver.
Talk to Gulliver to start haunting. Try to frighten the mayor again with Gulliver's head. That did not work again.
Gulliver ghost with fiery eyes: Back at the camp, use the glowing coal from the firepit.
Gulliver removes his eyes and N8 places 2 coals as replacement eyes. Spooky!
Talk to Gulliver to start haunting.
Mayor: The mayor is still not scared - string and Wilbur talking. Fire!
The mayor gets scared of Gulliver's head with the eyes. Gulliver takes the PKE and runs out.
Camp: Talk to Gulliver. Get the PKE. Give Gulliver his eyes back.
Go to the heart of the woods:
While at the camp, look at the background and see jump to points: village, woods, tunnel (leads deeper into woods) and the castle (later).
Jump to the tunnel that leads deeper into the heart of the woods. Enter the tunnel.
Spider and werewolf: See a spider about to eat the bounty hunter. Wilbur fires an arrow and scares the spider away.
Another spider drops down from the tree. The werewolf saves the gnomes.
Wilbur stops the bounty hunter from killing the werewolf. The werewolf is Timmy.
The bounty hunter is Lizzy Pebblebrook aka Tin Lizzy. With the PKE, they will look for the heart of the wood together.
Heart of the wood: See the old tree at center of the clearing. The PKE nearly breaks.
Esther and fear: Enter the diseased tree. Esther is here.
Meet apparitions that feeds on the fear of the person. Talk to the apparitions: Arch Mage and Rémi for Wilbur and spider for Lizzy.
You are fear. You are not real.
Look at the picture of the clown, big fish and man. Look at the objects on the table. Talk to Lizzy.
Look at and talk to Esther. Leave the cave.
Mayor at store: Bounty Hunter and Wilbur inform the Mayor about fear and the curse.
Lizzie gets her bounty and takes all of it from Wilbur.
The mayor takes Wilbur and the woman to the castle. Wilbur draws a map.
Vladi and the Castle:
Courtyard: Vladi tells Wilbur that Wilbur is now Igor, his new servant.
Look around. Look at the chicken, chicken shack, water bowl, statues, portcullis, water fountain, stone, weeds and damaged carriage.
Enter the castle: Look around. Look at painting, heap of wax, pot of stove, cloth that covers the mirror, stairs and the ceiling.
Chest: Go close to the chest under the large painting.
Look at the painting of the sorcerer with a wolf.
The chest has 7 seals; 2 are already opened.
Count Vladi: Go left at the hallway. Vladi wants Wilbur to set the table and make dinner.
Talk to Count Orlov. He found the sorcerer's diary and gave it to Wilbur. The paladins and knights cannot take the chest and painting of the sorcerer.
The lady is to have rocket salad with vinegar and oil dressing and chicken. Vladi drinks the red wine.
Look around. Check the balcony, dining table and cord hanging by bookshelf.
Sorcerer's diary: Read the diary and learn about Rutherford. Read the introduction at top of left page.
Look at the drawings to learn how to open the chest. Click on the squares at left page to learn about each seal.
- Only the hand of the greatest sorcerer of all time will open this seal.
- The second seal is opened by blood of innocents. Already opened by the Count.
- The third seal will open when the word "open" is spoken in Ratish.
- Only those with insatiable hunger can open the fourth seal. Already opened by the Count.
- The fifth seal can only be opened by the breath of death.
- The sixth seal is opened by the invisible key visible to all.
- Only one of worthy of heart can open the seventh and final seal.
Read the right page.
Set the table and make dinner:
Set the table: Go left and see incense on the table at left.
Open the drawer. Get cutlery.
Look at and take the plate left of the balcony entrance. Hear a voice calling Wilbur.
Go to Entrance hall. Take the red cloth covering the mirror.
Go back to the dining table in the office.
Use the heavy cloth, plate and cutlery on the table.
Take the candlestick and place it on the table.
Find dinner ingredients: Go back to the courtyard.
Look at letter box and take the scroll from Seastone. It has the Seastone coat of arms.
Lift the stone by carriage to see and take maggots.
Look at and take weeds by door.
Take the water bowl from the chicken shack.
Jump to camp using the map in inventory.
Talk to Esther. Esther gives sausage to Wilbur.
Give Esther the maggots and she will roast them. Get fried maggots.
Look at background and click on cave at heart of the woods.
Look at and take flute and bottle of wine from table.
House: Go to village and look at the handyman house at right. It is perfect for Gulliver and Esther.
Talk to the mayor about the house for the zombies.
The mayor has old oil for warriors.
Exit the store and hear someone call Wilbur.
Arch Mage Alastair: Jump back to the castle. Hear the voice again.
See a drawing of a ghost over a symbol appear on the mirror. He's gone.
Prepare dinner: Go to the left hallway.
Place the pulled weeds, oil, sour wine and the fried maggots on Kiki's plate. Look at Salad a la Wilbur.
Talk to Count Orlov twice. Give the Seastone mail to the Count.
Pull the cord by bookshelf. The count tells Wilbur how to pull the cord.
Open some seals on the chest:
Kiki: Go to entrance hall. Kiki talks to Wilbur.
Get Kiki to open a seal of the chest. She opens the seventh seal (Only one worthy of heart can open the seventh and final seal.)
Key: Look at the painting above the chest. Van Buren is pointing at the key on the table.
Click on the key on the painting. Take the key. Unlock the sixth seal.
Summon Master Alistair:
Symbol: Look close at the symbol in the mirror.
Jump to the store and talk to Mayor Whale about summoning ghost and Ratish.
The procedure - Draw a circle on the ground and a triangle outside the circle. Have blood in a bowl and placed in the triangle.
Incense is needed for atmosphere. Draw the symbol of the ghost inside the circle. Then do the incantation.
Collect items for the summoning:
Jump to camp. Take a piece of coal from the firepit.
Jump to castle. Go to the office and see the lovers dining. Listen to the lovebird's conversation.
Take incense stick from the table at left.
Pinch a little of red wine from the desk. The red wine is placed in the water bowl.
Family crest: Read the letter on Vladi's desk. The family crest is on Alistair's amulet.
Take the heavy glass from the bottom shelf of the bookshelves right of the desk.
Use the glass on the letter to see the family crest.
Summon Arch Mage: Go back to the chest at entrance hall.
Use the coal on the stone floor in front of the chest. Draw a circle and a triangle on the ground.
Use red wine in water bowl on the triangle. Use the incense for atmosphere.
Use coal with the drawn circle. Wilbur does the incantation.
Arch Mage Alistair: Talk to Alistair. Wilbur learned that Rémi is not dead.
The book does not have the spell to destroy the wand. It has spells written by Alhazred to summon magic beings.
Munkus wants to open the dungeon dimension to siphon the Nameless One's power.
Alistair wants the book destroyed. They need to destroy the magic wand, book and mechanism under Seastone. There are copies of the book.
The seal that can be opened by the breath of death is opened by the Arch Mage.
Learn about removing the curse on Timmy. Timmy has to learn to manage the curse of the wererat. Wilbur has to bring out the piece of the wererat that is Timmy with a food or song.
The Arch Mage leaves.
Timmy the wererat:
Camp: Jump to camp. Talk to Esther.
If you don't have sausage yet, ask one from Esther.
Learn about the tune Timmy wants to whistle.
Catch wererat: Using the background at the camp, jump to the woods.
Look at the tree where the bait was placed. Lizzy's trap is underneath the ground.
In inventory combine the stick and the sausage. Use the sausage on the stick on the tree as bait.
The wererat arrives. After eating the sausage, Timmy is caught.
Play for Timmy: Use the flute on or talk to Timmy.
See the flute. Numbering the holes 1-5, left to right: click on 1, 5, 4, 3, 2 and 1.
Wilbur talks and play to Timmy. Timmy turns back to a rat. Talk to Timmy.
Jump to camp. Give Timmy to Esther.
Chest: Go to the chest at the castle.
Open the third seal by saying open. Only one seal is left.
Open the first seal:
Look at the leftmost seal. It is to be opened by the hand of the greatest sorcerer. That means himself - Van Buren.
Get info about Van Buren: Jump to store at village. Talk to Mayor Whale.
They spread Van Buren's remains all over the land in graves that doesn't bear his name.
Graveyard: Go to the graveyard. Look at the 4 gravestones. They are Lugosi, Lee, Chaney and Karloff families.
Go back to the Mayor. Talk to the Mayor about the graves. Learn that 3 of the families are from Somberville.
The Mayor stutters on the Lee family.
Go to the Lee family gravestone at the graveyard. It is now labeled Van Buren's gravestone.
Go to camp and talk to Esther. Wilbur asks Esther to get the hand.
Leave and then come back. Esther gives the hand. The hand attacks Wilbur.
Open the seal: Go back to the chest at the castle.
Use Van Buren's hand on the first seal of the chest. The first seal is opened. The hand runs away.
Wilbur takes the book from the chest.
Decision: Wilbur talks to Gulliver. Wilbur decides to not destroy the book. Wilbur will use it as bait. <sigh>
The zombie family will live as handyman at Somberville and reside at the house across the store.
Temple underneath Seastone:
Munkus: Munkus grabs Wilbur through a portal and takes him (and Timmy) to the temple.
Ivo and Critter are imprisoned in bubbles that can shrink. See that Chantal and the wand is here. Her wand doesn't work with Munkus. Munkus put Lady Van Buren to sleep.
Learn that there are threeVan Buren brothers: the first made the wand, the second wrote the book and the third made a ring (Munkus is wearing it) that protected him from the magic of the other two. That is why Chantal's wand did not affect Munkus.
Chantal: Munkus orders Wilbur to place the book on the lectern and Chantal to read the spell.
Chantal is surrounded by bars coming from the machine.
Timmy: Look at the moonlight behind Munkus. Learn about what happened to Rémi .
Throw Timmy the wererat into the moonlight. Timmy attacks Munkus but was repelled. Wilbur tries to get the book.
Machine: The machine drops into the abyss. That released the bubbles holding Ivo and Critter.
Wilbur hits Munkus and both fall down into the abyss. Wilbur used the flap opening spell to release the chains.
Adjust the machine: Munkus lands on top of the machine while Wilbur is at the side.
The right side has pressure hose and metal tube. The left side has a lever. The middle part rotates.
Release the hose: Pull the lever at left side and see steam comes out of the pressure hose at right side.
Go to the right side and look at the metal tube. The tube leads to the inside of the machine.
Look at pressure hose. Try to loosen the cuff holding the hose. It's too tight.
Go to the middle and check what can be seen on the middle part when it turns: glass cylinder, cables, grating, knobs and tubes.
When the middle part has the cables, take the clamp that is inserted on the cables.
Use the clamp to loosen the cuff that holds the pressure hose at right side.
Use the loose hose on the metal tube. This plugs the steam hose to the metal tube that leads inside the machine.
Munkus: When the grating part is seen on the middle part; pull the lever on the left side. See that it is an exhaust.
When the middle part turns, note that the cables is seen before the grating. When you see the cable in front of Wilbur, that means the grating is under Munkus.
Go left and pull the lever to release steam from the exhaust grating while it is under Munkus.
Munkus flies off and down the abyss.
Ivo and Critter arrive in the flying carpet and saves Wilbur.
Aftermath:
Ivo and Wilbur talk aboard the Mary. A butterfly flies in. There is always hope.
After the credits: Hear Munkus land at the bottom of the abyss. The machine drops too. Munkus is met by another and another and maybe another (?). They laugh.
This document may not be distributed without express written permission of the author and the content may not be altered in any way.
For Questions or Comments on this Walkthrough,
Please write to: MaGtRoCopyright © 02/2015 MaGtRo