There
are nine slots for you to save games, and the game also
automatically saves for you. |
Walkthrough by Tally
Ho, Winter 2003
GameBoomers Edition Summer 2003
There
are nine slots for you to save games, and the game also
automatically saves for you. |
| The Viking Village | The Pillagers' Forest | The Fortress | Between Worlds I | The Starship |
| Between Worlds II | The Land of Shadows | Between Worlds III | The Fisherman's Cabin | Thorgal's Island |
Enter Oldreif's home and talk with him. (Always exhaust all dialogues.) He mentions having to tie the pontoon bell because it is so windy. Talk with Oldreif about the possibility of leaving the island through the forest. Oldreif refuses to let you cross the bridge, because the Pillagers in the forest are too dangerous. Noral appears. Talk with him as well. He will show you a frightening scene, reflected in a mirror. Your son, Jolan is in danger, apparently by Thorgal's own hand. Speak with Noral again. He mentions a fisherman named Maleb who could lend you his boat. Noral leaves, and you are standing outside.
Go right, to the end of the village, where the drawbridge is located. Examine the mechanism, and discover that there is a piece missing. Return halfway to the village. Just to the right of the point where you stop, is a spot on the ground where you can stand. From there, you can shoot arrows at the rotating target. Aim at the center of the target, and release the arrow as the target is facing away from you. That way, the timing is correct, and the arrow will strike the target when it is facing you. Now talk to the woman who is working on the far side of the walk. She tells you about the Dragon. She tells you that the key to the bridge is hidden in Oldreif's home. If you have successfully shot three arrows into the target, she gives you her son's knife.
Go around the side of the house, where you first arrived, and find the Bell. Use the knife to cut the rope. (Right-click for inventory.) A timer starts as you enter Oldreif's house, and you have only a brief time to take the lever for the drawbridge before he returns. It is located behind the shield, just to the right of the entrance.
Go to the drawbridge, insert the lever (it looks like a garden-fork to me) and pull it to raise the bridge. Cross the bridge, and into the Pillagers' Forest.
![]()
Enter the forest, and take the first left path, then the next right path This brings you to an encounter with a rather unpleasant oaf who is guarding a stone bridge. Approach him to start a rumble, then back away. Shoot at the three cords holding up the shields and symbols over his head. The material drops, stunning him.
From here, take the path at the bottom left, and find the Iron Bow on the ground, below the path. (Looks sort of like a large snake sitting there.) Go back to the guy you knocked out, and examine the body. Click once to discover the strange object (statue) and click again to take it with you.
Cross his little bridge, and proceed to take the left fork. This will take you to the old man's house. Talk with him. Show him the Iron Bow you found. He is grateful to get Andrulf's bow back. He soon sends you on your way.
Return to the fork, and find a Rope on the ground, near the left end of the large log. Now take the other path, the one to the lower right. Behold the Dragon! Look on the stone wall, just in from of Thorgal's face. Press the Triangle. (You may have to click once to approach it, and again to activate it. A stone panel opens to your left.
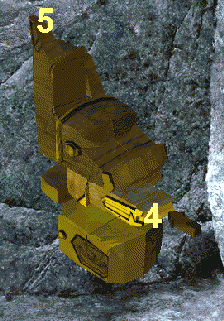
Approach the hole, and use the statuette on it. A 3-D wooden puzzle is revealed. Here is the shortest solution.
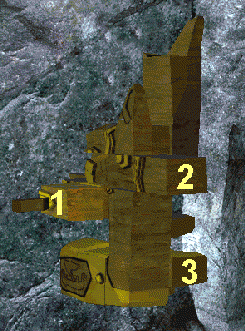 |
The 3-D puzzle in the Dragon's Cave can be solved in 6 clicks! Start by rotating the puzzle so you are looking at the left-rear quarter. Push the pieces 1, 2, and 3 as indicated. Rotate it so you are looking at the right-front quarter, and (important) tip it forward. Push in the mouth-part, No. 4, then push down on the right-rear column, 5 TWICE. |
 |
The dragon's fire is extinguished. Go forward, only to discover that the Dragon is a fake, put there to scare people. Proceed further, to the Fortress. Walk up close to the base of the tower, and inspect the grille. A grapple could reach it, but you only have a rope and still need a hook of some sort. Go see the Old Man and ask for help. (The bow-and arrow game will not be activated until you "need" the grapple, and ask the man for it.
He has made a special arrow, that you must earn by displaying your skill at archery. Look for the hotspot on the ground, similar to the one you stood on before when shooting arrows behind the house. The trick to this challenge is getting the timing correct.
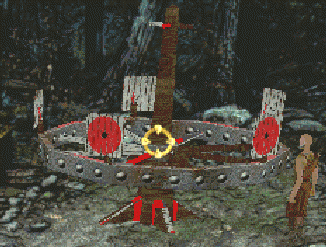 |
The best place to aim is just at the bottom of the pole, and the best time to shoot is when you see the two targets at the right overlap. Shoot when it looks like this picture. You will have better luck if you wait between alternate targets, rather than attempting to hit them all in a row. Don't wait too long, or the wheel will stop. |
Return to the Fortress. Combine the rope and grapple that the Old Man gave you. Swing the grappling hook at the Grille, and enter the Fortress.
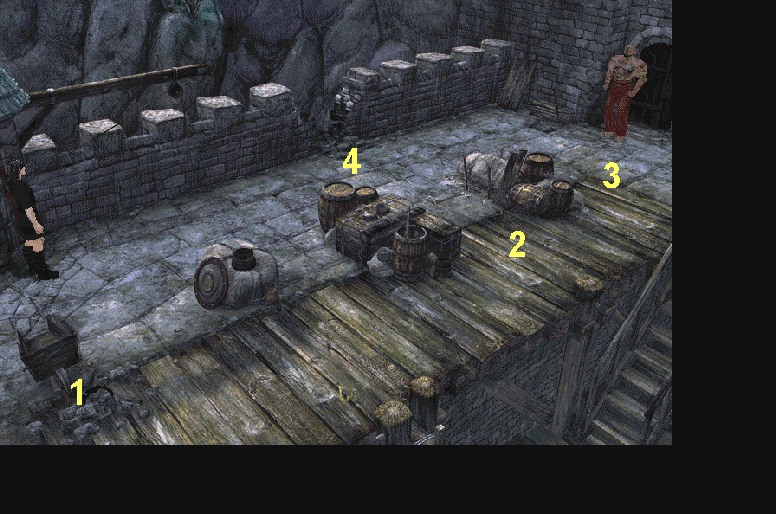
1. Pick up stones at the very bottom-left of the screen.
2. Walk toward location two in the picture. Stand there, until Vymir starts to walk toward you.
3. When he gets to point 3, throw a stone at him, making him run.
4. Walk toward the notch in the wall.
5. Step aside, and he will fall through the notch.
![]()
Pick up the key that Vymir dropped, and enter the Fortress. When inside, go to the right. You come to a Tee intersection, where you can go down and left, or up and right. If you look at the lower corridor, you discover a fissure which you cannot cross. You will have to find something to help you cross the gap. The other way, up, leads to a small room. On the way there, notice a board, solidly attached to the wall. In the room, find the tongs sitting on a box at the left, and a key sitting on the large barrel to the right side of the room. Exit this room, and use the tongs to loosen the board. Take the board.
Return to the place where you entered, and take the other corridor, to the left. Go around the next corner, and to the door at the far end. Open it with the key.
Stop! Before you let Thorgal touch anything, search the room until you discover the location of six objects but Don't Touch Them Yet!
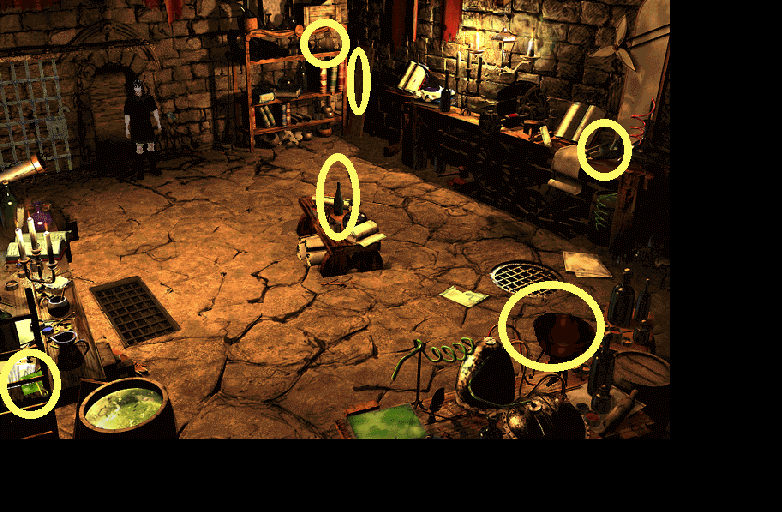 |
A Container on the right side of the bookshelves
A Board leaning against the wall, just right of the bookshelves
A Crucible on the far right end of the workbench
A Bottle of Water on the bench in the middle
A Green Stone (Emerald?) in the bottom left corner of the screen (hard to see)
A Distillation Device, on the lab table, bottom right of the screen
The moment Thorgal touches any one of these objects, the gate will close and lock. Your "host" decides to purify the laboratory. A timer starts, and it only runs for two minutes, not giving you much time to experiment.
Pick up the first five objects. Combine the Green Stone with the Crucible, grinding it into a powder. Put the Green Powder into the distillation device. Put the Water into the distillation device. Collect the Acid dripping from the end of the coiled tube, by using the flask. Use the Acid to burn through the lock on the gate, and exit.
![]()
You will have to touch the Eye of the Dragon, whatever that means. Return to the room with the gap, and combine the two boards. Use them to jump to the stones, pick up the board, and use them to cross again. Continue into the Fortress, and go left, into the room with the red and gold carpet.
On the wall is a carved dragon, whose eye is a hotspot. If you don't see it at first, wait and it will sparkle briefly. Touch the eye and you hear a door open. It is at the end of the other corridor. Enter the room. Uh-oh, those holes in the floor look pretty ominous. Have you ever watched Battlebots? Step forward and meet Hiralgur, Pillager-in-Chief. He is not pleased that you have conquered his two sons. Step forward again, and you are in really deep trouble.
![]()
The spikes rise randomly, and Thorgal can only survive a few hits. In order to stop the mechanism, shoot the sandbags from their ropes. I found that stabilizing the mouse with two hands made the job considerably easier. Shoot at the ropes as they are rising, before they reach the top of their travel. Be patient, you will probably die a few times, while developing the skill to get through this segment. When you understand just how it is done, you will be able to knock off the four sandbags right in a row.
When you get the fourth rope, the machine stops, Hiralgur dies from his own trap. He triggers something, and the room floods with water. This is the last Thorgal will be seeing of the natural world for quite some time.
![]()
Talk at length to Noral. He unravels the whole point of the story - the tragic loss of his loved one, and being eternally doomed by immortality. When he is finished, talk with the Guardian of the Keys. She will open a portal, of things past. Enter.
![]()
Talk to the child - exhaust all dialogues. You need to find a box and a disk. Go through the portal. You find the second door locked; examine the pedestal to the right of the door. A triangular object will probably open the door.
Continue and take the corridor to the left of the four small doors. There is a series of magnetic fields preventing you from reaching the door. Notice the triangular switch at the left of the door. Shoot the switch with an arrow, initiating a repeating cycle in the deadly magnets. Watch the red lights at the ends of the magnets to determine when each one is off. Be careful not to step too far; proceed by stepping over the magnets while they are inactive. Enter the room, and take the glass triangle that is on the edge of the console opposite the entrance. More information about the magnets -->
Exit this room, and go back to the four small doors. In one room you can take a small steel key. (I am not sure if the position of the door containing the key changes from game to game; mine was in the second door from the left. The other three doors contain nothing you can take.) Finally, continue and enter the last large room to the far right. When you approach the center of the room, the laser-robot comes to life and is determined to kill you.
![]()
Deactivate the robot by pressing the six pyramids atop the poles. Hurry. You must proceed to each pole, then touch each pyramid to turn them off. Take the disk, which is at the triangular stand by the robot's lair.
Go to the locked door, and use the triangle on the pedestal to reveal a logic puzzle. The object of this puzzle is to discover which five symbols are the correct ones, and in which sequence. You will probably want to have a pencil and paper handy. Choose five of the symbols from the panel at the left, and press the green button to check your accuracy. If a flashing green light appears, it is one of the correct symbols, but you have it in the wrong position. If a steady green light appears, the correct symbol is in the correct position. If no light appears, the symbol is not to be used. You have five chances to test your accuracy. The required symbols randomly change each time you restart the puzzle. Getting all five correct will unlock the door. You can hear it click. Go in and use the steel key to open the cabinet containing the box.
Return to the child, combine the disk and the box, and the boy's memory is restored. He relates the tale of his ancestors, and how he came to be saved by the Vikings. He is young Thorgal.
Take the ring he leaves on the floor, it is half of a key you will need. Return to the Lands Between.
Talk to the Guardian of the Keys. She now opens the next portal, of things yet to be.
![]()
Talk to Death, the Grim Reaper at the entrance. You must find a lost soul and convince her to return with you. Enter the caverns. You see three paths: the center one will take you to the Blind Archer. Go there and talk with him. You learn that the butterflies are souls, and that you will need to find a gold and silver mask. Also, you must find two crystal pieces to help the Blind Soul regain his sight.
Leave the blind man and go to the upper left, retrieving the Rose. Return to the first crossroad and find the Crystal Piece sitting on the ground, on the right-hand edge of the blue ramp (Hard to see). Then go to the far right path then the upper-right path, and find the second Crystal Piece (easy to see). Give both crystal pieces to the Blind Soul, and take the Gold Headband that he leaves behind.
Climb the blue ramp from the crossroad and speak to the Mute Angel. He challenges you to a game of Runes. The white game is for practice, and the black game is for high stakes - either the Silver Gag, or your imprisonment. You should first choose the white game in order to learn the rules and practice the game. Playing the black game, Thorgal must win three times. If he loses three times, it is over.
![]()
Upon winning, Thorgal receives the silver gag. Combine the silver and gold pieces to create the mask. You hear a woman singing in the caves. Go to the lowest point, always taking the right fork. If you are going the correct way, you will hear the singing get louder. Find the red butterfly. Do not attempt to talk to it, or examine it. It will be frightened and fly away. Instead, give it the Red Rose. The red soul is transformed into Alianne, Noral's long lost love. She tells you his pendant must be destroyed in order to end his immortality. Remember this information. She agrees to leave the cave in order that you can help.
![]()
Kriss is unreal, but dangerous nonetheless. She has trapped apparitions of your wife, son and daughter in hanging cages. She attempts to shoot down the cages. If she does this three times, you are doomed. You must shoot each of the three cables connecting the top and bottom of each cage in order to free the apparitions. Aim at the middle of each cable.
After Thorgal frees his family, the Guardian of the Keys presents him with some sand from the Lands Between and allows him to return to Mitgard.
![]()
Talk to Maleb, the Fisherman. He would be happy to help you, but his boat was smashed in a storm. Go to the end of the dock and place the miniature boat in the water. Then use the Moonstone's magic to activate the boat. You are transported to Thorgal's Isle.
![]()
Go to your home and speak with Aaricia. She tells you the children are at the beach, fishing. Cross the island, and find Jolan and Louve. Talk to Louve, and try to talk to Jolan. Wake him up with the sand the Guardian gave you. He tells you about an old man, and what he saw before he fell asleep. Talk to him until Noral appears. He's a duplicate of Jolan!
Suggest you save your game
right after you see the flashback from the mirror, and
before Noral appears - |
After Noral appears on the beach, first as Jolan, then as the raven, run (double-click) back to your home. Take up a position close to the house and click on Noral to get his attention, then discharge an arrow at him, hitting the pendant and setting him free from the bonds of immortality. Talk to him, and the ending sequence follows.
Further help with the Magnets:
There is a pattern which will grant safe access to the other
side of the corridor.
There are five rectangular blocks that are affected by the
lights. The fifth and final block is also a safe area from which
you can open the door. This can be completed in six steps:
Wait until the first two blocks are safe to cross and then go to
the end of the second block.
Go forward one more block when lights change again
Wait a turn
Wait another turn
Step forward once when lights change again
Step forward once when lights change again
Press the triangle to the left of the door and then click on the
door to open it.