To the Moon
by
Freebird Games
Walkthrough by Chrissie January 2012
Launching the game takes you straight to the Main Menu screen where you have the options to Begin, Load & Exit.
To play in Windowed Mode press Alt + Enter. (In some cases windowed mode might result in mouse latency, so full screen is recommended).
You can access your desktop by pressing Alt-Tab or the Windows button on the keyboard.
Controls: The game is mainly point & click using the mouse. On occasions when you need to use the keyboard clear instructions will appear on the screen.
Left-click the following icons to perform an action: Cursor: to move the playable character(s), Magnifying glass: to look at a person/object, Hand: to interact with a person/object, Door: to enter/exit a room/building
Footprints: to jump on/off an object, Hourglass: to pass to a different time, Arrow: to move to another area in that direction.
There is lot of dialogue in the game during which actions can’t be performed. A flashing mouse will appear when the game play area becomes active again.
During the game you will collect Notes & a few Items which can be viewed by right-clicking (or pressing Esc on the keyboard) to switch to another screen & left-clicking on the appropriate heading. Clicking on Characters will give you a brief description of the current playable character(s).
You will also be able to view a monitor, which will appear along the top of the screen, when you receive the appropriate gadget.
You also access this screen to Save, Load & Exit. Clicking on Save will switch to a new screen - there are 3 save slots & an autosave which will automatically save the current game on exit – the date & time are recorded.
Right-click to return to the previous screen, & again to return to the game.
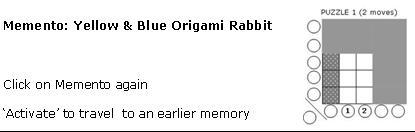
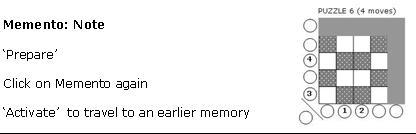
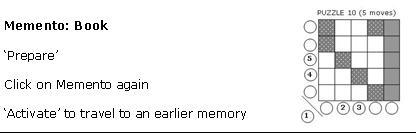
Grid Puzzles: You will see some squares filled in with parts of a picture - the object is to complete it. Clicking on any of the bottom orbs will flip the column of pieces above it, the left orbs the row to the right & the corner orb the pieces diagonally from it. In the earlier puzzles, squares at the top &/or to the right are inactive & will show as darkened sections of the picture. There is no limit on the number of moves you can make.
Walkthrough: There are a few times during the game when you have to make a choice. Although these don’t significantly change the course of the story they may lead to some slight variation in details which differ from this walkthrough.
Story A new technology has been developed which allows doctors to weave artificial memories into a patient. Two experts in the field, Dr Neil Watts & Dr Eva Rosalene, race against time to fulfil the dream of a dying old man.
(NB for the purposes of this walkthrough the doctors are referred to as Neil & Eva).
Introduction
Watch the opening scenes.
Click through all dialogues. Click on the car to receive Equipment. Click on the car again, & then on the squirrel.
Move forward & look at the signpost. “Wyles household ahead” Notice the arrow to the left but click on the arrow to the right.
Follow the track around until you come to a ‘boulder’. Click on it - you can either push it out of the way or find a branch. To use a branch, click on the one just visible on the track in the foreground to receive Tree Branch. Click on the boulder to automatically use it – it ‘deflates’. If you decide to push it – it bounces away. NB There are openings in the fencing – click on the areas that look like gates as they are actually brick paths.
Continue winding round the tracks & paths, clicking on the arrow to go over the wooden bridge, until you reach the front door of the house. Click on the door.
Act 1
Click through all dialogues, click on equipment to receive Equipment & follow Lily to the right – Yes, Go Upstairs!
Go left to the bedroom. Talk to both the doctor & Lily – choose to set machine down.
Click through all dialogues then click on Lily. The patient’s last wish is to go to the moon but Lily doesn’t know anything more about him other than his wife died two years ago.
Neil & Eva need more clues – choose one of them to search the house. NB It doesn’t matter who but each has a different approach & there’s some variation in dialogue. Lily tells them that either Tommy & Sarah, or my children, can show them around depending on who you pick.
Look around the house
Look at the bookcase top left in the bedroom.
Check out the bathroom through bottom left exit & the gallery down bottom right stairs – look at the paintings.
Go to exit the bedroom through the door on the right & the doctor calls to Neil/Eva – receive Remote Patient Monitor. From now on you can right-click to see Johnny’s status on the monitor shown at the top
Go through the door on the right to the hall landing & look at the clock.
Go downstairs to the right hall & up the stairs bottom right & look at the clock in there.
Go down the steps & click on the arrow right bottom to enter the kitchen. Notice the candycane on top of the cupboard.
Exit the kitchen & go down the left stairs to the central hall. Talk to the children & choose to be shown around the house...........it doesn’t matter which response you give! If you decide to get them the candy cane go back to the kitchen, click on the stool on the right, click on it again & then on the candy cane to receive candy cane. Click to jump down, go back to the hall & click on the children to automatically give them the candy cane.
Before going to the study check out the bathroom by clicking on the arrow left of the dining room located left of the hallway. (NB If Neil is the playable character you can choose to turn on & store tap water by clicking on the sink at the bottom)
Back in the dining room, click on the arrow at the bottom to enter the study. Go down steps on the left & click on the bookcase facing you to look at a book.......choose to Read Passage – receive Room Key.
Leave the study & go left down the steps to the basement. Click on the lamp to turn it on. (By now you may have noticed the many lamps around the place some of which can be interacted with to switch them on & off!)
Go down right steps & look at: dusty books, unused fine china, locked chest & boxes full of coloured paper. Go back up steps & look at: another locked chest & the bookcase to see a dusty pile of Animorphs books.
The ‘Funny’ Room
Click on the door ahead & again to automatically open it with the room key.
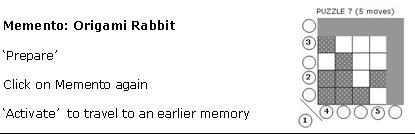
Click on the lamp & see the room is full of origami rabbits. Look at the broken music box just left of the exit.
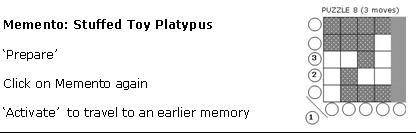
Click on the stuffed animal on the box – it’s a toy platypus – click on it to interact with it first if you want before you pick it up to receive Toy Platypus
Leave the ‘funny room’ & ask the children about the rabbits – they don’t know but tell you where there are more of them. You can choose to go there now or stay & wait for the machine.
The Lighthouse
If you decide to go to the lighthouse exit the house & go back to the signpost near Neil & Eva’s car. En route you will discover what the ’boulder’ really was! Click through all dialogues.
Click on the arrow left of the signpost - see a log with a sleeping squirrel. Click on the arrow, log, choice of command & dialogue for a slight diversion!
Carry on along the path to the lighthouse. Click on the headstone to the left - “In memory of River E Wyles”.
Enter the lighthouse & go up the stairs to a room full of paper rabbits. Click on the multi-coloured rabbit, the phone rings, receive Paper Rabbit.
Automatically be back in Johnny’s bedroom. Click on Lily - Neil & Eva are going to link to Johnny’s mind using their machine, travel through his memories & then transfer to him his registered desire of going to the moon.
Click left of the arrow at the bottom – either Neil or Eva will sit down (depending on who you chose to look around the house). Click on initiate. Neil & Eva put on helmets........ they’re now in the world of Johnny’s last memory. If you move the cursor to the top of the screen you can see where Neil & Eva are in his timeline.
MEMORY 1 (Johnny’s last accessible memory)
Location: Johnny’s bedroom.
The bedroom is empty.
Go right to the landing & look at the clock to receive Note: Clock Right-click & click on notes to read a description. (Right-click to return to the game)
Go left down the stairs & look at the piano to see a page of sheet music “For River” – there’s just two notes repeated over & over.
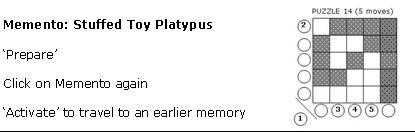
Leave the house through the front door at the bottom. Follow the path round to the left of the house. Go over the wooden bridge ............see Johnny & Lily. Talk to Johnny – Neil & Eva ask him why he wants to go to the moon so they can help him fulfil his wish – he needs a motive but Johnny doesn’t know. This means Neil & Eva will have to go back through his memories in gradual backward leaps & need a memento. Talk to Johnny to ask about an item of importance to him – he places down a yellow & blue origami rabbit. Click on it, receive Note: Moon & click ‘prepare’.
MEMORY 2
Location: Central hall in Johnny’s house.
Johnny is playing the piano.
A bar appears at the bottom of the screen to show a row of 5 unlit orbs.
The objective, as well as unravelling clues about Johnny’s past, is to find enough memory links to light up all of the orbs (some links may light up more than 1). Also Neil & Eva need to find a memento relevant to Johnny during that time.
Look at the yellow & blue rabbit on the left (Link)
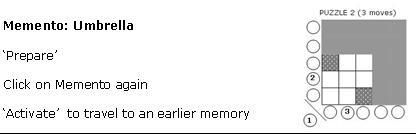
Go up the steps on the right & look at the clock (Link) Look at the umbrella – it’s the memento. Go right up the stairs then left to the bedroom. See Johnny & click on him – look at: the jar of pickles on the table in front of the window (Link ), the backpack, & the book on the stand left of the foot of the bed - The Emperor’s New Clothes (Link). Go down to the gallery from bottom right of bedroom; try clicking on Johnny & through the dialogue. Look at the fresh wild flowers (Link). Now you have all of the memory links you can travel with the memento. Go back down to the hall. Click on the umbrella to power it with the memory links. Click on it again.
MEMORY 3
Location: On the cliff by the lighthouse.
Johnny is sitting outside in the rain holding an umbrella.
Look at the headstone – “In memory of River E Wyles” (Link) Click through the dialogue – Neil & Eva need to find a leaping memento.
Look at the stuffed platypus left of John (Link X 2)
Click on the door of the lighthouse. Before entering click through the dialogue
Inside the lighthouse receive Note: Anya Right-click to read description in notes!
Go up the steps, click through the dialogue – Neil disappears. Look at the broken lamp (Link). Look at the platypus - it’s detected as a memento. Click on Johnny when he appears (Link). Click on the platypus to power it with the memory links. Click on it again.

MEMORY 4
Location: Johnny & River’s bedroom.
River is lying in bed. Click through the dialogue – River wants John to finish the house & take care of Anya. She gives him a yellow & blue origami rabbit.
John plays the piano.
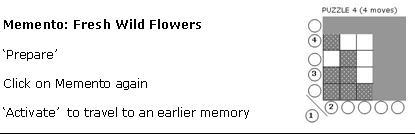
Neil has enough memory links & on contact with the fresh flowers left of Johnny disappears from this time period.
Eva can choose to follow Neil or Stay & Explore.
If Eva stays, look at the book on the bed (Link X 2). Click on River to receive Note: Paper Rabbit Click on John to receive Note: ‘For River’. Right-click on notes for a description: ‘Its title is a placeholder’
Exit the bedroom by the door on right. Click on the hourglass to go downstairs to a point earlier in the current timeframe.
Look at: pot of mixed dough (Link) & glass of pickled olives (Link). Click on John & Nicholas & through dialogue. (Link)
Go back upstairs & click on the fresh flowers – the memento to power it with the memory links. Click on it again.
MEMORY 5
Location: The cliff top overlooking the lighthouse.
Click through the dialogue. Click on the arrow & go down over the wooden bridge. See Johnny’s house half-built. Click through the dialogue then follow the track round to the front of the house. You see Johnny & a woman approach him. Click through the dialogue to learn about Johnny’s motives & Isabelle’s objections to them.
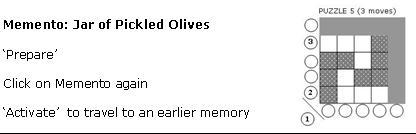
When Johnny leaves look at the jar of pickled olives Isabelle brought – it’s the memento. Look at the picture frame Nick sent (Link). Click on the truck on the right (NB you may not see an icon but click the cursor on it anyway) (Link). Enter the doorway of the house (Link). Exit & follow the track round towards the top of the cliff (Links X 2). Go back to the front of the house & click on the jar of pickles to power it with the memory links, click on the memento. After completing this puzzle & clicking on the memento again you receive a Note: Pickled Olives.
MEMORY 6
Location: A bar somewhere.
See John & River sitting at a table with Isabelle & Nicolas.
Click through the dialogue. Learn a little about River’s obsession with making origami rabbits.
Click through the dialogue between Neil & Eva – ‘It’s a confined memory & there are no mementos anywhere’.....
As Neil, go over to the bartender on the right, click on him & through all dialogues (Link)
Click through all dialogue with Johnny (Link X 4). Johnny puts a note on the table. Click through dialogue between Neil & Eva. Look at the note – it’s the memento. Click on it to power it with the memory links clicking through dialogue when it appears. Click on note again.
MEMORY 7
Location: The lighthouse.
Neil & Eva appear on the top of it. Click through dialogue...........
See John & River outside the lighthouse. Click through dialogue to learn why John later builds a house in that location. Click through the dialogue between Neil & Eva.
Click on the arrow down (Link). Click through the dialogue between Neil & Eva to receive Note: Anya.
Follow the track down until John & River, at an earlier point in the timeframe, pass you (Link X 2).
Continue following the track down & click on arrow (Link X 2). You reach the exit to the road. Click on the origami rabbit – the memento just inside & right of the exit. Click on it to power it with the memory links. Click on it again.
MEMORY 8
Location: John & River’s bedroom.
See Johnny & click through the dialogue. Johnny exits through the door on the right – Neil & Eva appear in the bedroom. Go right to leave the room & go downstairs to the hall.
Look at the boxes on the floor to the left ‘New boxes of plain paper’. Click through the dialogue (Link). Look at the piano & click through the dialogue (Link).
Exit the hall through the door on the left (Link). Click through all dialogues. Look at the bucket left of the lamp ‘Many long strands of orange hair’ (Link). Look at the platypus – it’s the memento.
Look at River & click through the dialogue – this is the day River started making the origami rabbits (Link). Click on the memento to power it with the memory links. Click on it again.
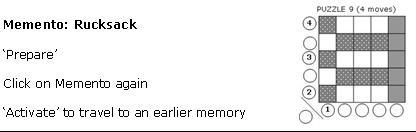
MEMORY 9
Location: The road by the entrance to the cliff area.
Go through the gateway. Notice the platypus in the car on the right.
Start to follow the path around to where Johnny’s house was (Link). Click on the arrow to go over the wooden bridge & follow the track up. Click through the dialogue – this is where the house was later built. Receive Note: Acrophobia (Link).
Go left & click on the arrow to go over the log. Go up & click on the arrow to go over the log ahead (Link).
Click through the dialogue between John & River. See River throw something on the ground. Click through the dialogue ........watch John ..........then River............... & click through the dialogue.
Go forward over the log ahead (Link). Look at the rucksack (hacky sack) – it’s the memento. Look at River & click through the dialogue (Link).
Click on the memento to power with the memory links. Click on the memento again.
MEMORY 10
Location: Study area in a public library.
John, Isabelle & Nicolas are sitting at a table.
Click through the dialogue – Johnny is finding River’s behaviour difficult to live with. Learn something about River’s condition – Isabelle suffers from the same condition but copes with it differently.
Click through Neil & Eva’s dialogue (Link). Move right from the study area & look at the faceless librarian at the reception desk & click through the dialogue (Link).
Walk around to where River’s standing - Johnny has appeared next to her. Click through the dialogue – learn a little more about River’s personality (Link). River goes to check the book out.
Click on John & see 3 images of him appear representing different points in the timeframe.
Click on the nearest image of him & the dialogue to see what he is looking at (Link).
Go to the lower right bookcase; click on Johnny & through the dialogue to trigger a question about Animorphs: “Do you know what animal is David’s main cover morph?” A screen appears with letters, numbers & symbols. You don’t know the answer yet so click any letter on the screen & then ‘Ok’ at the bottom.
Click on the image of Johnny looking at the lower left bookcase – he joins River at the reception desk. Go & click on them & through the dialogue to learn the answer to the question. “You could have googled it” (NB it’s true – you can!)
Go back & click on Johnny by the bottom right bookcase. When the screen appears, click on the letters to spell out ‘cobra’ & click ‘Ok’ (Link).
Go to the reception desk & click on the book – it’s the memento. Click on it to power it with the memory links & click on it again.
MEMORY 11
Location: Cliff area by the road.
It’s laid out for a garden party. Click through dialogue.
Click on the bottle of pickled olives on the right table & click through dialogue (Link)
Follow the track forward & click on the arrow (Link). See River & Johnny sitting outside the lighthouse.
Click on the door to the lighthouse (NB you need 2 memory bars to proceed).
The point in time has now changed within the timeframe. Click through the dialogue between Johnny & River – they go into the lighthouse & you see their silhouettes at the top........continue to click through their dialogue then see them appear outside the lighthouse – you witness their marriage. Click through the dialogue between Neil & Eva (Link).
Click on the arrow at the bottom & follow the track down to the wedding party - see Johnny & River sitting at the leftmost table.
Click on the table & through all dialogue to receive Note: Joey (Link). Click on John’s mother sitting on the bottom right table – “I’m so proud of Joey”.
Go right & follow the track down. Exit to the road – see John & River looking at a dead rabbit. Look at the rabbit – it’s the memento. Receive Note: Dead Rabbit. Right-click to read the description in Notes: “A roadkill on Johnny & River’s wedding day”. Click on River & through all dialogue to learn that this was the trigger for her obsession (Link). Click on the memento to power it with the memory links then click on it again.
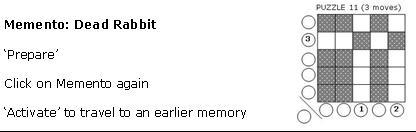
MEMORY 12
Location: On a road outside an enclosure.
You see a dead rabbit. Click through the dialogue - there’s a smell of farm.
Go right along the road & enter the enclosure where you see a horse. (Link) Click through the dialogue ........Neil mounts the horse.......... Click on the dialogue to receive Note: Dr Neil Watts.
As Eva go right until you come to a shelter & go up through it. You see John & River mounted on horses.
Click on the ghost figure in front of the rider-less horse (Link).
Click through the dialogue between John & River – they ride off.
Click through Neil & Eva’s dialogue. She mounts the horse.
Use the arrows on the keyboard to move in those directions - press the spacebar at the same time to gallop.
Ride around the enclosure passing behind the tree in the top left-hand corner (Link)
Ignoring the horses ridden by ‘ghosts’ chase & bump into the horses ridden by John (Link) & River (Link) (NB you may be lucky & get both links together if they are riding side-by-side at the time!)
Chase & bump Neil to knock him of his horse.
TIP: If you find chasing the horses too challenging don’t bother! Walk leisurely around the enclosure without using the space bar to gallop – eventually they will bump into you!
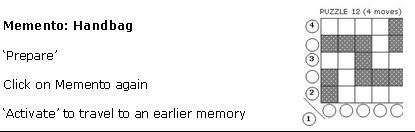
Go to the shelter on the right of the enclosure. Neil is there - if you want to talk to him you need to go behind him. Click on the handbag in front of him – it’s the memento
To power the memento with the memory links, position Eva’s horse in front of Neil close to the handbag, click on it & press the space bar on the keyboard to make the horse rear. Click on it again.
MEMORY 13
Location: Doctor’s surgery.
See images of Johnny & River in the consulting room & also in the reception area. Click through all dialogue. You learn that River suffers from a pervasive development disorder & the doctor gives her a book about it. (NB I understand the disorder to be a an uncategorised form of autism) Click through Neil & Eva’s dialogue.
Go up into the consulting room & click on the desk to receive Note: Tony Atwood. Click on the handbag next to River (Link)
Go down into the reception area (Link). Click on the platypus next to River & through the dialogue (Link). Click on Johnny & through all dialogue to receive Note: Clock Ticking (Link)
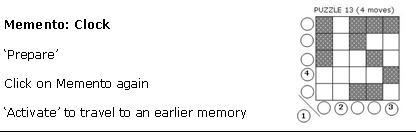
Click on the footsteps on the reception desk to jump up & click on the clock – the memento.
Jump down & click on Johnny, who is now standing by River, & through the dialogue (Link). (NB an icon may not appear when you move the cursor over Johnny but click on him anyway)
Click on the memento to power it with the memory links & click on it again.
MEMORY 14
Location: Cinema theatre
See Johnny sitting watching a movie. Click through the dialogue. Johnny gets up & leaves. Click through the dialogue.
Exit the theatre through the door at top right (Link) See Johnny sitting in the corridor – click on him & through the dialogue (Link)
Go to the cafe area on the left. Click on all of the ‘ghosts’ & those down in the bottom right area as well as through the intermittent dialogue. Eva is removing everyone.
See Johnny appear – look at him & click through the dialogue (Link).
Go up & right to exit to the corridor – click through the dialogue. Wait, then see River arrive & click through all dialogue (Link) – continue clicking through all dialogue.
Johnny & River head into the theatre. Click through dialogue then enter the theatre through the door on the left (Link).
Go down the stairs & click on the platypus – the memento right of Johnny & River. Click on the memento to power it with the memory links & click on it again.
MEMORY 15
Location: High school hallway.
See River reading a book. Wait, and then click through all dialogues.
Click on River – she resumes reading her book. Click on the toy platypus next to her (Link)
Go down the hallway towards the two boys, Johnny & Nicolas, & click through their dialogue (Link).
Go past them & enter the art class on the left. See Johnny & Nicolas. Click on the ‘ghost-teacher’, & then twice on John & Nicolas & through their dialogues.
Exit the art class & go further down the hallway. To follow the arrow to the right you need 3 bars of memory (i.e. 3 links) so go to the corridor on the left & down into the first classroom.
See John & River sitting at different desks. Click on the ‘ghost-teacher’ at the front of the class & through all dialogue until he gets River to respond (Link).
As you now have 3 bars of memory, go back to the hallway & follow the arrow into the sports hall. Click on the ‘ghost’ - he disappears, & then click on Johnny & Nicolas when they appear doing press-ups (Link).
Exit the ‘atrium’, go to the corridor on the left again & go down into the leftmost classroom. See John & Nicolas sitting at desks. Click on them & through dialogue twice to receive a Note: ALT-Tab & a Note: ALT-F4. (NB if you follow the instructions literally ALT-Tab will send you to desktop & ALT-F4 will exit the game!)
Exit the classroom & go up through the doorway opposite to enter a refectory. See Johnny & Nicolas sitting together – click through all dialogue.
Go up & to the right to see River sitting on her own at another table - click on the toy platypus by her & through the dialogue. (Link)
Click on the rucksack next to Johnny to locate the memento. Click on it to power with the memory links, click on it again.

MEMORY 16
Location: Kitchen of Johnny’s childhood home.
See Johnny’s mother by the work surface.
Click through all dialogue. Look at the clock (Link), the jar of pickled cucumbers on the left work surface (Link) & the rug on the right (Link).
Go up through the door at the top of the kitchen & click on the bookcase (Link).
Go back into the kitchen & through the door on the left to enter Johnny’s bedroom (Link).
Click on the soccer ball to locate the memento. Click on it to power it with the memory links then click on it again.

A Disjointed memory
Location: An empty white place
Click through all dialogue as Neil & Eva move right to the edge of the place. There is a smell of roadkill. See a fragment of a place with buildings floating in space to the right. There is nothing Neil & Eva can do here.
Act 2
Neil & Eva return to the present time in Johnny’s bedroom – click through the dialogue.
The scene switches to Johnny’s most recent memory (1) where he is on the cliff overlooking the lighthouse.
Click through the dialogues. Neil & Eva think they have enough - all that is left to do is to link Johnny’s registered desire to go to the moon with his early memories.
PUZZLE: Link Johnny’s desire to go to the moon with his early memories
See Neil & Eva on two floating platforms. To the left there is a series of 5 sets of floating platform which represent Johnny at a point in each of the 5 accessible timeframes in his timeline. (NB if you click the cursor underneath the platforms Neil & Eva will float along in that direction)
In each set Johnny is surrounded by items relevant to him in that timeframe. If you click on him the items rotate.
The object is to pass through Johnny’s latest desire to his earliest. Starting with the most recent you need to create a link between each timeframe & the previous one by matching the objects.
From right - left, rotate sets 1 & 2 to match the flowers, sets 2 & 3: the yellow rabbits, 3 & 4: the books, & 4 & 5: the clocks.
On the far left you see a partial sixth set of platforms but the details are all obscured. Click through dialogue. Click on the ‘ghost’ & through the dialogue. You can now click on any of the younger ‘Johnnys’ to travel to a memory in that timeline – click on Johnny in the memory to return – nothing has changed.
Go back to the most recent Johnny in set 1.
Automatically be back at Johnny’s house in memory 1. Go round to the left up to the cliff overlooking the lighthouse. See John & Lily. Click on all of the dialogues. Deja Vu! The transference hasn’t worked!
Ignite Johnny’s memory
Location: Cinema corridor
Click through dialogue. Johnny’s memory might need some stimulation.
See Johnny & River – click through their dialogue. They enter the theatre.
Click on dialogue – “Hopefully that’s enough for an ignition”.
Notice Neil’s not there so as Eva go left into the cafe area. See Johnny & click through dialogue.
Exit the cafe into the corridor. Enter the theatre through the door on the left & go down the stairs.
See Johnny & River – click through all dialogue. Click on Johnny – he disappears.
Appear back on the cliff top in memory 1. See Johnny & Lily – it’s all the same! Click on Lily – she disappears.
Click on dialogue then click on Johnny.
Influence Johnny’s memory
Location: High School Hallway (Memory 15 revisited)
Eva appears. River is sat reading a book as before. Click on dialogue. Click on River & the platypus then go down the corridor. Click through the dialogue between Johnny & Nicolas – something’s changed. When they leave follow them down & go right into the ‘atrium’.
A crowd are watching a basket ball game........
Click through all dialogue while watching Neil give a presentation ...........Johnny is not interested in going to the moon. Everyone leaves. Click through the dialogue between Neil & Eva.
Neil & Eva each revisit various other locations in Johnny’s memory in a desperate attempt to implant in him the desire to go to the moon. These include: outside Johnny’s half-built house (memory 5), doctor’s consulting room (memory 13), the horse riding enclosure (memory 12), Johnny & River’s wedding (memory 11) & Johnny & River’s bedroom (memory 8). Watch the scenes & click through all dialogues.
It’s not working. River’s more important than they thought.
Present time
Location: Cliff top overlooking the lighthouse
As Eva, go down & round to the front of the house. Click on door & on dialogue before entering.
Go up to Johnny’s bedroom; click on the doctor & through the dialogue. He tells you there’s not much time & your colleague is in the kitchen.
Go down to the kitchen – Neil is on the phone. Click through all dialogue. Click on the yellow & blue rabbit on the table & click through the dialogue.
As Eva, exit the kitchen, go to the dining room & then down into the study. See Lily with her children & click through all dialogue.
Lily leaves the children sleeping in the study. Follow her into the dining room. Approach her & click through the dialogue. Ask her about everything when the dialogue choices appear to learn more about her. Go to leave the dining room – Lily calls you back. Click through the dialogue.
Go back to the kitchen & click through the dialogue. Neil has discovered, from old records, some strong medication Johnny had taken which would have an effect on his memory at that time.
Neil has been given reconfiguration frequencies but to activate they need a trigger “something that exists strongly in the bridging inaccessible memory”
Neil leaves to get some fresh air & returns briefly to pick up his coffee – receive Note: Beta Blocker
As Eva, leave the kitchen – see Neil exit the house then barge back in. Click through all dialogue..............Lily gives Eva a pair of gloves.
Unlock Johnny’s memory
Exit the house & go back to the road by the car. Click on the dead squirrel. Click on the car..............
Meanwhile see Neil go to suddenly exit the house, click through the dialogue – he then rushes out.
Back to Eva – see something fall out onto the ground as she rummages through the car. She receives a Valved Container. Click on the squirrel. Eva automatically puts on the gloves & uses the container to receive Contained Roadkill Odour.
Click on the item right of the tree that fell out of the car – they’re painkillers.
Return to the house & meet Neil en route. Click through the dialogue to ask Neil about the painkillers.
Neil & Eva automatically return to Johnny’s bedroom.
Act 3
MEMORY 16 (revisited)
Location: Kitchen of Johnny’s childhood home
Neil & Eva appear (Links X 5)
Go down & left into Johnny’s bedroom. Click on the soccer ball.....
A disjointed memory (revisited)
Neil & Eva appear in the empty white place, while in Johnny’s room in the present his condition destabilises.
Click through all dialogue.
Eva tries to get Neil to leave the empty white place - Johnny’s condition stabilises.
Click through more dialogue then click on the soccer ball.
The fragment of the place with buildings, floating to the right of the empty white place, gradually materialises into a larger scene.
MEMORY 17
Location: Playground.
See Johnny & his mother sitting on swings to the left.
Click through the dialogue. Eva suddenly has a recollection of something not right in Johnny’s bedroom in the previous memory.
Go to the left of the playground & exit through the gate at the top. See Johnny’s mother standing by a car.
Go to the left & down the pavement – notice all of the images of Johnny around. Go left across the road & click on Johnny kicking a soccer ball. Click through the dialogue between Neil & Eva – the time lapse is getting out of hand.
Continue down the pavement & look at the dead animal in the road.
Return to the playground – the scene reverts to Martha (Johnny’s mother by the car). Click on the dialogue...
Neil & Eva are now walking along the road......
Watch the cut scene...... you learn why Johnny was given beta blockers.
Click through the dialogue then click on Joey to receive Note: Joey
(N.B. the link in this memory is the smell of roadkill)
MEMORY 18
Location: Bedroom in Johnny’s childhood home.
Click through the dialogue until the boys leave. Receive Note: Animorphs (Link X 5)
Click on the train.
MEMORY 19
Location: Carnival
Go right to the fruit stall. Click on the ‘ghost’ & through all dialogue.
Continue right to the next stall. Click on Johnny’s mother & through all dialogues. Click on ‘ghost’, through dialogue & play whac-a-mole (Link) (NB you don’t have to try too hard as it doesn’t matter how few you hit!)
Go to the next stall on the right & click on the fortune teller (Link)
Go down from the fortune teller & click on the ‘ghost’ next to the ferris wheel (Link)
Now you have 3 memory bars you can go to the far right & down over the bridge (or over the bridge on the far left & down)
Go left & up the steps to the stage (Link)
Head back down towards the fence at the bottom. See Johnny & mother etc sitting at a table. Click on their dialogue (Link) Receive Note: Pickled Olives.
Johnny leaves – go right to follow him, click on the arrow then click on him in the playground.
Continue following him until he reaches the log. Approach the log & click on it – Johnny will go over it. Click on the log again to follow him. Go up along the brick path ahead then click on the arrow. (NB the path is difficult to see as it looks like part of the wall)
Click on Johnny again – he goes & sits on a log. See River appear – click through all dialogue & watch the scene.
Click through the dialogue between Neil & Eva – now they know why Johnny wants to go to the moon Neil doesn’t think they should fulfil his wish.
Neil & Eva’s disagreement
Location: School Refectory (memory 15)
Neil appears looking for Eva. Click on dialogue to receive Note: Moon. You see River sitting at a table – click on the toy platypus if you want. Further down to the left you see Johnny & Nicolas at another table.
Exit the area by clicking on the arrow at the bottom. Go right & see Eva go up the next corridor. Click through the dialogue .......they continue to disagree.....click through the dialogue again.... Eva just wants to buy some time.
Booby Traps: large globes start sliding towards Neil & a keyboard command appears. Try to keep moving right using the arrow buttons on the keyboard to avoid the globes & the spikes that start to appear in the floor.
Once past those avoid the PC monitors (they’re not flat screens either!)
Once Neil is past those, click through the dialogue – Eva invites Neil to meet her at the end of the hall.
‘Zombie Evas’ start to appear & also another keyboard command. Keep going right. Use the W A S D keys on the keyboard to fire plant pots at the ‘Evas’ in the way while using the arrow buttons to avoid yet more spikes. You will also need to avoid a few giant cannonballs!
Tip: The sequences are not timed so take as long as you need. The globes & monitors are fairly easy to get past. (NB I found it easier to progress using the mouse cursor to manoeuvre Neil rather than the arrow buttons. On confronting the zombie Eva’s I kept the D button on the keyboard held down to continually fire pot plants to the right & used the cursor to move around the spikes & keep going to the right).
Eventually when you get far enough click through the dialogue when it appears – Neil realises he’s in a loop & throws the next ‘zombie Eva’ through the wall.
Click on the hole it made to enter another corridor. Go right until you see Johnny – click on him & follow him into the classroom. See River & click on her. Exit the classroom. From this point on continue going right visiting all the classrooms to see Johnny at various stages in his life. Note items relevant to him & click through dialogues when they appear.
Continue right until you reach a table with a phone. Click on the phone when it rings – it’s Eva – then click through the dialogue.
The table & phone disappear & Neil automatically goes through the door. Go up & see Eva......click through all dialogue & then observe the scenes to see the alterations Eva has made to Johnny’s memory.
NEW MEMORY 1
Location: NASA reception area
Go up along the corridor ahead. See Johnny & click through dialogue. Look at the rucksack. Look at the book (note the author) (Link)
There’s an office down on the right but click on the door ahead & go up the corridor. The next door in front needs 4 bars of memory so go right & click on the panel right of the door to enter an elevator. See Johnny & ‘ghost’ guide. Click on 2F & exit.
2F: Go down & left into the mission control centre. Click on the ‘ghost’ & through all dialogue. (Link) Go back to the elevator & click through dialogue.
3F: Go right & up & see Johnny in a sleeping area. Click on the ‘ghost’ twice. Exit & go down into the area left of the elevator. Click on the ‘ghost’ next to Johnny & through all dialogue. (Link) Go back to the elevator.
4F: Go right & click on the door to enter a viewing area. Click on the ‘ghost’ & through all dialogue (Link)
Now you have 4 bars of memory links go back to 1F.
1F: Click on the door left of the elevator to enter the break room. Click through all dialogue ..........River arrives (Link) ......continue clicking through all dialogue to discover what Eva did.
NEW MEMORY 2
Location: Crowded concert room
Johnny is playing the piano – River is in the audience. Click through all dialogue.
The scene switches briefly to the present time in Johnny’s bedroom.
NEW MEMORY 3
Location: Empty concert room
Johnny is playing the piano with River standing beside him. Click on the ’ghost’ & through all dialogue.
NEW MEMORY 4
Location: Bridge with a view of the NASA launch pad
Neil appears. Keep going left clicking through dialogues en route with ‘sight seers’, Isabelle & Nicolas, & Lily & the doctor. Click on the arrow right of Lily & the doctor to talk to Eva. Click: Initiate
Watch the closing scenes.......
THE END
Watch the credits.
Epilogue
Location: Outside the lighthouse in the present time.
Click through all dialogues.......
This document was provided to GameBoomers.com and may not be distributed without express written permission of the author and the content may not be altered in any way.