Tomb Raider II: The Golden Mask Levels - Walkthrough by Stella
BACKSTORY: Our intrepid heroine, Lara Croft, always on the lookout for a new challenge, comes across some information that leads her to Melnikov Island, part of the Aleutian island chain in the Bering Sea. These clues--a faded photograph showing an Inuit whale hunter holding what looks like an ancient golden mask; a newspaper clipping from 1945 describing the conflict over gold discovered in Alaska; and a secret Russian blueprint of what looks like a fortified military mining base--are shown in the game's intro screen. Naturally Lara's interest is the mask, which is rumored to be the famed Golden Mask of Tornarsuk. According to legend, the mask is a "greater spirit" that bestows powers of re-animation on its wearer.
In this first level, Lara drops from a helicopter onto an island in the Bering Sea. She finds that mercenary treasure hunters have arrived here before her. The mercenaries are part of an organization known only by the acronym A.V.A.L.A.N.C.H.E. Now Lara must outwit and outfight her rivals, in order to find a way into the heart of the old complex.
For more TR2 Gold info, including a useful map, patched savegames and the usual "Expert Challenges," visit http://tombraiders.com/tr2gold/. If this is your first taste of TR2 and you want to review the controls, see my Game-Play Tips page (http://tombraiders.net/stella/gameplay.html).
Be sure to find all 12 secrets in the four Golden Mask levels, so you can play the fifth bonus level, Nightmare in Vegas.
Level 1: The Cold War
Kills: 40* Items: 62, plus harpoon gun, M16 assault rifle, automatic pistols, Uzis, 2 keys and 3 secrets
*The number of kills is approximate. The exact count will depend on your actions and those of your allies.
Starting inventory: small and large med-packs, 2 flares, loaded shotgun and pistols (unlimited ammo).
ICY POOL: The level begins with a drop into cold water. There's a
great white shark in the pool so either head for dry land or find a useful weapon. To get to shore, swim forward and climb out on the small snowy ledge at the left of the cave opening. (See the screenshot at http://tombraiders.net/stella/images/coldwar1.jpg if necessary to get oriented.) The shark comes in from the right, so move quickly. Now shoot it from the safety of the ledge. Or, from the starting position, turn around and swim down and forward. You'll find 2 bundles of harpoons on the bottom, more harpoons off to the right, and the HARPOON GUN on a sunken box in the corner beyond. Now you can swim back toward the cave and take on the shark.Once the shark is belly-up, swim to the back corner of the pool opposite the area with the boxes where you found the harpoon gun. You'll see two barrels on the bottom. Behind them and to the right there's an underwater tunnel in the ice containing
SECRET #1, the gold coins. There are also 2 more bunches of harpoons on the bottom of the pool between two of the ice hills.Climb out onto the small square ledge near the cave. Pick up the
flares if you didn't get them earlier. Kill the leopard prancing around inside the cave before hopping over.LEOPARD CAVE: Just inside the cave is a slope with
2 boxes of shotgun shells. When you take the one on the left, a big snowball rolls down from inside the cave. Side flip to the right to avoid it and pick up the second box. Push or pull the movable crate to find a small med-pack underneath.As you enter the cave from which the snowball came, a
leopard will charge. (NOTE: If you go in through the opening on the right, you'll see him coming and be able to hop back while shooting.) There are more shotgun shells at the rear. Go back toward the crate until you come to an opening on the right. There's another leopard in the cave beyond. Kill it and continue forward down the slope. Turn left to face the flares on the ground. When you pick them up, immediately side flip to the left to avoid the rolling snowballs. Continue forward toward where the snowballs came from. As long as you don't stray to the right, the remaining snowballs will pass by harmlessly.Turn around and enter the cave to the left of where the last snowballs landed. A
leopard lurks on the left. Pick up some shotgun shells there and another box of shells in the cave where you shot the previous leopard.Go up the slope toward where the snowballs originated. The gap ahead isn't deep; you can jump it or stay to the left to walk around it. Run up past the shallow alcove on the left to avoid
more snowballs coming in from ahead and from the right. Ahead on the left you'll find more shotgun shells. Come back down the slope and turn left into the opening opposite the alcove where the snowballs landed. Go to the back of this cave and climb the ice ladder to the top.MINE COMPOUND FIRST AREA: When you approach the
large med-pack on the ground, a door at the top of the room opens and a goon in a white suit enters. Take him out and proceed to the top of the room to fight it out with another mercenary, who comes in as you approach. Don't forget to search the bodies for 2 sets of M16 clips.Go through the door and take a standing jump over the snowbank. There's a
movable crate on the right. Pull it once, go around or over it to the other side and push it once. Behind it is another movable crate. Pull this one once to reveal a low, narrow cave containing a small med-pack and shotgun shells.ZIP LINE: Climb onto the first crate and up the ice ladder next to it. Grab the
small med-pack on the rock next to the zip line handle. Follow the zip line out to the edge of the cliff for a nice view and a pack of flares. If you hang around for a little while, a pesky eagle will fly in.Use the Action key to grab and hold the zip line. Ride it all the way to the end to land in a shallow trench on the other side of the
deep chasm. Kill 2 more eagles (plus another if you didn't meet the one at the top of the hill). Walk toward the building. A leopard patrols the raised path to the right. If you stay down in the trench, you can kill it safely.FAR SIDE OF CHASM: Climb onto the icy ledge near the window. Turn around and look to the right. There's a flat ledge in the ice wall that you can jump to. Below and behind that is another trench. This is also
snowball hazard. Jump down and turn left but walk forward slowly. As soon as you hear the snowball start to roll, hop back, and it will sail overhead. Continue down the trench. In the pit beyond the zip line you'll find the M16 ASSAULT RIFLE.Return over the ice wall to the trench on the other side. At the end farthest from the building is a flat spot you can jump up onto to get some
shotgun shells. From there, jump into the depression ahead. Climb onto the ice block ahead on the left. (You can also get here by walking up the path alongside the building.) Below is the deep chasm you passed over earlier. Turn around, drop and hang from the ledge and climb the ice ladder to the bottom.BOTTOM OF THE CHASM: Follow the long tunnel, killing a
leopard along the way, to SECRET #2, the gold bars, plus 3 boxes of shotgun shells. Backtrack down the long passageway and climb back up the ice ladder you just came down. (NOTE: You can also drop down through the opening with the wood sides, but you'll end up back in the LEOPARD CAVE area, on the slope near the first ice ladder. You'll need to climb back up to the zip line and ride it down again.)BUILDING COMPLEX/GUARD ROOM KEY: Follow the snowy path next to the buildings to the upper end. Hop down and enter the room ahead. Another
guy in white comes in from the right. Kill him and take his M16 clips. At the far end of this series of rooms, behind some overturned barrels, you'll find the GUARD ROOM KEY. Take it and return to the lower room. Pull the switch in the barred alcove to open the door on the other side of the bars.GUARD ROOM: Return to the icy path where you dropped into this area. Climb out on the right, not straight ahead or you'll fall into the
chasm. Go down the path to the first ice window. Shoot it out, enter and unlock the GUARD ROOM door. Kill the yellow-jacketed mercenary who emerges. (NOTE: If you're low on health, and don't want to confront the mercenary at close range, wait to pull the switch until after you unlock the guard room door. Then go back to the switch to open the inner door and let him out.) Pick up automatic pistol clips and shotgun shells from the floor of the GUARD ROOM.Exit through the door where the mercenary entered and follow the path to the
small med-pack. Return back through the GUARD ROOM and continue straight ahead to a movable box. Push it out of the way and go into the dark, snowy area on the right. Take a standing jump up the slope, then a running jump across the deep pit to grab the opposite edge. Pull up and continue forward. Climb onto the step, turn right, and jump over the ice hill to land in a depression where you'll find the AUTOMATIC PISTOLS. The exit door opens when you pick up the guns.Take the
automatic pistol clips in the doorway and go through this room to the snowy area between the buildings. Ahead and to the right, through an opening in the rocks, is the door to the GUARD ROOM. Go through the guard room, out the door opposite the barrels, and along the snowy path (toward where you got the small med-pack).SECOND CHASM WITH TWO RAMPS: Along the left side of this path is a snow ledge that dips down in the middle. Step up onto this ledge for a panoramic view and a little sniper action. There are
mercenaries down below on both left and right. Go for the one on the left first. It may take a little while, since he runs in and out of the cave. Get a lock on him with the pistols or M16 and hold the button. When he falls, walk up the snow ledge toward the right. From the top, you should be able to kill the guy in white down below. (NOTE: You may also be able to target a third mercenary on the roof of the building above the white-suited guy.)Now return to the lowest part of the snow ledge. Look down and you'll see a short ramp between the cliff side and the longer ramp leading from the cave on the left. Safety drop down onto it. (Check the screenshot at http://tombraiders.net/stella/images/coldwar2.gif if you're not sure where to drop.) Shoot the eagle that comes in from above before going into the cave. There's a leopard in the cave, so go carefully. When it's dead, pick up
M16 clips from the mercenary and a small med-pack lying on the ground. Pull the switch to open a door in the back of the cave on the other side of the chasm. You'll also find the SnoCat parked in a room off to the left.If you want to, you can climb down the ice ladder on the left side of the ramp (the previous screenshot
also shows the location of the ladder). At the bottom are shotgun shells and flares, along with another leopard. (You can kill it from above or at ground level.) Now either climb back up to the snowmobile and jump it across the gap (press Action for turbo speed), or climb up the ice ladder on the other side of the chasm (in which case, you'll need to be ready for another mercenary at the top, if you haven’t already killed him).(NOTE: If you slide off the snow ledge onto the ramp with the white-suited mercenary first, all is not lost. Take a carefully angled running jump to grab the ice ladder on the left side of the building. In the
screenshot at http://tombraiders.net/stella/images/coldwar3.jpg Lara is standing in the correct spot to start. From there, hop back, take a running jump and press the right direction key in the air to turn toward the ladder, then press Action to grab it. Now, either climb up to confront the goon on the roof, or climb down into the chasm, get the goodies and climb up the ice ladder on the other side to pull the switch and get the SnoCat. If you go up to the roof, follow the passage down to the OPEN AREA WITH THREE WOODEN BLOCKS, described below. Backtrack later to get the items down below if you want to.)Assuming you jumped the SnoCat across to the other ramp, run over the white-suited mercenary if you didn't kill him from above. Dismount and pick up his
M16 clips. (NOTE: If you like, walk to the end of the ramp and try to shoot the mercenary on the roof from below. You'll get another chance later if you don't want to bother.) Go through the open gate.OPEN AREA WITH THREE WOODEN BLOCKS: Climb onto the first block and await the arrival of a goon on a snowmobile. Take him out from up on the block, since he can easily follow Lara through the door and run her over. One block has
M16 clips on top, there are automatic pistol clips on a snow ledge next to the door on the right, and more M16 clips and a large med-pack on one of the other blocks.Take your snowmobile of choice and exit through the door on the left. Follow the path to the top, killing the mercenary there, if you didn't do it earlier. Take his
automatic pistol clips.SNOWMOBILE AREA WITH ICE WINDOWS: Ahead is a ramp with three ice windows. Drive the snowmobile up the ramp (mind the gap or you'll crash into the pit), bust through the windows to the area on the other side. You can ride through the single ice window opposite to take on another armed snowmobiler. (In this case be sure you've got one of the snowmobiles with guns and not the speedy SnoCat.) Or, dismount and climb into the wooden opening without windows on the left. Soon the snowmobiler will ride in and you can kill him from here.
(NOTE: If you choose to fight on the snowmobile, be sure not to drive through the ice windows in the second open area. The drop-off is a killer if you aren't prepared for it. Afterwards, if you want to get down there, see Theresa's tombraiders.com Expert's Challenge--http://tombraiders.com/tr2gold/ColdWar/Experts/ColdWarExp.htm--
for tips.)BUILDING AND FROZEN POOL: Climb through the wooden opening on the left side of the first open area. Beyond is a building and a frozen pool. Find the
switch in the dark corner on the left. Pull it to cause an avalanche that breaks the ice on the surface of the pool. This also alerts the mercenary inside the building, who comes out to investigate. Kill him and take his small med-pack and M16 clips.Go into the building and pull the
switch to open the wall of ice back in the snowmobile area. (Note the closed door near the switch. This will open later.) At this point, you can go back to the SNOWMOBILE AREA (described below at the **) or continue to the ICE CAVERN and deal with the snowmobile area again when you return.ICE CAVERN: Wade into the pool. At the deep end, swim down and follow the underwater passageway. The door opens as you approach and closes behind you. Surface in a pool. (Note the items on the shelf above the water. You can't reach them yet, but you will.)
At the far side of the cavern, there's a
large med-pack up on a tall block of ice. There are several ways of getting to it. I'll describe two. (A) Follow the path from the right side of the opening between the pool and the cavern. This leads along the cave wall. Turn right, then right again to find a block of ice you can climb on. A fragile bridge made of ice tiles leads from this block, in a Z-shaped path, all the way to the med-pack. At each corner is a solid block where you can pause if you need to. (You have to jump to land on the first block.) Don't worry if you fall through, just try plan B. (B) Find the angled wall next to the block with the med-pack. Stand Lara with her back to the slope and her chest against the med-pack block. Back flip onto the slope and then quickly jump and grab to catch the edge of the block. Pull up.Once you break any of the ice tiles or explore along the side path, your first new ally appears on the block above the med-pack. These ice men, described as "restless spirits" by the level designers, will help Lara fight her enemies and generally try to lead her in the right direction, so don't harm them. If you do, they will attack.
When you pick up the med-pack, a pair of snowballs falls from the ceiling, breaking through the ice floor. For whatever reason (wind chill...magic?) this also causes the pool where you entered to freeze over so you can reach those goodies. So make your way back to that area. If you didn't break the ice tiles already, you can take that route. (It's a lot more exciting now with the hundred-foot drop!) Or, take a running jump to the snow ledge on the right (Lara's right when she's facing out into the cavern). Stop to admire the spectacular view, then go left or right at the mound of clear ice and follow the path counterclockwise along the wall of the cavern. This will lead you back to the frozen pool, where you can now get the
Uzi clips and grenades from the ledge.Slide down the ramp of bluish ice to the floor of the cavern. There are 3 more ice men here to assist. Pay attention and they'll lead you to the points of interest in the area.
SECRET #3, the gold skull, is behind some panes of ice near the middle of the cavern. Shoot the ice to get at it. When you pick up the skull, 3 mercenaries enter from the tunnel to the left of the ramp. The ice men will help you fight them.Once the mercenaries are history, search the bodies for
shotgun shells, 2 sets of Uzi clips and a small med-pack. Go through the ice window where the mercenaries entered into a long, U-shaped tunnel. A leopard will charge, but you should have plenty of time to bring it down before it gets to Lara. Continue along the tunnel to the top. Turn right and climb the ice ladder to the top. You emerge back at the BUILDING AND FROZEN POOL. The door opens automatically. Go through the building, cross the pool and climb out through the wooden opening.(**) BACK AT THE SNOWMOBILE AREA: Continue straight on to the area with the ramp, which was previously concealed behind the ice windows. Two bad guys--one in yellow ahead on the right, one in white just inside the entrance on the left--make things difficult for you. Kill them, and take their stuff:
M16 and automatic pistol clips. Pick up the flares on the block near the wooden gate. There's another white-suited guy beyond the gate. Open it using the switch up on the ledge to the left of the opening where you entered. Kill the goon, and pick up another small med-pack.INTO THE PIT: Now climb onto the stone wall to the left of the gate. Get Lara's health up to 100% and save your game; you're about to take a long drop. Position Lara on top of the wall so the gate is behind her on the right and the jagged wall of snow is in front of her. Now choose Plan A or Plan B again: (A) Aim a little to the left of the joint in the textures of the snow wall (see the screenshot at http://tombraiders.net/stella/images/coldwar4.jpg
for clarification) and take a running jump. Immediately press Roll, to turn in the air and land so Lara is facing uphill as she slides down the back of the slope. Press Action to grab the lowest edge. Traverse all the way to the left corner and drop. Or, (B) starting in the same spot on the wall, angle the running jump a little bit to the right. Instead of rolling, press Jump and Right as you land to spring off the slope, land on the sloping ice wall to the right, and slide down backwards. Grab the edge, traverse as far as you can to the left and drop. (NOTE: Special thanks to Ralph Black and Stiletto for plans A and B, respectively.)Once you've made it to the floor of the chasm alive, pick up
Uzi clips, a large med-pack and the UZIS. Climb the ice ladder beyond where you picked up the Uzis and you'll magically emerge on the other side of the ice window in the SNOWMOBILE AREA.(NOTE: If you haven't already done the ICE CAVERN, proceed there now: Go to the left into the next open area. Then climb through the wooden opening on the right. Pick up the walk-through above.)
UP THE RAMP: Head to the left, then left again to return to the ramp. If you like, you can pick up a snowmobile on the way, but it's possible to continue on foot. Go up the ramp, turn right, and continue past the guy in white who you recently killed. As you head up the hill, give the snowmobile some gas to jump the pit. You'll land on the other side near a wooden block. (NOTE: If you're on foot, you can climb up the wall on the right to jump to the top of the steep slope. Then drop down or jump across the pit.)
The next area, a slope down to the right, is also a
snowball trap. Stay in the middle of the slope and the rolling snow will miss you. Go through the doorway into a series of connected rooms. As you go up the hill, a mercenary in white comes to meet you. Kill him, take his automatic pistol clips and the large med-pack on the ground. When you pick up the med-pack, another mercenary comes in from the snowball trap area, so stay alert. Dispatch him and take some grenades and the SHAFT B KEY off the body.Continue to the top of this series of rooms. Use the key to open the wooden door next to the lock. (You'll open the metal door nearby shortly.) Enter carefully; there's a leopard just inside. I recommend hopping back into the room to fight, rather than running out onto the walkway. If you accidentally fall, it's not a long drop, but it puts you way back at the GUARD ROOM area.
SHAFT B/EXIT: Cross the walkway to the room beyond. Admire the view, then pull the
switch to open the metal door back near the shaft B lock. Return there and take on yet another angry merc. He's carrying a pair of grenades.There's a box of
shotgun shells on a table in the next room, but you'll probably need to take out the 2 more mercenaries in the room beyond before getting them. One of these guys has a small med-pack, the other shotgun shells.When you enter the next open area, an eagle flies in from above. Farther along, is a covered structure with a
switch. This opens a nearby trapdoor. There is a sniper on top of the high structure beyond the switch area, a second sniper appears when you throw the switch. You can take them out together, or kill one, throw the switch and kill the second. Or, if you're not interested in getting all the kills, just pull the switch and run to the trapdoor.Drop through the open trapdoor into an icy pool below. Swim through the wooden opening toward the ledge with the ice man to end the level.
Level 2: Fool's Gold
Kills: 62 Items: 57 plus grenade launcher, circuit board, 3 keycards* and 3 secrets
*NOTE: Starting inventory for the demo version is small and large med-packs, 2 flares, loaded shotgun and pistols (unlimited ammo). In the demo version, or if you missed them in the first level, regular pick-ups will include the M-16 assault rifle, automatic pistols and Uzis.
Walk-Through: Jump into the water and swim forward and up to another opening where you can surface. When you do, the three small, square doors at ground level open. You'll emerge under fire from a
sniper up in the opening on the right. A Doberman emerges from one of the small, square doorways and attacks from behind. If you wait a minute, another thug with a shotgun will come downstairs and through one of the square doors. He drops some shotgun shells. These guys are foot soldiers for A.V.A.L.A.N.C.H.E. (See the section on backstory at the beginning of the level 1 walk-through for more info.)There's also a
large med-pack in the small room below the ledge where the sniper was.ROOM WITH STAIRS AND POOL: Go through either small square door into a room with a pool. Another
Doberman sneaks up as you explore. Pick up the flares on the ledge across the pool next to the yellow tank. Now head up the stairs. As you approach the shotgun shells near the window, 2 guys carrying flamethrowers come into the room below and start up the stairs. I found the easiest way to dispose of them was to grab the shells, pull out the shotgun, kill one of the guys from above. Then, as the second guy comes up the stairs, jump down to the floor and kill him from below. If Lara does catch fire, you can either reload or jump into the pool. One of these guys has a small med-pack.(NOTE: You can also shoot out the window near the shells and jump down into the room where you started. You'll be able to shoot the flame-throwers through the windows without taking fire damage if you stay against the back wall. Just be sure not to step on the square in front of the pools, which re-opens the small, square doors.)
On the upstairs wall near the opening above the pool, you'll find a
switch. Pull this to open a door elsewhere, releasing another goon. If you wait near the switch, he'll come to you. Jump over the hole in the floor into the doorway opposite the switch. Go back into the hallway and continue past two doors--a closed one with wooden crates behind it and the one you just opened--to the upper opening where you killed that first sniper. Relieve him of some shotgun shells and pull the switch to open the door to the room with the crates.SMALL ROOM WITH WOODEN CRATES: Follow the hallway back to that room. Just inside the door is a
movable crate. Pull this out into the hallway (4 times). Turn left, go down the stairs, then climb into the raised opening on the right to get back to the crate room. Pick up the 2 sets of M-16 clips from the floor. (NOTE: If you don't yet have the M-16 ASSAULT RIFLE , you'll get it here instead of one of the clips.) Pull the other movable crate to reveal SECRET #1, the gold coins.Exit to the right and go to the second door (the one you opened with the first switch). Climb over the metal ledge and continue to a windowed room with
2 bad guys pacing around inside. If you walk along the ledge near the windows, you'll hear the door open and one of the mercenaries will come out. You can kill him as he approaches. Don't forget to take his small med-pack. You'll have to go around the building and inside to get the second guy, who's carrying 2 boxes of shotgun shells. Inside the room with the windows is another switch. Use this open the gate just outside leading to the next area.(NOTE: On the way out, check into the hallway ahead with the carved portraits of Joseph Stalin. You'll return here later for a secret.)
OPEN AREA WITH VARIOUS SMALL BUILDINGS: Enter this area and run across to the wall near the box with the
shotgun shells on it. There are 2 snipers on the roofs--one on each side. Take them out before exploring any further.Continue forward to the alley on the left. Hop up onto the block with the
M-16 clips and you'll be able to kill the Doberman that charges from the alley without getting bitten. You'll find a box of flares in the snow at the back of the alley. Come back out to the main area and head to the left. Inside the cave you'll find another dog and some more M-16 clips. (The ramp there is too steep to climb, and the double doors don't open yet.)Return to the open area and use the box under the hammer and sickle/CCCP sign to climb onto the roof. A
goon with a club pops out from behind the roof peak, and 2 crows fly in from behind as you fight. When it's over, grab the goon's shotgun shells.Jump across the alley to the rooftop where the first sniper was standing. Get more
shotgun shells from him. Then follow the ledge around past two doorways--one small, one larger--to the second sniper. If you explore inside the smaller door, another club-carrying baddie emerges. He's carrying a small med-pack. (NOTE: A little farther in, you can see SECRET #2, the gold bars, behind some barred windows. You'll get it a bit later on from the other side. There are also two ramps leading back down to the lower level.)The second fallen sniper has more
shotgun shells for you, and there's another box of shells laying in the snow nearby. If you haven't killed him already, that last guy with a club will sneak up from behind.As you approach the doorway beyond where the sniper fell, a
guy with a shotgun emerges. He also has a small med-pack. Enter the room he came from and use the switch to open the nearby door. Inside you'll find a CIRCUIT BOARD guarded by an angry Doberman.Take the CIRCUIT BOARD back to the larger opening at the other end of the open area (the one between the two rusty, circular ducts). Inside you can place it in the electrical panel to open the door.
DARK ROOM WITH MANY CRATES AND RAMPS: Enter the dark room and immediately climb onto the block ahead and a little to the left to await the arrival of an
armed snowmobiler. He can't run over Lara when she's on the block, but he can still shoot. So take him out quickly (the M-16 works well). There are also 3 rats scampering around on the floor. Either kill the rats right off, or get a lock on the snowmobiler and keep holding the Action key so Lara won't target the rats.After taking care of the snowmobiler. Scour the room for goodies:
flares on a box to the right of the entrance, M-16 clips off to the left behind a low wall, a large med-pack and a KEYCARD (type 1) on some crates near the far left corner, and Uzi clips behind one of the ramps. (Watch out for rats in case you missed any.)When you take the keycard, a
bad guy with a club appears down below in the open area near the door the card will open. If you wait inside this room, he'll come to you. If you go outside, however, you'll trigger the snowmobilers (see next paragraph) and have to deal with all of them at once.BACK OUTSIDE WITH NASTY SNOWMOBILERS: When you exit back to the open area, the double doors in the cave below open and
2 snowmobilers come out to play. One comes up the ramp and through the dark room; the other circles around down at ground level. You can get up on one of the boxes inside the dark room, but there's a nice, safe, well-lit spot outside. Turn right and run along the ledge and over the roof to the corner. Climb onto the square column with the concentric circles carved on it. (The screenshot at http://tombraiders.net/stella/images/foolsgold.jpg shows the safe spot.) Dispatch the first snowmobiler from here. Then move to the edge of the roof to get the second one down below.(NOTE: Alternately, you can take the first snowmobiler's ride and have yourself a lovely shoot-'em-up. Or, you can go down the ramp, as in the paragraph below, climb onto the ledge and kill the first snowmobiler as he drives past. Then, later, when you exit this area--either by the ramp or through the dark room above--the second snowmobiler will appear.)
RAMP DOWN FROM DARK ROOM: In the dark room with many crates, along the right wall near the back, there is a
movable box. Move it aside to find some flares underneath and an opening behind it. Follow the ramp down to a metal ledge. Climb onto it and take out the guy with the shotgun on the other side of the pool.POOL BELOW RAMP: Dive into the pool, find the
lever on the central column and pull it to shut off the propeller. Surface and climb out of the water above the lever and to the right. A man with a flamethrower approaches from the dark hall ahead. Take him out before he gets close enough to toast Lara. Get a small med-pack off his body and some flares in the room at the end of the hall.Return to the pool and take a running jump to grab the ridged metal wall, which serves as a ladder. Climb up to the room above. Pull the
movable crate. When you pick up the grenade underneath, a door opens on the other side of the room. Go inside and get another grenade. When you do, a second door opens behind the crate, giving you access to the GRENADE LAUNCHER.Dive back into the pool and follow the underwater passage past the propeller. Pick up
2 sets of automatic pistol clips on the bottom. Turn around, swim to the rusty ledge and climb out. Kill a rat and claim 2 more sets of automatic pistol clips. (NOTE: If you don't have them yet, you'll get the AUTOMATIC PISTOLS and one set of clips instead.) Swim to the other end of the hallway and exit through the panel with Stalin's face on it, which opens as you approach. You emerge in the hallway near the double doors below the ramp.LOCKED DOORS AND THREE KEYCARDS: Head to the left, cross the open area and use the KEYCARD in the YELLOW STAR LOCK to open the door under the big fan. (NOTE: If you didn't kill that second
snowmobiler earlier, you'll have to do that now.)Enter the small room ahead, and pick up another
KEYCARD (type 1). When you do this, a goon with a club will vault over the doorway ahead. Kill him and take his small med-pack. Climb into the room from which he came. There is a RED STAR LOCK here, as well as a switch. The switch opens the outer door, and your card doesn't work in this lock. To get the right card, pull the switch then climb back into the doorway. Another bad guy will appear in the next room. This one has what you need: a KEYCARD (type 2) with a red star.Before unlocking the door, backtrack for a secret. When you crossed the threshold near the YELLOW STAR LOCK, you also opened a door back in the short hallway with the carved portraits of Stalin. To get back there, leave the keycard rooms, make your first left (into the doorway through which you entered this area). Then turn right and you'll see it. The door at the right end of this hallway is now open. Go inside, climb up onto the slope, and pull the
switch on the right. This opens the door at the top of the slope and lets in 3 Dobermans. Beyond the door is an open area with SECRET #2, the gold bars.Return to the keycard lock rooms and use the TYPE 2 CARD to open the RED STAR LOCK. Use the
switch to open the outer door. Then hurry through; it's timed.SNOWY AREA WITH IRON SUPPORT BEAMS AND WOODEN CRATES: Advance to the open, rocky area on the left.
Two nasty guys with clubs attack--one from the right, one from the left. Take care of them, then climb up the snowy rocks in the left corner. At the top, turn right and walk along the ledge toward the rusted metal support beam. Take a standing jump to the beam, where you'll find some flares.Ready a decent weapon, then cross the beam to the area with the wooden crates.
Two thugs with shotguns emerge from behind the crates. When you've dealt with them, find the movable crate near the back. Slide it aside and go around (or over) it to step on the spot where it was, then jump on top of it to avoid being cornered by 2 vicious dogs. Kill them. Move the first crate against the wall or the wooden ledge. This will enable you to pull the second movable crate aside to find a grenade and 2 sets of Uzi clips underneath.There's also a
large med-pack on top of a box on the other side of this area. When you pick it up, another bad guy exits the building below and climbs up the rocks. If you're alert, you can easily kill him before he gets to Lara. He drops a small med-pack.You can also shoot the
guy pacing around behind the building from the top of this box. No need to waste M-16 ammo here either; pistols will do nicely. Safety drop down onto the rusty ledge closest to the spot where he was pacing. Climb up to him and find 2 sets of Uzi clips on the ground near the window. (NOTE: If you didn't get them earlier, you'll get the UZIS here instead of one set of clips.)Walk back to the edge and slide down toward the second building. There are
clips for the automatics on the iron support sticking out of the snow off to the right. (Use a standing jump to get onto the snow next to the support.) If you want all the kills, take a running jump over to the rectangular ledge made of rusted metal. When you do, a crow will fly in and another goon will come out of the building to attack. When you're ready, climb up to the door of the second building.BUILDING WITH FLAMETHROWERS: There's a
rat just inside and 2 guys with flamethrowers in the next room (behind the metal bars). Climb onto the rusted metal ledge on the left. Don't hop down on the other side yet; there are 3 more rats there, and the whole area is rigged with lethal rolling barrels. Instead, wait for the flamethrowers to appear behind the bars and shoot them. Hop back behind the metal ledge if they start to shoot flames. If one of them comes to the barred doorway, you can back up onto the steps outside, where it's safe.(NOTE: Alternately, you can slide down from the building with the crates at the left side and enter the second building through the left door. Kill the rats and flamethrowers. Then exit through the other door to get the Uzis and various clips. I prefer the first way, since the Uzis are useful against the flamethrowers.)
Now clean up any leftover rats, jump down into the area behind the ledge and make a dash for the alcove on the left to avoid the
barrels. (You may want to trigger all four sets of barrels so you don't have to worry about them later.)At the top of the barrel slope on the left is a depression with a trapdoor and another YELLOW STAR LOCK. Use your remaining KEYCARD to unlock the trapdoor and the big double doors in the barrel area.
There's another
flamethrower waiting for you outside. You can deal with him in several ways. I prefer climbing out of the pit, running through the double doors into the small doorway beyond, turning around and taking out the flamethrower as he follows you in. (You can also swim in through the trapdoor and surface in the pool.) In either case, you can jump in the pool if Lara catches fire.At the bottom of the larger pool, you'll find
2 sets of Uzi clips, a small med-pack and flares. In the smaller pool at the far end of the room, there's a grenade and a large med-pack.Now head through the doorway between the yellow and brown signs. Climb onto the ledge just inside on the right. You can kill
guy with the shotgun on the ledge above by jumping up to get a lock on him, then hopping up and down while firing. Climb onto the ledge for 2 sets of M-16 clips. Then drop down and continue on.SKELETON CAVE: Enter the cave and go to the right to the end of the metal walkway. Take a running jump to grab the square stone block just above the bridge with the skeleton on it. Pull up. If you like, you can now shoot the guy you saw through the window earlier.
Below and behind this block is a shallow pit containing
SECRET #3, the gold skull. Grab it and climb back up to the block above the bridge. Turn and drop back to hang off the edge of the block, but don't drop to the bridge yet. When you hang there, 2 baddies with clubs emerge. Pull up and take them out from relative safety; then drop down to the bridge.Cross the bridge and jump over to the rocks on the right. Kill the
bad guy above if you didn't already, along with 2 meddling crows. Climb up to where the bad guy's body is and pick up automatic pistol clips and a small med-pack from the ground.Climb back down to the skeleton bridge. Take a standing jump to grab the ridged metal wall. Climb down to the bottom, then climb sideways as far as you can to the left or right. This will enable you to drop onto one of the flat ledges at the sides of the ramp. Walk back to the skeleton, take the
large med-pack and kill the 5 rats that emerge from the hole.Slide backwards down the slope, grab the edge and drop to the ground. Turn around and head to the left side of the cave. You'll find
3 boxes of shotgun shells behind a low wall. Go through the tunnel near the skeletons to finish the level.
Level 3: Furnace of the Gods
Kills: 36* Items: 58 plus Mask of Tornarsuk, gold nugget, and 3 secrets
*The number of kills is approximate. The exact count will depend on your actions and those of your allies.
TRAPPED PASSAGEWAY: As you slide, jumpo grab the ledge with the
flares. Pull up and take them. Then either safety drop or hop down to the slope below. Slide to the bottom where you’ll find two skeletons. Among the remains are shotgun shells and more flares. Continue along the dark passage. As you approach the small med-pack on the ground, a rat sneaks up from behind.Ahead is a section of
break-away tiles with spikes below. Beyond that is a short ramp down and two converging spiked walls. One comes in from ahead, the other from the right. Run across the break-away tiles and duck into the hallway on the left. When the first spiked wall passes, run into the alcove behind it (where it came from) and wait for the second wall to pass. Kill the 3 rats nibbling on Lara’s bootlaces and pick up 2 sets of automatic pistol clips from the ground where the second wall came from.Go to the end of the hall (where the second spiked wall went), pull the
metal box with the gold chain away from the wall and move it aside. Follow the passageway to a big, open area with huge, square columns.BLUE CAVE WITH INUIT WARRIORS: Enter the cave and kill
2 wolves. There’s a third wolf sleeping near the left rear column. You can sneak up on it, or approach the skeleton with the small med-pack and the wolf will emerge.Take the
MASK OF TORNARSUK from the pedestal and the 3 Inuit warriors will animate. (NOTE: Like the ice men, these guys are your friends. If you don’t harm them, they’ll help you fight the real enemies.)Taking the mask also opens one of the doors out of the cave. (The double doors will open later.) Enter here and slide down the ramp to land in a water-filled tunnel. Turn around and swim forward down the tunnel. Either harpoon the
catfish or turn around and lure it to the other end of the passage where you can surface and kill it with pistols. At the end of the passage with the catfish, you’ll find 2 bundles of harpoons. At the opposite end is the RAT ROOM.DARK ROOM WITH SKELETONS AND RATS: Climb out of the pool. As you explore this dark room,
12 rats emerge. Pick up all the items on the ground and move the metal boxes to get at the goodies underneath. In all, you’ll find 5 boxes of shotgun shells, a small med-pack, a large med-pack and flares. Pull the third movable box out from the wall and push it to the side to access the exit.Go up the hallway, running over the
collapsing tiles with spikes below. At the end of the hall, turn around and jump up to grab the ladder above. Climb to the top. Push the blue block with the face on it twice, then move it to the side to find SECRET #1, the gold coins, underneath.Go around to the other side of the room. As you approach the skeleton in the passageway, a
boulder rolls in. Hop back and to the side to avoid it. Pick up the flares among the bones and continue along the hallway, jumping over the 3 spike pits, until you come to a ledge above the blue cave. Pull the switch to open the double doors below. Return to the left side of the ledge and take a running jump to the ledge jutting out of the left side of the pillar. From there, take another running jump to the ledge with the M-16 clips. After making the pick-up, take a running jump back to the previous ledge and safety drop to the hill below. (If you drop here, Lara won’t take any damage.)BACK AT THE BLUE CAVE: Go through the double doors you just opened. Pull the
switch to open the gate and hang back as the Inuit warriors take care of the 3 thugs in the next room. You can assist if you like, but be careful not to accidentally shoot the warriors. When it’s over, pick up Uzi clips and a small med-pack from the bodies.DOUBLE DOORS/ORANGE-AND-GOLD ROOM: At the back of the room on the left is a barred alcove overlooking a room with a
pool of molten gold. There’s a large med-pack here on the floor. Get it and backtrack to the climbable ledge on the right. Go through the opening above and drop onto a ledge in the gold pool.MOLTEN GOLD POOL AND ‘WATERFALL’: Walk to the end of the first ledge and take a running jump to the next one. Jump to the rock ledge on the left. Jump/walk up to the left end. Take a running jump over the molten gold to grab the back side of the angled block near the wall. Pull up, slide nearly to the bottom, then jump to land on the angled block in the corner. Immediately jump again to land on the ledge with the
grenades. Walk forward to the other side of this ledge and take a standing jump to grab the stone block ahead. Pull up, turn right (you’re now facing the falls), and take a running jump to the small, squarish block next to the falls. Take another running jump to the next block (it has a flat front and an angled section at the back). Turn left, and take a standing jump to the flat area behind the falls.Climb onto the rock ledge and from there to the higher ledge, which turns into an elevated bridge and runs around the perimeter of the room. (NOTE: You can also get the grenades by walking along this bridge and safety dropping down to the block near the grenades.)
Follow this ledge/bridge all the way around to the rock pile. Climb/jump up the rocks. About halfway up on the right, there’s a shallow pit containing a box of
flares. A little farther on, there’s another pit on the right with a small med-pack.After getting these items, backtrack along the rocks to where they drop off. Climb up the flat, stepped blocks on the left and turn around to face the river of molten gold. (See the screenshot at http://tombraiders.net/stella/images/furnace1.jpg if you’re not sure where to climb.) Take a running jump to grab the ledge ahead; pull up. Cross the ledge and take another running jump to grab the next ledge. Walk around the hanging rock to the other side of the ledge. Take a standing jump to the opposite bank. Pick up the
shotgun shells at the right side of this ledge, and the flares in the pit below on the left.After getting the flares, climb back up and take a running jump to the pillar with the
M-16 clips on top. Pick up the clips and shoot the crow that flies in from downstream. Take a running jump to the ledge on the opposite side of the river (above where you got the small med-pack in the pit). Another crow flies in from below.Continue upstream along the rocks. Watch out for the
spike pit, and be sure to get the shotgun shells (and shoot another bird) at the top of the tall rock outcropping beyond the spikes. Now follow the pathway around the bottom of the outcropping to a low ledge with automatic pistol clips. Climb onto the ledge above where you found these clips. Take a running jump to the T-shaped rock in the middle of the gold river. Pick up the M-16 clips and kill 2 more crows.Back up to the top edge of the rock, being careful not to step off into the
molten ore, and take a standing jump with Action to the lower end of the block. Turn right and take a running jump into the hole to land on the safe block. (See the screenshot at http://tombraiders.net/stella/images/furnace2.jpg for clarification.) Drop down to the block below to get SECRET #2, the gold bars.Climb up two blocks, turn around and take a running jump to grab the high, square block just upstream. Turn right and take a running jump back to the T-shaped rock where you got the M-16 clips. Take a running jump back to the bank.
ROOM WITH ROLLING BLADE: Continue upstream through the gap in the rocks to a room with a
rolling blade. Run carefully past the blade, ducking into the alcoves if necessary. Look in the alcove on the right just after the blade corridor to find a large med-pack.STEPPING STONES IN MOLTEN GOLD RIVER: Turn right and continue upstream to a ledge near the
molten gold river. Take a standing jump with Action to land on the square block in the river near the right wall. Jump from block to block upstream: a running jump to the second block, standing jump to the third, running jump to the fourth, standing jump to the fifth, then turn right and take a running jump to the sixth and last. From here you can pick off the polar bear in the cave ahead using the M-16.POLAR BEAR CAVES: Take a running jump from the block into the pool of water ahead. There’s one of those
biting fish waiting for you. Either harpoon it, or swim forward and down through the passageway, then up to surface in the polar bear cave. (NOTE: If you harpoon the fish, you may also be able to harpoon the polar bear from the water-filled opening.) Pick up the large med-pack among the bones.Go through the square opening to a ledge above water. Take 2 steps back from the edge then a standing jump to land on the rock with the
harpoons. (NOTE: Make sure you nail this jump; if you don’t Lara will be swept downstream, missing a kill and pick-ups.) Jump into the shallow water on the right, then advance carefully into the cave. When the second polar bear emerges, back up into the waist-deep water to shoot it from safety. (Don’t go beyond the drop-off, though, or the current will drag Lara downstream). Pick up 2 sets of Uzi clips in the bear’s lair.Now float downstream to a small, square opening in the cave ceiling. There are
2 sets of M-16 clips on the bottom of the next underwater room. Notice the items behind the ice windows. You’ll get those soon. Climb out of the water through the square opening. Grab the small med-pack and flares from the ledge. Take a running jump from the ledge across the gold river to grab the ladder. Climb over to the right and dismount on the ledge.RAMPS WITH BOULDERS: Head down the ramp to the left. Push the
button to open the nearby door and immediately back flip so Lara’s back is against the wall, avoiding the 2 rolling boulders. (NOTE: Both doors out of this area lead to the same place. I’ll describe one route.) Climb down the ladder inside the doorway near the button. At the bottom, climb to the left and drop to safe ground. Press the button, roll and run to the side to avoid the boulder. Go through the doors you just opened. Pick up 2 sets of Uzi clips, then climb through the rock tunnel to the locked double doors. Go to the left and kill the mercenary in the cave ahead. Take his M-16 clips.ANCIENT BUILDINGS IN GOLD LAKE: If you want the maximum number of kills, explore these buildings thoroughly before flooding the area. As you poke around,
4 more mercenaries will come out of hiding. One is carrying Uzi clips, one a small med-pack and one M-16 clips. You’ll also find a few scattered items. There are three buildings, one set apart and another pair one next to the other. The first building contains automatic pistol clips. There’s another small med-pack on a pillar in the gold pool. You can jump over from the walkway to get it or wait until you flood the area. Inside the right building of the adjacent pair, you’ll find a small med-pack and a switch. Pull this switch to open the double doors near where you entered.To get back there, exit the building and go up the stairs on the left to the path carved out of blue stone. Follow that path (past where you killed the first mercenary) to the doors. Enter and pull the
switch there to raise a barrier in the ice-window pool and flood the area with the buildings. Return there and swim down to pick up some things on the bottom: 2 bunches of harpoons below the now-submerged walkway and the GOLD NUGGET, plus the small med-pack on the pedestal if you didn’t get it earlier. Inside the lower levels of the buildings you’ll find a large med-pack and 3 sets of automatic pistol clips. Each pick-up is guarded by a biting fish (three in all).Use the GOLD NUGGET in the
receptacle at the top of the orange stairs to open the doors there. (You’re facing these stairs if the submerged walkway and the boulder room are behind you.)BIG ROOM WITH MOLTEN FALLS, WALKWAYS AND SPIKED PANELS: This next section is much easier than it looks. There are three walkways. The left and right ones have
moving panels with spikes. The center one has a rolling blade. Walk or run down the left pathway until the spikes start moving. Roll and run back to the wall, positioning Lara on the safe spot between the walkways. When the spiked wall arrives, go back down the walkway behind it. Don’t go all the way to the end, as there is molten ore in the alcove. Turn left and take a running jump to the ledge in the corner. Pick up flares and a small med-pack from the skeleton. Return to the wall near the entrance.Repeat the same procedure with the second spiked wall. Go to the end of the rightmost walkway and take a running jump to the ledge in the corner. There are no goodies here, but you can climb higher onto the brown rock ledges near the
rivulets of molten gold.Climb up to the barred window. Turn around and jump up to grab the ladder. At the top, turn around and jump to the flat spot on the right to find another ladder. Climb to the very top of the rocks. Take a standing jump over the
stream of gold. (Notice the hole on the right with the ladder; you’ll return there in a moment.) Look over the edge on the left. Locate the flat ledge below and slide backwards down the rock face, grab the edge, and drop to the flat ledge. There’s a ladder inside the opening. Climb down to get SECRET #3, the gold skull.Return up the ladder, turn right and jump over the slope to the corner ledge. Climb over the block on the right and slide onto a flat ledge. Here you’ll find another ladder which you can climb to the top of the cliff. Walk back to the other side, again jumping over the
stream of gold. Climb down the ladder into the pit.BREAK-AWAY TILES AND FUNNEL TO EXIT: At the bottom of the ladder, drop onto the
break-away tiles. Run forward, then make a U-turn around to the left. Jump to clear the gap and land on the break-away tiles on the other side. Keep going to the solid block with the large med-pack. Now, either take a standing jump from the BACK corner of the block or run off the remaining broken tiles to land on the brown area of the funnel below. (If you land in the opening, the drop is too far and Lara will die. If you land on the molten gold, she’ll fry.) Slide down the chute. Continue to the cage. Drop through the square opening to end the level.
Level 4: Kingdom
Kills: 24* Items: 44 plus 3 secrets
*The number of kills is approximate. The exact count will depend on your actions and those of your allies.
The level begins with a view of the cage from outside. Several ape-men are running around outside. (I’m not sure what the designers’ intention was here, but I’ll refer to them as sasquatches--the Pacific Northwest’s version of the Abominable Snowman, also known as "Bigfoot." If you’ve played TR2, you’ll recognize these as redecorated Tibetan Yeti.)
CAGE AND THREE CAVES: Slide the
movable box toward the gold square on the floor and get the flares underneath. (Watch out for the lit burner.) Push the box onto the gold square to open the trapdoor. Pull the switch to open the cage door. Get up on the blocks. The 3 sasquatches can climb up to reach you, but this will buy you a little time to shoot them as they enter the cage and come around the trapdoor to climb up near the switch.Before going into the trapdoor, exit the cage and explore a bit. There are
Uzi clips on the ground near the door, plus more flares and a small med-pack on the rocks to the left. As you scout the area, another sasquatch emerges from the cave on the left. When you’ve killed it, enter the caves. The right cave contains a box of shotgun shells. The middle cave has more shells and a spike pit, and the left cave, a large med-pack. When you pick it up, you’ll need to deal with another sasquatch who comes down from the cage area.Return to the trapdoor in the cage and climb down the ladder. Drop onto the gold block below the ladder; it’s safe.
UNDERGROUND CAVE WITH POOLS OF WATER AND GOLD: Go around to the right and jump into the pool of water. Surface and climb out on the ledge near the gold panel with the face. Climb onto the ledge to the right of the door. Continue into a short hallway where you’ll find
Uzi clips, M-16 clips and a small med-pack. Turn around, walk forward and find another ledge on the right. Climb onto it and follow the passage back around to the pool of bubbling gold.Jump to the square ledge jutting into the pool. From there, take a running jump to the alcove with the
shotgun shells. Take another running jump back to the ledge. Look into the next room where there’s a pool of molten gold with several angled blocks in it. Take a standing jump onto the right side of the rectangular slope, slide forward and jump to land on the flat spot in the far right corner.Go up the ramp, climb onto the high ledge on the left. Go around the left side of the orange structure, kill the
sasquatch and pick up some shotgun shells. Climb/slide down the rocks on the other side of the orange structure to the opening. Drop down into another cage.
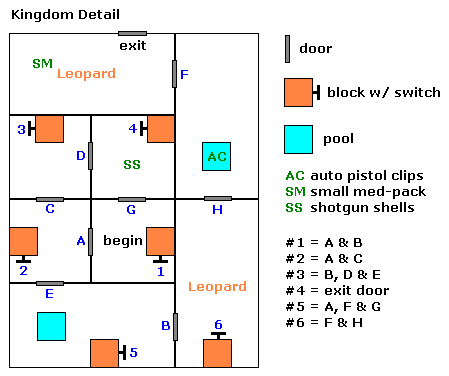
NETWORK OF CAGES WITH SWITCHES: This section is illustrated in the diagram kingdom.gif (included in the .rtf version of this walk-through and also available online at http://tombraiders.net/stella/images/kingdom.gif).
Each switch is numbered (1 through 6); each door is labeled with a letter (A through G). When you begin, all gates are closed, all switches in the up position. Pull
switch #1 (in the cage where you start) to open doors A and B. Go through door A, which you just opened, and pull switch #2 in the next cage to open door C (ahead) and close door A. Go through door C into the next cage and pull switch #3 to open doors D and E, and close door B. If the leopard in the cage at the far right (bottom of the diagram) went into the adjacent cage (bottom left of diagram, with pool) when door B was opened, it will now be able to reach you.Go through door D, pick up the
shotgun shells, and pull switch #4 to open the exit door. (If you like, you can wait for the leopard to go through that door and close it again to lock him in while you explore.) Go back through doors D and C, then through door E into the cage with the pool. Pull switch #5, which opens doors A, F and G. Use switch #1 again to open B (it also closes A, but you can exit through G). Go through door B and pull switch #6 to open door H (it also closes F). This lets in the second leopard if he’s not locked behind the exit door. Use switch #5 again to reopen door F (and also open A and close G). If you didn’t leave the exit door open, use switch #4 to reopen it. Go through doors H and F, grabbing the automatic pistol clips from the pool and the small med-pack on the ground near the exit door.AREA ABOVE THE CAGES: Go through the exit door and to the left. Slide down the ramp and jump to grab the ladder. Climb all the way down to the
spikes. Let go and walk through the spikes to get the Uzi clips. Climb back up the ladder and to the left, where you can dismount on a spiked ledge. Turn around, walk through the spikes, and take a standing jump over the opening to the ledge beyond. Now you can get the flares and automatic pistol clips you saw through the grates from below.Go up the stairs and along the hallway to a T intersection. Go left at the T. Don’t jump over the ramp ahead or Lara will land on the
spiked ledge. Instead take a standing jump up onto the flat spot on the right, where you’ll find the automatic pistol clips. Hop back down and follow the hallway down the stairs to SECRET #1, the gold coins.Taking the coins opens the trapdoor. Now there’s a
sasquatch running around in the cages below. You may be able to hang from the opening to draw it out and shoot it from above, but this is time consuming. When you’re ready, drop down into the cage. Return to the exit door and this time follow the footprints up the long ramp up to the right.TREES AND WOODEN BRIDGES: Climb the rocks to the orange opening. When you take the
large med-pack near the skeleton 2 sasquatch charge up the hill. Take care of them, then jump down to the flat area. Avoid sliding into the pit of molten gold. Take a standing jump up to the flat spot in the center of the clump of trees. Another sasquatch charges in from the left. (For some reason, he’s able to withstand the heat of the bubbling pool.) You can easily pick him off as he approaches.Now walk out onto the wooden bridge. Turn left and do a tricky running jump across the pool to grab the dark green ledge with the
automatic pistol clips on it. To line up this jump, position Lara at the back edge of the bridge with her left hand just touching the bridge support. Don’t get too close to the support or she’ll knock into it when you do the running jump, and she won’t make it to the ledge. (The screenshot at http://tombraiders.net/stella/images/kingdom1.jpg shows Lara ready to go.) Pull up, grab the clips, then go to the back of the ledge. Take a running jump to the angled stone ledge against the back wall. Slide back, grab the edge, and traverse as far as you can to the left. Pull up. Go around to the left and take a diagonal standing jump to grab the edge of the wooden bridge. Pull up and cross the bridge.Take a careful standing jump to the ledge with
SECRET #2, the gold bars. (NOTE: Make sure you give Lara enough room to jump; it’s easy to overshoot this ledge and land on the ramp behind. Then you’ll have to reload or come all the way back around.) After getting the coins, slide down the ramp and take a standing jump to the root with the M-16 clips. Walk up to the peak of the root. Turn to face the orange opening where you started, and take a running jump (don’t press Action, or you won’t make it) to the green-and-brown ledge.Jump back up to the ledge between the trees and, this time, go all the way across the wooden bridge. Look to the left across the stream of gold to locate the ledge with the pacing
Inuit warrior. Take a running jump to grab the edge of the ledge. Pull up and follow the warrior to a barred window with a small med-pack. Take a running jump back to the path and go to the left to enter the building.BUILDING WITH GOLD ‘X’ PATHWAY: Inside is a hallway with barred windows surrounding a large room with an X-shaped golden path. Go down the hall to the right. Near the end you’ll find some
grenades. Come back to the entrance. On the way, you’ll see a switch on the right. Pull it to open a trapdoor in the room with the X path. A mercenary drops down into the room.Continue past the entrance to a
pair of switches. Use the one on the left first. This opens 3 doors in the X-path room, letting in 3 Inuit warriors. After they finish off the mercenary, pull the right switch. This opens the door into the X-path room.Go in and pick up the
large med-pack. Doing this opens the gold door at the end of the hallway outside, releasing a sasquatch. Unfortunately the Inuit aren’t much help here, but cross to the far corner of the room from the entrance, you’ll have plenty of time to blast the sasquatch before it reaches Lara. (Again, just be careful not to accidentally target the warriors.) Climb back into the doorway to shoot the sniper in the cage above.Go down the hall to the right (where the sasquatch came from), picking up some
automatic pistol clips on the way. Go through the gold door and get the Uzi clips at the back of the room. Slide down the ramp with the greenery. Don’t rush forward; it’s a long drop.TREETOPS: The grunting sounds should alert you to the presence of a
couple of sasquatches in the treetops above. There are a few different ways you can explore this area. I’ll suggest one possible sequence. Jump to the green ledge ahead, then take a running jump to the next ledge to get the flares. Jump back (over the wooden bridge) to the previous ledge. Walk to the right end and take a standing jump to grab the shorter wooden bridge. Pull up and walk to the higher end. If you turn around here and look up, you may be able to shoot the sasquatches with the M-16 from below. They run around quite a bit and don’t come near the opening often, but even if you only get in a few shots, they’ll be easier to kill when you reach the top.Jump to grab the ladder on the tree. First climb down. Near the bottom, backflip off the ladder to land on the ledge behind. Take a standing jump from the BACK of the ledge to the molten gold square with the
grenades. This square is safe; the rest of the pool is burning hot. Jump back to the ledge, then jump to grab the ladder.Climb all the way to the top. Kill the sasquatches and pick up
small med-pack. Jump over to the skeleton. There are automatic pistol clips among the bones of the second skeleton and M-16 clips nearby. Mind the gaps; it’s a long way down. Climb down the ladder near the second skeleton to get another small med-pack. (NOTE: Instead of climbing the first ladder, you could climb this second ladder from the lower rope bridge to get to the sasquatches. However, when I tried this, they almost always reached Lara and knocked her off the ledge before she could kill them.)Stand at the right side of the ledge where you got the med-pack facing the ladder. Light a flare and side flip onto the gold ramp. When Lara lands on the dark slope, slide and jump the gap to land on another gold slope. Slide to the bottom and pick up the
shotgun shells.(NOTE: If you begin from the treetops, jump onto the gold ramp at the top, near the panel with the gold face, facing uphill. As Lara slides through the turns, she’ll end up facing downhill. If you miss the jump to the second golden slope, you’ll slide down to the right. Either reload a saved game or keep sliding, jump and veer to the left at the very end to avoid landing in the molten gold. You’ll end up at the bottom of the forest near where you got the grenades. Climb back up the ladder to the top.)
GOLD WALKWAY WITH TRAPDOORS: Stand Lara on the golden panel with the face, with her back to the ramp. Turn a little to the right and take a diagonal standing jump to the gold ledge. Follow the walkway with the opening and closing trapdoors. As you round the bend after the first trapdoor,
2 sasquatches emerge from the dark hole ahead. Back up while shooting, taking care not to step off into the molten gold. Go into the opening the sasquatches came from. When you take the small med-pack, a third sasquatch attacks. You’ll find some shotgun shells and Uzi clips in the dark areas off to the sides, but watch out for the spike pits.Return to the first trapdoor. If it’s not open, hop over to the ledge near the entrance to open it. Then take a running jump into the open trapdoor. The gold floor here is safe. Follow the passage to a ladder. Climb to the level of the orange ledge, back flip onto the ledge behind, then climb onto the orange ledge.
ROOM WITH GOLDEN SLOPES AND FOUR GOLD 'WATERFALLS': In this room, you need to work your way around the golden slopes counter-clockwise from the entrance to the gold panel on the opposite side. (The sequence of jumps is illustrated in the series of screenshots at http://tombraiders.net/stella/goldwalk/kingdom.html.)
Slide down the ramp to the right to land on a flat spot. Take a running jump across the
flowing stream of gold to the next flat square. Position Lara at the MIDDLE of the square and turn about 45E to the left. Take a standing jump to a more or less flat spot below (at the lower middle of the golden slope). Turn so the pool of molten gold is ahead and to Lara’s left. Take a standing jump from the BACK of the flat square to another flattish spot two squares ahead (at the bottom corner of the slope). Take a running jump across the gold stream to the flat block one square higher and to the right.Turn right to face uphill. Take a standing jump from the top edge of the flat square to ledge at the base of the ramp. (The gold stream will be on the right.) Turn left (the ledge with the gold door will be ahead and above) and take a standing jump to the flattish spot above and to the left on the hillside. Walk to the top of the flat spot and from there, jump up to the long slope and slide down to the flat spot near the
molten gold stream with the flat, gold panel above it. Take a diagonal standing jump onto the ledge in front of the gold panel, and the panel will shatter.Inside is a small room with some items lying on the floor. Be careful only to walk on the squares below the shiny gold ceiling squares. All the other squares are
burning hot. Walk forward, take the flares, and kill the leopard that charges in from the next room. Get the small med-pack, then return to the square where you got the flares. Turn around so the exit door is behind Lara. Take a running jump to the safe square near the wall ahead. Turn left and take another running jump to SECRET #3, the gold skull. Jump back from one safe square to another and enter the orange room with the stairs.Go up the stairs to emerge through the gold door above the gold-hill room. Slide down the ramp ahead (not the one on the right) to land on the flat spot below. Take a running jump across the
gold stream. Climb up to the ledge on the left with several small, square alcoves. In the corner you’ll find the exit ramp. Slide down and you’ll land on the gold square with the face at the bottom of the TREETOPS area.Again, take a standing jump into the alcove on the right. Follow the gold walkway with the trapdoors all the way to the end this time. Climb up the golden blocks then the ladder.
SLOPE LEADING DOWN TO FINAL AREA: At the top of the ladder, follow the path around to an open area with a rocky slope.
Two leopards charge in. Deal with them, then pick up the items inside the building: M-16 clips and a large med-pack. Taking the med-pack opens a gate outside above a ladder. (You can see this area through the window.) This gate leads back to the cage and three caves at the beginning of the level. As far as I can tell, there’s no reason to go back there.Instead, head down the slope. Kill another
leopard on the way and continue down to a wall of ladders. Climb up. At the top is a receptacle for the MASK OF TORNARSUK. If you want all the pick-ups wait to place the mask. First approach the double doors on the right. They open and you can enter the room beyond. Climb down the ladder into the pit, walk through the spikes and take the large med-pack in the alcove on the right, then climb back out.Now set the mask in place. When you do, the gold structure behind transforms into a ramp with a room at the top, and the
GUARDIAN emerges. (NOTE: If you’ve played TR2, you’ll recognize him as a gilded version of the Guardian of the Talion.) Stand at the base of the slope, a little to the side, and as the guardian comes stomping down, get ready to run. When he reaches the bottom, run up the ramp into the building (running jumps may be a little faster).Inside the room, you’ll find a
large med-pack, grenades and a switch. If you want the pick-ups, you’ll probably need to run into the room, grab one item, and run out the other side and back down the hill. Let the guardian chase Lara down, then run back up for the next item. Take a third pass to flip the switch. This re-opens the double doors down below on the right and extends a bridge over the pit. Run down and across the bridge with the guardian close on Lara’s heels. Pull the switch on the other side to retract the bridge. The guardian will either be trapped on the other side of the gap, or he’ll fall into the pit. When you kill the guardian, the level ends.(NOTE: You can lure the guardian across the gold bridge, then pull the switch to retract the bridge, trapping him on the switch side. You can then safety-drop into the pit and climb out the other side. However, once you pull the bridge lever, the guardian’s building and the ramp leading up to it disappear. So you won’t be able to get the med-pack and grenades unless you do it first.)
When the game ends, wait through the credits and the final stats screen. When the passport comes up, turn the page and, if you've found all the secrets in the four Golden Mask levels, you'll be able to choose the bonus level, Nightmare in Vegas.
Level 5: Nightmare in Vegas
Kills: 22 Items: 62 plus shotgun, automatic pistols, Uzis, door circuit, elevator junction, 2 keys and 3 secrets
Starting Inventory: Pistols only.
HOTEL ROOMS: Press the
button to open the door and exit the bathroom. In the closet on the left you’ll find 4 boxes of shotgun shells, small and large med-packs and flares. Grab the LOADED SHOTGUN and 2 boxes of shells from the windowsill near the chaise lounge. The balcony affords a view of the Vegas skyline. In the suite next door, you can see a couple of armed baddies pacing back and forth. Lara smells danger! If you press the button below the TV showing the Elvis concert, you’ll receive a mysterious vision of Jeeves blundering around in a bathroom somewhere. Now it’s Lara to the rescue!The remaining door in Lara’s room leads to the hallway. The doors at the other end are locked, so shoot out the window in the hall and climb onto a tiny ledge. Take a standing jump to grab the ledge on the right. Traverse to the left to the trellis, then climb down, to the left and up again onto a ledge outside the nasty neighbors’ window.
Go around to the front, take a standing jump to the balcony, shoot out the glass, and take on those
2 masked goons. Relieve the bodies of a small med-pack and shotgun shells, and pick up 3 more boxes of shells scattered around the room. Free Jeeves from the bathroom, grab the small med-pack from the dresser and the HOTEL KEY from the floor of the shower stall.Go out into the hallway (the exit door opens automatically), and use the key in the keyhole there to open the double doors.
ATRIUM WITH HUGE GOLDEN SCULPTURE: Here, on the top level of the atrium, you’ll find, counter-clockwise from the entrance, the BIRD MONSTER CAGE, a BROKEN ELEVATOR (it’s missing a junction, which you’ll find shortly) and a HALLWAY WITH GARISH CARPET, which is barred by a gate at the moment. (NOTE: You can get in here by safety dropping from the walkway to one of the ledges below. But I’ve included this section later on, to save climbing up and down.)
Enter the room with the BIRD MONSTER CAGE. Grab the
shotgun shells at the back left, near the snow leopard diorama. Pick up the flares on the block between the cages. This triggers the appearance of another thug. Take him out, then climb the blocks at the front of the room to reach the rafters. At the back, above the cage, you’ll find 2 boxes of shotgun shells and a small med-pack. (NOTE: You can also see the third secret, the gold skull, inside the cage. You’ll be back for it later.)Return to where you entered from the hallway near Lara’s room. Take a running jump to grab the sculpture just below the
large med-pack. Climb up and take the med-pack. Now, either drop and hang from the right side of the sculpture (with Lara’s back to the HALLWAY WITH GARISH CARPET) and climb down the side of the sculpture. At the bend, climb a little to the right, then continue climbing down as far as you can. Drop and slide to the floor. Or, stand on the flat spot where you got the large med-pack, face the walkway near where you entered and walk forward to the edge. Then back flip to land on the sloping surface of the sculpture. As you back flip, hold Action to slide and grab the edge, then release to slide all the way down the sculpture to the floor.Two armed bad guys
come in from the SWIMMING POOL. Kill them and take their small med-pack and 2 boxes of shotgun shells. Jump into the pool and retrieve another HOTEL KEY from the bottom. (NOTE: The underwater door opens later from behind. It connects via an underwater tunnel to the trapdoor at the left side of the sculpture.) When you surface, another thug is taking potshots at Lara. Climb out of the water and kill him. Take note of the double doors near the pool. They’re missing a CIRCUIT, which you’ll need to locate.JUNGLE ROOM/T. REX CAGE: Use the key to unlock the doors to the right of the sculpture. There are two greenery-lined hallways leading away from the door. An
armed thug lurks along each one. You’ll also find 2 boxes of shotgun shells near the Tyrannosaurus rex cage in the right hallway and a small med-pack and more shotgun shells in the other hallway.BLACK-AND-WHITE CELL BLOCK ROCK LOUNGE: Return to the ATRIUM and go through the doors framed with black-and-white star tiles. Press the
2 buttons in the alcoves decorated with blue bubbles. This raises the curtain on the stage. As you approach the stage, 4 club-wielding goons climb over the boxes and attack. You can put some distance between Lara and them, but be careful not to back up too far. If you go back up the stairs, another bad guy enters and starts shooting. When you’ve taken care of the four goons, pick up shotgun shells from one of the bodies, plus a small med-pack lying on the ground in the lounge.Climb onto the stage and take the
shotgun shells, which triggers the appearance of 2 more goons from behind the crates. Go to either side of the stage and climb up onto one of the blocks just below one with a swinging crate above. Stand Lara at the outside edge of the block and climb onto the block next to the swinging crate. (As long as you stay toward the edge, she won’t get clobbered.) From there, take a standing jump to the ledge along the backstage wall with the 2 boxes of shotgun shells. Grab them and safety drop to the ground.Along the base of the backstage wall are
2 movable boxes. Pull each of these twice toward the front of the stage, so they line up with the stationary blocks. Doing this opens the trapdoor behind the wall of blocks.Drop down into the opening. Here you’ll find a small room with
several black-and-white movable blocks. There’s an L-shaped open space in one corner, as well as another open square. Hop down into the L-shaped open space. Pull the first movable block once. Climb over it, turn around and push it into the corner. Turn around and walk to the next movable block. Pull it once, climb over it, turn around and push it into the other corner. Turn around, pick up the Uzi clips from the ground, then find the third movable block. Pull it once, then climb over it to find SECRET #1, the gold coins.Climb out of this room and return to the ATRIUM. If you didn’t encounter the
bad guy with the gun earlier, he’ll show up as you exit. Kill him and take his small med-pack and 2 sets of Uzi clips. As you exit the black-and-white room, go to the left. The doors in the corner leading to the second elevator are now open.ELEVATOR BETWEEN LOWER AND MIDDLE LEVELS: Pull the
switch once to call the elevator. Pull it again, then get on the elevator and ride up. Walk out onto the ledge overlooking the sculpture. Take a diagonal standing jump to the gold ledge near the wide ledge with broken glass shards on it. Walk through the glass and pick up 2 sets of Uzi clips. Take a standing jump from the edge of the ledge with the glass shards to the ledge with the stars. Pick up the DOOR CIRCUIT and a large med-pack.Stand at the left side of the star ledge facing the broken glass ledge. Walk to the front edge of the star ledge, then take two hops back. Take a running jump to land on the gold ledge beyond the broken glass (where you were earlier). From there, jump back to the ledge in the corner and climb up to the elevator. (NOTE: If you overshoot the gold ledge and slide down the sculpture, just call the elevator and ride up again.)
Flip the
switch near the elevator to send it down. Take a diagonal standing jump to grab the ledge above the ladder inside the elevator shaft. Climb into the passageway and go to the right. Jump over the broken glass in the pit and kill the goon who charges from the hallway ahead. Pick up some shotgun shells in the hall where the goon came from and return to the elevator the way you came. Call the elevator and ride it down. (Or, take a running jump from the ledge beyond where you got the shells to the gold ledge where you were earlier. Then slide down to the floor.)PARKING LOT: Cross the ATRIUM to the SWIMMING POOL. Use the DOOR CIRCUIT in the receptacle on the wall to open the double doors. Stay sharp, though. Someone left the cage door open, and there’s a
Tyrannosaurus rex running loose in the parking lot. If you want to kill it from a relatively safe spot, climb into the opening in the cement wall just inside to the left. And, if you’re in need of flares, there’s a box on the ground near this opening.An alcove on the other side of the parking lot can also be used to hide from the dinosaur. Inside you’ll find the
AUTOMATIC PISTOLS and 3 sets of clips, but watch out for the nasty guy with the club who comes around when you explore here.In a depression near one of the CNet vans, you’ll find the
ELEVATOR JUNCTION. Picking it up triggers the appearance of a second T. rex. If you want to, you can take shelter in the small room with the black-and-white tile floor and the Bartoli poster hanging above it. It’s safe as long as you stay back from the door when the dino comes around.After the second rex is dead, go down the ramp into the cage and pick up
SECRET #2, the gold bars. Then return to the ATRIUM.UPPER LEVEL AGAIN: Climb up the side of the sculpture on the side that faces the T. Rex cage room to a flat spot with some
Uzi clips. From the spot where the clips were, jump to the sloping section ahead and a little to the left. Slide back and grab the edge. (NOTE: Make sure you jump to land on the left side of the slope. If Lara lands too far to the right, she won’t be able to grab and will slide down to the floor.) Traverse over to the right a little and continue climbing upward, all the way to the top, where you found the large med-pack earlier. (The screenshot at http://tombraiders.net/stella/images/vegas.jpg shows where to climb.)Turn to the left (to face the entrance to the hallway where you first entered this area) and take a running jump to the ledge.
Follow the ledge around to the left to the HALLWAY WITH GARISH CARPET, which is now open. Run down the ramp, roll and take out the
armed thug who follows Lara in. Pick up 2 sets of Uzi clips in the alcove at the bend in the ramp, and 2 sets of automatic pistol clips in the alcove at the bottom. When you reach the bottom, another bad guy comes down. Take care of him before he can knock Lara off the high ledge. Return to the top of the ramp.STUNT DIVING FOR UZIS: Follow the walkway back around the top of the ATRIUM to the other side. Now, make a detour for some goodies. With Lara’s back to the BIRD MONSTER CAGE room, look waaaaayyy down. The trapdoor at the base of the sculpture is now open. If it’ll make you feel better, light a flare and throw it down so you can see the opening. Now stand Lara at the edge of the ledge lined up with the opening below. This is the perfect opportunity for a swan dive: Hold down the Walk key, then press Forward and Jump. Add a couple of rolls on the way down if you like. (See the screenshot at http://tombraiders.net/stella/images/vegas2.jpg if necessary to get oriented.)
In the underwater room below the opening, you’ll find the
UZIS and 4 sets of clips. If you need air before you’ve picked up everything, swim down the passageway to emerge in the SWIMMING POOL. Take a breath and go back for anything you missed. Climb back up the sculpture to the top just as you did before.THE BIRD MONSTER: Jump over to the walkway and follow it around, past the BIRD MONSTER ROOM, to the BROKEN ELEVATOR. Place the ELEVATOR JUNCTION in the receptacle nearby to fix it. Pull the
switch to call the elevator. Then pull it again, get in and ride up to the top floor.The
BIRD MONSTER is loose on the roof, and naturally the object of the game is to kill it. Once it falls, the level ends. So if you want to pick up all the goodies, you’ll need to do some running. As you exit the elevator, go left. Continue on, jumping over the glass shards. As you emerge outside on the roof, head to the left. You’ll find 2 sets of Uzi clips in the corner. There’s also a large med-pack but you’ll need to walk carefully through the glass to get it. (You can run through the glass, but then you’ll need to use that med-pack right away.) If you have a few med-packs to spare, you can just skip this one to save time. Or you can make two trips, luring the bird monster down the hall away from the goodies before returning.Run (or run/jump) back down the hall toward the elevator, past it and down the ramps into the monster’s cage, again jumping over the
broken glass or running through it and using med-packs as you go. Pick up SECRET #3, the gold skull.Run back to the elevator and pull the
switch to send it down. As it passes, jump on top of the elevator and ride down. Climb the ladder up the inside of the elevator shaft. At the top of the ladder (just below the gray area), back flip to land in the opening behind. Here you’ll find 4 boxes of shotgun shells and a large med-pack. Walk up the ramp and climb down another ladder here to drop into the hallway near the elevator.(NOTE: If the monster catches up with Lara while you’re getting the goodies, try to dodge it and use a med-pack or two to repair the damage. He needs to pound her several times to take all her health.)
Use the switch again to bring the elevator up. Safety drop into the shaft to avoid the monster’s pummeling fists. But when the top of the elevator reaches the opening, walk off, then jump back into the elevator when the doors open. You can shoot the monster from inside the elevator, and he won’t be able to reach Lara. When the monster falls, that’s the end of the level and the game.
Copyright © 1999 - Stellalune (e-mail stella@tombraiders.net). Special thanks are given to the participants in the alt.games.tombraider newsgroup, without whom some parts of this walk-through couldn't have been written. Feel free to copy, distribute and quote this walk-through, but please include this credit line so people can send me their corrections, comments and suggestions. Also, if you'd like to offer this on your own web site, kindly ask permission first.
E-mail stella@tombraiders.net.Stella's Tomb Raider Site: http://tombraiders.net/stella/
Stella's PC and MacIntosh Saved Games
![]() GAME BOOMER'S hints, cheats, and walkthroughs
GAME BOOMER'S hints, cheats, and walkthroughs