
by DREAMCATCHER-THE ADVENTURE COMPANY
by DREAMCATCHER-THE ADVENTURE COMPANY
Introduction |
 |
The story, briefly: You are Wales (pronounced Wells), a scientist inventing a time machine. You manage to get it working, and it transports you 800,000 years into the future, when it disappears. You need to find it and repair it in order to return home. The people here do not die, they become older or younger at the whim of Khronos, who controls everything. You must learn your way around this strange environment, and overcome fierce opponents who have no use for strangers.
Take some time to get used to walking and navigating. You can press the up-arrow continuously, and at the same time, control your direction with the right and left arrows without stopping. It is a bit unnerving at first, watching the overhead view, and confusing when Wales is walking toward you, because the left and right arrows rotate the walker relative to his point of view, not yours. Think of the hero rotating or turning left or right, not necessarily going left or right on the screen. It is VERY IMPORTANT to become good at moving around early in the game, when no one is attacking you.
The spacebar is the main action key and is used to accomplish things such as open doors, pick up objects you find, use them, and to start conversations with people. To open a door, walk right up to it, face it, and press <space>. To talk to a character, stand close to them and press <space>.
The spacebar also uses inventory items. An example would be using the oilcan to fix the rusty grate. You retrieve the item from inventory (press the <I> key to open inventory, find the object, <enter> to select it, <esc> to return to the game), face the grate, and press <space> to actually use the object. If you are using an item on yourself, you can be facing any direction.
The Ctrl key fires weapons, if you are hold one, and casts a magic spell if you are not holding a weapon. The enter key toggles magic mode on and off. At any point in the game, you can press F1 for a list of command keys.
Throughout the game
you will acquire a few weapons and several magic spells. The main
object of this game is to discover which combination of weapons
and spells help you to survive most efficiently. If you find the
most appropriate means of offense or defense, it is possible to
come through most situations uninjured, or nearly so.
| A word about saving
games: To save your current position, first press Esc.
This takes you to the Main Menu Screen. Next, use the
right arrow or the mouse to move the clock hand to the 4
o'clock (save) position. Press Enter. This opens
the Save Screen. (You can also get to this screen by
pressing F5). Use the right arrow or the mouse to one of
the twelve positions and Press Enter. If there is
already a game saved in the slot you want to use, and you
wish to use a new name Press Enter Again. Type in
the name you want and Press Enter. Do not put the arrow over the Save box in the upper right portion of the screen. This box is only the title of the screen, not a button to push. |

| Just a quick idea - some people like to print out their walkthroughs. I think it's much, much easier if you save the walkthrough to your hard disk, and while offline, open it with your browser. Then, while playing the game, just switch between the game and the walkthrough by pressing Alt-Tab. This technique works beautifully on nearly all games. |
![]()
At the end of the opening movie you wind up stranded in a city 800,000 years in the future. Pick up the Nautilus (use the spacebar to pick things up; they go into your inventory automatically.) On the lower left of the screen appears a Nautilus shell with two areas: the outer white segments represent your “Jad Garrûl”, or the amount of raw energy you have. Each time you cast a spell or save a game, you spend some of your Jad Garrûl. This is unfortunate, because it compels you to not save as often as you would like. Don't be too stingy, though. It's vital to save. The inner, green area is your “Sand.” This represents your health, and you lose it by being attacked. Keep an eye on this area when you are under attack. First it shrinks, then it turns yellow (warning) and shrinks again, then turns red (Imminent death) and shrinks rapidly. When it's gone, you die, and you must restart a saved game. I suggest hitting <esc> before you are really dead, and you can get to the menu much more quickly.
Go around the corner and talk to the boy. Always exhaust all dialogue with all characters who will talk with you. He mentions wanting to trade, but you don't have anything to trade right now.
Go through the alley to the right into Hourglass City. Explore and talk to whomever you meet. The only one who will speak to you is the gardener. Everyone else is too busy to talk, and they tell you to go see the priests.
This city is semi-circular, with a giant hourglass at the center, surrounded by exits which are mostly locked at the beginning. Look all around. When you go toward the exit that is two doors to the left from where you entered, an Event (a Time Wave) occurs that changes you into a child.
Go into Temple Square, around the temple to the far side and enter the temple. Talk to the priest inside. Go into the sphere and talk with the Lemur. Touch all three crystals to learn spells. You may practice spells without cost while you are inside the sphere. Approach the Lemur and choose a spell. He will teach you about it. Practice each spell, and talk to him again until you are sure he has nothing new to say.
| Learn how to set up the hotkeys. The numerals above the keyboard 1 through 9 can be hotkeys assigned to either an object or a spell. They can be reassigned at any time. The numeral 0 puts away the object you are carrying. You need to understand how to get to the spells and weapons, and how to use them, sometimes in a hurry. If you are not proficient, and need to repeat a spell in real life, it costs you energy points each time you cast one. |
You should also become familiar with the layout of the interior of the sphere; you will enter several more spheres, and they are all laid out the same. At times you will be in quite a hurry. After you cross the second bridge, on the way to the final chamber, look for a small cul-de-sac opposite the crystal formation.
Find the alcove
|
 |
Talk to the Lemur again on your way out. Go outside the sphere, talk to the priest again, and exit the temple. Go left (remember it looks like you are going right on the screen) and find the second altar that is in the shadows; go around to the left end of it and pick up the Wrist Jadgar. This is your “ray-gun.” To use it, you must be holding it in your hand. That is, go to the inventory screen, highlight the object, and press Enter. Recommended: highlight the Jadgar, and press a numeral (1 for example) to assign a hotkey to it. With a hotkey, you can access the Jadgar immediately by pressing <1>. To shoot it, press <ctrl>. Be sure you are facing the character you want to shoot at..
Then go talk to the old woman at the booth. She's not in the best of moods. You need to steal the object on the ground behind the counter. Cast the invisibility spell on yourself, and go pick up the Vissahid Ointment. Go around the temple to the other altar that you can see close-up. Around to the left end of it is a bowl that you can take.
Optional: you can go down the alley past the merchant, and visit with the guards near the city gates. You can talk to the boy working on the wagon; the nasty guard wants him to get back to work. The friendly guard gives you a hint where to find the relic you are seeking. Variation: you can deharmonize (shoot) the nasty guard at this time. Some fighting techniques: Make yourself invisible, and learn to jump right and left. (Alt-left or right arrow) Shoot and jump, if he returns fire where he thinks you are, but have jumped, he can miss.
Go into Hourglass Square and find the gardener. Talk to him and he will give you some sand herbs. Go to the street where the boy was, near where you first came in. He has turned into an old man with a backache. Trade him the ointment for the compass. If you have the sand herbs, you can trade them for an Hourglass of Ashes. (The old woman will give you herbs for the hourglass, but you should keep the hourglass, it is much more valuable. It is uncharged now, and useless; but after it is charged, it restores all your health and powers.) If you have the bowl, you can trade for a knife. If not, don't worry, you will find a knife later, when you need it.
Go to the city gates (beyond the old woman's booth) and you see an automatic sequence with the guard zapping a child. If you visited here earlier, you could talk to two guards, now there is only the nasty one. The guard shoots the boy near the Tripodon, then decides to attack you. You need to activate magic abilities. If you become invisible you can approach the guard. The closer you are, the more effectively you fight. You can either zap him with the de-harmonizing spell, which costs you Jad Garrûl, or select your Wrist Jadgar and shoot. He’s not armored, two good shots will do it. Variation: If you got rid of the nasty guard on your first visit here; in that case the boy still survives. (Will he appear to help us later?) You can approach the Tripodon and touch it for a ride to the monastery. Get on the Tripodon by standing behind it and press <space> without any objects in your hands.
| Just a brief note to all players: Many of you have been kind enough to send helpful hints and suggestions, when you have discovered a new or easier way to accomplish tasks in the game. Our knowledge of Time Machine is still evolving, and we are very grateful for any new hints or ideas. You may send them to me any time. |
Episode Two: In the Monastery
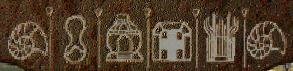
The Tripodon carries you across the Deadly Desert to the top of a chasm. Don't explore behind the Tripodon. You can get there, but it is the Deadly Desert again. Descend, walk up to the sign and read it (spacebar), listening to the six sounds. You see an inscription and above it, six icons. The pictures represent the sounds you hear cycling, only once through.
 |
| He who seeks his way must follow the voice of the web and conquer his mute guardian. He will then be worthy of appearing before Tetradon Logor Shar Master of the Monastery and Guide of the Lords of the Wave. |
To hear them again, step back and read the sign again. I found it helpful to go to the game options and turn the music volume way down, and the sound effects volume up a little. Otherwise, they are easy to confuse, because sometimes the musical sounds resemble the effects. The sounds are Nautilus (wave of time), Gong (from the big hourglass), Temple (escaping steam), Mine Entrance (machinery), Organ, and Nautilus again. The idea behind crossing the bridge-maze is to step on the proper sequence of transporters. If you are exploring, you have the option of walking down another staircase, taking you to the mine entrance. There is nothing to do down here, but it's worth the walk because you get a much better view of the Web of Time (bridge-maze).
| Save your game here! |
The first platform you come to is the Nautilus. You will hear the Wave sound as you step on it. Carefully step off the platform onto the wooden area, one step at a time, and listen. You are looking for the Gong sound. When you hear it, you are going the right way. See those rising bubbles? They are transporters (Beam Me Up). Walk ahead and be transported to the “Gong” platform. Don't hurry, you'll misstep.
Each time you arrive at a new platform you need to gingerly test the exits one step at a time to find the right one. You must do it by ear. I cannot give you directions, because the directions are randomized each time you retry! Even if you fall through, and re-load a previously saved game, the directions are changed. If you can't hear the sounds, or tell them apart, enlist the help of someone who can. Remember, you started on Wave. The order from there is Gong, Steam, Mine, Organ, and Wave again. Oh - and watch out for sounds that didn't appear on the sign. There is a musical honky-tonk sound that some might mistake for the organ. Don't go there! There is also a "Click" sound. Don't go there either! Some people have a hard time distinguishing between the 'wave' (nautilus) sound and the 'mine' sound. They are very similar, but the mine sound is about twice as long in duration.
[A word about the randomization. Apparently, several of the game's variables are adjusted at random when you begin a new game. Inside the next area, the Monastery, you should find it easy-going. There is a guard on the first floor who will talk with you, and a Chronomancer near a big clock who is relatively friendly. If either of these characters attacks you without provocation, the aggressiveness of your attackers will turn out to be more than you can handle. I suggest quitting and beginning a new game. The random difficulty factor affects many areas throughout the game, and we haven't discovered them all, yet. You can replay Episode one fairly rapidly if you need to, now that you are familiar, and the only real pain is crossing the Web of Time again.]
| IMPORTANT:
Cast the warp (invisible) spell on yourself BEFORE you take the last step (to Wave) and get your nautilus out of inventory and into your hand. When you arrive at the Monastery, there is someone standing there. If he can see you, he will shoot, if you are invisible, he won't. He is an illusion, but his weapon inflicts real injury so don't just stand there. Just walk forward briskly and USE the Nautilus on him. He will disappear. |
Go right in, and look around. Like the Spheres, the Monastery seems a lot bigger inside than outside. Once you're inside, it's okay to turn the music volume back up, if you lowered it to cross the maze. Read the informative panels on the wall. You will find three stairway-exits. One is guarded, another takes you up to a catwalk, and the first one you want to enter takes you into a factory-like chamber called the Salt Processing Room. To find it, start at the main entrance and walk to your right (looks like left, right?) Take the first stairway you come to. Go in there, turn left, right and right, and go up stairs to some worktables. Take the oil can. Go back down the stairs; do not touch the copper machine up there; you'll get an electric shock. Go back down the steps and talk to the Chronomancer Woman. She is a slave and does not have much to say. You can talk with the Chronomancer Monk (in green). If you show him inventory objects he will teach you about them. Do not attack him now. You could deharmonize him, but that identifies you as being ‘smarter’ and more aggressive than you are expected to be, and will set up problems to come. Pick up the black salt gem from the table at the foot of the stairs. You can use it on yourself to regain Jad Garrûl if you need to. And use the “Ointment” spell to recover your sand before you regain your Jad Garrûl.
If you poke around near the door, there is a small passageway you can fit through, but an adult cannot. Try it if you want, but you can't get out the other end. Go back out to the main chamber, down the steps and turn right. Go back past the main entrance until you come another stairway, (not the one with the guards,) and enter. Go across the catwalk and into the area on the left. Do not talk to the monk and do not depress the lever yet. Go left, behind the stairway and examine the duct grate near the floor. It needs oiling. If you go in, you find that this is the other end of the passage in the Salt Room. You don't need to go in now, but oil it so you can escape through here later.
The Cylinder of Knowledge is here. It's the machine with a gramophone horn atop. Examine it repeatedly to learn some history. To the right of the Cylinder of knowledge is a 3D map of the sand world. Examine it to learn some geography. To the right of the entrance to this area is a table containing a sand globe. Pick it up and use it if your sand (green spiral) is low. It will restore your sand points. Save it for later if your sand level is okay now. Don't forget you can cast the Hourglass spell on yourself to do the same thing, using a little Jad Garrûl in the process. Go back through the center area and into the sphere area. Look left and find a charged (green) hourglass on the table. It can increase your Jad Garrûl, or it can be traded for a spell.
Go back to the center area and pull the lever just to the left of the catwalk you came in on. This starts up the clockwork. If you pulled it already, the monk talked with you, and you don't need to do it again, just don't go into the sphere until you have done these other things. The other uncharged hourglass can be charged now, that you have turned on the chronomantic clocks. “Use” the hourglass on the clocks and it becomes activated. If you show the uncharged hourglass to the Monk he will tell you to use the clocks. You have two charged hourglasses. If your strength resources are very low, you can use on hourglass on yourself. If you are still “in the green,” you should wait. You will need to survive a couple of fights. The hourglasses will please the Lemur in the crystal. He trades spells for them.
DO NOT touch the blue crystal near the sphere entrance. It unlocks the sphere and lets the Lemur out. You haven't befriended him yet, and he will zap you. Go into the sphere and talk with the Lemur. There are three crystals to find, but the first one you come to won't stand still. It jumps away when you try to touch it. Wander far back into the cave to find the other two. Cross the first bridge and pick up the "Counterspell." It's like an antidote, when spells are cast against you. Go to the final chamber and get the "Stop Time" spell. It freezes moving objects and people. Use the spells on the Lemur to learn about them. It is important to know which spells are effective against various opponents. Cast the Stop Time Spell on the first prism to make it available. It is the "Chronomantic Mask." Practice it with the Lemur to see how it works.
Important:Offer an hourglass to the Lemur. He will offer you a choice of several spells in exchange… Select the spell Eye of Jad Garrûl. You must have this spell. It will be required soon. This spell dispels illusions. In episode six, there will seem to be a bridge missing. If you do not have this spell there will be no way to cross the bridge and you will be stuck. |
If you wish, you can trade another hourglass for a spell; either the Grip of Khronos or Sand to Ashes would be a good choice. Or you can keep the hourglass for your own use. Your choice.
SAVE YOUR GAME BEFORE YOU EXIT THE SPHERE. Chances are, you will need to practice the next scenario a few times.
When you go out, converse with the monk, after which there is an automatic sequence with Tetradon. He will try to kill you. Step towards the Chronomantic Lock, the blue glowing crystal in the pole. Touch it to open the sphere and release the Lemur. The Lemur will fight Tetradon, distracting him long enough for you to escape through the duct to the salt processing room. There is a good lesson here: you can't defeat Tetradon yourself, it's good to get others to fight him.
If Tetradon attacked you enough to deplete your strength, you might consider repeating the scene until you come through it with most of your resources left. You will need to fight the monk in the salt room. It would help to save again right after stepping out of the duct. Be ready to deharmonize the monk quickly. You could have attacked the monk earlier, but it is much easier now, because you can paralyze him with the stop-time spell. It is easier to approach him if you are invisible. Shoot him with the Wrist Jadgar.
Go up the steps,
turn the wheel, and turn around and jump into the mine car before
it leaves without you. (Tap the space bar to jump in). If you
miss it, another one will come. The new car will just sit there
until you turn the wheel again. You will descend to the chasm. On
the way down, another Time Wave turns you into an old man and
replenishes all your sand and Jad Garrûl.
![]()
Episode Three: Much work to do.
Notice that your strength is automatically replenished. Find the stairs and go up, ride the Tripodon back to the city. Talk to the Farmer, who will take care of the Tripodon for you. Speak with him again until he offers to take you to the city gates. If you try to go alone, you won't survive. You can speak to one of the guards on the way in.
Head to Temple Square. Talk to the merchant woman. I think she is the same merchant as before, made younger by the Time Wave. She has lost her sandscraper (one of those little jumpy animals) and implores you to find her some new sandscrapers. If you catch seven or more, she will reward you. Be sure you notice her unique clothing before you make the deal with her, so you can recognize her later. She is the one in the green scarf and yellow-bottom skirt. Go behind her booth when she leaves, and pick up some sand herbs.
| There
are eight sandscrapers in all. You need at least seven to
present to the merchant-woman. She will give you a tuning
fork, which provides you with a magic armor which remains
active as long as the icon of the tuning fork appears on
the screen. It's not absolutely necessary to have it, but
it's worth the trouble. The armor is good protection.
You can hear the sandscrapers' cries when you are close to them. The one in the city gates area is easy; just pick it up. While you are right there, pick up the bucket. Another sandscraper is in a small alcove, to the left after you enter Temple Square from the gates. |
Find the Priest and talk to him about the Memory Sanctuary and Vel Subek. DO NOT go into the temple.
Go to Hourglass City. Find the gardener and talk to him. You will learn about Hamiata and Ataimah, sisters who live together. Go the far left end of the street and find a container of Merthweed Leaves sitting there. Take some. The Sandscraper hopping around Hourglass City is the hardest one to get. How to Stop him? Use a spell. Don't chase it, stand still while it passes you, then when it's nearly off the screen cast the spell.
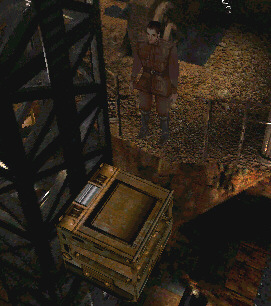
Go into the new road, next to the original entrance. This is Crossroad 1, an L-shaped street. On the way in, you will see a diagram on the pavement for playing a game called Rainbow Nautilus. The boy walking around Hourglass City will play this game with you. Do it later, you have work to do. Proceed into the street and see the sandscraper behind a little fence. Put some merthweed down for it to feed. It steps forward, and you can pick it up. Go a little further, and a boy walks out of a doorway. He is too busy to talk. Go into the doorway and talk to the crying girl. The boy took her doll and lost it. It's up to you to get it back. Explore the area around the corner of the Crossroad. You will find several wooden crates, and a special plant called a honey-cactus around the corner. Cut a piece of the cactus with your knife. (If you didn't trade for the knife in Episode one, you need to go to Hamiata's house now. She lives in an alley in the U-shaped street where you originally talked to the boy in the first scene. Go there, talk with her, and take her knife.)
| How
to Use Crates: You will have several scenes in the game where you need to use the wooden crates to accomplish your purpose. To move a crate, walk up close to it and hold the spacebar. This makes you grab onto the crate. Then you can push it forward with the up arrow, or pull it back with the down arrow, holding the space bar down during the process. Most of the time, after moving a crate you will want to climb on it. To climb, walk up close to it and tap the spacebar once quickly. |
You need to rearrange the crates in order to climb over the wall. Climb up on the big dark crate furthest to the left. Pull the large, light-colored crate towards you. Climb over it and jump down on the other side of this crate. Push it completely to the left. The reason for moving the top crate is so you can get the middle one out of the bottom row. Get down and pull out the light-colored crate in the middle. You can ignore all the other crates now. Push this crate tight against the right-hand wall and climb upon it. Then climb over the wall. You will find a Tripodon pen. The doll is in there, on the ground. The Tripodon won't let you take it because he is hungry. Put some cactus heart in his trough and he is content. Take the doll, and return it to the little girl who lives in the same alley where the crates are. Talk to her, give her the doll, and she gives you an Effahid Flute in return. YOU MUST GET THE FLUTE. It is possible to get out of Episode three without it, but you can't survive Episode Six if you don't have it. Pick up the Sand Herbs on the window sill. Pick up the uncharged hourglass on the other window sill.
While you are in Hourglass Square, you can visit a sculptor who is working near the city-center. If you examine her work, there are errors in the spelling. Pick up the chisel and correct the work. She rewards you with a salt gem. As you walk aound Hourglass square, a boy entreats you to play a game of Rainbow Nautilus. He will take either the chisel or your compass as a bet. If you win the game, you get Sand herbs. When you begin the game, he offers to explain the rules to you. Be sure you are not holding an object in your hand if you want to get the rules. Otherwise, he accepts the trade and play starts automatically. It is not required to play this game, but it's not difficult, and gets you some herbs to help replenish your health later. (You can do this at any time, as long as you have something worth trading.)
Note from a player: If you score 14 or more in Rainbow Nautilus, the boy says something like, "Wow that score is too good for sand herbs," and instead gives you a charged hourglass! Three 3-pointers and one 5-pointer will do it. To aim, look at the ground below the ball going back and forth. There will be two dark specks right next to each other. If you are going for a 3-point shot, letting go just to the right of "between" them will work with the power indicator just touching the orange. For the 5-pointer you must release exactly as the ball goes over the right hand 'speck' with the indicator at around the 6th or 7th "rivet" on the side of the indicator thing. Once you have played once, you can practice this if you want or need the hourglass, but I have not figured a way to get to play anyone on the other rainbow nautilus gameboard. (Thanks, Josh)
Go to Crossroad 2, the T-shaped street on the far left of Hourglass Square. On your way over there, stop at the Merthweed container and get some more. Go into the Crossroad and notice another Rainbow Nautilus game on the steeet. Go to the T intersection and turn right. If there is a man in the dead-end alley, he tells you need to find the Hierarch's seal. (He may not be there). There is another honey-cactus to the left of the door. Take some. There is a sandscraper atop the crate. Use another crate to get up there.
|
 |
While you are in Crossroad 2, go into the other end and find the old woman at the pump. She is Ataimah. Talk to her about her bad back. The pump isn't working correctly and she has to carry heavy buckets. You need to repair the pump. Pull the lever down to start the pump. It's leaking. Go around the left side of the machine and turn the wheel (space-left arrow). You don't need to hold the control down, Wales knows how far to turn it. Then go around front again. Find the adjustable spanner (called a pipe wrench in the US) and use it on the leaking pipe. Go turn the wheel to the left again. Back around front, grab the left-hand crate and pull it out. Now you can get to the new leaking pipe and fix it. Talk to the woman again. Her back isn't any better, but the plumbing works now, and she is grateful enough to give you one of the two keys you need to unlock the box in Hamiata's house.
To get the other key: you need to dry the fresh merthweed leaves and make tea for Hamiata. The place to dry them is in Prison Square. Find it by going back to the original entrance. There are guards here, and you should stay close to the walls. Go around to the right until you find a large metal plate with nuts drying on it. Place the leaves on the tray and wait. You can hear them sizzling. The merthweed is dried when the noise stops, and you see it turn brown. Pick it back up. A sandscraper is walking in the prison yard, easy to pick up. If you decide to talk to the guards, one will tell you to get lost; the other is in a really bad mood because he was deharmonized by some kid. (That was you in Episode One.)
Let's free that prisoner. Talk with the prisoner if you like. It turns out he was arrested for stealing a Tripodon. So he is being tortured for something you did. It's only fair to try to help him. Go stand underneath the stairs between the guards and the prisoner. You will hear them talking. Get the Warp (invisibility) spell ready and Save Your Game. Go up to the prisoner's platform. Straight ahead is a console with two levers. The left-hand lever activates the electric shock to torture the prisoner. The right-hand lever (straight ahead) turns off the power to the shocker. Turn off the power, do not shock the prisoner. He will scream and draw attention to you. Go to the right side of the platform, and find three levers. Pull the first one down once, and pull the other two down twice. Then turn the wheel to the left (space; left arrow). Hurry. When the guard says he will "freshen up" he will come to the fountain for a drink, see you, and . . . Zap! You can avoid getting zapped if you must make yourself invisible two or three times. Another option is wait to free the prisoner until you have traded seven sandscrapers for the Tuning Fork. To use the Fork, put it in your hand and press the spacebar. You will hear a tone and see the icon appear at the bottom of the window. It lasts for one minute, and protects you from attack. After you ring the Fork, you can put it away, so you can handle levers, etc. Probably the best of both worlds is to use Warp once, then the Fork to escape.
Here's another method: You have enough time to push one or two levers; when you hear the guard say "freshen up" there's enough time to jump off the platform. If the guard sees you in the prison yard, not standing on the platform, you won't get attacked. Just go back and forth pulling the levers one at a time, until the prisoner is free.*
One player reports being able to talk to the prisoner after he is free, by standing near the sack just before entering the square where Hamiata's house is.*
Now you can go to Hamiata and make her some cactus-merthweed tea. Find the teapot, put in the leaves and the honey-cactus. If you leave out the cactus, she doesn't like it. It's too bitter. If you leave out the merthweed and only put in the cactus, she finds it too sweet. (If you gave her a taste of either bitter or sweet tea, just fix it by adding the missing ingredient to the teapot. It's not necessary to go back and get more merthweed or cactus.) When you get it just right, she gives you the second key. Open the chest and take the Hierarch's Seal.
Here's where seven of the sandscrapers are:
|
The eighth animal is in the Sanctuary of Memory square, just trotting around. If you need this one, because you couldn't capture the one that runs away, be sure to exit the square and trade it to the merchant before you go see Vel Subek inside his sanctuary.
The Merchant who wants the sandscrapers will not be at the market when you go back; she is walking around Temple Square and is hard to find. A good way to stop her is to run past her and wait until she walks near you and hit the spacebar. Test the Tuning Fork when you get it, so you know how to use it when you are under pressure.
Optional: Remember the kid near Hamiata's house that traded with you in Episode One? He is there again, and is the same boy who lost the little girl's doll. He will exchange some Vissahid ointment for the bucket. If you give Ataimah the ointment, she will think you are a hero; but gives you nothing in trade, except perhaps some good advice about oiling some wheels.
It is essential that you have the Effahid Flute and the Eye of Jad Garrûl spell in your possession before finishing Episode Three. You cannot complete Episode Six without both items. Do not proceed further without them. |
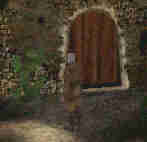
Go to the second crossroad (past the water pump you repaired) and ring the bell by the red door. You may have to ring it three or four times, because the guard inside is hard of hearing.The guard wants to see your seal. Show him and go into the Sanctuary of Memory square. Learn the layout now, you will be in a hurry to get out later. Go through the grey doors into the sanctuary. Touch the doors to open them, and step in promptly. If you wait until the doors close. You can't open them a second time. Be sure you have done everything else you want to in Episode Three before you go into the sanctuary; this episode ends automatically when you exit the Sanctuary.
Look around. There is a table with a sand globe and black salt gem for you to take. If you have an uncharged hourglass, you can charge it at the clock. Talk to Vel Subek. He won't speak to you until you show him your Nautilus. Read the scrolls on the library wall. There is an important clue about the Lemurs weakness in one scroll. The higher ones can be accessed by using the steps. The wheels squeak, and need to be oiled. (The readable scrolls are the gray ones, harder to see than the parchments.) Read the scroll near the entrance carefully, it contains an important clue for a later episode.
Be sure to talk again to Vel Subek until he wishes you well and has no more to say. Show him your inventory items to gain some information.*Enter the Sphere to learn two new spells (Voyage of the Arch and Veil of the Nautilus). The Veil of the Nautilus is in the far rear. Pick it up first, and go back to the Lemur to practice. He shows you how it protects against the loss of Jad Garrûl, whether from attacks, or through the singing of certain creatures. Remember his advice.
Since the Lemur wants to keep the Voyage of the Arch spell, he hides the real prism among three fake ones. It's an illusion. If you touch one of these fake prisms, you will lose some health. So, cast an Eye of Jad Garrûl spell or use your Nautilus and you will see the fake prisms disappear.
Exit the sphere and
leave the Sanctuary, an automatic scene unfolds, where you are
arrested.
You are in prison with Ashamira. Speak to her until a Time Wave occurs and you are both changed into children. The guard has stepped away for a moment and dropped his key by the door. You have very little time. Pick up the key, unlock the door and exit to your right. Go into the cell two doors down by unlocking it. Watch the guard return and go into your former cell to search. To exit your new cell you must put the key away (<zero>) or you will lock yourself in. Exit to the left, walk promptly to your old cell, get out the key and lock the guard inside. This scene is easier if you assign a hotkey to the key. An alternative to locking the guard in your cell, is to take his key and wait until he comes back to stand guard. You can use the deharmonizer spell or the Wrist Jadgar and shoot him in the back.
Still another alternative is to exit the cell, and use the invisibility spell when the guard comes back. if you stay invisible, the other guards will come to this place, and the guardroom will be empty. Stay invisible and go to the guard room. Upon entering, turn right and pull the lever to close the gate immediately. *
OR -- go back past your hiding place, and through the door by the bell, into the next cellblock. Go up to the first cell you come to and unlock it. The child imprisoned there turns out to be the man you freed from the torture machine. His memory needs to be restored. Give him a black salt crystal. He has a plan to help. He will distract the guards for you. The boy rings the bell, summoning the guards from their ready-room. You must wait until the guards “Inspect the Cells.” Then exit, go to the guardroom, turn right and pull the lever to close the gate. Now you really haven’t much time. Suggest you save immediately, the following scene is hard to survive until you have practiced it a few times. Position yourself near Ashamira. If you stand behind Ashamira, her shield will protect you.Get the “Stop Time” spell ready, and cast it on the woman when she enters. Immediately get the Deharmonizer Spell ready, and walk toward the woman, zapping her. If you are close enough, twice should do it. An alternative is to become invisible and let Ashamira do the dirty work! Take stock of your life resources. If you don’t have about half of your Jad Garrûl left, you can’t make it through the next part. In that case, go back to your saved game and get through this scene more efficiently. There are four doors in the guardroom. Exit the door to the far right (not the one the woman came through, that exit leads to hourglass square, and certain death).
Get the “invisible” spell ready, and use it as soon as Ashamira exits. Run to the crates. Push the crate to the left just far enough to clear the other crates, then push it through the door. Near the end of the pushing process, you will be shielded by the other crates or by the wall, and the guards stop shooting at you. Once you clear the door you are safe, for a while. You and Ashamira need to find a way out of this enclosure without going back into the yard where the guards are.
Push the crate against the other nearby crates and climb all the way up to the roof. Ashamira will follow you. Go jump on the lift platform. (That is, walk up to it and tap space.) She will automatically hoist you up. Go across the roof and jump across the gap to the other roof, and touch the plank. The plank is now a bridge. Go back to the two crates and cut the rope. Bring the crate (you can only move one of them) across the bridge and push it up against the abutment at the far right-hand end, so you can climb onto the next roof. Touch the new plank (on the far side of it) and it makes a bridge that is too short. Push the big crate onto the end of the plank to hold it down. Climb over the crate to the plank, jump to the gatehouse, and turn the wheel. Ashamira rides up. Get on the lift; she lowers you. Now go get the original crate you brought with you (it's a long walk) and put it on the lift. She brings you and the crate up. Take the crate off the lift and turn the wheel again, to lower the lift and bring up the weight. Put the crate on the counterweight. Now there is enough weight to cause the appartus to descend, and you all escape. Go find the Tripodon. He won’t have anything to do with you because he is thirsty. Fill your bucket with water and pour the water in the trough. Willoughby is happy now, and will take you to the Rebel Camp.
Episode Five: In the Rebel Camp
Talk to everyone. (Do
Not Head Away From The Camp Into the Desert. As in Episode
One, the Lemurs are out there and will put you to an unmerciful
end.) The Tripodon-keeper will tell you things, and give you a
nip of Ash-Fire when you show him some cactus. Dahjaroun, the man
working at a table is suspicious of you, but he feels better
after you recharge his wrist Jadgar. Talk to him more, and he
gives you a Sounding-Stick. Go into the big tent, and no
wonder Ashamira said she could help you find the arch; it’s
in her tent! Turns out she’s in charge of things around here.
Talk to her, pick up the salt gems, fire up the arch,
and step through. Cast the Voyage of the Arch spell on the arch.
If you don't want to spend the Jad Garrûl on a spell, the
Nautilus will also turn on the Arch. Stand in the Circular area
to activate the Arch with the Nautilus.
No, Toto, this doesn’t quite look like Kansas; more like the Deadly Desert. You need to cross this expanse. Use the Sounding Stick, and don’t ever step past the area cleared by the stick. Listen to your footsteps. When they sound mushy, don't go any further. Test the ground with the stick. When you come to a canyon with a gravel floor, you can put away the stick. Go to the rock wall with a hole in it, and observe the Lemur on the other side. You will need to crawl through the hole (Put away all inventory and press <space>) and deal with the Lemur. Play your flute to calm him down.
Suggestion: The following scenes are difficult indeed. The first Lemur will be charmed by the flute, but the second one, which you encounter while trying to climb the ledge, will attack you mercilessly, and you must kill him before he does you in. If you have not been using the hotkey feature yet, this is the time for it. Put the flute on a hotkey, so you can get to it immediately. Put the wrist Jadgar on a hotkey as well. Remember: to play the flute, hit the hotkey, then the space. To fire the Wrist Jadgar, hit its hotkey, then the Ctrl. key. You can also put spells on a hotkey, perhaps one to shield yourself, and one to slow down the lemur. The invisible spell doesn’t fool them, nor does the Stop Time Spell have any effect. You’ve heard of Shake ‘n Bake, or Surf ‘n Turf, right? Well, this is Flute ‘n Shoot! If you are quick and careful, you can get rid of this one without losing any powers. The technique is to still him with the flute, fire the Jadgar, then immediately flute again.
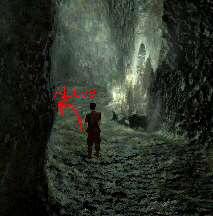
After you dispatch the nasty Lemur, you can climb over the next set of ledges. Down to earth again, and look carefully! There is an object right there in the path, but hard to see. The Shell of Time is good for restoring your Jad Garrûl. Before you enter the Lemurs' Lair, save your game. Choice: You can flute the first three Lemurs, but don’t dawdle. They will not only shoot at you, they will cast a spell that drains you away. Watch out for a red glow that looks like a funnel over your head. If that happens, escape to a saved game. It drains your sand until you are dead. If you are really agile, and not too close to the Lemur throwing a spell at you, you might be able do dodge (<alt>) left or right and not get hit. You can also run (<shift>). You can use the counterspell that cancels out spells put on you, but only if you survive long enough to use it. I decided to kill the first two. That way you don’t have to deal with them on the way back out.You will come to a chasm which is really an illusion. In previous spheres, there was a bridge there. Fix the illusion with the Eye of Jad Garrûl spell, and you can cross the bridge. Don’t take too long, the Lemur over your shoulder doesn’t stay charmed forever. Past the chamber on the other side of the bridge, there will be a cluster of crystals on the right side. Across from the crystals, there is an alcove on the left which is difficult to see. Turn in there, and pick up the Chronophore from the floor.
| Here is the picture again: The little alcove is just ahead, on your left, across from those crystals. When you get close enough to actually enter it, your view will have shifted, so that it's now to the right of the screen, (still to "your" left.). Look at the floor to see where the rocks depict an entrance. | 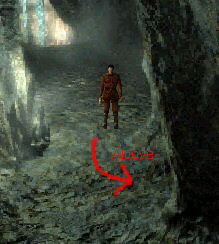 |
Go further and charm the last Lemur, the Old Woman of the Caverns. Charm her again, go behind and steal the charged hourglass. (Put the flute away in order to pick something else up.) Don't bother to offer the hourglass in trade - she is not interested. Put the Hourglass away, get the flute back out, charm her again, then put the flute away and talk. Note: be sure to continue the conversation (space) before she finishes the first long speech. It helps to have the captions turned on. It seems if you allow her to finish her speech, you will be unable to restart the conversation. Keep talking to her until she gives you the Spectral Body Spell. Then she won’t attack you when you leave. After you leave her, don’t return or she will have a change of heart and throw a deadly spell at you. If you left any Lemurs alive on the way in, the best technique is to use the spectral body spell and run past them so quickly they don’t have time to do you harm. Whew!
Go down the canyon, ignoring the Lemurs on the way. Hop from rock to rock, playing the flute in between each hop. Go to the far right to pick up the Crystal Flask. Be very careful to face the right way when jumping off this rock and the next one. It is possible to fall into the chasm. You probably should shoot the Lemur who attacks you. You can do this before getting the flask, just don't leave it behind. You can get past him by playing the flute between each jump, but you need to be precise for each jump. It’s hard to make headway because you must be standing on exactly the right spot each time you want to hop. If you have “been there and done that” enough times to memorize the route, you can make it out of there solely on your charm. I preferred to zap the bugger. Don't bother to restore your health now; a Wave is near, and you will be fully healed. Have the Veil of the Nautilus Spell ready before you go near the ocean.
Go to the end and climb down. Stay close to the wall, work your way around to the right in between two pillars and find another Shell of Time. Pick it up and watch the automatic sequence. If you get too close to the water before finding the Shell, you can’t get back to it. (It's not a big problem if you miss it.) Take the crystal flask to the spot on the beach and fill it. Look for the spot at the farthest right you can go. If you found the shell, go up-screen. It's near the waterline, and near the cliff. You must fill the flask. (If you miss it now, you get a second chance in episode 10)
You are an adult
again. Cast the Veil of the Nautilus Spell on yourself as
soon as possible. The mermaids’ song will do you harm if you
don't use this spell. Remember the Sirens of mythology? Go the
Mermaid in the center of the scene, show her the flask and talk
to her. She will agree to help you, and gives you the Conch of
Khronos. If you missed filling the flask before the Mermaid
came, do it now before you take the Conch. Take the Conch and
watch the automatic sequence. You blow a note on the Conch,
causing a wave. It affects the guards, and the rebels are unhurt.
The conch turns to sand, and it’s time to go to work.
![]()
Episode Eight: Ready for Battle
Head for the temple. Suggestion:
Save your game at the beginning of this episode. You will have a
tough battle in the Temple, and will want to practice your
strategy. Avoid the battles on the way through town. (Use
the Spectral Body spell to slip through the town unscathed.) As
you come to the entrance of Temple Square, you will see Ashamira
engaged in a fight. Make yourself invisible and go past them.
Enter the temple. Vaporize the Chronomancer as soon as possible.
You will need to use the Chronophore or the Wrist Jadgar on him.
If you couldn’t find a Chronophore in the Lemurs’ cave,
there is one on the far side of the big altar in the temple. Cast
Warp on yourself to become invisible, so you can get to the
Chronophore. He is tough to beat. One way is to stay invisible
until you can get right up close to him, and cast the Stop Time
spell. Then shoot. It is more effective to fire the Chronophore
slowly and deliberately, because each time you fire it, it
discharges twice.
One thing to watch for, is when you
enter the room, you can't see the Chronomancer yet, but if you
hear him cast a protective spell on himself (sounds like drawing
a sword) load your game again. You can't spell him if he's
protected.
Here's an alternate (Easier) way to beat the Chronomancer: when you enter the temple, walk straight ahead to the altar. Look for the crack in the altar, and stand right there. The altar will absorb all the weapon-fire and spells, and you will be safe. Use the wrist Jadgar to shoot in the direction of the Chronomancer. You can't see him, but you can hear when your shots strike. He is shielded at first, but eventually you will get him. Thanks 'Odin' for finding this method. *
After the Chronomancer is toast, you can relax until you leave the temple. Talk to the Effahid. He just happens to be the deaf guard from the sanctuary. He will give you the key to the red door, the same one where you needed the Seal before. Walk around to the far back of the room and try what looks like a back door. Something strange here? Erase the illusion and get a charged hourglass for your efforts. If you were exploring carefully back in Episode One, you found this “strange” spot, but couldn’t do anything about it unless you were clever enough to try the Nautilus on it. Or you might have found it in Episode Three, when you shouldn't have been in the temple anyway, and got zapped for your efforts. Find the Black Salt Gem and the Chronophore on the altar. (If you already have a Chronophore, leave this one. You don't need two.)
Go to Vel Subek’s Sanctuary. (Out the Temple door, and head right, into the first alley.) You will need to get by the guard at the red door. The same technique (invisible, stop-time, shoot) works pretty well. Inside the walls are two more Shekandars who have nothing better to do than shoot at you. If you are invisible, and if you know the way, you can get past them and into the Sanctuary door unscathed. Vel Subek will talk to you and reveal something. When he is done talking, explore. You can find sand crystals, salt globes, an hourglass in the small bookcase, and if you position the stairs correctly, a “Vapor Thrower” on top of the large bookcase at the right-hand end. Optional: You can go into the sphere and talk with the lemur. He will trade the Acceleration Spell for an hourglass. It speeds you up.
Go to the city gates and see the machine. (Out of the alley, go left, and take the first road toward Hourglass Square. Don’t step into it. Go back and see Vel Subek. He created the Cyclops and will help you to destroy it. Approach the machine with Vel Subek. Use your adjustable spanner to open the central panel of the machine. Put the wrench away, pull out the middle cable, which releases Ashamira from the paralyzing field. Go to the palace gates (beyond the Hourglass) where you will find Ashamira engaged in battle with the guards. She can’t quite pull it off without your help. Make yourself invisible, go up the steps and paralyze and shoot the guard who is not fighting. Then do the same with the other one. (Wait until the guards are actively firing at Ashamira. If you go too soon, they both concentrate on you.)
Enter the throne room by pulling the levers together with Ashamira. She shows you how. The Heirarch is in there, and he is one tough dude. His only desire is to eliminate you. It turns out the best way to get the better of him is the lesson you learned before. Run away from him, lurking in the shadows for a while. Ashamira will fight him while protecting herself. She keeps the Heirarch occupied while you can sneak up and use the Chronophore. Three or four good shots should do it. When he vaporizes, you can relax for the time being. Pick up the black salt gem on the table, if you didn’t already get it while Ashamira was doing your dirty work. Go into the sphere, where there is an unpleasant but harmless Lemur. If you try to take the spells, he transports you out. Carry the quartz flask with you, and the Lemur is repelled. Two good spells: The Mermaids’ Song to cause your opponent to be insane, (works on Lemurs) and the Chronomantic Armor to cancel spells cast by your opponent. You could go into the sphere while Ashamira is fighting. The Chronomanntic Armor can give you some protection when you exit and join the battle.
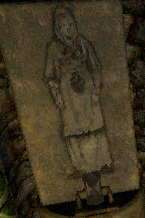
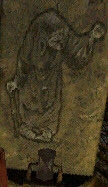
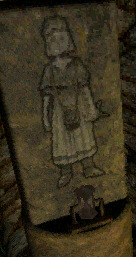
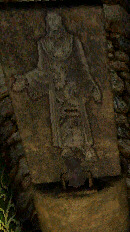
Now to find Ulmoreth: he is trapped behind the secret door. Examine the four statues with hourglasses. Turn over each hourglass once only. You need to activate them in the correct order. The clue comes from the scroll near the entrance to Vel Subek's Sanctuary of Memory. The order is: Woman, Old Man, Child, Shekandar.
Woman (Adhamid) is left of the entrance, just right of the rear of the sphere. Old Man (Vissahid) is the next one to the right of the entrance. Child (Effahid) is to the right of the throne, and left of the sphere; and Shekandar is left of the throne, between there and the Vissahid. The secret door is behnid the table where the black salt gem was.
Here are the images in sequence:
 |
 |
 |
 |
The secret door will
open. Go in and talk to Ulmoreth, ultimately to exit and talk to
Vel Subek. You will return to the Mine-Monastery area.
![]()
The key lets you into the mine entrance. When you step forward, you see the sequence with the Chronomancer woman and a worker, after which she attacks you immediately. You must have a strategy in place. The new Chronomantic Armor spell protects you allright, but it only lasts two or three seconds, and costs a whopping two and a half Jad Garrûl points. The stop-time also delays her, but not for long. It will be a fight. You might try the Tuning Fork.
Two players have sent suggestions for this sequence: Odin's advice: "Here I used the vapour thrower - in the salt processing room (Shekandar), in the control room (guard), in the organ room (Shekandar) I assigned it to key 1, and Chronophore to key 2. Move quickly and not straight, thus avoiding the spells the Chronomancer fires at you, when you are near her press 1,2,2,1,2,2, and so on, she should be harmless. If you are quick you can get out of it with no loss of Jad Garrûl and health." SS Posey's advice: Upon entering the mine, immediately pull out your Chronophore. Half-hide beside the wall protrusion just as you enter, and fire from safety. I killed her without getting hit at all."
Don’t go look at the robot (you can see it in the movie, so you know where not to go.) Go to the controls, and the furthest one straight ahead gives you control of the robot. It is standing on the bridge and must be moved back. (Press space to take control of the robot, then the down-arrow to move it back.) The control nearest the entrance controls the bridge. The middle one, which the woman turned off, is the power to the mine cars and lifts. We need to destroy the robot, so do this: back up the robot so it is not standing on the bridge. Retract the bridge. Move the robot forward until it falls over the bridge into the mine. Turn the power back on. Watch carefully, and you will see a mine-car get stuck. It is on this same level, the middle of three levels. Put the bridge back and cross it, looking around to the left (go behind that stuck mine-car) until you find the lift. Take it downstairs, find the smashed robot, examine it and retrieve the Disrupter. Talk to Semireth. He gives you a clue how to get to the Monastery. A mine car could help. Remember the Salt Processing Room?
Take the lift up to the third level, with the disrupter ready. Use it immediately on the robot so it doesn’t attack. Go across to the controls, put the robot on the lift, and take it back to the second floor. Now exit the lift to your right, find the gap in the guard rail, and wait for a conveyor. Hop on, and ride to the third floor. (Don’t forget to turn around so you are facing the floor, lest you jump into the abyss.) Jump off, control the robot to push the mine car. Now things are moving again.
Call the lift with the red button and take it to the bottom floor. (Press down again when it pauses at the middle level) Take a conveyor to the second floor and jump into the mine car. (Don’t forget to turn toward the car.)
| Here's where to stand to get on the first car. | Here's where to stand to jump to the mine car. |
 |
 |
You will ride to the salt processing room. Quickly turn left and press space to get out of the car, or the Chronomancer will use the gas on you. The monk in the Green robe is there. If he fights you, zap him. There is a Black Salt Gem on the table. Go around the elevated area, past the small passageway, and into the control station. Look for the silver doors. Zap the warrior before he gets to you. Play with the control stations. The one straight in from the door only arouses your curiosity. The one to your left is a surveillance station, and gives you more views than you have had before. Notice how the mini-prison walls are lowered. Be sure to watch carefully when Tetradon controls the robot. Use the four arrow keys to move your surveillance view. Press Esc. to quit the view. The machine to your back is the control for the transporter maze. Activate it to repair the Web of Time. (If you have observed the maze carefully, you found that it is constructed in the shape of a nautilus. The maze is rebuilt, and Ashamira and the Rebels cross the maze. A Time Wave occurs and you are old.
You can pick up another Salt Gem before you leave the processing room. Go back to the Chronomancer’s room, and walk into one of the transporter beams. You are challenged to a duel where all your weapons are deactivated, and you must use only spells to fight. You should get the first shot. Stop-time him ASAP, put on your armor, and deharmonize him. It is possible to survive with your powers intact. (There is a Sand Globe on a table near the sphere, and a Black Salt Gem on the table near the interactive map.)
After this battle, go up the stairs near the passageway you escaped into before, into the control pulpit and take control of the robot. Send the robot around the other side, where Ashamira is occupied fighting the other robot. Make your robot attack the other one (press Ctrl). Both robots blow up. Make your way down to Ashamira. She and Ulmoreth will be fighting two guards. You can hang back until they deharmonize both guards. Then, they head for the Organ Room door. Talk to Ulmoreth and Ashamira.
Go into the organ room. You enter, and see Tetradon control a flying robot to entrap Ulmoreth. You step forward, and Tetradon also traps Ashamira. You must find the controls to the robot. Go straight ahead, through the area where Tetradon’s pulpit is, and run around the metal catwalk until you find the entrance to the room where the Shekandar is apparently controlling the robot. Deharmonize him. (If you can't manage t deharmonize him, just use the Spectral Body Spell to avoid injury.) In each of the four corners there is a robot control. You must get to each corner and activate the lever without getting hit by the robot’s ray. Creep along the walls. The sequence is unimportant. The robot is finished, and Tetradon reappears. Armor yourself or protect with the Spectral Body Spell before he attacks you and go to Ulmoreth’s trap and turn the wheel to free him. (<space/left arrow>) When you release Ulmoreth, Tetradon hides in a secret room and you will have to figure out how to open the passage to the room. The key is playing notes on the “organ” in the correct sequence. You get some clue by listening as he plays the notes, then watching as the secret door opens, which two levers had been pulled.
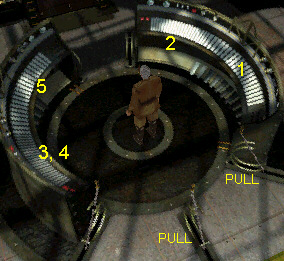
Go to the circular area across from the robot control room. The three levers control the organ’s functions. The keyboards are the big semicircles. Don’t worry, you don’t have to be musical here; just select the five notes in the right order. Do this: as you approach the organ area, the three control levers are all up. Put the center one and the right one down. Then, let’s call the right semicircle A and the left one B. Go to the right half of A (closest to you) and play the note once. Go to the left half of A and play the note once. Turn around and go to the left half of the B side (again, closest to you) and play the note twice. Then to the right half of B and play once. The door should open. If you goof up, start over by cycling the control levers. Here's a picture:
 |
Inside the room is
an arch, decorated with eleven pyramid-shaped holes. Around the
perimeter of the room are fourteen busts with pyramids above.
Therefore, three must be booby-trapped. To place a pyramid in the
arch, just go touch it. To avoid being injured by the traps,
protect yourself with the Spectral Body spell. Activate the arch
by going around the back side of it and casting the arch spell or
using the Nautilus. You are back on the beach.
![]()
Talk to the Mermaid. She gives you the Foam Key and some advice, and leaves with Ulmoreth. Before you leave, be sure you have filled the flask with water. The place to get it is on the far right, right at the edge of the water. If you managed to fill it in Episode Six, it is still full. Pick up the Shell of Time near the place where you fill the flask.
Go through the pillars. You and Ashamira are in a cavern. Right behind you is another Shell of Time. Explore the perimeter until you find a stone lever in the wall, just to the left of the stairs. When you approach the stairs, Tetradon appears, and Ashamira is cornered by a pair of Lemurs. Tetradon wants that key. Give it to him. Unfortunately, he uses it in the wrong keyhole, and joins the Sands of Time.
You need to operate the lever, closing one-quarter of the door to the Lemurs’ nest. You also need to survive. For safety, you can always run up the steps into the pillars. They can’t get to you there. It gives you time to prepare. Don’t take too long, new Lemurs keep appearing. From your safe place, you can throw a Mermaid spell at a Lemur, confusing him. You can cast Spectral on yourself, making it easier to get to the next lever. If they put you into slow motion or cast the Grip of Khronos, you need the Counterspell handy. Put it on a hotkey, so you can make it back to the pillars. There is a Shell of Time behind the pillars.
If you wish, you can fight the Lemurs at any time. If you destroy them, Ashamira can accompany you. If she goes with you, she will die in the next episode anyway. So if you wish, you can just abandon her here. Your choice. She really deserves saving - but I have never succeeded. One player (Odin) suggests the following strategy: "Right after the sequence cast the spectral body spell, and have the flask in your hand, now run towards the lemurs, they'll release Ashamira (if you are fast enough she'll get only 2 or 3 attacks), she'll keep running around and firing on the lemurs from now on. (I was never able to get them to release her before she died.) He also suggests running around the lemurs with the flask in hand. (I never saw any effect from the flask; I know it was filled with sea-water, but they seem to ignore it. The Song of the Mermaid spell is most effective - they get confused and shoot at each other.)
In the pillars, Tetradon had succumbed to an illusion. Use the Nautilus to discover the correct keyhole. Retrieve the Foam Key that Tetradon left in the wrong keyhole. Use it on the proper one and be transported to the Sanctuary of Khronos.
Episode Eleven: The Final Conflict
There is a Shell of Time on the barrel. We have gathered quite a few shells of time recently. Does this make you think you might be in for one hell of a fight? Examine the clock with the quartz hand. Go up the platform to inspect the Chronoeider. Tetradon Logor Shar appears, in the form of a Lemur. He is not in the best of moods. As soon as you trigger the Chronoeider, run back to the clock, and take the hand. (You cannot take it until the fighting begins.) You automatically throw it at him, causing him to labor in slow motion for a while. Attack Logar Shar and Deharmonize him. Be sure your health is strong before you begin. You will need all your resources. The Chronophore is the weapon of choice. Some players report that they are unable to pick up the hand. I believe this to be one of the random difficulty variables set at the outset. Logar Shar likes to jump to the side, where you can't see him, but you can figure out his position by where the spells are coming from. Shoot in that direction.
If, according to Odin's methods, you saved Ashamira and she comes with you, the technique is different. Use the Spectral Body spell on yourself, and keep the Quartz Flask in your hand. Keep approaching Logor Shar, so that he is forced to teleport. After he moves, his armor is down, and Ashamira can shoot at him. Just keep after him, and have the counterspell ready just in case.*
When Logor Shar evaporates, stand still and restore your well-being. Whew!! When you move back to the Chronoeider, Khronos himself appears. Talk to him. Listen to the entire dialogue, it's the whole point of the story. At the end, you are invited to destroy Khronos in order to save the Universe. Khronos is easily defeated, he has no power, but the Chronoeider tries to defend him. The fight is easily won, and you return to your original world in the closing movie. A Job Well Done! For a special treat, be sure to watch the credits. Wonderful sketches and concepts!
This
document may only be distributed with the express written
permission of the author, Tally Ho
The content of this
document may not be altered in any way without the permission of
the author.
Any proposed changes or
additions to the walkthrough may be submitted toTally Ho.
copyright 2002 ©GameBoomers