UNDERCOVER: OPERATION WINTERSUN
by SPROING
Walkthrough by MaGtRo
September, 2007
GamePlay:
This is a third person point and click game. The main menu has new
game, load game, video options, audio options, credits and exit game.
The video option has
selections for resolution, antialiasing, gamma, shadows, SFX, subtitles, sepia
filter, novice mode and change mouse buttons. The audio option has volume
adjustments for music, SFX and speech.
The ESC key brings up
the main menu during gameplay or move the cursor at top left of screen. It has
the save game, load game, options, back to main menu and back to game.
Left mouse click on
screen item identifies it and right mouse click does the action like picking it
up. Same actions can be done with items in inventory. To combine items, right click an item
and left click it on the other item you want to combine with.
Press the space bar to
skip the intro and dialogues. Double click to make
John run.
January 5, 1943:
A lovely lady sits in a fancy restaurant. She is handed a menu. Inside the menu is a
folder of Operation Wintersun.
January 8, 1943 London: Professor John Russell
receives an urgent phone call from the Security Service. They want him
immediately to come to the office.
January 8, 1943 -
BRITAIN’S SECRET SERVICE HEADQUARTERS
At Britain's Secret
Service Headquarters (M16), Col. Travers asks Dr. Russell to authenticate the Operation Wintersun documents. Since John Russell
verified that theoretically that the
weapon is an immediate threat, he is sent to find the final plans to Berlin. He
is to go with an agent, Peter Graham
to Berlin.
Backyard:
Dr. Russell is sent out to the backyard while Travers briefs Peter. John could barely hear
the briefing going on at the room with the window ajar. He wants to hear more.
In inventory:
Handkerchief.
Open the window
- Look around the
backyard. Take the old newspaper from the ground.
Check the cellar
window below the window. One of the bars is bent. Take the cellar window
bar. Use the bar on the window. It is much too short.
Check the dustbin to
the right. Take the potato from the dustbin.
Look left and see a
crow on a tree branch. Check the tree branch; it looks like it is a bit rotten. Try and take the tree branch.
Stupid crow...
Use the potato on the
dark colored cobblestones on the ground below the crow. Wonderful. Now take the
tree branch.
In inventory, right
click to select an item. Combine
the bar and the branch. Use the branch with bar on the office window.
<music> Arrgh,
all that work.
January 9, 1943 -
KAISER WILHELM INSTITUTE
Outside the Institute:
The secret documents came from the Institute. Peter and John need to
get inside the Institute to look for information about the weapon.
Schmidt, the Berlin contact will watch outside the Institute. There are 2 guards
standing by the main entrance.
John thinks that maybe
he can distract the guards.
Talk to Schmidt
completely. He gives John a pocketknife. Look at the lorry beside the
guards.
Go to the open truck
at left. Look at the side of the truck and check the tie handle and radiator
below it.
At the back of the
truck, pick up the paper- list from the ground. Read it in inventory and see
various combinations of chemicals and the properties of the combined chemicals.
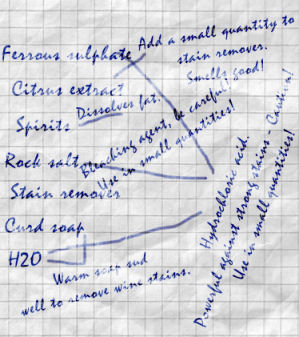
Examine the box inside
the truck. Take (right click) spirits, soft soap, citrus extract,
rock salt, sharpened pencil, stain remover, empty glass
bottle and Ferrous sulfate.
Distract the
guards:
Take the rubber hose
hanging above the box from the truck and pebbles on the ground right of the truck
(middle of the road).
Use the rubber hose on
the tie handle at right side of the truck
Use the pebbles on the
rubber hose on tie handle and get and improvised slingshot.
Peter takes over the
shooting. He shoots at the 2 guards. The guards leave the main entrance.
Main Entrance of
Institute: They go to the main door.
The door is locked and Peter goes right to check for other way to get inside.
Open the main door
(first try):
Look close at the
keyhole of the entrance door and see that the key is in the lock.
Let's do a Nancy Drew
here; use the newspaper (or
handkerchief) on the door.
Use the sharpened
pencil on the keyhole. Oh no. The key is too large to pass through the bottom of
the door. How annoying!
You can make John run
by double clicking and hasten the change to next screen by double click
of exit sign.
Open the main door
(second try):
Let's try another way.
Read the paper taken from the ground behind the truck - aha. We can burn that
keyhole.
Go back to the truck
and take the rubber hose from the tie handle of the truck.
In inventory, combine
the rubber hose and empty glass bottle. Use the rubber hose in bottle
on the radiator below the tie handle to get rubber hose in bottle filled
with water.
In inventory, combine
rubber hose in bottle filled with water with Ferrous sulfate and then add rock
salt to get bottle of hydrochloric acid.
Go back to the main
gate and use the hydrochloric acid on the keyhole. Corroded! <music>
Door squeaks:
Peter arrives. The door squeaks and it will wake the sleeping
guard inside.
Let's check that paper
list
again - read the paper taken from the ground behind the truck. Okay,
anti squeak coming up.
In inventory, combine
the rubber hose and empty glass bottle. Use the rubber hose in bottle
on the radiator below the tie handle to get rubber hose in bottle filled
with water.
In inventory, combine
soap and pocket knife to get soap flakes. Combine soap flakes with
rubber hose in bottle filled with water to get bottle of liquid soap.
Go back to the main
entrance and use the liquid soap on the door-entrance. John applies the liquid
soap on the hinges.
Inside the Institute:
See the sleeping guard. Peter checks the laboratory and leaves John to check the
offices.
Storeroom:
Go and enter the door on the right of the foyer. Look around the storeroom.
Take the wire
from chair by door. Take the plumber's helper in front of the chair. Take the
screwdriver from top of the crate with jugs. Take the sticky
tape from top of crate with pail.
Exit the room and go
across to the other side of the foyer - door to offices.
Corridor:
Enter and see doors on the right. Check the first door and see that it's a
locked bathroom.
Check the second door
(what is that noise?)
and enter.
First office:
Look around at blackboard, bookshelves and plant. Look at desk and file
folders. Take the torch, it's damaged.
Look at the desk drawers. The top right
drawer is closed and the others are empty. Look at the waste bin
right of the desk and beside the radiator. Take scraps of paper. Check the radiator,
it is cold. Exit the room.
Enter the second
office (Institute Director's office): Try to enter the third door. It's
locked.
Look at the window on
the door. Hmmm. The window putty is crumbly.
Let's try another
chemical solution. Read the paper taken from the ground behind the truck.
Use the spirits on the
window and see that it softened the window putty.
Use the pocketknife
(or screwdriver) on the window to remove the putty. Use the plumber's helper
on the window.
Now, use the wire on
the opened window. Enter the Institute Director's office. I ought to do
this professionally.
Institute
Director's office: Look around the office.
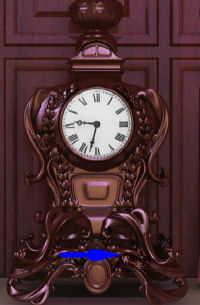
Check the grandfather
clock left of door. The minute hand is missing.
Check the book case,
the warm heater and the desk.
The middle desk drawer
is locked.
Go to the table
clock on the table right of door.
Look close (right
click) and get
the desk key at bottom right of the clock base.
Use the key on the
middle drawer of the desk. Take the metal pin. Take the scraps of
paper.
Take and read the
journal. He is a man of habit; he begins work everyday at 5 minutes before
eight. Take note of the notations at bottom of right page.
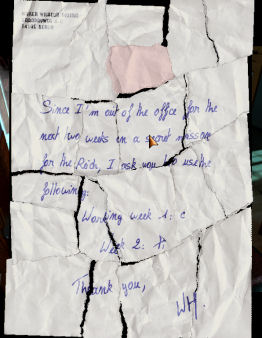
Scraps of paper
- In inventory, combine the 2 set of scraps of paper and see them on the game screen.
Arrange the scraps
by left click to pick up and right click-hold to turn the pieces.
Place the pieces on
the correct position in the frame. If correctly placed, the pink paper turns
white.
Take note of the notation - week 2: Pi.
Grandfather clock
- Place-use the metal pin on the grandfather clock.
Now what do we set
the clock on? The start of the work day of the Director - 5 minutes to 8.
See the bookcase
open to a secret room. Peter arrives.
Secret Room:
Enter the room.
Safe - Check
the safe. John says he knows how to open the safe.
How? The journal
notes a pi (π) at bottom right page: pi = 3.1415 and the put together
scraps of paper states week 2 = Pi.
Turn the dial - Left
to 3, right to 1, left to 4, right to 1 and left to 5. Bravo, professor!
The uranium bomb is
complete. The uranium bomb is
being made at HWA - Heereswaffenamt.
Look around. Check the
file cabinet, table and the blackboard. The table has slips of paper with some
writings (l=o-z-o, r=o-o-z).
Exit the room and talk
to Peter at end of the corridor. The guard awoke because he is cold. They
can't get out until he goes back to sleep.
Get heat:
Go to the first
office (middle door). Check the radiator and see that it is cold.
Desk drawer -
Check the top right drawer and John comments that it opens like
other desk drawers by means of the other drawers. Aha! That's what the paper
notation on the table at the secret room means. l: O Z O and r: O O Z
Open the top left
drawer and the left bottom drawer.
Open the right
middle drawer and then open the top right drawer.
Take the radiator
valve wheel.
Use the valve wheel on the cold heater beside the desk. The valve is open
but no hot water is flowing.
Go to the Director's
office heater. Check the radiator, it is warm and John says it warms the next room too.
Use the wheel
on the warm heater. That should heat the foyer.
Go back to Peter at
end of corridor. After a 15 minute wait, the guard goes back to sleep.
Exit the Institute.
Peter tells John to
report to Travers using the hidden wireless in the truck.
Go to the back of the
truck and use the wireless. John tells Travers that they are going to HWI or
Heereswaffenamt.
January 9, 1943 - HEERESWAFFENAMT (HWA)
Main Entrance:
Go to the side
entrance of HWA on the right side of the building
Side Entrance:
Peter can't open the door.
Meet Anne Taylor, the lady that got the documents in the restaurant.
Anne unlocks the door.
After the discussion, Peter stays to guard and Anne and John go inside. Enter
the building.
Office:
A guard is coming. They enter the door on the left.
In inventory:
pocket knife, spirits, stain remover, sharpened pencil,
handkerchief, screwdriver and empty bottle.
Talk to Anne completely.
Find a way to disable
the guard - Check the balcony door; it is locked. Look around the room. Check the door,
electric socket, desk, telephone and cord.
Take the telephone
cord. Use the pocket knife on the telephone cord to get stripped
telephone cord.
Use the stripped
telephone cord on the door handle. Open inventory and use the cord on door
handle on the electric socket left of door. <music>
Talk to Anne and get her
to yell for help. Watch what happens.
Take the stripped telephone
cord from the door handle and then pick up the stripped telephone
cord from the socket.
Corridor:
Look around and check the guard and weapon.
Broom Cupboard -
Open the door right of the hallway.
Take the floor polish
and window cleaner from the middle shelf.
Go left to the other
corridor. Look around. Check all
the portraits on the wall. John has a way with words in describing the
portraits.
Open the door at the end
of the hallway.
Archives Department:
The Special Archives room is at the end of the lower level.
Stealth puzzle to
Special Archives Room - After Ann flips the switch, learn from the guards that one light usually goes
out in a part of the hallways below. If 2 lights go out, the guard
investigates the fuse box and you will be caught.
Anne goes down to the
lower level.
A floor plan of the
aisles between the bookshelves is seen at top right of screen. It is divided in
12 areas; 4 in each aisles. Each area has a switch with green light for ON and
red light for OFF. Click the switch to turn it on-off.
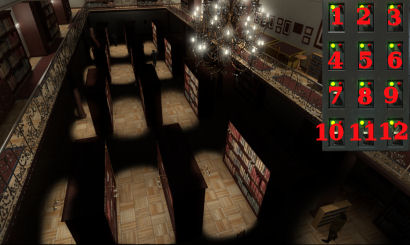
The Special Archives
room is at the end of the middle aisle. Ann is standing right of #12.
To make Anne move, you
have to turn off the light on the portion of the aisle you want her to go to.
Be sure to have only ONE
light off. If there are 2 lights off, the guard investigates and Ann is 'Oh No'
caught.
Be sure to turn on
the light where Ann is located before you turn off the light on the area you
want her to move to.
Wait for the guard(s)
to move away one area before you make Ann move.
The best path I found to
move Ann to go to the Special Archives room is: 12 9 6 5 2.
As soon as puzzle starts
(this way the guard in immediate left is in the middle of the aisle)
- Turn off light at #12 and Ann will go to #12.
At #12, check if the
guard on same aisle is 2 bookshelves away and the guard on the left is still at
top of the middle aisle, then immediately turn on light #12 and turn off #9.
At #9, wait for the
guard at middle aisle to pass and immediately turn on #9 and turn off #6.
At #6, immediately turn
on #6 lights and turn off #5 while the guard at same aisle has his back turned
at the bottom of the aisle.
At #5, immediately turn
off #5 and turn on #2.
There is no save
possible during the puzzle, only when completed. If caught, the puzzle starts at
the beginning for another chance.
Return Stealth puzzle
- Ann reaches #2 and sees that she needs a code. Now she needs to go back to
John.
As before, take care that you
turn ON the light before moving Ann to the next area (turn off next area). Watch out for the guards,
the return path is trickier.
The best path I found
is: 5 8 9 12.
While standing at #2,
wait for guard to move before turning off #5.
At #5, wait for the
guard to go left, immediately turn on #5 and turn off #8.
At #8, wait for BOTH
guards to move before moving. When the right guard moves one or 2 steps, turn on
#8 and turn off #9.
At #9, wait for the
guard at same aisle to move from #6 to #3, immediately turn on #9 and turn off
#12.
Ann goes up and talks to
John. The guards might have the code for the secret archives room. Both guards
need to be taken out.
Take out the guards
- Now, it is John's turn. Go down the stairs at right corner of top level.
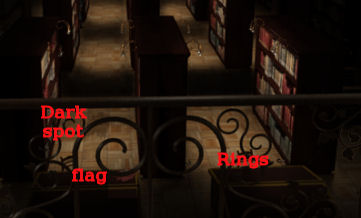
Look at the bottom of
the bookcases in #12 (bottom of right aisle) or left of John. See 2 rings, one
each at bottom of each bookcase.
Use the stripped
telephone cord on the rings (right bookcase) to make a trip wire between the 2 bookcases.
Take the flag
that is on the table below the middle aisle.
Go to the bottom of
middle aisle (#11). Note that there is a dark spot on the floor.
Combine the floor polish
and flag to get flag with floor polish. Use the flag with floor polish on the dark spot at bottom of middle aisle.
Watch what happens. John
is good!
Search the unconscious soldier
tripped by the wire and get a notebook with 4 9 3 written on it.
Special Archives
Room: Go to top of middle aisle.
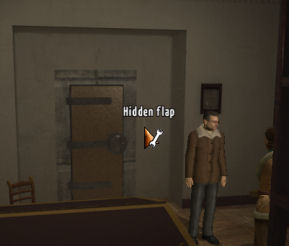
Door - Click the hidden flap right of the door.
Look close (right click) and enter the
numbers taken from the tripped guard - 4 9 3. Enter the room.
Room - Look
around. The filing cabinets are dusty.
Look behind the middle
picture above the desk. Take the keys.
Lockers and keys
- Look at the lockers at left. Use the keys on the lockers.
The object of the puzzle is to find the correct keys seen on the left to the
alphabetized lockers on the right.
This is a fairly simple
puzzle. The keys on the left are arranged from top-down to match the file cabinets
seen on
the right.
So the top left key
matches the top left file cabinet (A) and the top right key matches the top
right file cabinet on the right (B).
Go through that way
until the bottom of the file cabinets on the right. Then go to the next
set of file cabinets at right of the opened ones. It starts at C and D.
Continue until you open
U for uranium. The key for U is the left key on the 8th row of the keys at left.
John studies the
document. He states that the rocket propulsion won't work. Too many unknowns.
The Uranium bomb doesn't work also but by actual calculation only the implosion
mechanism needs to be corrected. The prototype is being built in Haigerloch,
a small town near Stuttgart.
Von Pressnitz arrives.
He threatens Peter and then Ann if John does not help correct the problem with
the implosion process of the bomb.
January 10, House 12:
Von Pressnitz talks to the prisoners. The light goes off and someone pushes John
out the window.
Berlin Streets
Alley:
John bounces off the top of the lorry and on to the ground. See him leave the
alley. While hiding in a dark corner, the lorry leaves.
Drunken Siren Operator:
Go to the right and be on the road.
If you hear guards
coming - hide (right click) in 'dark corners' found in doorway alcoves.
Go right and see a
drunken man holding on to the lamp post. He is the siren operator.
Talk to him completely. Learn about the train. He will not give John money unless he is given fruit brandy.
The train station is
behind the roadblock. Go to street.
Checkpoint:
Go right to the end of the street. Double click the exits to get there faster.
Remember that you can make John run by double clicking.
See the checkpoint with
2 guards on the right. They will see John if he walks to the other side of
street. The train station is at the back of the checkpoint.
Air raid siren -
Look close at and see 2 buckets and wall cupboard. The left pail contains water and the right
pail has sand for fires.
The wall cupboard is the
air raid siren with a crank. Look at the crank and then look at the lock.
Get money:
We need money to get a ride on the train and need to distract the guards to get
to the train terminal.
Make fruit brandy - Use
the bottle on the water pail on the left. Combine spirits to bottle of water
to make bottle with diluted spirits. Go to street.
Note: Any error in
preparation can be discarded at the street grate close to the drunken operator.
Go left, left again of
the drunken operator and look at the poster on the wall right of the doorway.
Use the pocket knife on the poster to get poster corner.
If you hear guards
coming - hide (right click) in 'dark corners' found in doorway alcoves.
Talk to drunken operator completely.
His assistant is a fruit brandy. Learn about his favorite fruit brandy.
Go back to the
checkpoint. Combine poster corner
with sharpened pencil to get enhanced poster corner (now that you know
the favorite brandy).
Look close at pails. Use
the enhanced poster corner on the pail of water.
Use the damp poster
corner on the bottle of diluted spirits to get labeled bottle with
diluted spirits.
Go back to the drunken
operator and use the labeled bottle with diluted spirits on him. He will give
money
(5 Reichsmarks).
Distract the guards -
Talk to drunken operator completely. He gives the key for the air raid
lock (after you looked close at the lock).
Go to the dead end
street-alley on the
left screen. See a puddle of oil on the ground. Use the handkerchief on the oil
to get oily handkerchief.
Take the military
blanket by the door at the end of the alley.
Go back to the locked
air raid siren. Use the key on the lock. Use the crank.
Use the oily
handkerchief on crank. Use crank and watch.
Go to street and then go
to the right screen - narrow side of street now that the guards are looking up and distracted.
Get to train station
-
Go to the side alley. See barbed wire on top of the fence at end of the alley.
Use the military blanket
on the barbed wires. Climb over the fence to get to the train terminal.
January 15, 1943 - HAIGERLOCH
Train Station:
John arrives at Haigerloch. Take the small bowl at bottom of the corner
of the building.
Marketplace:
Go left to the town. See some soldiers go inside the inn at right at the far part of the
marketplace.
Hawker Stall -
Talk to the man inside the stall on the left completely. He wants cigarettes and
it seems he can sell anything. He did not see the
soldiers.
Go across the street and
check the tailor shop. Take the hatchet and piece of wood left of the tailor shop.
Fountain -
Go to the fountain at top of screen. Talk to the priest sitting by the fountain.
Latin!
He also did not notice the soldiers and seems disturbed.
Hawker Stall - Talk to the man again. Ask about 'have anything else' on the
dialogue option and ask for information. Then ask about the priest and learn
that the priest lost his rosary.
Inn: Climb the steps and go inside the Inn.
Talk to the barmaid completely. No soldiers seen. She wants a pair of stockings
and will give something that might interest John. Learn that the door behind the
bartender goes to the cellar and that she is afraid of insects and rats.
Talk to the barkeeper completely. Definitely, no soldiers. Note the door
behind the barkeep. Note that there are cigarettes left of the barkeeper. Try to
take the cigarettes.
Pick up the rosary from the floor right of the barmaid.
Gain entry to the cellar behind the barkeeper:
Go back to the priest outside by the fountain. Talk and give the rosary to the priest. He
gives money - 5 Reichsmarks.
Talk to the hawker man
at the stall again. Select “Do you have anything
else?” dialogue. Buy stockings.
Go back to the Inn. Give
the nylon stockings to the barmaid. She gives a bottle of liquor. Take the
liquor. Exit inn.
Outside the Inn -
Look at the kitchen
window left of
the Inn door. Use the pocket knife or screwdriver to open the window. See that
it is the kitchen.
Go to the grain sack
left of the Inn and the lorry. Use the pocket knife or screwdriver on the
grain sack. Use bowl on the grain sack to get bowl of grain.
Side Street - Go
back down to the fountain area and go right. See a man sweeping the same place.
Go up the street. See a
woman looking out the window and a rat by dung heap across the steps.
In inventory, combine
the bowl of grain and liquor to get bowl of liquor.
Give the bowl of liquor
to the rat. Pick up the rat.
Inn - Immediately go to the
opened kitchen window left of the Inn's door. Use the rat on the open kitchen
window.
Hear the barmaid scream
and the following ruckus.
Go inside the Inn. See
that the barkeep is gone. Take the cigarettes from the bar counter.
Go to the hawker. Talk
to him and select the "I have cigarettes' dialogue.
The hawker gives a code:
The bear drives two hares into the maw of the wolf.
Inn Cellar - Go back
to the Inn and go through the door behind the bar to be at the cellar. Look
around.
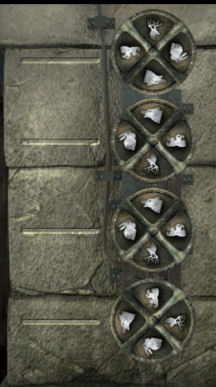
Open the secret door
- Look close at the wheels left of the big barrel by the far wall. Save game
here. There is no reset of the puzzle.
See 4 wheels and a line
left of each wheel. Each wheel has the
figure of a bear, moose, hare and wolf.
The object of the puzzle
is to use the code given by the hawker - The bear drives two hares into the
maw of the wolf.
Study what wheels are
affected by turning one of the wheels: The top wheel affects the top, second and
last wheels. The second wheel affects the second, third and fourth wheels.
The third wheel affects the first and third wheels. The bottom fourth wheel
affects the second and fourth wheels. Then find the combination that would
produce the solution.
Turn the wheels to end up with:
The bear is on the left
of the top wheel.
The hare is on the left
of the second from top wheel.
The hare is on the left
of the third from top wheel.
The wolf is on the left
of the bottom wheel.
To get this solution, do
this before touching the wheels:
Click the first wheel
once.
Click the fourth wheel
once.
Click the second wheel
three times.
The door opens. Enter
the secret tunnel.
PRODUCTION FACILITY
Secret Tunnel:
Go forward to the sluice gate. Look at half closed sluice gate. It is blocked by
a wooden beam.
Use the hatchet on the
half-closed sluice gate.
Central Room:
Enter and get surprised
by Anne Taylor. Learn things from Anne.
Look around.
Look at the bullet
ridden control panel on the left. It is connected to the sluices. Now the
sluices can't be opened.
Take the large gear
wheel from the table next to the control panel. Talk to Anne about
everything.
Go through the broken
sluice at top right of room.
Tank Room:
Look around. See a large tank used to make hard water.
Look at the still full
metal cylinder in front of the closed sluice. It is held by a security chain.
Hmm...
Check the crate just
front-left of Anne and automatically get 2 small gear wheels.
Pick up the small
gear wheel on the steps going to the big tanks at front-right of screen.
Enter through the small
sluice door left of the walkways.
Corridor:
Look around the corridor. The door to the telephone switchboard is locked.
Pick up the medium
gear wheel propped against the wall.
Go through the sluice
door at end of corridor.
Laboratory:
Look around.
Take the cable from the
table right of the steps.
Check the lockers. They
are all locked.
Pick up the red
Bunsen burner at shelf on the left wall.
Take the medium gear
wheel from the table in the foreground.
Go back out, through the
corridor and back to Ann at the Tank room.
Tank Room:
Open the locked sluice -
Use the Bunsen burner on the chain of the large gas cylinders just in front
of the sluice.
Look at the large gas
cylinder that is now on the floor. It has a closed valve.
Use the hatchet on the
valve of the large cylinder. There goes the homemade
rocket.
Storage Room:
It is dark here.
Look at the fuse box and
get a broken fuse.
Take the gear wheels
on top of the crate below Ann in the foreground.
Go left and through the
sluice at left side of the room. See a mechanism cabinet
right of the light.
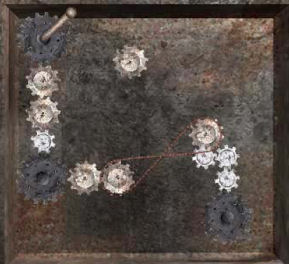
Mechanism-gear puzzle
- The object of the puzzle is to place the collected gears so the gears will move from top left gray to the bottom gray gear.
The gear turns green
when it can be placed and turns red when it cannot be
placed.
Click the other
stationary white gear to move the
chain to that gear. Click again to twist the chain.
Place the gears and then
turn the handle of the top gray gear to see if they turn. Sometimes I'm really
good.
Production Room:
Enter and see what Von Pressnitz has done. Ann will try to open the locked
sluice at the far end of the room.
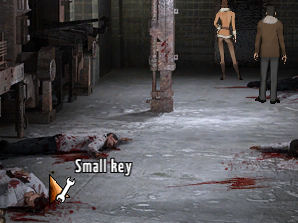
Pick up the small key
between the 2 bodies on the left of the room.
Laboratory:
Go back to the laboratory where the lockers are located: exit, dark storage
room, tank room, small sluice on the left, corridor and then laboratory).
Use the small key on the
lockers to see which one opens - open the locker at right end.
Right click the plastic
box on the top shelf of the locker to get a fuse and the plastic box.
Dark Storage Room:
Go back to the dark storage room.
Use the fuse taken from
the locker on the fuse box. Let there be light.
Look around and see a
secret door at left side of the back wall (left of storeroom).
Secret Tunnel:
Go through the secret door into a secret tunnel. Meet and talk to Peter Graham
completely. Peter said to wait and he will search the facility.
Outside:
Go through the sluice. See a well worn path outside. John doesn't want to go
further. Go back to the tunnel.
Storage room:
Check the bag at center of the room. It is full of gold bars. Take the gold
bars (1) that is out of the bag.
Communications Room:
Go left through the sluice, corridor and then to the production room where the
bodies are located. See that Ann has opened the sluice. Go through the opened
sluice.
Anne talks about the
last transmission and he wants John to contact Travers.
Read the radio log and
see that Von Pressnitz last transmission was to Col. Gen. Keller. It says that
he has the prototype and he will use it where urgently needed.
Look around. The
transmission unit is not working.
Place the cable taken
from the lab on the generator, the cabinet left of the door-sluice.
Use the transmission
unit.
Outside: Go back to the storage room, the secret tunnel
(Save game here) and
outside.
John automatically picks
up the gun. Take the gun with one bullet from inventory and shoot the
person you think is the traitor.
If you shoot Anne, Peter
shoots John.
If you shoot Peter -
watch the explanations. John states that someone from the government asks him to
support the US in a research called Manhattan Project developing nuclear
weapons. It was a scientific challenge.
Airfield Hangar:
Go left to the path and be in airfield hangar. Look around.
Enter the hangar. The
exit icon is right of the barrels on the snow.
Ann says that they
loaded the bomb in the airplane.
Sabotage the plane - Use
the screwdriver on the fuel hose attached to the tank of the lorry.
Block the fuel using the
plastic box on the sieve at the end of the fuel hose on the ground.
Use the screwdriver on
the fuel hose to reattach the fuel hose with plastic box to the tank of the
lorry.
Von Pressnitz arrives
and the two hides in the plane.
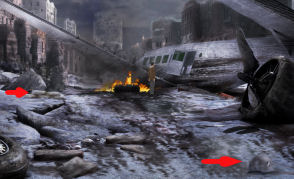
January 15, 1943 STALINGRAD
The plane is shot at by
antiaircraft fire and crashes. The two are caught by the guard. Ann is pinned in
the wreck.
Plane Wreck Site:
Von Pressnitz orders John to be shot and leaves. The soldier shoots in the air and
leaves John alive. John has to put out the fire.
Timed puzzle - As
soon as able, take the German steel helmet seen at bottom right of the screen.
Use the pocket knife (or
screwdriver) on the sandbags at left under the wing.
Use the helmet on the
sandbags to get helmet with sand.
Use the helmet with sand
on the burning pool of fire under the wing. John will do this again
automatically.
Ruins-Alley:
Go to the alley via under the airplane wing (where Von Pressnitz went).
Click and then
talk to Anne.
Take the empty
canteen right of the path.
Try to take the machine
gun barrel left of Anne. It's frozen tight.
Use the German
steel helmet or empty canteen on the snow right of the cannon.
Go back to the
crashed airplane (wrecked site) and use the helmet with snow (or canteen with
snow) on the extinguished pool of fire to heat helmet with water.
Go back to
Anne at the alley-ruins. Use the helmet with water on the frozen machine gun
barrel.
Take the
machine gun barrel.
Ruins - street:
Go to the street exit at end of the path.
Distract Sniper -
A soldier (officer) sees the two and was shot by a sniper.
Anne says that the
sniper at the water tower needs to be distracted.
In inventory, combine
the machine gun barrel and the German steel helmet to get barrel with German
helmet.
Use the barrel with
German helmet on the water tower. Watch. They run when the sniper needed to
reload.
Factory Entrance:
See a soldier guard the entrance to a ruined factory.
Look at the bullet
ridden wall above the soldier.
Use the gold bar on the
bullet ridden wall above the soldier. Perfect!
John takes a hand
grenade from the unconscious soldier.
Factory – Ground Floor:
Go into the factory. Anne will check the left side of the factory. Look
around.
Take the wooden beam
on the ground at right and the wooden beam propped against the tank.
Go the hall at center of
the room. John says that the rubble will fall and he needs to support it.
Use a wooden beam on the
rubble above the path to the hall.
Factory – Broken
Staircase: See a collapse staircase. John wants to get up
there.
Take the wooden beam
propped on the metal post at right.
Use a wooden beam on the
landing of the broken staircase. Try to climb to the landing.
Use the other wooden
beam on the landing. Climb to the landing.
Save game here!
Bomb room:
Enter the room. Anne arrives and says she has the prototype. See the bomb at right.
It is ticking.
Disarm the bomb -
John says it is needed to interrupt the current supply.
The wires can be cut
only on the left since the center wires are covered by a glass plate.
Only 4 wires are needed
to be cut. The wires that should be cut lead to the
rectangular things.
Place the tip of the
cursor on the wire to be cut and then click.

Watch Anne and the
Russian soldiers.
Listen to Travers and
John.
This document may not be
distributed without express written permission of the author and the content
may not be altered in any way.
For Questions or Comments on this
Walkthrough, please write to:
MaGtRo
Copyright © 9/2007
MaGtRo
 GameBoomers
Walkthroughs and Solutions
GameBoomers
Walkthroughs and Solutions