ASSEMBLING THE EXILES | ||||||||||||||||
| Scurvy told you he uses the hydraulic organ (in the middle of the crater) to call the exiles. The organ must be supplied with air and water in order to operate it. The control valves for opening or closing the air and water supply, identified by their respective ideograms, are in the room next to the organ. Initially both valves are closed, i.e. horizontal position. | ||||||||||||||||
NOTE: Scurvy's dialog about the exiles is repeated in your log for ease of reference | ||||||||||||||||
AIR SUPPLY | ||||||||||||||||
| One of the clues Scurvy gave you was to 'open the door of the nose'. Examine the metal box (similar to the those with the number puzzles) and note the iron bolt at the top. The levers on the box move the bolt, either opening or closing it slightly. The direction in which the bolt moves varies, depending on which lever is pulled, and how many times you pull it. Using simple trial and error you can work out the sequence to release the bolt by moving it all the way to the left: | ||||||||||||||||
| ||||||||||||||||
| The switch inside the metal box opens a door leading to the top. After opening this door, turn the air control valve to a vertical position to open the air supply. The large fan next to the control valves should start turning. | ||||||||||||||||
WATER SUPPLY | ||||||||||||||||
| The diagram next to the metal box, and Scurvy's information, provide the solution to opening the water supply. | ||||||||||||||||
| ||||||||||||||||
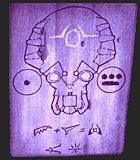
| As indicated by the ideograms at the bottom, eat a blue and red compote. The Selenite numbers (1 and 8) will only be visible with the purple vision effect caused by the compote. | ||||||||||||||||
| Study the diagram carefully, noting the resemblance to a Selenite skull. Does the skull shape look familiar? Go to the top and face the stairs leading down through the door you opened for the air supply. Scurvy's reference to it being 'the door of the nose' now makes sense. The door is the 'nose', the pools of water are the 'eyes', the control panels next to the pools are the circles and the markings painted on the rocks near the edge are the same as those on the forehead. | ||||||||||||||||
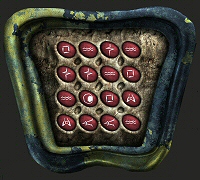
| Go to the pool on your right (next to the broken telescope) and examine the control panel with the ideogram buttons. | ||||||||||||||||
| ||||||||||||||||
| ||||||||||||||||
| Scurvy said 'press once per line and once per column on the ideogram representing the liquid element'. Two buttons in the top line have water ideograms and the same applies to the column on the right. To comply with these instructions the top right button (common to both) must be ignored. Therefore press the following buttons: | ||||||||||||||||
| ||||||||||||||||
| The lever inside the control panel regulates the water flow (from the pool) to either the left or right. Study the pipes that lead from the pool very carefully. The pipe on the right leads to the 'door of the nose', while the one on the left leads to a second control panel. Pull the lever until the water flows to the left (3 times) to activate the second control panel. | ||||||||||||||||
| ||||||||||||||||
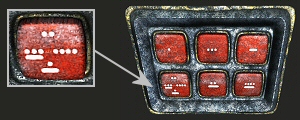
| The buttons on the second control panel all have Selenite numbers on them. Pay particular attention to the bottom left button which has all the even numbers (2, 4, 6 and 8) on it. | ||||||||||||||||
| From the skull diagram you know the number '8' is associated with this control panel. Nothing will happen if you press the button (bottom left) with an 8 on it. The only button that produces any reaction is the top left one, causing a round disc to lift out of the pipe below the control panel. If you now press the bottom left button, a second disc lifts up. From this you work out that the buttons must be pressed in numerical order from 1 to 8. The complete sequence is: | ||||||||||||||||
| ||||||||||||||||
| Finally, you must regulate the water flow to the hydraulic organ (in the direction of the 'door of the nose') by pulling the lever on the first control panel twice. | ||||||||||||||||
| Now go to the other pool, next to the working telescope. | ||||||||||||||||
| ||||||||||||||||
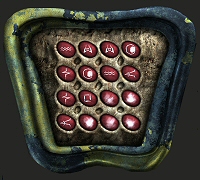
| Some of the ideograms on the first control panel at the other pool (next to the working telescope) have been smudged and are illegible. To comply with Scurvy's instructions only the fourth button in the third line and the second one in the last line can have water ideograms. Knowing this, press the following buttons: | ||||||||||||||||
| ||||||||||||||||
| Again you first regulate the water flow towards the second control panel, in this case to the right. On the skull diagram the number '1' is associated with this control panel, so only press the top left button to lift one round disc. | ||||||||||||||||
| Don't forget to regulate the water flow towards the 'door of the nose' (to the hydraulic organ) to complete the process. | ||||||||||||||||
| Return to the room up the stairs next to the organ and adjust the water control valve to the vertical position to open the water supply. The hydraulic organ should now be fully functional. | ||||||||||||||||
| Note that the skull diagram has opened, revealing a supply of sodium chloride. | ||||||||||||||||
HYDRAULIC ORGAN | ||||||||||||||||
| ||||||||||||||||
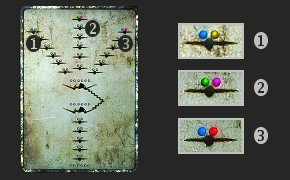
| Examine the white chart (next to the organ) carefully. Each of the three pairs of coloured dots at the top are resting on what resembles an exile's shoulder pads. The colour combinations are identical to those of the miniature plants on the actual shoulders of the three exiles you came across. | ||||||||||||||||
| Scurvy told you that to call an exile use the organ to imitate the song of the fruits it eats and then reproduce the reply. Although the organ has thirteen buttons you only use those on the top row. Five of them are colour-coded and marked to correspond with the plants. There are also three white buttons, one on the left and two on the right. Each of these buttons plays a different musical note. To imitate the song of the fruit an exile eats, press the two buttons that match the colours of the fruit the exile eats. Reproduce the exile's replies by pressing the buttons that play the same notes. | ||||||||||||||||
| You can either test your musical ability to recognize the different note played by each button or use the simplified way of reproducing the exile's replies. Did you notice the slot for a level 2 hierarchical key next to the white chart? Use the level 2 hierarchical key to turn on the non-musical features of the organ. Now, the next button to press will glow. | ||||||||||||||||
| ||||||||||||||||
| Reproducing the replies are timed sequences. If you wait too long before pressing a button, or press an incorrect one, the exile returns to its where it originally was. Each exile's progress is indicated on the white chart and when it gets to the centre, you see it on the stone pad in front of the fan-shaped device. Note that if you tampered with the fan-shaped device and changed the settings, the exile might leave through the door immediately. Don't worry as this has no effect on the puzzle or its outcome. The songs and replies are as follows: | ||||||||||||||||
| ||||||||||||||||
FAN-SHAPED DEVICES | ||||||||||||||||
| After all three exiles have been called they exit through the door. Immediately after this (or after the last one exits) you are given an opportunity to follow. This leads to the fan-shaped device on the second level in the underground caverns. If you decide not to follow them, you can return to the caverns via the top of the mountain or repair and use the device. | ||||||||||||||||
| The strange needle in the centre always points to a red button that indicates the number of individuals standing on the stone pad. The bone-shaped cursor (along the outer rim) indicates which button opens the door. If you want to use the door set the bone-shaped cursor to the first (one) red button. Don't forget that the device first needs to be greased. | ||||||||||||||||
MOVING THE SHELL | ||||||||||||||||
| The exile stables are the alcoves in the room on the second level, next to the yellow smoke. Return to Scurvy and ask him to order the exiles to carry the shell. Note that if he's still suffering from the effects of any compote that you put in the food vat, first wash out his stomach (with a dose of water) by switching the distribution lever next to the vat. | ||||||||||||||||
| The exiles move your shell to the combustion chamber of the space cannon. Returning to the passage on the second level was dealt with previously. Click the link below if you want to view that part of the walkthrough again. | ||||||||||||||||
| ||||||||||||||||
| Your next task should be repairing the broken lumen machine and parabolic mirror on the first level. | ||||||||||||||||
| ||||||||||||||||