TOP OF THE MOUNTAIN | ||||||||||
| You need to climb the ledges a number of times, so a shortcut would be very useful. What if you planted something in the fertile soil on the bottom ledge? The vine plant from the shell won't grow on its own, but it can be hybridized with a lunar seedling. Combine the vine plant, blue seedling (only compatible one) and lunar raffia to produce a grape hybrid. Plant the grape hybrid in the fertile soil to grow a grapevine. You can now use the grapevine to climb directly between the bottom and fifth ledges. There's also a supply of lunar grapes on the grapevine. | ||||||||||
| You should climb to each ledge once more and examine (click their hotspots) the frescos. This copies the ideograms for the plants (or fruit) in the monograph. | ||||||||||
| You encounter a third alien creature at the top of the stairs on the fifth ledge. From the purple and green plants on its shoulders you know it can be pacified with a yellow and blue compote. | ||||||||||
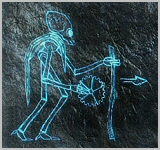
| The fresco on the wall at the top of the mountain provides a clue to opening the door behind the alien creature. | ||||||||||
| ||||||||||
| The arrow is pointing towards the door and the round object carried by the creature resembles the control panel on the device on the fifth ledge. | ||||||||||
| Go to the device (on the fifth ledge) and try figure out how it works. Each of the five segments on the control panel can be clicked to change its colour. The button in the middle rotates the entire panel clockwise. When the segments have all been set to the correct colours, the blue light on the bottom left switches on and a coloured gear is released. | ||||||||||
| ||||||||||
| The mechanism next to the door behind the creature is missing a part. Fit the coloured gear into the mechanism, then pull the lever to open the door. | ||||||||||
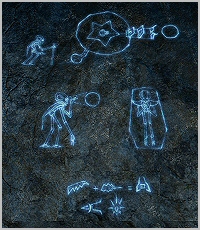
| Through this door you find a similar door (and mechanism) to your left, a locked portcullis straight ahead and a fresco painted on the wall to your right. By now you should realize that frescos contain clues, so study this one to find a clue on how to open the locked portcullis. | ||||||||||
| ||||||||||
You should be able to decipher four of the five ideograms depicted at the bottom of the fresco. | ||||||||||
| ||||||||||
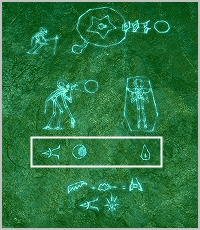
The ideograms can be translated to mean 'eat blue and green fruit to see ?' | ||||||||||
| Return to the bottom ledge to prepare and cook a compote of blue and yellow fruit. Eat the compote (click on Ardan in your inventory) and, in addition to feeling weird, you have green vision. When viewed with green vision there's an extra line of ideograms on the fresco. These extra ideograms are the code used to unlock the portcullis. | ||||||||||
| ||||||||||
| Push the buttons on the portcullis control panel that have these three ideograms on them to unlock the portcullis. | ||||||||||
| Examine the glass of water in your inventory to learn that drinking it is a cure for feeling strange or giddy after eating a suspicious substance. Restore your normal vision by drinking a glass of water. If empty, the glass can be filled at the pool of water on the bottom ledge. | ||||||||||
NECROPOLIS | ||||||||||
| On entering the Necropolis you learn that the ideograms mean 'see the earth and die'. Don't panic when the portcullis closes behind you - this is supposed to happen. | ||||||||||
| At the far end (near the opening where the earth is visible) is a sealed sarcophagus. From Ardan's thoughts about the sarcophagus resembling a tin can, you work out that the can opener is needed to open it. Inside the sarcophagus you find an iron bar, lunar tool, Selenite key and leak proof globe. Examine the inscriptions (below the ideograms) to copy them into your log. | ||||||||||
| There's another sarcophagus (near the portcullis) that can also be opened. Prise it open with the iron bar, then remove the damaged mechanical arm, damaged flute and gold necklace. Examine the damaged mechanical arm in your inventory to learn it has multiple parts. Dismantle it with either the lunar tool or monkey wrench, leaving you with some corroded parts, a mechanical forearm and upper arm. The arm can only be re-assembled when you find the necessary replacement parts. From the flute's description in your inventory you know glue must be used to fix it, which you also don't yet have. | ||||||||||
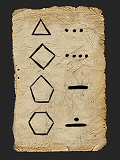
| The second inscription copied from the sarcophagus is your first taste of the Selenite number system. This inscription contains the 'key' to operating the control panel next to the portcullis. | ||||||||||
| ||||||||||
| The objects in the left column are the same as four of the shapes on the control panel. Can you identify the correlation between the first object and the 'dots' next to it? The same correlation exists between the second object and the 'dots' next to it. The first object is a three-sided triangle and there are three 'dots' next to it. The diamond has four sides and there are four 'dots' next to it. Applying the same logic to the other two objects (counting the number of sides) you can work out that the number 5 is represented by a 'bar' and the number 6 by a 'dot and bar', i.e. 1 plus 5. | ||||||||||
| Once you've understood and grasped the above you should find it relatively easy to operate the control panel and open the portcullis. First, count the sides on each of the ten object buttons to get the 'numbers' they represent. | ||||||||||
| ||||||||||
| As the puzzle is randomly generated there is no fixed solution, but the principle is always the same. There should be green lights under two (or more) object buttons and you need to add the numbers these objects represent, then press the object button corresponding to their total. For example, with green lights below the second (3) and last (6) buttons in the top row, press the (9) button, i.e. the first button in the bottom row. | ||||||||||
| This process has to be repeated a few times and your progress can be monitored by watching the cover on the sphere below the buttons. For every correct button pushed the cover opens slightly and conversely it closes slightly whenever an incorrect button is pushed. The portcullis will unlock and lift up when the cover has fully opened. | ||||||||||
Should you return to the Necropolis at any time during the game, the exit control panel will have some changes. | ||||||||||
| ||||||||||
SECOND COLOURED GEAR | ||||||||||
| When you try getting a gear for the other door (using the same method as before) nothing happens and Ardan realizes there's an another solution. | ||||||||||
| For the first gear each segment's colour was set to match the pattern of the forests. Starting at the top and moving clockwise the sequence was PURPLE, RED, BLUE, YELLOW, GREEN. For the second gear, again begin by setting the top segment to PURPLE. Push the gold button to rotate the control panel clockwise, then (using the same colour sequence) set the segment now at the top to RED. Repeat this process with the rest of the segments, always setting the colour of the segment at the top. By doing this segments are set in reverse colour order, producing a gear with the colours in reverse. | ||||||||||
| Fit the gear with colours in reverse into the mechanism, pull the lever and head down to the underground caverns. | ||||||||||
| ||||||||||