TRIP TO THE MOON | ||||||||||||||||||||||||||||||||
| On regaining consciousness Michel Ardan must work out where he is and what he's doing here. As he progresses the sixteen blank squares in the 'investigation' section of your inventory will be filled in with pictures. Although solutions for all sixteen pictures are given, it's not essential to do them all as there's a 'fun' way of completing the investigation later in the game. | ||||||||||||||||||||||||||||||||
| Begin by examining the two men lying on the couches. One is Barbicane, the president of the gun club, and the other is an engineer, Captain Nicholl. The newspaper article on the wall is about Ardan. At this point the first four pictures in the 'investigation' section should be filled in. The second picture provides a clue to opening the locked cupboard above Barbicane's body. | ||||||||||||||||||||||||||||||||
| ||||||||||||||||||||||||||||||||
| There are a number of timed sequences during the trip to the moon. The order of doing things used in this walkthrough allows you maximum time during these timed sequences. | ||||||||||||||||||||||||||||||||
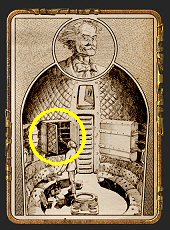
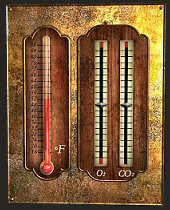
| First look around the shell to familiarize yourself with everything. There are four closed portholes, a basin with a tap for getting water, a tank of potassium hydroxide, a metal plate (with a mesh cover) suspended above an adjustable flame and two atmospheric gauges. Study the atmospheric gauges, noting the current temperature (52° Fahrenheit) and that the indicators for oxygen and carbon dioxide are both positioned in the middle. | ||||||||||||||||||||||||||||||||
| ||||||||||||||||||||||||||||||||
| To fully understand how the atmospheric controls react, experiment with the metal plate and adjustable flame. Moving the metal plate away from the flame causes the oxygen level to decrease and adjusting the flame affects the oxygen level as well as the temperature. | ||||||||||||||||||||||||||||||||
| Next to the newspaper article a monkey wrench is attached to the wall with a short strap. Remove the short strap and then pick up the monkey wrench from the floor. Also pick up the can of potassium and a funnel. By examining the can of potassium in your inventory you learn that potassium absorbs carbon dioxide and purifies the air. | ||||||||||||||||||||||||||||||||
| Use the monkey wrench to loosen the bolts on the portholes (above, two on the sides and one on the floor) leaving the one on the floor till last. To get to the one above climb up the metal rungs. When the bottom porthole cover is released you learn about the launching of the shell and the fifth picture in the 'investigation' section of your inventory will be filled in. This triggers the first timed sequence in that the oxygen level slowly starts dropping. | ||||||||||||||||||||||||||||||||
| There's a dark red stain on the blanket covering Barbicane. Remove the blanket to find that Barbicane has been shot. For now, pick up the carriage key (that drops to the floor) and use it to open the cupboard. Remove the monograph on lunar ideograms from the leftmost cubicle in the second row. Next, take the chlorate of potash that was hidden behind the monograph and examine it in your inventory to learn that this chemical generates oxygen when heated. | ||||||||||||||||||||||||||||||||
| Move the metal plate (with a mesh cover) away from the flame and fill it with the chlorate of potash. When the plate is moved back over the flame the oxygen level should return to normal. | ||||||||||||||||||||||||||||||||
| Return to Barbicane's body and read the top half of the torn letter in his hand. You learn about Barbicane and Nicholl waking up before you and realizing that there's only enough oxygen for one person to survive the trip. The sixth picture in the 'investigation' section of your inventory will be filled in. Inside his wallet (in his pocket) you find a love letter from Diana Moon, the same woman who wrote the monograph you found. Remove Barbicane's hat, then examine it in your inventory to note the lining is slightly misshapen. | ||||||||||||||||||||||||||||||||
| Next, examine Captain Nicholl's body to learn that he shot Barbicane. Pictures thirteen and fifteen in the 'investigation' section of your inventory are filled in. Inside Nicholl's pocket is a love letter written to him by Diana Moon. You find out about a bitter rivalry between the two men and the seventh picture in the 'investigation' section of your inventory will be filled in. Take the rifle and also examine Nicholl's face, noting the bitter almond smell. | ||||||||||||||||||||||||||||||||
| There will now be a rooster on the floor next to the bottom porthole. Examine the rooster to learn that Ardan intended using it to play a practical joke on Barbicane and Nicholl. Pick up the burnt paper under the couch behind the rooster, which is the bottom half of the letter in Barbicane's hand, and learn why it's burnt. This fills in the fourteenth picture in the 'investigation' section of your inventory. | ||||||||||||||||||||||||||||||||
| The burnt paper can be made legible. Move the metal plate (with the mesh cover) away from the flame, then adjust the flame as low as possible by turning the valve three times. Hold the burnt paper over the flame to read it. Don't forget to replace the metal plate over the flame and readjust the oxygen level by turning the valve once. Note that not doing this (the ninth picture in the 'investigation' section of your inventory) is a good way to ensure you get to use the 'fun' way of completing the investigation later. | ||||||||||||||||||||||||||||||||
| You should now take all the items needed later in the game. Take the powder barrel, vine plant, cartridges, empty pot, small knife, loaded red retrorockets, spent blue retrorockets and two pieces of raffia. Although the other items are not required, they will have some 'value' on the moon. Examining the bottle of disinfectant filled with cyanide, coupled with examining Nicholl's face, triggers the twelfth picture in the 'investigation' section of your inventory. Lift the roller shutter (bottom right corner of the cupboard) and take the empty glass on the left. Examine the glass on the right to learn that Nicholl poisoned himself. This triggers the tenth and eleventh pictures in the 'investigation' section of your inventory. | ||||||||||||||||||||||||||||||||
| At about this time potassium hydroxide escapes from the potassium tank, forming floating bubbles. Combine the can of potassium and funnel in your inventory and use it capture the bubbles. This is done by moving the little arrow on the left of the funnel over each bubble. There are nine bubbles in total that must be recovered. Note that this is not a timed sequence and you can take as long as you like to collect the potassium bubbles. If you find this too difficult, leave the can (fitted with the funnel) in the middle of the screen and go make yourself a cup of coffee. Eventually all the bubbles will be recovered, albeit that this may take quite a long time to happen. | ||||||||||||||||||||||||||||||||
| The potassium hydroxide caused the carbon dioxide level to rise, resulting in the oxygen level dropping. To rectify this adjust the flame below the metal plate (i.e. make it bigger) by turning the valve once. | ||||||||||||||||||||||||||||||||
| Remember the misshapen lining on Barbicane's hat? Use the small knife to cut open the lining of the hat and you find yet another letter from Diana Moon. This is the last part of Ardan's investigation so the eighth and sixteenth pictures in the 'investigation' section of your inventory are filled in. | ||||||||||||||||||||||||||||||||
ALL THE ACTIONS REQUIRED TO COMPLETE ARDAN'S INVESTIGATION | ||||||||||||||||||||||||||||||||
| ||||||||||||||||||||||||||||||||
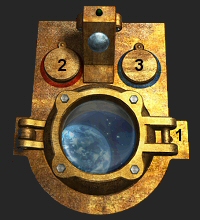
| There are a few things that should be done before loading and firing the retrorockets to begin the descent to the moon. Although you only find out what to do during the descent, doing them now effectively eliminates the timed sequence of the descent. Do you recall Ardan thinking about using the blankets as shrouds for both his friends and that it would be fitting that their bodies be buried in space? Tie both blankets with the raffia you found in the cupboard and pick up the bodies, adding them to your inventory. Ensure that the covers on all four portholes are removed by loosening the bolts with the monkey wrench. Now open the bottom porthole by lifting the handle, marked (1) in the graphic, and throw out both bodies. The porthole won't remain open for long, so I suggest that you open it while holding a body. In addition to disposing of both bodies you need to further lighten your load by throwing out the monkey wrench and rifle. | ||||||||||||||||||||||||||||||||
| ||||||||||||||||||||||||||||||||
| Don't forget to pick up the can opener that was hidden under Nicholl's body. | ||||||||||||||||||||||||||||||||
| Open the red colour-coded slot, marked (2) in the graphic, and insert the loaded red retrorockets. Before inserting the blue retrorockets in the same manner they must be loaded. There are two sources of explosive powder - either smash the powder barrel (using the rifle or monkey wrench) or cut open the cartridges with the small knife. Now open the blue colour-coded slot, marked (3) in the graphic, and insert the loaded blue retrorockets. The green light at the top should be flashing and you're ready to fire the retrorockets by pushing the silver button in the centre. | ||||||||||||||||||||||||||||||||
| Before opening the hatch to step out onto the moon's surface, make sure that you've got all the items you require. | ||||||||||||||||||||||||||||||||
| ||||||||||||||||||||||||||||||||