| |
UNDERGROUND CAVERNS |
| |
| The door at the top of the mountain leads to the ground (first) level in the underground caverns. |
| |
| Be careful not to step into the empty elevator shaft. The 'death' ideogram on the shaft wall warns of the consequences if you do. The call button is on the right of the elevator. |
| |
| There are three panels on the wall. The arms and legs of the gilded characters in the centre panel are adjustable. The tile in the bottom panel can be moved around the panel by using the red arrows. The illustration on the tile will change for each position, indicating how the arms and legs must be adjusted. Take note of the patterns at the top and bottom of the centre panel and on the tile. Use these patterns to identify which character's arm or leg is illustrated on the tile. For example, in the graphic below the pattern on the tile matches that below the right leg of the second character. |
| |
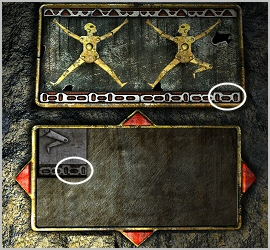
|
| |
| After adjusting the arms and legs of both characters correctly a drawer at the bottom opens, revealing a control box. |
| |
 | VIEW THE SOLUTION |
|
| |
| |
| In the room at the end of the tunnel you find a broken machine and a smashed parabolic mirror. There's also a hopper and an ax on the ground in front of the broken machine. For now you can't do anything with the machine or mirror. |
| |
| The elevator controls consist of six buttons and three slots. Note that the symbol on the top slot is identical to that on the Selenite key. Insert the key in the slot to access the first four levels of the underground caverns. |
| |
| |
| |
SECOND LEVEL |
| To your left as you exit the elevator coloured mushrooms fall from the ceiling, exploding on impact. You need to catch at least two mushrooms, but this will be dealt with later in the walkthrough. For now, focus on the metal box attached to the wall below the mushrooms. |
| |
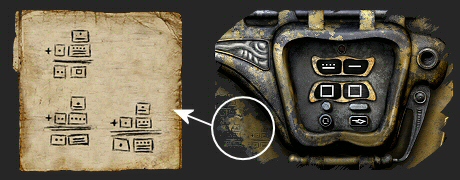
| Study the three arithmetic sums scratched into the wall next to the metal box. The sums together with an explanation of the Selenite number system are copied to the log. A 'bar and dot' (which you know represents a 6) is painted on the ground below the metal box. |
| |
|
| |
| From the log entry you know the Selenites use a Base 20 system. Numbers up to nineteen are shown in one column, and any 'twenties' are carried over to a second column on the left. You previously worked out that numbers from 1 to 4 are represented by dots and 5 is represented by a bar. Therefore, in a Base 20 system, the numbers from 6 to 19 are represented by a combination of bars and dots. Knowing this, the sums in the inscription should now make sense. |
| |
| 6 | | 6 | | 6 | | | + 34 | (1 x 20) plus 14 | + 44 | (2 x 20) plus 4 | + 28 | (1 x 20) plus 8 | | 40 | (2 x 20) plus 0 | 50 | (2 x 20) plus 10 | 34 | (1 x 20) plus 14 |
|
|
| |
| In all three sums the number 6 (which is also the number painted on the ground) is added to another two-digit number. The metal box displays a two-digit number at the top and two squares (zeros) at the bottom. The round button is used to input 'dots' and the long flat button to input 'bars'. The left button at the bottom resets the puzzle and the one on the right is the 'enter' key. Initially the right window on the second display has a light grey shade, which can be switched between the windows by clicking them. The two-digit number is randomly generated so yours may be different. |
| |
| In the above graphic the number displayed on the metal box is 185, or (9 x 20) plus 5. As indicated by all three sums, you must add 6 to this number and input the answer. Do the arithmetic by first adding 6 plus 5 and input 11 (less than twenty) in the right window using 'two bars and one dot'. No 'twenties' are carried over, so the left number remains the same and is repeated in the left window. Remember that in a Base 20 system the numbers in the right column can be as high as nineteen and 'twenties' are carried over (added) to the left column. Also, zero is represented by a square. |
| |
| After inputting the answer press the 'enter' button and the metal box should open. Flip the switch inside the metal box to open the door on your left. |
|
| |
| Inside the room through this door are two levers and an indicator shaped like a bull horn. The left lever is marked with a '6' and the one on the right with an '8'. Pull the left lever to close the left door, then pull the right lever to open another door on the right. You learn that both doors cannot be open at the same time. The right door leads to the combustion chamber of a space cannon. Note the '8' painted on the floor, which corresponds with the right lever. These two rooms are not important now and are dealt with later in the walkthrough. Go back to the passage, remembering to first close the right door before opening the left one. |
| |
| On the second level you find another fan-shaped device and white chart on the wall, both being identical to the ones in the middle of the crater. If your curiosity gets the better of you and you test the device, pressing the second button on the indicator opens a door in the passage. The door leads directly to the fan-shaped device in the middle of the crater. Unfortunately that device still needs to be greased, so you have to return via the top of the mountain. |
| |
| At the far end of the passage is a room with alcoves built in the walls. The burning smoke from the yellow chlorine gas prevents you going any further. |
| |
| |
| |
FOURTH LEVEL |
| As soon as you try go to any lower below two, Ardan is escorted to the Dignitary's office on the fourth level. During the lengthy dialog with the Dignitary you are given an intelligence score, which is updated as you progress. If you followed this walkthrough you should already have approximately 260 intelligence points. Ardan prepares his action plan for the return trip (displayed in the log) which is a useful guideline of what needs to be done. |
| |
| Examine all the machines and devices in the office, paying careful attention to their functions and uses. |
| |
| READING SCREEN |
| Used for learning to read Selenite. Randomly generated ideograms are displayed and must be correctly identified from the multiple choice answers to master the art of reading Selenite. |
| |
| HARMONIC EDUCATOR |
| Used for learning to understand Selenite. The two panels each have sixteen buttons, those on the left are marked with skulls and those on the right with various ideograms. Each of the right buttons plays a unique musical note. The same sixteen notes are randomly duplicated on the left panel. The notes have to be matched by pushing a button on the left and then the button on the right panel that plays the same note. Unless you have an exceptional ear for music and an extremely good memory, this puzzle is best solved by 'trial and error'. Push the first button on the left panel and then try the first button on the right panel. If they don't match, push the first left button again and now try the second button on the right panel, and so on. Repeat this procedure for all sixteen buttons on the left. No solution can be provided as the notes for the left buttons are randomly generated each time you use the harmonic educator. After all sixteen notes have been matched you can understand spoken Selenite. Although you're afforded an opportunity to try again (to earn intelligence points) there's no need as you can collect more than enough points elsewhere in the game. |
| |
| |
| DISTRIBUTOR |
| Used to buy items needed during the game. At this point there's nothing you need. Note that as the game progresses certain additional items become available in the distributor. You should sell some of your possessions to the Dignitary as you often need lunars (money) during the game. Try not to sell items you think may still be used later, even though you can buy them back. I suggest that initially you sell the following items: |
| |
The 5 hybrid plants (110 lunars each) - can easily be produced if needed again
Rifle (60 lunars)
Protective shell or twisted plating (70 lunars) - you only need one of them later
Earth raffia (50 lunars)
Closed tin can of food (50 lunars) |
|
| |
| |
| BELBAAB CONCH |
| Discuss the Belbaab conch with the Dignitary, learning that it enables him to speak and understand all languages. |
| |
| REQUEST BELL |
| Your intelligence score is over 200 and you can therefore request a level 1 hierarchical key. You need to earn at least 300 intelligence points for a level 2 hierarchical key, so continue exploring and solving puzzles. |
| |
| |
| |
THIRD LEVEL |
| The kitchen to the right has a vat filled with puréed fruit. The lever next to the vat is used to switch distribution between food and water. All five fruits, lava (fire) and water are available here. You also find a shovel and cogged cylinder. |
| |
| At the other end a Selenite is standing in a booth. You can understand him, but as yet cannot communicate with him. Take note of the metal door on the wall next to the Selenite. |
| |
| |
| |
FIFTH LEVEL |
| Insert the level 1 hierarchical key in the appropriate slot in the elevator, then make your way down to the fifth level. |
| |
If at this point in the game (or at any time later) you find that the level 0 key is missing - don't panic!
Despite being negligent by leaving it in the slot (rather than carrying it with you) it can be recovered.
Recovering the key is covered later in the walkthrough. In the meantime, simply use the level 1 key. |
|
| |
| Opposite the elevator is another metal box number puzzle. Note the lunar number corresponding to '22' painted on the floor below the metal box. This puzzle is solved the same way as the other one, except that '22' must be added to the displayed number instead of '6'. |
| |
| The switch inside the metal box opens the door to the laboratory. The purifier machine inside the laboratory is out of operation and must be repaired before it can be used. The rock slabs at either end of the purifier have various Selenite chemistry formulas etched on them, which are copied to your log when examined. There's a scale used for separating isotopes, lava (fire) and water pools as well as supplies of potting soil and lunar raffia. Nothing much can be done until you find the components needed to repair the purifier. |
| |
| At the other end is another Selenite, busily working on the lumen plant. |
| |
| |
| |
LEVEL 2 HIERARCHICAL KEY |
| If you followed this walkthrough (or completed all the puzzles dealt with so far) you should have earned more than 300 intelligence points and are entitled to a level 2 hierarchical key. Return to the Dignitary's office on the fourth level and request the key. Only the Supreme Ruler can grant keys higher than level 1, so you need to learn to speak Selenite in order to address him. Unlike this walkthrough, the Dignitary's assistance isn't free! At a cost of 100 lunars he tells you to repair the damaged flute. From the description in your inventory you know that a tube is missing and glue is needed to repair it. After earning 300 intelligence points Yrshnouff's gluance (glue) is available for sale in the distributor. |
| |

|
| |
| Buy Yrshnouff's gluance (glue) and then combine it (in your inventory) with the damaged flute and a lunar reed. |
| |
| Now that you speak fluent Selenite, press the request bell again. The Supreme Ruler grants you a level 2 hierarchical key, but orders you to return the removed items to the sarcophagus. If your investigation into the deaths of Barbicane and Nicholl (on board the shell) is incomplete he also orders you to finish it. This is dealt with later in the walkthrough. |
| |
| |
| |
HALL OF SECRET ANTIQUITIES |
| Insert the level 2 hierarchical key into the appropriate elevator slot to access the sixth (bottom) level. The tiny archway in the corner is an entrance to the Hall of Secret Antiquities. You cannot go through at this point in the game, but take note that the star above the archway is identical to the one on the strange device in the room. |
| |
| |
| |
|
| |
| |

