THE WARD
A Walkthrough by Soren Andersen
Personal Observations
The jewel case sized booklet--the manual--starts with two sections: the Ward Background Story and the Main Story. I found the mass of detail confusing, but science fiction mavens who are more used to this sort of plot will in all probability comprehend it much better than I. At any rate, read it a couple times to get some background. The rest of this booklet is used to present in detail the game's user interface; this latter subject may also be found as a Microsoft Word document on game disk 1. In several instances there is more than one way to do what you want to do--for example, load or save games--and one of these will usually turn out to be simpler.
Not covered in the above manuals are method of playing options presented when beginning a new game: Easy, Normal, and Demo. Place the cursor on each word to get an explanation. What is not stated is that you can switch from Normal to Easy by keying Ctrl/Shift/E; apparently you cannot switch back.
The Ward is quite a long game for one that is on only two CD's, and it is about as nonlinear an Adventure game as you are likely to find. The graphics are quite good, and game storage to all intents and purposes unlimited, with adequate space for situation description and aided by thumbnails. This is to your decided advantage because there are many, many opportunities to be destroyed, so you must save often. A good share of these chances are the result of timed sequences, a couple with visible countdown timers and others evident only when you are overcome. It is during these periods that the protagonist Walker’s deliberate pace becomes frustrating, at other times it is only annoying, and there is no way to make him hurry.
The first section of the game on the Moonbase is quite straightforward and linear, but when you get to Mars the incessant moving and talking that you must do to force development, as well as the tedious blackjack game, can become rather wearying, and I was tempted a couple times to give up, but I hope that is not an impediment to other players, because it is a pretty fair game if one overlooks these shortcomings, accepts the premise, and ignores the discontinuities.
I found irritating the several instances in which the same item is designated by different names, such as when positioning the cursor on it in place and then when in it is done in inventory. Be prepared for this oddity. In connection with the inventory I believe that it would be much easier to identify items were they not shown so dark; this is exacerbated by the fact that they spin when the cursor is on them—which is fine—but if thin or narrow black items stop when edge on they are almost invisible.
I found it interesting that it is only in a few videos that there is any spoken dialog, the rest of the time—and there is a lot—it is not spoken but printed. Walker’s is shown in white and others consistently have other colors, which helps identify the speaker. Good idea.
In the following walkthrough I tried not only to present explicit instructions on what moves to make, but also in many instances why they are necessary. The appended maps, especially that of the Mars Colony, should prove quite helpful. And you should always keep in mind that this is an Adventure game, so you must save often.
Walkthrough
NOTE: Be sure that you have set the options so that the inventory items will show printed identifications.
The game opens with a long video of the Apollo XIX mission that is on the moon investigating unusual seismic activity. Lewis and Higgins are at the moon surface with the Lander module or in the Orbiter circling the moon, it is not exactly clear about this. You, David Walker, are out with the Rover on the surface of the moon setting up instruments and making measurements. Lots of conversation between you, the moon base, the Orbiter, and Houston before the Orbiter goes out of communication on the moon's dark side. Shortly thereafter an alien force destroys the Orbiter and the Lander with missiles, and you are the only one left.
Keep in mind throughout this walkthrough that the Fraction are on your side, and the Controllers, the Reptoids, and the Greys (maybe) are your enemies.
The Moonbase
An explosion has rendered you unconscious and you have been captured. Your interface with the game begins with you regaining consciousness, without your space helmet and in a compartment filled with many things, so you must start exploring. Around your neck is a collar that you can't remove, apparently a surveillance device in conjunction with the sphere floating above (click on it). The collar in inventory is called a necklace. In the center of the compartment is a cabinet that when seen in closeup shows a screwdriver for you to pick up and put in inventory. There are a couple of dead bodies on cots, one alien and one human; perhaps this is a morgue. Nothing for you on the human, but the alien has a card in his pocket that you need the screwdriver to remove. It is a medcard.
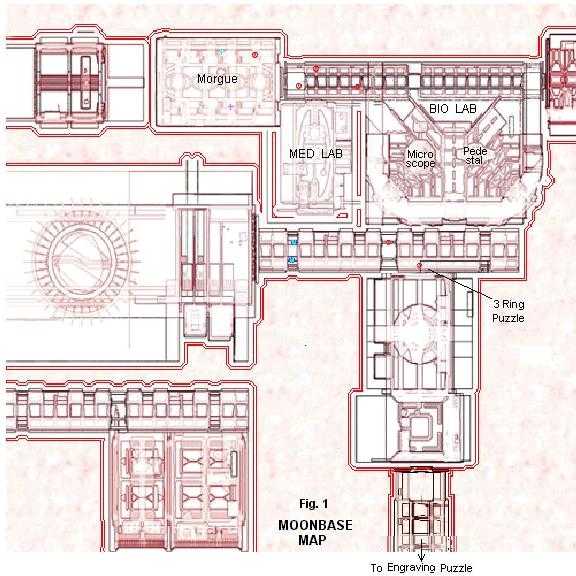
Click on the glowing area on the wall with a red and green column on each side. It is a map of the moonbase where you are being held. Move your cursor over it and the various compartments will highlight; click on any one of them and a legend appears across the top, but you can't read it because it is in an alien script. Click on the legend sections and more alien script appears. Clicking on the section underlined in yellow takes you back out of the map (you can also do this using a red movement arrow at screen bottom). In the second compartment from the left at the top the map shows a pulsing red +; that would be your position in this morgue compartment as you look at this map. There is a blue o where you found the dead alien and a green + for the dead human. There are more such indications in other compartments, the blue o's are aliens and the orange diamonds are enemy drones that must be avoided. Pulsing ones are "alive". Fig. 1 is a screenshot of this map; unfortunately in order to make it printable the colors had to be electronically reversed and some of the details, such as aliens and robots, are no longer so prominent, but nevertheless you can use it to follow your progress as you move around the base.
The map indicates three dead aliens in the passageway next to you. When you go to investigate a painful noise comes from the collar, getting more intense the longer you stay away from the floating sphere. However, you have time to examine the first of these aliens before being driven back by the noise, and from next to his body you can get a security card. You can put this card in a slot in the red column to the left of the moonbase wall map, whereupon the column turns green, and the + representing you on the diagram turns from red to green. Now when you move away from the sphere the collar is silent, though it still emits a tracking beacon, as you will find out.
There was something else on that alien in the passageway: a ring, but it is tight on his finger and you can't get it off. On the floor next to him is an uncharged laser gun for your inventory. Farther down the corridor on the floor is another alien corpse from which you can get a ring with blue engraving. On the third alien corpse there is nothing. This corpse was thrown up on some cabinets by the explosion that presumably killed the three of them but fortunately only knocked you out. In the wall opposite him is a locked door, but you can open it using the medcard. It leads to a medical laboratory.
Lots of stuff in here, but not much for you, at least at this time. On either side of the door through which you entered are red sensors, the one on the left will accept the medcard and open the door. The one on the right also accepts the card, and then some faint blue markings appear on the screen immediately to the right of it. Click on this screen and a closeup of it appears showing a spaceship and a 6-button touch screen. Click on the leftmost button and the spaceship turns out to be a robotic surgical instrument that drops down from the lab ceiling. You can play with these touch screen buttons to see what they do, but after the first, you need to click on the third to expose some blades and the last to lock them in place so you can break one off and place it in inventory.
What to do with this sharp blade? Apply the medcard to the left door sensor to go back to the alien corpse in the passageway and use the blade to get the ring from his finger. This ring has an engraving on it identical to the blue one you got from the other dead alien, but the color of this one is cyan. Back in the medlab go all the way to the right where there are five cabinets in the wall, four closed and one open. Below the closed one on the right is a sensor into which you can put the medcard to light up a screen; a closeup of the screen shows the indecipherable alien script. From the open cabinet you can get, one at a time, three capsules containing blood samples. In the foreground are three medical beds and a medical robot, the red light on the latter indicating it is active.
Go through the door to the left of the five cabinets, where you will be in a biological laboratory—a biolab. In this room is a blue square right in front of Walker when he enters; place the cursor on it to find that it is a microscope. Click on it to exhibit a closeup: a globe in which may be seen floating another blood sample capsule and below it a bright "light object". Below the globe are four smaller bars and one larger one. Use the smaller ones to move a pair of circles on the surface of the globe around to the lower right until they can be superimposed and become one, then click on the larger bar to turn the circle red and the sample will float out of the globe. Place it in inventory and then click on the light object, which after a short pause also goes into inventory, where it is called a glowing lens. The room goes dark but the emergency lights come on shortly, just wait. A door opens in the wall on the left, beyond which can be seen laser flashes.
Farther into the room is a long probe extending from the ceiling toward a low pedestal on which something is swirling. Putting the cursor on it labels it "pulsating matter"; click on it and Walker calls it "a hollow mass of live tissue". If you put it in inventory it is called a biocontainer. However, for now leave it on the pedestal. You can look around this room but you will not find anything productive. Nothing more to do here at this time, you will come back later. Leave through the door on the left; use the medcard if you have to.
Outside this door you are in a corridor in which an alien is in a laser battle with an unseen opponent, which the moonbase map indicates is a couple of drones. When there is a pause in the shooting, hurry across to a door on the opposite side. Be careful here, it is your first opportunity to be killed. On the floor is another alien body, and again when there is a firing pause, retrieve a green engraved ring from it. In the wall by the new door is a control panel that will show a closeup when you click on it, but it is too dark to make out the details. Apply the glowing lens that you took from the microscope, then use the screwdriver to pry off the cover in the panel upper left--keep at it, it will come off after several attempts. Click on the blue bar underneath the cover so that all three bars are red.
Below the bars are three sensors on which are faint insignia that match the engravings on the three rings that you have in inventory. Your task is to match a randomly established color sequence of the sensors with the rings. You do this by picking a ring from inventory and clicking it on a sensor, putting the ring back in inventory, and repeating with another ring on another sensor. You must complete the sequence within a quite short time set up by a timer in the panel. If time runs out, start again. No ring colors are repeated, and therefore there are six different sequences of the green, blue, and cyan rings:
GBC GCB CGB CBG BCG BGC
Line up your choice of a ring sequence in inventory, and by operation of the left and right mouse buttons you can select, place, and release the three rings before the timer runs out. What you are looking for is two green lines to appear at the bottom of the panel display, so keep trying different sequences until that happens. When it does, note the sequence. At this point the shooting alien will toss at your feet a red engraved ring (which might be hidden by the inventory display). Pick it up.
Now you must go through the same procedure of clicking rings on the three sensors, but here the red ring is substituted for one of the rings that got the two green lines. Clearly this will take no more that three sequence attempts. When you have the correct one the door opens and you go through. However, the alien loses his fight and gets killed so the drones he was fighting are free to come after you, and therefore you must immediately click on the sensor on the left of the door to close it and keep a drone from getting to you and ending the game unfavorably. You must be sure to note the ring sequence that opened the door as you will need it to open another.
The compartment in which you now find yourself has a large screen display and console on the left wall, and next to it is another moonbase map with its own console. Click on the latter and Walker will say that he sees a ring slot in it, but you can't find it with your cursor. In the center of the room is what looks like a large gaming table, but Walker thinks it is a holographic projector. At the end of this table is a cover and next to it a button or a bump, depending on the place from which you view it. Click on it and the cover moves off to bring up a device that resembles a TV remote control, but the game calls it a memorizer. All of the writing on it is in the alien script.
Move on to the next compartment where you will find more displays and consoles, and another projector, but nothing with which to interact. A panel to the left of another door will open to let you move on into a long stone walled passageway with yet another door at the far end that opens as you approach it.
Now you enter a large indistinct area with a luminous sphere suspended high above a circle on the floor, and floating lower at shoulder height is a gray object that is called a plate when you run the cursor over it, then a floating stone when you click on it and Walker moves to it. Click on it again and it morphs to a plate with symbols on it. Click on it a third time and you can place it in inventory, yet it remains floating in front of Walker. Click on it once more and hold the mouse key down, whereupon it morphs into a set of disks and triangles stuck together; these are labeled tiles. Put them in inventory.
The overlapping parts of the disks and triangles should be a close color match for corresponding sections of the stone plate diagram on the left. Click the crystal cone on the engraving.
A long video ensues, and at the conclusion two alien members of the Fraction appear. After the pyrotechnics that have just concluded in which Walker is given an implant, he can now understand them and read their language. A long conversation ensues during which Walker is told things about himself that he did not know, of the many things he is expected to do, and his important responsibilities. For these reasons, a copy of this conversation follows as a reference:
..wwhat?..
We don't have much time. You understand us because of the implant we installed in you while you were in touch with the Maker's Artifact. Now, the only thing that you can do is protect what is inside you - and reach Mars in a vessel alive.
Mars?
Yes. We expected you, Ward. The Nexus told us that you would come.
The Nexus?
It's a code name of a man you'll have to find on Cydonia. It's a Reptoids base on Mars.
A man? Who is he?
There is no time to waste - he is your connection, Ward. You'll find him with this.
What's this?
A Communicator. Show it only to the Nexus.
Why do you call me Ward?
Because you are him. You are the Ward.
No, I am David Walker.
That may be your name, but have you felt it yourself - the Technology knows your very core. Believe me, it wouldn’t react if you were not the real one.
The real one? Real what?
You'll find out later. Now there is no time to discuss it. The essence that took your body was made by Technology, and the one who owns the Technology owns the Universe.
What about the fighting all across this base?
The Fraction is fighting to keep you alive, Ward - you have to stay alive and go to Cydonia. The Controllers are after you. Believe me, you do not want to meet them.
How about some protection?
Do you have a weapon? Here is some extra ammunition.
You mentioned a vessel.
It's a spacecraft leaving for Mars. You must board it, undetected by the...enemy. We have failed to capture it.
Very comforting. How can I get there?
There are containers in the hangar ready for uplifting. Get to them somehow, try to use your necklace to create a distraction. If you have a memorizer, you'll have to use it. One more thing, Ward--trust no one except the two of us. Anybody else will act according to the Reptoids' orders; shoot first, then capture the remains.
What about the biocontainer?
The biocontainer is a biological container. You'll need it you preserve the crystal cone with the Makers' symbols. The Reptoids mustn't get it. The only way to smuggle the cone past the Reptoids is to use the biocontainer and smuggle it inside your body. For that you'll need a sample of your blood in order to match the biocontainer's molecular structure with yours. Blood samples of abductees should be in the medlab, and the microscope and the transferring ray apparatus in the biolab next to it. Remember this: the biocontainer integration is possible only when using the correct activation code.
Anything else?
You will need the memorizer in order to establish a link with various base facilities. Now hurry up, they are coming for us! Go!
The aliens have given you a badge-like object they called a Communicator; it is called a Secret Sign in inventory. They have also provided you with ammunition for the laser gun that you picked up early in the game. You must now return back to the compartments where you were at the other end of the stone walled corridor. Getting back through the corridor without being shot by a laser is one of the more difficult episodes of this game. The time given to do this is so short it borders on being unfair, but it can be done with practice. Before entering the corridor (when Walker is ready to say "Anything else?" to the Fraction aliens), in inventory set up the final colored ring sequence that you learned from that particular puzzle, then save your game and be fast with the mouse keys when you get to the code lock. And don’t forget to close the door immediately when you get through it, or you can still be shot.
With the implant from the aliens you can now read the alien script. In the oval display are several items telling about attempts and failures to reach an artifact, presumably the Maker's Ark. Move on to the next room and access the moonbase map and click on the blinking legend at the top. This brings up the rest of the legends, all of which are now readable. Most of these will display messages similar to the ones you just read on the oval display; many of these are cryptic, others will have reference to things you have learned or experienced. You will also note additional icons indicating more drones. Your position is still the blinking green + in front of this second panel.
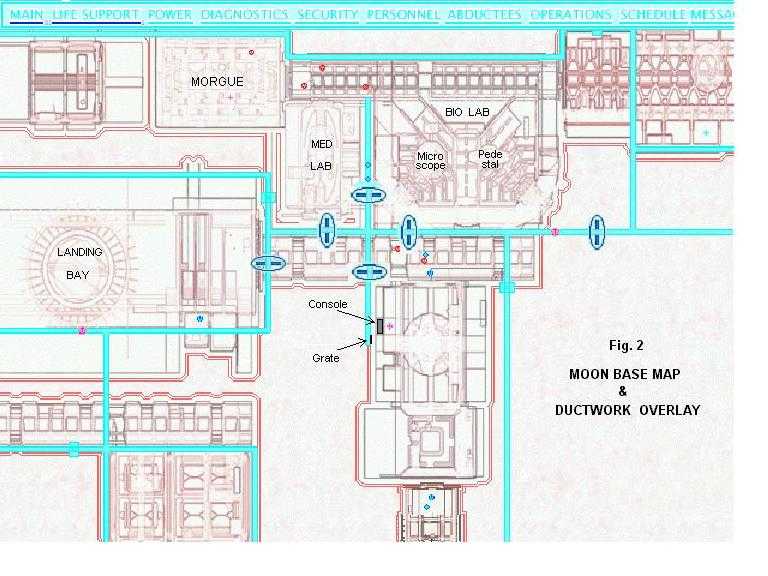
When you click on the Life Support legend on the top left the map will show a red overlay of ventilation ducts, which may also be used to move around the moonbase, and in fact there are drones patrolling it. Two of these are the menacing orange diamonds, and in addition there are two square ones in which are tiny green anchors. These latter ones are harmless maintenance robots, and the motionless one on the right is broken. There are four red ovals on the ductwork that are gates through which there is no passage, but if you put any of the four rings in the console slot you get control of these gates. Click on one of them and it turns blue, signifying that it is open for passage. Fig. 2 is a moonbase map screenshot now showing the ducts, and again the colors had to be reversed to get a print. This screenshot will be quite helpful in following the movements you will be making.
You are trapped in your present location by drones outside the door zeroing in on the tracking signal from the collar that you can't remove. Check the map. You are going to have to get the collar off and send it away with the drones following it as suggested by the Fraction aliens, and to do this you are going to have to move around through the ducts. You need to get to both the maintenance robots and of course avoid the orange drones. Click on the moving maintenance robot patrolling the ductwork on the left and its patrol commands will be shown (if it is not visible, wait a bit and it will appear from the left). There are four of these: sector 101, sector 102, sector 103, and checkpoint exh. 2. The first and last of these are highlighted, meaning that they are active. Put the cursor on each of the four patrol commands and the zones will be indicated on the map, with blinking arrows showing for sector 103 and a circle for the location of checkpoint exh. 2. It is currently patrolling sector 101, but you want to meet it at the checkpoint, so click on the fourth bar and the robot will go to this location and wait. Being broken, the other maintenance robot cannot move so you must go to it.
By setting the oval red gates alternately open and closed and watching the two patrol drones as they move, you can get both of them in the section of ductwork above the upper gate and then confine them there, thus giving yourself a safe path to the immobile maintenance robot. When you have done this the upper gate will be red and the other three blue. Now you must get into the ducts. Near the floor on Walker's left you will find a grate in the wall. In inventory click the gun load from the aliens on the laser gun that you picked up early in the game, and then click the gun on the grate. A video shows the grate being removed, after which you are in the duct with the lasered opening on your right.
Move forward until you come to the cross duct, then go right to the maintenance robot. One of the reasons that this robot is not working is because the tool that is its right hand is almost torn off. You can use this item, so click the blade on it, then put the tool in inventory.
This robot contains setup readings that you must get into the memorizer, the unit used to communicate with several robotic items that you will encounter. You need these settings to activate them on the other maintenance robot waiting at checkpoint exh. 2. Bring the memorizer up from inventory. There is a display panel in the upper half and a command section in the lower half, and you can now read all of the printing on it, thanks to your alien implant. When you use a command from the lower section, watch the announcements in the top and bottom lines of the display.
Move the cursor to either side of the duct to turn it into a rotating arrow, signaling an about face when you click. Return back through the ducts and out to the map console.
Use a ring to get the map and ductwork overlay again. Release the drones from the upper ductwork section and manipulate the ovals to allow them into the section on the right of the right oval, which is then made red to confine them there, and make the other three blue. You have just been in this duct where the drones are now trapped, and you do not need to go there again. Return into the ventilator duct and go straight up to where the drones were previously trapped. At the end of the duct you will find a grate that can be removed by using the robotic hand on two screws at the top corners of the grate. Click on a grate handle to remove it.
Drop down into the passageway, a location you should recognize. You need to get a data setting from the security sphere floating in the morgue compartment where you began the game, so go there and bring up the memorizer. You neutralized the sphere at the beginning of the game, and this setting will be needed later.
Go back into the passageway and use the medcard as before to go into the medlab. Move to the far end of the room where you got the blood samples. Bring up the display, which you can now read. In the closeup, click on the "obductees menu", then on "security beacon necklace removal". It tells you to approach utilliturret A, which is the robot with the red square showing. When you do that two arms reach up and remove the collar; put it back in inventory. Note, as does Walker, in the closeup the statement that the collar beacon is still functional. There is interesting information to be had from other items in the display, though it is not necessary for game progress.
Leave the medlab and reenter the ductwork. Move to the crossduct and turn right, then go to the end of the duct and turn left, where you will be facing the waiting maintenance robot that you sent to the checkpoint. Hang the collar on the robot's upraised arm. Now you must activate its inactive sectors so that you can send it to one of them, using the data you got from the inactive robot, and for this you need to again use the memorizer.
Back off from the robot, turn left, return to the console, and use a ring on it for the last time. The orange enemy drones that were outside the door are now next to the active maintenance robot at checkpoint exh. 2, since it is carrying the collar. Click on this robot to show its assignment list, all four of which will now be highlighted. You can send the robot to either Sector 102 or 103; the latter is farther away so choose that one and send it there with the orange drones following it since it and the collar. You can watch this happening on the map.
Since the drones are no longer outside the console room door, you can leave and go back to the biolab and complete the instructions from the Fraction aliens to get the crystal cone past the Reptoids. Click on the panel at the left of the door to open it, then cross the passageway and use the medcard to enter the biolab. If you have taken the biocontainer (pulsating matter) from the pedestal below the long probe, put it back now. Go to the microscope, click on it to get the closeup, and return the glowing lens to it, where it becomes a light object. Click on the longer of the five bars beneath the lens and the microscope globe reappears with the red circle on its surface. Blood samples can be placed in the microscope and analyzed by clicking on the touch screen strip.
The aliens have told you that the only way to get the crystal cone past the Reptoids is put it inside your body using the biocontainer and that a sample of your blood is necessary. You have four blood samples in inventory, and if you analyze them in the microscope you will find that two--Nos. 2 and 4--are from Greys and two--Nos. 1 and 3--are from humans, neither specifically yours. The microscope shows no apparent difference between these latter two, but in the subsequent absorption process, sample No. 1 will not work and sample No. 3 will, so perhaps it is somehow close enough to your own to be suitable. It could be that this sample was taken from you while you were unconscious.
Put blood sample No. 3 in the microscope and click on the touch strip. It should show that the sample is human DNA biomatter. Click on the rightmost of the six buttons, and below the probe (the aliens transferring ray apparatus) the DNA can be seen being infused into the biocontainer on the pedestal. Put the biocontainer in inventory and while there, click the crystal cone on it. The cone may be faintly seen in the biocontainer. On the memorizer:
If this absorption process fails go back in your stored games as close as you can to entering the biolab and repeat, closely following each of the directions.
Use the medcard to return to the passageway. Go down to the far end, which will take you to the landing bay. Before you do that, however, bring up the memorizer and use the arrows to highlight SEC.LEVEL 6. Then as soon as you enter this hangar click transmit in order to neutralize the floating security sphere or you will be zapped out of the game.
With the security sphere successfully neutralized you can pick up an oxygen mask on your right and an oxygen tank on your left. Place them in inventory as you get them. Bring up the memorizer:
Enter the container, the large box on the right with the red handle. When you are in it, get the memorizer and use the arrows to select the container code, then click on transmit. The container closes. In inventory, click the oxygen tank on the oxygen mask, and a long video ensues in which the container is loaded on a spaceship and transported to Mars.
Mars Colony
Here the character of the game undergoes a decided change. This section is far from linear, so presenting here an orderly game procession sequence is not possible. It would seem Walker is aptly named, for now you have to keep him moving around in this colony, endlessly talking and talking to the various people and amassing information. People keep randomly popping up and leaving, and you pretty much have to address everyone that you can, using all the queries that are available. On the conversation lists you can choose to be confrontational or agreeable, but usually you ask everything that you can.
You will find some who won't talk to you at first, then after a while those that do will not have much to say because you have exhausted that person's information; however, depending upon replies from one, a flag may be set so that new information will be forthcoming from another, and therefore you must keep asking. Here is a list of the personnel you will meet and query, in no particular order:
Recall that the aliens on the moon gave you a badge-like Communicator to help you identify a contact they called the Nexus, so you must be on the lookout for him by showing this item to colony inhabitants, though if you do, most will say it is not a good idea to do so. See if you can get a handle on the distinction between the Greys, the Reptoids, the Controllers, and the Men in Black (MiB), and what is their relationship with each other. All through much of the following you will find things that must be done, but not necessarily in the order listed.
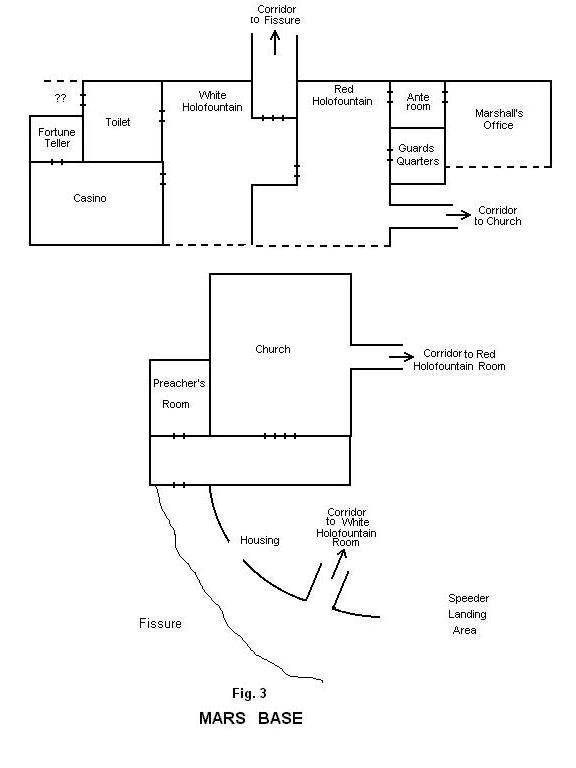
When you arrive at this colony you will be in an arrival area that is a ledge in a large cave overlooking a fissure. This scene is a long shot, and if there are other people there they may be hard to see. The housing for the people here at the colony may be reached following the second directional arrow at the left. Refer to the attached diagram of the Mars Base, Fig. 3, to help move around. Check your inventory to see what you still have left from the things you gathered on the moon. You are met by the villain Jack Ripper who will take you to Jack Marshall, the man who runs this place for the Greys. He will tell you the rules and give you a chamber card for your housing. Ripper takes you there, on the way telling you about the church. He leaves you outside your door. Go into your spartan chamber, where there is not much more than a locked cabinet, a chair, and a bed. Click on the bed to lie down for a bit, and you will have a vision or dream in which you are told to look for the Quickener.
Leave your room and begin your endless questioning by going to the toilet and talking to Sebastian Mezenga, the attendant. There will be a long conversation with him, as well as with Dr Morgan and Jessica when you meet them. Some of the people will suggest that you talk to someone else, so do that. Much of the dialogue will take place in the casino and the church, since for some reason these are safe places from the non-human oppressors. In the left rear of the casino is the door to the room of the smartass fortune teller; at first her conversation is rather sophomoric, something to endure.
Sooner or later you are going to have to play a tiresome game of blackjack with the Gambler in the casino, and you might as well get it over with. You need to get two items that he has, which are his sleeping chamber card and a half of the Pager's card. (If you need the rules for this dull game, click on the card in the upper right.) It may be that he won't bet the card half until it is the last thing he has to wager, so by the end of this card playing you should have all of the items that you will be needing, plus some new ones that have unaccountably appeared and others that you have won. Obviously the gambling has to be fixed so that you eventually win the items that are needed for the game to progress, so while you will lose some things as you play, you will win in the end after a tedious playing session. You have to offer two items from which he can choose, unless you have only one betable item left (some of your items are not candidates for gambling). The Save function is disabled during the blackjack session. Once you get the Pager's half card you can show it around, specifically to Hacker, and you eventually will learn how to get the second half. This card is vital.
It bears repeating that you must keep moving and talking to anyone you can, particularly Jessica, Dr Jeffrey Morgan, and Preacher John Holbrook, as well as most others except the Gambler, in order to learn more and to trigger new conversation or action. A couple of things for which you should be on the lookout:
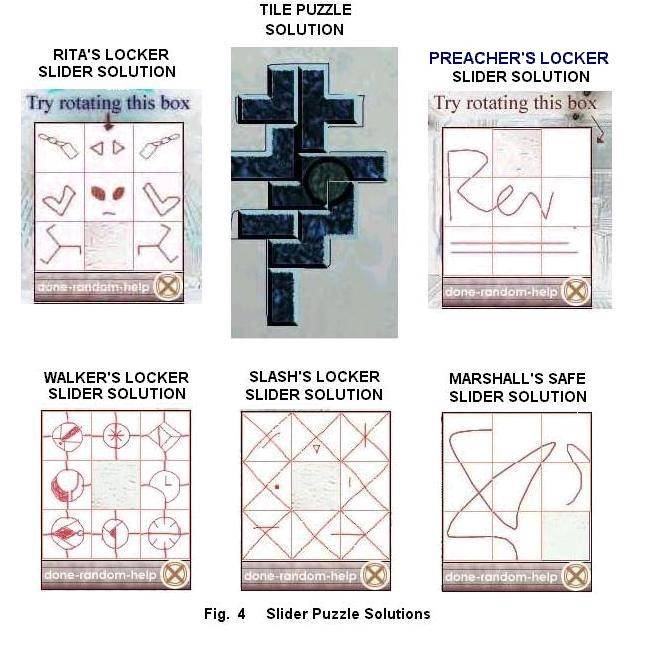
In the personnel quarters there are several cabinets with slider puzzle locks; you have already seen one in your room. There are clues that turn up to solve these puzzles, and you can't solve one unless the clue is present or in inventory. See Fig. 4. After solving one you must click on the word "done" at the bottom of the puzzle, the puzzle disappears, and you can click on the cabinet for it to open.
Probably the first of these cabinets that you encounter will be the one in Rita's room off the casino when you finally find the door unlocked and she is absent. Pick up the three Tarot cards from the table from an earlier visit with Rita; the cabinet puzzle clue is the Wheel of Fortune card. Examine the card and you will see the same items that are in the cabinet lock slider squares. Note that the squares may be rotated to orient them exactly as seen on the card (except for one of the boots) by using the right mouse key. The upper center square with two triangles is symmetrical and may have to be rotated twice.
When you get the cabinet open you will find a slot concealed behind a book on the lower shelf; use the King of Pentacles Tarot card on this slot and a door will open behind Rita's table. Hurry to this door before it closes and you can enter a secret room. From the back of the room you can pick up a notebook, or you can get it later. Don’t bother with the door on the right at this time unless you have managed to get Pager's complete card. Close Rita’s cabinet door on your way out, and you may wish to put the Tarot cards back on the table.
After you have rescued Rosa from Ripper, the next time you locate her she will give you a diagram that she tells you is the key to the cabinet in Slash's room and in which is the other half of Pager's card that you won from the Gambler. There seems to be an anomaly here: from the Gambler you have won—or will do so—his room admittance card (and so identified in inventory), which will open the room next to yours; however, when you get the clue from Rosa she says that it is Slash's room. Accepting this to be the case, apply the Gambler’s card to enter the room to the right of yours and using Rosa's clue to solve the slider puzzle, get the other half of the card from the cabinet. Find Hacker, give both card halves to him, then the next time you find him he will return it repaired.
Keep talking to people and learning things. Eventually you will find Jake the Radioman who shows you a note he found on his radio. It is from Holbrook asking you to meet him in his room. When you get there the door is ajar. Save your game.
Inside the room the door closes and locks, the call bell beside it does not work, and air is being drawn from the room. You have begun a timed puzzle in which you must repair the bell or you will suffocate. The game Save function is disabled during this timed sequence. Click on the picture above the door, then a little way up on the right side of it find a hidden switch that allows the picture to swing back and show the bell circuitry. Using the screwdriver you can remove a plate at the top where you can see a pair of open wires. Click on the wires, which will join crossed, then press the bell button, causing sparks. Look at the cabinet again to find the wires are once more open. Join them again, making sure they are not crossed (click on them twice). The bell still does not work. Click on the round knob to remove the fuse that has burned out. Put the fuse in inventory. This fuse looks remarkably like the C.S.M. model. Put the C.S.M. model in the fuse base sitting in bottom of the cabinet. Click on the base to screw the assembly back in place, then try the bell button again.
Assuming that you have performed the foregoing within the allotted time and successfully repaired the call bell, the scene shifts to Hacker and Preacher John talking in the church, when they suddenly hear bells. Another scene shift back to the Preacher's room, where you have been resuscitated. The Preacher denies the Radioman's note, and the scheme is attributed to Marshall aided by Ripper. Should you check your inventory you will find that the Secret Sign, the medallion from the aliens on the moon, is missing; someone has taken it. Everyone leaves. Follow them out and look for Jessica, probably in the church, to have a very long conversation with her concerning implants, the MiB, and Dr Webber.
After Rita's remarks about Dr Webber, you can now talk to and get answers from him, but you won't learn much. Disagreeable fellow. If you can locate Hacker he will give you the repaired Pager's card. However, you can't look for him in the casino, as Jake tells you that Ripper is in there, mad and looking for trouble after the failure to suffocate you. Look elsewhere for Hacker; when you find him and get the repaired card, ask him about the Nexus and the Inner Circle.
Pager's card will open the preacher's door, so go there and look for him. He won't be there; use the bell button to see if that will bring him. It won't, but you will meet him as you leave. The bell has called the people to church, ask the Preacher to cover for you as you have something to do. He reluctantly agrees. Go to the casino, where Ripper has since left, then to the fortune teller's room, using Pager's card to get in. Click on the cabinet door to bring up the solved slider, click on "done", then click on the cabinet, which will open to show the slot behind the book on the lower shelf. Pager's card applied to the slot will open the secret door behind the table. Hurry through it.
Now go through the door at the right of the room. You will see a book that will fall to the floor when you click on it, revealing another slot on which to try the Pager's card. A section of the wall to your left starts to shimmer, and you can pass through to another room. Here you will find a notebook containing a star chart and a diary. After you examine it Jessica walks in and there is a discussion about the Makers, their technology, and the center of it in the Holy Mountain on Draco. Jessica tells Walker that Preacher John is the Nexus, then they join him in the outer room.
More discussion, mainly about the situation they are in, about the crystal cone and the diary, and escaping through ventilation ducts. Jessica says she is going with you, and there is a video of passage through the ducts to an ending. Use the Pager's card on the sensor to open a hatch, and go out to a base core panoramic scene. There is a small red triangle at left center signifying your position; click on that and you will go to a large corridor with spacecraft traveling overhead. A red movement indicator points to the wall on the right; when you follow it you will find a sensor on a pillar. Once again use the Pager's card on the sensor and you can pass through the wall to the right of the sensor.
A video places you on a walkway over an abyss. Cross the walkway and through a door where you will be met by a Fraction alien. After some discussion about releasing your biocontainer and stating that you are in a safe place, he leads you to the Fraction High Council. More talk about the technovirus and the old technology. The Reptoids want it to destroy just about everything, including the earth. You are told that when you landed at the Mars human colony a Fraction agent managed to switch your memorizer with another, so Marshall does not have the one to access the biocontainer within you. The needed memorizer is hidden back at the colony, so you have to go there and get it. Rita Mayden is somehow involved. Just as there is mention of a needed keycard the Reptoids attack. So much for safety...During a long video a Council member, Gowddeln, helps you escape in a speeder and you and Jessica are returned to the landing area on the Mars human colony.
The game takes you to Preacher John's room. He says that the Controllers surprised the colony with a gas attack but Rita saved them by creating a shield. It is not exactly clear, but this conversation indicates a bridge must be lowered in order to get to your hidden memorizer. Holbrook suggests that you mingle with the others so suspicions will not be aroused concerning your absence, and you are back to chasing around and asking questions. Specifically, talk to Jake and Hacker, see if you can make any sense of what they say; also find Dr Morgan, who says someone unknown has a dangerous implant, and Jake Shaffer tells you that Marshall has a bridge controller in his safe.
Go to Rita's room using the Pager's card to get in, where you will find the door to the secret room open. Go all the way back to the diary with the star chart, and there you will find Rita. She tells you that there is a rumor that a bridge controller is hidden somewhere in the Colony, which you already know if you have talked to Jake. Open the diary to the star chart, then click the notebook that you have been carrying on it, and the star chart will be copied to the notebook.
Leave, and when you get outside the casino Ripper will be there with information that something has happened to the Preacher and Jessica. Ripper leaves telling you to go to the Brazilian's room. (This is the room two doors to the right of your room.) The scene then shifts to that room, where Ripper is standing menacingly in front of Marshall, and Jessica sitting tensely in the room's chair. There is some dialog, threatening from Ripper, pseudo-urbane from Marshall. He has placed a poison dart necklace on Jessica and has a remote control that can kill her in seconds. He wants the biocontainer and gives you 15 minutes to turn it over and has Ripper set a timer. You are now at the beginning of another timed sequence, but in this one the game Save function remains working.
Mike Shaffer comes in and tells Marshall the guards want him--something to do with the Preacher. They leave. More threatening interchange between Walker and Ripper, then a video fight in which Ripper is killed and Walker is apparently unharmed. (Superb astronaut training.) Get from Ripper's body his pager and freezer. You must find Hacker to save Jessica. He is in the casino, and he tells you Marshall has a backup controller in his safe. He also tells you that he saw Marshall go into his office, then he automatically takes Pager's card and goes to Jessica to try and slow things down.
You will have to get Marshall out of his office. Leave the casino, and as soon as you are out of the door use Ripper's pager. Click on the long blue button, which turns briefly red. Put the pager back in inventory and get the freezer. Walker will move to a point where he can freeze Marshall who comes to answer the pager call. As soon as he appears by the double doors from the corridor, click the freezer on him and he crumples. From him get his freezer (it disappears, two are not needed), and from his pockets get his personal card and a diagram. Go to Marshall's office and tell Slash you need to get the decoder to save Jessica and he lets you go in.
The large cube on the floor below some pictures is Marshall's safe; click on it and a slider combination appears. The diagram you just got from Marshall is the slider clue. However you solve the puzzle, click on "done", the safe opens, and from it you get the data reader/backup controller. The picture above the safe is a hologram; click the freezer on it and it dissolves so that you can get the implant gun from the shelf behind it. Hurry to Sebastian's room and open the door using Marshall's personal card. Give the data reader to Hacker, who determines the code to free Jessica, and all three of you leave the room. After a short conversation you decide the only way to hide Ripper's body is throw it into the abyss. This done, Hacker and Jessica leave and you are on your own in the landing area just outside the entrance to the rooms. On the far right across the abyss the cursor can locate a control room (often referred to in the game as the controller's room).
There seems to be no indication of it, but you are once more in a timed interval of unspecified length before the Controllers discover you and end the game. In inventory, click Marshall's personal card on the data reader, which then appears much as the memorizer did. Use the red arrows to highlight bridge on, then press transmit. An energy or force bridge appears crossing the abyss to the control room. Watch Walker closely and get him across the bridge just up to the control room, then use the data reader again, highlight bridge off and press transmit to make the bridge disappear. Enter the control room.
Inside the control room is a window through which you can see the landing area where a Control speeder is arriving for a medical emergency. If you have removed the bridge in time they will not know that you are in the control room and the speeder will leave. There are two cabinets just to the left of the window with a pair of sensors between them. Click the pager's card on the right sensor, and from the right cabinet you can get your memorizer, and also two implants. Get the memorizer from inventory and use the red arrows to highlight the last scrambled code, unscramble this code the same number of times you scrambled it, press transmit, and a video shows the biocontainer coming out of Walker's hand. It may be found in inventory with the crystal cone inside it.
Leave the control room and use the data reader to reform the force bridge. Since you are close by and have the code for the cabinet slider lock that is in your room--the code is the center part of the star chart copy--you may as well go there. When you go through the solving routine and open the cabinet you find some purple tiles. Walker thinks Rita should know something about them, so go to her where she is still in the secret room puzzling over the diary.
On the way you may run into someone, probably Slash, with bad news about Preacher John. If you do, after telling it he will go through a newly accessible door into the guards' quarters. You can follow him to see the Preacher, but he is unconscious so you can't react with him. Go to Rita.
Rita has nothing to offer concerning the tiles. She does, however, have an idea of how you and Jessica were found in the secret Fraction headquarters. She thinks it was because of a trace implant; Jessica has been on walks before and has not been caught, so it must be in you. She says you should see Dr Webber because of the implant experience that Jessica told you about. After you leave Rita the crystal cone is no longer in the biocontainer. When you find Webber, tell him you need help, and you gather in Rita's room with Jessica and Hacker. Webber at first refuses, but is persuaded. He has everyone but Hacker leave, and after a video of visions and impressions, the implant is out and a 3 minute countdown timer is running. Hacker says to inject the removed implant in someone while it is still functional, there is only a limited time. That must be what the timer indicates; at any rate, if it expires the Controllers find you.
If you have not yet encountered Slash, he should be in the room with the red holofountain and he will tell you about the Preacher and you can follow him into the guards' room; if he has already told you, go directly to the guards' room and through it to Preacher John. Click the just removed implant on the implant gun, then click the gun on Holbrook. (Why??) Slash will tell you that Preacher John said "Picture. Double-T-Five" before passing out.
Return to Rita in the room with the diary to check on her progress. Keep talking to people you meet on the way. Rita says she drew contour lines of a shape needed to activate the crystal cone, which she returns to you and then leaves. Click on the diary to see this contour, then click the purple tiles from your room on it. The tiles will separate into seven pieces on the opposite page. Left click on a tile to engage it, right click to rotate it a quarter turn as many times as you think might be required, then drag it to the outline that Rita drew. There is no automatic solution as there is for the sliders, but it is not very hard. When you get it completed, examine it closely to find a hard to see circle just SE of center. Place the crystal cone in this circle, the books pages flip rapidly, and a shimmering dot of light rises from it. Click on the dot to see a multi-pastel colored crystal that the game calls an object. Ward says it is pure light. Place it in inventory.
Preacher John is still a concern. Go to his room, as you have seen there a closet that has not yet been opened. The picture above the door is doubtless the one to which Holbrook referred in the words you got from Slash. It may still open showing the bell circuitry, but if it is you can close it by finding an arrow at the very top left corner. Near the center of the picture the cursor says there is an ornament; click on it for a closeup and you will see the word Rev doubly underlined. This is the clue for the closet slider lock. You would be well advised to use the Easy Game solution for this slider, because the squares in the unsolved one in no way resemble those of the solved one. The open closet reveals some miscellaneous books; click very carefully up and down along the backs of these books and you will turn up the Preacher's personal card. You will also find inside the Bible a data reader, another item of which you do not need two, so it stays there. However, since these items accept personal cards, try inserting the Preacher's card in the data reader that you have. A lot of codes appear; bring up those below the last line and sure enough, one begins with tt5.
Back to the Preacher in the guards' quarters. Highlight the tt5... code and press transmit. Something glows in Holbrook's hand. Click on it and a cross-shaped object called a psi comm appears, as well as a picture with the name Gowddeln in it. Click the psi comm on the exclamation point in the picture and you have a conversation with Gowddeln about a window of opportunity to go to the Holy Mountain on Draco. You are to meet him at the entrance to the city at the end of the ducts.
There you have a long conversation about the details of the trip as follows:
We meet again, Walker.
Gowddeln! It's good to see you. Can you help me?
Yes. We have organized everything necessary for your trip to Draco.
How far away is it?
37 light years away.
I'm starting to have second thoughts about this.
It is the only true way to go. I am sure you think the same.
Yeah.
You will board Dorb Adiopter. It is a Reptoid supply ship. You will have to pass a series of security scans to do that. You will identify yourself as a member of the MTI - the Makers Technology Institute. Take this card and this implant which will activate upon firing. They are all programmed with your ID code. If the implant recognizes that it has been extracted from your body it will start to scream for guards. It takes a minute, minute and a half at best for the implant to recognize that situation.
A useable feature.
Do you have an implant gun?
Yes. Plenty of ammo, too.
Good.
What do I need that for?
You can not enter the ship alone. You have to find a crew member and put him under your control. Use him to increase your chance of survival once you are aboard. Also, keep in mind that you don’t stand a chance directly fighting the Reptoids. You can only try to fight them from somewhere else, or from a moment earlier or ahead in time.
I've been hoping we could do this quietly.
This is our minimum violence plan. A council made of three remaining Fraction members has spent several days working out all the details. Trust us. The Dorb, like every Reptoid interstellar ship, is made according to the Makers blueprints. This makes it a potential ally of yours. If you are recognized by the computer as the Ward, the Reptoid crew could become strangers on their own ship. That is, I am afraid, the only development that is likely to succeed.
All right.
No human is allowed to prowl the docks unsupervised. This holomask will complete your disguise, but I doubt that it will fool any scanners more complex than those used on the docks. Go now...and Godspeed.
He departs, having given you an ID implant card, a special implant, and a holomask to disguise yourself as a Reptoid. Click on the holomask and the holomask control appears. There are four settings shown on the left that you highlight using the wings of the arrowhead on the right, then activate by pressing the arrowhead point. Select Reptoid maintenance and press the point, whereupon you will finally see what a Reptoid looks like. Go out the hatch into the city.
Just to the right of the large vertical central tube the cursor will show a right pointing red movement arrow that will take you to a view of the docks. Enter the smaller hexagonal opening in the center that takes you to a loading dock. Here there are Reptoids on a break enjoying a joke. When they are finished talking a Grey is left standing at the end of the dock. Load one of the two standard implants in the implant gun and click the gun on the Grey to place the implant in him to bring him under your control. Talk to him. He is called Bloom. There is a Q&A session about boarding, what you can carry, what you will encounter, etc.
Put the special implant in the implant gun and fire it into the biocontainer in inventory. Get out the memorizer, which should still show the highlighted implant code from when you removed the biocontainer in the control room. Click on transmit and the absorption video will show the biocontainer being taken into Walker's hand. Scrambling is not necessary this time. Take off the holomask, talk to the Grey, and a video takes you aboard the space ship Dorb Adiopter.
Space Ship
Now the game action gets more complicated because you must switch back and forth playing as either Walker or Bloom, and you can exchange inventory items. There is nothing in your inventory but the absorbed biocontainer containing the special implant. Bloom has a memorizer and an STD card. Click on Bloom and tell him that you want him to do something for you. When he agrees, the inventory icon at lower right rotates to a different one (Bloom's), and a new star icon appears above it, briefly at first but more permanently later.
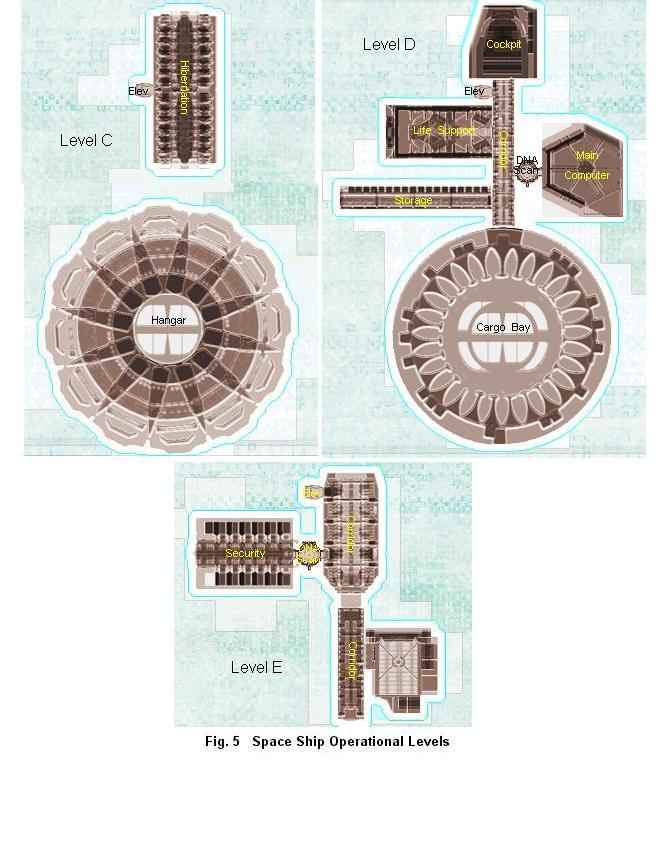
You are now playing as Bloom and you have his inventory. You are on space ship Level D. On the wall are a console, a locked door, and an open container. As Bloom, get out the memorizer and highlight comm.link to container, then click on transmit to establish the comm.link. The container's code will appear; note what it is, then click on receive to bring the code information into the memorizer. Still as Bloom, go to the console and click on it, then successively click on the three Level indicators. At each of the three there will be a diagram of these ship levels, and you are to run the cursor over all of the sections of each diagram to highlight them and see what they are. Click on Walker to get a list of questions about the functions each of the sections. Fig. 5 shows labeled screenshots of these three Levels (colors reversed).
The last question on the list is about the unidentified room in Level E. After answering that, tell Bloom again that you want him to do something for you. Bloom is to click on the locked door, then in closeup use the STD card on the center slot and the door will open. Send him through into the corridor. A short way in on Bloom's left (your right) will be the door to the Storage section, which the STD card will also open. In the shelves along the side you can get closeups of Maintenance Equipment, Hardware/Tools, and Electronic Devices; in each of these is a small chest from which you can remove a maintenance key, a wire cutter, and two communicators, respectively. There is also a closeup of Electronic Parts, but you can't get anything from it at this time.
Have Bloom exit the Storage area and continue along the corridor. A Reptoid will appear from Life Support. After a very brief conversation, click on the red elevator call button almost obscured by the Reptoid's head and an elevator door button will appear. Press the yellow area and enter the elevator when the WAIT notice goes out. Press the control for Level C, and the tiny Level map on the control will change to that map when it gets there. Leave the elevator.
Bloom is in the Hibernation area on Level C. Along the wall are cryobooths, and Bloom must find his, which is nearby on the left. When he locates it (near the leftmost set of lights) he will say so, and that there is a panel on the left. Find this panel with the cursor; the resulting closeup requires the use of the maintenance key on the container lock to open it and show a full gas tank. Take the tank, then click on the red and blue wires to disconnect them.
Call the elevator, go down to Level D, and return to the Storage area, where from the Electronic Parts closeup you now can a get a Y-microjack. Go back up to the hibernation area on Level C. Move forward to the large rectangular container with slots in the top and get the empty gas tank. Open the cryobooth panel again and put the Y-microjack in the microslot on the left, then connect both the red and blue wires to the Y-microjack. Put in the empty gas tank and close the panel. Take the elevator down and return to Walker waiting in the Cargo Bay on Level D.
Click on Walker to talk to him. The star icon will appear above Bloom's inventory icon at lower right. In Bloom’s inventory click on the following items to transfer them to Walker's inventory:
Click on the star icon to switch to Walker's inventory and check to see that he has all four items. Announce that "there is nothing left to be done," and "await the call to hibernation." A video supplies the latter, at the conclusion of which Bloom says the waiting is over, Walker tells him he had better get going, and the star icon appears again.
Click on the star to switch to Walker and use the STD card to open the door. Click on the double triangle icon to switch to Bloom and send him through the open door and down the corridor toward the elevator. He will be met by a Reptoid and taken to the hibernation area. Place him at his cryobooth and click on the small cyan mark to bring up the booth control screen. Choose "open booth" and "sphereblend", then click on Bloom to have him lie in the booth. Do not hesitate in this sequence or the Reptoids will discover Bloom's implant. A Reptoid says there will be a scan in a few minutes. Use the star icon to switch to Walker in Level C and save your game.
Click on the container for a closeup, then click on the crates for a closeup inside that. Put the full gas tank on the floor behind the crates. Call up the memorizer and highlight the code for the biocontainer implanted in your hand.
Click on transmit to remove the biocontainer, which goes to inventory. A 60 second counter is initiated because, as Gowddeln said, the implant recognizes that it has been withdrawn. Put the biocontainer on the floor by the bottom of the gas tank and open the valve on the gas tank. Get the memorizer again and highlight the container code, then click on transmit to close the container. Click on the door and use the STD card to open it, then go to the elevator and call it. An intruder alarm may sound, but ignore it and hurry into the elevator as soon as you can. Go to Level E and when you exit look for a door on the right. Go through the door and stand on the circular platform for a scan, where you are recognized as the Ward and allowed to enter the Security room. Here you are safe for a while. A video shows that a Reptoid has homed in on the implant in the biocontainer that you put in the container on Level D and when he opens it he is laid out by the escaping gas. Save your game.
Click on the Security console. Deny the early awakening request. Deny and keep denying the request for elevator service from Level E; it is from a Reptoid trying to get to you. Step back from the console, switch to Bloom, and click on the EXIT button. When Bloom is out of his cryobooth, click on the red elevator call button, then on the yellow elevator door button. If it continues to show WAIT, that means that Walker has to deal with an elevator request from the Reptoid. Switch to Walker, click on the console, and deny the request from Level E. Step back, switch to Bloom, and have him try again to call the elevator. Keep repeating this alternation and before long if you are quick enough Walker will see an elevator service request from Level C. Approve this request and have Bloom go to Level D, where he will find the gassed Reptoid, "separated from the flow," lying in front of the open container.
It is not explicitly stated and there is no counter visible, but you have a limited time to pursue the following series of actions before the Reptoid outside Security sends some sort of lethal drone flying through the scanner and brings the game to an end, so you had better move as expeditiously as you can, saving your game often.
Click on the Reptoid by the container and Bloom will get his gold SEC card. Use the card to open the door and go all the way down the corridor to locate the door on the left just before the elevator. This is the door to Life Support and may be opened using the SEC card.
Move Bloom into Life Support and locate the console
Have Bloom click on "abort"
Switch to Walker and have him approve the abort request
Switch to Bloom and
click on "set grav gen. shutdown"
click on "affirmed"
select "3 minutes"
select "until we arrive at Draco system"
click on "affirmed"
Switch to Walker for approval.
Switch to Bloom and
use maintenance key on round lock at panel bottom left
use wire cutters to cut both wires from LSR
Switch to Walker and as before, approve his request while continuing denial of elevator request from Level E.
Switch to Bloom in the elevator and select Level C. Go to his cryobooth and click on the small cyan mark that brings up the booth control panel. Select "open booth", then when that is observed to happen, select "hibernation". Click on Bloom to put him into the cryobooth, then answer "yes" to both computer questions that appear on lower left screen.
Switch to Walker and approve Bloom's hibernation request. Leave the control screen and click on the Vitrifax on the left side of the Security room. Initiate the Vitrifax and affirm the procedure. Choose 10 minutes in response to questioning from Vitrifax control and enter the Vitrifax. Protected by the Vitrifax, the attempt by the Reptoid to kill you backfires and he is destroyed.
Return to the control panel and disengage the security lock, then leave through the scanner and call the elevator. Go to Level D, walk the length of the corridor toward but not into the Cargo Bay, and enter the door on the left. Proceed through the scanner and you will be greeted by the ship's computer. After talking with the computer there will be a video taking you to the Holy Mountain on Draco.
When you again gain control, follow the red forward movement cursor across bridges and up an elevator to a portal in the center of a pathway. Click on the portal and an animated disk called a FLOW appears; click on this and a video takes you to the final puzzle. This consists of a series of crystals (six?) that must be changed from colorless to different colors. Doubtless there is a pattern to do this, but if you keep clicking on a central animation called a TELEPORT as it appears, then on a colorless crystal (unless there are only colored ones), you will eventually solve this puzzle, signified by a very long enigmatic concluding video, and the credits roll.
Commentary
Following are some things that came to my attention as I played The Ward. Nothing overwhelming, but things to which I would rather not have had to adjust. They are my personal observations and others may well disagree, and I readily admit that I could have missed something that would nullify my objections. It has happened before.
Fairly early on Walker is given a medallion (called a secret sign in inventory) by the Fraction to help him identify a secret ally in the Mars Colony called the Nexus; whenever he tries this he is told not to show it, and when he does show it to the person who turns out to be the Nexus, he will not admit to recognition. Several personnel call it a Communicator, as did the Fraction aliens when they present it to him, and that it contains an important message. It is eventually stolen—and we are not told by whom—and we never find out what the message is. However, it is not needed to identify the Nexus because Jessica tells Walker that it is Holbrook. Seems to me this goes beyond a red herring.
Behind Rita’s room in the Mars Colony is a secret room containing a short diary in which there appears a box that says "You quickly page through the diary and discover something of interest near the end." I must have missed something because no matter how quickly I paged, all I found was another box that said all the rest of the pages are blank...And what are those squiggles on page 3?
We got to know the people in the Mars Human colony—not all admirable, but I for one would like to know what became of them. And what about the Quickener that Walker was to find?
When first arriving on the space ship, to take the elevator between levels you only had to call it and indicate the level; later when Walker is in Security, approval has to be given to use it. This ploy may make the game more challenging, but it is inconsistent.
Security is on Level E, as is the Reptoid attempting to attack Walker just on the other side of the Scanner (from where he launches a lethal drone if not thwarted), so why does he have to keep calling for the elevator, and how can he be kept at bay by denying the Level E elevator request?
There is much effort in getting the crystal cone and putting it into Walker’s body, getting it back out, then converting it to what appears to be a crystal that Walker says is pure light and that it is a Maker’s artifact; inventory calls it an object. It is in Walker’s inventory until he boards the space ship, after which it is no longer there. Bloom says it may be registered as cargo. The ship’s computer remarks about the "presence of the Ark within your system." There is mystery here.
This game displays much originality, but there are places where it seems to me that the conversation does not flow all that smoothly, and I think the same can be said for the action. Item nomenclature is odd at times. The former might be attributed to the fact that the names showing in the credits indicate that the game originated in eastern Europe, and words may have suffered in translation. Finally, I contend that it also suffers from what happens in many Adventure games: a weak ending that gives the impression of running out of steam and being quickly brought to an unsatisfactory conclusion just for the sake of ending.
Soren Andersen, July 2002