RITA'S LOCKER SLIDER PUZZLE SOLUTION
Walkthrough by Witchen
=O)
February 2, 2001
"Your name is David Walker. You are a member of the Apollo XIX crew. Your mission is to collect information about unexpected seismic events detected on the Moon's surface. It should've been a smooth routine assignment. As you near the completion of your task, the whole world goes berserk. Something kills your fellow crewmen, without warning, and apparently without much effort.
And now it is coming for you.
During the course of this adventure, you will learn that your true mission is given to you by ancient forces far beyond your grasp. You will discover that your mission and your identity are coded inside your very being; your hidden DNA awakens and starts your ride through the destiny battlefield. Should you succeed, you will make the final step in the course of both human history and future. Otherwise, your civilization will never have been."
With thanks to Leonardo Magdic, of Fragile Bits. And friends, Ray Ivey and Lone Lines! :)
_______________________________________________________________
NOTE:Choose your mode of play after selecting a NEW game from the menu:
1. EASY: If you play the game in easy mode, you will be given the option to skip all major logical puzzles. All you have to do is find the SKIP icon and click on it. This, however, may spoil your enjoyment of the game. Also, if you press F9 and press CTRL/SHIFT/E simultaneously, you can switch between easy and normal modes.
2. NORMAL: To finish this game in normal mode, you have to solve everything by yourself. You will still receive hints during the major puzzles. Don't despair. With a little LOGIC and determination, it is easily conquered.
3. DEMO: This is an unique mode which will play through the first bit of the game for you. At any point, you can hit ESCAPE and start playing yourself. Or, you can advance the action to the next puzzle using the space bar.
___________________SAVE YOUR GAME VERY OFTEN!________________
INTRODUCTION
You will first view the introductory movie where you, David Walker, are traveling along in the moon rover, where you are out performing measurements to track seismic activity. You are able to complete your assignment and are on your way back to base with some samples, when your partners, Higgins and Lewis, are both suddenly killed by an aggressive enemy attack from outer space. You will briefly see a huge, green glow on the horizon. You immediately call for help from headquarters at Houston, Texas and then lose consciousness. You dream.....or are you dreaming.....?
_______________________________________________________________
EPISODE 1: IN THE BEGINNING
When you come to, you are alone inside a damaged cabin of some kind. There are a couple of control panels on the left wall, a couple of dead bodies lying on cots, and there's a strange collar or necklace apparatus around your neck. As you become more cognizant, you realize there is a sphere of some kind floating overhead.
Move to the red and green lit control panel on your left. Click on the center screen. You will see what looks like a blueprint or chart of some kind. Maybe its the moon base? Click on any area within the grid and you will see a red bar appear at the top of the screen. Click on the leftmost position which shows a yellow-lighted underline. It will display the game screen again. Clicking on some of the other postiions on the red bar, will bring up a message in an alien language. You can't understand all this yet. But, don't worry about it. Click on the far left position on the bar to exit the screen again and click on the left (red) vertical strip on the side of the control panel. You see a small slot there. But you have nothing to use with the slot. Or do you? Right click to bring up your inventory and menu screen. No, there's nothing there that will fit in the slot. Just that uncomfortable looking necklace you have around your neck. Put your inventory screen away by right clicking again.
Click on the right (green) vertical side of the control panel. Hmmmm, another small slot appears on the side. Further to the right, you see an alien body lying on a cot. Click on it again when you are in the close up screen. Click on the dead alien's uniform pocket and remove a bluish MED CARD. Notice the insignia on the alien's uniform. It looks like an acorn that has been separated in the middle.
While the Med Card is still rotating, right click to place it in inventory and exit the close up window by clicking on the X in the lower right corner. Right click again if you want to make sure the card displays in your inventory screen along side the necklace.
Turn away from the alien's body, cross the room and examine, in close up, the human body on the opposite cot. The body is badly mutilated, but you can retrieve no item from it. Exit the close up and walk front screen to a case sitting on the bulkhead at the end of the next cot. Take the SCREWDRIVER from the case. You go ahead and take a look at the newspaper and someone's old clothes in the case, but there is nothing more of value to you in there. Exit the close up. Click on the floating sphere. Could it be some kind of antigravity security robot that is supposed to observe or guard you?
After clicking on everything else in the cabin, attempt to go down the passageway. The necklace will begin emitting an increasingly loud and uncomfortable alarm which will inevitably drive you back into the cabin. After testing the alarm's volume, duration, and possible harm to yourself, you discover that you can make brief trips into the passageway and back to the cabin with no problem. Walk down to the first dead alien body lying to the left, in the passageway, and take the red and blue SECURITY CARD. With both cards in your inventory, return to the control panel in the cabin. Use the red and blue card you just picked up on the left red panel. The panel turns green. Use the other bluish card you found first, on both panels. No luck. It must be for another panel somewhere.
Leave the cabin again. And, as you walk down the passageway toward the second dead alien again, you note that the necklace alarm does not sound. You must have disabled it with the security card. Look at the dead alien in close up again and click on the BLUE RING on his left hand. You can't remove it. It's stuck. You don't have anything to remove it with in your inventory. Exit the close up after examining the alien's body. It appears he was killed in the explosion you witnessed as you were coming to. Was this installation being attacked by some other alien enemy?
Pick up the uncharged LASER GUN from the passageway. You may need it!
Across the passageway, you see another alien body thrown up on some storage units. Click on it. You find this alien carried nothing of value to you. Walk down the passageway to the hatch at the far end. Heat is coming from the hatch. Better not enter. Stop to examine the third alien body and take the ring with the blue carving on it. Go back along the passageway to enter the hatch on the left side wall. No dice. The door has a nearby sensor. Take your bluish Med Card out of inventory and use it on the sensor. The door will open onto what appears to be some sort of strange laboratory or medical facility for performing robotic surgery.
There's another hatch in the rear middle of this cabin . But, for now, use your Med Card on the red sensor to the right of the hatch where you entered. It activates the screen to the right of the sensor. Click on the screen for a close up. Touch the symbols at bottom left of the close up screen to see that it operates the suspended surgical equipment in the center of the cabin ceiling. It looks dangerous. Use the close up screen's control panel to lower the equipment from the ceiling. Use the screen again to lower a sharp set of surgical blades from the equipment. Walk over and snap off one of the blades; just click on them.
Go back into the passageway and click on the dead alien with the ring you couldn't remove. Use the blade to (ugh!) remove the CYAN RING from the dead alien's finger.
Go to the far right rear corner of the cabin and look at the console there. It also displays a red sensor at upper left. Use the Med Card on the sensor. You see a close up of alien symbols. You aren't able to decipher the language or use the panel. So, exit it. Click on the blue lit overhead cabinets above the console to learn that they are filled with jars of some sort of tissue. You can't access the cabinets and you probably don't want to.
Note that the lower left cabinet is unlit and appears to be standing open. Click on it and remove THREE BLOOD SAMPLES. Now, turn to the left and in the middle of the wall, enter the hatch to the rear cabin. Your viewing postion is reversed and you can see Walker standing at the entry.
Click on the blue light on the raised platform right in front of you. Its a microscope. In close up, click on the smaller upper and lower buttons on the little control panel to move the bluish rings around on the glass globe. When you get them aligned (overlaying one another) click on the middle horizontal button to turn the overlaying circles to red, which releases the sample from the microscope. This is BLOOD SAMPLE #4. Put it in your inventory.
You need to find the blood sample that looks human and code the bio container (pulsating matter) you see on the platform in the center of the cabin to match your own. Put Blood Sample #3 in the microscope and use the buttons on the left side control strip to examine, rotate and bombard the human like sample with beams (you will see activated at the bio container position). Just make sure you have a sample that looks like human blood and you use all the available buttons. When you are finished remove the blood sample and take the GLOWING LENS out of the microscope. The room will go dark. Don't worry, the emergency lights will come on in about 10 seconds.
If you want to, go around the periphery of the cabin and check out all the screens and consoles. But, you will find that none of them are usable to your advantage.
Use your Med Card on the left side hatch sensor and enter another passageway. Stay right where you are as you witness a laser battle between one of our now familiar little aliens and some unseen enemy lurking down the passageway.
When you see a pause in the firing pattern, quickly cross the passageway to a massive door. Turn back to the passageway, and watching the laser fire carefully, go back into the passageway and get the GREEN RING from the body of the alien lying nearby.
Then, go back to the door and click on the blue sensor to determine that you need additional lighting of some kind to get the sensor to operate. You have no flashlite or anything like that. So, it looks like you'll have to try that Glowing Lens from the microscope. Seems logical. Use the microscope lens on the sensor panel to the right of the massive doors. A close up of the controls appears:
THE RINGS PUZZLE
Pull out your trusty Screwdriver and
remove the uppermost left panel on the sensor in the close up screen.
Keep trying. It takes several nudges with the Screwdriver to get
the panel free. You will see three wire circuits. The third
switch, in the lower position, is blue. Click on it to make sure
it is red like the other two. All three circuits are now functional.
Below the three red circuits are three horizontally placed sensor positions. Does it look to you like the insignia on those rings you have been gathering might fit in there? Good thinking. You must correctly match the color positioning of all three rings three separate times. The puzzle is random, so there is no established solution. Also, the puzzle is timed. There is some sort of timer device running on the right side of the panel. If you wait too long you will have to start the ring color sequence over again.
Try placing the Green, Cyan and Blue rings (G C B) in that order. If you get one green line showing at the bottom of the display, you have the first color sequence correctly placed. If that combination doesn't work, try C B G or another. You can't use the same color of ring twice in one sequence. When you get two green lines to appear simultaneously on the lower display, the little alien, who is still feverishly firing his laser, will toss you a fourth RED RING from his position.
NOTE: If you have your inventory screen up you may miss seeing the Red Ring. It is laying to the right of your feet. Pick it up. SAVE YOUR GAME.
Now you will have to try to find out which of the rings in the sequence you should replace with the Red Ring. If you remember the last combination success with this last challenge shouldn't take more than three tries to figure out where the Red Ring goes in the third sequence. But, in any case, you will get it by trial and error. REMEMBER THE VERY LAST COLOR SEQUENCE and write it down as quickly as you can.
When the doors open and your cursor is free again, click on the sensor at Walker's right to close the doors and prevent your being caught by the security drone and put "off line." If you are caught by the drone, go back to your last save game at the Ring Puzzle and reenter the correct codes to open the door again.
_______________________________________________________________
You find yourself in another large cabin with a holographic projection device in the center. Go to the far end of the center table. Click on the smaller rectangular button on the right end of the center table. (If you are at the back of the table, you will see the small button on the left side that is marked "bump." But, its the same button. The memorizer panel will rise from a larger rectangular panel on the top of the table. Play around with it a bit to find you can't do anything logical with it yet. The MEMORIZER remote goes into your inventory.
Go to the first display console on the right side of the room from the entry doors. The upper central display shows you the same strange chart you accessed in the first cabin.
NOTE: You've probably figured out by now that its the Moon Base map you are looking at and your position is indicated by the flashing green cross. The stationary green cross is the dead human in the first cabin. The flashing red symbols are live aliens. The steady blue symbols are dead aliens; now including your little alien buddy who threw you the Red Ring. The circulating red diamond symbols designate a security drone. The green symbols are security robots. As yet, you do not know what the red cross in the upper right corner of the chart is. Could it be a live human being?
Click on the bar at top screen in the second position from the left, to view a lighted red lined overlay of the chart. But, you don't know what that means yet. Exit the chart by clicking on the first bar position to the left. Click on the console in front of you and see that it has a ring slot. Do you have the correct ring for accessing the console? Trying each of them will prove that you do not. Or, maybe you have the right ring, but something else needs to be accomplished first.
Move to the larger console to the left on the wall. Look at the big screen to be reminded of home once more. Homesick? Clicking on the many buttons, screens and switches is useless.
Click on the glass door to the left of the big console in the rear of the room and enter another cabin. Saving your game along in here might be a good safety precaution.
Look around the room, checking out various consoles and screens. On the back wall you will find a large screen with an interesting looking alien symbol. And, another smaller screen beside it which displays undecipherable alien language, all in red. In the front screen section of the cabin, you see another hologram projector device. This time installed in a cot. Behind the cot is another display of consoles and screens. But, none of them are accessible. After you have looked around, use you Security Card (red and blue) on the door on the left side of the room. You will exit to find yourself in what appears to be a long corridor which is lined with stone walls.
Walk down the long, dangerous looking corridor to another huge hatch at the opposite end. Open the hatch and enter a large circular area. This room has a ring of reddish lights around the walls. And, a black sphere floating over a green circular platform on the floor. There is a gray disk shaped object suspended in the air over the middle circle. This disk is designated as a "plate" when you pass your cursor over it. Click on the plate. Walker will walk over and stand within the green circle. Click on the glowing plate to the right. It glows and now displays symbols of some kind. Click on the plate again. You will take the PLATE and be able to place it in your inventory. Walker ask, "Now where did I see this before?" You recognize it from the symbol on one of the screens in the security control room you have just left at the other end of the corridor.
Now notice that another plate has appeared
in the same place. Click on it. This time the plate lights
up and a shower of "fairy dust" twinkling lights appears and the plate
transforms itself. Then, it moves directly away from you. If
you place your cursor over the new reddish, floating object, it reads,
"tiles." Click on it. Walker will walk over and take the object.
Put the TILES along with the CRYSTAL
CONE in your inventory with the first Plate. (If you click
now on the circle of reddish lights around the wall, you will note that
it is now called an energized section.) Now click on the engraving
(symbol) at Walker's feet.
THE FLOATING TILE PUZZLE:
Take a good look at the engraving in
the full screen mode. The Tiles and Crystal Cone will fit nicely
into this engraving. Look in your inventory and click on the Plate.
This will bring up the sample of the pattern you are attempting to duplicate.
You will get hints as you try to duplicate the proper color, shape and
sequence of placing the 4 required tiles on the engraving. Here are
the hints in order:
0. Those tiles are some
sort of color invertors.
1/13. It seems that tile order is very
essential.
2. Check areas on the stone
Plate where only two colors overlap.
3. Check the schematic
where only triangles overlap.
4. The are only 2 possible
combinations.
5. Triangles don't come
first.
6. Triangles come second.
7. Start with Cyan.
8. Green comes last.
9. Yellow we have.
10. Pink and Blue we don't.
11. Cyan or Green. Green or Cyan.
HERE'S THE TRICK - The answer lies in WHICH CIRCLE and WHICH TRIANGLE is the right color and in the right place at the right time. Both circles and both triangles can be interchanged in the circular and triangular spots. Also, the colors on all four pieces you are going to use, can be changed. You have to find the RIGHT circles in Cyan and Green and the RIGHT triangles in RED AND YELLOW. And, you have to place them at the right time.
Remember, you can skip this puzzle (if you are in EASY mode) just by clicking on the gray bar above the puzzle. But, wouldn't you rather solve it yourself? Here's the solution and the correct sequence of placing the tiles. But remember it has to be the right circle/triangle and right color in the right place:
1. The right CYAN
circle in the upper position.
2. The right RED
triangle in the upper position.
3. The right YELLOW
triangle in the lower position.
Here you should see a black bow shaped color appear under the eye.
4. The right GREEN
circle in the lower position applied last.
After you solve this puzzle, you will experience some strange physical treatment, where you learn about the Techno Virus and meet the friendly aliens; The Fraction. For the first time, you find you are called Ward. You are given a COMMUNICATOR, and you are told you must seek out The Nexus at Cydonia, on Mars. The Controllers are after you. You ask for some protection and the aliens give you some EXTRA AMMUNITION.
You are told you must sneak onto a space craft leaving for Mars, because The Fraction was not able to capture the ship. Someone on the crew is a Fraction mole and will help you. First you have to get the bio container. You need it to safely perserve the Crystal Cone. The containers are stored in the hanger entry, ready for uplifting. You'll have to use your necklace to cause a distraction in the security system. Hmmm, wonder how you will do that? You'll have to use your Memorizer. Trust no one, they tell you, except them. You have to smuggle the Crystal Cone, secreted in a bio container, inside your body. Cool. This, in order that the dreaded Reptoids are unable to find it. The aliens bid you a hasty farewell, as they are in danger too, and you set off on your mission.
Note: You can't save your game now, until after the upcoming action sequence.
When you get to the corridor with the stone walls again, move down to the opposite door as quickly as possible. Walker can't run. More is the pity. But, click on the sensor on the right side of the door as soon as soon as you can see it. A close up of the sensor will appear. Immediately, if not sooner, use the Three Rings in the same sequence you last used when you opened the massive doors earlier. Did you write it down? My code is Blue, Green, Red........but since it is a random code, that may or may not work for you.
This sequence is quick and difficult to get through. But, with a few "deaths" inflicted by an assaulting security drone, and a few additional spins down the corridor, you will get the knack and will get the door open in time. As soon as you do succeed in getting that door open, get inside and close it quickly by hitting the switch on the left side of the door, once you are facing the door inside the cabin.
Go over to the screen with the red symbol and click on it. Now, you can read the alien language with no problem. Maybe it was that Techno Virus you ingested involuntarily. And, you learn about using humans to find some mysterious artifact. You don't need to read all this stuff to successfully complete the game. But, it is interesting and informative in developing the back story.
Go back into the cabin, the security control area, where the big hologram projector is. Go back over to the console closest to the oppostie hatch. (In transit, you notice that the security drone's laser attack on you has damaged the glass between the two rooms.)
Remember the console there on the right side has a ring slot? Use any of your rings to bring up the chart. They work now. The ring gives you authorization to use the chart/map of the Moon Base. Click on the titles across the top to learn much more than you knew before about the base, its occupants and its functions. You will also learn a little about what has recently occurred at the Moon Base. Lastly, click on the LIFE SUPPORT bar. That red overlay of lines we talked about earlier designated an activated security system. The oval shaped nodes, near the center, are the controllers. If you click on the four in the center, they will shut down...turn blue. There are two control nodes you can't manipulate. Don't worry about these.
Using the four central controllers you need to isolate the two red diamond shaped patrol drones from the area of the ventilation system that you will need to navigate to accomplish the tasks The Fraction assigned to you. You must see to it that they cannot gain access to the cabin (top left) where you first awakened at the Moon Base. The best way, I found, is to leave the upper node in blue and close in the drones so they have to go up to the top of the screen there. Then activate the node (red) so they can't get back down to the four way intersection. They will patrol together vertically there until you come back to reconfigure the security system. You will need to get up there to the first cabin. But there is something else you must do first.
See the green anchor shaped robot symbol moving over on the left side of the screen? And, there's another immobile one just like it over on the right side. The robot on the left is in Sector 101. Click on him. See in the display the two patrol zones he is assigned to. Change his patrol pattern to Checkpoint exh.2 by clicking on that line. He will obligingly travel right up to that point and stop.
At this point, the bottom node should be blue and the left and right nodes should be blue. The upper node should continue in red to block the two drones up there.
Exit the screen and click on the ventilation grate between the two consoles. It won't budge. Well, you don't have any heavy duty tools on you, but you do have a laser gun. Looks like its time to use it. In inventory, click on the laser gun click the gun on the bright pink capsule you got from the aliens as Extra Ammunition. Use the gun on the grate like a torch (done in a cutscene) to melt the grate's attachments. It falls away and you are able to enter the ventilation ducts.
Crawl inside and go up the ramp to the right. When you get to the crossroad, turn and go right toward the dark shape ahead. That's the inactive maintenance robot. When you reach him, use the Blade from your inventory to remove the ROBOT HAND on your left (the robot's right hand). Put the Robot Hand in your inventory.
Now, use your Memorizer, from inventory, and use the scroll arrows to indicate you want comm.link to maint.robot. Choose Transmit and click on it. Then click on Receive to see the maintenance robot's routes. Scroll to Route 102 and Route 103, individually and press Receive each time. Then click on abort.comm link and exit the Memorizer. Go to the intersection and turn right to see a grate ahead of you. It looks like white lines and buttons.
You are about to jump down into the corridor outside the cabin where you woke up, so you'd better be sure that you have routed the red security drones so they can't get into this area.
NOTE: If, at any time, you are blocked in here by a red flash of "solid air" you will have to go back to the chart and reprogram the security nodes to open for you. But, be careful not to allow access to the area you are in by the red patrolling drones. You will "die."
When you come to the grate, use your Robot Hand to unscrew the two top screws and use the handles to pull the grate free. Jump down into the passageway...cutscene. Go into the beginning cabin.
Use the Memorizer on the floating security
system sphere.
Select Sec. Sphere then select Sec.
Level 6, then hit TRANSMIT.
Leave the cabin and use your Med Card to reenter the Med Lab. If you go to the console on the far right end of the room and use your Med Card on it, you will see you can now understand the alien writing in the close up. Click on Obductee's Menu, after reading the contents of the Personnel Menu and Last Action report (which reveals that your moon party, including Higgins and Lewis, we destroyed by a tractor beam).
In the Obductee's Menu, its pretty obvious you want to click on Security Beacon Necklace Removal, right? When you do, you are advised that the necklace will remain active even though it has been removed. The message advises you then to approach utiliturretA with "subject." Of course, that's our old pal with the red light in his helmet. Walk over to the medical robot. The robot will automatically remove the necklace. Put the NECKLACE in your inventory and use your Med Card to return out to the passageway. Climb up into the ventilation ducts again and make your way back through the shaft to the security control room where you entered the vent system.
In the control room, go back to the right side console and use a ring to authorize your entry to the security system once more. Click on Life Support and alter the route of the two patrolling red drones to allow you access to the robot in checkpointexch.2.
Go back into the ventilation shaft, left at the intersection and left again when you come to the wall. Click on your Memorizer as you face the active robot. Page the comm.link to maint.robot. Transmit the Sectors 102 and 103 codes to the robot. You must recieve a "Transmit CRC ok" message to verify this has occurred properly. Exit the Memorizer. Put the Necklace on the robots uplifted arm and go back to the security control room.
Use your ring to access the security grid again. Click on the robot you just decorated with the security Necklace. Click on Sector 103 (all four patrol positions on the close up display should be lit if you transmitted Sectors 102 and 103 successfully) and send the little robot happily off to Sector 103, necklace in hand. Nice diversion, Walker!
Now, with the security troops and robot off on a wild goose chase, you can actually use the exit hatch in the control room again. Leave the cabin through the the right side hatch using the Med Card. Go across the passageway and back into the microscope area, the Micro Lab.
You know now, from what the members of the alien Fraction have told you, that you must first successfully hide the Crystal Cone in the bio container in order to escape with it to Mars.
Go to the central pedestal apparatus and put the bio container back on the pedestal. Then, walk over to the microscope. Replace the Glowing Lens in the microscope. Click on the yellow horizontal button to close the globe. Get Blood Sample #3, the human sample we used earlier, out of your inventory and place it in the microscope. Use the little control pad in the close up screen. Touch the X symbol on the upper end. When the next screen comes up and you can see the words "human dna," and also can see the white DNA strand, push the far right button to bombard the pulsating matter on the pedestal (bio container) with human DNA.
Exit the microscope. Go to the pedestal and pick up the pulsating matter. In inventory, insert the Crystal Cone into the bio container. Ah, safely stored away. But, now you need to scramble the code to open the bio container, so only you can access it. Use your Memorizer on the bio container. Select comm.link to biocontainer. Hit Transmit and receive a string of zeros, (0000000000) as the open code. Hit abort comm.link (exit) and then Generate a code. (Mine was c34a7he98pg3740ty773. :) But, you only need to write down the first three to five digits or letters. Just so you can identify one code from another.
NOTE: If you have already accidentally generated the Memorizer's capacity of three randomly generated codes, while previously learning to operate the Memorizer (as I did), just select a code from those you see and write it down.
Now, use the Memorizer scramble button to scramble the code. (Mine was tybt4ip...........) Write down the new scrambled code for the bio container. Make sure you note that it is for the bio container. There's another container coming up later!
Scroll to the comm.link to bio container line. Press Transmit and the zero string will display. Hit transmit again to go back ot the scroll screen. Scroll to the scrambled code and click on Transmit again. You should now see the new scramble code. Exit the Memorizer. Scroll to the new code and hit Transmit again.
You will see a cutscene where the bio container, with the precious Crystal Cone, is rather painfully absorbed through your left palm and into your body. SAVE YOUR GAME.
Exit the Memorizer. And, using your Med Card go back out through the hatch you just came in, to the left of the pedestal. When you are standing in the passageway, put your Med Card away. Then, get out your Memorizer again and scroll to Sec. Level 6. Put the Memorizer back in your inventory, noting where it is in the inventory line. You will need it in a big hurry.
Only then is it reasonably safe to go up screen to the open area at Walker's right. As soon as you enter what turns out to be the landing bay, get out your Memorizer and hit Transmit to send Sec.Level 6 to the floating security sphere and disable it. If you don't do this, it will zap you into infinity almost immediately. Awww, dead again........
You will now need to make some carefully planned preparations before you proceed. Pick up an OXYGEN TANK to Walker's left. And, pick up an OXYGEN MASK to his right. Put them in your inventory. Then:
1. Get out your Memorizer and scroll to comm.link to the container (NOT bio container). Hit Transmit, then Receive to see and receive the container code.
2. Write down the code, making sure you don't accidentally duplicate the scrambled code for the bio container when you placed it inside you. (My container code was 582wix........)
3. Before you go in the container (off to right screen) you need to change the biocontainer code again for when it was absorbed inside you. Scroll to find that code line and scramble it again. (Mine was atic1j........) Tansmit the code.
4. Exit the Memorizer and enter the container through the open hatch to screen right.
5. Open the Memorizer, find the container code (listed under Sec.Level 6 probably) and Transmit (to air) the container code. it will activate the container doors and they will close.
6. Put the Memorizer away in inventory and combine the oxygen mask and the oxygen tank in inventory.
NOTE: During the following cutscene
IF you arrive on Mars and are immediately shot by the Grays and the bio
container is extracted from your crumpled body, the Grays found the bio
container code and you didn't program it correctly in the landing bay.
If this happens, you need to go back and rescramble the bio container code
so it is not the same as the code you used to place it in your body.
(Redo the above steps.)
EPISODE II: THE MARS COLONY
If you successfully scrambled the internal bio container code, you witness a rather lengthy space travel cutscene, where you eventually end up at the Mars Colony; outside on some kind of gigantic platform.
NOTE: This episode is not linear.
Just make sure you keep moving; talk to everyone, do everything available
to do (gambing, puzzles, etc.), and talk to everyone that will talk to
you, with every opportunity that arises. You can choose to be surly and
uncooperative yourself, if you wish. But, it may cause you more trouble.
Your cleverest choices in conversation will determine how quickly you are
able to complete this level. It might be a good idea to reveal as little
about yourself as possible until you figure out who the "bad guys" are.
And, its probably not a good idea to show the secret stuff in your inventory
to anyone, although you will be constantly prompted to "show object."
Okay, enough said and off we go on the path I followed........
Ripper, a very disagreeable human being, is the first to greet you, sort of. He takes you to the boss, Jack Marshall. You are informed that you are now a member of the colony and have to follow the rules. You simply have to do what you are told. He gives you a CHAMBER CARD. Ripper takes you, via a rather circuitous route, past the church, to the sleeping quarters in a corridor stacked with chambers. Use your Chamber Card on the two left and right sensors on your far left; they are not bright lit in red. Depending on your answers here and elapsed time, Ripper may take you to meet the Brazilian in a high tech bathroom, or he may leave you to your own devices for a while.
This walkthrough continues from where Jack leaves you standing in front of the chamber door.
Walk into the bed chamber and click on the bed. You will immediately fall asleep and have a wild dream (cutscene) about finding The Quickener, about growing, and about owning the Universe. When you wake up, click on the cabinet on the side wall before you exit the room. You will see that this cabinet has a lock that involves a rather ominous looking slider puzzle. You need something to complete the puzzle though, so don't worry about it now.
Leave your room and go left screen two times. Talk to the man standing in front of the church door, Mike Shaffer, or Pighead as he is commonly known. He doesn't want to talk to you. You can try the hatch upscreen to the right, but you can't get in. Enter the church instead. Walk a little forward toward the altar and not that the book laying on the altar is the Bible. You may see humans periodically appearing and disappearing as you move about. But, you will find that almost no one will speak with you.
Leave the church out the right side doorway and continue walking left until you come to a screen that has a fountain in the back that looks like orange fire. Learn that is is just another hologram. Continue going left screen and see what looks like a white fountain hologram. Keep going and enter the rear door with the green sensor.
Now you meet the Brazilian lavatory attendant, Sebastian Mezenga. You can respond to him with "Do I look that bad?" and leave for now, or you can talk to him and ask him "What is happening here?" He will ask you what you want to know. Choose "tell me about Marshall." He tells you of his own abduction and how Marshall and Jack Ripper:) abuse the abductees (people) in the Colony. He tells you that people are not talking to you because Marshall has apparently made an exception of you by not taking away all your stuff. And, you are still wearing your flight suit, which is highly valuable at the Colony.
You also find out that Slash is Marshall's bodyguard and that he and Ripper are very dangerous. The Greys have put Marshall in his dictator position and they are really in charge. The Greys perform experiments on humans. You hear of an incident where someone died oozing a golden, glowing liquid. The Controllers tried to clean it up, but on of the abductees supposedly got a small sample before they accomplished the clean up.
Sebastian tells you there are about 40 people left at the Colony. Some died in a useless revolution and others seemed to just disappear permanently. Jessice Blaze is a prominent human. Sebastian also mentions Dr. Morgan, the Preacher, and the Fortune-Teller. These are definitely people you want to talk to soon. You also learn from Sebastian that you are in an abandoned portion of the Reptoid Mars base, and that both Marshall and Ripper have guns.
NOTE: At this point I showed Sebastian the gold Secret Symbol. You know, the one the little Fraction aliens gave Walker after the Floating Tile Puzzle. I wouldn't necessarily advise you to do that. But, if you do choose to show the Symbol to Sebastian, however, he will tell you NOT to show it to anyone else except, maybe, Hacker.
You hear the church bells ring three times and you are transported to the church automatically. Jessica Blaze whispers in your ear that she wants to meet with you after the church service, outside the church or in the Casino. Outside the church, Ripper confronts you and tells you that Marshall wants to talk to you. You have to go with him and when you do, he resoundingly beats the daylights out of you and uses his gun (apparently at stun level) on you. He definitely doesn't want you hanging around Jessica.
You will awaken to find yourself talking to a man in a white coat, Dr. Morgan, we presume. Talk to him just briefly and he will disappear. Walk back to the left two screens and enter the hatch nearest you on the other side of the room. Its the Casino (and piano bar) :). Talk to Hacker who will probably show up back by the pictures on the rear wall. He tells you he will talk to you later.
Leave the Casino. If Jessica doesn't show, go back to the church, going right screen until you get there. Talk to Jessica (in the black shorts outfit). She fills you in a bit about the peoples' suspicions about you and that you appear to be in line with Marshall, and the bad guys, because you still have that flight suit. She tells you to meet her to talk more in the Casino. So, go back there.
When you get there talk to Hacker, the guy in the black shirt and purple tie, again. He is the Manager of the Casino. He will tell you that neither the Greys or the Reptoids have the knowlege to have created the bio containers. You also learn that its dangerous to carry one inside you for too long, as they begin to deteriorate. Uh oh!
When you finish with Hacker, talk to Jake Palminski - Radioman. Learn that Jake has a crude radio. But, there's a force shield around the Colony that prohibits radio waves from escaping. The people are able to receive incoming Earth radio transmissions. Learn that the Colony is not only on Mars, but at Cydonia. Just where you need to be, according to The Fraction. Wonder if The Nexus is anywhere around? Jake/Radioman tells you that there are pyramids on Mars and all over the Universe. They were created by a higher race called The Makers. Jake tells you that the Reptoids may be aware that a bio container was taken in an uprising recently at the Moon Base (you wouldn't know anything about that would you?) and you should be warned not to keep asking people about bio containers. (Jake's radio is sitting on the counter behind him, in case you want to check it out.)
If Rosa Martinez (white shirt and jeans) shows up, you can also talk to her. She is suspicious of the Preacher and Doctor Morgan.
Go into the Fortune Telling Room at the rear of the Casino. If the doctor is in there, he'll want to talk to you out in the Casino. Follow him out there. You will learn a lot from the good doctor about Rita, the Preacher, the Reptoids and Greys, and the so-called Rebellion.
NOTE: Remember you don't have to talk to any of these people in a set pattern, just so you get the plot to keep moving along by continually moving and questioning one person after another.
Go back into the Fortune Telling Room and talk to Rita Mayden about escaping (special implants are needed to be able to use the speeders). You also discover that there are two groups of human. Some are subjected to experiments and other are not. A control group, of sorts. You tell Rita the story of your abuction. Afterward, check the cabinet on the right. Whoops! Another slider puzzle. Let's leave it for later.
Walk back to Rita and click on the Tarot cards on her counter. You can't do much with the cards yet...the Wheel of Fortune card holds the solution for the lock on the cabinet. Maybe you'd better wait until Rita steps out and forgets to lock the Fortune Telling room door.......
Go back out and play 21 (Blackjack) with the Gambler in the Casino booth. Good idea here, to save your game before you start. You can't save again until you are completely finished with this exercise. You need to win his personal card and half of the Pager's card. Use your ROLEX, the GOLD RING and the SILVER DOLLAR as ante. Try not to loose any of your other stuff. Play until you win both the GAMBLER'S CARD and the HALF A CARD (Pager's). If you don't know how to play the game, click on the Help button in the Menu. SAVE YOUR GAME immediately after making sure you also still have in your inventory, the:
bio container-red glow
secret symbol
your personal card
C.S.M. model
screwdriver
Robot Hand
The silver dollar and the gold ring
are bonuses, or the Rolex, if you win it back.
If Doctor Morgan shows up in the Casino, talk to him again about Pager. If Jessica shows up here, where she said she'd meet you later, have a good long talk with her. (And, who is that lurking creep in the lab coat and the sun glasses anyway?.....he's just everywhere.)
Rita fills you in . A lot of it you have already heard from one person or another. But, she does put across that the Reptoids are very scary. Much more so than the Greys. She tells you about how she was abducted and about the biological clones put on Earth to replace people who are abducted. She thinks the US Government, in the form of the MIB (Men In Black), are working with the aliens.
After this lengthy discussion with Jessica, leave the Casino and walk around and talk to whoever you meet on the way across to the church. You might see Jake/Radioman before you leave the Casino. These people do zip around! If you do see him, talk to him again about the MIB. Jake will fill you in on how the MIB work with the aliens to enable the abduction of people for experiments.
When you get back to the church, the Preacher, John Hollbrook, is there. Talk to him about everything. He wants to meet with you in his room.
Ripper calls you over and tells you Marshall wants to see you ..."this is business." Go with him. You are led to Marshall's office. All he does is give you a pep talk and warn you about not talking to the people at the Colony.
Go back down the passageway to the church. Go right screen and out the main entrance. The door to the right of the main entrance is the Preacher's room. If he's not there yet, wander around and talk to anyone who crosses your path. Sebastian is a good target. You haven't talked to him for a while. If you run across him he will probably tell you that the Casino is safe and there may be some sort of secret passageway in there somewhere.
Anytime now, you will get a message from someone that the Preacher is in his room and is ready to talk to you. Go down to the door to the right of the church's main entrance. You have a long talk with the Preacher and find out that the Reptoids may be trying to exterminate humanity all together. You also find out that Pager was Jessica's boyfriend, Douglas. Douglas is gone forever. The Preacher has an interesting closet in his room too, with a slider puzzle.
But, for now, leave and go into the church to talk to Rosa Martinez. She will tell you about her implant and more about what happened while you were on the Moon Base.
Go to the lavatory and ask Sebastian about the Holy Mountain Rosa mentioned to you. Leave and go wander around till you can talk to Jessica again and then meet her in the Casino. Ask her everything. Talk to people and watch for an opportunity to see Rita leave her Fortune Telling room and forget to lock it. You need to get in there privately. If you haven't had a long conversation with her yet, in the Fortune Telling Room, do it now.
Afterward, you just have to keep moving and talking and biding your time (it won't be long) until the Preacher tells you to go talk to Rita again in her room. She should be gone this time, with the door left unlocked. Go in and take the Tarot cards off the counter; THE WHEEL OF FORTUNE, THE KING OF PENTACLES and the DEATH CARD. Put them in inventory. Use the Wheel of Fortune card on the storage cabinet to the right. The card has the solution for the slider puzzle lock.
NOTE: The slider puzzles are all 3X3 and not terribly difficult. You can switch to Easy mode by pressing F9 and the CTRL/SHIFT/E keys. In Easy mode, you can use the bar at the top of the puzzle screen to skip the puzzle. You can also save your game, go back in and auto solve (skip) the puzzle to see what it should look like, then go back into your saved game and try to solve it yourself. There's lots of flexibility here.
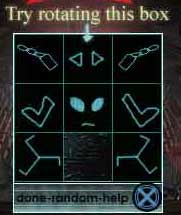
RITA'S LOCKER SLIDER PUZZLE SOLUTION
When you exit the puzzle screen, the door to the cabinet will open. Move the books on the second shelf down to see a red sensor with a small slot. None of your pass cards will work. Try the King of Pentacles Tarot card. Notice the vertical bar code down the center, barely visible? Use the card on the sensor. You will see a door open behind Rita's counter. Ah, the secret passage, at last. Or, at least one of them.
When you are inside the Secret Chambers it might be a good idea to save your game if you haven't for a while. Wander into the room to the left and pick up the NOTEBOOK from the side bar under the Earth painting. Enter the room with the green sensor. Move the book to the rear of the door sitting on a crate or box. You will see the book fall off onto the floor revealing another red sensor slot. You can try all your cards. None will work.
Leave the Fortune Telling room, making sure to close the cabinet. See Ripper abusing Rosa. After this altercation, leave the Casino and find Hacker. As usual, he'll want to meet you back in the Casino. Talk to him and show him the Pager half card. Leave the Casino and if Jake gives you a message, find Rita and talk to her. Or, you can talk to the doctor again at this point, if he appears. He'll tell you about Webber. Someone we haven't heard of at all until now.
Now find Rita and meet her back in the Fortune Telling room. Just unload on her about finding the secret passage after she carelessly left the door unlocked. Then, leave to find Rosa in the church. She tells you the other half of the Pager card is in Slash's room, next to your own. She gives you a NOTE with the combination to Slash's locker.
Go back to the landing platform. Go to the sleeping chamber area and open Slash's cabin, to the right of Walker's. Use the locker combination on the lock to solve the slider puzzle and open the locker. (Or use the solve/skip or other options decribed above for the slider puzzles.)
SLASH'S LOCKER SLIDER PUZZLE SOLUTION
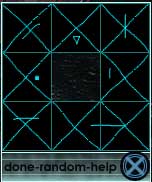
You should be able to get the OTHER HALF OF PAGER'S CARD from the locker. Find Hacker immediately and then meet him in the Casino. Give him both halves of the Pager card. He will put the pieces back together and make them usable for you. But, it will take a little time.
Go to the Preacher's room as soon as you can find Jake the Radioman and he gives you the message that Hollbrook wants to see you. Jake found a note on his radio. Go to the Preacher's room again; to the right of the church's main entrance. Sebastian may show up and ask to talk to you at this point, but its not necessary to speak with him right away.
At the Preacher's door, you'll see its ajar. Uh oh! I'd be a little suspicious here if I were you and maybe save your game?
When you get inside, the hatch
will close and lock you in. You're trapped and the oxygen is deliberately
being rapidly depleted from the cabin. Try to open the door and ring
the bell to the right. No use. It doesn't work. Now:
1. Look at the picture above the hatch
in close up.
2. See that tiny switch about midway
on the right side of the picture frame?
3. Click on it to reveal the device
that operates the bell system. Open the top compartment with your
screwdriver.
4. Fix the wires into an X shape.
Press the bell button. The fuse will short out.
5. Put the burnt fuse (turquoise in
color) into your inventory.
6. Fix the wires again, but in the
proper straight across way, not the X shape this time.
7. Click the C.S.M. Model from your
inventory on the fuse cap, now sitting on the shelf.
8. Then, put the fuse cap back in the
mechanism.
9. Ring the bell.
You will be rescued in the upcoming cutscene. Hmmm, you find out that the Preacher didn't send that note Jake found attached to his radio.
Leave the Preacher's room after you talk to everyone. If they leave before you can do that, go into the church and likely meet Hacker there. He will give you the REPAIRED PAGER CARD. You'll probably run into Jake again, or someone else will warn you to stay out of the Casino for a while. Ripper got pretty upset when his attempt to suffocate you failed. Talk to Jessica too. And, the Doctor. Track them down, if you need to.
Jessica will tell you all about what happened when Douglas (Pager) was abducted and about Professor Webber. You find out that there are three kinds of implants: the language translator, the one used for mental control, and the third, an observation implant which is not used on human beings. They work on Greys though, which gives you an idea. She also tells you her opinion about the MIB being controlled by the Greys rather than by the US Government. She and Prof. Webber have devised a method called "decompression" to restore people's minds.
Webber is still around on the Colony. His nickname is Weirdstuff. You ask Jessica about someone called The Nexus. She doesn't know. Find Hacker. Ask him about The Nexus. He doesn't know. He will tell you to ask Jessica or Rita about the Inner Circle. Find Rita and ask her. She'll refer you to Preacher John. If Rosa shows up, ask her too. She knows very little but overheard something about a notebook. Ask the doctor too. He'll tell you the Inner Circle might have been part of the failed Rebellion at the human Colony.
About now, follow Rita's advice and go back to talk to the Preacher in his room. Use Pager's card on the door. Go in and find the room is empty. Ring the bell. Leave the room and Preacher John will join you. Talk to him. Ask him to "cover" for you. You have some heavy stuff to do and you don't want anyone missing you.
Go to the Casino; then the Fortune Telling room. Open the cabinet by pushing "done" when the slider puzzle close up appears. Use Pager's card on the sensor again. Reenter the Secret Chambers. Go ahead to the room with the sensor and enter. Use the Pager's card on the sensor where the book fell off the box. The wall behind it will begin to shimmer and liquify. You've found the secret door. Walk through it. Find the notebook on the side table. Open it. Look at the Star Chart on the inside cover. If you are interested in more back story, read the journal.
Jessica will come in. She'll fill you in on some missing pieces. You find out that Hollbrook, Preacher, is The Nexus. In time, Jessica takes you to Preacher and you will learn the rest of the story. Fill in some story for him too, and find out about possible escape options.
You and Jessica find yourselves inside the ventilation system after a cutscene. When you come to the central core, the cutscene closes. Use Pager's card on the red sensor. The hatch releases and you're in the panoramic core of the Colony, with the flight center ahead of you and the abyss around it. See Jessica and Walker on the ramp mid-left there on your screen? Go to the smaller red entry up left on the screen. You will eventually find yourself in The Fraction headquarters.
Go to the door at far right rear and use Pager's card on the sparking white sensor left of the central panel. Walk through the now liquid door. Follow the light.
You're in the Fraction's headquarters for sure. And, the fact that the Memorizer was captured, won't be a problem. They will get you to Draco where the Holy Mountain is. You are now formally recognized as The Ward by The Fraction High Council. You learn that the Reptoids are definitely after the Techno Virus. You have to get it first. And, you need to get the Memorizer back using another key card.
Suddenly, you are all brutally fired
upon by mind controlled Greys (The Controllers). Everyone is killed
except you, Jessica and one member of the High Council, who gets you both
back safely to the Colony.
EPISODE III: THE UPRISING
Talk to Preacher aka: The Nexus in his room. You need to activate the bridge across the abyss and get that Memorizer back from the Control Room. Remember it was taken from you before you got to the Colony. But now, Jake tells you to mingle and make yourself inconspicuous for a while.
Leave the Preacher's room. Go straight out to the landing platform and talk to Hacker. Talk to everyone you find to talk to; expecially Mike and the guy in the sunglasses and lab coat, who turns out to be Professor Webber. FInd Rita in the Secret Chamber behind the Fortune Telling room. You must go through the liquified door again to find her. Before you talk to her use the notebook you picked up earlier on the stationary notebook on the side bar, to make a copy of the star chart. You need it to open the locker in your room. Talk to Rita. She tells you there may be a bridge activator hidden somewhere in the Colony.
When you leave Rita, and subsequently the Casino, Ripper will accost you and you'll end up in Sebastian's room with Jessica and Marshall. Marshall has placed a security necklace on Jessica. You'll wind up having a knock down drag out with Ripper and killing him. No time for remorse after killing this sadistic creep. Take his FREEZER and his PAGER. You are at the beginning of another timed sequence of fifteen minutes. Leave the room to try to find Hacker. He's in the Casino. Talk to him and save your game.
Afterward, leave the Casino and, right
where you are standing, do the following:
1. Use the Pager.
2. Click on the long blue button to
the left.
3. When the red light flashes, put
it back in your inventory and take out the Freezer.
4. The game automatically positions
Walker in the prime spot to ambush Marshall (next to the center post beside
the corridor that leads to the church).
5. Have your Freezer ready when Marshall
appears in front of the double bay doors across from your position.
6. The trick is to wait until he turns
his back to you and is facing the doors.
7. Let him have it with the Freezer.
8. Go over and get his FREEZER,
his PERSONAL CARD, and a NOTE
from his pockets.
Go to Marshall's office and speak to Slash. Convince him that you need the Data Reader from Marshall's safe. Go into Marshall's office. The safe is on the opposite wall. You have to solve a slider puzzle to get the safe open.
MARSHALL'S SAFE SLIDER SOLUTION
Or you can click on the top screen skip bar and the puzzle with solve itself. If you do the auto solve, click on 'done' in the puzzle close up to open the safe. Take the DATA READER. Use the Freezer on the world map on the wall above the safe. You will see that its only a hologram that hides a storage area for the Implant Gun. Take the IMPLANT GUN.
Leave Marshall's ofice. Go back to Sebastian's room where Jessica is being held, still wearing the lethal necklace. Open the doors with Marshall's Personal Card. Give the Data Reader to Hacker, immediately. He will encode the proper sequence to free Jessica. Afterward, in a cutscene, Jessice and Hacker will throw Ripper's broken body off the edge of the landing platform and into the abyss.
When Hacker and Jessica leave you on
your own, take out Marshall's Data Reader and use his Personal Card on
the Data Reader:
1. Scroll the arrow down to BRIDGE
ON.
2. Hit the Transmit button.
3. Look at the energy bridge now in
place to the right, which joins the platform to the Control Room.
4. Walk Walker across the energy bridge,
stopping short of going into the Control Room.
5. Take out the Data Reader again,
already armed with Marshall's card. Transmit BRIDGE OFF. The
energy bridge will disappear.
6. Go into the Control Room.
7. Use Pager's Card on the RIGHT hand
cabinet over on the wall to LEFT screen. Ah, there's your trusty
Memorizer. Take the MEMORIZER.
Also, take the IMPLANT CAPSULES.
Now, you can remove the bio container from your body with the Memorizer. Take it out of inventory and scroll to the code you scrambled earlier just before you left the Moon Base. If you didn't write down the code, and you've forgotten it, just keep scrolling to a new code and hitting Transmit, until you get the right one. When you do, you will see a cutscene of the bio container being expelled from your left hand with the Crystal Cone inside.
Use the Data Reader again and Transmit BRIDGE ON. Go back inside the Colony and someone will tell you about what has been happening to poor Preacher John. (Probably it will be Jake that tells you.)
Before you check out the Preacher, you need to go see Rita. She is still hiding out behind the Fortune Telling room in the Secret Chamber beyond the liquified door. Rita will tell you she thinks you also have a Tracer Implant inside you. You are concerned that this implant may have led to the discovery of The Fraction's secret hiding place, when you and Jessica met with the High Council. Your being there may have led The Controller's to them and you may have inadvertently caused the death of most of the High Council leaders. Heavy guilt trip here.
Go back out and go to Walker's room in the sleeping chambers area. Go to the cabinet on the left side of the room. Use the Notebook you picked up in the outer area of the secret room behind the Fortune Telling room, earlier in the game. It will help you solve the slider puzzle for the lock. By now you know how to bypass the puzzle if you so desire.
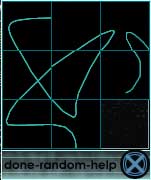
WALKER'S LOCKER SLIDER PUZZLE SOLUTION
When you get the cabinet open, take out the PURPLE TILES inside and put them in your inventory. Go back out and find Professer Webber. When you find him, talk to him about helping you get the Tracer Implant out. After he, Hacker and Jessica have helped you do that, put the Tracer Implant in the Implant Gun and go to the guard's room (straight across from the Casino, in the middle) and find Preacher in the back room. Shoot Preacher with the Implant Gun.
Go back and talk to Rita in the secret room again. She's trying to activate the Crystal Cone. She gives a clue for the solution to you. Use the Purple Tiles on the new page in the notebook laying on the side bar behind Rita. Solve the puzzle by correctly placing the tiles at left, in the imprint at right.
TILE PUZZLE SOLUTION

When you get it right (its easy) put the Crystal Cone in the round imprint on the complete puzzle. When you do that, you will get a dazzlingly bright OBJECT. Take it now and go to Preacher's room down next to the church's main entrance. Use Pager's card to get in. Try to get into Preacher's locker again, to no avail. Look at the painting above the hatch again. Click on the top area of the painting where your cursor highlights. You'll see the word REV, with two underlines beneath it. Go back to the locker and solve the slider puzzle to look like the writing on the painting. Or, bypass the puzzle and click on 'done' in the closeup to open the locker.
PREACHER'S LOCKER SLIDER PUZZLE SOLUTION
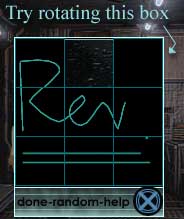
Do a little Dylan Thomas poetry reading to find the Preacher's Personal Card. You can check out the other literature in Preacher's locker, but your next target is the Bible. Open it. You can't take the Decoder. You don't need it.
Leave Preacher's room and go find him again in the guard's room across from the Casino. Inside, near Preacher, remove Marshall's card from the Data Reader and insert Preacher's card. Find the code that begins tt5...... (Remember the words Preacher mumbled ..."Picture. Double T5?") Click on Transmit. The Preacher's right hand will begin to glow brightly. Click on Preacher to retrieve the PSI COMM (communicator). Then, use the exclamation point (!) on the unit to call Gowddeln, the High Council Fraction Grey, who helped you escape earlier.
You will talk to Gowddeln. You now have everything you need in preparation for the journey to the Holy Mountain. You're going to travel there via the Dorb Adiopter starship. Its a Reptoid supply ship. Gowddeln gives you PASS CARD and a SPECIAL IMPLANT with you personal ID code. Next he gives you a HOLOMASK so you can disquise yourself as a Reptoid.
Get out the Holomask. Select Reptoid Maintenance with the blue buttons at right on the control unit, in close up. Click on the exclamation point (!). (The Reptoid disguise envelopes Walker.........your first look at a Reptoid.)
Now, go out the hatch onto the platform. Go to the larger exit at top screen. When you arrive in the dock area, you'll see an exit left (a dark alley) and a smaller exit just to the right of it, with a sort of half wall. This exit is between the dark alley exit and the speeder platform. Take that smaller exit and enter a preflight staging compartment, next to the Draconian ship.
Another timed sequence: Use a regular white implant on the Implant Gun in your inventory. Use the gun on the Grey standing in front of you. Talk to him (Bloom for short) about everything.
Next, put the Special Implant in your
Implant Gun. Fire it into the bio container, still in inventory.
Click on the Memorizer and Transmit the implant code to put the container
in your body again. Turn off your Holomask. Talk to Bloom again
and subsequently board the Reptoid starship, Dorb.
EPISODE IV: THE ALIEN STARSHIP
NOTE: Now that you are in the hangar on Level D of the Dorb, you have a choice of identities. You may start playing this segment as either Walker or Bloom. I chose Bloom. Switch your identity by using the new icon you see on the screen at bottom right. You can also trade inventory items back and forth; very handy. But, this is only going to happen when the two players are standing in the same area together. If you choose to be Walker, you have no inventory except the bio container. If you are Bloom, you have an STD.card and a Memorizer. Practice switching identities and exchanging inventory before you continue, until you are sure you have the routine down "pat."
First, as Walker, turn to Bloom and say ..."Bloom, I need you to do something for me."
Click on the container room to the right of the screen and, as Bloom, walk over to it. Use his Memorizer to comm.link to container. Transmit to air and then hit Receive to get the code for the container. Write it down...at least the first four or five characters.
Then, go to the console to the left of the hatch and click on all three levels shown on the ship's floor plan. Highlight every room on each level. Then, go back and talk to Walker about each room, so you are familiar with what functions are performed, and where, on the ship. You may or may not want to make a quick sketch or notes of which rooms are on which floors.
As Bloom and after the discussion with Walker, go over to the hatch and, in close up, use the STD.card on the sensor. Go down the passageway, not far, and go to the hatch on your right. Use the Std.card to enter. You are in the Maintenance room. Look at the lower shelf on your right, where you see small cases with red lights. In close up, push the red button, open the case, and take at least one MAINTENANCE KEY. (I took two of everything I could get.) On an upper shelf, just above the maintenance equipment, you'll find the Hardware/Tools. In close up, click on the case and take at least one WIRE CUTTER. Now, go left, and on the lower shelf again, find the Electronic Devices. Click on the red button and remove TWO COMMUNICATORS. Leave the Maintenance room and go down the passageway toward the green light; an elevator. A Reptoid may appear and question you. If so, just talk to him briefly. When the chat is over, go past him and push the lighted elevator button. In close up, push the yellow button. Then go sharply left screen (not to the big doors) and enter the elevator.
Choose Level C. See the diagram on the elevator change to show the floor plan of the level you are on? Get out of the elevator by placing your cursor at the bottom of the screen.
Look at the cryo-booths and walk to the second one in back and to the left of where Bloom is standing. Scan the side of the cryo-booth until the word PANEL appears. Bloom will walk over and a close up of a lock will appear on the panel. Use a Maintenance Key on the lock to reveal a Gas Tank. Take the GAS TANK. This action will display some hidden wires. Take both the RED WIRE and the BLUE WIRE to disconnect them.
Exit the close up, cross the aisle and pick up the EMPTY GAS TANK from the opposite cryo-booth. Go back to the elevator. Go to Level D, where Walker is waiting. Leave the elevator and walk forward until the screen reverses and you can see the door to the hanger area. Click on the right door and use your STD.card on the close up. Go back into the Maintenance room. Above where you found the Electronic Devices is a shelf containing cases of Electronic Parts. Click for a close up. Click the red button and take TWO Y-MICROJACKS from the case.
Go back to the cryo chamber on Level C. Go to your cryo-booth. The panel will open. Put the Y-Microjack on the slot to the left. Then connect both the Red and Blue Wires to the Microjack. Put in the empty gas tank from inventory. This is sleeping gas for hibernation. Guess Bloom won't be needing it? Close up the cryo-booth and go back to the elevator.
Go back to Walker waiting on Level D. Talk to him. Everything is ready. Choose "Let's just sit and wait....call for hibernation."
While you are waiting as Bloom, give the STD.card, a Communicator, a Wire Cutter, the Full Gas Tank, and the Memorizer to Walker.
NOTE: You should see a display that tells you what you are giving and whether you are giving it to Walker. You check your inventory afterward to make sure Walker has one each of all five items.
As Walker, go to the container area and put (in close up) the Full Gas Tank on the floor in the hiding place behind the crates.
As Bloom, go to the hatch that leads to the elevator and use the STD.card on it. Go to the elevator and then to Level C, the hibernation area. Set Bloom's cryo-booth for "sphereblend." Get in the cryo-booth and change over to become Walker. As Walker, still in the hangar area, go into the container area. Use the Memorizer to transmit the biocontainer code. Enter the closeup of the container area and click on "behind crates." use your Memorizer and transmit the bio container code to remove the bio container from Walker's body. Put the bio container down on the floor beside the Gas Tank.
After the cutscene, you have just a few seconds (60) to get yourself up to Level E and get safely inside the Security control room, as follows:
1. Click on the Gas Tank to release
the sleeping gas.
2. Quickly transmit the container code
to close the container doors.
3. Use the STD.card on the hatch.
4. Go to the elevator and press LEVEL
E.
5. When Walker can be seen leaving
the elevator on LEVEL E, enter the door on the right side of the passageway.
6. Under the security scanner, the
ships computer will determine your true identity and will allow you access
to the Security control room.
7. Walk into the room at right and
the doors will close and seal you safely (more or less) inside. Walk to
the console.
8. Save your game.
NOTE: On the console screen, now and EVERY TIME you see it, DENY request for elevator service coming from LEVEL E. Its a Reptoid trying to get at you.
9. Switch you identity to Bloom on Level
C and exit the hibernation area.
10. Hit the elevator button. If the
elevator button says WAIT, it means that Walker must deal with an elevator
request from the Reptoid first.
11. Switch to Walker. DENY the request
from Level E. Switch to Bloom and press the elevator button again.
If it still says WAIT, switch to Walker, DENY the Reptoid's Level E request.
Keep this up during this sequence (and later in the game) until you see
a request coming from Level C. That's Bloom. Approve his request.
12. As Bloom, in the elevator, go to
Level D where you and Walker came in. Its the cargo hangar.
You might want to SAVE YOUR GAME along in here somewhere.
NOTE: THOUGH NOT A VISIBLY TIMED SEQUENCE, this next series of requirements must be completed in correct sequence, with no wrong moves. If you make any error in correct input, hit the wrong buttons by mistake, or hesitate rather than moving briskly along, you will die and have to start over at your last saved game.
13. Go to the reptoids body, on the
platform and remove the GOLD CARD.
14. Use the Gold Card to get back into
the passageway and go toward the elevator at the opposite end.
15. Enter the door on the left before
you reach the elevator.
16. Go to the Gravity control console
and immediately hit ABORT.
17. Switch to Walker. Deny Level
E and then next Approve Bloom's upcoming request.
18. Switch to Bloom. Hit SET GRAV GEN.
SHUTDOWN, then, AFFIRMED, and choose 3 MINUTES. Then choose UNTIL
WE ARRIVE AT DRACO SYSTEM, then AFFIRMED.
19. Switch to Walker and approve Bloom's
request.
20. Switch to Bloom. Use a Maintenance
key on the left hand round lock on the control panel below the Gravity
console screen.
21. When you see the wires, use a pair
of Wire Cutters to cut the two (red and blue) wires under the designation
LSR. That's all that's necessary.
22. Still as Bloom, exit the Gravity
control room and go left to the elevator.
23. Call the elevator and switch to
Walker. When it appears to be okay, approve Bloom's request for the elevator
from Level D.
24. As, Bloom in the elevator, go to
Level C and go click on his cryo-booth. Click on OPEN BOOTH, then
HIBERNATION. Get in the booth (lie in booth) and answer YES
to both of the two upcoming text questions from the computer.
25. Switch to Walker and approve Blooms'
hibernation request.
26. Then, step back from the screen
and click on the left wall of the cabin, where you see on hot spot.
That's the Vitrifax. Choose ten minutes.
Several events happen in a cutscene where Walker and Bloom are frozen, the ship's gravity shuts down and the one remaining Reptoid is rather disgustingly killed. Ewwwww!
Afterward, you go to the console and turn off the security lock so you can leave.... DISENGAGE SECURITY LOCK. Go out through the scanner area down to Level D and go into the ships computer room, which is on the left side of the screen after the screen reverses upon leaving the elevator. The security scanner won't betray or hold you. The computer, in the form of a huge free floating white diamond shape, greets you and you have a short, but profound conversation. Afterward the starship's course changes it heads for Draco and the Holy Mountain.
When you have control again, just follow the path of least resistance until you come to a very long bridge. Cross it and enter the elevator, the huge lock in the side of the cliff. You're in for a long trip down into the depths of the Holy Mountain.
You have access then, to the six crystals, representing the six worlds where the Makers have built pyramids. The object is to light all the crystals into their appropriate world color, and simultaneously be teleported to all the world's possible paths. Just keep traveling and clicking until the cut scene occurs. You will receive "The Quickener" and be teleported, rather unceremoniously, back to Earth to be picked up along side a snowy mountain highway by a park ranger.
You are the Ward of the new consciousness that The Makers have sent from the future. This sojourn finishes another of many transitions in which humans attempt to refrain from destroying the entire Universe in the form of a cataclysmic implosion...the reverse of the Big Bang that theoretically formed this Universe way back ............In The Beginning.............
Good job, Walker. You should be proud of yourself for beating this considerable gaming challenge and saving humanity one more time while you were at it!
This walkthrough may not be copied or posted to another website without the express written permission of the author, Witchen, at GJan1@aol.com or webmaster@gameboomers.com
Questions or comments regarding the content of the walkthrough may be sent to the author's address.
Copyright © 02/2001 GameBoomers