YESTERDAY
by Pendulo Studios
Walkthrough by MaGtRo March 2012 (revised)
Gameplay: This is a third
person point and click game.
Once the game is opened, select one of four
profiles. The profile can be deleted by clicking on the trash can at top right
of the frame or selected by the arrow.
The game interfaces are at bottom bar of the in game
screen.
There are 4 icons at left of the bottom bar:
Power icon - quit game.
Sound icon - adjusts volume.
Star - shows the different points in the
game. This is the autosave and load feature of the game.
Click on a picture and load that scene. The game autosaves at certain points in the game.
Lightbulb - gives hints. The hints will
regenerate after 10 actions.
Crosshair - displays the hotspots in the
screen.
Inventory is shown at middle of the bottom
bar. Items can be combined by selecting an item, take out of the inventory bar and clicking it on another item in the inventory bar or on another item on the game screen.
Logo at bottom right of screen displays the game
commands and credits.
Resolution adjustment: If
the game screen is too big or too little for your monitor - the resolution
adjustment is found in the installed Yesterday game folder.
Open the game folder and then the PSconfig file. See
the config tool frame. Select "manually" and the resolution you want on the drop
down menu. Click ok button.
Other actions: Double click the red arrow to jump to the next
screen.
The space bar
pauses the game.
ESC key or right mouse click pulls back from other
pages or close ups or return to former actions.
Walls full of writings in blood, pinned pictures
and a pentagram on floor are seen. Tortured screams are heard.
One year earlier: Henry White,
a volunteer at NGO - Children of Don Quixote is informed by June, the director
of NGO that another homeless person is killed. They want to inform the other homeless people
not yet contacted that there is help for them. Henry is given a list of those to
contact. The first one is at Cadway Station. The station's hall has collapsed
and it might be dangerous.
See Henry White and Samuel Cooper drive to the entrance of Cadway Station. Cooper is left in the van.
Cadway Station, NY
As Henry White:
Left side train ramp:
Henry walks down the tunnel of Cadway Station and
ends up at the train ramp.
Inventory has ID card, cell phone and
flashlight.
Look around. Check the eye mosaic at left wall.
Check the destroyed stairway at left and see a
suitcase blocking the passage.
Check the train and see light coming out of the
train car.
Train car:
Enter the lit train car. Check the weeping mannequin
sitting on the bench.
Pick up the broken iron handrail on the floor
beside the mannequin.
Pick up the empty beer can on the floor
across the mannequin.
Check the electrical cable at end of the left bench.
Check the door at end of the car and see that it is
blocked.
Left side train ramp:
Take the suitcase from rubble:
Exit back to the left train ramp.
Use the electrical cable on the suitcase blocking
the rubble. Henry ties it on the suitcase and wraps the cable around the post.
Use the iron bar on the cable wrapped on the post.
Use the iron bar and Henry pulls the suitcase out from rubble.
Examine the suitcase in inventory. Get a box
cutter, screwdriver and electrical tape.
Right side train ramp:
Go back to the train car and exit at right side.
Look around and check everything.
Keyboard: Check the toy box
at left front of the screen. Pick up the electric keyboard with no
batteries and the toy phone.
Check the rubble by the entrance to the train car.
Pick up a battery operated figure (Poet of Pain - The Next Big Thing).
Combine the screwdriver and the battery operated
figure by click-hold (out of inventory bar)-release the screwdriver over the
figure in inventory. Get batteries.
Combine the batteries with the keyboard.
Telephone: Check the phone
on the post at center of the area. It has no keypad and receiver.
Check the hole on the wall left of the staircase and
basketball hoop at right post.
Vending machine: Check the
machine at right and see that there is a coin stuck in the slot.
Holy Grounds:
Open locked
gate: Go left at top of the stairs and see a padlocked
gate with brambles growing at top.
Use the box cutter with the aluminum beer can to get
strip of aluminum.
Use strip of aluminum on padlock of gate.
Hall of Eternity:
Henry walks in a hall with mannequins and altar.
Boris hits Henry with his gun.
See Choke with a Y on his palm. Choke asks his
mannequin congregation what to do with Henry since he desecrated the Holy Grounds.
Answer Choke anyway you want but the favorable
answers are:
- Tell the truth about who he is.
- Tell the truth about family.
- To help as the reason why he profaned the church.
- Higher intelligence as reason for continued
existence.
When Henry responds that he should be saved because
of higher intelligence; Choke tests this by asking several chess moves.
Chess moves:
1. Checkmate - Bishop to E7.
2. Leaves the black with no options - Pawn to G3.
3. Checkmate in one move - Bishop to E7.
Even after proving his intelligence, Choke needs to
cleanse his soul before meting the judgment.
Choke throws a NYC-token to Henry.
Boris closed all tunnel doors and watches over him
with his gun inside the train car.
Get help:
Boris: See Boris get a call
using the receiver of the phone outside. He wants that his Danny be found.
Talk to Boris completely. Learn that he is waiting
to pick up Danny, his son. Question Boris until you learn about Choke and
Boris. It is Danny's birthday today.
Get receiver: Use the box
cutter on the toy phone to get toy receiver.
Give the toy receiver cut from the toy phone to
Boris. Learn that something happened to Danny, Boris' son here at Cadway
Station. He is still reliving that fatal phone call.
Henry takes the receiver from Boris' pocket.
Vending machine: Exit the
train car at right.
Use the token given by Choke on vending machine at
right.
The token dislodged the coin. Automatically get the
half dollar coin.
Fix the phone: Use the receiver taken from Boris on the phone on the post. Henry
attaches the receiver using the red tape. It still works; there's a dial tone.
Call for help: Use the keyboard
with batteries on the working phone and see that Henry dials a number using
the musical tones.
As Samuel Cooper:
Cooper wakes up and answers the phone. He hears
Choke's voice and realizes that the call for help is not a joke.
Go inside the tunnel:
In inventory: van keys,
cell phone and The Young Pioneers badge. Check the badge to see how it was
stripped from him by the scoutmaster.
Van: Click on the van. Take
the box of matches and key of the back of the van from the glove
compartment.
Use the key on the back of the van. Take the
baseball bat and the gas can.
Tunnel: Check the tunnel
and see the memory of the scoutmaster. Learn that Cooper is afraid of the dark
and about making a torch.
Check the billboard at top of bridge.
Make a torch: Check the
trash can by the fence and get the rag.
Check the hole on the wire fence and Cooper gets a
length of wire.
Combine the rag with the baseball bat and
automatically tie it with the length of wire to get an unlit torch-baseball
bat.
Combine the baseball bat-unlit torch with the gas can. Cooper soaks the rag in gasoline.
Combine the soaked rag-baseball bat with the matches
to get a lit torch. Get another memory of the scoutmaster.
Cooper walks the tunnel to be outside the lit train
car.
Left train ramp: Look around.
Take the cable left of the rubble that Henry left earlier (left part
of the stairs) where the suitcase was located.
Take the iron bar leaning on the post that was left by
Henry earlier.
Get inside the train car:
Check the door of the train car and the plank in front of the door. It is
locked.
Use the iron bar on the door of train car. Enter.
Check the bullet ridden mannequin and take the
bullets from the pocket. Get another memory of the scoutmaster.
Check the pockets of the coat and take the
plastic receiver.
Right train
ramp: Exit at right. Look around.
Check the basketball hoop on the right post
to take it.
Rubble: Check the rubble
left of the stairways. Remove the rubble and see a door.
Look close at door and see a padlock. Use the iron
bar on the door at far view. Get another memory of the scoutmaster.
Former store room: Enter
the room and see that the floor is gone.
Check the bar at floor level and the pipe at ceiling
level.
Look at the coat closet at end of room and see a
revolver in a holster.
Get revolver: In inventory
combine the basketball hoop and the cable to get a makeshift grapple.
Use grapple on the pipe at ceiling. Cooper swings
across and loses the grapple.
Take the revolver. Combine the bullets and
the revolver to get loaded revolver.
Go back and out: Check the iron
door left of Cooper. Take the iron door.
Use the iron door on the bar across the empty floor.
Walk the plank and Cooper jumps out to the outside.
Save Henry:
Climb the stairs and watch Choke's judgment. Henry's
fate is to be decided by the rats in the well of truth. If the rats,
attacks Henry, he is innocent and have sent him to heaven. If the rats leave
him alone, Henry will be shot.
Look around. Check the well, Henry, Boris, Choke and
the gun on the altar.
Use the loaded revolver on Choke-scoutmaster. Pent
up anger is released.
Boris pushes Henry down the well. There are no rats.
Henry starts whistling. Uh oh! Henry decides not to
burn the 2 hobos.
In the van, Boris watches as the body of Choke
rises. They laugh.
White Enterprises:
One year later, a changed Henry White talks to his
administrative assistant. John Yesterday is brought in.
Talk to John completely.
Learn that John has lost his memory and was
hospitalized. All expenses were taken care of by Henry. Learn the background of
John: his loss of memory, his mother, his education, profession, connection
with Henry and his last job.
John's memories are triggered by a movie (a girl in
Paris antique shop), his hand (an image of a priest in a church killing
someone-me) and a blue bird (sees John with a beard and long hair in a
blizzard).
Learn what John found out in his investigation from
Henry. Henry wants him to get information about the Order of the Flesh. Click
on dialogues until they are checked. It seems that there is a connection
between the Order of the Flesh and the Notre Dame cathedral. That is what John
was investigating before his call to Henry.
John was found by Henry in Paris with a Y mark on
his palm and has taken mercury in his attempt to commit suicide.
Henry has been investigating a killer that has been
burning hobos for years and lately has been torturing them using Satanic
rituals.
Hotel Doré, Paris
A man watches the John's penthouse suite at Hotel Doré in
Paris. This is John's old suite. Albert the hotel clerk is weird.
As John Yesterday:
Hotel suite:
Something is bothering John about the room.
Look around.
Use the phone to call mom-Mrs. Yesterday.
Check all the paintings.
Safe: Check the painting on
the post left of the bathroom door and right of the desk.
Get a flashback of Albert the desk clerk holding an
envelope and giving it only to the person that mentions 2 words - that
includes John.
Demon paintings: Check the
paintings above the desk. John remembers that he was forced to take mercury.
Take the notebook and fountain pen
from right part of the desk.
Take the blunt letter opener from left side
of the desk.
Balcony: Exit on the left
and look around.
See the Eiffel tower and the L'Hotel National des
Invalides.
Check the table with champagne. John remembers
cutting something from a similar Eiffel tower card. He takes the welcome
card.
Check the hot tub and the rough horse head
sculpture.
Find the first word:
Look for clues that will show the words that Henry
needs to give the envelope to John.
Bathroom: Go back inside. Enter the
bathroom. Take the Rosemary oil bottle at left and the hand cream.
Check the cologne behind the hand cream and it
reminds John of Henry. John does not like it.
Take soap and the towel from the
right side of the faucet.
Turn on the hot water and see that the steam is
sucked in by the extractor fan on the ceiling.
Extractor fan: Use the
letter opener on the extractor fan. The tip does not fit the screws.
Exit the bathroom by clicking on the door image on
the mirror.
Exit to the balcony at left.
Use the blunt letter opener on the rough horse head
sculpture. John sharpens the edge.
Go back to the bathroom. Use the sharpened letter
opener on the extractor fan.
Use the towel on the spinning fan. John places the
cover back on.
Now, turn on the hot water tap. See the word:
ALCHEMY.
Exit the bathroom.
Find the second word:
Use the sharpened letter opener on all the
paintings.
Original sketch by Gustave Doré for Divine
Comedy: Open the cover of the safe again.
Use the sharpened letter opener on the back of
Doré's sketch.
Get an Eiffel card with cutout. It triggers a memory.
Exit to the balcony.
Click the card with cutout on the view of the Eiffel
Tower. See the second word - REVOLUTION.
Exit back to the room by moving the cursor to bottom
of screen and get an exit arrow.
Get the envelope: Use the
phone and contact the front desk.
Talk to Albert completely. The maintenance man was there to fix the extractor fan. Ah.
Lastly, tell him the 2
words - Revolution and Alchemy. Albert brings the envelope to John.
Open-click the envelope in inventory. See a note - Evergreen, 1852 and
swimming goggles.
Find the item from the envelope clues:
Decipher the note: Use the
phone and talk to Henry White completely.
Henry is interrupted by Cooper about a drunken woman. Hmmm...
Henry mentions that The Evergreen refers to a chess
move - knight to E7.
Hot tub: Go to the balcony and
turn on the hot tub by using the control panel at the corner.
The hot tub is lit up. Click the goggles on the lit
hot tub and see an outlined 8x8 squares.
Use the sharpened letter opener on hot tub.
John automatically removes the tile at E7. Get a
plastic package.
Open the plastic package and get a key.
Safe: Go back inside and to
the safe. Use the key on the safe.
Get a card - Le Tout Petit. It is an antique
store run by Jean and Pauline Petit. Memory of the girl returns.
Antique Store, Paris
Talk to the woman of John's memory. She slaps John.
Learn that her father committed suicide 2 months ago. Learn also about the diary
that he was supposed to pick up the next day. It has Jean's notes about the
connection of Notre Dame with alchemy.
John recalls the night they were
together. They were both supposed to fly back to New York but he
never came back from the hotel to pick her up.
Pauline tells John to get the diary himself from the
place he hid it in the store. Pauline gives the key.
Front part of the store:
Look around. Check all the shelves and active spots.
Take the scissors at center table with statue.
Take the loupe from the table with the candle
holder at left.
Talk to the man in red, Marcel Drissard. He is the one
tailing John.
Check the shelves with the bird on top at right side
to trigger a memory.
Talk to the tourists if you want.
Tapestry: Check the tapestry
hanging at right side of the top level.
It triggers a memory.
A man speaks that Don Gines de Orduña, a priest poured mercury from his right
hand, sulfur from his left hand, sprinkled salt on top and lit a fire
underneath that blazed white hot like the depths of hell.

Search for the
diary:
Use the key given by
Pauline on the door. Look around.
Small cross:
Take the small cross hanging on back wall. Note the 4 pivots on its
back.
Check the shelf with
the duck, lamp and bull statue at center of room. Automatically take lamp
full of oil.
Take the box with
alchemy pieces-satanic symbol on the cover by left wall. John opens it to
show strange wooden pieces with symbols.
Check the Notre Dame
facade by the door. Try to take it and it triggers a memory. The secret is in the
facade.
Take the alchemy
symbol chart on the wall above the desk. It triggers another memory.
Open the hatch above
the desk and take the ultraviolet light.
Take the
wooden bar with a Y at end on the table left of the large cross.
The door at top level
is locked.
Large cross:
Study the large cross right of the stairs.
It has holes on each
of its 4 arms and one at the center.
Use the small cross on
the large cross. The holes match at the center but the large cross' holes are
plugged.
Open the holes of
the large cross:
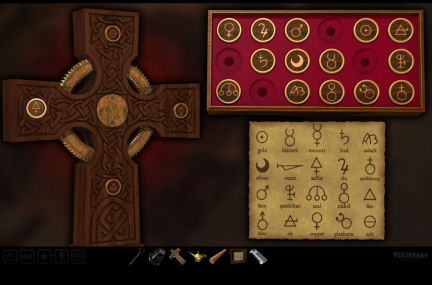
Use the alchemy box on
the cross.
On the close up of the
cross-puzzle, click the alchemy symbol chart on the alchemy box above. Use it
as reference.
Remember the triggered
memory clue seen on the tapestry at top level at the front part of the store.
Click on a symbol and
then click that symbol on the location-hole on the cross you want.
Place salt symbol
above.
Place the mercury on
the right arm of the cross - right when facing the cross.
Place the sulfur on
the left arm of the cross - left when facing the cross.
Place fire at bottom
hole.
The holes open. Use
the small cross on the large cross. The secret compartment
opens. Take the diary.
Diary:
Open the diary and it triggers memories. John was tortured.
Learn the truth about
Henry White, Cooper and Boris. Boris is in Happy Dale, a mental hospital.
Look for Scytale and
then Boris at Happy Dale.
Exit the room and talk
to Pauline completely (maybe 3 times). Learn that her father is friends with
Choke. Before the father's suicide, he was with a rich American the whole day.
Look for a scytale:
Make a scytale:
Check the diary. Use the scissors on the diary to get the rubber band
around the diary.
Use the rubber band
around the Y wooden bar. John rolls the rubber band on the bar.
Decrypt the scytale:
Use the ultraviolet light on the scytale.
See that the encrypted
words are St Fergus Church, Inverloch Woods, Scotland.
John updates Pauline
about his amnesia.
Henry White's minion
threatens Pauline and John. He wants the diary. Marcel killed Pauline's father. He shoots the American tourists. He also poisoned John with mercury.
John runs inside the
back room.
Find a way to stop
Marcel:
Check the hatch above
Pauline's desk again. Get keys.
Use the keys on the
locked door at top level.
The door makes noise. Use the lamp of oil on the
door. Exit again. (Thanks!)
Check the Samurai at
left and get the katana. Touching the katana brings memories.
Somewhere in a
snowy mountain centuries ago
Learn to be an
adept:
John pulls a sled in a
snowy mountain. He collapses. He wakes and sees the
aerie abode of the master he is searching for.
John shows his palm
with the Y. You are late.
The blind master gives
him a razor to cut his hair.
John undergoes
training of his mind, body and soul.
Talk to the blind
master, Olhak Adirf.
John wants to learn
swordsmanship. He is not ready. The master wants him to bring truth
flower.
Meditation room:
Look around. Check the
clothes cabinet, the table in front of it and the katana held by the dragon
yak's mouth.
Check the stationary
and the left window. Take the ladle
from the water jar at right.
Talk to the blind
master completely.
Balcony:
Look around and check
the incense burner, the brick railing and the protruding wood at the corner.
Check the nest and the
truth flower bush. It is too far.
Outside:
Exit to the middle
entryway. Check the dead bush by the steps.
Take the rope
from John's sled. Check the pulley right of the bridge.
Take the planks
left of front part of the bridge. Check the head left side of the bridge. Go back inside.
Make a plank
walkway:
Check
the door of the meditation room and see decorations on the door.
Pull back. Use the
razor on the meditation room door. Get hinges plus some screws that are not
enough to use with the planks.
Enter the meditation
room and talk to the blind master again.
Playing:
At end of dialogue, a game will be played.
You have to guess the
total number of fingers held up by the master and yourself.
Take the katana
from the dragon yak's mouth (The katana cannot be taken out of the room).
Use the katana to open
the window on the left. It lets light and also shadow in the room.
Now play again with
the blind master.
See that the shadow
shows the fingers he holds behind his back. You can now answer the game
correctly.
You can play 3 times
to win all of the master's treasures but the important one is
the "small vices".
The small vices are
screws. These are added to the screws taken from the door decorations.
Return the katana to
the dragon yak and exit to the right.
Planks:
Combine the monster faces decoration and the planks. Automatically make a
long plank.
The long plank doesn't
work to reach the truth flower bush across the balcony.
Bell:
Go right to the bell
area. Turn a prayer wheel.
Fix the bell
ringer: Check the bell and the log used to ring the bell. The
log is missing a rope. It needs to be at
level to be adjusted.
Take cereal and
legumes sack from floor.
Take corn from
the open sack. Good for birds.
Use the long plank on
the log bell ringer.
Place the sack of
legumes on the right end of the inserted plank.
Use the rope on the
bell ringer.
Call the bird:
Ring the bell by use
of the log.
The bluebird flies to the
nest.
The master teaches
John the art of swordsmanship.
Back to the present
at the antique shop:
Watch John show his
swordsmanship after remembering the cold blooded murder of the tourists.
He shows the last
lesson he learned - forgiveness. Pauline takes over.
John tells Pauline to
meet him in Inverness airport and he will be there after he meets with Boris
at the mental hospital. I love you.
Happy Dale
You'd be mad to
go elsewhere.
John is allowed to
experiment with Boris because of his connection with Henry White who donates
to this hospital. John is not allowed to
touch, wake or upset Boris. Call Ernie the orderly in case of help. Remember
Runaway 3?
Boris:
Boris calls John as Choke. Choke saved him from torture at a warehouse.
John recalls being
above the warehouse. Click on the roof of the warehouse and get John to jump.
Recall the
existence of Choke or John:
Talk to Boris
completely. Boris recognizes Choke's voice when he is young. Learn about the
torturers: Cooper and Henry.
Recall what happened
after waking up in the van. Boris updated the young amnesiac Choke on what has
happened since he died. Boris is Choke's only friend. Boris has a broken leg and can't
escape with Choke-John.
After the van stopped
at the gate of White's warehouse; John exits the van and escapes. Henry
realizes that Choke is gone and leaves to look for him. Cooper takes Boris.
Get inside the
warehouse:
Warehouse:
Look around. Check the outside gate of the warehouse.
NYC metro tokens
are in inventory.
Pick up the rubber
tires beside the second lamp post at left.
Train:
Go right and check the fence by the train cars.
Check the wire gate in
front of John. See that a clamp holds the gate shut.
Use the tokens to
release the clamp. Get clamp.
Pick up the wooden
beam on the ground just across the gate.
Open the rail car.
Examine the boxes. Get a professional camera from the boxes at left.
Pick up the roll of
tape in front of the boxes at right.
Tower:
Go back to the
warehouse area. Go left to the tower area.
Check the trash heap
right of the tower. Get a circular blade.
Check the canvas
covered item left of the tower. Get canvas and see a surveyor tripod.
Record your memory:
Place the camera on the tripod.
Use the perched camera
and John records what he remembers so that he can recall important things when he dies
again.
Make a foothold on
the logo: Check the logo on the wall of the tower. It
needs to be more recessed to be used as a foothold.
In inventory combine
the wooden beam and the circular blade. Hold the blade in place using the
clamp take from the wire gate.
Use the makeshift axe
on the logo on the wall of the tower.
Use the recessed logo
and John climbs up to the top.
Take the can of red
paint at top of the tower.
Protect the camera:
The camera needs to be protected so that John can remember things after his
next death.
Combine the camera and
the rubber tires. Cover it with the canvas. Hold it all together with the roll
of tape and get a canvas wrapped camera.
Use the can of red
paint on the canvas wrapped camera. John paints a Y on it.
Drop the canvas
wrapped camera on to the roof of the warehouse.
Now - jump and die.
John returns from
death and sees his palm and watches his recording.
Find Boris:
Check all the trash
can on the left. Get an RCA cable in the middle trash can.
Check oven controls at
the middle of the building. It is broken.
Check the fire axe
cabinet at right. Use the canvas on the axe cabinet and then take the axe.
Oven:
Go to the lit area. Check the oven at right.
Press the red button
right of the oven door to open it. No power.
Cabinet:
Go behind the desk at left and look at the cabinet. It is locked.
Use the fire axe on
the cabinet. Get a plan.
Control panel:
Use the red arrow to get a close up of the control panel desk right of the
cabinet.
See that the monitor
is broken and has no connections.
The middle
alphabetically labeled panel is similar to the plans.
There are 3 buttons
below that opens: the main door, fence and oven.
Set up the monitor:
Use the cable on the video out hole at right.
Use the professional
camera on the attached RCA cable.
See that cam 1 is
noise.
Use the red button to
cycle through the different security cameras.
See that cam 6 shows
Cooper with Boris.
Look close at the
monitor. There is a generator in that room.
Find the generator
room: Use the plan taken from the cabinet on letter
A-switch of the control panel.
John will then check
each alphabet to finally find the generator room.
Flip the switch of the
generator room - F. The light goes out at the generator room.
Cooper exits out of
the oven. Get a memory recall of the teaching of the master. John attacks
Cooper with the axe.
Oven door:
Press the green oven button on the control panel.
Exit the control panel
by moving the cursor at left and behind the panel.
Press the red button
right of the oven door. Fire. Now how to get to Boris?
Use the canvas on the
oven door. John rescues Boris
Fortune is a...:
John places Boris in the train but is shot.
Henry empties his gun
on Choke-John.
Choke-John realizes
that he has a lot more past lives memories to recover. The Y on his hand is
the first priority.
John takes leave of
Boris and tells him he will come back for him later.
St. Fergus
Church, Inverloch Woods, Scotland
Pauline and John
arrive at the ruins of St. Fergus Church.
The cross:
Something catches
John's attention.
Cross:
Look around.
See that the cross is
full of dirt and needs to be cleaned.
Click at the center of
the cross and see a circular cover.
Check the ground in
front of the cross and note that there is a mound of dirt in front of the
cross.
Check the stained
glass window of the church ruin. It resembles the rose window of the Notre
Dame.
Go right.
Medallions:
Check the area on the left by a pole. See a part of the church that has
medallions similar to the facade of the Notre Dame. John recalls the letter to
the Grand Inquisitor. Touch it and John recalls what Pauline's father said about
the connection to the Order of the Flesh.
Tombstone:
Check the tombstone on the left of the area.
Take the scrub
brush.
Batteries (revised): The placement of the batteries is random and not shown by the crosshair-hotspot icon. There are 5 possible places that the batteries can be located: left and right edge of the rock ledge at bottom right; top of the mountain at left; top left edge of the mountain at right and dark wide path of the far mountain at center of screen. Take the batteries.
Ruins:
Enter the ruins of the church.
Talk to Pauline. Keep
asking about the diary. Learn that mercury is for memory. Learn that John said
that the mercury being the key before he left for the hotel. Ask about Choke.
Take all the chemicals
on the pedestal at left: alcohol, cobalt, zinc, mercury, gold, salt, sulfur
and vinegar.
Pick up the cooking
pot and the shovel.
Clean the cross:
Exit and take water from the lake using the cooking pot.
Go back inside the
ruins. Combine the pot of
water with vinegar.
Place the pot with
water and vinegar over the camp stove.
Use the lighter on the
camp stove. Take the heated pot from the stove.
Go back to the dirty
cross.
Use the scrub brush
with the heated vinegar-water.
Use the dipped
scrubbed brush on the moss part of the cross. Now it is cleaned.
Use the shovel on the
mound of dirt around the cross. See that it is part of a headstone.
John also picked up
the coin of judgment. John recalls a memory.
Secret of the
cross:
Note that the cross is
similar to the cross of Pauline's father that hid the diary.
Place salt in the
circular plate at the top of the cross. Hear a mechanism move.
The hole at right arm of the
cross while facing it is plugged. Use the knife to unplug the hole.
Place the mercury in
the circular plate at right arm of the cross - right when facing the cross.
Hear a something released.
Place the sulfur in
the circular plate at the left arm of the cross - left when facing the cross.
Place alcohol in the
circular plate at bottom of the cross. Hear a sound.
Use lighter on
alcohol. Hear a mechanism slide inside the cross.
The gear turns. A stairs opens in the
ground. John climbs down.
Order of the flesh:
The baddies arrive in
3 vans.
John uses the lighter
to light up the back of the altar and sees the Y.
John recalls who he is
at the place where he was made immortal 5 centuries ago.
A tortured John is
under judgment by Gines de Orduña and the members of the Order of the Flesh.
Answer any way you
want.
He is Miguel de
Castro, son of the Duke of Fuentenegra; he was Gines' right hand man in the
Order of the Flesh and his other-order name is Vulcanus.
Miguel-John's crime is not
continuing the carnal act of a male child.
The judgment of
immortality but no remembrance (by omitting mercury from the recipe) is
imposed on Vulcanus-Miguel.
He is branded with the
Y on his palm and then killed. The Inquisition Army arrives and kills all of the Order of the
flesh.
Cooper:
Cooper chokes Choke-John. Henry's minions are going to do all the possible
torture on John.
Cooper says that Henry
wants John to make a recipe for him.
John goes to the
generator and turns the lights off.
Get a truth flower:
Back to a long ago
memory: John wants to learn from the blind master how to
control the unknown sense.
The master wants a
truth flower.
Look around.
Check the 3 bowls in
front of the master.
Get a block of
butter from middle bowl.
Use the ladle-cup on
the left bowl to get a little honey.
Take the katana
from the dragon yak. Exit the room.
Get truth flower
seeds:
Go to the bell area at
right. Take corn from the open sack.
Go back to the
balcony. Place honey in the ladle on the
brick on the railing.
Use corn on the brick
on the railing. See the bird come and eats the corn.
Get more corn from the
sack and place it on the railing.
See that the bird left
truth flower seeds on the honey. Take the truth flower seeds.
Plant the truth flower
seeds: Go outside and check the dead bush by the steps.
Use the katana to dig
up the dead bush. Plant the truth flower
seeds on the hole.
Water the planted
seeds: Check the crank of the pulley at right of the bridge.
It is rusted. Use the
block of butter on the crank.
Turn the crank now.
Use the katana to get the pail with rope.
Check the dragon head
at left side of the bridge. It has icicles hanging down from it.
Use the pail with rope
on the dragon head. John cuts of icicles with the katana.
Go back inside and use
the pail with icicles on the top of the incense burner. Get a pail of water.
Use the pail of water
on the planted seeds outside.
John waters the plant week after week until a
truth flower is obtained.
Watch how John learned
to open his unknown senses.
Immortality:
Mrs. Yesterday turns
on the generator. See that all of
Henry's minions are incapacitated.
Henry arrives using
Pauline as shield. He wants John to make him immortal.
To convince him, he
shoots Pauline. John prepares the immortality potion and gives it to Pauline.
Pauline dies.
Continue talking to
everyone completely.
Decision:
Which of the three
leading characters in this story will upset the balance?
When the time comes to
make a decision; you can replay all 4 endings-decisions using the last autosaved game.
In the choice of John: there are 2 ways. Take the heated knife by the left foot of John or use the batteries on the Poet of Pain doll located at top of the pillar at left corner (left of the statue with sword).
Be sure to watch the
cutscene after the credits.
This document may not be distributed without express written permission of the author and the content may not be altered in any way.
For Questions or Comments on this Walkthrough,
Please write to: MaGtRo
Copyright © 03/2012 MaGtRo
 GameBoomers Walkthroughs and Solutions