Yoomurjak's Ring
By Private Moons Studios
Walkthrough by MaGtRo April 2009
Gameplay: This is a first person point and
click game. The Main Menu has New Game, Continue, Settings and Quit.
The Settings have the Sound, Graphics and Game
selections. The Sound options have adjustments for background noise, music and
dialogues. The Graphics options have adjustments for color depth and 3D
anti-aliasing. The Game options have selections for rotation speed and
subtitles.
In-game Menu has Save, Load, Back to game and Exit (autosave).
Dial Menu is seen at top right of the game screen.
The Menu can be accessed by clicking the button. M stands for Map, I is
for inventory, N for notebook-dialogues and E for encyclopedia The Encyclopedia is
turned off in English version.
The map can be accessed only when outside a building
or a location.
Inventory is at top of the screen and seen when the
I dial is clicked on. A click on the I dial again closes the inventory. The
same function can be done by pressing the space bar.
The game has Hungarian dialogue with English
subtitles.
Thanks to Judit for filling the gaps.
Jonathan Hunt from New York recalls his letter to
Allison. He is on a train on his way to Eger in Hungary, the country of his
dead mother. His trip was inspired by the book, Star of Eger given to him by his
grandfather. With him are 2 letters written to his great grandfather, Samuel
Hunt by Pal Abray, professor from Eger.
Day 1: Eger the City
Hotel Senator:
Room 15: Jonathan checks in
and enters room 15 at the Senator hotel. Look around.
Take the remote control and use it on the TV. Watch
the local sights in Eger.
In inventory, read the Star of Eger written by
Gardonyi Geza, Abray's 1st letter and Abray's second letter. Learn that Abray
was working on a time machine but was scoffed by the scientific community.
The
second letter mentioned a pen pusher and Abray's assistant meddled with his
time machine. Learn also that the politicians were willing to support his
project.
Exit the room. Look around at the decorations at the
landing.
Reception desk: Go down the
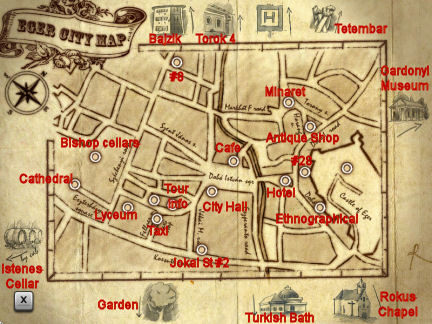
stairs and talk to Istvan Bako, the receptionist. He gives a map of the
city.
This map can be used to jump to a place already
visited or marked on the map by another person.
He mentions the Tourist office and he doesn't know an Abray.
Pan left and exit through the flowered stain glass
door.
Tourist Information: You can jump
to the tourist office using the map or walk forward to the square at the end,
take a left and forward to the split in the road. Take the right, forward and
see the tourist office at right.
Juli: Talk to the woman
behind the counter, Julianna Sarosi.
While asking about Abray, the old man checking some
books became interested. He invites Jonathan to coffee at Cafe Francesco and
to discuss Abray.
Juli marks Cafe Francesco in the map. She advises to
get a cell phone.
Cell phone: Exit the office, turn right and go forward 3 times.
Enter the cell phone office. Jonathan exits with his brand new cell phone.
Go back to Juli and talk to her. Her phone number is
entered on the cell phone.
Cafe Francesco: Exit the office. Jump to
or walk to the Cafe at Dobo Square.
Mihaly Jambor: Talk to the
old man. He knows about Jonathan's great grandfather.
Learn about the old
man's grandfather, Zsigmond Jambor, the assistant of Abray. This must be the
one mentioned on the second letter of Abray. They talked about time travel and
the Abray's letters. Learn that Geza Gardonyi is the pen-pusher, journalist
that Jambor the one eyed assistant helped. Yoomurjak a character in the book
written by Gardonyi is based on his grandfather. He believes that his
grandfather is the first time traveler.
He invites Jonathan to visit him tomorrow at 8
Kocsis St.
Day 2: Time Traveler
8 Kocsis St: Exit the Senator
Hotel and jump to 8 Kocsis St. at top of map.
Talk to ambulance man. He would not answer questions
and states to ask later at Hospital Markhot.
Markhot Hospital:
Juli: Jump to tourist
information and talk to Juli. She marks the map with the hospital location.
Hospital: Jump to hospital
at top of the map. Go forward and talk to receptionist.
Dr. Ostoros: Turn around
from receptionist and talk to the doctor. Learn that Mr. Jambor passed away. Mihaly left a
letter for Jonathan.
Letter: Open the
letter. He wants Jonathan to carry on his work - to not allow posterity to
forget Zsigmond Jambor and to see Yoomurjak as the first time traveler. Mihaly
left the keys to his house.
8 Kocsis St: Jump to #8.
Use the keys on the door. Enter the house.
Go forward and look at the picture of a one eyed man
on the wall. Look down and take the rope on the floor.
Go to the desk by the window and look close.
Read the entries in the brown journal at top left
that are Mihaly's proofs: 2 letters by Gardonyi, a map drawn by Mihaly's
grandfather, Samuel Hunt's letter and a coded note by Gardonyi from the
Bresnay's collection.
Read Jonathan's grandfather's letter to Abray at
bottom left.
Read the 2 letters by Gardonyi. One mentioned his
trip to dozen towns in Hungary. Both mentioned wines and the mention of the
Istenes Cellar where he ponder over the memory of a late companion.
Check the map. Mihaly's grandfather wrote that he
collected Turkish objects in Eger and has marked the map. At the very center
of the map is a minaret.
Study the coded piece of paper at top of map. The
scripts are alphabets created by Gardonyi.
Tourist Information:
Talk to Juli. Learn about the key to Gardonyi's
ciphers. She referred Jonathan to Klara Bakonyi, a historian. The historian is
at Cafe Francesco. She marks Istenes Cellar in the map.
Istenes cellar:
Taxi: Exit the office and go
forward to the car seen close to the curb or use the map. Hire the taxi to go
to Istenes Cellar.
Wine Cellar: Go forward,
right and enter through the door ahead.
Talk to the winemaker. He mentions that the history
of the cellar is on the poster by the door. The walls have etchings that are
old and valuable.
Turn left and forward to the middle long table. Take
the candle at end of table.
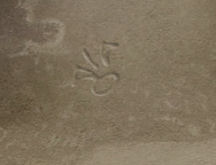
Turn around and go forward. Turn right to the wall
and look close at an etched relief of the crucifixion.
Go back to middle aisle. Turn right between the 2
short tables and forward to the dark wall right of the barrels. Look close at
the etched words on the wall.
JI - First message of Yoomurjak: I've
been caught.
Go back to the taxi.
Search for Gardonyi key code.
Cafe Francesco:
Go to the Cafe.
Talk to Klara Bakonyi, a historian of literature sitting at the bar.
Learn that the librarian might help in decoding Gardonyi's alphabets. She
enters the Bishop's Library in the map.
Lyceum-Academy: Use the map to jump
to the Lyceum-Academy seen left of the taxi icon or walk down the street where the
cell phone place or tour information is located; then turn left.
Go forward to the doors at other side of the hall.
Look at the board in front of the stairs. See that
Camera Obscura is on the 4th floor, Terrace is at third floor, Observatory is
at second and Bishop's Library at first.
Bishop's Library: Click on
the first floor of the board. Go forward and turn right.
Enter the library and talk to the librarian. Learn that some documents surfaced after the death
of Gardonyi's son in 1965.
He writes the decoded Gardonyi script for EGER. Exit the
Lyceum-Academy.
8 Kocsis St: Jump to #8.
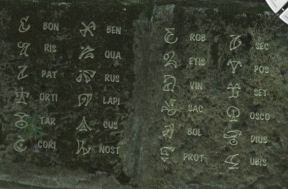
Go to the desk and look close at Gardonyi's script.
Decipher Gardonyi's note: See a close up of the script to be deciphered and a
table at right.
The table at right has Gardonyi's alphabets and the
regular alphabets at the bottom.
Click on a Gardonyi's alphabet and the corresponding
alphabet at the bottom and that letter will be placed on the white paper at
left in the positions of the note to be decoded.
See that the white paper at left already has the
EGER transcribed. Continue to deduce the other letters.
When done, the cipher code keys are in
inventory.
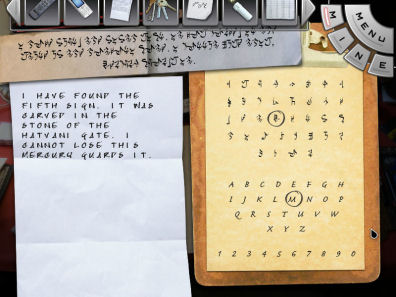
The note implies that there are 5 messages from
Yoomurjak. The fifth message is guarded by Mercury. We already saw the first one at the Istenes cellar.
Search for Mercury.
Tourist Information:
Talk to Juli. Learn that the Hatvani Gate has been
demolished. Gardonyi's house is now in a museum. Juli marks the museum in the
map.
Cafe Francesco: Go to the Cafe.
Talk to Klara Bakonyi, a historian of literature sitting at the bar.
She mentions that Mercury can be the God or the
planet. He is the God of merchants, thieves and travelers. The Greek name is
Hermes.
Gardonyi Museum: Jump to
the house marked at right edge of the map.
Take the left path and see the statue of Gardonyi.
Go back to the gate and take the right path. Enter the first door of the
house.
Auntie Iza: Talk to the
receptionist. She gives a brochure-Gardonyi leaflet.
Talk to her again about Mercury. Learn that she
knows Mihaly-Miska. She mentions that one of the Gardonyi sons sold some
items to Mano Hauser in Budapest.
Juli: Call Juli on the cell
phone and ask a favor that she check the Mano Hauser in Budapest concerning
the Gardonyi collection.
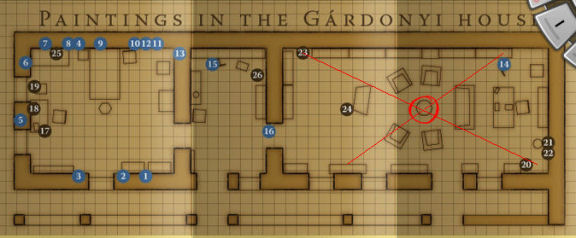
Leaflet: Study the leaflet.
Turn to the other side and see the floor plan of the house. The items are
numbered.
Bedroom: Enter the room on
the left. Look around. Compare the items in the leaflet to those in the
bedroom.
Note that the back of some paintings on the wall
have letters on them. Check the bookcase and the piano.
Study: Enter the room on
the right of Auntie Iza. Look around. Compare the items in the leaflet to
those in the study.
Yard: Exit the museum and
look around at the yard. Take a left outside the museum door and then right.
See the back of the torso statue and see ciphers
with translations.
Message from Juli:
Go somewhere or if you want, you can also ask Istvan
at Senator Hotel about Mercury.
Get a text message from Juli about an Antiquarian
named Tollar buying the Gardonyi articles.
Antique Shop:
Go to Cafe Francesco and talk with Klara. She marks the
Antiquarian's shop in the map.
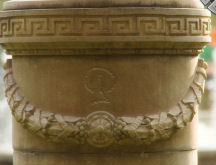
Jump to the column
icon on Dobo road. If you want to walk, take the road right of Senator Hotel and
then take a left. Go forward and take the left road when the road splits.
Mr. Tollar: Talk to Mr. Geza
Tollar and ask about the Gardonyi items.
Ledger: Enter through the door
behind and right of Mr. Tollar.
Go forward to the desk. Look close at the brown
ledger. Open to the third listing.
Study the list of items and where they were found
originally placed in the Gardonyi's house.
Take note of:
Typewriter: It stood in the
study under the map on a small table.
Part of a leg, bronze statue: It
is a winged foot used to fix the door for the darkroom opening from the
study (back, at right corner of the room).
Pack of cards: It was kept in
the study, in the cupboard with painted doors on the left side.
Look around the shop and search for these items:
Typewriter: Go around from the
desk and see a typewriter on a chair beside a table of vases and
boxes. Look close and see that the brand name is Hermes.
Winged foot: Turn around
from the typewriter, forward and then left. Look close at the bronze statues
on the shelf. See the broken winged foot.
Pack of cards: Turn right from
the winged foot and forward. Look close at the box of playing cards on a
stand. It has a symbol of a planet on the back of the cards.
Exit the shop.
Lyceum-Academy: Go to the
Lyceum-Academy (building
icon left of the Taxi symbol in the map).
Observatory: Go to the second
floor of the Lyceum-Academy. Enter the observatory. Look around the displays.
Look close at the pictures in a display case at back
wall. Take note of the planetary symbol of Merkur-Mercury.
It is the same as that on the back of the playing cards.
Gardonyi Museum: Jump to the
house marked at right edge of the map.
Study: Enter the museum and go to the study.
Mercury puzzle:
Look close at the thermometer at back left wall.
Jonathan comments that yes - it is made up of mercury.
Turn around and look close at the map on the wall
between the 2 windows. There's a small table under it.
Turn left and forward to the right corner of the
room beside Gardonyi's diplomas. See a sealed door at the corner.
Turn left and go to the painting on the easel of a
rug seller. Look down and see that bottom parts of the doors are painted.
Open the leaflet of the museum in inventory.
Look at the map of the room on the other side of
the leaflet of the museum.
Now that all clues have been seen, there are
active spots in the map.
The back of the map are graph squares. When a
square is clicked on, a sound is heard and a red line is made. Click the
other end of the red line on another square in the map and the red line is
drawn. Make another line by clicking on 2 other points.
Jonathan states that these 4 points can make a
fifth one by intersecting these lines.
The points should be placed on specific areas.
Since we now have seen 4 items that refers to Mercury, click on those
places where they were originally placed.
Be sure that you click on the center of the
squares.
Click on center of square marked 23. Click the
other end of the red line on center of the square right of 20.
Click on the center of the square of the table
under the map and end the red line by clicking on the square above #14.
See that the point of intersection of the 2
lines is circled.
Look at the table at center of the room where the
lines intersected.
Read the tracing made from the rock of Hatvani
Gate.
JV - Fifth message of Yoomurjak:
JV - Seek Csonka M. 7D. Pince.
Juli: Call Juli on the cell
phone and ask about a street name Csonka M.
Day 3: Yoomurjak's messages
Search for Csonka M.
Hotel Senator:
Room 15: Jonathan gets a
call from Juli. She did not find any Csonka St.
Landing: Exit the room.
Jonathan calls Juli. A pictured is being hanged on the wall.
Turn around from the stairs and look close at the
new picture hang on the wall.
Look close at the tower picture. It is labeled
Csonka mecset, a minaret.
Minaret:
Tourist Information: Talk to Juli. Learn the confusion between the
minaret and mosque terminology. Juli marks the map.
Minaret: Jump to or walk to
the minaret. Look up and see how tall that minaret is.
Read the poster at right and learn about the minaret.
The balcony opens to face east.
Talk to the lady by the gate. There's no cellar here.
Enter and climb up those 97 steps.
Go close to balcony and turn to the right 7 times.
Jonathan mentions that maybe it is the shadow that is important.
Enjoy the view. See the castle, the cathedral and
other familiar sights.
Go down by backing up from the scene with Hotel
Minaret.
Souvenir shop: Look at the souvenirs
for sale.
Buy a wooden mosque-minaret and old
binoculars. If you want, buy the Eger book.
8 Kocsis St: Jump to #8.
Go to the desk and look close at the map.
Note the minaret at the center of the map. All the
buildings around are present during Yoomurjak's time.
One of these buildings has the cellar but which
one?
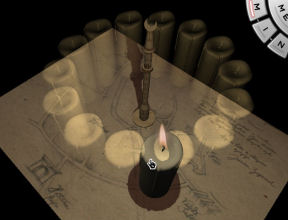
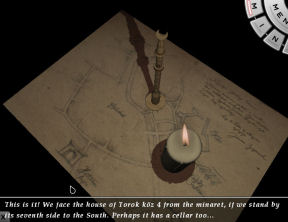
Minaret shadow puzzle:
Place the wooden minaret at center of map.
Remember that the balcony opens to the east.
Click-hold the candle to turn it. Place the candle
facing the balcony of the tower.
Count clockwise to the 7th candle shadow seen to
see a shadow fall on one of the locations in the map.
Click on the positioned shadow. It falls on Torok
4.
Torok 4: Use the map to jump
to Torok 4 seen at top of the map beside the hospital icon.
The house is for sale. Enter through the green
door.
Talk to Aunt Marika. Jonathan acts as a potential
buyer. Talk to her again about age of the house and the cellar.
Go forward and enter the house
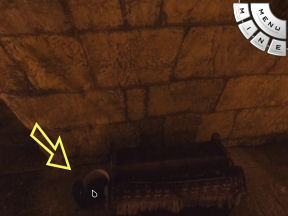
Cellar: Jonathan
experiences deja vu.
Take the lantern from the floor at left
side of the cellar.
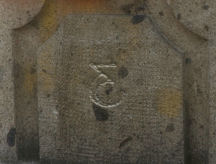
Go forward and check the beehive oven. Look close at the oven door.
JII- Second Yoomurjak message:
The ring... The pious Turok lived here.
Something is missing; some words and note that the
oven door bar is not here.
Look around and then go to the stairs. Take the
padlock key from the shelf across the stairs.
Exit and talk to Aunt Marika again. Learn that
Tibi sold some things with the Tollars. There's a neat wooden chest.
Antique Shop: Jump to the column
icon on Dobo road. You can walk to the shop from here.
Mr. Tollar: Talk to Mr.
Tollar and he says there is no latch but there is a beautiful chest. It is empty
but has not been opened it because the padlock key is missing.
Talk to him about the key. Jonathan made a deal about
getting the contents of the 'empty' chest.
Click on the chest behind Mr. Tollar. The oven iron
rod was inside.
And it ended here. The arrow points to the tip of the
rod. Exit the house.
Search for Turkish Tombstones.
Cafe Francesco:
Answer the phone call from Juli. She wants to talk and
meet at the Cafe.
Jump to or walk to the cafe.
Talk to Juli. She thinks that Jonathan is doing
something illegal. Jonathan explains about time travel and Yoomurjak. There are
2 more Yoomurjak messages to be located.
The oven latch's arrow points to a turban. Juli
mentions that Turkish tombstones have those turbans. Ethnographical Museum on Dobo St. would know. Juli marks the museum in the map.
Ethnographical Museum: Jump
to the Ethnographical Museum by clicking on the flowered mosaic icon left of the
Castle of Eger or better yet walk to that place using the road right of the
Senator Hotel. Look at the shops and see symbols seen on the back of the torso
statue at Gardonyi's museum on top of some gates.
Enter the gate and then go left to enter the museum. See a violinist rehearsing. Look around the museum.
Talk to the violinist. Learn that there are some
Turkish tombstones outside.
Exit and go forward to the area behind the shed at
right. Look at tombstones with turbans.
Go back to the violinist inside the museum and talk to
her again.
She mentions Laci-Laszlo Czifra, the historian. He can
be found at the Turkish bath. She marks the map.
Turkish Bath: Jump to the
building at the bottom outside the map.
Talk to Bela, the comedian caretaker of the bath.
Go forward and enter the bath at right. Talk to the
historian having a soak in the bath.
He says that a special Turkish tombstone can be seen
on the facade of a house at Jokai St #2. It replaced a garret window.
Jokai St #2: Jump to the door buzzer icon at bottom
of the map.
Enter the building:
Door buzzer: Use the door buzzer on different apartments and
try to convince 3 of the residents to let you in.
Keypad puzzle: Pull back from buzzer. See a boy on a bike
use the keypad and enter through the gate.
Look at the keypad under the buzzer.
Try to reproduce the sound made by the boy's pressing the keypad. There are 6
numbers.
To hasten or get the boy to come out and later come back to redo the keypad
entry - press 999999 and/or 666666. Then pull back. This will eventually show a
cutscene of the boy. Listen again to the sound produced by the keypad.
After several tries, Jonathan will say he got the code and it is: 8 7 1 4 3 0.
Enter the code and go through the gate.
Tombstone: Go forward to the courtyard. Turn left and
forward to face the blue painted wall of the building.
Look up and see a tombstone above the attic windows. Use the binoculars to see
the writing on the tombstone.
JIII - Yoomurjak's third message: Its
beauty is most talkative beneath me.
Exit through the gate and see a brightly painted church across the street.
Search for the Talisman.
Turkish Bath: Jump to the
building at the bottom outside the map.
Talk to Bela, the caretaker of the bath.
Go forward and enter the bath at right. Talk to the
historian having a soak in the bath.
Ask about the inscription on the tombstone. Czifra
translates it as a talisman and underneath is the grave.
There might be more Turkish tombstones at the back of
the castle where artifacts are found. Also there are some at the castle
itself.
Tetembar - Rails at back of castle:
Jump to the wood rails at top of the map.
Cross the street to the slope. Pan right and down to
the ground.
Pick up a grapnel. Go forward and read the
information about this place on the marker.
Castle of Eger: Jump to or
walk to the castle.
Look around. Go forward to the building ahead.
Heroes Hall: Enter through the door
where women are blocking the way.
See the Hall of Heroes and Dobo's tomb. Look close at
Dobo's tomb and the designs on the sides. Exit the room.
Take the path at right close to the bright orange
building and go towards the white building ahead.
Look close at the Turkish tombstones under the trees
at left.
Juli: Exit the castle and get
a phone call from Juli. She mentions Czifra.
Czifra left a message saying that they found a
talisman in the castle and it is on display at the museum.
Juli's father is the chief of security at the castle
and today is his birthday.
Castle Museum: Turn around and enter the
castle again.
Go forward to the building ahead. Climb the stairs to
the second floor.
Talk to the security guard at end of the balcony. The
talisman is in the red room.
Enter through the door at left. If you want look
around the museum, there's a map behind you and by the door as soon as you
enter.
The red room is #4 in the map. Pan right from the map
and forward to the red room at the end of the rooms.
Turn right and forward. Look at the display case on
the right. Look close at the Torok-Turkish talisman cushion. The talisman is
under renovation.
The easiest way out of the museum is to exit through
the entryway at right of the display case. Go forward to the blue room. Go
forward past that room and turn right to the exit door.
Renovation workshop: Talk to the security guard again. The renovation
workshop is in the courtyard.
Go down to the courtyard. Go back to the Turkish
tombstones at end of the courtyard.
Go to and click on the locked door behind the tombstones - Restauralo Muhely. It is the renovation shop. Hmm...
Tourist Office:
Talk to Evi, Juli's co-worker. Juli's father left his
keys here.
Turn to Juli's desk and click on the notepad. Jonathan
sees and takes Juli's father's keys. Remember he is the chief of security at the
castle.
In inventory combine the rope and grapnel to get
rope with grappling hook.
Castle: Jump to castle.
Watch as Jonathan climbs the wall of the castle and
enters the renovation shop.
Go forward at left side. Pan left and click when
action cursor appears.
See the worktable. Click the switch at right side of the desk beside the
mortar and pestle.
See and click on the talisman. Jonathan gets the last
message.
J IV - Fourth Yoomurjak's message:
J IV - Boldogi. Jonathan copies the paper found in the second compartment of the
talisman.
Uh Oh! Jonathan is caught. Meet Juli's father. Nice
beginning to a relationship.
Day 4: Search for the Ring
After a night of drinking, Jonathan has a nightmare of
being attacked.
Look in the dialogues-notebook and read the Poem of
Yoomurjak. Yoomurjak heard the news about his grandson brought by an angelic
messenger in a feathered hat. The messenger took fire from his home to ruin his
enemy.
Search for Boldogi and the treasure.
Boldogi:
Go downstairs and talk Istvan.
Go to Turkish bath and talk to the historian. Ask
Czifra about Boldogi.
He finally recommends checking the City Hall right of
the Minorita Church. He will contact a former student, Geza Darazs.
Szarvasko:
Jump to City Hall at Dobo Square. Talk to Mr. Geza Darazs. He
gives the address of Pal Boldogi in Szarvasko.
Jump to taxi and take a ride to Szarvasko.
Boldogi: Talk to Mrs.
Ica Boldogi sweeping the driveway.
Go back to Eger.
Hotel Senator:
Go around the tables at right and enter the hotel
Talk to Istvan at the reception desk. Professor Czifra
left a message.
The Boldogi family once owned the Nagyliter Inn which
was later bought by the Bajzik family.
Talk to Istvan again. He talks about Blanka Bajzik.
Tourist Information:
Talk to Juli. Blanka sure has a reputation in town.
Juli marks the Bajzik residence by the stream. Learn
that the Nagyliter Inn was formerly at 28 Dobo St.
28 Dobo St: Jump to 28 Dobo
St beside the castle. Go forward and then look up. Talk to the woman. She's
not a nice person.
Bajzik residence: Jump to the
apartment building at top left of the map.
Go forward twice and then go right to apartment
buildings. Look
close at the buzzers at right of door.
Enter the building. On the fourth floor, turn left and
use the door bell right of door.
Talk to Jeno Bajzik stating that Blanka referred him.
Learn about the Nagyliter Inn.
Szarvasko:
Jump to taxi and take a ride to Szarvasko.
Boldogi: See that a car
is now in the driveway. Enter and knock on the door at left.
Talk to Pal Boldogi. Jonathan reveals some of his
family history.
Bulcsu is the Boldogi ancestor that is a Turk basher.
They have a family crest.
The treasure of the Boldogis is hidden in the barrels.
The wine was sold to Taray, owner of the Istenes cellars.
Istenes Cellar:
Jump to taxi and take a ride to Istenes cellar.
Enter the cellar and talk to Tamas Nagy the winemaker.
Learn that they still have empty crested barrels. He will sell the barrel to
Jonathan if he can show the Boldogi crest. Now, Jonathan is a Boldogi to
a small degree.
Search for crest information.
Szarvasko:
Jump to taxi and take a ride to Szarvasko.
Boldogi: Enter the house at left and talk
to Pal.
He points at the enigmatic scroll on the wall. Look
close at the scroll and a translated poem is in the notebook.
Talk to Pal again about the scroll.
Lyceum-Academy: Jump to
Lyceum-Academy and then go
to 1st floor - Bishop's Library.
Enter the library and talk to the librarian.
Reading room: Look at the desk by
the window. Jonathan studies the books brought by the librarian.
Read the brown book at bottom left.
On Chapter 3 on Escutcheon, turn to next page and
see the scutum gallicum shield shape at bottom left of the left page.
On Chapter 5 - Tincture, see that Argent is silver and
plain.
Chapter 6 shows the Illustrations on the Escutcheons.
See the bottom left shield in illustration #2 has Gules, chape
ploye Argent de point fess.
Read about the figures seen on shields.
Crest:
1. Let the scutum
gallicum praise the kindred of Boldoghis. Their bravery, strength and blameless
clarity.
Select the scutum gallicum (as seen in the brown book)
shape from the top orange selection. It is the bottom left one on the orange
cutouts.
2. Let the
Telemones guard it laterally
Gules laureate headed Troglodits holding mauls
bleakly.
From the 4th from top selections at the bar at right,
select the men with red laurel on the head and carrying mauls.
3. It parades on
its ornate Argent compartment
Lion d Or Rampant hold in his strong paws a Turkish
sabre
Select from the square beside the palette, a lion holding high a Turkish sabre.
Place it inside the shield.
4. On a field Argent a chape ploye Azure de point
fess
Charged with the symbols of wine proper twice.
From the graph paper at left select the middle top
lines to be placed inside the crest.
Color the point fess or bottom compartment to blue
(Azure). Click on blue from the paint palette at top and then click at bottom
compartment of the crest where the lion should be.
Select the symbol of wine from the selection beside
the palette - barrels. Place barrels on both top silver quadrants or corners.
5. That contains long since the treasure of the
kindred
The bascinet looks left with closed visor
From the second from top selections at the bar at
right, select the helmet pointing exactly to the left and is closed.
6. And above the crest beast put in crown grabs the
scimitar
The helm's majestic wreath is waved by the breeze
From the top selections at the bar at right, select
the golden lion facing left and holding a Turkish sabre.
From the third from top selection at right, select the
blue and white (to match the crest) wavy wreath.
7. Its talking ribbon twists as it should saying
Thesaurus Boldogiurium Doliis latent
From the bottom selection at right, choose the ribbon
that twists.
Now for the second from bottom platform - I did this
by trial and error and by what color would match. Select a gray and white
platform.
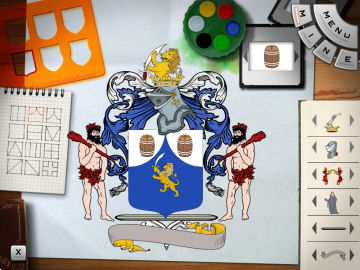
Pull back and the crest solution folded paper is in inventory. Do not
click on the table again or you start another puzzle. Turn right and click on
dark door to exit the reading room.
Talk to the librarian. Jonathan will have someone verify the correctness of the
crest.
Istenes Cellar:
Jump to taxi and take a ride to Istenes cellar.
Enter the cellar and talk to Tamas Nagy the winemaker.
He found the barrel with the matching crest. <whew>
Jonathan calls Juli to show her the barrel.
Hotel Senator:
See Juli waiting at the Hotel. They go upstairs to the room.
Jonathan opens the barrel. He finds Yoomurjak's ring.
Day 5: Yoomurjak's Ring
Juli plays with the ring and its coordinates are
located. A man is sent.
Gardonyi Museum: Jump to the
house marked at right edge of the map.
Talk to Auntie Iza twice. Auntie Iza's conscience bothers
her. A much awaited package was sent to the museum and she didn't feel right to
show it to another.
She finally decides to show the package that
Miska has been waiting for from the Bresnay collection.
German envelope: Read the letter
inside on how it was collected. There is also the star sheet and the
coded text message.
Look at the coded text. Combine the cypher code keys
with the
coded-cyphered text and get a deciphered message.
Five books: Read the
translated message. There are 5 books that are needed to be found.
Warning: Exit the Gardonyi museum. Meet the tattooed man with
earrings and braided hair.
Jonathan has been warned.
Librarian: Jump to the
Lyceum-Academy and then go to the library. Talk to
the librarian.
He will help pull out books for Jonathan that Gardonyi
only saw once.
Camera Obscura: Go downstairs and
select Camera Obscura on the 4th floor from the board.
Enter the room and turn around. Click on the switch to
turn off the light.
Turn around to the lens. See different parts of the
city.
Scroll and go through all the places. This is going to
be useful later checking if the tattooed thug is at the place you want to go to.
Use this every now and then. This will show the thug when all the locations are
already visited. Right now the cathedral might not be in the map yet.
1. The path to the praefationale leads through the
valley of the dead.
Look for the German emperor who lived 10 years.
Take what is left of Boldizar.
Starlight may shine on their reminiscence!
Valley of the Dead:
Rokus Chapel: Go to Turkish bath and talk to Professor Czifra. He
mentions the Rokus Chapel where the Germans during olden times are buried. The
Chapel is placed in the map.
Jump to the Rokus Chapel seen right of the Turkish
bath at the bottom of the map.
Boldizar: Look around at the different tombstone. Go forward up
to the chapel.
Look close at the brown tombstone that is closest to
the crucifix.
--NCSICS is what is left of the surname of Boldizsar
(Surname written first and first name is written last).
German Emperor: Go to the tombstones at the back of the chapel. Look
close at the white tombstone at the very back and close to the fence. The young
girl lived only for 10 years. Her last name is Kaiser (German Emperor) and her
first name is Vera.
Librarian: Jump to the
Lyceum-Academy and then go to the library. Talk to
the librarian.
Type in VERANCSICS
Enter the middle door of the Reading room at the
back of the library.
Open the book on the stand and flip through the pages.
Take the deltoid marked V.
Exit the library.
Juli: Every once in a while get a text message from Juli.
She took the ring with her.
2. The torso in the garden will speak in new
language
Talk on the gate in the big garden that leads to
nowhere.
Will talk on the lover's white stone bench and on
the northeastern urn.
The eternal astronomer will talk of a different
star.
Big Garden - Ersekkert - Archbishop Garden:
Jump to Senator Hotel and talk to Istvan. Learn about the Archbishop garden. He marks the location in the map.
Jump to the Garden by clicking the tree at bottom of the map.
You might meet the tattooed thug and get another
warning.
Go forward to the path right of the band stand.
Gate that leads to nowhere: Go forward until the paths splits into 3 and there's a new gate at right. With
the gate at your right and the middle path on your left, go forward to the tree
close to the wall.
Pan left and forward to a small path close to the wall.
See a gate that leads to nowhere. Go through the gate and turn around.
Look up and see the symbol similar to the one at the torso in the garden.
Remember or draw this symbol.
Lover's white stone bench: Go back to the gate or the fork in the road.
With the gate on your back, take the right path.
Turn left when you can not go forward anymore.
Go forward to the bridge over the ponds.
Turn right and look close at the stone bench.
See the symbol similar to the one at the torso in the
garden. Remember or draw this symbol.
Northeastern urn: Turn left from the bench and go forward until the large fountain.
See that the fountain has 4 urns surrounding it.
Check the marker on the left. See a description of the
garden and map. See where north is located.
Turn right from the plaque and forward to the urn.
Look close at the urn. See the symbol similar to the one at the torso in the
garden. Remember or draw this symbol.
Exit the garden by taking the path left of the plaque. Go forward until the gate.
Turn right, pan left and forward to the band stand. Exit to the road.
Torso in the garden: Jump to
the Gardonyi museum.
Go to the torso in the garden in front of the museum
door. Look close at the symbols at the back of the base.
Look for the symbols seen at the garden. In order as presented on the puzzle:
SAC ROB OSCO.
Librarian: Jump to the
Lyceum-Academy and then go to the library. Talk to
the librarian.
Type in SACROBOSCO.
Enter the middle door of the Reading room at the back
of the library.
Open the book on the stand and flip through the pages.
Take the deltoid marked IX.
Exit the library.
3. Sometimes what is missing means more that what is
present.
URA FRATUM MINORUM
CRUX AVE SPES UNICA
CON ENTUS ORDINIS F.F. MINORUM CON ENTUALIUM
PRO HETA ALTISSIMI
DEI O M IN HONOR M
DECU SU UNIUS LUSTRI EXSTRUCTA
The professor of anatomy will show a new star to
you!
2. Cathedral: Go across the street from the
Lyceum-Academy and forward
until the Cathedral.
Enter the church and walk to the center aisle. At the middle, turn right and
left to see 2 side altars. Check both of them.
Look up and close at the Latin inscription of the right altar and see O CRUX AVE
SPES UNICA. The puzzle is missing an O.
4. Cathedral: Go to the left side altar and look close to read PROPHETA ALTISSIMI. The puzzle
is missing a P.
5. Minorita Church at Dobo Square: Jump to Cafe or City Hall.
Go to the center of the square and face the Minorita church
left of City Hall.
Go forward and then look up. Zoom in on the Latin inscription close to the top
of the church.
See DEI. O. M. IN HONOREM. The puzzle is missing an E.
3. Building at Dobo Square: Pan left and go forward to the building beside the church.
Look close at the Latin inscription above the main entryway at the middle of the
building.
Read CONVENTUS ORDINIS F.F. MINORUM CONVENTUALIUM.
The puzzle is missing 2Vs.
1. Church at Jokai St:
Jump to the Jokai St #2 where the door buzzer puzzle was done.
Turn around and use the binoculars on the Latin
Inscription of the church across the street.
Read CURA FRATUM MINORUM. The puzzle is missing C.
5. Terrace of Lyceum-Academy: Select terrace on
the third floor. Turn around and exit to the other side of the balcony.
Look close at the statues on top of the Cathedral. See
DECURSU UNIUS LUSTRI EXSTRUCTA. The puzzle is missing an R.
Arrange the missing letters in the puzzle in order: C
O VV P E R
Librarian: Jump to
Lyceum-Academy and
then go to the library. Talk to the librarian.
Type in COWPER or COVVPER. Thanks, chrissie.
Enter the middle door of the Reading room at the
back of the library.
Open the book on the stand and flip through the pages.
Take the deltoid marked III.
Exit the library.
4. A road leads from the heaven of arts to the
reality of the earth.
Evoke the key of the Symphony No. 7 by Schubert.
Read the glorious quartsext accord.
And if you add 3 to the base sound on the machine
with the buttons,
Another 3 for the middle sound and 6 to the last
sound,
You can continue to appreciate the pleasures for
the eyes: Painting.
The delicate brush strokes of Festy on the face of
a lady,
The apostle of Casagrande with the broadsword.
Natural history is the science of the rational, but
is it not the stars of artists that shine on creative minds?
Symphony No. 7 by Schubert: Jump to the Ethnographical Museum by clicking on the flowered
mosaic icon left of the castle.
Quartsext accord: Talk to the violinist. Learn about C-dur and that G C
E is the quart sextet accord.
Jump to the Gardonyi's museum or at the Antiquarian
store and look at the
typewriter.
If you move the G key 3 to the right and it becomes K.
If you move the C key 3 to the right and it is N.
If you move the E key 6 to the right and it is O.
Festy painting: Jump to the
Gardonyi museum.
Read the leaflet of the
museum. Check the #6 portrait. A woman's head was painted by Festy.
Go to the bedroom and look close at the painting right
of the window and left of the piano. It has an R on the back of the picture.
Apostle of Casagrande: Jump to the Cathedral at Esterhazy square.
Enter the
cathedral and to the middle and center aisle. Pan right and read information
about the cathedral. Learn that Casagrande sculpt the statues above and on the
stairs of the cathedral.
Exit the cathedral and look close at the statue of St.
Paul holding a broadsword right of the steps. See an R.
Librarian: Jump to
Lyceum-Academy and then go to the library. Talk to the
librarian.
Type in KNORR.
Enter the middle door of the Reading room at the
back of the library.
Open the book on the stand and flip through the pages.
Take the deltoid marked VII.
Exit the library.
5. The longest journey takes you to the science of
engineering.
A devious path, for which you will have to find the
map.
Read the scripture guarded by Dobo himself.
And look for the ornaments on the yellow wall.
One entrance to the clerical cellars is marked.
A single gate, this is also the exit.
There you might visit the underground to find the
southern star.
Scripture guarded by Dobo: Jump to Cafe or City Hall whichever is safe with not
thug seen by the camera obscura.
Go to the statue of Dobo at the center of the square.
Look close at the base of the statue.
See etched maze like lines.
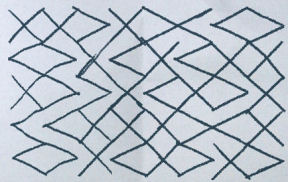
Ornaments on yellow wall: Jump to the minaret. Look close at plaques on yellow
wall of the temple across the minaret.
See patterned lines on the marble slate left of
the door.
Clerical cellar: Jump to the Tourist Information. Go forward and talk
to Evi about clerical cellars.
Learn that the cellars covers the whole city. It is a
labyrinth.
The local government handles the renovation of the
labyrinth. She will call her husband Geza to help Jonathan go to the labyrinth.
If the thug is waiting there, walk to rather than
jumping to the City Hall.
Enter City Hall and talk to Geza. He gives the
padlock key
to the cellar.
Jump to the Archbishop cellar seen at left side of
the map. Watch Jonathan open the gate.
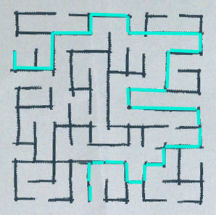
Single gate which is also the exit: Study the 2 drawings taken from the wall and the
statue.
The maze like lines appear to be a path inside the
maze. The spaces in between the lines always lead to a dead end.
The patterned line chart shows < > and X. Following
the maze map: < is left, > is right and X is forward.
Use which directions suits you.
On the directions below, an automatic forward is done
when you change direction to right or left.
With lantern in inventory, let's go:
Forward, forward, right, forward, right, left, left,
right,
left, right, (Jonathan says we're on tract) forward, left, forward, left, forward, forward,
forward, right, right, forward, left, (OK) forward, right, forward,
left, left, forward, forward, forward, (OK) right, left, forward,
left, right, forward, left, forward, right, forward, (OK) right.
Jonathan checks a tablet that is marked BESSONI.
Turn around and exit.
Librarian: Jump to
Lyceum-Academy and then go to the library. Talk to the
librarian.
Type in BESSONI.
Enter the middle door of the Reading room at the
back of the library.
Open the book on the stand and flip through the pages.
Take the deltoid marked XII.
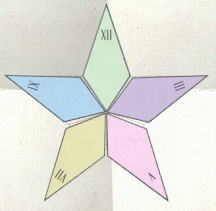
Star puzzle:
In inventory, look close at the star sheet.
Place the 5 deltoids over the star sheet.
Place the deltoids based on the position of the clock
numbers.
Place XII at top, to the right is III, then V, VII and
IX.
Exit the library.
Time Travel:
Juli: Juli left a text
message - she left the ring with Istvan.
Hotel Senator:
Jump to Senator Hotel and talk to Istvan.
Juli left the box with him and he placed it the room.
Someone - the Gangster searched Jonathan' room.
Ring: Go upstairs to room 15.
Look close at the ring on the dresser. Click the ring
12 times and it resets back to start.
The stars matches the position on the star puzzle.
The star puzzle has deltoids of different colors.
Where can we find 12 of something that have different
colors? What order?
#8: Jump to #8, Miska Jambor's home. Go to the desk.
Read the bottom right letter of Gardonyi. He visited
these towns: Kecsemet, Szeged, Szabadka, Mako, Bekescsaba, Nagyvard, Debreczen,
Miskolcz, Losoncz, Gyongyos, Jaszbereny, Nyiregyhaza.
Gardonyi's museum: Jump to Gardonyi's museum and look close at the map in
the study between the windows.
The provinces have different colors and they
match the colors of the deltoids.
Kecsemet (pink), Szeged (purple), Szabadka (green),
Mako (blue), Bekescsaba (green), Nagyvard (purple), Debreczen (pink), Miskolcz
(yellow), Losoncz (yellow), Gyongyos (green), Jaszbereny (yellow), Nyiregyhaza
(blue).
Hotel Senator:
Go back to the ring at the hotel.
Using the colors and the position of the deltoids: III is purple, V is pink, VII is yellow, IX is blue
and XII is green.
Ring: Based on the colors of the
towns visited by Gardonyi and the color of the deltoids of the star puzzle:
Click the stars on Yoomurjak's ring based on position of the numbers on clock:
5, 3, 12, 9, 12, 3, 5, 7, 7, 12, 7, 9.
Uh Oh! Jonathan calls Juli. He makes a date at the
city wall.
Under the Turkish Bastion: Watch as Jonathan arrives in the secret time travel
headquarters.
Meet Professor Abray. They are under the Turkish Bastion.
Learn Abray's thought of what he will do to Jonathan and his feelings about his
former assistant.
Jonathan convinced Abray to send him back to the past Turkish age
of Eger.
Abray offers Jonathan to be a time traveller. He is given 1 hour to decide
and come back to accept his offer.
Yoomurjak: Meet Zsgismond
Jambor aka Yoomurjak.
Jonathan delivers the message from his grandson, news
of the book and Gardonyi. These are the basis of the poem in the ring. See the
talisman on Yoomurjak's turban.
Destroy the Time Machine:
Jambor advises not to stay in the past but to destroy the time machine.
The flaw in the strategy means Jonathan also go bye
bye. There are makings for a bomb here.
Jambor will contact Juli at the city wall.
The bomb needs 40 of sulfur 30 of carbon and 200 of
saltpeter.
Make carbon-coal:
Go to the table and see that there is no coal-carbon.
Turn left and look down on table below the stairs.
Take a nail.
Pan left and get a hammer on the shelf by the
stairs.
Go back to the low coffee table. Pan left and down.
Take the sauce pan with cover.
Go to the oven. Take firewood from the pile at
right.
Go to the corner with candle. Take the stone
beside the candle.
Pan right and see if you can take the AGON game from
the shelf.
In inventory, combine saucepan and firewood.
In inventory, combine, hammer and nail.
Combine hammer and nail and lid. A hole is made in the
lid.
Combine lid with saucepan with wood. Place the stone
over the saucepan.
Open the oven and place the covered saucepan with
wood.
Close the oven door and look around for a bit.
Open the oven door and take the saucepan with
charcoal.
Measure the makings for a bomb:
Look close at the table.
Jambor-Yoomurjak gets the message to Juli. Juli runs.
Saltpetre: Click the brown tin
container of 250 saltpetre on the 50 glass vial.
Click the remaining 200 in the brown tin of saltpetre
on the container beside the mortar and pestle.
Empty the 50 glass vial on the brown saltpetre
container.
Carbon: Use the charcoal in saucepan
on the mortar and pestle.
Use the charcoal powder on the 30 glass vial. Place
the filled 30 glass vial on the container beside the mortar and pestle.
Sulphur:
Use the 80 sulphur on the 50 glass vial.
Use the 50 on the 30 glass vial.
Use the 30 on the 80 glass vial.
Use the 50 on the 30 glass vial.
Use the 80 on the 50 glass vial.
Use the 50 on the 30 glass vial.
Use the 50 on the container beside the mortar and
pestle.
Use the mixture on the container on the round bowl
right of the mortar and pestle. Take the bowl-bomb.
Push that star and go!
Back to present day: Agent returning from November 1615 Hungary.
Watch what happens.
Check the pictures on the making of the movie-game.
This document may not be
distributed without express written permission of the author and the content may
not be altered in any way.
For Questions or Comments on
this Walkthrough,
Please write to:
MaGtRo
Copyright © 4/2009
MaGtRo
 GameBoomers
Walkthroughs and Solutions
GameBoomers
Walkthroughs and Solutions