| ||||||||||||||||||||||||||||||||||||||||||||||||||
| ||||||||||||||||||||||||||||||||||||||||||||||||||
BEACH | ||||||||||||||||||||||||||||||||||||||||||||||||||
| From where you arrived, walk towards the fishing nets on the beach, then follow the path leading into the forest. Talk to the guard at the village entrance twice. During the second conversation he tells you lemurs can guide you through the forest if they are given red berries. After both conversations you can take the berries from the plate on a stand next to the guard. | ||||||||||||||||||||||||||||||||||||||||||||||||||
| Take the path into the forest. When you find the lemur, place the berries on the rock in front of him. The lemur takes the berries, disappears into the forest and you need to follow him. Move forward twice, then listen very carefully to the lemur's call. You should hear the call either straight ahead, behind you, to the left or to the right. Slowly pan towards the call (stopping to listen at each possible path) until you hear it straight ahead, then walk in that direction. Repeat the process until you eventually reach a clearing. Note that the lemur again sits in front of a rock at the point where the path leads back into the forest. | ||||||||||||||||||||||||||||||||||||||||||||||||||
CLEARING | ||||||||||||||||||||||||||||||||||||||||||||||||||
| Look carefully at the large tree in the clearing, noting the tree hut at the top. Try climbing up the tree to learn that some of the wooden stairs are missing. | ||||||||||||||||||||||||||||||||||||||||||||||||||
| There are three paths leading away from the main clearing: | ||||||||||||||||||||||||||||||||||||||||||||||||||
| ||||||||||||||||||||||||||||||||||||||||||||||||||
| Take the rags from the top of the log in the main clearing, then go to the second clearing and pick up the wooden slats. Attach the rags to the wooden slats (in your inventory) to make two temporary steps. Return to the large tree and insert both temporary steps into the holes visible above the existing stairs. Climb up the stairs once, remove the lower of the two temporary steps (below you) and insert it into the hole above the stair you are now standing on. | ||||||||||||||||||||||||||||||||||||||||||||||||||
| Climb up the stairs and into the hut. Look around carefully as there are a number of items that need to be examined or taken. These are dealt with as and when they are used. First go up to the second level where you find an old man. Give him some wine (from your inventory) and he tells you that he's hungry. Take the bowl from the shelf next to the second level exit. Also take some brown berries that you find in a basket on the same shelf. Go down to the first level and pick up the missing step next to the ladder leading up to the second level. Take the matchbox from the table, then fill the bowl with some rice from the pot on the shelf next to where you entered the hut. | ||||||||||||||||||||||||||||||||||||||||||||||||||
| Exit the hut and make your way down the stairs. After climbing down two lots of stairs you won't be able to go any further until you insert the missing step in the hole above the three remaining stairs below you. | ||||||||||||||||||||||||||||||||||||||||||||||||||
| Time to test you culinary talents. Did you notice the burnt out fire in the clearing? Collect some firewood from the small area enclosed by a clump of thorn trees and put it on the burnt out fire. Pour the rice from the bowl into the tin suspended above the fire. Before cooking the rice you need to add water. There's a barrel of water (visible to the right) as you leave the clearing along the way to the small area enclosed by a clump of thorn trees. Fill the bowl with water and similarly pour it into the tin. Do this twice before you light the fire with the matchbox. You need to let the rice cook, so leave the clearing, wander around and then return. Once the rice is cooked fill the bowl and take the steamed rice to the old man in the tree hut. | ||||||||||||||||||||||||||||||||||||||||||||||||||
| Give the rice to the old man, then talk to him repeatedly until all dialog topics are exhausted. Pay careful attention to his story and answers as they contain vital clues to what needs to be done. Specifically, note the following about Captain Dodd: | ||||||||||||||||||||||||||||||||||||||||||||||||||
| ||||||||||||||||||||||||||||||||||||||||||||||||||
| After talking to the old man you can climb the ladder at the foot of his bed and get to the captain's nest. Most of what you find in the captain' nest (third level) will only make sense after solving other puzzles. | ||||||||||||||||||||||||||||||||||||||||||||||||||
| Collect all the poems scattered around the hut. Each poem has a title and a drawing of a different carved headstone on it. Look up the titles in the English-Malgasy dictionary (grey book under the hammock in the captain's nest) to learn they're the numbers one to ten. The poems can be found in the following places: | ||||||||||||||||||||||||||||||||||||||||||||||||||
| ||||||||||||||||||||||||||||||||||||||||||||||||||
| There's nothing else to do with the poems for now. The old man mentioned that he put carved headstones next to the captain's grave, so you should go look for the grave in the forest. | ||||||||||||||||||||||||||||||||||||||||||||||||||
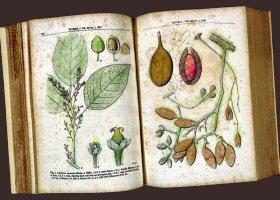
| You need more red berries to again get help from the lemur. One of the pictures in the brown book under the hammock in the captain's nest illustrates that red berries are found inside brown berries. | ||||||||||||||||||||||||||||||||||||||||||||||||||
| ||||||||||||||||||||||||||||||||||||||||||||||||||
| If you don't yet have them, take some brown berries from the shelf next to the second level exit. Now go to the second clearing and examine the statue standing on the crate. It's a type of nutcracker, so put the brown berries in the 'mouth', then pull the lever on the side to open them and get the red berries. | ||||||||||||||||||||||||||||||||||||||||||||||||||
| Head back into the forest and give the red berries to the lemur. Walk forward twice, following the lemur into the forest. Slowly pan in either direction until you hear the call on your left or right, then go straight ahead. Repeat the process (with the call on the same side as before) until you can no longer hear it. From here walk forward twice to find Captain Dodd's grave. | ||||||||||||||||||||||||||||||||||||||||||||||||||
CAPTAIN DODD'S GRAVE | ||||||||||||||||||||||||||||||||||||||||||||||||||
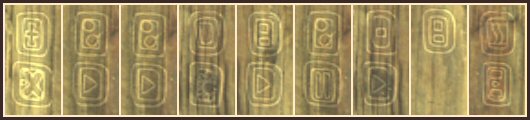
| Study everything carefully, noting that you can read the inscription on the tombstone by approaching the grave from the right-hand side. To the left are nine grave posts with designs on top and symbols carved in the wood. Also, if you approach the tombstone from the left, an alphabetical list of the carved symbols is visible on the back of the tombstone. | ||||||||||||||||||||||||||||||||||||||||||||||||||
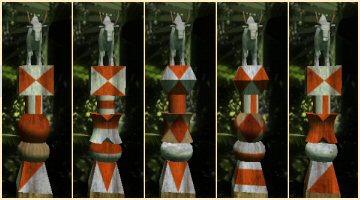
| Each design at the top of the grave posts corresponds to a drawing on one of the poems. Contrary to what the old man said, the grave posts are not in the correct order. Also, you collected ten poems but there are only nine grave posts. Read the actual verse on the FOLO (tenth) poem to learn more about where to place the grave posts. | ||||||||||||||||||||||||||||||||||||||||||||||||||
| ||||||||||||||||||||||||||||||||||||||||||||||||||
| Iray, Roa, Telo and Efatra can be translated as one, two three and four. These grave posts must be put at the 'end of the cycle', meaning that the first grave post must be the farthest, and the ninth grave post the nearest, to the actual tombstone. | ||||||||||||||||||||||||||||||||||||||||||||||||||
| The order in which the old man placed the grave posts is randomly generated, so no fixed solution can be provided. You need to compare the design on each grave post with the drawings on the poems to work out the correct position for each grave post. | ||||||||||||||||||||||||||||||||||||||||||||||||||
| ||||||||||||||||||||||||||||||||||||||||||||||||||
| ||||||||||||||||||||||||||||||||||||||||||||||||||
| When the grave posts are all in the correct positions, Samuel's thoughts are about what else has changed. The list of symbols on the back of the tombstone now has a 'hotspot', so after deciphering the symbols on the grave posts you need to type in the message. | ||||||||||||||||||||||||||||||||||||||||||||||||||
| ||||||||||||||||||||||||||||||||||||||||||||||||||
| ||||||||||||||||||||||||||||||||||||||||||||||||||
| This is yet another cryptic message from the unknown person who has the 'WK' initials. The inscription on the tombstone shows Captain Dodd's dates of birth and death. Approach the tombstone from the right and then examine it in close up mode. Use the knife to open the secret compartment below the dates to find a third codex scroll and the captain's notebook. The illustrations on the last page of the notebook show the controls of the telescope in the captain's nest. There's nothing more to do here, so you need to go back to the clearing. | ||||||||||||||||||||||||||||||||||||||||||||||||||
| Head back into the forest, then walk forward twice to hear the lemur. The lemur is trying to guide you to the beach but you want to go in the opposite direction. Pan until you hear the call behind you, i.e. when it sounds the faintest, then walk forward. When you no longer hear the lemur, walk forward twice to get to the clearing. | ||||||||||||||||||||||||||||||||||||||||||||||||||
CLEARING | ||||||||||||||||||||||||||||||||||||||||||||||||||
| Go back to the hut and examine the painting on the wall next to the exit from the first level to the second level. Take note of the name of the ship in the painting - ABE. talk to the old man to learn that the captain doodled on the painting. | ||||||||||||||||||||||||||||||||||||||||||||||||||
| Climb up to the captain's nest and open the brown book (Marine Dictionary) in front of the box of books. Note the three words written on the front page of the book: | ||||||||||||||||||||||||||||||||||||||||||||||||||
| ||||||||||||||||||||||||||||||||||||||||||||||||||
| There is also a reference to ABE in the dictionary, meaning 'daft' or 'aberration'. | ||||||||||||||||||||||||||||||||||||||||||||||||||
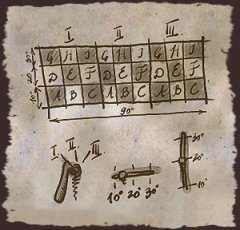
| Examine the controls below the telescope, noting they are drawn in the illustration on the last page of the captain's notebook. Also, the letters A, B and E each appear three times in the grid in the illustration. | ||||||||||||||||||||||||||||||||||||||||||||||||||
| ||||||||||||||||||||||||||||||||||||||||||||||||||
| Set the controls to correspond with each location on the grid of the letters A, B, E and then look through the telescope noting what you see. | ||||||||||||||||||||||||||||||||||||||||||||||||||
| ||||||||||||||||||||||||||||||||||||||||||||||||||
| Now open the Marine Dictionary and type in the appropriate answers to the three questions: | ||||||||||||||||||||||||||||||||||||||||||||||||||
| ||||||||||||||||||||||||||||||||||||||||||||||||||
| Take the lantern from the shelf (where you found the bowl and brown berries) on the second level. Note that this is not essential as you will find another lantern if you forget to take this one. | ||||||||||||||||||||||||||||||||||||||||||||||||||
| Knowing that you must go to the beach, leave the hut and head into the forest. This time you don't need to follow the lemur as the game automatically takes you to the beach when you enter the forest. | ||||||||||||||||||||||||||||||||||||||||||||||||||
BEACH | ||||||||||||||||||||||||||||||||||||||||||||||||||
| Walk towards the fishing nets. There's a water plant on the ground at the point where you turn around to see Skull Rock. Take two pieces of seaweed from the plant, then make your way to Skull Rock. Continue all the way around the rock to a cave entrance. | ||||||||||||||||||||||||||||||||||||||||||||||||||
CAVES | ||||||||||||||||||||||||||||||||||||||||||||||||||
| You need to cross the seawater inside the cave to progress further. Click either of the two bamboo sticks floating on the water to lay them out horizontally on the large rock. Did you notice some bamboo sticks on the beach outside the cave? Go to the beach (on the right of the cave entrance) and pick up eight bamboo sticks. Place all eight bamboo sticks on top of the two already laid out on the rock, then tie them together with both pieces of seaweed to build a raft. You can now use the raft to cross the water. | ||||||||||||||||||||||||||||||||||||||||||||||||||
| Once on the other side of the caves you need a source of light. If you forgot to take the lantern from the shelf in the tree hut, don't panic as there's another one hanging from the cave ceiling. Use the matches to light the lantern, then continue through the tunnels to another cave inside which is a large chest. Open the chest, remove all the rocks inside it and you find the treasure - another board game. | ||||||||||||||||||||||||||||||||||||||||||||||||||
| There are three tunnels leading out of this cave. The one to the left of the chest leads back to where you came from, but as your raft has drifted away you now cannot get back across the water. There's another tunnel to the right of the chest. Walk through this tunnel until you reach the point where it's blocked by a pile of rocks. Carefully examine the pile of rocks to see a pick axe head wedged in the rocks. You won't be able to take the pick axe head with your bare hands, so return to the cave with the chest. If you look closely, a third tunnel is visible behind the chest. Push the chest out the way to get to it. | ||||||||||||||||||||||||||||||||||||||||||||||||||
| Go through the tunnel behind the chest and continue until you reach the village's fresh water supply. Pick up the ladder and rest it against the brick wall (visible at the top) next to the rope. Climb up the ladder to get to the brick wall. Certain bricks in the wall can be removed, but again you cannot do it with your bare hands. Pan around slowly to find a pick axe shaft on a narrow ledge at the bottom of the brick wall. | ||||||||||||||||||||||||||||||||||||||||||||||||||
| Return to the tunnel leading off to the right of the chest and using the pick axe shaft you can remove the pick axe head from the rocks. Fit the head to the shaft (in your inventory) to make a fully functional pick axe, then return to village's fresh water supply. | ||||||||||||||||||||||||||||||||||||||||||||||||||
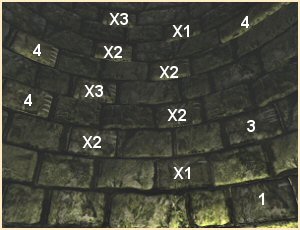
| Climb up the ladder and examine the brick wall in close up mode. You can now use the pick axe to remove certain bricks, but initially only the bottom right one can be removed. The bricks must be arranged so as to build a staircase to climb up the wall. Some bricks have 1, 2, 3 or 4 lines etched on them and some also have an 'X'. The lines represent the size of the bricks and the 'X' markings indicate where each stair has to be. To build the staircase each 'X' brick needs to be replaced with a larger one, i.e. with more lines. | ||||||||||||||||||||||||||||||||||||||||||||||||||
| ||||||||||||||||||||||||||||||||||||||||||||||||||
| There are numerous ways to build the staircase, and the solution below is not unique. | ||||||||||||||||||||||||||||||||||||||||||||||||||
| ||||||||||||||||||||||||||||||||||||||||||||||||||
| ||||||||||||||||||||||||||||||||||||||||||||||||||
VILLAGE | ||||||||||||||||||||||||||||||||||||||||||||||||||
| After talking to Chief Rakotnarivelo give him the board game. talk to him a second time to play Fanorona. | ||||||||||||||||||||||||||||||||||||||||||||||||||
PLAYING FANORONA | ||||||||||||||||||||||||||||||||||||||||||||||||||
| ||||||||||||||||||||||||||||||||||||||||||||||||||
| To use the solution below you must set the difficulty level to NORMAL. | ||||||||||||||||||||||||||||||||||||||||||||||||||
| ||||||||||||||||||||||||||||||||||||||||||||||||||
TO BE CONTINUED... | ||||||||||||||||||||||||||||||||||||||||||||||||||