| |

|
|
egin by reading all the documents on the corner of Samuel's desk. Note that you need to approach the desk from the front to look at the documents. After reading the mysterious letter and codex they are entered into your Files and can be accessed via the 'F' dial. Take note of Samuel's thoughts about having to let Smythe know about the contents of the letter. |
| |
| Have a look around the office taking note of what there is. There are a number of books in the bookcase that can be opened and read. It's not necessary to read all the text at this stage, as long as you get a gist of the subject matters. |
| |
| As you leave Samuel's office you learn (from his thoughts) that only the director has telephone privileges. The director's office is at the far left of the corridor. Unfortunately the office is locked so you need to find a way to get inside. |
| |
| At the opposite end of the corridor is a door leading to the back staircase. Go all the way down the stairs to get to the storage area below. Talk to Swanson, the warehouse guard, asking him to let you to look for something in the storage rooms. He won't allow you to, but lets you look through the inventory book on his desk. You need more information before the contents of the inventory book make any sense. After having looked at the book talk to Swanson again, paying attention to what he says about being on nightshift. Also take note of where he keeps the key to Dr. Moresby's office. |
| |
|
| Return to the director's office and unlock the door with the key from Swanson. The light switch is on the wall to your left. Initially you are in Smythe's office. Open the small glass cabinet and take the bottle of whisky. Also, note the exemption order form on his desk. |
| |
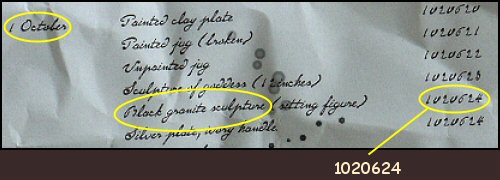
| The double doors in Smythe's office lead into Moresby's office. The light switch in his office is to your right. Use the telephone on Moresby's desk to call Smythe. You know his number (55-623) from the letter he left for you. During the conversation you learn about a black granite sculpture. Take the rubber stamp from the desk. You find a crumpled up sheet of paper in the waste bin (next to the desk) that reflects the inventory number allocated to the black granite sculpture. |
| |
|
| |
| While in the director's office, also take the matchbox found on the mantelpiece above the fireplace. |
| |
| Return to the storage area and talk to Swanson, giving him the bottle of whisky in the process. Previously he mentioned falling asleep after drinking, so hopefully the same will happen. Examine the inventory book again, turning to the page showing entries for 1903. You see that the sculpture (received on 1 October) is in Store D. |
| |
| Go back to Smythe's office and complete the exemption order form. Enter the inventory number '102064' and store letter 'D', then <ENTER>. The words 'locus sigilli' at the bottom of the form are often found on legal documents and mean 'the place for the seal'. Use Moresby's rubber stamp on these words to certify the order. |
| |
|
| When you go back downstairs Swanson is fast asleep, so you can open the key cabinet behind him. All the keys must be put back in their proper places. The last page of the inventory book has information needed to do this. The notes in the book and clues for putting back the keys are as follows: |
| |
The first holder is for the key to the Back Staircase. This key is in the door at
the top of the staircase, so nothing is put on this holder. |
|
| |
| The second holder is for the key to the Main Building. The key with an 'MB' tag on it must be put on this holder. |
|
| |
Leak in Store A, lock needs
to be changed! | The lock was recently changed, so the shiny (or newest) key is put on the holder for Store A. |
|
| |
Mrs E. von D.'s legacy was placed in the special glass
cabinets (keys attached) | Page back in the inventory book to see that Mrs. von D.'s material is in Store B. There is only one key that has two extra keys attached to it. |
|
| |
| You already know that Dr. Moresby's key has a green ribbon tied to it. |
|
| |
| New upper safety lock on Store C since January | Only one key has one extra key attached to it. |
|
| |
| The remaining key must obviously be put on the holder for Store D. |
|
| |

|
| |
| Along the corridor leading to Store D you find a lantern on top of the stack of crates. |
| |
| Unlock and enter Store D. When you switch on the light (to your left) the globe fuses, so light the lantern with the matchbox. To find the black granite sculpture go left twice (from the entrance) to the first aisle on the left, then all the way down this aisle and finally turn right and keep walking until you reach it. |
| |
| Take the stone on the sculpture and examine the runes carved on it. Do they look familiar? One the books in Samuel's office (third shelf from the top on the right) contains translations of various ancient symbols. The symbols on the stone are Hungarian Runes. Read the explanatory text carefully to learn the runes are written in boustrophedon style. This is an ancient style of writing in which, rather than going from left to right, as in English, or right to left, as in Arabic, lines are written in alternating directions. The origin of the word is Greek and means 'going back and forth like an ox drawing a plough across a field'. The runes on the second line must therefore be read from right to left. |
| |
|
| Examine on the stone (in your inventory) and enter the translation as in the graphic below. Remember that the runes on the second line must be read from right to left. |
|
| After doing this, the map in Samuel's office will have an active hotspot. To view the exact location where the points intersect (E28 and N68) set the magnifying glass to E60-70 (at the top) and N60-70 (along the left edge) before zooming in. Keep positioning the magnifying glass and zooming in until you get the exact location - Lapland. |
| |
| All that remains is to telephone Smythe again... |
| |
| |
|
| |
| |