Gabriel Knight: Sins of the Father
20th Anniversary Edition
By Pinkerton Road Studio
Walkthrough By MaGtRo October 2014
Gameplay:
The main menu has new game, return to game, save
game, load game, graphic novel, settings and quit.
Settings has gameplay, audio and display options.
Gameplay has narrator voice, hints, subtitles,
tutorials and language (English, Francais, Deutsch, Italiano and Espanol)
selections.
Audio has the volume bar for master, music,
SFX and voices.
Display has anti-aliasing adjustments.
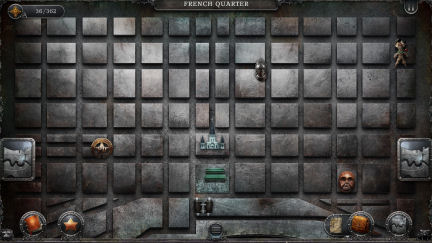
A score bar is seen at top left. The total score
is 362.
Clicking and holding the score bar as well as
pressing the space bar reveals the hotspots in the screen.
Click once to walk and double click to teleport.
Pause button at top right of screen and ESC key
display the menu.
The journal at bottom left has Gabriel's thoughts and
has clues and important information. The hints tab in the journal provides
guidance.
The star button has concept art, notes and interviews
that are new at Special Edition version.
The bottom center button toggles to show-hide the
other buttons in the screen.
The bag at bottom right is the inventory.
The world map at bottom right teleports Gabriel to a
visited destination.
Icons:
The talk balloon is used to talk to people.
The hand icon is used to pick up items.
The gear icon is used to interact with an item.
The key icon is used to interact the selected item
with someone or another item.
The eye icon is used to examine people or objects.
The open door icon is used with an item to
open-close it.
Keyboard shortcuts:
F1 - tutorial
Esc - main menu
F5 - Save menu
F7 - load menu
I - Inventory
M - world map
Space bar - hotspots
In Win7, the saved game folder is located at
C:\Users\computer name\AppData\LocalLow\Phoenix Online Studios\GK1 folder.
A woman is burned at stake. The man shed tears. The
woman's face changes to a leopard. Blood drops on a talisman. The man dies.
Gabriel Knight wakes up from this nightmare.
Day 1
Rare Book Store:
Grace Nakimura enters the Rare Book Store.
Learn that Gabriel has been having nightmares 7 days
in a row and is researching a book about Voodoo.
Examine everything that is active.
Newspaper: Read the Friday June 18, 1993 New
Orleans Times - newspaper on the table.
Learn about the 6 murders of out of towners in 2
months.
Grace: Talk to Grace
about everything. Click again on the subject matter until it is removed from
the list or the answer(s) are repeated.
Learn that the 2 best sources for Voodoo research
is here at the French Quarters are Dixieland Drugstore and Historical Museum
of Voodoo. Get new locations at the map.
Messages: Ask about
messages.
The first
message is from Detective Mosely. He volunteered for Gabriel's book that his
mother's maiden name is Humphrey. Mosely has photos for Gabriel left at the
station's front desk.
A Wolfgang Ritter from Germany called and says
it's urgent.
Gabriel's grandmother called. She sent the box on the
table.
Sketchbook: Examine and
take Gabriel's father's sketchbook and charcoal pencil from the open box
on the table.
Examine the sketchbook and see scary drawings as
well as that of a medallion.
Cabinet: Look close at
the cabinet under the table. Examine everything inside.
Take the tweezers and magnifying glass
from the cabinet.
Bookcase: Look close at
the bookshelf.
Read the World of Snakes book. Learn that snakes
sense their prey by vibration.
Examine the German-English dictionary to learn
some German words: Drei (three), Reise (journey), Spiel means game.
Mittag (noon) Himmel (heaven) and Drachen (dragon), Besessen (possessed).
Read the German Poetry book by Heinz Ritter.
It opens to Drei Drachen - Three Dragons.
Check the ladder. Examine the
coat on the coat stand.
Cash register: Open
and examine the cash register on Grace's desk.
Take the twenty dollar gift certificate
from an old book store promotion.
Examine the painting Three Snakes in a Skull on
the wall by Grace. It was painted by Gabriel's father.
Bedroom: Enter the
bedroom. Examine everything in the bedroom.
Take the hair gel from the bathroom
cabinet.
Take the flashlight by the lamp on the
dresser.
Exit the bedroom and the store.
Get involved in the voodoo murders.
Police station:
See the world map. Go to the police station.
Get the photos Mosely left:
Enter the police station. Look around at everything.
Look at and talk to Officer Frick on the counter.
Frick doesn't want to talk about voodoo and the
murders. Learn about New Orleans's food.
Ask about the photos and Detective Mosely.
Learn that there is a new crime and Mosely is at
the scene. Frick refuses to tell Gabriel where the crime scene is.
Get the photo.
Photos: Open the manila envelope
and get 2 photos.
One is of Mosely and the other of a crime scene
photo of the Voodoo murder. The chest is cut opened. A knife and
some feathers are seen by the body.
Exit the police station.
Jackson Square:
Go to the world map. Select Jackson Square.
Find out where the crime scene is located:
Gabriel stands by a police motorcycle with a band radio. The radio is asking
for an ambulance.
Talk to the policeman. Try to use the radio.
Mime: Walk around the
Square. Examine all the people there.
See that the mime is irritating people (woman and
bruiser) that are strolling at the Square.
Distract the policeman:
Go to the mime and face him. He will start following Gabriel.
Lead the mime to the motorcycle and the policeman.
Look at the mime and he will follow Gabriel. Slowly walk to the motorcycle and
be as close to the cop as possible. The mime catches the attention of the
policeman. The cop chases the mime.
Use the band radio. Hear that they are waiting for
the ambulance at south of Lakeshore Drive.
Lakeshore Drive Crime Scene:
Go to the world map. Click on either one of the
side maps - to be at the Greater New Orleans map.
Go to Lake Pontchartrain with the police tape
icon.
Detective Mosely: Talk to
Mosely. Mosely shows the body to Gabriel.
The unidentified body has the same MO as the other
voodoo murders.
A limo stops. Malia Gedde talks to the gentlemen.
Gabriel falls in love.
The ambulance takes the body away. Mosely will be
at the station tomorrow.
Crime scene examination:
Look around.
Check the blood where the body was.
Examine the marks on the sand left of the blood.
Use the sketchbook on the markings. Gabriel draws it in the
sketchbook.
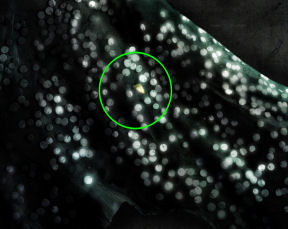
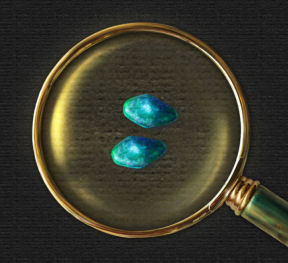
Examine the tracks by the tree at right. Use the
up arrows twice until a small shiny greenish thing is seen on the sand.
Use the magnifying glass on the iridescent thing.
While on enlarged view, use the tweezers to pick lake snake scale up.
Gabriel says it looks like a snake scale.
Check the mesh pattern beside it.
Check the bank and see that it is rich with clay
deposits. Take some clay.

St. George's Book Store:
Go to the French Quarter in the map and then back
to the St George's book store.
Grace: Talk to Grace and
ask her about snakes.
Ask her to research Malia Gedde.
Grace yawns and closes the day.
Gabriel experiences the same nightmare.
Day 2
Grace: Talk to Grace.
She says that Gabriel is out of his league with Malia. The family owns 3
hospitals and other businesses. She lives at 557 W. Ingrahm at the Garden
District.
Talk to her again about messages.
Newspaper: Read the June
19, 1993 newspaper.
It describes the recent voodoo murder. There is also an
article about the history of Jackson Square. Read the day's horoscope.
Exit the store or use the world map icon.
Learn about voodoo.
Historical Museum of Voodoo:
Go to world map. Go to the Voodoo Museum at bottom
of map.
Look around at everything. See a rada drummer outside
the museum.
Examine the electrical switch right of door.
Check the shrine left of door. Note and take the flyer at top right on the wall. It has
the address of Magentia Moonbeam a local voodooienne. Get new location at
the map.
Examine and use the wishing stump at center of
room. Note Gabriel's wish.
Examine the python in a cage behind Dr. John.
Dr. John: Talk to Dr. John
completely. Learn about his thoughts on the Voodoo murders, snakes,
historical voodoo, etc...
One of the first local gathering places is at St. John
Bayou where they worship the Great Zombi. Congo Square is the next gathering
place. In 1830, Marie Laveau became the sole ruler of the Voodoo community.
Learn about Hoodoo, a part of voodoo. The mother
Laveau is also known as Mother Paris. One of the Laveaus is buried at St.
Louis Cemetery #1.
Moonbeam Residence:
Go to the Moonbeam residence and see that she will
be back on June 22nd.
St. Louis Cemetery:
Talk to the watchman. Learn what he thinks of
voodoo and the murders. Learn that Dr. John comes here to Marie Laveau's
tomb at least once a day. Some say that Marie's tomb is at St. Louis
Cemetery #3, not here.
His name is Toussaint Gervais. Learn that there
are other tombs that are marked.
Marie Laveau's tomb: Check Marie Laveau's tomb.
Check the markings on the wall. Use the sketchbook
to get a copy of the tomb marks.
Check and then take the red brick on the
ground.
Gedde tomb: Go to the back part
of the tombs using the right path. See an elaborate structure marked Gedde.
It has an angel crying on a stone plinth. Note a
marble plate left of the tomb door.
Wright tomb: Try to go down
the path left of Gedde's tomb. That is the way to go to Gabriel's family tomb.
Watchman: Go back to front of
the cemetery.
Show the copied markings from Laveau tomb to the
watchmen He doesn't know the meaning of the marks.
Dixieland Drug Store:
Go to the drugstore at top right of map.
Madame Cazaunoux comes in with her dog. She
complains to the storeowner that someone might have left a bag on her front
step that caused her to be sleepless. She also complains about another woman
putting something in her tea. Mr. Walker recommends that she does something
to the other lady to be proactive. She knows voodoo.
Talk to Mr. Willy Walker completely. He keeps on
stating that everything in the store is just curios and not voodoo stuff. He
would not give the address of Madame Cazaunoux. He is busy because of the
upcoming St. John's Eve event.
Look around the store.
Check the sign on the counter that states free St.
John's Eve Lagniappe (something little; something extra) of a Lover Come Back
to me or Master Gamblin Oil for every purchase over 50 dollars.
Gedde Mansion:
Go to world map. Click on the Greater New Orleans
map at either side of screen.
Go to Gedde Mansion at bottom of map.
Look around and then try to enter the mansion.
Gabriel was rebuffed by the butler. He needs to be
on official business.
Police Station:
Go back to French Quarter and to the police
station.
Officer Frick: Talk to the
policeman on the counter.
Learn about St. John's Eve. Ask about Detective
Mosely.
Mosely: Go through the
gate.
Thermostat: See a yellow post it - "don't touch" above the
thermostat left of Mosely's door.
Use the thermostat. Use the red arrow to raise the
temperature to ~80.
Enter Mosely's office. Mosely just removed his
coat - he's hot.
Talk to Mosely. At the voodoo murders, at least 20
people attended the killings. There has been 7 murders. The first was 8
weeks ago.
Leopard fur was found as evidence. There were also
flour, red and black candle wax, chicken feathers and blood, also goat's
blood.
The victims' heart were cut out with long, narrow,
wavy ritualistic dagger.
Learn about Mosely.
Get Mosely's badge:
Gabriel will ask for coffee.
When Mosely goes out to get a cup, get the badge from Mosely's coat hanging on the coat rack left of the
window.
Patterns around bodies:
Ask Mosely about the markings. He said that they are the same for all 7
murders. The police still do not know the meaning of the markings.
Ask to see the other 6 pattern and Mosely gave
permission to ask Officer Franks about them. Exit.
Get a copy of the patterns:
Talk to Officer Franks about the case file.
She gets the case file from the
file cabinet. Franks says no copies and they cannot be taken out of the
station.
She has a camera on her desk. Examine the files.
Return the files to Franks' inbox tray.
Go back to Mosely's office and talk to him again.
Ask about photographs. Then ask for a cop/author
shot.
Mosely calls Franks to take their picture.
After one picture, ask to check Gabriel's hair.
Take the case file from Frank's inbox and
use it on the copier. Get voodoo files photocopy.
Return the file to Frank's inbox.
Go back to Mosely's office. Have another photo
taken.
You can insult or chat with Mosely to learn more
about Gabriel and Mosely.
Jackson Square:
Artist: Go to top right
of the Square. See the artist chase his painting that blew away. It lands
behind the fence of Jackson's statue.
Talk to the artist. He does lines, circles,
anything geometric.
Show him the patterns. The artist does not do
commissions.
Try to get the blown sketch from inside the fence
enclosure.
Get the artist's sketch:
Tap dancer: Look at the
tap dancer who dances for the Doobie Dogs vendor.
Talk to the tap dancer. He wants food or money.
Doobie Dog vendor: See
the vendor is engrossed reading a book. Try to talk to the vendor. He's busy.
Give the book store gift certificate to the
vendor. Get a Doobie hot dog in return.
Give the hot dog to the tap dancer.
Talk to the tap dancer about special request.
Ask about bars around the statue.
Get the sketch.
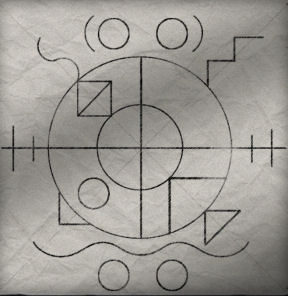
Reconstruct the pattern of the markings:
Give the sketch to the artist.
Show the lake pattern to the artist. He needs more
markings.
Give him the voodoo files photocopy.
He can see what he can come up with tomorrow.
Gedde Mansion:
Now that Gabriel has Mosely's badge, go back to Gedde
Mansion.
Enter the mansion. Show the badge to the butler.
Talk to Malia Gedde. Ask Malia about voodoo, the
murders and Lake Pontchartrain.
Then flirt with her twice. Malia asks Robert to
show Gabriel out.
St. George's Book Store:
Go back to the book store.
Talk to Grace and ask about research. Look up a
Madame Cazaunoux.
Day ends.
Day 3
Grace gives the phone listings for Cazaunoux in
the book.
There are also several messages.
Messages: Ask Grace about
messages.
Mosely called about a suspect interrogation that
Gabriel might want to see.
Newspaper: Read the June
20th newspaper.
Learn that a Professor Hartridge is giving a talk
at Tulane University about African Religions.
Learn about Voodoo connections in the city.
Find out the address of Madame Cazaunoux:
Go to the bedroom.
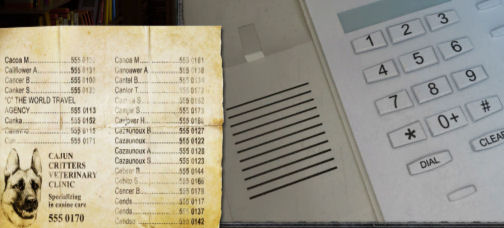
Use the phone by the window. Use the phone listing
on the phone.
See a list of Cazaunoux on the page. Enter the
numbers and then press dial button.
A Cazaunoux sounds like an old lady and hear a dog
named Castro.
Call the number of the Cajun Critters Veterinary
Clinic advertised on the same page.
Ask about Madame Cazaunoux. Say that you're worried
because Castro missed 3 dance lessons. Get Madame Cazaunoux' address. It is
now in the map.
Police Station:
See a rada drummer outside the station.
Enter the station and go through to Mosely's
office.
Mosely takes his badge back.
Watch Mosely interrogate Crash, an old informant.
Crash is very scared and would not talk.
Learn from Mosely's interrogation that the victims
are members of the underworld. The police can only keep Crash for 24 hours.
Jackson Park:
Artist: Go to the artist.
The reconstructed vevé he made for Gabriel gave him the creeps.
Madame Lorelei: Go left
and see a fortune telling booth.
Get scales: Talk to Madame Lorelei that has a boa named Elvis.
Leave and walk a bit.
Madame Lorelei belly dances after a while. Watch her dance and
appreciate it (gear icon). She drops her veil.
Pick up the silken veil.
In inventory, look close with magnifying glass at
the veil. See a snake scale. Take the veil snake scale.
Return the veil to Madame Lorelei. She tells
Gabriel's fortune and gets scared of the forces around Gabriel. She runs away.
Compare scales: In
inventory, combine (arrows icon) the blue scale with the green scale. The
veil scale and lake scale do not match.
Tulane University:
Go to Greater New Orleans map and then to Tulane
University.
Listen to the lecture by Prof. Hartridge.
Gabriel gets a nightmare about being forced into a
small coffin. He wakes up after the lecture
Prof. Hartridge: Talk to
the professor completely.
Learn about St. John's Eve and reference to
ancient worshiper's burning wheel.
Learn that cabrit sans cor is a Haitian term which
means goat without horn or a human sacrifice.
Show Hartridge the reconstructed vevé. He made a
copy of the vevé. Hartridge is excited about this vevé and wants to research
it immediately.
Show him the murder photo and learn that it is a
rare voudoun practice.
He will contact Gabriel the undercover guy at the book store.
St. Louis Cathedral:
Go to French Quarter in the map and then to St.
Louis Cathedral.
Look around.
Get the priest's collar: Enter the confessional.
Look around at the confessional. Note the knothole on the wall.
Kneel and hear confession. Do the whole confession
until the priest gives a penance that is appropriate to Gabriel's sin and takes
a lunch break.
Go inside the priest's booth after he leaves.
Look in the box left of the window. Check the oil
used for blessings and take the priest collar.
Meet with Madame Cazaunoux:
Go to Madame Cazaunoux's residence. Try to
enter her residence. She's a good catholic lady and closes the door.
Holy disguise: Go back to the bedroom in the book store. Take the
black shirt from the closet.
In inventory, combine the priest collar and black
shirt. Then combine that outfit with the hair gel from the bathroom cabinet to get
priest disguise.
Go back to Madame Cazaunoux's residence. On the
street, use the priest disguise on Gabriel. Oh he looks good!

Enter Madame Cazaunoux's residence. Gabriel is Father MacLaughlin.
Look around. Talk to Madame Cazaunoux completely.
When asked about cabrit sans cor - Madame talks about
human sacrifice.
Ask about human sacrifice and learn that the real
voodoo queen did it.
Ask about the real voodoo queens. Marie Laveau was
just a front for the real queen that has been the same one for 200 years.
The real voodoo queen is very beautiful.
The drums of the honfour keep her awake.
Bracelet mold: She has a bracelet from her grandmother that
allows her entrance to the real voodoo honfours. She asks Father MacLaughln
to bless the bracelet.
Hear the "classic" prayer made by
Gabriel on the
bracelet.
Use the clay taken from the first crime scene
on the bracelet to
get a bracelet mold.
Dixieland Drug Store:
Go to the drug store.
Talk to Willy. Learn about St. John's Eve and
Willy Jr, the crocodile mask. It's the only one left here.
Willy will part with Willy Jr. for a hundred
dollars; later he changes it to 120.
St. Louis Cemetery:
Go to the cemetery. Go down the path at right to
be at the Gedde tomb.
See Malia. Gabriel pours his heart out to Malia. He
invites her to see him at the bookstore.
Book Store:
Automatically be at the bookstore. Grace
closes the shop.
Malia arrives and wants in at the book store.
Grace tries to Malia to leave. Gabriel
pulls Malia inside the store.
Day 4
Grace is upset with Gabriel.
See a man standing outside the store watching
them.
Look at and talk to the man outside.
Newspaper: Read the June 21,
1993 news.
Mosely closes the voodoo murders case. Gabriel reads his horoscope.
See an ad by Sam Springleton, Master Jeweler. He
hangs out at Napoleon House.
Grace: Talk to Grace.
Gabriel's grandmother called to remind him to go
through his father things. New location is now in the map.
Wolfgang Ritter called again and left a number. He
says he's a relation of Gabriel. Ask for Ritter's number.
Ask Grace to research the pattern - vevé.
Learn Gabriel's personal connection to the case.
Grandma Knight's House:
Visit Grandma at the Greater New Orleans map.
Look around Gran's things. Talk to Grandma
completely to learn about Gabriel's family. Gran is a Wright before she got
married.
Family: Ask about Knight family. Harrison Knight is
grandpa, Philip is father and Margaret Templeton is momma. Grandpa
immigrated
here.
Grandpa Harrison supported the
family as a bookkeeper. He was 36 when he was hit by streetcar and died.
Grandpa wrote poetry.
Dad Philip suffered nightmares like grandpa (so
does Gabriel). Father and mother died in a car crash when Gabriel was 8. The
police says that father must have been scared with something on the road
while driving. Philip became a painter.
Margaret Templeton's money supported them. She
came from a rich Creole family. Her family refused to give her money
after she married Philip. They lived on Margaret's trust fund. Grandma asks that Gabriel visits the family tomb.
Attic: Look at things.
Clock: Check the mechanical
German clock. Use the clock to look close. There is an interesting design at
base of clock and a keyhole on the side.
Examine the clock face and note the symbols:
sword, sun, angel, noose, eclipse and a dragon. The minute hand turns
as well as the symbols.
Trunk: Open the trunk. Look at
Grandpa's things.
Move the cross, then move the picture and take the
key hidden underneath.
Secret of the clock:
Look close at the clock again.
Remember the poetry book at the book shop
written by Heinz Ritter. It is about Three Dragons - Drei Drachen.
Turn the symbols to have the dragon on top.
Turn the minute hand until it shows 3:00.
Insert the key from the trunk on the keyhole.
Turn the key.
See the drawer with interesting design open.
Take the photo and letter inside.
Photo and letter: In inventory
look at the photo of 3 men. Use the magnifying glass on the photo. One of
the young men is Grandpa. At the back is written - Schloss Ritter 1925.
Use the magnifying glass on the letter sent from
Schloss Ritter in Rittersberg, Germany written in German from Wilhelm Ritter
to Mein sohn Heinz Ritter.
Grandma: Show the letter to
Gran. She doesn't know German.
Show her the photo. She recognizes Harrison as the
one in the middle of the photo.
Talk to Gran. She remembers that
Schattenjäger
is
the word that Harrison would say in his sleep.
Learn that Harrison Knight changed his name from
Heinz Ritter when he came from Germany.
Learn about a family curse - nightmares that
Harrison thought to spare Philip and Gabriel.
She does not know Wolfgang Ritter.
St Louis Cemetery #1:
Gran says to visit the family tomb. Go to the
cemetery at the French Quarter.
Take the left path. Look close at the Wright
Family tomb. These are Gran's family tomb.
Look at and talk to Grandaddy's tomb - Harrison
Knight; Philip Knight and Margaret Knight - Gabriel's parents.
After greeting the family, a squirrel runs over
the green vase in front of the tomb. The vase breaks and exposes a currency.
Take the 20 dollar bill.
Book store:
Go back to the store. The man is still outside the
book store.
Bruno: Bruno comes in and
asks about buying Philip's painting. Sell the painting to Bruno for 100
dollars. Grace is appalled.
Wolfgang Ritter: Go to the
bedroom and use the phone number of Wolfgang on the phone.
Dial the number using 011 first and then the rest
of the written number. Enter 011 490 9324-3333. Press dial button.
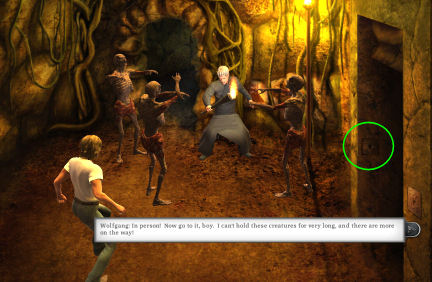
Wolfgang Ritter warns Gabriel about the
premonitions and dreams he's been having that Gabriel is in danger. He wants
Gabriel to leave New Orleans immediately. Heinz is his brother.
Wolfgang will send a journal and gets a promise
from Gabriel to read it.
Dixieland Drug Store:
Go to the drug store.
Talk to Willy. Give Willy 120 dollars.
Get Willy Jr. and a bottle of Master
Gambling oil.
Napoleon House:
Remember that the newspaper ad states that the
master jeweler can be found here at the bar.
A rada drummer is outside the bar.
Bartender: Talk to the bartender
about bar patrons.
Learn about Sam and Marcus. Sam always loses the
game to Marcus. Sam is into Voodoo.
Sam: Look at and talk to Sam.
Sam doesn't want to talk.
Get the mold cast: Give Sam the Master Gamblin
Oil from Willy.
Tell Sam that Markus uses it. This is powerful
voodoo oil. Could make a nun get lucky.
Sam finally drinks the stuff. They play the game.
Checkmate! After 20 years...
Use
the bracelet mold on Sam.
Sam will cast the mold and Gabriel can pick it up
later in the day.
Police station:
Enter station and Mosely's office. Talk to Mosely
about reopening the case.
He was ordered to close the case. To reopen the
case, Gabriel has to prove that there is a legit cult in the city; that the
cult is a threat and get a lead on the cult.
Jackson Square Overlook:
Use to look through the binoculars. The one at
right focuses on Crash talking to the drummer.
Napoleon House:
Go back to Napoleon House. See that Sam is back.
Automatically talk to Sam and he gives the
snake bracelet. He had problem getting it to set in the mold.
He will be gone tonight. Markus will be taking him
around the world.
St. Louis Cathedral:
Crash: Go to the
cathedral and see Crash sitting in the pew.
Talk to Crash. He looks seriously ill.
Convince Crash: Show
Crash the snake bracelet. Crash shows the tattoo on his chest - it is the
sign of the snake. It allows one to get close to them.
Talk to Crash again. Now he will talk.
Learn that Crash was sending a message to them via
the drummers.
The rada drummers around the city reports to them
about everything. They do the drumming in code.
Learn that these people control the underworld
cartel. The voodoo cult controls the city. They control everything on the
streets as well as legit ones like banks, foreign stuff.
The temple - honfour is somewhere underground in
the Quarter. Crash is a runner.
He remembers seeing one meeting at the lake; the people
became animals. He starts seeing the eyes of the snake, dhambala - Crash
dies.
Tattoo: Look at Crash and
see him from front. Open his shirt. See a snake tattoo on his chest. It
looks like the snake bracelet.
Use the sketch pad on the snake tattoo to
make a copy.
Look at his body - it shows signs of
strangulation.
Book Store:
At the map, automatically go back to the book
store.
Gabriel calls Malia and goes to her place.
Day 5
Grace arrives to open the store. Gabriel drives in.
Grace is worried about Gabriel. She shows the
overnight package from Germany. There a letter and journal from his great
uncle. She read the journal in the package.
Get a call from Prof. Hartridge. He's very excited
about his vevé research. He mentions the Agris and a revolt in 1791.
Reconstructed vevé: Grace also
found something about the pattern. In 1810 , a murder has a pattern beside
it that looks like a part of the one she researched on.
Use the magnifying glass on the 1810 Voodoo
article. See that it is similar to the reconstructed vevé.
Grace: Talk to Grace about
researching the Rada drums.
Newspaper: Read the June 22,
1993 newspaper. Read Gabriel's ominous horoscope.
Man: See that the man is back
watching them from outside. Grace says a profound statement.
Gunter's journal: Read
Wolfgang's letter that came with the journal.
Read Gunter's journal. Learn about Tetelo and how
the medallion was used and lost.
If you haven't yet - read the graphic novel at the
main menu.
Reopen the voodoo murder case.
Tulane University:
Go to Greater New Orleans map and to Tulane
University.
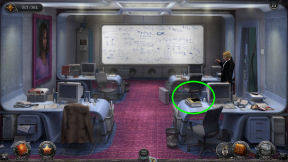
Enter Hartridge's office at left. He's dead.
Find notes about the vevé: Look
close at his desk.
The top sheet of the notepad is torn off.
Take the pencil and use (click-hold-move) it on
the notepad to see the notes written by Hartridge.
Use the magnifying lens on Hartridge's notes -
doodles.
Exit. Gabriel notifies campus security before he
left.
Magentia Moonbeam's residence:
Go to the French Quarters and then to Magentia's
place (seen only after getting the flyer from the museum).
Look around. See a python in a cage. There is shed snake skin inside the cage.
Talk to Magentia Moonbeam completely.
Her python is named Grimwald. Learn more about
snakes and St John's Eve.
Continue to talk to her until she snake dance with
Grimwald.
While Magentia dances, look in the snake cage and
Gabriel will take the shed snake skin.
In inventory, use the magnifying lens on the shed
snake skin. The scales are brown, it does not match the Lake scale.
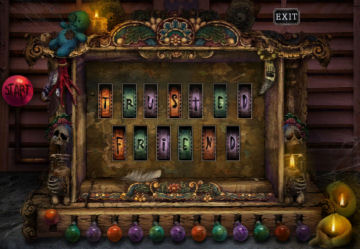
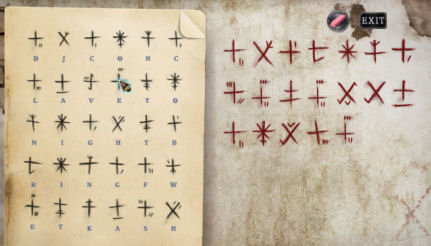
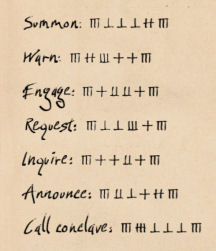
Translate the voodoo code:
Show her the voodoo code taken from the wall of Marie Laveau's tomb.
She refuses to translate it. Show her the code
again until she says that the "Ask the Loa" machine will decide if she
should help Gabriel.
See closeup of the machine.
The machine should read "Trusted Friend".
Press start and see the letters change.
Press start.
Labeling the levers from left to right 1
to 13; click the levers:
3 - 1x, 5 - 2x, 7 - 2x, 8 - 2x, 12 - 1x,
11 - 1x
4 - 1x, 6 - 1x, 1 - 2x.
Magentia translates the voodoo code: DJ, conclave
tonight bring kash.
Voodoo Museum:
Save game while at the map and
before going to the Voodoo Museum.
Go to the museum. It is dark here.
The snake drops on Gabriel and starts to choke him.
Immediately click on the switch left of the window
(right of door). The fan starts and the snake slithers away.
Dr. John enters and turns on the light.
Book Store:
Grace notes that Gabriel's face looks like pale
green. She takes something from Gabriel's face and places it on the ashtray.
Use the magnifying lens on the ashtray and see a
snake scale.
Use the tweezers on the closeup of the scale.
In inventory, combine the museum scale and the
lake scale. It's a match.
Police station:
We have enough to fill the criteria laid out by
Mosely in order to open the Voodoo murder case.
Go to the police station. See 3 nearly identical
girls playing jump rope in front of the Rada drummer. Look at them.
Something is off.
Enter the police station and Mosely's office.
Talk to Mosely about Hartridge and Crash deaths.
Reopen the case:
Prove there is a cult: Show the
reconstructed vevé and then Hartridge's notes to Mosely. Mosely is
convinced it is done by a legit voodoo cult.
Prove that the cult is a threat:
Show the 1810 Voodoo article to Mosely. Mosely is convinced.
Give an evidence as lead to the murders:
Show the compared snake scales.
Mosely tells Gabriel to lay low and then leaves the
station.
Book store:
Go to the map and Gabriel goes home automatically.
Gabriel tries Malia's number but gets a busy signal.
Gabriel experiences the same nightmare.
Day 6
Grace enters the book store and sees a barely
alive chicken on a pattern drawn on the rug.
She screams bringing Gabriel to the store. They now
know where Gabriel lives. Gabriel sends Grace to get coffee while he cleans it up.
Grace gives the rada drum book to Gabriel.
Letter: A letter is inserted on the mail slot.
Take and read the white envelope.
Mosely sent the letter. The cartel is throughout
the department and city board. Mosely went underground. He sent his
office key.
Newspaper: Read today's
paper.
Tonight is St. John's Eve, the celebrated voodoo day. Voodoo
gatherings are in Lake Pontchartrain, Bayou St. John and other sites. Read
Gabriel's horoscope. Eek!
Find out where the voodoo gathering is to be held and
join the celebration.
Jackson Square:
Go to Jackson Square.
Fortune teller: (Thanks to official list)
Talk to fortune teller. The possessed fortune teller warns Gabriel about
Malia Gedde and runs away again.
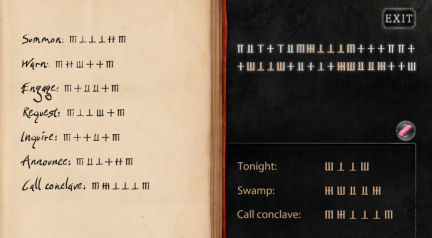
Drummer: Use the Rada book on the
drummer.
See the book with the translation. Gabriel writes
down the drum code sent by the drummer.
Find any set of drum beat seen on the right
that is also seen on the book page at left.
Click on that found phrase-code on the book
and the translation will be entered on the blank square.
Turn the page to do another set of codes.
Click the eraser to reset the puzzle.
First page: Tonight.
Second page: Swamp
Third page: Call conclave.
The meeting will be at the bayou.
Police station:
See that the 3 girls are still here as well as the
Rada drummer.
Abandoned car: Look at and
examine the car.
Gabriel goes to the back of the car and see a dead
crow. A warning?
Take the tire iron beside the crow.
Enter the station and try to go to Mosely's
office. Gabriel was stopped by Frick.
Note the design on the trash can in the corner.
Talk to Frick. There is no Detective Mosely here.
Enter Mosely's office:
Exit the station.
Go to the alley left of Mosely's
office.
Examine Mosely's office window. Try to open it and
see that it is stuck.
Use the tire iron taken by the car on the window.
Look around the office.
Use Mosely's key on the locked drawer of his desk.
Take the tracker and 2 signal devices.
See the police staff watching Gabriel with blank
eyes through the window.
Outside, the girls now with blank eyes watch
Gabriel run and drive away.
Voodoo Museum:
Go to the museum. Talk to Dr. John.
Look at the shrine left of door.
Examine the coffin - sekey madoule.
Use one of the tracker on the coffin.
Now to get them to take the coffin to the ritual.
St. Louis Cemetery:
Study the markings on Marie Laveau's tomb. See a
new series of markings.
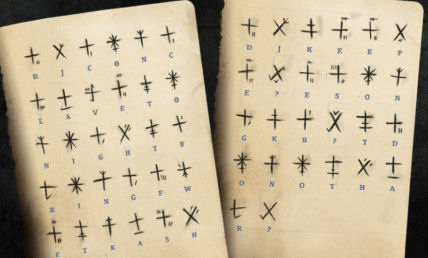
Translate new markings: Use the sketchbook to copy the
new markings.
See the closeup of the markings. Use the
translated Voodoo code done by Magentia on the markings.
Combine the new voodoo code with the one done by
Magentia. Automatically it is translated.
Read the new message: DJ Keep E?ES on GK B?t Do
Not Har?
Change message: The watchman
leaves.
In far view, use the translated markings on the
wall markings to get GK erase the old writing.
See a close up of the wall with the translated
markings.
Write a new message by selecting the symbols to form new words.
Select a letter code and it will show on the wall.
Turn the page to see the other translation to use
for the new message.
DJ bring sekey madoule.
Book Store:
Get Grace to draw the snake symbol on Gabriel:
Use the snake tattoo on Grace.
Use dialogue: Costume party; Well, if you're
jealous...
Grace paints the tattoo on Gabriel's chest.
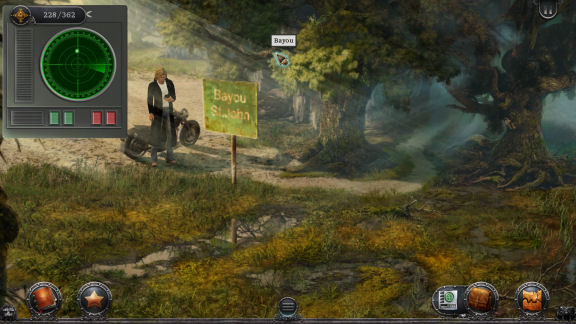
Bayou St. John:
Find the conclave: Go to
the Greater New Orleans map.
Use the tracker device on Gabriel. Keep the blip
on the tracker device at top line.
Enter bayou - up. The drums should get louder. Go
up, right, up, down, right, up, right.
Dress up: Use the mask on
Gabriel.
Gain entrance: Meet
Dr. John.
Brother Eagle tests Brother Crocodile.
- Great serpent is Damballah.
- Destroyer of men is Ogoun Badagris
Celebration: Watch as a
chicken is sacrificed. Blood is blown on Gabriel's face. A woman in leopard
mask does the snake dance.
Unmasked Gabriel takes off the leopard mask to
reveal Malia.
Malia is taken over by Tetelo. Tetelo recognizes
Gunther's blood in Gabriel.
Where is your talisman, witch hunter?
Gabriel loses consciousness.
Day 7
Grace wakes up Gabriel. She followed him last
night and took him home. Gabriel does not believe that Malia will hurt him.
But Tetelo...
Call Wolfgang: Grace
urges Gabriel to contact Wolfgang.
Use the phone. Enter 011 490 9324-3333. Press dial
button.
Talk to Wolfgang about Schattenjäger. It means
Shadow Hunter.
Tetelo is the primary Loa of the tribe. She
possesses the female descendants. Her power is greater because of the
added Ritter talisman.
The talisman entrusted to the Ritters is used only
for good not evil and as defense not offense. Gain the talisman back to be
on equal footing with Tetelo.
Look for talisman: Find
Tetelo's remains; the talisman might be buried with her.
Her remains might be in New Orleans or in her
original homeland. The professor found out that the tribe's African homeland
is Agris in Benin.
Newspaper: Exit to
store.
Read the newspaper about ghosts in the Bayou St. John. Read the
horoscope.
Be what you are.
St. Louis Cemetery:
Take the right path to get to Gedde tomb.
Open Gedde tomb: Examine the red
light left of door. The plate is up and shows the red button.
Use the red button. Hear the sound of breaking
glass. Hmm...
Gabriel enters and the door closes. It is dark in
here. Use the flashlight on darkness.Check the broken glass on the floor. Someone broke
the light here
Check the 9 drawers on the back wall. All
are female Geddes. The middle center drawer has the vevé etched on the
plaque. It is locked.

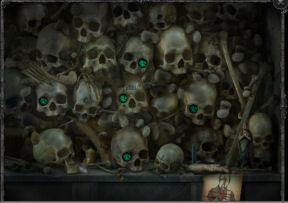
Ossuary: Look at the ossuary on
left wall.
Use the ossuary to get a closer look. These are
mostly the men in the family. LOL.
Note the drawing at bottom right. It is the
sign of the cross.
5 skulls have green gems in the eye socket.
Press the green gems like the sign of the
cross: top, bottom, left, right and then center.
The middle drawer opens.
Mosely: Open the middle
drawer and see Mosely in it.
Gabriel drops his flashlight and then gets hit on
the head. He remained unconscious for a while.
Look in the middle drawer and see that Mosely is
gone.
Take Mosely's wallet.
Examine the wallet in inventory to get the
American Repressed credit card.
Use the button at right of screen to open the tomb
gate.
Book store:
Go back to the book store.
Grace tells that Wolfgang called. He found what he
was looking for and left Schloss Ritter to Gabriel.
Phone: Go to the bedroom and use
the phone.
Call Wolfgang. The woman who answered says he
cannot get Wolfgang.
Call the C The World Travel Agency listed on the
page at left - 555-0113.
Ask about Rittersberg, Germany. Charge it.
Mosely's card is abused.
Grace: Talk to Grace. Chat with
her and tell her about Germany.
Schloss Ritter, Germany:
Go to Greater New Orleans map and select the
airport. Gabriel flies to Germany and drives to Schloss Ritter.
Gerde: Gerde greets
Gabriel. Wolfgang is not here. Gabriel can stay in Wolfgang's room upstairs.
Talk to Gerde completely to learn more about
Wolfgang, Schattenjäger and Schloss Ritter.
Learn about the talk in the village, about the
curse of the Ritter family. The decline started at 17th century.
Look around the room.
Chapel: Enter the chapel
left of the tapestries. Look around.
Look at and talk to the stained glass depicting
St. George.
Examine the panels on the walls - 3 on each side.
Gerde: Go and ask Gerde
about the panels.
The panels describe the Schattenjäger initiation
ceremony.
Initiation ceremony:
Panels: Go back inside
the chapel and click on each of the panels.
First panel shows hands and water.
Second panel shows hair and knife.
Third panel shows chalice on the table with
ocean waves in the background.
The fourth panel shows a knife and a few drops
of blood.
The fifth panel shows someone kneeling.
The sixth panel shows a scroll.
Foyer: Take the shaker of
salt on Gerde's desk.
Take the dagger on the wall by the lion.
See a dragon head on the wall above the stairs
landing.
Bedroom: Climb the stairs
and be in the bedroom. Look around.
Take the scroll from the case right of
door. Examine it in inventory. It sounds like a prayer to St. George.
Check the dresser. Take scissors.
Poem above the door: Read
the poem above the locked door decorated by an ornate lintel at left.
Go down to Gerde and ask her about the portal
poem.
Only the purest here may pass,
He whose heart is pure as glass,
He whose soul is pure as fire,
Through this portal passes higher.
Use the scroll on Gerde to learn that it is the
scroll of St. George patron saint of England and the Ritter family.
Perform the Initiation ceremony:
First panel shows hands and water:
Go back upstairs and open the window. See a puddle outside. Use the puddle
to wash hands.
Second panel shows hair and knife:
Use the scissors on Gabriel. Gabriel cuts his hair in front of the mirror.
Third panel shows chalice on the table with ocean
waves in the background: Take chamber pot from the
dresser. Go down to the chapel.
Place the chamber pot on the altar. Use the salt
shaker on the chamber pot.
The fourth panel shows a knife and a few drops of
blood: Use the knife on Gabriel.
The fifth panel shows someone kneeling:
Use the altar to get Gabriel to kneel down.
The sixth panel shows a scroll:
Use the scroll on Gabriel. Gabriel says the prayer.
Gabriel feels let down and regrets cutting his
hair.
Initiated:
Gabriel dreams of a dragon questioning him about
his initiation. Gabriel must burn away the past.
The 2 redeeming qualities that Gabriel have are
that he has Ritter blood and 3 women loved him purely.
Gabriel must still earn the right to be a
Schattenjäger. He is to be tested and has to let go the greater part of
himself.
He asked for purification and the dragon burns
him. Gabriel produces a sword and stabs the dragon that changes to his other
self.
Day 8
Take the key from Gabriel's dream on the storage ottoman at the foot
of the bed.
Find where Wolfgang went.
Secret library:
Now that Gabriel is purified by the dragon, use
the key on the door under the portal poem.
Look around.
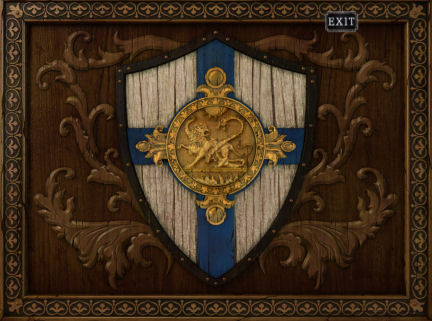
Shield: Use the jumbled shield
on right wall.
Arrange the tiles to form the coat of arms with an
image of a lion and a snake - like the talisman.
Click on a tile to select it and then click on the
tile you want to replace it with.
The hidden room is revealed.
Schattenjäger trophy room:
Go through the secret passage and enter the
Schattenjäger trophy room.
- Read the People's Republic of Benin book by Loel
Caley.
Read the book. Learn about the powerful tribes
Fons, Dahomeys, and the terrible Agris.
Primal Ones by John Roots has insight to these
cultures.
Follow the trail of books and Wolfgang's research:
- At the main secret library, look at the
Sociology section that is top shelf at right case close to door.
Read the Primal Ones by John Roots. Learn about
the violent behavior of the tribes in these regions.
- Go to history section at top shelf on the
bookcases under the window at left. Learn about the sun worshippers during
ancient times.
Read Ancient Roots of Africa by Earl Lee Days.
- Go to Religion books at top left bookcase on
back wall.
Read Sun Worshippers by A. Curate The sun god was
violent so his worshippers are also.
- Go to Archeology section at bottom right shelf.
Read Ancient Digs of Africa by Professor Seymore Shards. The great snake mound is located 50 miles from capital of
Benin at the Red Basin. It is a double snake ring. Gabriel looks at the
picture and recognizes the wheel within wheel. There is supposed to be
temple inside.
Gerde: Talk to Gerde
about the snake mound book. The Ritter estate cannot pay for the trip.
Charge the trip to Africa.
Day 9
Snake Mound in Benin:
Arrive at the snake mound in an airport taxi. The
driver will wait for Gabriel.
Look around. Study the double snake mound. 2
snakes eating their tails.
Enter the snake mound.
Outer wheel - ring:
Note that the up passageway goes clockwise.
Pick up the tiles:
The aim here is to pick up all 10 loose tiles
with etched snakes on them.
There are 2 tiles attached to the wall slots
already: 7 snakes and 12 snakes tiles.
There are 12 rooms.
The room with 7 snakes tile attached on wall also has a
mural.
In one room, pick up the snake rod also.
Place the tiles on wall:
After picking up the 10 loose tiles, attach them
in sequential order.
You should be at the starting point where the
entryway is located.
Here place the 6 snakes tile. The next room has
the attached 7 snakes tiles room.
Continue to place the tiles from 8 to 12, 1 to 5.
Activate the rooms:
Go to room with 3 snakes tile on the wall.
SAVE GAME here.
Insert the snake rod on the slot at the center of
the 3 snakes tile. Sounds are heard.
Evade the mummies:
The mummies come alive. Evade them and continue
to go clockwise (exit at top of room).
In the room with 3 mummies (6 snakes room). Use
the vine hanging at center of room and Gabriel will do a Tarzan and kick the mummy blocking
the room to the 7 snakes room.
The mural at 7 snakes room is now open. There are
3 mummies here.
Uncle Wolfgang drops down from the ceiling and
tells Gabriel to close the open mural. It is what activates the mummies.
Use the snake rod on the hole at the inner wall of
the open portal.
Enter through the open portal.
Inner wheel - ring:
Uncle Wolfgang runs in with Gabriel but he is
hurt.
He praises Gabriel about the 3 snakes tile activation. He missed
that. He says that Gabriel will make a good Schattenjäger. Wolfgang still
needs 3 quests for his testings.
Talk to Uncle Wolfgang.
Sacrificial table: See a trough at right. Uncle says it is a
sacrificial table.
Read the inscription on the base of the
sacrificial
table. Wolfgang reads it. A native found the mound and the entrance to the
inner wheel. He finds an idol that radiates like the sun. That is the source
of power of the Geddes. The idol must be destroyed.
Open the sacrificial table: Try the lid of the sacrificial table.
Take the 2 bars on wall behind the sacrificial
table. It takes both Gabriel and Wolfgang to carry the bars and insert them
into holes.
Use the bars to try to lift the lid off.
Wolfgang wants Gabriel to be the Schattenjäger.
He advises Gabriel to follow his instinct.
He tells Gabriel to go and get the heart of the
mummy. The sacrificial table might be activated by a sacrifice - a heart.
Go left and use the Ritter dagger on the mummy on
the floor. Oh no!
Wolfgang's heart is on the table. In anger,
Gabriel removes the lid and gets the talisman.
Book Shop:
Grace is talking to Gerde on the phone. She
wonders why Gabriel is in Africa. She is worried.
Something opens the door and Grace is taken.
Day 10
Gabriel flies in to New Orleans after sending
Wolfgang's body back to Rittersberg.
The plane passes above Jackson Square. The 2 rings
of the square looks familiar.
Gabriel arrives at the book shop. He sees the
overturned chair.
Note: Read the note on
the table. Malia writes to Gabriel. Tetelo knows that Gabriel has the
talisman. Tetelo took Grace. If Gabriel returns the talisman and leave New
Orleans, Malia might be able to save him. Tetelo is too strong for Malia to
hold off.
Mosely: A sound is heard
and Mosely comes out of the bedroom.
It turns out that it was Mosely that broke the
light at the Gedde tomb. He climbed into the drawer and hit Gabriel on the
head. They are even because he lost his wallet there.
Talk to Mosely about Grace, update Mosely, update
Gabriel and make a plan.
Gabriel gives the tracker to Mosely.
Newspaper: Exit to the
store. Drink coffee.
Read today's newspaper - Season of storm. The
horoscope states "Gird thyself with mercy, arm thyself with righteousness.
The final hour awaits.
Find the honfour.
St. Louis Cathedral:
Find the entrance: Remember the
look of Jackson Square.
Go to the Cathedral. Enter the confessional at
right.
Look at the knothole on the wall. Use the snake
rod on the knothole.
The confessional acts as an elevator and goes
down.
Place the snake rod under the kneeler.
Place the signal device under the kneeler.
Exit at bottom of screen.
Voodoo Cartel:
Explore outer ring: Exit to a
foyer. Go through the door at right and be at the outer ring.
The honfour is arranged like the snake mound in
Benin. Go clockwise (up) and check the rooms.
Across every odd numbered room at left is an
archway at right that leads to inner ring.
6 snakes goes to the elevator.
7 snakes room is the supply room.
- Take the boar mask
for Mosely, the wolf mask for Gabriel and 2 robes.
8, 11 and 1 snakes room are locked.
9 and 12 snakes room are empty bedrooms.
10 snakes room is where the ritual animals are
kept.
2 snakes room smells of Malia's perfume.
- Malia
walks in from the other room. Gabriel hides. Hear Malia call Tetelo and
asks her to not kill Gabriel. Malia asks to be released. Tetelo refuses.
Malia runs back to the next room. Exit the room.
3 snakes room is Dr. John's room.
- Enter and
see a keycard hanging at other side of room. Do not get it yet. You will
die.
4 snakes room is a business room.
- Take the
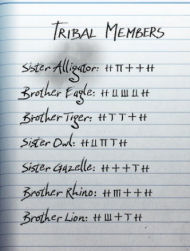
black record book on the inbox of the desk at front right. Read the
book and see that it has the lists and rada code for the tribal members. It is the
book that Mosely will need for the FBI.
Look at the portrait on the wall.
5 snakes room is another business room.
Inner ring: Go to the inner room
through an archway across any odd number room.
Examine the sacrificial table at center of room.
The history of Tetelo is etched at the base of the sacrificial table -
Tetelo holding the talisman, ship sailing, killing their owner, arrival at
New Orleans, voodoo power and hounfour built under Jackson Square.
See a fire pit beside the table and the Gedde
poteau-mitan.
There are 6 exits.
- top left exits across 11 snakes room
- middle left exits across 9 snakes room
- bottom left exits across 7 snakes room
- bottom right exits across 5 snakes room
- middle right exits across 3 snakes room (Dr.
John's)
- top right exits across 1 snakes room
Get Dr. John's keycard:
Examine the rada drums. Save game here.
Use the record book on the drums. Select-click the
Summon and Brother Eagle codes.
Play. Gabriel plays the code.
As soon as Gabriel stops, exit through top right
hallway to be across #1 room. Hear Dr. John exit his room.
Run if possible (double click) to next (up)
hallway until 3 snakes room.
Enter and take the keycard across the
room. Exit and go up the hallway. Hear Dr. John go back to his room.
Check the locked rooms:
There are 3 locked rooms: 8, 11 and 1 snakes rooms.
Check 1 and 11 first and do 8 last.
11 snakes room: Use the
keycard on the keypad. Enter and see that it is the surgery.
See bodies in the back wall and on the table. The
hearts are in jars on the left.
1 snake room: Use the
keycard on the keypad. Enter and see that it is the safe.
Take (3xs) as much paper (shameful amount) money
as you want.
Save the game. No saves are possible after seeing
Grace.
8 snakes room: Use the keycard
on the keypad. Enter and see Grace.
Mosely enters the room. The drums started as soon
as Gabriel entered the room and Mosely came off the elevator.
Try to wake Grace up. Use the talisman on Grace.
Grace wakes up.
They formulate a plan.
Confront Tetelo:
Wear disguises: In
inventory, combine the masks and the robes to get 2 sets of disguises: boar and
wolf with the robes.
Give the boar-robe to Mosely.
Dr. John opens the door and finds the 2
disguised guys and was told to get to the meeting room.
Ritual: Dr. John enters
carrying the sacrifice - Grace and lays her on the table.
Malia comes in
snake dancing. She is already ridden by Tetelo.
Tetelo raises the knife to stab Grace.
Gabriel yells to stop her. Tetelo is happy to see
the witch hunter and tells the
members to leave.
- Use the talisman on Tetelo. The talisman is too far from
her to have an effect.
Grace leaves the table just in time before the knife drops down.
Dr. John punches Grace since they need a
sacrifice.
Mosely shoots Dr. John and grabs Grace. Dr. John dies
and bleeds on the sacrificial table. The table rises and exposes the Gedde
idol underneath.
Mosely's gun is removed from his hand by Tetelo's
magic. Tetelo wants the talisman back or she will kill Mosely and Grace.
- Throw the talisman to Mosely. Gabriel tells them
to leave.
Gabriel is now unprotected. Tetelo chokes Gabriel.
- Take the Gedde idol under the table. Gabriel destroys
the idol.
The place is breaking up after the idol was
destroyed.
The floor cracks and Tetelo-Malia hangs on the
edge.
- Decide whether to go to Malia or leave. They
have different endings - worth replaying.
This document may not be
distributed without express written permission of the author and the content may
not be altered in any way.
For Questions or Comments
on this Walkthrough,
Please write to:
MaGtRo
Copyright © 10/2014
MaGtRo
 GameBoomers
Walkthroughs and Solutions
GameBoomers
Walkthroughs and Solutions