MEMENTO MORI 2: Guardians of Immortality
By Centauri Production
Walkthrough by MaGtRo May 2014
Gameplay: Memento Mori 2 is a third person point and click
game.
The Main Menu has continue, new game, restore
game, save game, settings, credits and end game. It is accessed during
gameplay by the ESC key or by the main menu button at right of the inventory
bar.
The settings options have basic options for:
graphic and sound quality; customs settings, mouse sensitivity and subtitles
selections.
Other settings are selections for sound volume,
graphics and 2 advanced graphics options.
The cursor changes depending on the action
required.
The arrow moves the character. Double click
any cursor makes the character run.
Some items can be interacted in more than one
way. These items shows a split cursor when the cursor is on top of them.
Left or right click selects the action in that position in the cursor.
Eye cursor is to get information about the
item.
Hand cursor is to pick up or combine the item.
Cogwheel cursor is to do a specific action.
Lips cursor is to talk to another character.
Finger cursor is to push.
Question mark cursor is to get more
information.
Green arrow cursor shows points to another
area not seen on the screen or present location.
Green footstep arrow cursor means you can exit
to another location.
Camera cursor denotes important cutscene
dialogs.
The TAB key or the "?" symbol at top
right of the
screen show the active spots in the screen.
Red circle means important object.
Grey circle means an object that has
interesting information.
Arrows shows exits.
Inventory is seen when the cursor is moved to top
of the screen. Items can be combined by picking one, laying it over another
item and then click. Items in inventory can be seen in close up and possible
interaction with that item can be done. The items can be scrolled during
gameplay (no need to open inventory) using the mouse scroll wheel.
Dialogues can be skipped by left mouse clicks.
Saves are automatically done at start of each Act.
They can be overwritten or deleted.
The saved game folder can either be found at
Memento Mori 2 folder in My Documents folder or if downloaded from Steam,
C:\Program Files (x86)\Steam\userdata\68665703\237970\remote.
Decisions - Responses: There are 2-3 choices on
certain events: positive, negative and question. In some cases, the response
does not matter and usually ends up the same path forward. Sometimes, you
have to repeat the dialogue to get a better response to move forward.
Act 1: Moon and Star
September 27, Cape Town, South Africa
Get a case.
Alta Bay Hotel Room:
Max wakes up from a nightmare. The phone rings and
Max goes to answer it. The call is from Renier, Lara's former boss at
Interpol.
Something to write with:
Lara gets orders from Renier. Lara asks for something to write with.
Go to the desk right of balcony door. Take the
diary and the car keys from the valise on the desk.
Go to the balcony and pick up the pen on
the table.
Check the unfinished painting of Max' nightmares.
Give the diary or pen to Lara.
Bathroom: Go to the
bathroom at right. Check the sink and Max washes his face. Looking in the
mirror, Max gets a vision of 2 statuettes.
Exit the bathroom and Max talks to Lara. Lara
returns the journal-diary to Max.
Journal-diary: Read the journal
by clicking the button at upper right of screen or pressing the J key. New
journal entry is shown by an animation at bottom left of screen.
Max rented a Beetle.
New case: There is theft at the
gallery and the gallery owner Katlego thinks the police work is
unsatisfactory. Since Lara does not have jurisdiction here, she must be
diplomatic.
Rented Beetle VW car: Click on
exit door and Lara asks about what happened to Max in the bathroom.
Go to the Beetle. Lara is not impressed with the
Beetle.
Select the gallery in the map.
C. T. Art Gallery:
Pascal Katlego: Enter the Gallery. Talk to Katlego
about the police and specifically Captain Nomusa. Lara introduces Max as co-investigator.
Newspaper: Katlego shows the newspaper to prove
why he doesn't trust the police. Captain Nomusa has closed the case. Turn
the newspaper and see the earthquake in San Francisco.
Close the view by clicking on the X at end of the turn bar.
List of stolen items: Take the stolen exhibits file
from the counter. See that the items are: 2 mahogany statuettes, 11
pieces of golden Krugerrands and a stone head.
Max
recognizes the 2 statuettes in his vision. He gets a new vision of a room.
Max admits this
occurrence to Lara. His medicine is at the hotel. Lara tells Max
to lead the investigation.
Captain Desmond Nomusa: Nomusa is hostile. Max and Lara
ask pointed questions.
Investigate the Gallery.
Interrogate:
Question Katlego: Examine (right click) Katlego. Max is
reminded of Boucher in Marseilles.
Talk to Katlego. There are no security bars or cameras in the gallery. Learn
that the
stolen statuettes are used in an ancient ritual.
His
alibi is he is with an associate at a motel in Port Elizabeth.
Police investigation report: Ask Lara about the police
report. The thief entered through unsecured glass window that he broke.
There was a partial fingerprint taken from the glass display case.
Lara gives tips about the fingerprint and what to do.
Max
talks to the receptionist to get the pictures scanned and sent to Interpol
HQ. Get the 2 pictures and prints in inventory.
Question the receptionist: The receptionist verified Katlego's alibi. She booked Manor 38 for him and called him the morning when
she discovered the robbery.
Investigate:
Identify the windows: Go left and look at the windows.
Examine (right click) the police photo of the gallery. Click on the tapestry
above the window. Note the glyphs on the tapestry.
Exit photo.
Click on the tapestry that is similar to the one in the picture.
Max says this is the right window.
Examine the grate. Max wants to remove the grate.
Death masks: Go up to the walkway-upper gallery. See that
it is blocked. Examine the set of photos.
Take the metal bar propped on the railing beside the posts. Go back
down.
Identify the broken into display case: Go to bottom right
to be at the display cases. The broken display case is now fixed.
Examine the picture of the broken case in inventory. Click on the 2 display
cases in the picture. The one on the left has Karagwe Tribe.
Click on the second from left display case; it has display from the Karagwe
tribe.
Click on the third from left display case to know that it is the one broken
into.
Examine the broken into display case: Check the metal edge
of the display case.
See
the fingerprint. Use the fingerprint picture on the metal edge of the
display case.
Check the bottom right corner of the stand to see drop of blood.
Katlego: Lara talks to Katlego about the window. He says
only the glass is new; the frame is the same. He leaves.
Promise to Lara:
Outside the gallery: Exit the building. Go right to the
scaffolding at right side of the building.
Look around at cement, wheelbarrow and sturdy window. Take the overalls
hanging on the scaffold.
Take pill: As promised to Lara, Max needs his pills. Use
the beetle and go back to the hotel. Enter the hotel.
The
maid has been here and left something on the bed.
Check the bed. See clean towels.
Badge: Check the badge that is left on the comforter. It
is for Patrecha Ngubane. Max says to call front desk to find out what to do
with it.
Turn the badge over and read the note at back of badge - Call front desk
-
number 111.
Pills: Go to the valise on the desk right of balcony. Take
the pills.
Choice: Take a pill or take the whole vial for later use.
I took the whole vial for later use. Have pills in inventory.
Phone: Go to extreme right of room and use the phone.
Dial 111. The receptionist wants you to return the badge to front desk.
Leave the hotel. At the parking lot. Max calls Lara and told her he got a
box of Cooper's chocolate from the hotel for returning the badge.
Drive back to the gallery.
Check the window:
Prepare tools: Use the car keys on the trunk (front) of
the Beetle. Take the toolbox.
Open the toolbox. Take pliers.
Pull the red tie to see the sockets for a wrench. There's no wrench.
See
a drain on the street floor between the cars. Use the metal bar taken from
the walkway on the drain. Get
a 90 degree bent metal bar.
Window: Enter the gallery and go to the window.
Look close. Examine the screw on the metal edge of the window.
Use
the bent metal bar on any socket. Max says the rod end is too wide.
Socket wrench:
Combine the bent metal bar with the pliers to get flattened bent bar.
Open the toolbox again. Use the flattened bent bar with any of the sockets.
Look close at window. Use the functional socket wrench on the screw.
Get a cooperative receptionist: The
receptionist stops Max from doing any other damage. Lara gives some good
advice.
Give the box of chocolate to
Josephine Fofana the receptionist.
She
becomes very helpful and will not hinder Max' work. She strongly insists that Max
dismantle the window. LOL.
Dismantle the window: Go back to the window.
Use
the flattened bent bar with socket on window.
If
it doesn't fit the screw, change the socket to any size by clicking the flattened bent bar with socket on it.
The socket part is random. Change to a
larger or smaller size as needed. It takes 4-5 tries or so to get the right
one.
Examine the window frame closely: Use the improvised
wrench on the screw. The window is opened.
Look at the little nail at bottom right corner of the window frame. It has a
small fabric on it. Maybe from a glove.
Talk to Lara. She said that they need to work with the police.
Talk to Katlego. Learn who touched the window: workers and cleaner. The
window was cleaned before the theft.
Lara calls Nomusa and asks for the prints of the 2 workers and a fingerprint
kit.
Back
at the hotel:
Lara tells Max that Max is her first priority. You can't leave me.
Lara gives Max an amulet with a star and moon medallion. Max wears it.
Get
a call from Muriel and learn that the prints are not enough to get an
identification.
Lara gets a call from the hotel room phone threatening her and to
mind her own business.
September 28, 2012.
Police Station:
Go
to the police station. Go forward to the office at left.
Talk to Captain Nomusa. Max borrows the fingerprint kit.
He
allows Max to get the kit with the fingerprints of the 2 workers. One
of the workers, Nozi Nyamela wore gloves.
He
wants Max to sign it out.
Look close at his desk. Examine the picture of his wife.
Take the sunglasses.
Use
the pen in inventory and sign the form on his desk.
Check the clippings on the board above Nomusa. They are praises for the
police department.
Check the tie on the chair across from Nomusa.
Examine the diploma on the wall between the windows. It's a hunting
competition diploma.
Examine the wardrobe. Check The Joy of Hunting book.
Take the case - fingerprint kit at bottom shelf. Leave the station.
Gallery:
Check the old car still parked there.
Enter the gallery and go to the window.
Talk to Lara and find out that there's bloodstain on the window.
Find
fingerprints:
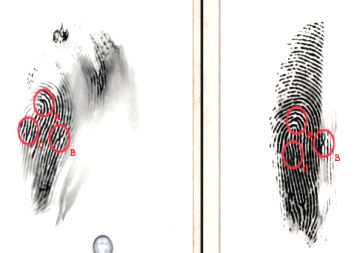
Read the instruction on how to use the fingerprint kit and how to identify 3-4
markers that are common between 2 prints.
Take the ninhydrin bottle and it is placed on the window sill.
Take the brush. Read the instructions by clicking the question mark at
bottom right of screen.
Click on the ninhydrin bottle and the brush is automatically dipped in the
powder.
To
use the brush on possible site of prints - click-hold-move the brush on the
site. It dabs on the place to be checked.
Move until a hint of print is seen. Then concentrate on that faint print
until it becomes visible and Max will say something.
Find 3 on bottom frame and 3 on right side frame.
Take
fingerprints:
Take a sticky tape and use it on a print. Do this to all 6 prints.
Max
talks to Lara. Max wants to identify the prints.
Compare
finger prints:
Take the top secret envelope to see the prints take from the culprit and 2
workers.
Find the print that match with Phillipe Nwosu:
Since the other worker wore gloves, check only for Phillipe's prints.
Use the (top middle)
hourglass shaped print on the left and the first print taken from Philippe.
Look for 3 markers that are similar in both prints. Note that the prints
taken from the window might be upside down or mirror image. Take that into
account in locating markers.
Click a marker and then click on similar marker of the other print. If it
matches, the prints will be labeled A, B and C.
If
a mistake or unmatched marker is clicked on - click on it again to remove it.

Find 3 window prints that match the culprit:
|
Compare the bottom middle window print first
with the culprit.
|
|
Compare the bottom left window print with the
culprit.
|
|
 |
|
 |
|
|
|
|
|
Compare the top right window print with the
culprit.
|
|
When a match is found on the culprit, the
known culprit print gets enhanced until a complete print is obtained.
|
|
 |
|
 |
Send
the prints to Interpol:
Talk to the receptionist. Aha! Give the print to the receptionist and she
will send it to the same place as before - Interpol.
Lara found info about the statuette that Kalego confirmed. He financed an
underwater expedition that found the statuettes on the SS Maori. A legal
battle ensued with the lawyers of some distant relations of the previous
owners of the statuettes. Katlego won the lawsuit.
They need to go to the port to see if they can find the cargo list of SS
Maori.
Exit the gallery.
Find the original owner of the statuettes.
Harbor:
Go
to the harbor. Look around.
Examine the bunch of boxes at left. Take the cardboard on top of the
box.
The
Harbour Bar is closed.
Henderson and Company:
Go
up the stairs to the Henderson and Co. office.
Talk to the old man, Roxbough. The ship sank in the last century and was
owned by Henderson. The company finished 30 years ago.
Roxbough brings the ship log from the back room.
Work table: Click on the log book to automatically go down
to the work table.
See
a fancy cigar cutter on the table. Roxbough sold the cigar cutter for
300.
Ship log: Examine the ship log. The
passenger list is copied in several ways.
Take the passenger-cargo list and
Max had to pay a grand to take 2 pages. He borrows the projector.
Make
the cargo listing readable:
Police station: Leave the building. Travel to the police
station.
Use
the cargo listing on the photocopier. Captain Nomusa asks about the progress
of the investigation.
Take the copies on transparencies from the top of the copier.
Henderson & Co: Go back to the harbor and Henderson and
Co. building.
Use
the cargo listing copies on the projector.
1. Select the middle top paper with the
reversed SS
Maori name (maybe top center).
Position the transparency at center of
table.
See an action lights up at bottom left. It
means that action can be done on that paper that is selected. Each paper
has its own action icon.
Use that action icon to flip the SS Maori
paper over to read the back side.
Read the copy that has LeC. It has smudged 1 bar
statuette under that name.

Find the other papers: Look for other copies that are part
of this LeC transparency and fit them all together. We work the LeC-statuette
words.
2. See the paper with Sowande (maybe at top
left). Turn that copy over so Sowande and a faint L can be seen.
Join the 2 copies together and turn it to be
readable using the left and right mouse. Superimpose the LeC over the
faint LeC of the Sowande paper.

3. Under the Sowande is the word Munro. Look
for the paper that has Mun... J that is on other side of the page (maybe
top right). You might need to turn this piece over.
Fit that paper with the rest. It is now read
as Munro, J. Q Compan.

4. Add the torn paper of that page. The word
statuettes is now complete and the y of Company below is added.
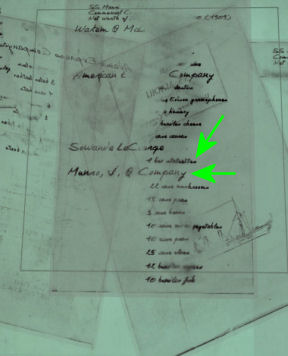
5. Add the name - American to the Company at
top of page. Complete that using the other torn paper.
6. Add Express on a torn page to the American
Express Company at top of the page.
Automatically talk to Roxbough. Learn that LeClerq is a really rich old lady.
For more money, Roxbough gives the address of
the LeClerqs.
Before leaving, take the baseball cap on the coat rack.
Lara: Go back to the gallery and talk to Lara. They
will go to the LeClerq Manor.
Find a way to get in the manor:
LeClerq Manor:
Go
to LeClerq Manor.
Try
to gain entrance: Go to the front door. Ring the doorbell.
The bodyguard denies them entry. It is only him and Mrs Zenzele here. He
knows Capt Nomusa.
Find a way to gain entrance: Go to the gate.
Check the mailbox and read the notice. A
technician is expected between 2 and 4 to check appliances destroyed by the
storm.
Check the gate with wet paint. It is freshly painted.
Water hose: Go to the yard at left
side of the Manor. Examine the flowerpot on the balcony at second floor. See
that it has a garden shear.
Look at the drain by the wall. Take the water nozzle.
Take the garden hose from ground. It will work only when you are close to
the hose.
Combine the water nozzle and garden hose. The nozzle fits loosely on hose.
Use
the hose with water nozzle on the flowerpot on the balcony. The nozzle
shoots off. Pick up the water nozzle again.
In
inventory, look at the cigar cutter taken from the harbour office. Left click the fuse
- large button to open it.
Combine the opened cigar cutter with hose to get hose ring.
Use
the hose ring on hose or water nozzle. Hmm...
Leave the manor and use the Beetle.
By the
Cliff:
They stop to check on a broken van at side of the cliff. Max finds out that
the technician has 2 more calls to make. One of them is at the LeClerqs.
Max
whispers his plan to Lara. She is not for it.
Stop
the technician from going to the LeClerqs:
Talk to Vosloo the technician. Learn about the storm and the sand that gets
to appliances.
Badge: Check the cabin. See the jacket and badge of the
technician. Take the badge.
The
technician heard Max at the cabin and talks to him. Max looks at the engine. Later learn
that he took a part of the engine.
Logo: Go back to the cabin of the van. Check the logo at
side of door.
Use
the cardboard on the logo.
Use
the pen on the cardboard at bottom left of screen. Max draws the logo on the
cardboard.
Continue on to the Gallery.
Obtain
parts of disguise:
The
overalls was already taken from scaffolding at right side of gallery.
The
sunglasses was already taken from the desk of Captain Nomusa.
Get
moustache: Go to the window at the gallery.
Look close and see the fingerprint kit still there.
Take the adhesive and the small brush.
Fix
the hose at LeClerq Manor: Go to gallery's receptionist desk.
Use
the cut hose ring on the paper cutter at receptionist desk to get sealing
ring.
Go
back LeClerq Manor. Go to the left side yard.
In
inventory combine the sealing ring and the garden hose end. It functions as
a seal.
Combine the water nozzle and the fixed garden hose.
Use
the hose with water nozzle on flower pot on the balcony. Take the garden
shear.
Right side of manor: Go to right side of house/front door.
See the other gate that is being painted.
The
bodyguard shoos Max off the backyard.
Get
the paint: Ring the doorbell. Talk to the bodyguard.
After the talk, immediately go right to the being painted gate.
Take the silver spray can.
Logo: Go back to the hotel and the room.
Combine the drawn logo with garden shears to get template.
Cap: Combine the template with baseball cap.
Use
the baseball cap with template with the silver spray can.
Moustache: Combine garden shears with small brush to get
black hairs.
Combine black hairs with adhesive to get false moustache.
Put the
disguise together:
Go
to the bathroom at right side of room.
Face the mirror.
Use
the baseball cap with logo, sunglasses, false moustache and overalls on
mirror.
Max
shows himself to Lara.
Investigate the Manor.
Gods in
the manor:
Gain entry to the manor: Go to the manor. Ring the
doorbell.
Max
the technician is allowed to enter but is warned that he will be searched before he leaves.
It is because his predecessor borrowed things from the manor.
Search the room: Look around. Check the stuffed bird and
the collection of artifacts.
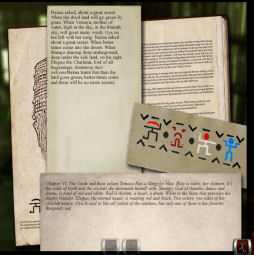
Bookcase: Go to the bookcase at right. Read Chapter VI
about The Gods and their colors (African Pantheon in journal). See the drawings on the
book.
Living room: Go left to the living room. Read the open
book on the coffee table. The
poem talks about the positions of the gods.
Max
is getting frequent headaches again.
Tapestry: Look close and click on the tapestry on the
wall. See
the Gods in their color.
Summary of the 3 information of the Gods:
|
Color: |
|
Position |
|
Yemaya is blue.
Shango is red and white.
Elegua is red and black.
Oya is burgundy red |
|
Blue - Yemaha |
Burgundy red - Oya |
|
Red & black -
Elegua |
Red & white -
Shango |
Altar: Go to the right side of the room. See an altar with
skull and open book.
Examine the skull and open book - illuminated manuscript.
Box-cabinet: Examine the box left of the skull.
God box: See that the
squares are made up of the drawing of the Gods seen on the tapestry.
Review the position and appearance of the gods from the books and
the tapestry - check above.
Arrange the squares to form the gods in their
correct position.
Numbering the gold buttons that turns the
squares 1-11 (from top to bottom, left to right).


Left click turns counterclockwise and
right click turns clockwise. These are marked as L and R on the
solution.
1. 1R - 5R - 6R - 3R.
2. 10R - 9L - 5L.
8R - 9R - 7R (2X).
3. 9R - 10R (2X) - 8L - 9L - 8L -11L - 10L
- 8R - 10L - 11L- 10R - 11L - 10R.
The box is
opened.
Lawyer letter: Read the envelope. Learn that the lawyers
resigned because Madame LeClerq will pursue getting the statues by other
means.
Madame Zenzele LeClerq: Madame LeClerq is wheeled in.
The
bodyguard is ready to throw Max out of the manor but was stopped by Madame.
Count to three until your wrath leaves. She knows Max' name. Max gets angry.
She starts counting and Max gets a vision.
Find the thief.
Hotel:
Max
talks to Lara and rants. There's no evidence to get Nomusa to arrest Madame
LeClerq.
Muriel identified the fingerprint taken from the window. Tony Zola is the
thief that broke in at the gallery.
Talk to Lara again about Madame LeClerq. She's dangerous.
Police
Station:
Go
to the police station.
Talk to Captain Nomusa. Nomusa initially denies knowing Zola and later
checks his database - computer. He says they have been watching him for a
while.
He
told them to leave and he'll take care of it.
Lara: Talk to Lara on what to do next.
Distract Nomusa: Be sure that you have checked all active
spots in Nomusa's office before or do it now: tie, hunting book on wardrobe,
Wife's photo on desk, Hunting diploma on wall and the newspaper clippings.
on the tack board.
Push-click the red button of the electric fan. Nomusa's papers are
blown all over.
Nomusa picks them up. Lara checks the computer.
Talk to Nomusa about the active spots seen in his office.
If
they are not in correct order, he goes back to his desk before Lara can get
information.
Talk to Nomusa in this order: Nomusa's tie, hunting brochure, photo of wife,
hunting diploma on wall and newspaper clipping.
Mosa is his wife. Lara comes over and says it's done.
Lara:
Talk to Lara. There is no file on Zola in the database.
Lara checked Nomusa's personal contact list and got a phone number
for Zola - OC1 OXAFLEG
Leave the office.
Search for Tony Zola:
Go
back to the hotel.
Use
phone: Go to the phone at right side of room. Use the
phone.
Note that Zola's phone "number" does not have numbers - OC1 OXAFLEG.
Call Zola's home: Transpose the letters to numbers. Dial:
021 6923534.
Anika, Tony's girlfriend answers the phone. Anika mistakes Max as Nicole's
brother. Nicole is Tony's ex-girlfriend. Learn that Tony works at the
Drunken Sailor as a bartender.
Tell Lara about the Drunken Sailor and Tony's whereabouts.
Drunken Sailor: Go to the harbor.
Check the motorcycle outside the bar. Enter the bar.
Max
talks to the man playing pool. He says that Zola is not here. Max asks to
buy art objects. Max is thrown out.
Hotel: Go back to the hotel.
Nomusa waits for them at the parking lot. Someone complained about the
investigation. Nomusa gives them 2 days before they leave the country or else
he signs the complaint form.
1:15
September 29
Enter bar: Max
and Lara are outside the closed bar. Max is going
in.
Use
the bent pipe wrench on the door.
Look around:
Check the Mixed Drinks paper left of the door. It lists the ingredients of
the drinks.
Look at the cash office. Check the price list by the cash register.
Check the wall at left. Turn on the bottom switch. This lights up the wall.
Look at the signs at the bottom part of the wall.
Read Hemingway's sign. Max thinks it's out of place here.
There's a bent nail left of the sign. Click on it to see a safe.
Find the safe combination: Check the journal's documents
to read the Mixed Drinks list.
Cola Hemingway's drink is made up of: white rum,
maraschino liqueur, lime juice, grapefruit and ice.
Check the price list in the journal's documents.
White rum R 15.
Maraschino liqueur R 20.
Lime juice R 12.
Grapefruit juice R 10.
Open the safe: Use the bent nail to open Hemingway's sign.
Look close at the dials and see 8 dials.
Top
has 4 and bottom has 4 dials. At the middle is the arrow that points to
numbers at top and bottom.
Enter 15 on first dial: 1at top and 5 at bottom.
Enter 20 on second dial: 2 at top and 0 at bottom.
Enter 12 on third dial: 1 at top and 2 at bottom.
Enter 20 on fourth dial: 1 at top and 0 at bottom.
Pull the handle.
Safe content: See that the stone head and the box
of Kruggerrand are in the safe.
Read the letter from B to Tony that states that the one who ordered the Gallery
items wants only the statuettes and he can fence the others.
Tony returns: Hear Lara's signal - the car horn. Max
turns off the lights.
Tony enters the bar and takes the rifle. He corners Max. Max hits the back
door open and escapes.
Hotel:
Lara wants to see Madame LeClerq. She's going alone. Max drives her to the
manor.
Madame
LeClerq: Madame LeClerq explains that it is hers to
begin with and the court decided against her to take something that has been
theirs for generation.
Lara says that she will check on it and if she finds out that the statuettes
are hers; she will help Madame LeClerq legally get the statuettes back.
10:05 September 29.
Jabali the bodyguard drives Lara back through the cliffs. See a crane raise
the Beetle from the water. The motorcycle rider is dead.
Lara talks to Nomusa. He thinks that Max is dead. She doesn't believe that Max is dead.
Check the motorcycle and Lara recognizes it as Zola's.
Go
to the left edge of the road and pick up Max' diary. Read the last entry.
Max has a vision of the Golden Gate Bridge in San Francisco.
Check the Beetle: Examine the seat of the car - there is
no blood. Examine the bullet marks - Max was fired on. Examine the tires.
Confront Nomusa. This is not a common accident, someone fired at Max. Lara tells that
Nomusa was the one that hired Tony to steal the
statuette. Nomusa admitted helping Madame LeClerq but regrets that it caused
2 deaths. Lara still denies that Max is dead because of the evidence seen in
the Beetle. Nomusa will resign.
Lara goes back to France.
Act 2: Blood and the Cross
October 4 Lyon, France
Diego Jimenez talks to Lara at the park. Lara decides to resign from SWoA -
The Office for Stolen Work of Art or Office for Art Theft Investigation;
which she heads.
Diego gives a mail from Breuz Liettt about a commendation for Lara that will
be given next week. She saved the child of a Countess of Wales.
Inventory has wallet, revolver and Letter of Resignation.
Check the bench and remember the old man from MM1.
Read the journal from Max' last entry to Lara's thoughts.
Decide the immediate future.
SWoA
Office:
Exit the park at right and be at the map. Select the SWoA department.
Lara receive regrets. Talk to Susanne the secretary.
Jean Coutu: Talk to Coutu. Learn about a meeting that Renier and Diego are preparing in the conference room. The case is requested by the FBI.
Learn that Coutu wants to take over Lara's position as head of the SWoA.
Lara's office: Go down the hall and enter the first office
at left. Look around.
Case 88441681-1:
Check the desk. Read the FBI file. A card falls on the floor.
The
FBI wants basic analysis of the crime scene and modus operandi based on
visual data sent.
They also requested an analysis of the painting marked as evidence 1.
Charlotte Renier of Interpol is the liaison officer for this case.
The
crime was reported by Thomas Stout, custodian of St. Peter's Church in
Mission St. Several days ago, he let in 4 Argo employees who were supposed
to check the church building structure. Stout discovered the paintings on
the wall made from blood. One of the 4 employees was in the hospital; so
only the 3 are missing. The case was given to the FBI because the missing
employees are foreign nationals.
See
3 different blood samples taken from the site and tested to be from the 3
missing employees.
The
exit must have been through the collapsed hole into the subway tunnels. The
other exits have been checked.
There is a strong presence of gas but was tested to be non-toxic but highly
volatile substance leaking from pipeline damaged during the earthquake.
Lara gets interested in the case and maybe help out one more time before
resigning.
Statistics: A page is added to the journal
that grades how well you do investigating and task solving. The grade
affects the game story.
Argo: Check the file cabinet at right. Use the scroll
arrow to go down to the bottom drawer.
Take the business card that fell off from the desk and slipped under
the file cabinet.
Check the business card in inventory. Turn the card of Joe Black and click
the back to get a new phone number.
Use
the business card on the phone and call Joe Black.
Missing employee files: Lara asks for the missing employee
files. Joe Black, Human Resource of Argo will fax it to Lara.
Exit office. Take the fax from the black machine at right. The printer is
right of the fax machine.
Examine the files. 2 of the missing Hungarians are brothers. Josef Aurel had
a suspended sentence for bodily harm.
Conference room:
Enter the conference room and Couto will ask if you have read the reports
before entering.
Lara asks to talk to Renier privately. The talk will be later.
Case: See the pictures. The paintings are done in
blood.
Couto makes a comment.
Select - Do not interrupt discussion. There were three samples - not
2 or 4.
This will be followed by Renier's question - if Lara has talked with
Argo.
Remember that the FBI wants basic analysis of the crime scene and modus operandi based on
visual data sent and requested an analysis of the painting marked as evidence 1.
Lara
wants to find out what happened at the crime scenes first before the painting:
Projector control: Take the projector control
from the table. See it at bottom left.
Click the projector control on the screen.
Click on next or previous to cycle the screen pictures.
Click on the power switch on-off to turn on the laser pointer.
Crime scene tagged 03: Turn on the laser pointer. Cycle the screen picture to 03.
-
Click the laser light on blood on floor.
Select:
The victim was injured in the heart.
-
Click the laser light on helmet. No conclusion on that helmet.
Crime scene tagged 02: Cycle screen picture to 02.
-
Click the laser light on blood on floor. The body was left here for a long time.
Cause was hit in the heart.
Select: Shots are improbable.
Victim was stabbed in the heart. It is a ritualistic action.
Select: Technicians were not poisoned by gas.
FBI
wants to know if there is a religious connection.
-
Click the laser light on bible. The
bible is over the blood.
Painting: Cycle to the paintings.
|
 |
 |
 |
|
Cycle to this picture and click on wings.
|
Cycle to this picture and click on wings. |
Cycle to this picture and click on wings. |
There are four different angels in the painting.
Lara recognizes them and says these are taken from four different paintings
of the Annunciation. Max painted a copy of one of them.
The
angel is Gabriel - The Angel of Death.
They will report that the paintings have religious significance.
Painting is detailed:
Lara also notes that the painting is detailed.
Cycle to screen picture with 04 tag. Click on the paint brush.
Cycle to painting with hands in closeup. Click on handprint.
The painter must have worn gloves. The handprints were made on purpose.

Placement of painting:
Cycle to that screen picture that has clear area at left. Click on the clear area.
The
painter could have used that but instead painted on the cobble brick wall.
Lara tells Coutu to collect information on the annunciation paintings.
Renier told Jimenez to help.
Decision:
Charlotte Renier: Renier asks if Lara really wants to resign. This decision affects the
end
of the game.
- Don't give notice. Lara thinks about her decision.
-
Do not hand in letter of resignation (second time).
Renier
says Lara is still the head because there's no better person for job. Renier wants
to be the boss here.
Prepare for investigation.
Make
copies of the paintings:
Use
the projector control on screen. Select the 4 screens of the closeup of the 4
angels.
Click on print on the projector control to get prints of the 4 angels.
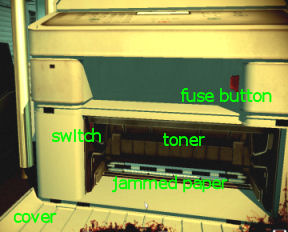
Printer machine: Go to the printer right of the fax
machine.
See
that the printer has an error message. It is jammed.
-
Use scroll arrow to look at the cover at base of the printer. Click it to
open the paper tray. There is enough paper. Push it back in.
-
Use scroll arrow to be able to see the red button above the cover of the
toner. Click red fuse button.
-
Open the cover. See the paper jammed on the rollers.
-
Click the switch at left to release the toner.
-
Remove the toner.
-
Take the jammed paper out.
-
Place toner back.
-
Close the cover.
-
Scroll to view the top.
-
Press the red continue button.
Get
the printed photos.
Comparison of paintings and photos:
Go
back to Lara's office. Talk to Coutu and Diego.
Look close at the
painting copies on the coffee table.
Click the printed photos on the painting album.
Scroll
through the paintings in the album using the arrow at bottom of screen.
Click the photos to see the next one.
Look for the angel that match the printed photos. The paintings are numbered
on the right side.
Tag them based on the
label of the printed photos (see base of photos).
Use
the hand and face positions as major points of comparison.
|
 |
 |
|
Place tag A on painting 02.
|
Place tag B on painting 13.
|
|
 |
 |
|
Place tag C on painting 06.
|
Place tag D on painting 10.
|
When Lara asks them to check the very smallest thing - select:
Quality of work.
Lara notes that the Argo people are not just structural engineers but most
do restorations. They might be able to do those kind of paintings.
Report:
Write report: Go to the desk and click on the computer.
Automatically type a report.
Check Max' picture.
Coutu and Diego's report: Go to Suzanne's desk.
Talk to Diego.
Read Diego's report about the paintings.
See
that a copy of Beccafumi's Annunciation was sold by a French painter M.D.
The painter was caught.
Note also that a duplicate of de Champaigne's Annunication was displayed at
New York's Metropolitan Museum after the Louvre refused to lend the
original. This duplicate was painted by Max Durand.
An
omen?
Diego will send the report. Lara requests that irrelevant stuff not be
mentioned in the report. Understood.
Trace the call:
Suzanne says that someone called Lara. Talk to Suzanne.
Learn that the caller sounds South African. LeClerq was mentioned. The
caller has info but hanged up when told that Lara was not available.
Diego says that the exchange is manned by Muriel today.
Go
to the office and use the phone. Talk to Muriel. Find out the number from
last call.
She
traced the call and puts it through after getting the number.
Talk to Jabali. Zenzele goes online. Find out that she's here in Lyon for an exhibition. She
wants Lara to go to her flat. It is very important that they talk.
Zenzele
LeClerq:
Leave the office. Jump to Zenzele's flat on the map.
Look around. Check the masks and other decorations on the walls. All are
connected to death.
Statuettes: Look at the stolen statuettes on the round
table.
Zenzele is wheeled in. Talk to Zenzele. She places Max' amulet on the table.
Do you believe Lara in Max?
His soul can be summoned.
Decide: Max lives or Let Max rest. (I decided Max lives.)
What if he's changed?
Look at and then take the amulet.
Look close at the amulet in inventory.
Zenzele advises to look close at his paintings.
Look at Jabali and Zenzele.
Talk to Jabali. Learn his history and his relation with "she".
Talk to Zenzele using all dialogue. Lara gets upset about info concerning her
private life.
Leave to go home.
Lara's flat:
Look around. Turn on the TV using the remote on the shelves at center of
room. The report is about the earthquake in San
Francisco.
Look at the plasma TV on wall at right.
Check the computer desk. Take the box cutter from desk.
Bedroom: Climb the stairs and check the luggage.
Max' last painting: Check the box on the bed. Use the box cutter
on the wrapping of the box.
Check the painting and Lara gets a vision.
Keira: Get
a phone call from Keira from San Francisco. She read the report from SWoT.
She
wants Lara in San Francisco. Her boss already booked a flight for you. She
also has Renier's consent.
Act 3: Hide and Seek
During the flight to San Francisco, Lara hears Zenzele talk to her. It's
too late to turn back.
Check the crime scene.
October 5 San Francisco USA
Officer Edwards:
Talk to the policeman. Argue with the policeman. He calls Burke and
apologizes for his mistake.
Show him Lara's wallet that has the ID. He calls Lara back and gives her the
key to the church door.
Asphalt: Pick up the fresh asphalt close to Edwards. Check
it in inventory. It's fresh, still warm and soft.
Metal rod: Pick up the metal rod by the fence.
Check the notice board, fence door and try to enter the gate to the building
site.
Church door: Check the door and see that it is locked. Use
the key on church door.
Kiera: Talk to Kiera. Lara slides over the question about Max.
ID
tags: Take ID tags and the pictures of the crime scenes
like the ones sent to Lyon from the table left of Kiera.
Talk to Kiera again. It sounds like Kiera has problems at FBI. Learn about
the missing technicians and told to place the ID tags on places that might
be evidence.
Look
around the crime scene:
Pictures: In inventory look through all the pictures.
Click on each picture to see what Lara thinks and sees. She gives clues on
what to check.
Examine the scaffolding. It might be used to examine the ceiling.
Cross:
Examine the cracked cross.
Spotlight: Look close at the overturned spotlight. Examine
the bible, broken leg and blood.
Painted wall: Check the painted wall left of the stairs.
Turn on the UV light. Kiera asks about Max.
-
Press the Tab key and click on all the rotating white circles. See
2 angels have a lily in the paintings.
-
See a piece of plastic on the floor in front of the painting.
Metal door:
Examine the metal door to the passage left of the wall with painting. It is
locked.
Small kitchen area: Go to small kitchen area - sink behind Kiera.
See
a slightly wet wash cloth at the sink. Take the wash cloth.
Cups:
Examine the washed cups. See
an empty light bulb box and a burner.
Coffee machine: Examine the coffee machine; then examine
the coffee reservoir.
Open the coffee reservoir. Examine inside the coffee machine. The inside
filter is gone and it is very clean.
Overturned chair: Examine the overturned chair and the
work table right of Kiera.
Take thumbtacks from table.
Back corridor: Go right to the back corridor. The exit
here is not possible. There's a strong smell of gas.
Examine but do NOT use the spotlights cable plug.
Examine the gas pipes and the spotlight on the left.
Go
down the corridor.
Examine the barrel. There is something sandlike at bottom.
Examine but do NOT pick up the blowtorch on the window sill.
Examine the window.
Examine the paper from the shredder in the box on the floor. Get piece of
paper from the shredded paper box.
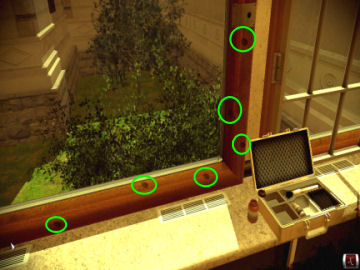
Corridor's end: Go right to end of corridor. See
a full pallet with cement bricks.
Examine the maintenance shaft right of the bricks. The shaft is covered by a
lid held by the brick pallet.
Update Kiera: Go back and talk to Kiera completely. Talk
about spotlight, locked door, clean coffee machine, blowtorch, crime scene,
blood stain, torn off plastic, bible and motivation.
Gas
leak:
Return to the back corridor and window.
ID tag: Use
an ID tag on the blowtorch.
Use
the metal bar from outside on the window. This triggers the arrival of
Burke. (It is also triggered by unplugging the spotlight cable). Kiera will
look for the leak.
Peter Burke: Burke gives the
4th technician report. The
4th technician - Theodore Jaczek left the hospital on his own the day after
the crime was committed.
Burke doesn't think Lara can find anything else.
Burke
opens the metal door left of the painting and gives a summary of the case.
As
Kiera:
Find the gas leak: Take a piece of paper from the shredded
paper box.
Go
to the gauges at left and look close.
Click the piece of paper on the yellow pipes. Kiera says it will show where
the leak is.
Use
the now vertical piece of paper along the pipes and see where it will
flutter.
To
move to next screen, click-hold-move to one direction to look at different
view of pipes.
The
piece of paper fluttered at the joint at the corner left of the window.

As
Lara:
Lara comes in and takes over from Kiera. Lara says she will close the pipes.
Look close at the valves and gauges.
Click on the valves and Lara says they are broken.
See
that the bottom left gauge reads zero already. That means it doesn't have
any gas passing through those pipes.
So
only the 3 gauges should read zero or less than zero.
Right click #1 valve or top left to get bottom
right (C) gauge to read minus 1.
Right click #2 valve or top right to get top
right (B) to minus 1.
Left click #3 valve or bottom left to get top
left (A) to zero.
And done! The gas isn't leaking anymore.


Check the side passage:
Go
back to the crime scene area and then to the left. Check the metal door that was unlocked by Burke left
of the drawing.
This is the site of the subway accident that hurt Jaczek the fourth member of the
Argo team.
Examine the aluminum case and door.
Take the rusty can on the floor by the corner.
Go
down and right. See the hole in the wall where the accident happened. It is
also the location they think where the missing men or culprit left.
Go
left and pick up the string and site diary from table.
Read the last pages that Gyula Neneth recorded.
Church plan: Check the plan of the Church. Click on
locations to know what they are.
Try
square: Remove the 2 plastic bolts holding the try square.
Take the try square -ruler in front of the church plan.
Captain
Burke:
Update Kiera: Talk to Kiera about the gas leak and Burke.
Exit the crime scene and talk to Burke outside the church. Talk to Burke.
Answer Burke: 5 liters.
Officer
Edwards: Talk to Edwards completely especially about the
changes in the crimes scene.
Ask about the spotlight. Guess
who is guilty of tipping over the spotlight.
Learn more from Edwards except that he didn't go to a lot of places at the
cellar.
Fix the
spotlight:
Go
back to the crime scene. Examine the spotlight and see that it has a broken
bulb.
Get
bulb: Go to the back corridor by the gas pipe valves.
Examine the spotlight used by the Argo engineers.
Unplug the spotlight cable at right by curtain.
Use
the little bolt under the spotlight. Open the spotlight hatch.
Check the light bulb - it's hot! Use
the moist washcloth on light bulb to get it.
Plug the spotlight cable back on.
ID tag: Go right and (after talking to Kiera
about it) place an ID tag on the damaged gas pipe juncture.
Replace bulb: Go back to the tipped spotlight. Turn off the spotlight by using the switch.
Use
washcloth to remove the broken bulb. Place the light bulb taken from
the spotlight by the gas pipes.
Fix
the leg: Look at the base of the spotlight. It is missing
one of the legs.
Pick up the broken - off leg. It cannot be reattached to the spotlight.
Use
the try square on the broken off leg slot.
Secure it using the string from the side passage.
Click spotlight to be upright and turned on.
Follow the clues left by murderer.
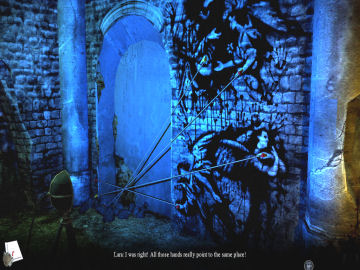
Study the painted wall:
Look close at the painted wall.
Angels' hands: Left
and right click on any angel's hand. Lara thinks there is something
meaningful with how all angels are pointing to something - towards the left.
Use
a thumbtack in any (pointing) hand. Laura can't push the thumbtack that is on the wall.
Use
the broken off leg of the spotlight on the thumbtack.
Use
string on the thumbtack.
Click on the thumbtack to turn it and place the string to where the finger of
the angel's hand is pointing.
Do
this to the other 3 hands with fingers that are pointing.
See
that all 4 hands' string cross at a specific point at the broken wall at the
bottom corner of the archway.
Secret
of the shattered plaster:
Look close at the shattered plaster. See
broken plaster with writings on them on the ground.
Right click on a piece of plaster. Try to take one but they will not hold on
the wall.
Make glue: Go to the wash basin behind Kiera.
Place the rusty can on top of the cooker.
Place the asphalt pieces taken from the road beside Edwards on the can.
Turn the cooker on. It needs to be mixed.
Use
the washcloth on the rusty can with asphalt to hold it.
Use
the broken off leg on melted asphalt to mix it. It is ready.
Take the melted asphalt.
ID
tag: Use ID tag on coffee machine and also the washed
cups.
Glue the broken plaster: Go back to the shattered plaster
left of painting.
Use
the melted asphalt on the plaster pieces.
Put
the glued pieces of plaster back on the hole on the wall.
Each piece can be picked up by left click. Right click rotates the piece.
Click it on ground or wall, to drop it.
I
started by placing the edges and worked from there.
Lara translates Crux Scia as cross and shadow.
ID
tag: Talk to Kiera about the Latin words. Go back and
place ID tag on the reconstructed Latin words.
Cross
and shadow:

Examine the cross. Look at the picture of the crime scene and study the one
with the cross' shadow on the stairway.
Position the spotlight so that the shadow of the cross matches the one in
the picture.
Click on the spotlight and see directional arrow at bottom left.
The
4 at left box moves the shadow side by side.
The
2 at right box moves the shadow up and down.
First move the shadow up by using the
right box' down arrow 12x.
Then move the shadow to the right using the
left box' left arrow 6x.
Then pull back the shadow using the left box' top arrow 6x.
That's it!
ID
tag: Talk to Kiera about the spotlight. Use ID tag on
spotlight.
Tagged duct: Look at the duct that is at the center of the
cross' shadow. See a paper inside.
Use
the metal bar from the fence on the duct.
Take the scrap of paper.
Read the scrap of paper. It's a quotation.
ID
tag: Place an ID tag on the duct.
Identify the scrap of paper:
Bible: Use the scrap of paper on the bible on the floor.
Kiera: Talk to Kiera about the duct and the bible
quotation. It is from the Book of Revelation; Chapter 6, verse 7 (6,7)
Plan of the church: Go back through the metal door left of
the painting.
Look close at the plan-drawing of the church at left.
Click the bible quotation paper on the square that is the meeting point of 7
at left and 6 on top. It is the exit to the building site where the brick
pallets are blocking the doorway.
Talk to Kiera. Lara wants to check the building site outside that steel door
but needs help from Burke.
Gain access to the last clue.
Get
to the building site right of church door:
Burke: Go outside and talk to Burke. Burke insists
that they have searched the crime scene well.
Burke is given a takeout chicken sandwich by Edwards. He throws it away.
Talk to Burke. Give any answer and still Burke will wait tomorrow to get a
search warrant. Lara wants to do it now.
Gate: Go to the gate of the building site right of fence.
There's a furious large dog behind the gate.
Get
pass the guard dog: Pickup Burkes' discarded sandwich.
Look at the latch and then look at the grate of the window behind the gate.
Lara says she can use the grate.
Use
the metal bar on the latch. Use string on metal bar to attach it to latch
and be able to lift it.
Use
the discarded sandwich on the side area right of the grate.
Burke says she's trespassing but he doesn't want to know about it.
Building site: Look around. Take the cramp iron from
behind the do not enter sign.
Go
further to the building site.
Hotwire the forklift:
Examine the church entrance at left. See that the door is completely blocked
by pallets.
Forklift: Examine the forklift. You are standing at back
of forklift.
Open the ignition cover under the steering wheel by turning the 2 small
bolts on the cover.
See
red and blue wire. Pull back.
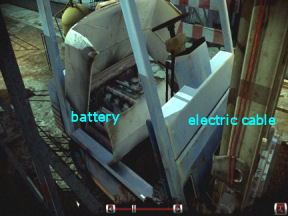
Open the engine cover - the seat.
Use
the arrow at bottom to be at right side of the forklift.
See
the battery under the seat and red electric cable on the forklift loader on post
at right.
Take a red electric cable.
Use
the electric cable on battery. Click to pick up the other end of the red
cable from the floor.
Look close again on the open ignition cover. Use the red connected cable on
the blue cable of the ignition. The engine starts.
Unblock the church door:
Save game here.
Click the forklift and be ready to drive.
Controls: There are 2 framed controls seen at bottom left.
The
left controls are for driving the forklift using the directional arrows.
The
controls at right are for the lift of the forklift. The arrows raise and lower
the lift of the forklift.
Crate in elevator:
Left controls: Left. Drive in elevator.
Right controls: Up. Pick up pallet.
Left controls: Right. Drive out with pallet.
Ride the elevator: Exit the forklift.
Check the ladder of the elevator and see that it has a padlock.
Click on elevator control (green light) and rise to the top.
Go
right and pick up the brick fragment on a platform by wall of
building.
Padlock: Go back to elevator.
Look at locked ladder at left edge of elevator. Left and right click the
padlock of the ladder. The padlock and the bars are rusty.
Press the elevator button and go down.
Break the ladder: Ride the forklift.
Left controls: Left. Drive in the elevator
Right controls: Down. Lower pallet.
Left controls: Right. Drive out empty.
Right control: Up 3x. Raise the lift to high position.
Left controls: Down (maybe 2x). Hit and break the ladder.
Pick up the pallet: Clear the elevator.
Right controls: Down 3x. Lower the lift.
Left controls: Left. Drive in elevator.
Right controls: Up. Pick up pallet.
Left controls: Right. Drive out with pallet.
Raise the elevator: Exit the forklift.
Press the lift controller to ride the elevator up.
Look close at ladder left of the cage. See the padlock and broken bar.
Click the padlock off the bar and release the ladder. The elevator is left
one level up.
Use
the ladder to climb down.
Remove
pallets from church door:
Pallet from elevator: The forklift has the pallet on it.
Ride forklift.
Left controls: Left 3x, Down 2x. Drive through.
Right controls: Down. Lower pallet.
Left controls: Up and right.
Right control: Up 2x.
Left controls: Down. The forklift is now in front of the
pallets by church door.
Right controls: Up.
Left controls: Up 2xs and down.
Right controls: Down. Lower pallet over the one from
elevator.
Left controls: Up, right.
Right controls: Down 2xs
Left controls: Down.
Right controls: Up. Pick up pallet from church door.
Left controls: Up 3xs, right 3xs. Forklift with pallet is
now right of elevator.
Check
church door:
Exit the forklift and examine the church door.
Left and right click the door knob.
Doorstep: Left and right click the doorstep at bottom of
door.
Use
cramp iron on doorstep.
Use
the brick fragment to hammer the crampon on the doorstep.
There is now a wide space at the bottom of the door.
Place
pallet in elevator:
Climb the ladder of the elevator.
Press the lift controller to lower the elevator. Use forklift.
Left controls: Left.
Right controls: Down to lower pallet.
Left controls: Right to back up.
Get
off forklift.
Use
the doorstep on the lift controller. The elevator goes up with the pallet.
Open
church door:
Use
the forklift.
Left controls: Left 3x, down, right and down 2x.
Lara drives the forklift through the church door, takes the palette and
drives out.
Maintenance shaft:
Enter the back corridor.
Left and right click the maintenance shaft. It's too dark in there. Lara
removes the cover of the shaft.
Look close at the maintenance shaft. Left and right click the maintenance
shaft. I can't see a thing.
Edwards: Go out to talk to Edwards at the road. Borrow his
flashlight.
Go
back to the maintenance shaft. Look close at maintenance shaft. Use
the flashlight.
Missing engineers:
Find the missing engineers. They have hourglass mark on their forehead.
Examine the ladder, symbol of the foreheads and blood stain on the chest.
Max' sign: See Max' signature on the wall. Right click the signature.
It's one that Max is thinking of using on his paintings. No one could have
known about it.
Decision:
Left click the mark.
Make a decision: Wipe off sign or Mark as evidence.
Make a decision: Select an option that supports your decision.
Kiera arrives.
(I didn't find the crime site that has a
bloody brush and know what happened to the bloody plastic in front of the
painting).
Burke
and Edwards:
Go
to the street and talk to Burke.
Burke blames the people he worked with for missing the corpses.
Decision: Infatuation or Nothing has happened.
But
I can't Lara.
Act 4: Life and Death
October
5, 2012
Lara is picked up by Officers Edwards and Soga.
They talk about Burke. Soga plays Burke's press conference. Burke
took all the credit in finding the bodies.
A
call is made about a shooting in Chinatown. They detoured to check on it.
Find out what happened to Burke.
Street
in
Chinatown:
They find Burke's car. Learn from HQ that Burke requested that no one interrupt
him because he is meeting an informant.
Laundry: Examine the garbage container and the window of
the laundry above it.
Elderly man: Look at and talk to the elderly man. He was
the one who reported the shooting.
He
saw the car enter the alley. No one enters that alley unless Cheng allows
it. After 20 minutes, he heard the shooting so he called it in. No one from
here did it.
Sign: Take the "closed" sign from the restaurant
next door.
Edwards: Talk to Edwards. He says to tell Soga.
Cezare Soga: Talk to Soga about investigating. He wants Lara to sign the
form to release equipment.
Form: Look inside the patrol car via the window.
Take a donut. Check the coffee, ignition and navigation.
Take the pen on top of newspaper on dashboard. The glove compartment is for
later.
In
inventory combine the pen and form. Give the finished form to Soga.
Equipment: Go to the patrol car's trunk. Open it.
Open the white box. Take the UV light and latex gloves.
Talk to Edwards about helping her.
Alley:
Enter the alley.
Footprints: See footprints that has clay. It leads to the
car.
Blood on car door: Use the UV lamp on Burke's car door.
There's blood.
Talk to Edwards about the blood. He says to tell Cezare.
Talk to Soga about the blood. He reports it to HQ and asks for further
instructions. He was ordered to search vehicle and document things.
Keira: Lara gets a call from Keira. She wants Lara to
wait for her there at Chinatown and they will investigate.
Coutu: Lara calls Coutu to book her another flight
back to Lyon. Renier is not to know about this.
Burke's
car:
Edwards: Lara asks Edwards to help with evidence
collecting. They need to take pictures but they have no tags.
Tags: Combine the "closed" sign from the restaurant
and the pen. She writes numbers on sign and tears them to pieces to get
numbered tags.
Evidence: Edwards will take the pictures.
Footprints: Place tag and Edwards takes picture. Tag #1.
Use
gloves on car. Lara should be wearing gloves now. The car is now open.
Steering wheel: Look at and use UV lamp on steering wheel.
There's blood. Tag #2.
Tissue: Look at and use UV lamp on tissue. Tag #3.
Can: Look at and use UV lamp on soda can. Tag #4.
Seat: Look at and use UV lamp on
passenger seat. There's blood
soaked on the seat. Tag #5.
Compartment: Look at and use UV lamp on glove compartment. There's blood on
cover. Tag #6.
Newspaper: Look at and use UV lamp on newspaper on
passenger floor. Tag #7.
File: Look at and use UV lamp on file folder. It has
Lara's short summary on the Argo murders. Tag #8.
Cloth bags: Look at and use UV lamp on Ferrington cloth
bags at back seat. They should be a set of 5; one is missing. Tag #9.
Dirt: Look at and use UV lamp on dirt on back seat floor
behind driver. The footprints has clay. Tag #10.
Rear view mirror: Use the arrow and go to hood of car.
Look at and use UV lamp on mirror. Tag #11. It is oddly positioned, like to see
the back seat. #11.
Area:
Look around at the alley.
Area in front of fence: Check the area at left.
Look at and use UV lamp on a cracked baseball bat by fence at right.
Look at and use UV lamp on door.
Entry to warehouse: Go to warehouse front.
Look at and use UV lamp on large footprints on ground.
Look at and use UV lamp on door.
Glassed in entry room: Check the storefront with bicycle.
Look at and use UV lamp on cigarettes butts. It also has small footprints
that must have been standing here for a while.
Look at and use UV lamp on door. It needs a key.
Alley: Go to the small alley between the buildings. The
door is blocked by boards on the other side.
Look at and use UV lamp on door.
Plastic-cloth fragment: Look at and use UV lamp on
possibly plastic cloth hanging on the pipes above the gate at right side.
Tag #12.
Side entrance: Go to building right of alley.
Look at and use UV lamp on door.
Metal fence: Go to fence at right side.
Look at and use UV lamp on stain on graffiti.
Look at and use UV lamp on door left of graffiti.
Sequence of events:
Talk to Edwards. Lara asks for the photographed evidence.
See
a numbered paper and pictures below.
|
Place the pictures on the paper in chronological order of events.
1.
Footprints with clay leading to car.
2.
Clay behind the driver's seat.
3.
Rear view mirror.
4.
Blood on steering wheel.
5.
Blood on passenger seat.
6.
Blood on dashboard - glove compartment.
7.
Opened package of plastic bags on back seat.
8.
Plastic bag fragment in alley.
Close the investigation. Read the unfolding of the sequence of events.
Burke was surprised by the arrival of his attacker who sat at back seat of
car. Burke was attacked from behind in the car. Face smashed on steering
wheel, bag on head and was dragged out.
|
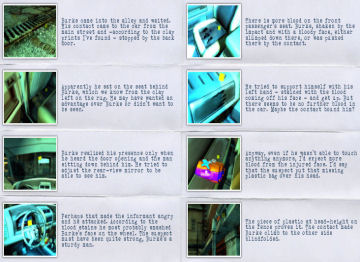 |
Edwards reports to HQ that Detective Durand has deduced that Burke was
kidnapped. Since the other officers are busy, Lara is given permission to
continue the investigation but not to enter any buildings until
reinforcement has arrived.
Edwards gives Lara the camera and mobile phone.
Alley:
Go
back to the alley and climb the boxes and crates at right to go over the fence.
Lara goes deeper in the alley and sees Kiera standing by a homeless man that
was shot. He is delirious.
Lara says to call an ambulance. The homeless man says Floyd says no. So that
is his name.
Lara goes and calls an ambulance anyways. Lara wants to treat the man.
Kiera says she passed through 2 policeman who are not happy about her
being here. It is up to Lara to fight with the homeless man.
Floyd: Look close at homeless man. See
a picture of a young girl on wall. It must be his daughter. Examine the bed.
Alcohol: Examine the bottle on the ground by the bed. It
still has alcohol in it.
Talk to Floyd. He talks about colors.
Check the wound and then the thigh. He ripped his pants to access the wound.
Get
items to stop bleeding:
Go
back to Edwards. He says there is a first aid kit in the police car.
First Aid kit: Look through window of police car. Open the
glove compartment. Take and open the first aid kit.
Read the manual about treating arterial bleeding.
Take bandage.
Elderly man: Talk to the laundryman. See the pigeon that flies
down to him if fed.
Ask
for thick clean cloth. He can get one from home because all the things in
the laundry are the customers'.
He
will get one for 2 bucks. He left but was stopped by Soga who uses the
siren. The alley is a crime scene. Edwards gets upset because of the siren.
The
elderly man goes back to his seat.
Give him the donut. The man feeds the pigeon.
The
pigeon hits a pot and breaks it. Take a shard - splinter.
Talk to the elderly man again - he will get the cloth.
Again Soga does the siren thing to stop the man and Edwards gets upset.
Talk to Soga. After Lara is through with him with her pointed finger, the elderly man is allowed
to get his shirt.
He
comes back with a Ladies T-shirt. The price went from 2 to 10 to 8.
Stop
the bleeding:
Go
back to Floyd.
In
inventory, combine the splinter with the T-shirt to get strip of cloth.
Use
the strip of cloth around the thigh (not wound).
Use
the pen to tighten the cloth and act as tourniquet. The wound stops
bleeding.
Take the bottle of alcohol from ground. Pour alcohol on the
wound.
Use
bandage on the open wound.
Talk to Floyd. The young girl in the photo is Caitlin - Caty. Caty is with
her mother. He'll try to stay awake for Caty.
He
recalls what happened. He heard one man shout "run". Floyd was hiding behind
the fence but one shot got him.
Kiera wants to leave and look for Burke. She promised that Floyd will be
okay.
As Kiera.
Yard:
Kiera tells Lara she will take over. Now Lara has to help her. Lara is to take pictures and tag
evidence.
Inventory has FBI badge, Glock 17, camera and UV lamp.
Search for evidence:
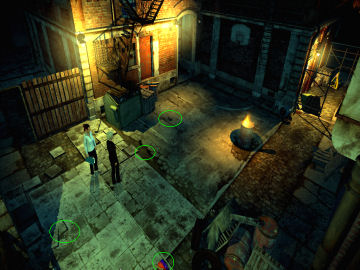
Look around the yard.
Asphalt: Examine and use UV light on the asphalt beside Kiera.
See bloody footprints. Take photo and tag.
Man
shoe: Examine and use UV light on man shoe by trash
container. The tied up shoe has soft pattern with small amount of blood. Take
photo and tag.
Broken cobblestone: Examine broken cobblestone at left.
See 6 spent cartridges and small handcuff key.
The
spent cartridges are 9mm and the shooter fired the whole magazine. Use UV
light on both items. No blood is found. Take photo and tag key and
cartridges.
Dump: Examine dump at bottom of screen.
Examine and use UV light on the red-purple plastic bag. There's strips of
tape on bag. There is a lot of blood in-on bag. Take photo and tag.
Examine and use UV light on unlocked handcuffs. Take photo and tag.
Analyze evidence:

Talk to Lara.
Correlate evidence: See map with pictured evidence and 3
squares at right.
Place 3 evidence pictures at right that correlate and produce a deduction.
-
Handcuff keys + Unlocked handcuffs + Bag = Informant released Burke at some
point.
-
Spent cartridges + Shooting report + Shot homeless man = This is the place
where the shooting took place and it was Burke's duty weapon that was used.
-
Suspect's shoeprint + Bloody shoeprints + Shoe with traces of blood = The shoeprints are Burke's.
They need more evidence.
Trash container: Check the trash bin - container.
Check bullet holes on trash container and brick wall. The target might have
been moving.
Check the ladder. Someone could have climbed up or down.
Use
UV light and take picture of the 2 sets of bullet holes. There are 6 holes
seen. It is tagged.
Use
UV light and take picture of the ladder and see blood on the floor. It is
tagged.
Now
correlate the last set of evidence. Talk to Lara.
See
the map with evidence pictures again. Take pictures from map to make new
deductions.
-
Shots in the yard + Evidence of shooting + Burke's shoe = Suspect was firing at a running Burke
(shoots at Burke).
-
Yells + Burke' release + Shoots at Burke = Bound Burke, took him to yard,
release him and told him to run. Then he started shooting at Burke.
-
Burke's release + Shoots at Burke + Blood on platform = Burke was trying to
escape, fired upon but must not have hit him.
-
Press conference about Mission St. + Files of Mission St. case + Contact's
schizophrenic behavior = Find out how the incident in the yard ended.
-
Burke's shoe + Run for the emergency staircase + Burke's fate =
Read the summary of the deduction. Burke tried to escape by releasing the
emergency fire escape (metal clang sound). Burke falls off the ladder and
might be injured or unconscious. The suspect then dragged him somewhere.
Close the investigation.
Look for Burke.
Find
the suspect:
Lara and Kiera looked around at the trash container.
Cellphone: Lara finds a cellphone with the last call
from an unknown number under the ladder. It has a calendar with the press
conference marked. It is Burke's cellphone.
Kiera wants Lara to use the phone and call the unknown number.
They hear a ring. They run with guns drawn towards the back door of the
Golden Dragon Restaurant.
Before they go in, Lara radios Edwards that they are going in and to
watch the front door of the restaurant. Edwards tries to stop her to wait
for backup. With Kiera's insistence they go in.
Red
Dragon Restaurant:
Lara holds the UV light to light their way. They enter through the
back door to the kitchen.
Note: You can use the UV light either as UV with a shorter
range to detect blood or right click it in inventory to get regular light that has a
longer range.
Bar:
Fire case: Go to middle and see a fire case. Get fire
extinguisher left of case.
Use
the fire extinguisher on the locked door of the fire case. Open it and get
the axe.
Examine the collapsed staircase at right.
Warn Kiera: Talk to Kiera about talk first and shoot
later at a familiar suspect (Max?).
Right click UV lamp to change to UV light. Look around to see any blood.
Right click UV lamp to change to regular light.
Lobby:
Go
right. Examine the tables on the floor and the balcony.
Lara can take pictures and tag some tables with numbers here if you want or
let Kiera do it later in the game.
Side
lobby:
Go
left to the side lobby. Check the tables on the private booths.
Climb the stairs right of Kiera.
Post: Examine the stairs and the railing. It is
broken. Use UV light on stairs. Then
click on post with handprint.
Take a picture and it gets tagged.
Lara says that it must be Burke. They climb up. Lara is hesitant but Kiera
is gung ho.
Check the 2 bedrooms.
Go
left to next part of hallway. 2 shots are fired through the bedroom door.
Lara wants to wait again for backup but Kiera is insistent.
Kiera hides on the table at left.
Light the door: Look close at detail of table where Kiera
is hiding.
Place the UV lamp on chair.
Open the door: Try to open the door. It's locked. Someone
fires through door.
Left and right click the door.
Use
the axe from the fire case on door. Right click the door again.
Use
the axe again on the door.
Change the UV light to regular light. Place it on the post of the railing. Examine the
bedroom.
Throw the fire extinguisher inside the room. Lara warns Keira again about
talking first to suspect.
Right click to see
inside the room. Use the gun on fire extinguisher. Boom!
Suspect
bedroom:
There is no one here.
Bloody hand: Use the UV lamp with UV light on the bed. See a
bloody hand.
They move the bed and see a hole on the floor.
Take a picture of the bed - hand and it is also tagged.
Soga: Use walkie-talkie and call Soga. Lara tells him
about the suspect and to cover the back door of the restaurant.
Corridor:
Blood on floor: Look at blood on floor. Take picture and
ID tag it.
Box: Check box at right. It is filled with hard disks,
paperclips, graphics card and other computer items.
Take a paper clip.
Move the graphics card at right. Take the screwdriver.
Restaurant layout: Examine the restaurant layout left of
Kiera.
Kitchen: Go down to kitchen.
See
Burke's badge on the door of the kitchen.
Soga comes running and talks to Lara. He hasn't seen anyone. He will report
to HQ.
As Kiera.
Kitchen:
Kiera says that the French word and badge was not here when they came.
Kiera takes over.
Back door: Examine the backdoor.
Look close at the lieutenant badge of Burke. Take a picture and ID the
badge. Burke's badge number is 48512.
Examine the blood writing of Chiffres. Numbers? Take picture and ID
tag it.
Left Rack: Check the left rack. See FLMZ at top part of
the panel.
Examine the calendar and flip to April. See blood smudges.
Middle Rack: Check the middle rack. See ELMS at top part
of panel.
There's a damaged fuse box right of the rack.
Right Rack: Check the right rack. See SLME on the top part
of panel
Lobby:
Go
to the lobby right of bar and check the tables. (This part can also be done
by Lara earlier with no change in scores).
Examine the tipped table at far top right. See that there are numbers etched
on the table. Take a picture and it gets tagged.
Examine the table at far right. See that there are numbers etched on the
table. Take a picture and it gets tagged.
Examine the table at left by Kiera. See that there are numbers etched on the
table. The chandelier falls from ceiling. Clear it off to see all the
numbers. Take a picture and it gets tagged.
Rest of
side lobby:
Go left to side lobby. Climb the stairs at back of room to be upstairs
again.
Continue down the side lobby.
Check the turned table closer to the railing at right.
See
a bloody handprint on table. Take picture of another set of
etched numbers.
Bedroom: Go back to the bedroom at end of hallway. Go
down the hole.
Lara: Talk to Lara.
Corridor off the kitchen:
Numbers? Let's work with that. Remember the 4 tables with numbers. Go
down to corridor.
Restaurant Layout: Look close at the restaurant layout at
left wall.
Remember that Burke's badge number is 48512.
Number the table pictures: In inventory are the 4 photos
of table with numbers that was taken earlier.
Examine a photo of numbers to recognize it. Then take from inventory and click it on the
numbered table on the
layout that you think it came from.
The
numbers of the table that have the numbers etched on them are:
4 - 8 - 5 - 12. Badge number!
Number letter connection:
Calendar: Remember the calendar on one of the racks. Go
back to kitchen and look close at calendar.
Use
the left arrows to flip the calendar. Use "remove tag" to erase the entries.
Use
the right arrow to change table pictures.
April: April has the bloody print. It is the 4th month
of the year.
Take the table photo we just labeled 4. Click it on the calendar. See the
table picture and table layout at right.
Click on the numbers (days) in order using the numbers etched on the table:
9 - 3 - 10 - 16 - 10 - 24 - 30. E!
May: Turn the
calendar to May that is the 5th month of the year.
Take the table photo we just labeled 5. Click it on the calendar. See the
table picture and table layout at right.
Click on the numbers (days) in order using the numbers etched on the table:
22 - 1 - 25 - 7 - 28. M!
August: Turn the
calendar to August. August is the 8th month of the year.
Take the table photo we just labeled 8. Click it on the calendar. See the
table picture and table layout at right.
Click on the numbers (days) in order using the numbers etched on the table:
7- 21 - 27. L!
December: Turn the
calendar to December. December is the 12th month of the year.
Take the table photo we just labeled 12. Click it on the calendar. See the
table picture and table layout at right.
Click on the numbers (days) in order using the numbers etched on the table:
17- 9 - 5 - 11 - 16 - 24 - 30 - 26 - 18. S!
Find
Burke:
Arrange the letters: Look at the photo with letters in
inventory.
Look close at one of the numbered photo to get a close up.
Take another photo from inventory and click it on the close up of the
previous photo.
Do
this until all 4 are together in close up.
Arrange the letters to form a word (based also on Burke's badge number 4 - 8
- 5 - 12) - ELMS. Get an ELMS writing.
Rack: Look close at the middle rack. It has ELMS on top.
Use
the ELMS paper on the ELMS at top of rack.
Kiera and Lara pushes the rack and sees a door with message in French: Burke still
has something to tell.
The
button of the door can't be opened.
As
Lara.
Fix the
fuse:
The
fuse box is broken. Lara tries to fix it.
Box
with switch: See a wire hanging down from the box with
switch. It is off.
Click on box to see the back side and see that there's only one wire.
Take that yellow wire.
Use
the other end of the wire on the terminal strip screw.
Use
the screwdriver taken from the computer parts box on the terminal strip
screw-wire to tighten it.
Fuse: Take the fuse on the panel. Look close and see that it is burned
out.
Use
the screwdriver on the burned out fuse. Lara removes the resistor wire that
is burned on the fuse.
Use
the paper clip on fuse as replacement for the resistance wire.
Use
the screwdriver to tighten the connections.
Place the jerry rigged fuse on the panel.
Press the switch on the hanging box.
Light comes back on.
Cold
room:
Examine the metal door. Press the button to open the door.
The
fuse gives out again and they are in the dark.
Kiera and Lara enter the cold room. Look around.
Burke: Go left and see Burke hanging on a meat hook.
Look at blood stain on floor. He was hanged and then stabbed in the heart.
Examine the butcher hooks on the table.
Click on Burke.
Automatically, Lara calls Soga. He questions 'we'. Didn't he see Kiera? He's
called the coroner.
Call Soga again on the walkie talkie. He tells Lara not to blame herself.
Burke seems to be dead for a long time.
Examine Burke. There's a different sign on his forehead.
Examine the traces of blood by heart and the body.
Use
gloves and examine his mouth. Get a SIM card.
Message: Save game here.
Use the SIM card with Burke's cellphone.
Get
a message that is meant for Lara.
Kiera reads it and says - not to believe anybody and this changes things.
Kiera quotes Zenzele. Fate is not an accident. She knows Zenzele.
Decision:
Everything can be explained. I just don't have enough information.
What's
happening is beyond my grasp of reality.
Have another decision to make to support the previous choice.
Renier calls and berates Lara.
The
door closes and traps Lara inside.
Call Soga on the walkie talkie. The backup has arrived.
Lara goes back to Lyon.
Act 5: Trust and Suspicion
October 7 Lyon, France
Get clue to what happened to Max.
Zenzele's flat:
Lara wants help from Zenzele. After getting angry,
Lara apologizes. Lara agrees to the ritual.
Talk to Zenzele. Zenzele reminds Lara of her
mother and her sister's ability.
Zenzele's reason for taking responsibility of Lara
is because she owes a debt. She doesn't want to leave a debt for her time is
short.
Lara needs 3 items: a symbol of mutual
dependence supplementing each other, something containing his imprint and
symbol of love.
Lara's home:
Search for symbol of mutual dependence:
Look around.
Check the shelves at center of room. Take the DVD
and book. Look at both in inventory.
Take Max sketchbook beside the book. Look at
sketchbook in inventory. Flip through sketchbook.
Pick up pack of crayons from desk at right. Take
the calculator and relaxation plasticine from computer desk.
Check the valise by coffee table. Take the comb.
Toothbrushes: Max toothbrush is half of a set that they bought
before vacation. Take Max' toothbrush and Lara's toothbrush
for the symbol of mutual dependence.
Look at the 2 toothbrushes in inventory. There's a
magnet on the back to hold them together. Join one toothbrush with the other
with the magnet on the back to get joined toothbrush.
Balcony: Go left to be at
balcony. See the giant sign of Rodin Cafe. Check the rooftop and the
railing.
Search for something with his imprint:
Go upstairs to bedroom. Check the luggage. Take the bath towel.
Take Max' dirty T-shirt that he uses to paint.
Take the sunglasses and Max' award from shelf.
Take paper cutter and strength of will book from
side table.
Painting: See Max' signature on
the painting.
Zenzele's flat:
Go to Zenzele. Talk with Zenzele and begin the ritual.
Place the items on the table:
Place the joined toothbrush in front of the left
stone with rune - mutual dependence.
Place dirty T-shirt in front of middle stone with
rune - contains Max' aura.
Place Max' talisman in front of right stone with
rune - symbol of eternal, love, waiting, commitment.
Vision: In the vision, Lara touches the Angel of Death
Statue and sees Max on top of the stairs.
At the Mission Street Church; now a ruin, Lara
touches the bloody painting and collapses.
She listens in on the conversation between a man
and a woman. The woman has altered the records to show that the man leaves
the hospital one day later. She also gave the man a bottle of strong pills
and warned him to take only a fourth of it. The man hears someone listening
in on the conversation.
Zenzele wakes Lara back and warns Lara that Time
is against you. Hurry!
Teodor Jaczek left the hospital one day earlier
than reported by the FBI.
SWoA department:
Couto talks about Chinatown incident. The FBI loves
Lara now but Renier is not happy. There's a similar case to the Mission
Church one that is reported in Finland.
Talk to Suzanne. Diego left something for Lara and
to talk to her somewhere quiet.
Commendation: Read the mail sent to Renier by FBI Special
Agent Louis Avery Boyd. It mentions the follow-up about the Mission Church
case. They deduced that the ritualistic murder was done by a non-treated
person with multiple personality. A similar case was seen by the Finnish
police. The corpse of a reporter Niklas Silven was found with a similar
symbol on his forehead. Lara will be given an option to become an external
FBI consultant soon.
There are some boring work needs to be done. Don't
postpone the work.
The Argo contact card is on the desk.
Office: Go to Lara's
office. Check the desk. Take the
Argo card.
Automatically, Lara calls Argo and asks about Jaczek. Black says
that they cannot find him and they want to send Jaczek back to Inari where they pulled him from
before they sent him to Mission Church project. He left some personal things
in Inari.
Coutu enters the office. Lara asks that he book
her a flight to Finland. Coutu warns her about Renier's anger. Coutu says
that he cares for the office not Renier or Lara.
Check the computer. Lara
automatically answers the important e-mails.
Lara's home:
Go home to pack.
Warning call: Suzanne calls Lara
to warn her that Renier got an anonymous tip that Lara is personally
involved in the
Mission Church Case. That she is hiding something.
She sent security to search Lara's apartment.
Coutu is not involved and he told Suzanne to tell Lara to go directly to the airport.
The doorbell rings. Security is here.
Painting with Max' signature: Go
upstairs to the bedroom.
Look at Max painting on the bed. Should you hide
or display the painting?
Take the painting and get a painting icon in
inventory.
Go to the easel and place the painting icon on it.
Diego: Lara opens the door and
sees Diego heading the security detail.
He leaves the other 2 men outside. Lara brings him
to the bedroom.
Diego sees the painting. He says that he didn't find anything. Lara admits that she's has
not been good to those that tries to help her.
Power play.
SWoA department:
Renier: Lara is brought to the
office and the conference room.
Renier explains about the anonymous tip. She uses
that to bring Lara down. She has Coutu's research on Jaczek. She also
mentioned that there is no Kiera Sheehan that works for the FBI. The
only record is an application that was denied.
Lara is now suspended (if she has not resigned). She gives back her badge
and gun. Lara is on house arrest.
Look at Jaczek's file on the table. Read Coutu's
summary of what is known about Jaczek. Automatically, Lara takes Jaczek's
photo.
Exit and they go to Lara's home for her house
arrest.
Lara's home:
Find a way to escape: Go
upstairs to the bedroom.
Go the bed and look at the blanket. It is a gift
from Max' father.
Use the paper cutter on the blanket twice and take
the third piece also.
In inventory, look at one strip and then attach the other
2 pieces to make tied sheets.
Balcony: Go downstairs and to
the balcony at left. Use the tied sheets on the railing.
It's too short. Add the towel to the tied sheets
and get rope made from fabric.
Tie the rope on railing. Use the rope. Lara removes all the other things
in her inventory before going down the rope.
Inventory has wallet, Max' talisman and
Jaczek's
photo.
Sign: Look at the sign for Rodin
Cafe. The foundation date is to be repaired and missing numbers.
Door: Examine the door
under the sign and see
the padlock on the other side of the door. Lara can't reach the padlock.
Tools: Go to cage with tools.
Turn right and check what
is under the cover. It is the 2 numbers that is missing on the
foundation date - 5 and 8.
The serviceman has not been here and the sign has
been down a month already.
Welding machine: Pan left and
see the welding machine that is out of order.
Take welding wire from top of box at extreme left.
Open the padlock: Go back to the padlocked door.
In inventory, look at the welding wire. Bend the tapered tip to get a bent
tip.
Use the welding wire with bent tip on the padlock.
Combination: See that the padlock
has a combination lock.
Now to know what the repaired man used. Lara
mentioned earlier that the repairman's memory might be
faulty.
The missing numbers on the foundation sign is 5 and 8 and the
sign that is up is 1 - blank - 9 - blank.
Try 1895 for the foundation year.

Act 6: Darkness and Cold
Zenzele warns about evil, ancient and twisted.
October 8 Inari Finland
Search for Jaczek.
Lara arrives in front of a hotel close to Inari.
She thinks the Argo people stayed here because of the proximity.
Get a room at the inn.
Hotel:
Climb the stairs to the hotel lobby. No one is
here.
Take the hammer belonging to Argo from the bench
across the counter. It has the Argo logo. Note a dent on the wall above the
bench.
Examine the chess set, old piano and fireplace.
Take the coffee grinder on the mantle of
the fireplace. See the nutcracker beside it.
The doors here and above are closed.
Dining room:
Exit the hotel and enter the dining room at bottom
level door.
Hear the discussion between the professor and the
bartender.
Harri Kopponen: Talk to the
bartender Harri.
After prodding from the professor, Harri says that
there has been unusual events that has occurred here. A newsman was found in
the lake with a burning cross on his forehead. He mentions that the burnt
monastery is an evil place but the newsman did not listen to him.
Ask about free room. Lara calls herself Madame
Leroy.
Learn that all of his rooms are under contract
with Argo whether they are used or not. Prof. Schneider is the only Argo
person here. Harri is afraid to lose his one month contract money from Argo.
Argo is working at the burnt monastery. The 3
people from Argo are the professor, Bateman and Jaczek. Bateman disappeared
and Jaczek has not returned from San Francisco.
Bateman is a weird guy that doesn't smile and is
quiet. Bateman's wife Beatrice died a year ago. He looks like
he's waiting for death to come get him. He had an argument with Jaczek and
it was Bateman that lost control. Bateman left to pick up some parts in
Helsinki a month ago but have not returned.
Jaczek is a nice person as long as he's not drunk.
Bateman and Jaczek argued about a manuscript.
Professor Klaus Schneider is their boss. They are
working on a crypt. Schneider is asking for pills while holding his stomach.
The myths says that Ajattar, a woodland devil
she-demon mother of all evil has her lair near the lake.
The monastery is the home of a strange order that
worshipped death. A young Frenchman started the fire to destroy the
monastery.
Map: Go to the right end of the
counter. Get a map. Examine the map. Click on it in closeup and see that the
way to the monastery is not marked.
Check the remote beside the map holder. It changes
channel.
Use the map on Harri. Learn about the monastery.
Harri marks the way to the monastery on the map. Take the map from the
counter.
Prof. Klaus Schneider: Talk to
Schneider. He's got a stomach ache.
Introduce yourself as a devoted amateur
preservationist Lara Leroy. I don't consider myself as a tourist.
Talk to Schneider completely. He still would not
let Lara use one of the free rooms. Learn that he suffers from gastric ulcer
and he lost his antacids. By questionings, he remembered that he must have
left it at a caravan at the monastery when he looked for the keys to the
crypt.
Iced Tea: Examine the cooler
with soft drinks at left end of the counter. A lemonade is 3 Euros.
Use the wallet on Harri. Lara takes a bottle of iced tea.
Hotel lobby:
Try to open the bottle in inventory. The bottle has a tight
lid.
Go back to the lobby of the hotel. Go to the
nutcracker on the fireplace mantel.
Place the bottle of lemonade on the nutcracker.
Use the lever.
Use the bottle of iced tea. Release the lever and take the
bottle with loose lid.
Monastery:
If Lara gets the antacids from the monastery,
Schneider might let her stay in one of the free rooms.
Go back to the car and use it to drive to the
monastery.
Guard house: See a light at the
guard house. Check the door and then the window.
Use the padlocked gate and the guard comes out and
throws Lara. out.
Look around to find a way in the monastery
grounds.
Check the metal roof of the guard house. If she
walks on it, it will
make noise and alert the guard.
Take the rubber hose from the drum at left.
Generator: Check the generator
right of the guard house. Look at the gauge. It still has a little bit of
gas inside.
Use the arrow to see the back of the generator.
Look at the tea in inventory and click on cap.
Lara drinks it to get an empty bottle.
Place empty bottle on the generator frame left of
the tanks cap.
Unscrew the tanks cap. Use the rubber hose on the
tanks cap.
Click on the bottle to start draining the tank.
Lara hides.
The guard comes out, check the generator and
enters through the gate. He padlocks the gate.
Use the metal roof of the guard house and Lara
jumps down to the yard. The light comes on; the generator is working again.
Search for the medicine.
Window: Examine the ajar window
of the Argo trailer. Examine the 2 bolts at left edge that holds the window
in place.
Junk: Go left and check the
junk. Get a stripping knife.
Open the window: Go to the
window.
Use the stripping knife on the bolt holding the
window. The window is now hanging loose. Open the window.
Book: Take the book on
Restorations written by Schneider.
Read the book and see an article on restoring
frescoes and old interiors.
Read the piece of paper on right side with drawing
of layers of frescoes.
Read the other 2 papers about the layers and how
they are applied.
Study these papers because you are going to be
given a test. :)
Take Schneider's medicine revealed by the
removal of the book.
Leave the yard by going through the green arrow at
middle right.
Go back to motel.
Convince Schneider:
Talk to Schneider. Choose to tell truth or bluff.
Stay in one of the rooms: Prove
that you can stay in one of the rooms.
Lara wants to be an employee of Argo so that she
can stay in a room.
Review the restoration notes in the journal's
documents.
Take the word test.
Steps to prepare in layers a Classic fresco:
1. Prepare the lime plaster.
2. Let it settle for 14 days
3. Apply the Arricio layer
4. Let it settle for 1 day.
5. Transfer the template onto the wall.
What would you do next?
1. Apply the Intonaco layer
2. Smooth out the surface with a wood darby.
3. Wait for the momento d'oro.
4. Paint the fresco.
5. Let the CO2 from the air work.
Ask to stay in Jaczek room. Lara is now an external
consultant to Argo.
Harri leaves to clean up Jaczek's room. He comes
back and says he placed
all of Jaczek's things in the wardrobe and locked it.
Jaczek's room:
Take room 3 key from the counter. See the key to
the wardrobe that holds Jaczek's things on the counter also.
Room 3: Exit and go to the
lobby. Climb the stairs and use room 3 key on door to enter the first room at right.
Turn on the switch left of the door. Check the lamp beside the bed and turn it on.
Lighter: Check the drawer
of the desk and get a lighter. Examine it in inventory.
Open the cap; use the tinder box and see that it
has no fuel.
Click on the lighter itself to remove the case
and see the reservoir.
Use the bottle of gasoline on the reservoir. Click
on reservoir again to close it.
Test it by opening cap and using the tinderbox.
Wardrobe: Check the wardrobe
right of bed. It is locked.
Squeaking floorboard: Go forward
and Lara notices a squeaking floorboard.
Look close at floorboard. The plank is loose.
Push the bed seen above the floorboard.
Use the stripping knife on the wide joint of the
plank close to
the bed. The secret stash is revealed.
Cockroaches: Check the beer in
the stash. There are cockroaches on the floor. Lara closes the floorboard
and exits the room.
Go back to Harri and tell him about the
cockroaches. Harri checks the cockroaches.
Key: Look close at bar. Take the
small wardrobe key from the counter
Harri returns. Take the insect killer spray from
bar. Go back to room 3.
Stash: Look close at floorboard
again to check the stash.
Use the stripping knife on the wide joint close to
the bed.
More cockroaches. Use the spray on cockroaches.
Examine and take the 50% strength Vodka.
Take and read the letter. The writer of the
letter - Holtys in
behalf of his client offers half the price - 70K for a manuscript - book.
Jaczek promised his partner to inspect it.
Click on the bed at closeup and it will be moved
back and the floorboard is returned to its place.
Wardrobe: Use the key taken from
bar on the wardrobe.
Check the pocket of the coat and read the letter.
It mentions a parcel number and how to explain it to Bateman. Bateman kept
the dagger.
Close the wardrobe door and Lara took the key
back.
Find a way to Bateman's room:
Remember that Bateman's room is next door. Check
the window but Lara said that it leads to a snowy roof. Exit the room.
Schneider: See Schneider by
fireplace. Talk to him.
Way to Bateman's room: Exit to
parking lot. Examine the recovery crane in the parking lot.
See Bateman's room at upper right of the building.
The window is ajar. Hmm...
Mikko: See Mikko trying to fix
the TV to watch hockey. He will leave his recovery crane here because
there's a tree blocking the road.
Talk to Mikko. Harri forces him to drink but he
doesn't because he came by car. Listen to him rant.
Talk to Harri about Mikko.
Recovery crane: Go outside and
look at the cabinet with controls at side of the recovery crane. The lock is
with a simple square lock.
In inventory, look close at the coffee grinder.
Remove the bolt on top of the grinder and get a grinder handle. It has a
square hole.
Use the grinder handle on the cabinet lock.
See 3 levers and a button at top.
The levers don't
work until they are started. Press the button.
It starts but it also alerted Mikko
out of the bar. He scolds Lara. Lara says she can't do anything while he's
here.
Get Mikko to go home: Go back to
the bar and check the TV. The score is tied.
Look close at bar again. Use the remote control.
Lara changes channel to the snow.
Mikko stands to fix the TV again.
Use the vodka from Jaczek's stash on Mikko's cup.
Mikko gets the hockey channel and drinks his
spiked tea. He rants at Harri and leaves.
Enter Bateman's room:
Use the recovery crane: Go
outside and open the cabinet with controls of the recovery crane.
Press the top red button to start the engine.
Press the red button at bottom left to get the 4
stabilizers to hold the truck firmly.
The levers can be clicked on at top and at bottom.
Adjust the arm so that it is a bit diagonal to
prevent hitting anything. Use the middle lever - click the top part until it
can't move anymore. The crane is diagonal.
Turn it to get the top part facing the roof now.
Use left lever to turn. (See picture.)
Now extend the crane to reach the window. Use the
right lever.
Adjust the 3 levers until Lara says that it now
faces room number 2.
Window: Enter the window and see
Lara climb the crane arm.
Click on window and see that it is latched inside.
Use the hammer on window. See Lara use the hammer hook to
raise the right window.
Use the stripping knife at latch at base of the
window. The way is clear!

Search Bateman's room:
Enter into the dark room. Use the lighter on dark
room to see a bit.
The room is a mess. Check the overturned lamp.
Read the letter on the dresser beside the
overturned lamp.
It is a letter by Bateman to his dead wife
concerning the book and the dagger he kept.
Check the mess on the floor and the bed.
Switch: Flip the switch left of
door and the light bulb breaks.
Go to the coat hook right of the door and take the
copper key to a padlock.
Beatrice: Go to the bedside
table. Bateman made an altar for Beatrice, Bateman's dead wife.
Click on candles to get some light on it.
Box: Check the box with an
unusual lock on it.
Using the clue on Bateman's letter, arrange the
boxes to form the word Beatrice.
Click on a square and then click on another you
want to replace it with.
Press the metal below the name.


Ritual: Read the letter and learn about the ritual.
The Vita Mortis ritual needs shed blood of eight people that are: weak in faith (burning cross), impatient
(hourglass), vain (mirror), avarice (unbalanced scales), and despairing
(drop of blood). The dagger is used to stop the beating of the 8 hearts.
See the symbols drawn on an inverted pentacle at
left. Bateman is trying to raise his wife from the dead.
Candles: Click on both candles
to snuff them off to leave no traces.
Lara exits. Automatically place the crane back to
original positions.
Decisions:
Go back to the room.
SAVE GAME HERE! Major decisions coming that will
affect the ending of the game.
Turn off the lights using the switch and lamp. Lie
down on the bed and see if you can sleep.
Angel of Death: Kiera arrives. She is the Angel of Death.
Learn what happened to the real Kiera. Kiera was
not accepted by the FBI when Lara and her separated. She slowly died. No
traces of her or her signatures will be found at the FBI case reports. The
real Kiera faked her conversations with Lara during the years. Diego covered
for Lara and is a very good friend.
Life is about decisions. The Angel of Death asks
whether Lara is ready to believe in destiny, that there are things beyond
her comprehension; beyond power?
Choose between:
1. Whoever you are, you see further that I. I will
follow, I will believe.
2. No. You're like a nightmare I want to awake from.
Keep your mysticism to yourself.
Next decision:
1. No. I will always rely on my reason only. On my
skills.
I... I'm not sure.
2. Yes, I will believe. I want to believe.
I... I'm not sure.
The Angel of Death says - Catch the killer first and then
we will talk
about Max.
October 9
Prof. Schneider:
Prof. Schneider:
Talk to Prof. Schneider. He's waiting for his
ride. After some discussion, Lara will take Schneider to the monastery in
exchange for looking around the monastery.
Yle: Lara was introduced
to the guard Yle who can barely speak or understand English as Argo. So now
she can move around freely.
Talk to Yle. Ask to help with repair. He needs
nail and hammer. That is why he is using tape.
Monastery grounds: Enter the courtyard and try to go to the back
area. Schneider stops Lara. It is dangerous because of cave-ins.
There are broken statues that he wants to
preserve. The monks here worship the Angel of Death. Bateman says that it is
only here that there are no passages. Anywhere else the ground may cave in.
The Angel of Deaths depicted here are not from one
culture but from all over; also some are 500 years to thousands of years
old.
Schneider gives permission to see the statues but
don't go to the crypt
Enter the crypt:
Back area: Examine the fallen
Angel of Death statue.
Entrance to crypt: Examine the
yellow gate to the crypt. See a frozen lock.
Thaw out the lock: In inventory
combine the insect spray with lighter.
See Lara torch the frozen padlock.
Use the copper key taken from Bateman's room on
lock.
Get light: Look close at the
worktable to get a closeup of the light control machine.
Use the handle at right side to open the front
panel of the machine.
Take the yellow link cable left of the ajar
front door-panel of the machine.
Pick up the red and blue link cables on table in
front of machine.
Look at back of machine and take the box of
nails from top of the machine.
Study the paper with diagram on top of the
machine. See the circles that needs to be connected.
Use the links to connect A - B, C - D and E - F.
Turn to right side and turn the large handle.
There are lights now.

State of crypt:
Fight: See a yellow
helmet on the floor behind Lara. It has Jaczek's name on it.
Check the cluttered papers.
Check the fingernail scratching by the entryway.
Lara deduced where and how the fight occurred.
Symbols on sarcophagi:
Check the sarcophagus by Lara. It has an hourglass
symbol; just like the ones on the structural engineers at Mission Street.
Examine the lid.
Check the next sarcophagus and see the mirror
symbol. Burke has it carved on his forehead. Examine the lid.
Lara doesn't want to go the dark area of the crypt
at bottom.
Yle: Exit and go back to Yle at
the monastery gate.
Give Yle the nails or hammer. Yle is done with
his repairs.
Take the mason hammer and the tape
from the table in front of the guard house door.
Light up the rest of the way:
Locked up: Go back to the crypt.
Continue down the walkway.
See a damaged cable. Use the tape from Yle on the
damaged cable.
Hear Schneider call Lara.
Lara talks to Schneider at the gate. He locked
Lara in thinking she's a spy from another company.
Light up the next passageways: Go
back to the fixed cable on the ground.
Look at the stain under it. Maybe it is blood.
Pick up another link cable above the stain. It might
have been thrown out so that there is no light here.
Power up the other lights: Go
back to the light control machine.
Pull down the large handle at side of machine to
turn the power off.
Use the cable from C-D to connect G-H.
Use the new cable picked up to connect I-J.
Unplug B and put it on D to connect A-D.
Turn the large handle at side of machine to turn
the power on.

Other sarcophagi and symbols: Go
down to the rest of the crypt pass the fixed damaged cable on the floor.
See a sarcophagus behind the wood beams. Look
close at the symbol. It is a burning cross on the corpse found in the
local lake. Examine the lid.
4th sarcophagus: Look close at
next sarcophagus.
Look close at symbol. It is a scale. Max told Lara
it is for avarice. Examine the lid.
This one has hardened mortar around the top part
of the base of the sarcophagi.
Open the sarcophagus with scale symbol:
Use the hammer on the hardened mortar to
remove all of them
You can hit the hardened mortar only 4 times
before the roof collapses. You get another chance.
Hammer the numbered mortar shown in the
picture in this sequence.

Push open the sarcophagus lid.
Locate Jaczek. He has the scale on his forehead.
The Angel of Death arrives. She is not here to
take Lara - Lara has a mission to perform.
The Angel of Death still would not say
what the role of Max is in the ritual. The Angel of Death is emphatic that
Bateman must be stopped - The ritual must NOT be performed.
Go back to the entrance to the crypt. Lara talks to Schneider. She knows that the dig
was looking for the Vita Mortis.
Lara calls Diego and asked him to research where
Bateman's wife died during their honeymoon.
Diego says that Beatrice was murdered at Bob's Motel in Tijuana
and buried at local cemetery.
Act 7: Faith or Reason
The show is about to end.
October 10 near Tijuana, Mexico
Motel: Lara drives into the
parking lot of Bob's Motel.
Check the car next to Lara. The engine is still
warm.
Check the different rooms: Go
upstairs and check the 2 doors and windows.
Take the screwdriver from table at far left.
Go down and check the 2 doors and windows at
bottom floor.
Room 23's shades are missing a slat at top.
Gas station: Go to gas station.
Diego: Get a cellphone call from
Diego. He wants Lara to sit down to hear news.
She said she's in Mexico and Diego told her to
wait for the backup he will send. Lara turns off the cellphone.
Table: Look close at table.
Check the guest book, ashtray, beer and chair. Take the matches.
Car: Go right to a wrecked VW.
Take the side mirror.
Check the damaged long hose on the gas pump at
right.
Truck: Check the truck right of
the gas pump. There's a man's body on the ground. He was
recently killed.
Check the welding parts on the truck's bed.
Sign: Look at the motel sign. It
is rusty construction and held only by a single cable.
Find Bateman:
Room 23: Go to room 23's door.
Use the side mirror on the top part of the shades
- blinds. Lara sees Bateman inside.
The mirror falls on the ground and breaks. Bateman
might have heard it. Take a shard.
Get to Bateman:
Sign: Go back to the sign and
click the cable again. Lara forms an idea of getting the sign to fall down
on Bateman's door.
Gas pump: Go to the gas
pump-stand with damaged long hose.
Use the screwdriver on the metal screw holding the
damage long hose and get long hose.
Table: Go to the table. Use
shard on the leatherette chair.
In inventory, look close at long hose. Use the
leatherette on the tear of the long hose. It is wrapped around the tear.
Welding setup: Go to the truck
at right. Look at the welding things on the bed.
Use screwdriver on the metal clamps holding the
short hose.
In inventory, look close at short hose. Take the
2
metal clamps.
Look close at long hose with wrapped leatherette.
Use the 2 metal clamps to hold the leatherette.
Use the fixed hose on the welding setup.
Use the screwdriver to tighten the metal clamps.
Turn on the valve of the oxygen and acetylene
tanks. Gauge shows full.
Take the welding torch and get welding torch icon
in inventory.
Sign: Go to the sign.
Use the welding torch icon on the cable. It is
placed on the rock left of the cable.
Use the match on the welding torch.
Confrontation:
The fallen sign opens the door to room 23. Lara
enters the room. Bateman shoots Lara. He says the wound is lethal.
Bateman discusses love and his reason.
Bateman has his wife's body here on the bed. The last step of
the ritual is to be done now. He has to perform the last sacrifice - stab
himself with the ritual knife. Then
the Angel of Death will have to obey him. Bring him and his wife back.
What happens afterwards depends on the decisions
chosen:
- If reason, Lara shoots Bateman.
- If faith, Max appears looks at Lara and discusses things with
the Angel of Death. Learn what happened to Max at the accident and
afterwards. See also how Bateman was stopped.
October 15 in Lyon, France:
Edouard Herriot Hospital:
- If the decision was reason: Amanda, Max'
psychiatrist is here to talk to Lara. She explains how Lara coped with Max'
disappearance and gave proof of those.
Have a visitor after Amanda leaves.
Visitor afterwards depends on resignation
decision: Renier if Lara did not resign or Diego if Lara resigned.
- If the decision was faith: Renier or Diego updates Lara.
Learn that Diego has hired people and Renier gave
funding for them to check on fishing villages, slums and hospitals for information about
Max; showing his picture. Lara gets promoted.
Lara gets another visitor...
Zenzele has the statues placed in storage. In the
safe, the Vita Mortis book and dagger are already kept. Jabali asks that
Zenzele use the book.
This document may not be
distributed without express written permission of the author and the content may
not be altered in any way.
For Questions or Comments
on this Walkthrough,
Please write to:
MaGtRo
Copyright © 5/2014
MaGtRo
 GameBoomers
Walkthroughs and Solutions
GameBoomers
Walkthroughs and Solutions