![[IMAGE]](MorphLS401.gif)
Morpheus Walkthrough - page 4
You've just hyperlinked to page 4
of
My Morpheus Walkthrough.
Is this where you wanted to be?
If so, then scroll down for the Final page of this Walkthrough. If it ISN'T where you'd
like to be, then click on one of the links below to zap yourself back to the another
page....
Morpheus Walkthrough
- page 1
Morpheus Walkthrough - page 2
Morpheus Walkthrough
- page 3
[Continued from Grace Thermon's world on page 3 of Morpheus Walkthrough]
Zoom in on each of the headstones and become familiar with each name. Note the ages on the
headstones. Back off the Cemetery, turn right and enter the doors at the base of the
monument.
CAVES:
There are 6 caves. Be sure to use “landmarks” so that you know which caves you
have entered and which have yet to be seen. See anything inside the caves? Something will
come your way! Explore each of the caves. When something grabs your attention, click on it
and you’ll be facing the cemetery again. The object of this puzzle is to place the
monkey in the correct headstone receptacle. If you place it incorrectly, it will return to
the apes in the caves and you’ll need to return, find it and try another headstone.
When you’ve placed the monkey on the correct headstone, put the fire icon on any of
the 3 crosses in the hut. One puzzle down, and two to go! Outside the hut, turn right and
head up the stairs by the water.
TOTEM POLES:
There are 8 totem poles and a different primitive instrument at each pole. By slowly
panning to the right you will hear the sound of each drum. Begin with the tall drum in
front of you. Slowly pan to the right, starting with your cursor on the left of this pole.
Click and hold down the mouse button as you begin panning. Pan all the way around without
letting go of your left mouse button. Pan several times around, gaining speed each time.
You will eventually get another fire icon for the hut. After placing the fire icon on a
cross, move left, click forward along the seashore, across the bridge and forward again to
the big bolder rocks.
Turn right this time and enter the MONKEY CAVE.
MONKEY CAVE:
Enter the cave. [see MONKEY CAVE picture below]
![[IMAGE]](MorphLS401.gif)
Move closer, please! There are 3 primitive baskets, and
a globe in the middle of the room. Enter the basket in the middle, pull the handle down,
go up and then pull down on the lever one time. Lower yourself back down and notice that
this basket controls light coming into the cave. Now enter the 2nd basket [closest to the
cave entrance], raise yourself up and pull the lever. Come down the basket and notice that
now the globe has flipped its lid! Exit the 2nd basket, enter the 3rd basket.
Go up, pull the lever, come down. Notice anything different? Sure, the reflection has
moved. You need to reflect the light from above so that it shines on the 2nd basket, or
the opening of the cave. Go back up the 3rd basket, pull the lever again, and see if that
worked.
When you have correctly set the reflection to the cave opening, enter the 2nd basket, and
pull yourself up. While up on top, turn to the right until you get a forward arrow. Follow
the bamboo walkway to the waterfall. Go through the waterfall. Bingo, puzzle solved!
XVII. NEUROGRAPHICON LAB:
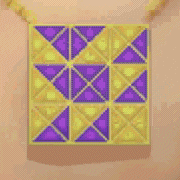
Turn right and click forward as if to leave. Anything unusual happen? Click on Claire and
then on the pendant/necklace. [see NECKLACE picture below]

Look like something you’ve seen before? Perhaps Jan
Phariss’s door code? Head to his room and duplicate the pendant design. Did it open?
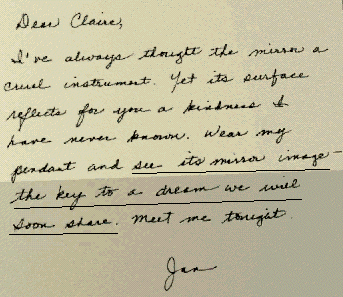
No? Well, let’s review the most valuable clue about Jan. We know that in the letter
to Claire from Jan in her diary, Jan writes...[see MIRROR IMAGE picture below]

Using the pendant, mirror its image and try that code on
Jan’s door. [see PENDANT REFLECTION picture below]
![[IMAGE]](MorphLS404.gif)
Try the reflection code on Jan’s door [Insert disc
3]. Move forward and click on the mirror. Watch and listen. Behind the mirror is another
Pendant design. Make note of this design. Perhaps Jan’s anger at his father, J.C.
Pharris, has caused him to leave us a clue to JC’s door! [see picture JAN’S
MIRROR picture below]
![[IMAGE]](MorphLS405.gif)
Try the code on Jonathan Cleveland Pharris’s door.
Move forward and enter the Neurographicon pod.
Turn all the way around and click on the ice pick. Chisel the ice from around Commander
Theodore Holmes. Read his journal. Click on the sealed letter.
Now turn all the way to the left and click on the marble table and read the
letter...........
Find anyone that looks familiar?
![[IMAGE]](MorphLS406.gif)
THE END!
![]()
This document may be freely distributed by any means as long as the context is not altered in any way and reference/links are provided to this site. Copyright 7/1998 - LINDA SHAW.
E-mail Address: LShaw3457@aol.com
ljshaw@flash.net
![]()
![]()
To go BACK to page 3, click
below.
Morpheus Walkthrough - page 3
To go BACK to page 2, click below.
Morpheus Walkthrough - page 2
To go BACK to the first page, click below.
Morpheus Walkthrough - page 1
![]() GAME BOOMERS hints, cheats, and walkthroughs
GAME BOOMERS hints, cheats, and walkthroughs
For comments on my Morpheus Walkthrough, please send all e-mail to: LShaw3457@aol.com