Welcome to Nancy Drew’s latest in the mystery series. This game will take you to the Wickford castle where a treasure is hidden in the Queen’s tower just waiting to be discovered. Join Nancy and a cast of strange-acting characters as you set out to solve the mystery of the Royal Tower.Minimum System Requirements:
Windows 95, 98, 2000, ME and XP
166 MHz Processor
16 MB RAM
150 MB available hard disk space
16 Bit color graphics video card that’s compatible with DirectX 7 or higher
8x CD-ROM drive
16 Bit compatible sound card
Mouse and speakers or headphones
Important note: When the letter gets put into inventory it’s not an important part of the game anymore. If you do not give the letter to Dexter, it’ll not deter you from completing the rest of the game.
![]()
"Yes, Thanks Mr. Egan..."The ski rental area is open during certain hours of the day. Here’s the schedule:
"What kind of incident?"
"Why would anyone..."
"Wow, a hole in the wall?!..."
"What else has gone wrong?"
"Sounds like you’re swamped..."
"Can you do something about my radiator?"
"Okay, see ya Mr. Egan."
Open 9-12pm; closed for lunch 12-2pm; 2-5pm.
If your watch doesn’t match any of these hours, find something else to pass the time. You can meet another character, Lisa Ostrum off in the Lounge to the left. You can do some exploring on your own, or you can set the alarm clock for 2pm and meet Jacques then. Right now, let’s have a chat with Lisa:
"Yeah, Dexter just told me…"After finishing the conversation, turn to the right and take a look at a couple of books from the bookshelf. These books will be very helpful later in the game.
"I guess you’ve really got your finger…"
"What do you know…"
"You said she’s a professor…"
"Do you have a theory…"
"I wonder why…"
"I’ll let you get back…"
After reading the books, turn left and head out the doorway behind Lisa. Turn right and follow the hallway down to an open room with knights on display. Turn right again and face the elevator. Press the call button; step into the elevator and head to the basement to meet Jacques. Have a chat with Jacques and receive Prof. Hotchkiss’ boots. (If you arrive here and the rental office is closed, pick up the paintbrush on the door-shelf. Check your watch and decide if strolling around the halls will kill enough time; if not, go to your room and reset the alarm clock.)
"Hi, I’m Nancy. I came to ski…"Head to the right and you’ll be facing a long row of lockers. Turn around and click on locker #310. Remember your locker com? If not, here it is 5-1-7.
"What about you, Jacques?"
"Work of art…"
"Yes, I did notice…"
"I’m dying to have a look…"
"Thanks for the tip…"
Click on the triangle each time you stop on a correct number. The locker doesn’t open! Oh No! Go back to Jacques and exhaust all conversation topics with him. Ask him about your locker combination. He will give you the correct locker number. The number is 311. Open up that locker and you’ll notice that it’s already occupied. Oops! Take a look inside the occupant’s bag:
-A letter to Lisa
in Spanish
(thought she wasn’t
fluent with languages?)
-Lisa’s two passports w/different IDs
-Four different ID cards for Lisa (hmmmmmmm)
Go back to the ski office again. This time, you’ll find that it’s been closed for the night. Get a close-up on the office door and take the paintbrush if you didn't do that before. Now, it’s time to visit the Library.
![]()
Open up the door and climb into the shaft. Take the ladder in front of you all the way to the second floor. When you get to the grate leading to the entrance of the second floor shaft, you’ll notice that it’s ready to fall off, like somebody’s already been through the shaft. Hop into the shaft and follow it until you come all the way to the grate that leads into the library. Open the grate and jump down into the library. Once you start moving towards the staircase you should hear somebody jangling his/her keys by the doors. Quick! Turn around and go back into the shaft and watch Dexter until he leaves. Once Dexter leaves it is now safe for you to explore the Library.
What should you do in the Library?
-Read the book True
stories Behind Famous Paintings
(To the right of
the stairs, on the table w/chess game)
-Go to the right again, until you see a table with a huge pile of dust and broken flower pots
-read the book "An atlas of the United States"; It will give you the solution to the globe puzzle(90*W)
-Also, use paintbrush on the dust and then dust off the alarm to find fingerprints for the security code (from darkest to lightest, they are 3, *, 7, 2)
-Head to the globe and solve the needle puzzle on top. Place the needle at 90° and lift up the top part of the globe. You’ll find the solution for the compass puzzle above the fireplace. (-15,10, -5)
-Go to the Fireplace. Click on the saying above the fireplace. You’ll find the compass puzzle.
In order to solve it; click on the green button once you reach each number. When you solve it you will hear a sound of a door sliding open above you.
-Go up the stairs and head over to the secret room on the left. Go in and grab the lighter off of the desk. Light the candle on the desk so that it’ll melt and you will find a key!
-Read the poem on the desk to the right of the candle. Turn around and read the Good and Bad books of Dexter on the other desk.
That’s all you can do in the Library for now. It’s now safe to exit the Library through the double-doors.
When you exit, use the elevator to go up to the second floor. Take a left, go straight, then right and head to Prof. Hotchkiss’ room, which is 214. Knock on the door and start a conversation with her:
"Actually…"
"It’s Nancy. And
I’m happy…"
(End of conversation)
When you’re done.
Place the Professor’s boots on the floor and back away from the door. Return
to Mr. Egan and pester him again to fix your radiator. He will tell you
that he received a call from the Professor, saying she received her boots.
Now he gives you another task. He wants you to fix the lights in the stairwell
that leads down to the basement. Go back to the basement and head over
to the circuit breaker.
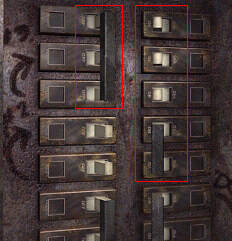 |
Here’s how to solve
this problem.
Pull the top-left triple switch to the left, and the top-right three single switches and the double switch, to the right. The picture shows
the switches
|
Go back to Mr. Egan again and once again ask him to fix your radiator. He will ignore you and ask you to get the Prof. Lunch order for him. Go back to the Professor’s room. Knock on her door and ask her what she would like for lunch. Once she gives you her order, go back down to Egan and tell him what she ordered. He will then tell you to have her order something off of the hotel menu. Go back again and get the order from the hotel menu in your inventory. Once again, after she orders, go back to Egan and he will give you the day off after you tell Jacques to defrost the big bag of chicken drumsticks. Go back to your room and you will find that your radiator has FINALLY been fixed! Take the oilcan that’s by the right of the radiator and set your alarm for 3AM.
It’s now time to find out where the source of that screeching noise is now coming from. Go down to the lobby and get behind the front desk. Take the key to the Library from the bottom-left drawer of the desk close-up. Go to the elevator door in front of the Library doors. Make sure that the elevator is on the first floor before you do anything else. Go to the Library and let yourself in. Quickly, turn around and disarm the alarm with the code you discovered earlier. (3, *, 7, 2) Go over to the vent at the top of the stairs. Climb in and crawl your way through to the elevator shaft. Climb down the ladder and turn around. You should see a handle that will open a grate leading into the ground. Try the handle. It’s stuck! Take the oil can and use it on the handle. Now try the handle. Ah-Ha! Now the grate will open!
Head down the stairs and solve the door puzzle! This is a random learn-the-sequence puzzle so you are going to have to solve this one on your own! Once you have solved this puzzle, follow the noise until you reach the dungeon. Surprise! You find Jacques hacking away at the jail door! Jacques sure seems surprised to see you, too! Have a little chat with him and he will give you his locker combination. (2-6-6-5) once he disappears, head towards the knight. Move the cursor until it is highlighted and then take the tip of the sword. Go back upstairs to the first floor. Or if you like, go back the way you came in. Take the elevator to the basement and go to the locker room. Head over to Jacques’ locker (near the sauna) and open it. Look at the letter from his fiancée, the letter from the immigration department and the magazine about diamonds (huh?). Try to take the medallion in the locker, you’ll get BONKED on the head instead.
After waking up in
your room, answer the phone. Once the conversation is over, check your
voice mail and find out that Dexter would like to talk with you. Call George
if you like; she and Bess will talk-a-plenty. Set your alarm for 12 p.m.
if it isn’t already 12 in Nancy’s time. Go down to the Lobby and have a
little chat with Dexter. Be HONEST about everything. He will end up telling
you how to get to the garden and that there’s a key to the jail cell in
the shed outside.
| Go back to the basement and SAVE HERE. When you go outside and you stay out there too long, you’ll freeze to death! Lucky thing there’s a second chance for Nancy! |
Go outside and head
towards the shed. Open the door and let yourself in. Once inside, heads
toward the ski-lift machine. It’s to the left a little bit. (The first
hot-spot is just to the right of the tire on the floor.) Then take another
left and you’ll be at a table full of old tools. Look to the right of the
table and take the key off its hook. This is the key to get you inside
the jail cell.
| Look to the left side of the table and see an important clue. Looks like controls for something, where the left lever is in the third position, the middle one is in the second position, and the right lever is in the fourth. | 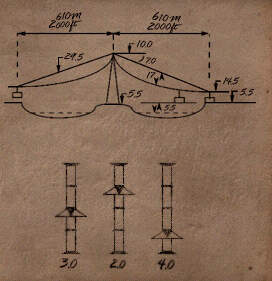 |
Quickly, go back inside and warm yourself up before you go back out again. When you’re ready to go out again, SAVE YOUR GAME! If you take too long you will freeze.
All right, time to
find the secret garden. Go outside and to the left past the NO TRESSPASSING
sign. You’ll come to a wall of overgrown weeds. (If you do not get an arrow
at the No Trespassing sign, go back inside and ask Dexter about the seecret
garden.) Move some of the weeds over to the side and open up the gate.
To unlock the gate, turn the circular section three times. Go into the
garden until you see a statue with an arrow on it. Move this arrow to the
west and then face the direction it’s pointing. You’ll find a handle in
the back of a statue’s head. Pull the lever down and out will appear a
box. Use the key from the secret room to open up this box. You will find
the RED MEDALLION hiding inside the box! Now, quickly retreat from the
garden and head back inside.
| Once inside, head to the lounge and talk to Lisa. Be careful of what you say to her. When she mentions the fact that she saw Dexter carrying a green ornament of some kind over by the shed, that means it’s time to go outside once again. Once again, go to the basement and SAVE YOUR GAME! |
Go outside, turn around and discover that you’ve been locked out! Oh No! Hurry over to the shed and let yourself in. Go over to the machine on the right and pick up the GREEN MEDALLION. Watch out for the rat! Now go over to the ski-lift machine and work the levers until you see the lift outside start to move. Click here for an easy answer to the levers. This is your version of SOS! Dexter will come to the rescue! When you’re inside, be honest about why you started the ski lift.
Now, time to go to the dungeon. You remember the way; go in the Library, silence the alarm, and go through the vent shaft, down the hatch in the floor, and solve the door locks again. Once you’re at the door to the cell, take the key from the shed and unlock it. Head into the cell and solve the chain puzzle. Follow the pattern on the opposite wall. The chains should end up looking like that pattern. Click here for an easy answer to the chains. When you’ve solved it, go straight through and head to the left. Solve the chess-like puzzle. The object of this puzzle is to get the different colored disks to their corresponding places. Once you solved it, you should hear the rumbling of stairs opening up above you. Climb the stairs into the very yellow room. Solve the gold leaf puzzle that’s to the right of the Marie Antoinette picture. When it’s solved a door will open up revealing Marie’s journal!

The finished gold-leaf puzzle.
![]()
Go see Professor Hotchkiss in her room (214.) She has come to trust you, but to seal her confidence, you need to answer a question for her. She will give you a question that you can answer by reading the books in the lounge. (You may have to do some deductive reasoning after reading.) Return to her room, tell her you have the information, and she will give you a slip of paper to place your answer on. Enter it, and she tells you she will be glad to talk further, between 3 and 6 a.m. in the lounge.
Now to go back to your room and set your alarm to 3AM. Go back to lounge and have a chat with the Professor. Exhaust all the conversations and give her the journal. She will tell you that she will wrestle you for it. Don’t do anything except giving her the journal. When she goes away to translate the journal, there’s nothing to do but sleep ‘til 3AM the next night.
Once you wake up,
go back to the lounge and talk to the Professor. She’ll tell you that the
journal has been translated and that Marie’s decoder is included with it.
Go up to the Professor’s room and read the journal and decoder. You MUST
look at the decoder. Find it left of the typewriter. Find the video-cam
on the dresser, and watch the film. It stops halfway through because the
battery runs down. Put the battery on the charger and go back to your own
room. Reset the clock to 3 a.m. Go back to 214, put the battery back in
the vid-cam and watch the professor discovering the peep-holes. Exit the
room turning right, and follow the halls to the art gallery. Look through
the peep-hole. Then use the red madallion on the peep-hole and look again.
Repeat the process with the green and blue medallions. Go ask Professor
Hotchkiss to translate the French quotations.
| Important: Go back to 214 and look at the decoder again. Nancy exclaims: "Purple Rose holds diamond key of Queen!" |
Go to the Tower. You should know the way by now. (Through the library, etc.) Move to a close-up of the design on the floor. Place the medallions in the following order:
| Red = Left | Green = Middle | Blue = Right |
Congratulations! Another case solved by Nancy Drew! Stay tuned for the next case coming out in November: Nancy Drew 5: The Final Scene!
![]()
![]() GameBoomers
Walkthroughs and Solutions
GameBoomers
Walkthroughs and Solutions
![]()
| Number the chains 1 to 5 from left to right.
Pull them in this order: 5, 5, 3, 2, 2, 1, 4, 4 |
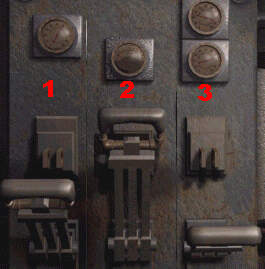 |
Number the levers 1 to 3 from left to right.
Pull them in this order: 3, 3, 2 |