Having dragged the terminal and the clock to the STM slot
Resonance walkthrough
This walkthrough is dedicated to Vince Twelve the designer of this great game.
©
June 2012 Bert Jamin (www.gamesover.com)
This walkthrough, written by Bert Jamin, may not be sold and may not be used for
any commercial purposes. Neither is it permitted to publish this walkthrough in
any way without the written permission of the author Bert Jamin.
Feel free to place this walkthrough on your web site or on your home page, on
condition that no part of this walkthrough is changed and that the name of the
author (Bert Jamin), the URL of the owner of this site (www.gamesover.com)
and his E-mail address (bert@gamesover.com)
are mentioned unchanged. For the most up to date walkthroughs always visit www.gamesover.com.
If you have any suggestions to improve this walkthrough, let me know by sending
me an email: bert@gamesover.com
Part 1: Your room
Look at the alarm clock at the floor next to the bed. Look at the computer at the right side of the room. Examine the hamper by the window. Search your pants to find your cell phone (5). Examine the cell phone by right clicking on it in your inventory to find out that it is dead for now (6). Remember that where is say 'Look at...' you have to left click and where I say 'Examine...' you have to right click!
Walk to the next room at the right side. Examine the masking tape on the floor (7). Look at the papers next to them on the floor (9). In your inventory read Ed's notes. Notice the microwave on the floor at the right back wall of the room. Take the key from it.
Use the key to open the desk's drawers. Search the drawer to find the phone battery. In your inventory put the battery into the cell phone (10). Use your cell phone and choose 'Use the phone's address book (12). Than choose 'Check the caller ID' (14). Then choose 'Call Dr. Morales'. When the doctor asks you if he woke you up say 'No', 'Yes' or 'Ignore the question'.
When the doctor asks you about the results of your notes click on Ed's notes in your inventory to move them to the conversation bar (19). This will end Part One of the game. Click on the 6:55 watch at the upper left part of your screen to enter the second part of the game.
Part 2: The metro
Pick up the coin that Anna dropped on the floor (21). Talk to Anna. Introduce yourself to her. Talk to her again and make a small talk. Talk to her once more and try to pick up a line. Hmmm... the lady surely isn't much interested in you to say the least. To change that give her the coin she dropped. After that exhaust all dialogs (24).
After she has gone and the metro stops for once and for all you can hassle with the homeless man if you like. But believe me... he took some booze too much to even notice you. Walk to the left and towards the doors of the subway. At the right side of the doors take the loose bar (26). Try to open the doors with your bare hands. Use the pipe from your inventory to open the doors of the subway (27). Step into the darkness to end Part Two of the game. Click on the half past 7 clock at the upper right part of your screen to enter the third part of the game.
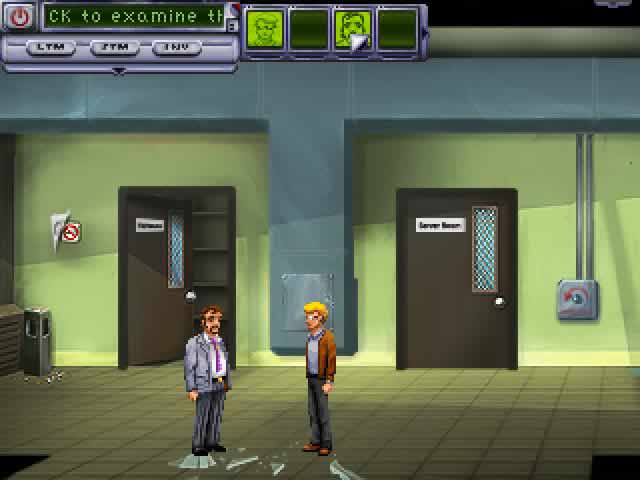
Part 3: The mainframe
In your inventory use Ray's smart phone. First check and read Ray's email. Then read his Memo's. Read about the Antevorta and remember that the receptionist leaves at 7:30 sharp and the name of a. batra that is mentioned. After that read your goals. Notice that you already accomplished two goals and read all about your remaining 5 goals! Believe me... some of them are easier said than done! Whenever you forget your remaining goals just use your phone again to read about them.
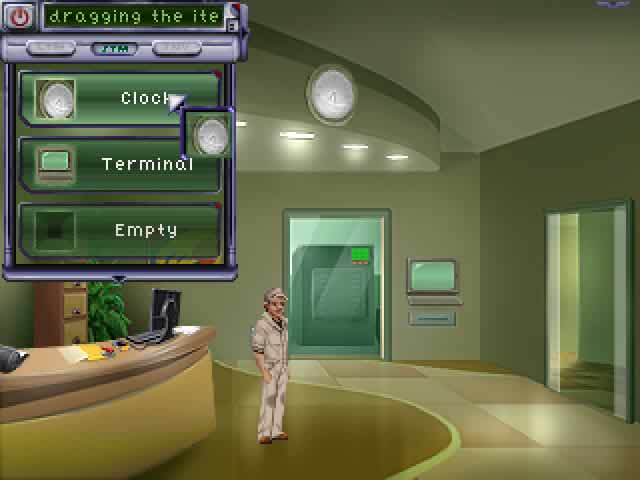
Close the phone. Click on the green terminal screen and drag it into the empty slot of your STM (short term memory) at the bottom of your inventory screen. Do the same with the clock that is hanging beneath the ceiling. Examine the clock to learn that it is already a couple of minutes after 7:30.
Having dragged the terminal and the clock to the STM slot
Talk to Emma, the secretary. When she asks you to state your business click on your STM and click on the slot with the green terminal screen so it appears in the dialog bar. Exhaust all dialogs. After that talk to her once more. Click on your STM again and this time click on the slot with the clock. When the lady has left search the trash can and take the empty pop can.
Use the computer on the desk. Notice the login name of Emma Walters is 'ewalters'. Insert the USB stick, alias the password cracker, into the USB port at the bottom left of the computer (30). Notice the very hard to remember password of Emma. Also remember her login 'ewalters' just in case. When the password is found and typed in, click on enter. Be sure to read the message 'WHAT'S MY USERNAME?' in Emma's Inbox and the message called 'Dear idiot' in the Drafts. After having read that message click on send to uhhh... actually send that message (31).
In my game my name is Dr. E. Ruiz. Emma has emailed that the login for Antevorta exists of the first three letters of his first name and the first three letters of his last name. Also notice that she emailed that she cannot give him his password because she doesn't know it! Remember that she emails that he can reset the password in case he has forgotten that. Also keep in mind that the username can be different from game too game!
Because my name is doctor E. Ruiz we now know that the second part of his login should be 'rui' without the quotes of course. Now we only have to find out what his full first name is. Just for fun you should read all the other emails of course! After that logout. In the login field type 'eruiz' without the quotes of course and put the password cracker into the USB slot of the computer once more. When the password is found and typed in, click on enter. Be sure to note down the correct password because this is different with each and every username! One thing is for sure... those passwords are really very hard to remember, such as 'password', 'saturday', 'abcdefg' and '12345678'.
Notice his first name on top of the screen, Edmundo. So the first part of the password should be 'edm'. So the complete login ID for Antevorta must be 'edmrui'. Of course you should read all of his emails! After that logout and exit the computer.
Of course if your name in the game is different, you should use the combination of the first three letters of that first name and the three first letters of that last name for Antevorta. So if your name for example is Dr. Alexei Jones, the correct combination for your username is 'alejon'. And if your name is Dr. Andrew MacCormac, the correct combination is 'andmac'. Another name I found is Dr. Stuart Forbes, the correct combination for that name is 'stufor' of course. And I found another one Ramon Valdez of which the correct combination is 'ramval'. And yep... I found another name of Dr. Eric Goldberg of which the correct combination for Antevorta is 'erigol'. And... the very last name I found was Darren Hill of which the correct combination for Antevorta is 'darhil'.
Walk towards the green terminal screen. Open the drawer beneath the screen to get some cotton swabs (32). Click on the green screen. Type the correct Antevorta username (edmrui, alejon, andmac, stufor, rvaldez, erigol, darhill or any other name that you have been given) and press enter. There where I say press enter this means that you have to press the Enter key on your keyboard! Great... now the terminal asks for your password. Since you don't have it, you have a severe problem...yes? Nope... Now remember that Emma emailed you something about resetting the password! Simply press enter to see the possible instructions.
Type /help and press enter. Hey... great... one of the possible instructions is to reset your password! Nothing goes above security...right!? Type /passreset and press enter. Type the correct Antevorta username (edmrui, alejon, andmac, stufor, ramval, erigol, darhil or any other name that you have been given) and press enter (35). You now will get the message that the new password is sent to the email address of this person. Exit the terminal. Walk towards the computer on the desk.
Use the computer. Type the correct username (eruiz, ajones, amaccormac, sforbes, rvaldez, egoldberg, dhill or any other name that you have been given) and the correct password and click on enter. Read the Antevorta Password Reset email in your Inbox. It says that the password is reset. I can't give you the reset password because it is different every time. So write down this one too!!!. Exit the computer and click on the green terminal screen. Type the correct Antevorta username (edmrui, alejon, andmac, stufor, ramval, erigol, darhil or any other name that you have been given) and press enter. Type the password you just obtained and press enter. Great... now it asks for a DNA sample!?!?!?
In your inventory use a cotton swab with the empty pop can. Put the can swab into the circular opening at the right side of the screen. Type /help and press enter to see the possible options. Type /search and press enter. Type 1 and press enter. Type a. batra and press enter. Note down the document number! Be sure to do so because you are going to need that file number later on! I can't give you the correct number because it changes in each and every time. Type /back and press enter. Type 3 and press enter. Put the can swab into the circular opening once more (37).
Logout and walk towards the file cabinet behind the desk. Examine each and every drawer to read the label on it. Open the correct drawer for the document number you just found and search for the correct document number. After you have found the correct file use the cotton swabs to get a DNA sample of yourself. Click on the green terminal screen once more. Type /search and press enter. Type 3 and press enter. Insert Ray's swab into the circular opening (40). Log out. This ends the third part of the game.
You'll end up as Anna as a little girl back in her bedroom. Quickly click on the door to lock it (48). Keep in mind that this will only slow down mister nice guy to enter your bedroom. So you have to be quick to avoid being killed by him!!!
Pick up senor bear. Click on the LTM (long time memory) (49). In your inventory right click on the bear to read it's tag (51). Remember that you hold the bear up side down. So the number on the tag is shown up side down too! So the actual number on the tag is 591! Click on 'Back'.
Examine the huge pink chest. Set the dials to 591 and click on 'Open the chest' (53). Click on the LTM and click on Uncle Javi's gift (54). In your inventory right click on the jar with coins. Hide under the bed and use the peso to pry open the vent. If you have done this correct and fast enough, the monster will enter the room and you will disappear though the vent. After that you will wake up by the sound of your alarm clock. If not, just restore your saved game and try again! This ends the third part of the game. Click on the half past 6 clock at the bottom right part of your screen to enter the fourth part of the game.
Part 4: Downtown
Examine your wallet in your inventory (56). Walk to the left a little. At the left side of the trash pick up a crumbling brick. Look at the left car mirror. Use the piece of brick to knock off the car mirror. Pick up the broken car mirror (58).
Look at the newspaper vendor. Although it is a totally rip-off use your credit card with the vendor to buy a newspaper (59). If you wish you can read it in your inventory. Enter the alley at the left side of the newspaper vendor. Examine the doors, the fence and the trash. Head back to the street. Walk further to the left. Don't enter the post office! In stead of that sit down on the bench at the bus stop.
In your inventory smash the car mirror with the piece of brick (60). Put the shard of mirror into the newspaper (62). Now read the newspaper... Gotcha! This ends the fourth part of the game. Don't be disappointed... the game isn't over by far yet! You will now be taken to the next part of the game... The Juno Lab...
Part 5: The Juno Lab
Talk to the janitor who is sitting on the grass. Don't interrupt him during the conversation. When the conversation is over walk towards the blocked entrance of the lab. Try to move the concrete slab that is blocking the entrance. Click on the concrete slab and drag it into the empty slot in your SMT.
Look at the broken window at the wall at the left side of the entrance. Click on it and drag it to an empty slot of your STM too. Head back to the janitor. Talk to him and click on the broken window slot in your STM (64).
Talk to detective Bennet. Tell him to follow you. Head back to the blocked entrance of the lab. Talk to detective Bennet. Click on the concrete slab slot in your STM. While he is pushing and pulling the stone slab help him by moving the stone slab together (67). Tell him to follow you again.
Walk towards the broken window. Talk to the detective and click on the broken window slot in your STM (68). Walk to the left and look at the art work on the wall. Look at the grey sketch on the other wall. Search the ash tray. Try to open the door of the maintenance closet. Click on the maintenance door and drag it to an empty slot in your STM.
Try to open the ventilation access. Try to open the door to the server room. Click on that door too and drag it to an empty slot in your STM. Look at the valve next to the server room. Click on the valve and drag it to an empty slot in your STM. Go back outside. Head back to the janitor. Talk to him. Click on the maintenance slot in your STM to get the key for it (70). Click on the server room slot in your STM to find out that he has no access to that room. Click on the valve slot in your STM to learn that he uses his wrench for that and keeps it in the maintenance closet. Leave the conversation. Head back to the broken window.
Talk to detective Bennet and click on the broken window slot of your STM. Use Saul's key to open the maintenance closet (72). Get the duct tape and the screw driver from the shelves. No matter how hard you search you will not find any wrench! Take the step ladder (73).
Head back to the janitor once more. Talk to him. Tell him that the wrench is not in that closet. He will keep on telling you that he always keeps it there with no exceptions. Great... now what!?!? Well... this time click on your LTM (long time memory) and click on Saul's story. Oeps... he forgot... he kept the wrench in his pocket (76). Leave the conversation.
Give back Saul's keys. You won't need them anymore and ohhh yeah... you will get 3 points in return (79)! Leave the conversation and walk back to the broken window. Talk to detective Bennet and tell him to follow you. Go through the broken window to end up inside the lab once more and this time accompanied by detective Bennet.
Hand over the monkey wrench to detective Bennet. Use your screwdriver with the ventilation access. Enter the ventilation access. Crawl all the way to the right until you are facing the water leak. While you are still up inside the ventilation shaft switch over to detective Bennet by clicking on his portrait at the right side of your game console. From now on I will just call this switch over to.
Switching over to a person by clicking on one of the
portraits...
Acting as detective Bennet walk towards the valve. Use the monkey wrench on the valve. Turn it to the right (81). Switch over to yourself. Take the rusty pipe in front of you. From your inventory drag the pipe to the missing pipe (82). From your inventory drag the duct tape to the replacement pipe (83). Switch over to detective Bennet. Use the monkey wrench with the valve once more. This time turn it to the left (86). Switch back over to yourself.
Use your screwdriver with the fuse box. Use the fuse box to get things right and unlock the entrance doors to the lab. Don't go outside! We are going to use a alternative way to enter the lab by opening the locked heavy door!! Look at the panel on the wall at the right side of the fuse box. Remove the panel cover. Use your screwdriver on one of the screws to remove the destroyed keypad.
Press the red power switch at the top of the panel. Remove the burned black wire. Move your cursor over the panel to learn that the upper pin is called the primary pin and the bottom pin the terminal pin. The nine pins between are just called uhhh... pins. It's obvious that the panel has been damaged by the leaking water. Your goal is to shortcut the pins with the loose wires at the bottom of the panel. By connecting the pins in a certain combination you will get the correct amount of power to open the locked heavy door to the lab. This one kept me off the street for many many hours! Why? Because I could not find any clue whatsoever that gave any hint for the correct connection of the pins. Any idea how much combinations are possible with nine pins? Well... sheer endless!!! So... how did I find the correct combination? Well... simply by trial and error for hours and hours and...!!!
Here is the correct combination. Number the upper row of pins 1, 2 and 3. Number the second row 4, 5 and 6. Number the bottom row 7, 8 and 9. Click on the loose wires at the bottom of the panel. Left click once at the primary pin to connect the loose wire to it. Move your cursor, while still holding the wire!!!, along the bottom side of pin 4, along the upper side of pin 5, along the left side of pin 7 and down to the terminal pin. Left click on the terminal pin to connect the wire to it. Click on the red power switch. That's it! (96). It must look like this:
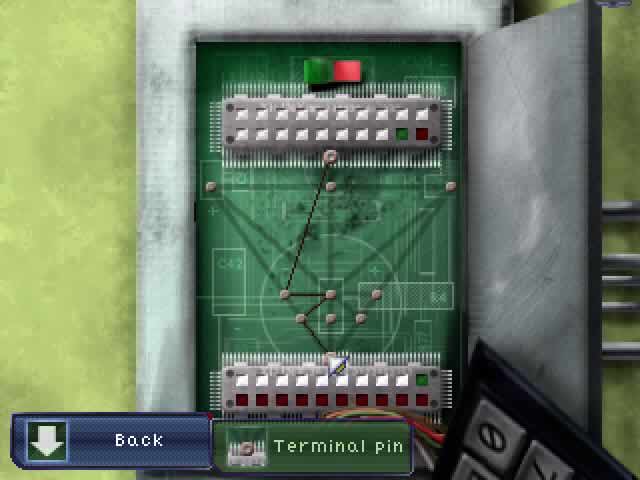
The loose wire connected to the correct pins to open
the heavy door
Enter the opened heavy door to the right. Enter Morals' lab. After the conversation with Dr. Morales in the simulator is over walk to the center of the room. Click on the grey metal beam on the floor and drag it to one of the slots in your STM. Talk to detective Bennet and click on the metal beam slot in your STM. Quickly take the brown book from underneath the lifted beam (99).
Examine Morales' journal in your inventory. Remember the picture of an angel wearing a diaper and the year 1982 beneath it on the journal's cover. Take the loose paper out of the journal (100). Click on Back and examine the loose paper in your inventory. Notice the PI sign pointing to the security keypad. Click on Back once more.
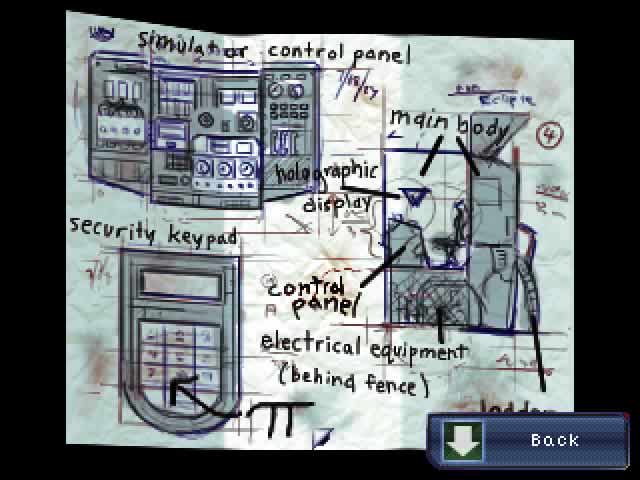
The PI sign pointing to the security keypad
Walk to the left side of the room. Look at the terminal next to the door. Press 'Touch to Start'. Press on 'Utilities'. Press the down arrow once. Press on 'Calculator'. Press on the PI sign and notice the number on the display of the calculator which is starting with 3.141 (101).
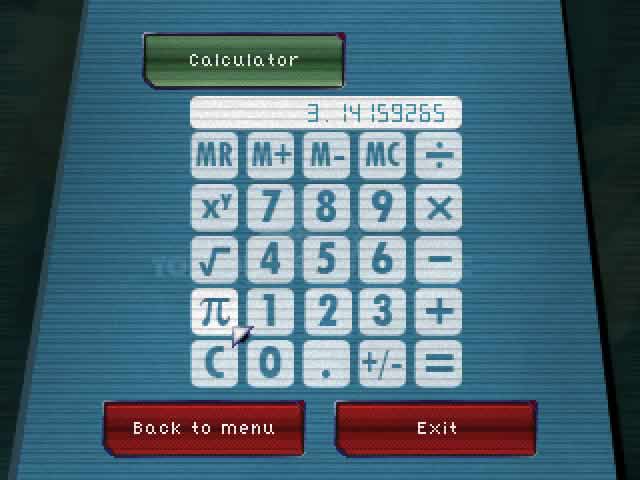
Press the PI sign and look at the number on the
display
Look at the keypad on the simulator at the right side of the lab. Notice that the buttons 1, 3 and 4 are the only used buttons. Now remember the number you saw just on the terminal's calculator. So push the buttons 3, 1, 4 and 1... (105).
In the hospital exhaust all dialogs with Anna. When looking at Morales' journal examine Anna's hospital ID badge in your inventory. Note Anna's D.O.B. (day of birth) April 22, 1982. Now remember the picture of an angel wearing a diaper and the year 1982 beneath it on the journal's cover. Of course Anna's day of birth must be the correct code for the lock of Morales' journal. So enter the code 422 and click on the clip of the lock to open the journal (108). When detective arrives at the scene tell him that someone was after him. You will end up as Anna while she is dreaming and crawling in some sort of maze. Save your game here.
Your goal is to find a manhole to drop down to a lower level three times. I cannot give you the correct solution to solve the maze. Why? Because it differs every time and besides that the screen turns around over and over again randomly. But believe me it is not very hard to solve, it is fun and you will have solved this in just minutes! On your way you will pass a blue light on each and every level. When you click on it you will get a new message in your LTM. Be sure to watch them after having found them! The LTM on the first level of the maze is called 'Hansel and Gretel' (110). Keep on crawling until you drop down the opened manhole (113). The LTM on the second level is called 'Where's mama?' (116). Keep on crawling until you drop down the opened manhole (120). And the LTM for the last level is called 'Papa' (124). Keep on crawling until you drop down the last opened manhole (134).
After that you wake up and you find yourself sitting behind your computer in your room. After a few seconds you will here a loud pounding on the door telling you that you are chased by mister nice guy again. Quickly save your game here! Believe me that you gonna have to restore your game more than once when you are doing your things high up on the roof a little later in the game!
Click on the bookshelf. Push the shelf to the right to block the door (136). Open the window and step outside. Climb down the ladder at the left side. Look at the green circular mechanism at the right side. Click on the center of it to get the handle (138). Climb back up the ladder. Climb up the ladder at the right side. Look at the green circular mechanism at the left side. Attach the mechanism handle to it (140).
Keep on turning the handle to the left until the ladder is firmly in place (143). Climb up that ladder too. Take a piece of glass from the broken window of the roof access door (145). Quickly use the broken window on the rope to cut it before mister nice guy gets you... To cut the rope 'just' move the broken window up and down on the rope. I guess you now know what I meant with my statement that you have to restore your game more than once :o)... When you cut the rope quickly enough the good news is that you deal with mister nice guy for once and for all. And not just that... you will also get three more points (148). By the way if you don't like this puzzle you can press 'Skip' at the bottom left of your screen...
You will end up with the three of you on the baseball fields. When you get the choice whether you will trust detective Bennet or not choose the option 'Trust Bennet' or 'We don't have a choice'. In the next options screen choose 'Ask about Morales' research (149). Next choose 'Ask about the circumstances Morales' death'. After that 'Ask about the vault' and finally "Ask about the Resonance weapon' (150). At that moment the guy in red (Ray) enters the party. As soon as you get the option click on the LTM slot Ed & Anna at hospital (152). After the conversation is over the four of you will reunion on the baseball fields again (160).
Switch over to Anna. In your inventory open Morales' journal. Your goal is to decode the ciphers in the journal. This looks very hard but it isn't. Each and every time you decode a character all the corresponding characters are decoded ass well. Of course the journal starts with DEAR ANNA. To decode that intro click on the upper left character and type D on your keyboard. Then click on the second character and type E on your keyboard. Then click on the third character and type A on your keyboard. The last example is the fourth character and type R on your keyboard. Because all corresponding characters are decoded it is rather easy to complete the words.
The final decoded character on page 1...
Great you might think... another 37 pages to go!?!?! Well... no! Just 4 of them and just a few words. Go to page two and finish it like this:
...the decoded page 2...
Then go to page four and finish it like this:
...the decoded page 4...
Finally go to page eight and finish it like this:
...the decoded page 8
That's it. Of course you should read the whole journal. After that click on the Back button to close the journal for once and for all (170).
Switch over to Ray. First of all use your smart phone and read all of your messages and about your new goals. You can find those new goals at your phone entry Memo - Goals 2. Of course you have to remember these new goals in order to accomplish your tasks. Whenever you forget your remaining goals just use your phone again to read all about them. There is also another way to keep track of your achievements. It works the same as saving and loading games. At the left side of the game console click on the red button. Click on achievements. The red labeled locked buttons are your remaining achievements. You can click on them to see what those achievements are. The white labeled buttons are the achievement that you already have accomplished. I guess I don't have to explain what the Next, Previous and Done buttons are for. Now let's rumble!
Walk to the right to exit the baseball fields. Go to the National Credit Systems. Open the red curtain. Talk to Ozzy and exhaust all dialogs. Before telling him 'See you later' click on the Get financial info slot of your LTM (171). Pick up the empty bottle Ozzy dropped on the floor. Examine it in your inventory to find out it is a prescription bottle for a drug called "Comfocil". Walk to the right and go back to the baseball fields.
Give the cotton swabs to Anna. Switch over to Anna. Walk to the right and go to the hospital. Enter the hospital entrance. Go to the second floor. Walk to the left until you are facing the patient doors. Read the patient folders next to the doors until you see the patient that is treated with Comfocil 100 mg. Note down the correct patient number of that patient. With me it was patient number 8468E all over again in each and every game. So I guess it's sound and safe to say that this will be the correct patient number all the time. If you find another number of course note down and use that number later in the game!
Use the orange AutoPharm vending machine at the right side of the patient doors. Use your hospital ID badge at the bottom right card reader. Enter the correct patient ID, which was 8468E with me all the time. Don't press 'Confirm' yet! In stead of that press 'Options'. Press on 'Fill with Placebo (174). Not only will this keep Anna's professional integrity intact, but it will also give you 1 point extra later in the game. And last but not least the placebo will be a lot cheaper than the original pills :o)
Walk to the right and enter the elevator. Use your hospital ID badge with the card reader to unlock the ninth floor button (175). Go to the ninth floor of course (177). Grab the death certificate from the only empty table. Examine Morels' body (180). Use your cotton swabs on Morales' body. From the right most table take the ultra-sonograph. Walk to the left and go to the first floor. Switch over to Ray.
Walk to the right and go to the hospital. Switch over to Anna. Give Morales' swab to Ray. Switch over to Ray. Enter the hospital entrance. Go to the seventh floor. Click on the green monitor and drag it to an empty STM slot. Talk to Emma and ask her 'Don't you work the morning shift?' (182). Then click on the terminal slot of your STM. End the conversation and use the green terminal once more.
Type /search and press enter. Type 3 and press enter. Insert Morales' swab into the opened circular opening at the right side of the screen. Press the Back button. Exit the room and go to the first floor. Talk to Anna and tell her to follow you. Go to the National Credit Systems. Click on Morales' FTTN in your inventory and drag it onto the red curtain (184). Chang person to Anna. Click on the prescription meds and drag it onto the curtain also (187). At least you gave him the placebo (188)!
Examine Morales' credit in your inventory to find out that a large payment has gone to Tortoise Security. The question of course is what was it for? Click on Back. Tell Ray to follow you. Go to the right and go to Tortoise Security. Ring the bell on the counter. Exhaust all dialogs with Tortoise. Before finishing the conversation click on Morales' credit in your inventory (191). Then ask about Morales' vault. Say thanks.
Switch over to detective Bennet. Go to the right and go to the Police administration. Just for fun talk to officer Barry. Exhaust all dialogs. Go up the stairs and all the way to the left. Talk to officer Johnsen. When he tells you to do so walk towards the black screen, the City Archive, and press your finger on the fingerprint reader. Hmmm... no go on the blue print (192). Talk to Johnsen once more. Click on the 'Get will and death cert.' slot in your LTM. Press your finger on the black screen again to get it (194). Click on the black screen and drag it into an empty STM slot.
Exit the police administration and go to Tortoise Security. Give Morales' will to Anna. Switch over to Anna. Ring the bell on the counter. Give the death certificate to Tortoise. Then give him Morales' will (199). In your inventory examine the security cam picture that Tortoise gave you. Hey... if that isn't the guy you saw earlier in the alley downtown!? Switch over to detective Bennet. Talk to Tortoise and click on the city archive slot in your STM. Switch over to Anna. Talk to Tortoise and ask him 'How can I crack the city archives?' Then click on the security cam picture in your inventory to blackmail Tortoise (204).
Show the security cam picture to detective Bennet. When he tells you that he feels that he has seen him somewhere before click on the alleyway door slot of your LTM (200). In the alley click on the alleyway door slot in your LTM. Notice the pattern of the knocking the guy does. He's knocking twice, then once and finally three times. Knock on the center door. Press knock twice, press knock once, press knock three times and press stop knocking (202). Back at the baseball fields look at the paper swan in your inventory to unfold it. Examine the vault plans in your inventory. Remember the issue with the battery written on it!
Switch over to Anna. Walk to the right and go to Tortoise Security. Look at the huge ornate safe at the right side of the room. Use the ultra-sonograph with the safe (205). Let's start with the easiest one, the blue side.
Blue side
Drag the right part of the sonograph to the right so you can see the inside of
the box. Move the brown button down, to the right and up into the blue bracket.
Move it all the way up. Move it all the way to the left into the big bracket.
Move it all the way down. Got it! Now there are three left to solve. First we
will solve the easiest one again, the green side.
Green side
Drag the right part of the sonograph to the right so you can see the inside of
the box. Move the brown button to the right into the small bracket and up. Move
the brown button to the left one part and down one part so it is at the center.
Move the brown button to the right and down. Move it to the left into the blue
bracket. Move it all the way up. Move it to the left. Move the brown button to
the right one part, down one part and to the left one part into the blue
bracket. Move it all the way to the right. Move the brown button up one part, to
the left one part and up one part. Move it to the right into the blue bracket.
Move it all the way down into the other bracket. Move it all the way to the
left. Move the small bracket up one part. Got it! Now there are two left to
solve. First we will solve the easiest one again, the yellow side.
Yellow side
Drag the right part of the sonograph to the right so you can see the inside of
the box. Move the brown button inside the blue bracket to the left. Move the
brown button up and all the way to the right into the blue bracket. Move the
brown button inside the blue bracket all the way down. Move the brown button to
the left one part and all the way up. Move the brown button to the left and down
into the other blue bracket. Move the brown button inside the blue bracket to
the center. Move the brown button up, to the left and all the way down
into the small bracket. Move the brown button inside the small bracket all
the way to the right into the other blue bracket. Move it all the way up. Move
the brown button inside the little blue bracket all the way to the left and one
part down. Got it! Now there is just one to go, the red side.
Red side
Drag the right part of the sonograph to the right so you can see the inside of
the box for the very last time. Move the brown button down inside the blue
bracket and to the right. Move the brown button all the way up inside the other
blue bracket. Move the brown button down one part and all the way to the left
into the small blue bracket. Move the brown button inside the blue bracket down.
Move the brown button to the right one part and all the way up inside the big
blue bracket. Move the brown button inside the blue bracket to the left. Move
the brown button down one part, to the right one part, down one part and to the
left one part into the small blue bracket. Move the brown button inside the
small blue bracket one part up. Move the brown button all the way to the right,
down into the big blue bracket and one part to the left. Move the brown button
up one part and to the left inside the small blue bracket. Move the brown button
inside the small blue bracket up, to the right one part and all the way down
into the other blue bracket. Move it to the right and all the way up. Got it
(210)! Don't forget to save your game here so that you won't have to do this
puzzle again...
Exit Tortoise Security and head back to the baseball fields. Talk to detective Bennet and tell him to follow you. Walk to the right and go to the Police Administration. Switch over to detective Bennet. Go up the stairs and bring Anna. Walk to the left. Click on the door of the copy room and drag in into an empty slot of your SMT. Talk to office Johnsen and click on the copy room slot of your STM. Switch over to Anna. Wait until the officer downstairs is looking the other way and then quickly walk all the way to the left. When you get caught just try again! Walk towards the black screen, the city archive, click on it and drag it into an empty slot of your STM. Walk back to the right and into the interrogation room. If you get caught while walking back... never mind!
Switch over to detective Bennet and click on interrupt. Walk to the right and down the stairs. Switch over to Anna. Exit the Police Administration and go to Tortoise Security once more. Ring the bell on the counter. Click on the city archive slot of your STM (219). Say Thanks. Talk to Ray. Tell him to follow you. Exit Tortoise Security and go to the Police Administration. Give the red master keycard to Ray. Switch over to detective Bennet. Go upstairs and bring Ray. Go to the left and talk to officer Johnsen. Click on the copy room slot in your STM.
Switch over to Anna. Click on the control panel on the left wall that officer Berry is operating and drag it into an empty slot of your SMT. Talk to office Berry. Click on the control panel slot of your STM (221). Switch over to Ray and then quickly go all the way to the left. Use the computer on the desk. Open the bottom left cover of the USB slot. Put your password cracker into the USB slot (222). When the password 'samantha' is entered press enter. Press Recent Documents. Notice that there are two recent documents, the juno lab blueprints with file number W12 and Morales' will with file number T09. Of course these are the two documents you have requested earlier with officer Johnsen but you didn't get the juno lab blueprints. The only problem is that these document number are different all the time so I can't give you the correct solution. But I can give you three examples of the numbers I found. So note down the two file numbers you have found!!! After that logout.
Here are my three examples.
In my first game the blueprint document has number H15. And Morales' will I13. So the blueprint has one letter less and two numbers more than the will. The correct calibrated robot arm points to M20. Your goal is of course to misalign the robot arm so that it gives you the juno lab blueprint when you ask for the will. In this case you have to misalign the robot arm in that way that it has to point one letter less and two numbers more, thus L22.
In my second game the blueprint document has number H09. And Morales' will I11. So the blueprint has one letter less and two numbers less than the will. The correct calibrated robot arm points to M20. Your goal is of course to misalign the robot arm so that it gives you the juno lab blueprint when you ask for the will. In this case you have to misalign the robot arm in that way that it has to point one letter less and two numbers more, thus L18.
In my final game the blueprint document has number W12. And Morales' will T09. So the blueprint has three letters more and three numbers more than the will. The correct calibrated robot arm points to M20. Your goal is of course to misalign the robot arm so that it gives you the juno lab blueprint when you ask for the will. In this case you have to misalign the robot arm in that way that it has to point one letter less and two numbers more, thus P23.
With these examples you should be able to figure out the correct misalignment of the robot arm with your document numbers. Walk towards the black screen, the city archive. Use the red master keycard with the screen. Click on Retrieval Arm Manual Alignment. To calibrate it to the correct state do as is written on top of the screen. Move it to M20 and click on the little green save button on the bottom left. Now use the red master keycard once more with the black screen. Again choose for Retrieval Arm Manual Alignment. Now move the arm to the correct misaligned point. In the three examples I gave you above that would be L22, L18 or P23. The chances are high that your misalignment number is different. No need to say that you have to use that one! Press on the little green save button.
Simply switch over to detective Bennet and click on interrupt. After Ray has been sent away talk to officer Johnsen. Simply act dumb and click on the Get will and death cert. slot in your LTM. If you have done the misalignment of the robot arm correctly... bingo! Those are the lab blueprints alright (226)!
Talk to officer Johnsen once more. Click on the Copy room slot in your STM once more. Switch over to Ray. When the officer downstairs is distracted quickly walk all the way to the left again. We don't want to keep the robot arm misaligned for ever don't we!? So use the red master keycard on the black screen once more. Move the robot arm to the calibration point M20 and press on the green save button.
Simply switch over to detective Bennet and click on Interrupt. When Ray has been sent to the interrogation room talk to officer Johnsen and click on the Get will and death cert. slot in your LTM. When Johnsen tells you to do so click on the black screen, scan your finger and take the copy of Morales' will. Go down the stairs. Talk to Ray and tell him to follow you. Talk to Anna and tell her to follow you too. Exit the Police Administration and head back to the baseball fields.
Switch over to Anna. Talk to Ed and click on the Angelo's grave slot in your LTM. Choose Let's go (229). Switch over to detective Bennet. Give the vault plans to Ed. Switch over to Ed. Walk to the right and go to Juno Laboratory. Enter the entrance of the lab. Enter Morales' lab. Use the terminal next to the door.
Press 'Touch to Start'. Press 'Utilities'. Press 'Thermal Scan'. Lower the left slider to the corresponding temperature as mentioned on the vault plans to 185 degrees. Press 'SCAN FOR ANOMALIES'. Lower the right slider one level to 2 and click on 'SCAN FOR ANOMALIES' again. Keep on doing this by lowering the right slider one level each time until you find the correct spot. With me that was B8 all the time. So I guess that will be the case in every game.
After that discovery you will be taken back to your friends on the baseball fields to inform them. And off you go to the magnetic tunnel. Your goal is to end up in a room at the end of the tunnel. And not just you but the four of you! The 'minor' problems are that only Ray and Anna can walk under steel crates while they are being lifted by huge magnets. The person that keeps a steel crate up isn't able to move while holding the switch of the magnet. And last but not least switches to control walkways and fuse boxes won't operate if there is a steel crate in the way. So... no need to say that you can't just simply walk to the other end of the tunnel. But of course there is a way! Save your game just in case something goes wrong!
Switch over to Ed. Walk to the right. Open the fuse box next to the ladder. Turn the fuse box on. Climb up the ladder. Walk to the right and use the switch to lift the magnet (230).
Switch over to Ray. Walk to the right. Walk past the ladder. Walk past the fuse box. Walk past the lifted steel crate. Go up the next ladder. Walk to the right and use the switch for the second magnet. Notice that not only the steel crate gets lifted by this magnet but also a steel walkway (231).
Switch over to Anna. Keep on walking to the right until you reach the area at the end of the tunnel with the closed door to the room next to another fuse box. Open the fuse box. Use the fuse box to activate another switch that controls the walkways.
Switch over to Ray. Release the switch so the steel crate and the walkway will drop down to the floor, making big cracks in the floor. You will find out in a moment why this is so important. Use the switch to lift the crate and the walkway back up.
Switch over to Anna. Walk to the left. Be sure to let her stand in between the cracks on the floor Ray just made!
The perfect place for Anna to wait for the things
that are coming...
Switch over to Ray. Release the switch.
Switch over to Anna. Go up the dropped walkway all the way. Walk to the right a little. Don't touch the green lit switch yet!!!
Switch over to Ray. Use the switch to lift the steel crate and the walkway back up again.
Switch over to Ed. Release the switch.
Switch over to Anna. Use the green lit switch. Walk to the right a little so you are standing just in front of the gap in the floor (232).
Switch over to Ray. Release the switch.
Switch over to Anna. Hmmm... it sure was a good idea to make those few steps to the right!
Switch over to Ed. Walk to the right. Go down the ladder and all the way to the right until you reach the area at the end of the tunnel with the closed door.
Switch over to detective Bennet. Walk to the right. Climb up the first ladder. Walk further to the right. Climb down the second ladder. Walk all the way to the right until you end up at the area at the end of the tunnel with Ed.
Switch over to Ray. Use the switch to lift the crate and the walkway.
Switch over to Ed. Use the fuse box.
Switch over to Ray. Release the switch.
Switch over to Anna. Walk to the left. Go down the dropped walkway until you are standing safe and sound on the floor between the steel crate and the dropped walkway.
Switch over to Ray. Use the switch.
Switch over to Ed. Use the fuse box.
Switch over to Anna. Walk all the way to the right until you end up with Ed and detective Bennet.
Switch over to Ray. Release the switch. Walk to the left. Go down the ladder. Walk all the way to the right to join Ed, detective Bennet and Anna. I think it is a good idea to save your game now you have made it! After that open the closed door (235).
After you have dealt with detective Bennet search him (238). Look at the console beneath the huge window. From the left to the right you will see a small control panel, a pad of paper and a fuse panel. Use the fuse panel. Take the pencil and the small box. In your inventory open the small box to find a fuse. Click on Back.
Use the pad of paper. In your inventory click on the pencil and drag it onto the piece of paper (239). Use your hand with the pencil and move it over the piece of paper until you can clearly see an eight- digit code. Note down that number. With me it was 31322133 with each and every game. So I guess that will be the case with your game too. If the code in your game is different of course you have to use that one. Click on Back.
Switch over to Ray. Give the pipe in your inventory to Ed. Switch over to Ed. Use the door control at the left side of the room (240). Look at the bars. Notice the fuse on the floor in the blocked room. In your inventory use the duct tape with the pipe (241). Use the tape with pipe with the fuse on the floor (242).
Look at the fuse panel at the right side of the console once more. In your inventory examine the upper fuse. Notice that one of the pins is bent. Click on it to straighten it (243). Pull the bottom fuse from the fuse slot. In your inventory examine the upper fuse to find out it is number 1. Put it into the upper fuse slot. Examine the next upper fuse in your inventory to see that it has number 3. Put that fuse into the bottom fuse slot. In your inventory examine the last fuse to see that is has number 2. Put that fuse into the middle fuse slot (244). So from top to bottom the numbered fuses are 1, 2 and 3. Click on Back.
Use the small code panel at the left side of the console. Don't touch anything yet. Now remember the eight-digit code you found earlier on the piece of paper 31322133. Notice the 3 fuse shapes at the right side of the panel. Also notice that the upper fuse shape is connected to the small code panel at the left side. The middle fuse is connected to the small code panel at the right side. The bottom fuse is connected to the center code panel. Number the left panel 1, the center panel 3 and the right panel 2. Now click the small code panel in this order: 31322133. If the code in your game is different you should use that one of course (246).
Acting as Anna use the vault computer (251). Press 'Touch to Start'. As a little girl in your memory climb up the stairs all the way. In your inventory click on your piece of paper and drag it to the stone of your father's grave. Move the pencil over the paper to reveal the key phrase TEPROMETO. Click on back and type that word. Back at the vault computer press OK (254). When Ed has left the room press Play. Choose Open the vault (257).
Exhaust all dialogs with detective Bennet. When he asks you to explain what note click on the Bennet's letter slot in your LTM (262). Then click on the Morales' note slot in your LTM. Click on the subway map in your inventory. Then click on the Ed & Anna at hospital slot in your LTM. When Ed has shot Anna quickly use the fuse panel on the console to seal the vault room with Ed inside (265).
Back on the baseball fields with Ray exhaust all dialogs with Reggie. Click on the Anna's murder slot in your LTM. Click on the Alley way door slot in your LTM (268). Show Reggie the security cam picture (270). In your inventory open the paper swan you received from Reggie. Examine the haiky in your inventory. Remember the first sentence on it 'once four, now two stand'. Enter the alley with the three doors. Click on the center door. Choose Knock once, Knock four times, Knock twice and Stop knocking (272).
Inside the room ask the man 'Who are you?, Why are we here? Was Ed working with you? What is Ed planning? Reno sees everything? Let Ray talk' Acting as Ray ask the man 'Amul Batra?' Then show him the Antevorta file in your inventory (275). Let Bennet ask questions. Choose 'Arrest them' and show him the security cam picture in your inventory (278). Then ask 'Why did you steel the Resonance files? Why did she gave me that vault file yesterday? How do we stop Ed?' Switch over to Ray.
In your inventory use the drafting compass with the subway map. Click on the top of the map. Set the compass to the 4 km scale as Amul suggested. Click with the compass a little right from the Juno Lab until you get the message that you found out where the blast was coming from. Well... that will hardly be a big surprise... it was coming from Ed's apartment (281)!
Exit the alley. Exit to the left and go to Ed's apartment. Search his drawers. Simply take all. Examine the resonance device on top of the tripod (284). Switch over to detective Bennet. Examine resonance device B in your inventory. Look at the resonance device B in your inventory. Click on Check text messages (287). Click on Cancel. Switch over to Ray. In your inventory use Ray's smart phone. Click on the phone icon. Click on the Reggie's number slot in your LTM. Click on the 14A number slot in your LTM (288). Click on Goodbye. Use the apartment door to exit the apartment. Go to the Police Administration (289).
Switch over to detective Bennet. Go up the stairs and to the left. Use your credit card to open the door of the Tech Room (290). Enter the opened room. Notice the red blinking electronic lock of the wire door. Examine it to find out a four-digit number. Note down that number because it is randomly different all the time! Exit the Tech Room and go to the right. Go down the stairs. Use the controls at the left side of the room behind the desk. Press on the MANAGE button at the bottom left of the screen. A new window will pop up. Enter the four-digit number of the lock you just found in the Tech Room and press enter (293).
Head back into the Tech Room. Open the now green blinking lock of the wire door. Notice the magnet at the right side of the opened door. Remember that you can find it here! Use the terminal screen on the desk (294). Click on the 14A number slot in your LTM (295). Click on back and switch over to Ray. Use your screw driver with the magnet at the opened wire door (296). Exit the Police Administration.
Go to the warehouse. Use Ray's smart phone. Read your email. Then click on back and click on the phone icon. Click on the 14A number slot in your LTM (297). Examine the yellow sticky note on the forklift. Look at the lockers at the right side. Find Todd's locker (298). With me it was the left locker all the time. Click on the ultra-sonograph in your inventory and drag it onto the locker. Click on the right part of the sonograph and pull it to the right to be able to look inside the locker.
While using the little magnet from your inventory take the key out of the pocket of the coat. Now you have to move all the way to the top along the left side of the coat and up to the ventilation opening at the top of the locker. If you drop the key in the process remember that you can find it at the bottom of the locker. In that case keep on trying until you got it! (303).
Hand over the forklift key to detective Bennet. Step on the forks of the forklift. Switch over to detective Bennet. Use the forklift key with the forklift (304). Use the forklift. Slide the green button into the upper green slot. Push up the red button until the forks, with Ray on it, won't go any higher. Then move the green button into the upper blue slot. Use the red button again until Ray is able to step down the forks on the first floor.
Switch over to Ray and step down the forks on the first floor. Use Ray's smart phone. Click on the phone icon and on the 14A number slot of your LTM. Notice the green blinking light in one of the grey pipes at the right side of the room. Remember in which pipe you see the green blinking light because in every game it is in a different tube. Take the resonance device A out of the pipe (307). In your inventory use the resonance device A. Click on 'Check text messages' (309). Click on 'Cancel'.
Step on the forks of the forklift. Switch over to detective Bennet. Use the forklift once more. Take Ray down by using the red and green knobs of the forklift. When done walk to the right and exit the warehouse. Go to the Police Administration.
Go upstairs and re-enter the Tech Room. Use the terminal screen once more. Click on the Cellfish number slot of your LTM. Tell Ray that you are calling him right now. Now you have to keep Ray and Ed on the phone long enough for detective Bennet to trace him. You can do this by acting and asking questions as follows:
Be interrogative
Who are you working for?
Ask about his plans
Go aggressive
Command him to stop
Tell him he betrayed you
Go interrogative
Ask why he did it
Ask about Amul and Reno
Click on the Eleven foundation slot in your LTM (311)
After that the both of you take off to the hospital. Enter the hospital entrance and go the 7th floor. Talk to Emma and click on the DNA slot at the bottom of your LTM (314). Click on 'Never mind' to end the conversation. Exit the room and go down to the basement by pushing the B-button in the elevator. Notice that Ray tells you that he has no signal for his smart phone. Save your game here! Click on the first maintenance door. Kick it in (315). Take the resonance device (316). Exit the maintenance room. With me the resonance device was in the first maintenance room all the time. If it isn't in the first room in your game, don't keep on kicking in doors until you find it! When you kicked in the second door you will be caught by security! So in that case load your saved game. Stand in front of each maintenance door and check your smart phone. In front of the correct door you will have signal for your smart phone again. So kick in that door.
Head back into the elevator. Go to the first floor. While standing in front of the hospital be sure that the acting person is detective Bennet. If not switch over to him. Save your game because you are going two play two different endings!!! First we will play the bad ending. Open the wire gate at the left side which seems to be unlocked. Enter the elevator (318). When Ed enter the scene here is the way to finish him down. Tell Ed:
Antevorta doesn't matter (320)
Step forward
Click on the News report slot in your LTM
Step forward
What happens now?
Step forward
More murders, Ed?
Let Ray say something
You're a sociopath
Step back
How do we stop them?
Now watch the ending of poor mister Ed. And enjoy the final scene...
Now we are going to play the good ending. Load your last saved game. Open the wire gate at the left side which seems to be unlocked. Enter the elevator (318). After Ed entered the scene tell him:
Antevorta doesn't matter (320)
Let Ray do the talking
You're a sociopath
How do we stop them?
Show him the device in your pocket
Click on the news report slot in your LTM
For each ending you get 20 points extra. So that means your total score is 340 out of 340! Of course you can check this by loading the achievements menu and notice that the 'High score' slot is unlocked and that you finished the game with a full score of 340!!!
I have looked at the list of achievements and this is what I have 'missed':
Blackmailer
Gain Tortoise's help by resorting to blackmail
Lesser of two evils
You sided with an enemy to stop a greater foe
Independent
Finish the game without asking another character for a hint
Listen to us
Play the entire game with commentary mode active
Safe seer
Insane achievement: open Tortoise's safe without using any
"vision aids"
Quick escape
Insane achievement: escape from the monster without locking
the door
Here is my response to that:
Blackmailer
To see the way to blackmail Tortoise see my walkthrough where I have
199 points. At that point you can switch over to detective Bennet. Talk to
Tortoise and click on the city archive slot in your STM. Switch over to Anna.
Talk to Tortoise and ask him 'How can I crack the city archive?' Then click on
the security cam picture in your inventory. You then will get the red master
keycard and 5 points. The strange thing is that if you obtain the red master
keycard in the way I describe in my walkthrough you will get the 5 points for
the keycard plus 4 extra points.
Lesser of two evils
Playing the good end
doesn't give you any additional point. You only save Ed's life but detective
Bennet gets shot in the process by Ed.
Independent
Finishing the game without asking another character for a hint
doesn't give you any additional point.
Listen to us
Playing the entire game with commentary mode active
doesn't give you any additional point. Though I must say that it can be very
funny to here the comments from the different characters.
Safe seer
Opening Tortoise's safe without using any
"vision aids" does give you 5 points. But... you will miss the 3 extra
points for using the ultra-sonograph. So opening the safe without the help of
vision aids will cost you 3 points! Now I understand why they call that an
insane achievement :o)
By the way while using my
walkthrough for that puzzle it is rather easy to solve it without using the
ultra-sonograph.
Quick escape
No matter how hard I tried, but I never managed to escape the
room in time without having locked the door without playing the LTM of Señor
Bear or without examining Señor Bear. So you will not only loose the point
for locking the door but also 1 point for playing the LTM. So... this insane
achievement is costing you at least 2 points. Now that is what I call insane too
:o)))
A final word. It is a very long time ago that I have played a game that I liked that much. I can only advise you to buy the game. For that little amount of money you get a lot of fun in return!
This document was provided to GameBoomers.com and may not be distributed without express written permission of the author and the content may not be altered in any way.