The
Book of Unwritten Tales
by
King Art Games
Walkthrough by
MaGtRo October 2011
Gameplay:
This is a third person point and click game.
The main menu has
continue game, save game (later), new game, load game, settings and quit game.
The main menu is
accessed during gameplay by the ESC key.
The setting has screen
resolution, graphics quality, antialiasing, music volume, sound effects,
speech volume and subtitles selections.
To save, click on
empty saving slot, enter a name and click on 'save'. Saved game can be
overwritten.
The inventory bar is
at bottom of the screen. Some items that are not needed are removed at end of a
chapter. Items can be combined by clicking one item over another item. Right
click will return the picked item to the inventory bar. Combinable items are
indicated by a red cursor and message seen at bottom edge of screen.
Right click of an item also describes the item.
To switch main
character; click on the picture of the other character seen at top left of the
screen.
Hints:
A dialogue or cutscene can be skipped by clicking on the skip (arrow-door)
icon.
Double clicking on an
exit (door) icon will transfer to next location immediately.
The ESC key also skips
a dialogue.
The spacebar key shows
all the active spots in the screen.
Talk to characters
often; they might have new info.
Examine active spots
several times and check the descriptions of the items picked up.
In Aventasia, there is
war between the dark army of the Shadows and the Alliance of free people.
Mortimer MacGuffin, an
old archeologist writes his findings. In a book brought back from Grindel
Mountains, MacGuffin found a travel report of a fairy researcher. The fairy was
stranded on an island in the Western Seas and made drawings of the temple ruins
on the island. MacGuffin translated the runes of the temple walls. He found the
entrance to the temple that partially sank to the bottom of the sea. He found
the "key" in the book.
The temple might hold
the legendary artifact. Legend states that whoever calls the artifact his own
determines the fate of the world.
MacGuffin has sent
Beetle to deliver a letter to Master Alistair, the arch mage of the humans.
Munkus the son of
Mortroga appears inside the house and takes MacGuffin prisoner. MacGuffin
refuses to reveal where he has hidden the key.
Chapter 1: The
Prologue
Playing as Ivo:
Ivodora Eleonora Clarissa is a Princess of the Silver Forest Realm.
Ivo sees MacGuffin taken
by the Shadows and loaded on a transport dragon.
Meet MacGuffin:
Ivo jumps to hold on the tail of the dragon.
Look at the rope
attached to the middle of the dragon. Click on the rope to get Ivo to swing to
the platform that holds MacGuffin's cage at right.
Examine the transport
cage. Speak to the gremlin.
MacGuffin tries to
give the ring to Ivo and tells her to deliver it to the arch mage. She is to
inform the Arch mage that the book that holds the information is in his secret
cellar.
Select any or all
dialogue. The plan is to release MacGuffin when they fly over the White Ridge
Mountain that is covered with snow and is on the way to Mortroga's fortress.
Look at securing rope.
The rope is too tight.
Look at support strut
at top left of the dragon.
Speak to the gremlin
and learn about Munkus, Beetle, the plan and the support strut.
MacGuffin gives a
bullwhip to Ivo. Use the whip ala Indiana Jones with the support strut. Climb up to the
support strut.
Ivo is now on top of the
dragon and outside the transport room. Hear Munkus talk to Mortroga. Munkus
wants IT.
Find a way to
release the cage:
Look at the weapon stand across from Ivo. She can't reach it without being seen.
Look at the box right
of Ivo. Search through the carton to get a fish hook.
Look at the flag left
of Ivo. Take the wooden baton-staff. Combine the wooden staff with the
string with fishing hook to get fishing rod.
Use the fishing rod on
the left sword on the weapons stand to fish for sword and get sword.
Climb down the
side of the dragon
at right.
Speak to the gremlin.
Inform MacGuffin about the sorcerer and learn more about IT, the artefact.
Cut through the
securing rope above the cage.
See Ivo cut the cage.
The transport room also falls over the other side. Munkus is on top of the
dragon. Ivo jumps off the dragon.
Playing as Wilbur:
Wilbur Weathervane is a gnome that works in a pub at the foot of the White
Ridge Mountain. He daydreams of magic.
Teach the robot:
Wilbur is ordered to
teach the house robot to catch rats that might destroy the hops that is used
in the pub's beer.
X-100 house robot:
Look at the wooden box right of Wilbur and try to open it.
Talk to the Master
Brewer at the bar and learn about the other dwarves that left to fight in the
war.
Take the crowbar
from the top of the bar left of the Master Brewer. Open the box with the
crowbar.
Read the user manual.
The X-100 has firstly to be fed disgusting remains of food. Then the robot has to be
fed the rats DNA.
Get food for the
robot: Go left into the
kitchen. Look around in the kitchen.
Look at the emblem at
top of the archway door. Learn that this pub is where the dwarven army was
located.
Look and try to take
the cooking pot at the foreground. It has slime.
Look at and take the
kitchen waste in front of the window.
Look at and take the
net under the counter in front of the window.
Look at and take the
rubbish right of doorway.
Take the empty
coffee pot from the stove.
Exit the kitchen. Look
at the chair and the map on the wall right of the kitchen door.
Get Rat DNA:
Look at the rat and rat hole by the bar.
Examine rat hole. Take
the rat's fur from the splinter made by the rat chewing the wood.
Train X-100:
Use kitchen waste or rubbish on robot.
Use rat's fur with
robot. Watch what happens. Problem solved.
Speak to Master Brewer
to call it a day. Leave the pub to go outside.
It is snowing outside.
From the sky, MacGuffin's crate drops in front of Wilbur. In haste, MacGuffin
gives the ring to Wilbur to bring to the arch mage at Seastone. MacGuffin is
picked up by the dragon again. Wilbur says he needs help and to ask granddad or
the brewer for advice.
Collect items for
granddad:
Granddad:
Look at and enter the gnome hole where Wilbur's family lives at bottom of
screen.
Look at the family
photo on the wall at right and learn about Wilbur's family. Look around the
room.
Go down the staircase
at right. Talk to grandpa.
Grandpa wants a
password. Being an old military man, choose "nuclear first strike".
Wilbur explains about
the ring. The hour of glory, fame...
Talk to grandpa again.
He explains that Wilbur should collect the equipment, while he sorts out the
transport.
The equipment needed
are: helmet, map of area and parachute.
Continue the dialogue
to learn about the arch mage.
Cellar:
Check the vice at left and the covered machine.
Look at and take the
silver elven rope at foreground.
Look at and take
toolbox right of the covered machine.
Look at and take
extendable arm right of toolbox.
Check the submarine,
scrap and the locker.
Front room:
Go back up.
Check the chemistry
experiment at the foreground. It is mum's experiments. The flower pot doesn't
have anything planted there.
Look at and click
twice at the strange ball on the floor - mechanical flying fish Nemo. See it
fly around.
Look at the large
metal gate and the levers at left. Use left bedroom lever, Meggie's lever and
the third from left gnome room.
Wilbur's room:
The third from left lever opens Wilbur's room.
Look at and take
tennis racket from under the bed and rucksack from wall.
Kitchen:
Use the rightmost lever to open the kitchen.
Look at and take
scissors from knife block.
Look at and take blue
bottle of antibacterial kitchen cleaner.
Open the kitchen
bottom cupboard and take the vial of super fertilizer.
Look at the grain mill
at right twice to take barley grains.
Leave the gnome hole.
Get parachute:
Look around outside.
Look at and take the
roll of tarpaulin under the scaffolding at right.
Combine the
tarpaulin with the elf rope. Done!
Combine the tarpaulin
with rope with the rucksack. A parachute!
Get map:
Go back inside the pub-dwarf bastion at left. Go left of bar.
Check the map above
the napping Master Brewer. Talk to the Master Brewer napping on his chair.
The Master Brewer
doesn't believe the ring's importance and doesn't want to give the map.
The Master Brewer goes
back to sleep.
Use the scissors taken
from the kitchen on the Master Brewer's beard.
Go right and feed
kitchen waste or rubbish (whatever is left in inventory) on robot.
Feed Master Brewers
DNA-beard on robot. Watch the robot attack the dwarf. They fight in the kitchen.
The Master Brewer celebrates his win at the bar.
Go left and take the
map from the wall.
Get helmet:
Go in the kitchen. Look at-take the cooking pot with the slime at the
foreground. Wilbur doesn't take it because of the slime.
In inventory combine
the extendable arm with the anti-bacterial kitchen cleaner.
Use extra strong
anti-bacterial kitchen cleaner on an extendable arm on the cooking pot
with the slime.
Take the cooking pot -
helmet for heroes.
Granddad:
Go back to granddad at the cellar of the gnome hole. Speak to colonel
granddad. Report!
Granddad wants
nitroglycerin substitute like dwarven ale and a part for his machine - cog.
Get cog:
Wilbur recognizes the cog granddad wants.
Go back upstairs and
see that Nemo, the flying fish is still flying around.
Note one of Nemo's
eyes.
Try to catch Nemo.
In inventory combine the net with the tennis racket frame. Use the homemade net
on Nemo. Gotcha.
Use the tool box with
Nemo. Nemo wiggles too much.
Go back down and go
left. Use Nemo on the vise. Use toolbox on Nemo to get cog.
Collect items for master brewer:
Get dwarven ale:
Exit the gnome hole and go to Master Brewer at the dwarf bastion.
Talk to Master Brewer.
Learn about dwarven ale and the brewing.
The brewer needs
crystal clear mountain and hops and malt.
Malt-barleycorn:
If you haven't taken it yet; get barley grains from the grain mill at the
gnome's kitchen.
Get crystal clear
mountain water: Exit the pub. Look at and take the
icicle hanging from the bottom rung of the left scaffolding.
In inventory, combine
the icicle and the empty coffee pot from the kitchen.
Go to the kitchen of
the pub. Place the coffee pot with icicle on top of the stove. Take the
coffee pot with crystal clear water.
Get hops:
Talk to the Master Brewer about where to get hops. The rat took the hops.
Look at rat hole.
Wilbur gets a single hop.
Give the single hop to
the Master Brewer. One hop is not enough but you can plant it for next year.
Go back home to the
gnome hole. Plant the single hop in the flower pot at left.
Use super fertilizer
on hop plant. Harvest the hops.
Master Brewer:
Go back to Master Brewer and talk to him to give all 3 ingredients: water,
hops and barley.
The Master Brewer
gives the dwarven ale. Wilbur explains about his quest and want of
adventure. Master Brewer wishes Wilbur his best.
Granddad:
Go back to granddad and talk to give him the cog and the ale.
Wilbur is inside Betsy
II. Granddad gives Wilbur his old aviator goggles. Fire!
See MacGuffin led by
Munkus towards Mortroga's throne. Mortroga wants Ivo the elf watched.
Playing as Ivo:
Ivo is in front of MacGuffin's home. She wants to find the book at the secret
cellar first before the baddies get them. Tschiep-Tschiep, the bird doesn't want
her to do so.
Find the secret
cellar:
Look around at the
yard. Check the well at right; the gable window that is shuttered above the
doorway at right of house and the undergrowth at left of the yard. Check the stove and
the stone mill right of the stove left of the door.
Search for clues
about the secret cellar:
Enter the house. Check
the frame on left wall that has a broken mirror.
Examine the wooden tub right
of the doorway. It has MacGuffin's laundry. Look at the square above the
doorway. Check this side of the fireplace.
Check THE Carpenter's
cup at bottom left. :)
Mummy:
Open the sarcophagus and talk to the mummy. That is quite a conversation.
Look at the tool bag
in front of the desk. Take the sieve.
MacGuffin's diary:
Look at and read the book on the desk. Learn what MacGuffin wrote before he
was taken away. Read the book again and learn how the book was obtained.
Look at the pile of
documents right of the book. Take the documents.
Wooden box:
Check the stone head right of the desk and the wooden box on top of it. The
box is locked.
Stone chest:
Look at the stone pillar at bottom of screen and the stone chest (Ark of the
Covenant) beside it.
Open the stone chest
and see sand inside. Search through the sand. Use the sieve from tool bag with
sand in chest. Get little brass key.
Wooden box: Go back to wooden box
on top of stone head. Use the key on wooden box.
Get a paper
inside the wooden box. It says something about ghost in the machine that knows
the secret of the house.
Look inside the wooden
box again and get hexagonal stone disc.
Fuel the ghost in
the machine:
Stone pillar:
Go to the stone pillar left of the stone chest. Examine the socket on top of
the stone pillar.
Use the hexagonal
stone disc on the socket. See a statue rise up.
Check the cup and then
the statue. Talk to the machine. Get aromatic beans.
Read the note from the
wooden box again. Back out of close up by clicking on exit at side of screen.
Exit the house.
Tschiep Tschiep:
Speak with the bird on top of the scarecrow.
Aromatic beans:
Use the aromatic beans with the stone disc-mill. Grind the brown beans to get
aromatic powder.
Water:
Go to the well and use the crank handle. The rope breaks and the bucket is
down in the well.
Go to the
fireplace-stove. Take the watering can left of the stove.
Tie the watering can
on the rope of the well. Ivo takes the watering can full of water.
Hang the watering can
on the holding bracket of the stove.
Take a stack of
wood left of the stove. Place the firewood in the stove.
Place the unimaginably
valuable documents in the stove.
Look under the flower
pot on top of the firewood. Get a firestone-flint.
Use the flint with the
paper on the stove to light a fire.
Turn the holding
bracket with the watering can over the fire.
When the water boils,
swing the holding bracket out and take the heated watering can.
Stone pillar:
Go back inside the house to the stone pillar.
Look close at
statue-machine. In inventory combine the heated watering can and the aromatic
powder.
Pour the
fuel for the
machine into the cup. The ghost (monkey) takes the fuel-cup of coffee.
Ivo talks to the
machine about the secret cellar. A stairway opens up on the floor.
Light the secret
cellar:
Check the secret
cellar: Go down and look around the cellar. Examine the
mural <grin>, little stone figure and the opening on the floor.
Take the wooden
staff at foreground and the garden shears on top of the crate.
Get light to the
cellar: Go upstairs and outside.
Use the garden shears
on the undergrowth left of the house. Examine the gravestone of Kinski.
Look at the garret
window at right side of house. Use the wooden staff on the window to open it.
Enter the house. See
the ray hit the broken mirror frame at left.
Take the
small silver
shield on the mantle of the fireplace-stove. Place the shiny silver shield on
the broken mirror frame. See the light beamed down to the cellar.
Go down to the cellar.
Place the wooden staff on the opening on the floor.
Adjust the stone
figure at left 3 times to get the light beam hit the top of the wooden staff.
Check the grilled gate with 3 gems at right. Inside
is the book.
Get the ruby:
Go upstairs and open the sarcophagus.
Talk to the mummy.
Mortimer asked him to hide the jewel of the staff.
The mummy gives a test
to be sure that Ivo is a friend of Mortimer.
Mortimer's underwear
is red.
Kinski is the cat's
name.
The answer is 234. Ivo
turns the table on the mummy and gets the ruby.
Open the gate:
Go down to the cellar. Insert the ruby on top of the wooden staff.
See the light hit the
3 gems and the gate opens.
Read the secret book.
Learn about the Artefact of Divine Fate.
Ivo will take the book to the arch mage at Seastone tomorrow.
Chapter 2: In the
Town
Playing as Wilbur:
See Bartholomew the guard taking a break.
Wilbur
drops from the sky and hits the town wall. Wilbur talks to Bartholomew Anton Shieldhand, the town guard.
Bartholomew explains that Wilbur is not allowed to enter the upper town where
the arch mage tower is located. The town inhabitants are gone.
Look around the lower
town:
Enter the gate and look
around.
Wizzard:
Check the Master Markus Mage School door. The signs are covered with cobwebs.
Knock on door. No one home.
Market stall:
Look at the market stall at other side of road. Looks like nothing has been sold
recently.
Go right. Check the
cartons, cart and sewer drain by the road.
Continue on the road
until the gate to upper town.
Bartholomew, the town
guard: Talk to Bartholomew Shieldhand and find out that
only people with invitations or mages with diploma are allowed at upper town.
You have to show a mage diploma to prove that you are a mage. There is a mage
teacher at the tavern playing a role playing game.
Look at the coat
of arms and basket with a giant sandwich.
Find the mage:
Dancing Boars
Head
Tavern: Go back down to lower town. Check the sign of the
tavern. Enter and look around.
See 2 men in front of
machine. Talk to Mage Markus and Bill the merchant. They are playing a business
version of the multiplayer role playing game World of Warcraft. :)
Master Markus
is too engrossed in the game to talk to Wilbur.
Stop the game:
Check and then take the
preserving jar on the bar counter and the saw on the tool box
behind the mage.
Server's room:
Now that you have a purpose, you can enter through the Server's room right of
the RPG machine.
Look around. See the
hairy demon - monkey operating the RPG machine. Check the chair the demon is
standing on.
Check the chair at the
corner and see that it is the similar to the server-monkey's stool.
Check the safe for saved
games. Hahahaha. There's an inkwell-jar on top of the table.
Check the paper basket
and the large wooden box with index cards at right. See that the index cards are
descriptions of the items in the game. Hmm...
Crash the game: Use the saw on the chair
at the corner.
Annoy the demon by
messing up the files cards in the wooden box.
See the monkey rearrange
the wooden box.
Mess up the file cards
again.
Immediately click on the
stool he stood on and Wilbur will swap it with the sawed stool from the corner.
The monkey-server falls
on the floor unconscious. Hear the 2 gamers complain when the machine stops
working.
They write technical
glitch complaints and submit them. See the complaint papers fall in the trash can.
Crash the game part
2: One more sabotage needed. Exit the room and the
tavern.
Go right to Shieldhand
the guard. See him eating a banana. Talk to him twice and learn that he helps
himself to the banana delivery sent by the RPG company.
Continue talking until
you threaten him by informing the gamers at the tavern. Get a banana.
Go back to the tavern
and distract the demon monkey with the banana.
See that it only got
the 2 gamers to write another complaint.
Crash the game part
3: Exit the tavern and the town to be outside.
Check the sign, the
bunny and the flat stone.
Lift up the flat
stone. See bugs. Use the jar on the flat stone to collect beetles.
Go back to the tavern
and the demon server.
Use the jar of beetles
on monkey. See the monkey do what monkeys do with insects.
The gamers stop
playing.
Learn how to become
a mage:
Master Markus Mage
School: Go to the Mage-wizzard school next door.
Learn that Markus
and the arch mage are not really friends. Master Markus cannot just give a
diploma; Wilbur has to become a mage graduate.
Three things needed:
mage robe made of magical fabric, a magic wand and pile of gold.
Robe:
The mage robe can be sewn by Wilbur. He needs magical fabric, needle and
thread and pattern.
Magic wand:
The wand fits to the mage not the other way around. Bill the merchant has
wands.
Heap of gold:
The mage wants to be paid for teaching Wilbur. He recommends talking to
Wupperman the showman. Wupperman is very rich but does not work and does not
steal. The showman can be
found at meadow.
Master Markus gives a postcard-map that can be
used to jump from one place to another.
The mage has glasses
that can see hidden script.
Search the room:
Look around the room.
Check the board and
the bookcase by Markus. Look around at the kitchen at the corner.
Check the strange
mirror. Check and take the crystal ball on the shelf by the door.
Check the carton left
of the door. Search the carton to get needle and thread and 3
potions (red, blue and green).
Meet the merchant
and the King of Thieves:
Exit the school and
see the merchant and the King of Thieves-rat are in a fight.
Talk to Bill the
merchant. Business is down and the thieving rat stole everything from him
when he was playing WOB.
The merchant wants
Wilbur to kill the rat and bring the mask as proof. He will give 3 things from
his store.
Buy something. No
magic wand fits Wilbur ala Harry Potter.
Buy something again.
The magically treated cloth cost 2 gold per thigh. It is too expensive.
Get the King of
Thieves' mask:
Go to the sewer-drain
in front of the tavern. Examine the entrance to the sewer.
Be small:
Drink the 3 potions taken from the carton at the mage school.
Drink the last-green
one again to make Wilbur small. Try to enter the sewer but he is not small
enough to fit inside the drain.
Talk to the merchant.
The merchant gives the shrinking ring after Wilbur tells him that he
needs it for the King of Thieves.
Enter the sewer:
Go to the sewer entrance. Put ring in finger; Wilbur is still not small
enough. Drink the potion; now enter the sewer.
Talk to the rat to
learn that he steals to take care of his family and friends. Learn about his
newly arrive Uncle Juan who was attacked by a robot when he was up north.
LOL.
Tell
him about giving
them food. The rat can help Wilbur by bringing him things. Exit the sewer.
Find a generous
amount of food for the rats: Go right to Shieldhand the
guard.
Take the sandwich out
of the basket. Talk to Shieldhand about the sandwich.
They will play Master
of Dragon Slayer's Defender card game. One can only win if one has good cards.
The guard lends Wilbur
some cards. The guard wins and is still the unbeaten champion.
Win the card game:
Get a very good
card: Enter the sewer. No need to be small;
automatically shrink.
Talk to the rat about
the sandwich and the card game. Exit.
Talk to Master Markus
at the school about everything.
Tell
the mage about the
card game. He gives a half card that is the mage's best one.
Ask about the mirror.
It is the gateway to another world - Kingdom of the Dead. Only ghost can go
through the mirror.
Exit and hear the rat
call Wilbur.
The rat gives him a
half card. Auntie Juanita said that the owner killed himself after he
dropped the card in the drain.
Win the card game:
Enter the tavern. Take the sticky tape in front of the console of the
RPG machine.
Click on a card and
then the sticky tape in inventory to stick the cards halves together to get a
supercard.
Enter the server's
room and take the ink pot from top of the safe.
Go back to Shieldhand
and talk to him. Wilbur shows him the supercard.
The guard gasps and
says that the card is damaged and it cannot be used. He knows the rules.
Go back to Master
Markus and tell him about what Shieldhand said. The mage gives Wilbur the rule book to show the guard.
Go back to the guard
and talk to him. They play the game and Shieldhand loses.
Wilbur will not
mention about the game again, losing and the guard gets all the cards
including the supercard. Get the sandwich.
Get wand and magic
robe:
Give the sandwich
to the King of Thieves: Go back to the sewer.
Push the sandwich in
the sewer. Do not enter with the sandwich or it will become small also.
Then enter the sewer
to talk to the rat. That sandwich is enough to feed the rats. They will stay
until Wilbur gets his diploma and then they will leave.
The King of Thieves
gives his spare mask.
Merchant:
Go to the merchant and talk to him about the mask.
Collect one of 3, er...
2 rewards. Ask for the magically treated material.
Rat:
Talk to the rat again and ask to get something. Ask for wand, cutting pattern
and pile of gold.
The rat will look for
wand and cutting pattern but no help for pile of gold. Exit the sewers.
Exit through the gate
and then come back to the sewer. See a white
handkerchief sticking out of the sewer.
Get the robe:
Reach into the hole. Get a human child's mage robe.
Click on the pattern
in inventory and see Wilbur in mage robe. That looks familiar - Simon
look-alike.
Get the wand:
Reach into hole again and get a magic wand. It works - it works!
Get a pile of gold:
The showman:
Check the postcard in inventory. Click on the meadow at bottom left.
Speak to Willy
Wupperman, the showman. He is really a fortune teller.
The top prize for the
wheel of fortune is a sack of gold. Try one game of wheel of fortune. Wilbur
loses.
Look around the area.
Check the cage of
pigeons at bottom right. Take pigeon feather.
Check the empty cage.
The sign says Ziggy, the invisible pink squirrel.
Check the crazy hairy
thing at left. The sign says Bertram, the world's fattest hamster.
Get good
predictions: Talk to the showman about predicting the
future. Wilbur gets a reading.
Then ask about the cages. Learn about the animals and the use of
pigeon as carriers of his predictions.
Talk to Wupperman
about Ziggy, the invisible squirrel. The showman will walk over to the cage.
When he leaves the
table, replace his crystal ball with the one from the mage school.
Ask him to predict the
future again. This time he goes into a trance.
He cannot talk but can
only gesture yes or no.
Wilbur will not
fulfill his mission with the arch mage but it is not for naught. Bad things
will happen and he will die.
Ask him to predict the
future again. Again he goes into a trance.
Ask questions to see
that he will answer only several questions before waking up. Find out he will
answer only 5 questions.
Predict the result
of the Wheel of Fortune: Talk to the showman again about
predicting the future.
Wupperman goes into a
trance.
There are 4 colors on
the wheel of fortune: yellow, red, green and blue.
To win the wheel of
fortune, you have to give the correct color the wheel will point to 3
consecutive times.
The trance - true
prediction will only be answered after 5 questions.
First question should
be: Is it color 1 or color 2?
Second question should
be: If yes from above, ask about one of the colors stated; if no, ask if it is
one of the colors not mentioned.
Deduce the correct
color of the first spin.
Move on to the next
spin.
Third question is
similar to first question.
Fourth question is
similar to second question.
Deduce the correct
color of the second spin.
Move on to the next
spin.
Fifth question:
The question is similar to first question. Then the showman wakes from his
trance.
You have to guess the
last color but you already eliminated 2 of the colors by his response.
Play the Wheel of
Fortune then. Keep on playing until you win the game.
Always ask for another
reading from the crystal ball.
More often than not in
my gameplay, the next color is closest to the second reading than the other
farther choice.
Get a bag of gold.
3 Tests to be a
mage:
Master Markus:
Jump to the town. Talk to Master Markus at the school about the mage robe,
magic wand and give him the bag of gold. Wilbur is now Master Markus' apprentice.
He says that to be a
mage, Wilbur has to pass 3 tests. The tests are: brew magical potion, have a
magic artefact and cast a spell.
Ask the mage about all
3 tests.
Brew magic potion:
Wilbur has to get ingredients and mix them in the cauldron. Get a
recipe from the bookshelf.
Magic artefact:
Good artefacts are rare. The mage will evaluate the artefact if it is
good enough.
Learn about Balthasar the Brittle. He took his artefact with him
when he died. The mirror belonged to Balthasar. The artefact is an amulet.
Wilbur says he will get that amulet. Only ghost can go through the mirror. One
has to die to go through.
The mage mentions that
someone at the Swamp of the Dead can help Wilbur.
Cast a spell:
Wilbur has to cast a real spell like make one disappear or transform them into something else like a sheep, the mascot of the order.
Find a spell:
Jump to the meadows
and talk to Wupperman, the showman about learning a spell.
He knows a magic trick
that he can teach Wilbur. He needs a top hat and a rabbit.
Take the carrot
from Bertram the hamster's cage.
Collect the
ingredients for the magic potion:
Find a recipe:
Back at the Mage school - Go to the bookcase close to the mage. Get a book and Wilbur will get a recipe
for a Power Elixir that gives strength and confidence.
See
the list on the left side of the screen. You can check the list in inventory.
Go to the corner
kitchenette.
Check the clay pot to
get peppermint.
Check the press used
to extract substances.
Examine the small
casket beside the press to get asthmatic fat grubs.
Take crystal vial
from end of the counter.
Check the stone mortar
on the mage's desk. Exit the school.
See Munkus talk to Mortroga.
Mortroga says the elf has the old book and that the gnome with the ring is
already in town but has not reached the arch mage. Munkus has an idea that
will stop the gnome from reaching the arch mage.
Rat:
Enter the sewer and talk to the rat to ask him to get things. The King will
get stag beetle antler and will signal Wilbur when they have it. He cannot
help with other ingredients, spell and artefact.
Take mouldy slime
from the water in front of Wilbur. Exit the sewer.
Exit the town and then
go back to the sewer. See a white handkerchief.
Take the
stag beetle
antler from sewer.
Swamp of the Dead:
Use the map to jump to
the Swamp of the Dead. Check the lantern and stone head.
Check the half sunken
tree. Examine the red plant on the armpit of the tree. Take the red devil's
armpits.
Look at the skeleton
on the swamp at right. Take a bone to get bone worms.
Ship:
Enter the ship.
Examine and take the
bluish ghost mushroom on the floor left of the entrance.
Take a piece of the
heavy rope by the bookstand to get thin rope.
Look at the top hat on
top of the bookshelf.
Check the Book of the
Dead on the bookstand. It is empty.
Death:
Talk to Death wearing fuzzy pink bunny rabbit slippers. LOL. No one dies in an
adventure game unlike an RPG.
Learn about the
Balthasar's mirror
and the Book of the Dead. Death can only kill the ones whose names are entered
in the Book of the Dead. Then he has to balance the dead's name with the ones
killed or the auditors will catch it.
Brew the magic
potion:
Jump back to town.
Enter the mage school.
Use the mouldy slime
from the sewer on the press at the kitchenette to get mouldy slime extract.
Use the stag beetle
antler from the King rat on the mortar and pestle at the mage's desk to get
stag beetle antler powder.
Check the
ingredients-recipe. It is now time to brew the potion.
Go to the cauldron. If
you make a mistake, you can do this over again (I know.)
Follow the directions
stated at top right of screen. The ingredients are labeled when the cursor is
over it. Thanks, Carla!
Step 1:
Put ghost mushrooms (top left) into the pot and stir until the water turn
green. Stop stirring.
Step 2:
Add mouldy slime extract (bottom green) and stir anti-clockwise until the
potion turns pink.
The potion goes from green to black to yellow to pink.
Step 3: Add the
red devil's armpit (middle left red) and wait until little red bubbles
appear. Then stir clockwise as quickly as possible.
Stir rapidly in clockwise
direction several times until the next step.
Step 4:
Sprinkle the stag beetle antler powder (black bottom right) into the potion. When the potion turns
blue for the third time, immediately add the bone worms (top right pink).
Step 5:
Then add the asthmatic transfat maggots. Stir the potion (normally) clockwise
4 times (change to white), anti-clockwise 2 times (color change yellowish) and
then clockwise 3 times.
Step 6:
Finish it off with the peppermint leaves for that fresh minty flavour. Add a
few leaves and stir until the potion turns a golden yellow colour.
The yellow
power
elixir is now in the vial.
Talk to Master
Markus. He checks the elixir and approves it.
Turn to ghost:
Exit the mage school
and talk to the merchant.
Swamp of Death:
Use the map to jump to the swamp. Enter the ship.
Talk to Death about
needing to be a ghost and the top hat. It was his gravedigger father's hat. He
would not lend the hat.
In inventory combine
the inkpot and the pigeon feather. Wilbur will now say that he can write on
anything.
Use inkpot or feather
to write on the Book of the Dead. Death scolds Wilbur. Death needs to be
distracted.
Check the stove and
the Spliss poster by the bed.
Merchant:
Jump back to town. Go to the merchant and see that he is packing up to leave
town.
Ask him about your
other rewards. He refuses. Tell him he won't be your friend anymore.
The merchant gives
Wilbur a sack. Open the sack in inventory and see that it contains fireworks.
Distract Death:
Jump back to the swamp. Enter the ship.
Place the fireworks
shells in the stove. The fireworks explode in the stove and Death stands up
to check the stove.
Take either the inkpot
or pen and click-write on the Book of the Dead. Wilbur enters his name in the book.
Talk to Death and
tells him that his name is there.
Death becomes
deliriously happy. Fare thee well, Mortal. Wupperman's prediction comes true.
Wilbur is a ghost:
Look at the mortal Wilbur while Death smokes a cigarette.
Exit the ship and
Wilbur will go to the mage school. Try to talk to Master Markus.
Enter the mirror.
Hours later, Wilbur comes out with the powerful magical amulet.
Go back to Death. Talk
to Death until he brings Wilbur back alive.
Learn the spell:
Get the top hat:
Wilbur tears the page off the Book of the Dead.
Talk to Death again as
live Wilbur about a new job; like being a contract killer.
Death becomes
interested in burying people alive. He will partner with Wilbur. Wilbur's job
is to get money to finance the business.
Jump to the meadows
and Wupperman. Talk to Wupperman about the business venture.
Wupperman sees the
venture as an excellent possibility in the future.
Go back to Death at
the swamp. Talk to Death by the swamp doing a trial burial.
The coffin is in the
ground. Death wants Wilbur to climb in the coffin. Wilbur convinces Death to
have the honor.
Death makes Wilbur
hold his top hat. Death is buried alive.
Get a rabbit:
Jump to town and then exit through the town gate. Try to catch the rabbit.
Knot the thin rope
taken from Death's home to the tree. Wilbur makes a snare.
Lay the carrot taken
from Bertram in the snare as bait.
Noooo... Thankfully,
the rabbit was only knocked out.
Spell:
Go to the showman. Talk to the showman about rabbit and top hat.
Wupperman shows how to
do the rabbit and hat trick. Wilbur's conscience gets tweaked.
Get the Mage
Diploma:
Jump to town and talk
to Master Markus about the elixir, the powerful amulet of Balthasar and the
spell.
Wilbur does the magic
trick using his powerful wand. He nearly changed the rabbit into a sheep.
It has a
walkthrough!!!! The arch mage is his brother. Wilbur has a friend in
Master Markus.
Wilbur gets the
mage diploma and is now wearing a sorcerer's hat a la Simon.
Exit the school and go
right.
The King of Thieves
congratulates Wilbur and says goodbye. Wilbur is always welcomed by the rats.
Upper Town:
Go to Shieldhand, the
guard by the gate. Talk to the guard.
Arch mage:
Shieldhand brings Master Wilbur to the arch mage.
Wilbur shows the ring
to the arch mage. In the manner of Star Wars, MacGuffin explains what he found
- the location of the most powerful artefact - the Artefact of Destiny (Divine
Fate) bestows good fortune to the holder. It will grant the holder everything
he desires. It is found in the temple in the Island of Sordia.
The arch mage orders
Shieldhand not to mention the news to anyone and dismisses him.
He orders Wilbur to
find 2 companions that will accompany him to the island. The arch mage is to
research where the island is located.
When Wilbur leaves,
the arch mage changes to Munkus.
Find transport and
a companion:
Nate and the
airship: Wilbur is at the airship dock. See the 2 cages
with a human and a pink something guarded by an Orc.
Look at the
Orc. Learn
that Ma'Zaz the female Orc is a bounty hunter. She is waiting for her supplies
from Bob the merchant.
Check and take the
net at foreground.
Try to take the rope
and get scolded. Nate is the human in the cage.
When Ma'Zaz gets into
an argument with Nate; then take the rope.
Talk to Nate. He is a
freelance treasure hunter and owns the airship The Mary.
Wilbur finds one companion and a transport. He needs to get pass the Orc lady.
Master Markus:
Jump to the lower town (lower part of town in the map) and go to mage school.
Read the note on the
desk. Master Markus is with his brother the arch mage at the Wild Thorn Pass
battlefield. Marcus Maria Alistair leaves his magic spectacles to
Wilbur.
Wilbur meets Ivo
and finds the other companion:
Upper town gate:
Walk to the upper town gate and Shieldhand. Overhear that Ivo wants to see the arch mage
about a book and was not allowed.
Talk to Ivo
completely. Look at Tschiep-Tschiep. Check the grapes of the poison ivy at
right of the screen.
Enter the gate.
Bring Ivo to upper
town: See that the airship is close to the walkway above
the gate.
Use the rope on the
pillar on the right side of the screen; just above the upper town gate.
See Ivo climb up the
rope. Wilbur and Ivo talked.
Find the Island of
Sordia:
Wilbur brings Ivo to
the arch mage's office and shows her the star wars-MacGuffin's ring. Ivo is in. Look
around the room.
Check the Encyclopedia
Phantastica by the window. It is large and blank. Use the magic spectacles
left by Master Markus.
Read about Sordia and
about the arch mage. Wilbur didn't like the arch mage.
Look around. Check the
rolled papers above the bookcase. He can't reach it.
As Ivo:
Change to Ivo by clicking on top left icon.
Get a
map from top of
the bookcase.
Check the large map on
the wall twice. Read the gremlin's book in inventory.
Learn that the fairy
explorer who found the temple started the expedition from a town called Krun Pak.
Check the map again.
Ivo and Wilbur cannot find Krun Pak. They realize that it was an old Shade's
name.
As Wilbur:
Check the Encyclopedia for Krun'Pak. Find out that the town was called Redstonebury.
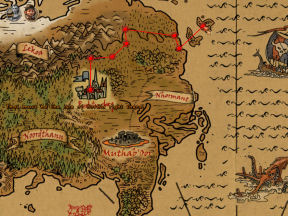
Check the large map on
the wall. See the compass.
Go WNW from the
central compass to see Seastone.
Go north from Seastone
and see Redstonebury in the middle of the north island.
Follow the steps of
the fairy explorer:
Click on Redstonebury.
Click up (north) to
foot of mountains.
Click right (east) to
plain.
Click to road (northeast to broken lines).
Go up (north to river
(solid lines).
Follow river to mouth
(east to end of solid line).
Go down to bay (south
to small indent in map).
Go NE to the second
(far) island.
Free Nate:
They now need the
transport. Exit the arch mage office to be at main square.
Take the rope
from the pillar.
As Ivo:
Speak to Nate and then the Orc. Ask Ma'Zaz for the human.
Have a contest of arm
wrestling. Ivo loses.
As Wilbur:
Give the Ivo the power elixir.
As Ivo:
Click on power elixir in inventory. Ivo drinks the elixir.
Challenge the
Orc to
another arm wrestling contest.
As Wilbur:
While Ivo and the Orc are arm wrestling, use the rope on the beam-bracing
above.
Use the net on the
plank where the Orc was standing earlier close to the cage.
Look-click on rope and
then click the rope cursor on transport bales.
Click on rope attached
on bale and then click the rope cursor on net to attach the rope. It looks like a good trap
to me.
Look at Ivo and wonder
how long the elixir will hold. Ivo wins the arm wrestling and the Orc returns
to her usual position by the cage.
Push the transport
bale and can't. Wilbur cries for help. Ivo helps Wilbur with the transport
bale.
The trap failed but
got the Orc seeing birdies. Ouch!
Talk to Nate. After
some discussion, Captain Nate Bonnett is part of the company.
Chapter 3: The
Sunken Temple
Playing as Ivo:
The companions are at the entrance of the Temple. Nate is going to repair
the ship. Ivo tells Wilbur to stay here outside the temple to keep him safe.
The bird scolds Ivo. It was for Wilbur's own good.
Outside the temple:
The temple side
door: Look at the temple's side door.
Check each of the 4
little alcoves at sides of the door. The alcoves are for creatures of air,
fire, earth and water.
Collect creature of
fire:
Check the sparkling
lights flying at left side over the ledge. They are rare fire fairies.
Click on them again
and learn that they need nectar to maintain their energy.
Check the beehive at
right of temple door. Try to take some honey.
You need a container to hold the honey. Talk to Nate by clicking at top
right of screen. He was snacking. He throws a glass jar at Ivo. Then Nate naps.
Talk to Tschiep
Tschiep and ask him to help distract the bees.
When the bees are away
from the beehive; use the empty jar on it to get a glass jar with honey.
Go left to the ledge.
Use the jar of honey on the ledge. After a bit, Ivo collects the jar with a
fire fairy.
Collect creature of
earth:
Take the rope
and the bucket of water left of the door.
Check the dry earth at
center of the ground area. Use bucket of water on dry earth.
Take the worms
that rise to the wet soil.
Collect creature of
water:
Look at the fish bone
at left ledge. Pick up a fishbone.
Pick up the branch
left of Wilbur.
In inventory combine
the fishbone with rope; then with branch and lastly with worms to get
fishing rod.
Use the fishing rod on
the ocean at left.
Ivo asks Wilbur to
catch a fish. Since Ivo is from the mountains, he asks what to do. Ivo said to
cast the fishing rod. Wilbur throws the fishing rod into the water. He sees a
fish get caught.
Ivo climbs down to get
the fish. The fish is in the bucket of water.
Get creature of
air:
Talk to Tschiep
Tschiep about creatures of air alcove. The bird finally agrees to enter the
alcove later.
Open the temple
door:
Place the creatures of
earth, water and fire in their respective alcoves.
Now talk to Tschiep
Tschiep. The bird flies into the alcove at top left.
The door finally
opens. Eek! Tschiep Tschiep leaves.
Ivo asks Wilbur and
Nate to come inside.
Inside the temple:
After some discussion,
Wilbur and Nate fall down into a dark trap.
Check the others:
Look down at the abyss.
Change to Wilbur and
look around. It is dark and there's a stone slab behind him.
Change to Nate and
look around. It's too dark to see anything.
Look for light:
As Ivo: Look at the stone
rings on the door at left.
Go deeper into the
temple - next room. Look around.
Check the water
and see jellyglowfish.
Take the machete
beside the skeleton.
Check the 2 grimacing
face on the end of the top and bottom bridges.
Check the middle
door with the crystal.
Check the 2 ledges and
see something shining up on the ledges.
Leave the entrance
room. Use the machete on the roots hanging over the abyss - broken floor.
Swing to the other
side and exit to the outside.
Check the little
alcoves. The fire fairy, worms and the fish are gone.
Take the glass jar
from top right alcove and bucket from bottom right alcove.
Go back inside. Swing
to the other side.
Go back to the
entrance of the inner temple at left.
Use glass jar on water
to catch a jellyglowfish.
Give light to the
others:
Place the jar with
jellyglowfish in bucket.
Combine the fishing
rod with bucket with jellyglowfish.
Use the jellyglowfish-jar-bucket-line
on the abyss and Wilbur.
Wilbur checks the
stone slab that has symbols of: something that looks like a snail with a long
neck, a fish without a head, a branch and a star.
Nate asks for the
light and sees a passage to the left.
Check the 4 stone
rings:
Look close at the 4
stone rings that can be turned.
Turn the rings to show
what Wilbur saw on the stone slab (from top to bottom): something that looks
like a snail with a long neck, a fish without a head, a branch and a star.
Press the button at right. That should be it.
The door beside Wilbur
opens.

Bring Nate up to
middle level to open hatch.
As Wilbur:
Go left and look around.
See a stone and 2
platforms. On the left is a hatch with a wheel that cannot be opened. Someone
stronger can do this.
Stand on the right
pedestal and it goes down to lower level. The left pedestal goes up.
Look at the head on
the wall.
Go left and go
through door to see a wheel. It is locked to prevent people turning it.
Leave the tunnel. Look
at roots hanging on the ceiling. Click on roots twice to get Nate to help Wilbur
climb up to middle level.
Bring the right
pedestal up: Stand on left pedestal and it goes down.
The right pedestal goes up.
Climb up roots again
to be at middle level.
Bring Nate up:
Change to Nate and stand on left pedestal.
Change to Wilbur and
push the stone on right pedestal. Automatically, Wilbur stands on right
pedestal. The combined weight raises Nate up to second level. Wilbur throws the
stone away.
Change to Nate and go
left to the hatch. Open the hatch.
Get Wilbur out of
the trap:
Bring
Wilbur up: Change to Wilbur and
stand on the right pedestal.
Change to Nate and
stand on the left pedestal.
As Wilbur: Wilbur is now at middle level. Change to Wilbur.
Go
left and crawl through the hatched opened by Nate.
Climb the ladder to
the top. Continue up one more level and be on the ledge at the entrance room.
Ivo comes in and asks
for the crystal. Wilbur throws the crystal to Ivo.
Pick up the stone
tablet by Wilbur.
Leave the gallery to
go back down to the top level. Climb out.
Give the stone tablet
to Ivo.
Get the other
crystal:
As Ivo: Change to Ivo. Look
close at the 4 rings. See the stone tablet at bottom right.
Change the rings to be
similar to the leftmost column of symbols. Press the button at right.
See that the mouth at
bottom level opens and a passage opens at middle level.
As Wilbur: Change to Wilbur. Go
left to tunnel and go down to middle level.
Crawl through hatch.
Enter the passage at the center and be at the other ledge.
Ivo comes in and asks
for the crystal. Wilbur throws the crystal to Ivo.
Leave the gallery,
climb up ladder and go to Ivo by the 4 rings.
Get the pedestals
available for use:
As Nate: Change to Nate. Look
at the face on the wall at bottom level and see a switch.
Use the switch and see
water pour from the wall to the pedestals to bring them up-down.
Get Nate to join
the others:
Go left to the big
wheel and see that it cannot be turned. It is latched.
As Ivo: Change to Ivo. Look
close at the 4 rings. See the stone tablet at bottom right.
Change the rings to be
similar to the middle column of symbols. Press the button at right.
See the wheel at
bottom level get unlocked.
As Nate: Change to Nate. Get
Nate to turn the wheel. The door closes.
As Ivo: Change to Ivo. Look
close at the 4 rings. See the stone tablet at bottom right.
Change the rings to be
similar to the right column of symbols. Press the button at right.
As Nate: The tunnel where Nate
is fills with water. Nate floats out to middle level.
Climb the ladder and
join the others.
Open the entrance
to inner temple:
As Ivo: Change to Ivo. Go to entrance to temple at left. Insert the crystals on top and bottom grimacing
faces.
Stand at middle
crystal and touch it. See that 3 people need to touch the 3 crystals.
As Nate: As Nate, go to
entrance to temple at left. Touch crystal of the top grimacing face.
As Wilbur: As Wilbur, go to
entrance to temple at left. Touch crystal of the bottom grimacing face.
As Ivo: As Ivo, touch the
middle crystal and the gate opens.
Find a way to open
the other doors:
As Ivo or Nate or Wilbur: Decide who will go
through to the temple.
Turn around and
examine the exit. (Ivo says that it is related to the crystals outside; Wilbur
says that the gears at top left are connected to the door and Nate tries to
push the door.)
Go forward and check
the boat with skeleton.
Take the
paddle-board from the skeleton. Check the iron bar (Ivo and Wilbur
cannot pick it up but Nate picks it up).
Go left and look at
the door at the end. Check the 2 holders planking the bowl. They should hold
the crystals.
Search the bowl. Take
sardines in oil tin and a stone disk.
Take round stones
from the ground in front of the door with opening-gears on top.
Check the door with an
opening on top. (As Ivo, jump through the opening on top; as Wilbur - use the
magic wand on the hole in the door and as Nate use the iron rod to break down
the door.)
Machine room:
Look around.
Open the drawer and
take another stone disk.
Look at the label of
the machine at right - Goom - Tec.
Stone disks:
See that it has 2 stone disks on top of the machine.
Use the stone disk in
inventory that has a larger brown area at center on the stone disks top of
machine.
Then use the stone
disk from inventory that has a smaller brown area at center on the stone
disks of machine. The disks are now the same height as the shaft at the
center.
Turn the stone
disks. See a close up of the disks.
Each disk has
symbols. See that there are 4 lights at bottom.
The object of the
puzzle is to select the correct symbols on each disk; then press the
shaft at center to get all lights green.
If the light is
green, there is a correct symbol at the correct disks. Find out which one
by changing the symbols on each and then pressing the shaft at center. If
the green light turns off, place that symbol back because that is the
correct symbol at the correct disk. If you already found a correct symbol
at correct place do not touch it anymore.
If the light is
yellow, there is a correct symbol but at the wrong disk. So check one
symbol at a time on the other disks.
Do this until all 4 lights are green.
Press the shaft at
center and see that all the machines are now powered.
Press the large
red button on the left.

Exit and go to the
main exit door and see it open. Exit and see that
the other 2 companions are gone.
Go to the exit to
the outside.
Hear Munkus give
orders to the troll guarding the other 2 companions. Munkus goes to the
inner temple.
Take care of Munkus:
Follow Munkus to inner
temple. See him try to open the door and place something as offering in the
bowl.
Enter the machine
room. Prepare a trap for Munkus.
Use the can of
sardines on the floor in front of the bottom drawer.
Open the bottom drawer.
Use the paddle on the
rotating machine with holes at right.
Look at and then take
the mail tube-cylinder on the floor.
Go outside and use
small stones at Munkus to get his attention.
Go back inside the
machine room and Munkus will follow.
Munkus slips on the
oil.
Munkus rises up and
gets whacked by the rotating paddle-board.
Use the cylinder on
the mail tube pipe at right.
Munkus rises up and
gets hit by the flying cylinder. Third time you're out!
The machine door is
closed.
Free the other 2
companions:
Go outside and search
the bowl for the object Munkus placed in it. Take the mirror.
Exit to the entrance
area. Take the 2 crystals and the door is closed sealing Munkus inside.
Go back to the exit to
outside.
Take the fishing
rod propped on wall. Swing to the other side.
Use the mirror on
the troll.
Go back outside.
Click the fishing rod on the troll's club, the brown item right side of the
troll.
Then click on the 2
companions, to give them a sign to distract the troll. The prisoners taunt
the troll.
Use the fishing rod
on the club. The rope is now strung in front of the troll.
Use the mirror on the troll again. The troll falls into the ocean.
Nate wants to leave
immediately but after realizing that only the arch mage can keep him safe
decided to wait for the other 2 to get the treasure.
Find the artefact:
Wilbur and Ivo use the
2 crystals to open the door to the inner temple.
They enter through
the statue's mouth and the teeth close trapping them inside.
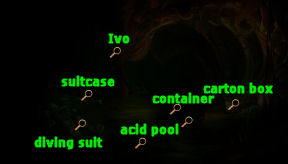
As Wilbur - Get light:
Playing as Wilbur.
It's dark in here. Use
the spacebar to see all the active spots.
Go right and check the
nothingness - take the carton box.
Go to the center and
take the container made up of metal and wood.
Check the caustic
liquid at bottom of screen. Check all the other hot spots.
Use the container in
the liquid at foreground.
Open the box and see
little packages. The little packages are full of dried jellyglowfish.
Use the dried
jellyglowfish with the container with liquid to get light.
Ivo points to the
artefact. They and the artefact are inside a monster.
Check the barrel. Wilbur cannot use the
barrel because there is no paddle.
Get Ivo and Wilbur
to the others side of the acid pool:
As Ivo: Change to Ivo. Use the barrel on their side of the stomach acid pool. See Ivo roll to the
other side.
Try to take the
treasure chest stuck on the wall.
Look at the hole, the
horn and the gramophone machine at right.
Take the board
left of the barrel.
Use the barrel to
cross back to the other side.
Give the
board to
Wilbur.
As Ivo: Change to Wilbur. Use the barrel and see Wilbur paddle to the other side.
Look around. Take the
gramophone scratchloudner.
Look at the metal
horn. Blow the horn.
Look in the smelly
hole. Go down the smelly hole. Read what Wilbur finds and does down there.
He gets a barrel
lid and rope given by the mirror.
Use the barrel to go
to the other side and Ivo.
Use the barrel lid on
barrel and Ivo gets an idea.
Ivo gets Wilbur to
enter the barrel and she rolls to the other side.
Get the artefact:
Give the rope to Ivo.
As Ivo: Change to Ivo. Use the
rope on the stuck treasure chest.
Pull the treasure
chest from the stomach wall.
Hear the monster's
sigh of relief.
Open the chest. See a
smaller box that is locked.
Get out of the
monster's stomach:
As Wilbur: Change to Wilbur. Look in the treasure chest and see another loudener - a
cone.
Talk to the monster:
Look at the metal tube. Blow into the horn. So soft.
Use the gramophone
scratchloudener on the horn. Blow into the horn. Not loud enough.
Use the cone into the
scratchloudener that is on the horn. Blow into the horn.
The monster talks.
Talk to the monster.
The monster releases
the two adventurers.
Ivo and Wilbur meet
Munkus, Nate, Critter and the troll. Nate made a deal with Munkus. The troll
holds Ivo while Wilbur tries to stop Munkus with his wand. Wilbur was suspended
in the air by Munkus. Nate attacks Munkus. The amulet of Balthasar opens a
portal. Nate and Wilbur with the artefact enter through the portal. Ivo tries to
go through but was stopped by Munkus.
Chapter 4:
The Wild Lands
Playing as Nate:
Wilbur
and Nate arrive
outside a cemetery. A very angry Wilbur gets caught in the snare. Nate was
knocked down by a black shadow.
Nate wakes up in a
Zombies' den. Talk to the 2 zombies. They are the Committee for the Humane
Treatment of the Undead. Wilbur is now at the Orc camp.
Nate tells everything to
the zombies. They scold Nate for what he has done. Nate has to get Wilbur, free
the elf and bring the artefact to safety.
The zombie holding his
head with a body that he cannot control is Gulliver. He can be found in his
workshop. The one with the pillory is the Boss.
The crypt:
Look around. Check the urns on the left.
Take the piece of
clothing-scrap of leather sticking out of the tomb behind the crying
bride.
The crying bride: Talk to the crying
bride-water corpse. Learn her story about being left by her Maximilian who
hoofed it.
Check the sarcophagus
of Maximilian's forbearers. There is a pool of tears in front of the crying
bride.
Chief Zombie:
Go to front part of crypt. See a dripping candle and a grave beside it.
Talk to the Boss-Chief
Zombie with the pillory. A paladin did this to him and is outside waiting for
him.
The paladin wants
revenge and would not listen to his apology. The pillory will open only when
the paladin forgives him.
Gulliver:
Go to the worktable at left. Take the pot of glue, yellow paint
and unbreakable string.
Look at mechanical
monstrosity. Talk to Gulliver with an Elvis haircut. Learn his story. The body
below his head is not his; he borrowed it from Esther.
The crying bride is
waiting for Maximilian to come back or write her a letter. Leave the crypt.
Outside the crypt:
Take the red earth
by the gate of the cemetery and the white mushroom at the foot of the
dead tree at right.
Esther:
Talk to the head on a lance. It is Esther.
Take the map
on top of the hat boxes below Esther. Check the map in inventory.
Paladin:
Check the pennant top of the tent.
Talk to the Paladin.
The paladin spits every time he says the word zombie.

Teepee:
Shaman:
Go to the teepee seen at top left of the screen and the crypt.
Talk to the minotaur
shaman. The shaman Fast Foot is smoking plants to commune with his
forefathers.
Take the copper
bowl left of the entrance and a feather of the headdress on the wall.
Pick up the broken bellows by the entrance
of the teepee.
Open the chest and
take the makeup-Indian ink. Leave the teepee.
Orc camp:
Go right of the crypt
to the Orc camp. Look around.
Take rotten boards
from the side of the path and blue blossoms left of the gate.
Check the juice press
on the garbage heap.
Look at and take the
poster-sheet of paper right of the gate.
Leave the mountains by
pushing the gate and an Orc appears at watchtower.
Talk to the Gorruck,
Chief of the Bloodscythe Orcs.
Wilbur is the bonus
prize for their warrior contest. The main prize is a bottle of firewhiskey.
Any warrior can enter
and Nate wants to enter the contest.
Find a way to win the
contest and Wilbur:
Go to the crypt and
talk to Gulliver. One way to win the contest is to have the invincible kit do
the fighting for you.
The invincible kit is
made up of the helmet, shield and the sword of power.
Sword of Power:
Gulliver says that if Nate helps with the making of his body; he will tell him
where the sword of power is located. Gulliver needs a lung, heart and bolt of
lightning to breathe life to the body.
The others would know
where the other 2 equipment are located.
Helmet:
Talk to Chief Zombie about warrior set. He will tell Nate who has the helmet
if he can get the Paladin to forgive him.
Get the Paladin to
forgive the Chief Zombie:
Shaman:
Go to the teepee. Speak to the minotaur about the Paladin. Tell him that the
friend regrets what he did but the Paladin won't hear any of it.
The shaman will brew a
sleepwalking potion. Nate will drink first and then get the Paladin to drink
the rest. As the Paladin walk him to friend and get him to listen to the
apology.
He needs Paladin's
hair, body fluid, clothes and something from his forefather.
Paladin's forefather:
Go to the inner part of the crypt and check the urns at left side. See one of the urns
has the coat of arms of the Paladin.
Take some of the
remains of the Paladin's ancestor to get ashes.
Paladin's clothes:
Go to the Paladin outside.
Check the chest at
left with logo of the Pink Crusaders. Open the travel chest and take the
pink pompom.
Paladin's body fluid: Look at damp ground in
front of the chest. Place the bowl on the ground.
Talk to the Paladin
about zombies. Pick up the spittoon.
Paladin's hair: Then talk about Paladin's hair. Get Paladin's comb.
Shaman:
Go back to the shaman. Talk to the shaman and give him all the ingredients for
the potion.
The shaman prepares
the potion and gives Nate the sleepwalking potion to drink.
Paladin:
Talk to the Paladin about a new drink. It has zero calories.
The Paladin is full of
mana. He hasn't used a spell in days. The Paladin gives Nate
power spells: sdr/sdk/sdw. The Paladin drinks the potion.
Enter the crypt as the
Paladin. Paladin-Nate talks to Chief Zombie and after some threats by the
zombie forgives
him.
Chief Zombie:
Nate returns to his body. Go talk to the Chief Zombie.
The helmet is with the
earth pixies in the mine.
Get the helmet:
Use the map taken from
the Paladin's camp and click on the mine at bottom left (one with the skull).
Helmet:
See Nate go down to the altar. The helmet talks to Nate.
He styles himself as
the prophet of their deity, Wuuzaaa. Learn that the pixies like glittery things. For the
pixies to believe, the deity himself would have to fire the helmet.
The helmet ordered the pixies to throw Nate out.
First area:
Go back inside the mine. Look around and see a water trough at left.
If you get caught
and thrown out - just come back in and be careful.
Second area:
Go through the opening at top of the screen.
Go right to next room.
Take key from table and dynamite from crate.
Go back down to first
area with water trough.
Side room by first
area: Go right to next room.
See 2 pixies working
here. There's a teddy bear on a chair and one of the pixies rubs it every now
and then. The other chair by the other pixie is empty.
Take the teddy bear
and place it on the empty chair. Watch what happens.
Go through the
entrance beside the chair with the teddy bear.
See a chest-box. Use
the key taken from the other room on chest to get magnetic stone.
Lit passage:
Go to the second area above. Go to the passage above and see a pixie working
at center of passage. Check the torch on the wall.
Left side room by
second area: Go back down to second area. Then go left to the side room.
See a hose-water skin
on the ground. Wait until the nearest pixie is halfway back to the wall to
pick up the empty water skin.
Go to first area and
use the water skin on water trough to get a full water bomb.
Lit passage:
Go back to lit passage going up twice.
Use the water bomb on
the lit torch. Now it's dark. Go to end of passage
above.
Third area:
See a pile of stones. There are 3 pixies working the lit passage.
Use dynamite on the
rubbish heap-pile of stones.
Go back down to the
now unlit passage. Take the extinguished torch from the wall.
Go down and left to
where the water skin was taken. Time your movement when the nearest pixie is
close to the wall. Use the unlit torch on the camp fire to get lit torch.
Go back to the rubbish
heap with the dynamite. Use the lit torch on dynamite. The passage fills with smoke.
Take the Helmet:
Go to the passage at top right now that the smoke covers Nate. Be on the level above the altar.
In inventory combine
the unbreakable string with the magnetic stone to get magnet on string
(pictured as string only).
Catch helmet with
magnet by clicking magnet on string at bottom of screen.
Watch what happens.
The pixie throws the helmet out of the mine.
Go down to the altar.
Look around and see a pixie cleaning a dragon head.
At the passage that
had the smoke before, check the veins in the rock wall. It is copper deposits.
Keep going down to exit the mine. Pick up
the helmet.
Jump to the crypt.
Find out where the
shield is located:
Talk to the crying
bride. She knows where the shield is located but would not let anyone else be
happy while she is in misery.
In inventory, combine
the feather or Indian ink (from teepee) with the blank paper (poster from Orc
gate).
Write a loving letter from Maximilian to the crying bride.
Select dialogues: High-born
Miss; the voices; fate kicked in; with considerable headaches and a malign curse.
Use the love letter
with the dripping wax candle by the crypt entrance.
Go to the sarcophagus
beside the crying bride and see the signet ring worn by the statue. Use the love letter
with wax blob with the signet ring.
Give the sealed
love letter to the jilted maiden. The maiden is now happy.
The bride says that the fat ogres took
the shield with them to the cave.
Get the shield:
Two headed ogre:
Use the map and jump to the cave at top left of the map.
Look at the gap at
middle of the path. Look at the 2 headed ogre.
Look at the huge plate
of food on the ground in front of the ogre. It's the shield.
Talk to ogre. Learn
that Blout on the left is hungry and Zloff at right is a battle mage. They are
half-brothers from the Lightning Fist tribe.
The shield is Blout's
favorite plate. Blout can eat after Zloff finishes reading.
Prepare a trap:
Go left to the gap. Use the rotten boards taken from outside the Orc camp on the
gap.
Go back to the ogre.
Look at the clay flagons at bottom right of the screen. It is XXXX strength.
Talk to Blout. Learn
that Zloff likes drink cocktail. Drunk very quick.
Nate will make them a
cocktail. The cocktail should be made of alcohol that blows your head off and
an umbrella.
Get ingredients for
cocktail: Take the hose left of the path by the
sword.
Take the sack of
fermenting apples just inside the cave.
Open the cupboard and
get umbrella.
Take the
cocktail
glass on top of the cupboard.
Prepare cocktail:
Jump to crypt and then go right to ogre camp.
Use the sack of rotten
apples on the press top of the garbage heap. Press the apples to get
fermented apple juice.
Go back to the left
and up to the teepee.
Look at the pot on top of the fire. There are holes on
the cover. Use the hose on the
cover of the pot.
Open the pot and place
the fermented apple juice inside the pot.
It is distilled once.
Do it again. Place the container with weak alcohol in the pot.
Do it once more. Place
the container with strong alcohol in the pot. That ought to do.
Get container with
ogre strength alcohol.
Set the trap:
Go back to the 2 headed ogre.
In inventory, combine
the container with alcohol with the cocktail glass and then with the umbrella.
Give the ogre
cocktail to Zloff. Zloff realizes that they are trying to get him drunk.
Blout hit Zloff's hand to get alcohol in his eyes. Blout empties the shield tray
of food but is still hungry. He will go hunting.
Talk to Blout and
learn that he
is hunting for anything.
In inventory combine
the string with the Paladin's pink pompom. Lure Blout by clicking the pink
pompom attached to string on Blout.
Take the shield of
power. The shield also talks. Marx is the helmet. Vladi is the sword.
Fix Gulliver's body:
Esther:
Jump back to the crypt. Take Esther's head from top of the pole.
Go inside the crypt.
Unite Esther's head with her body. Love at first sight. Wow!
Gulliver will not only
tell Nate where the sword is located but will give him an armor if he fixes
Gulliver's body soon.
Lungs:
In inventory, combine the broken bellows from the teepee with glue from
the worktable. Then seal the hole with the piece of leather taken from the
inner crypt to get repaired bellows.
Give the repaired
bellows to Gulliver.
Heart:
Talk to Gulliver and tell him that you can't find a heart anywhere.
Oh my! Esther donates
her heart.
Electrify the body:
Esther and Gulliver went out to erect the antenna.
Talk to Gulliver
outside. They are waiting for lightning to strike. It is part of the deal.
Get ghost mushroom:
Go to the shaman at
the teepee. Talk to the shaman. He is out of ghost mushrooms.
Talk to Gulliver about
the ghost mushrooms. They are small purple mushroom with green spots.
Talk to the Chief
Zombie inside the crypt about the mushrooms. There is no ghost mushrooms to be
found.
Make colors: If
you haven't yet, take white mushrooms from the base of the dead tree outside the crypt.
If you haven't yet, get red earth
from right of the cemetery gate. Go back to teepee.
Use the red earth
taken from cemetery gate on the mortar to get red powder.
Use the blue blossom
taken from garbage heap by Orc gate on the mortar to get blue paste.
Go to inner part of
crypt. Look at pool of tears left by the crying bride.
Use red powder on pool
of tears to get red paint.
In inventory, combine
yellow paint from worktable with blue paste to get green paint.
Combine red paint with
blue paste to get purple paint.
Make ghost mushroom:
Paint the white mushroom from the dead tree with purple paint.
Use green paint on the
purple mushroom to get lilac mushroom with green spots.
Talk to Gulliver about
the mushrooms rotten smell. Yuck and double yuck!. Get imitation ghost
mushroom.
Get lightning:
Shaman:
Go back to the shaman and give him the imitation ghost mushroom.
Talk to him about
lightning. He can summon the rain but lightning is another matter.
He gives the dance
steps for the lightning dance, the insult to the Gods. They will then
throw lightning on Nate.
Dance dance
revolution: Go to the dead tree in front of the cemetery
where the antenna is located.
Click on the dance
step paper given by the shaman.
Using your computer's
keyboard's arrows; click the arrow keys similar to that scrolling in the game
when the game arrows are inside the brackets.
Make as few mistakes as possible. The game is
forgiving after several tries. Good
luck.
Enough! Lightning
strikes the tree and Nate.
Follow Gulliver and
Esther inside the crypt. Talk to Gulliver.
Learn that the armour is inside the grave by the dripping candle.
The sword is
at Fiery Mountain, a volcano with a dragon in residence.
Nate takes the armour
from the grave.
Dragon:
Use the map to go the
Fiery Mountain at right of map.
Talk to the lady
transport
dragon that carried MacGuffin and was released by Ivo. She wants to be a
feared dragon, a position usually held by male dragons.
Nate will give her a
starter gold coin for her hoard and she will give the sword.
Get the head of the
lava bowl:
Look at the
lava bowl -headless metal dragon. Check the hole where the head was located.
Check the furnace. Take the stone bowl
right of the furnace.
Check the coin
press machine left of the furnace.
Check the anvil and
stone trough. Take the pliers and hammer.
Take a glittery
stone from the ground at left.
Pixies:
Remember where we saw a dragon's head. The pixie at the altar was cleaning the
sooty dragon's head. Pixies love shiny things.
Lay the stone on the
anvil. Hammer about the anvil by clicking the hammer on the anvil.
The stone splits open
to get stone with crystals.
Jump to the pixie
mine. Go up until the once smoky passage and then right. Go down to the altar.
Give the stone with
crystals to the pixie cleaning the dragon's head.
Take the stone
dragon's head. Take also offering - gold nuggets from the altar.
Make a gold coin:
Jump back to the Fiery
Mt. Use the dragon's head on the hole of the lava bowl.
Check the hatch of the
lava bowl. Pull the chain of the lava bowl to open the hatch and get lava
inside the furnace.
In inventory, combine
the stone bowl and gold nugget. Place the stone bowl
inside the furnace.
Use the pliers on
furnace to get the stone bowl with melted gold.
Use the melted gold on
the gold press at left. Look at press to get gold coin.
Give the gold coin to
the dragon.
Sword of Power:
Broken sword:
Nate looks for the sword under the dragon.
Nate takes a head
of a pickaxe. Nate gets a broken sword.
Read the smithying
book in inventory. Only level 98 smiths can reforge a sword. Nate has to practice
smithying until he can get to level 98.
The book says to make
copper pots. It only requires copper.
Get copper:
Jump to the pixie mine. Go to the passage where once was smoky.
Check the vein of
copper on the wall.
Take the wood -
handle
from the cart in front of the copper vein wall.
In inventory combine
the handle and the head of a pickaxe to get pickaxe.
Use the pick axe on
the wall to dig out copper ore.
Make copper pots
until level 98: Jump back to the volcano.
Place the copper in
the stone bowl.
Use the
stone bowl with
copper in furnace.
Use the pliers-tongs on furnace to get melted copper.
Use the melted copper
on stone trough to get copper.
Use copper on anvil.
See 98 copper bowls Nate made.
Reforge the magic
sword: Place the broken sword on the anvil.
Harden it in dragon
fire: Talk to the dragon. Select dialogues that will
make the dragon angry.
Select:
you're stupid; dragons like you shouldn't go in monster training and I need
your help...
The different items of
the kit talk to each other.
Check the shaman:
Check the shaman at
the teepee. The shaman is way out of it.
Orc camp:
Go to the
Orc camp.
Talk to the Chief Orc. After showing all the parts of the kit; enter
through the gate.
Playing as Ivo and
Critter: Inside the dungeon of Mortroga's castle, see
Ivo and Critter hanging from the ceiling.
Release Ivo:
As Ivo:
Talk to Tschiep Tschiep.
Talk to Critter. He
releases himself from the manacles and takes the bar from the torture
rack.
The bar doesn't work
on freeing Ivo's legs.
As Critter:
Automatically change to Critter.
Take the bar
again. Check the hanging skeleton and get piece of cloth.
Exit through door.
Critter slides under the barred door.
Troll:
See a sleeping troll. Under his foot are keys. Try to take the keys.
Try to take the hammer
in front of the troll. Too heavy.
To the right is a dog
kennel with bowls that have fire.
Mortroga:
Go up the stairs and see the back of Mortroga's throne and the Black Guard.
See a vase that
Critter can hide in. There's a locked chest, barrel at bottom of screen and cushion by Black
Guard.
Go left and see
cannonballs. Beside Mortroga is a table with parchments.
Far left of the
parchment and beside the cannonballs is a rusty basin with black liquid.
Get the keys:
In inventory combine the bar and the cloth from the prisoner.
Dip the
improvised
torch on the greasy black substance.
Go back down to the
dog kennel. Use the torch dipped in black liquid on the fire to light it.
Use the burning
torch on the troll's trousers. Immediately Critter hides.
See the troll run down
the tower. Take the keys.
Go back to the
dungeon. Use the keys on the leg manacles of Ivo. Ivo releases her arms.
Open the dungeon
door:
As Ivo:
Look around the dungeon. Check the 2 torch holders in the cell; the cage,
red phone booth.
Pulling the torch
holder by the window opens the phone booth.
Check inside the phone
booth and see pictures and writings.
Pull the torch holder
by the door and nothing happens.
Check the bars with
the lock. Talk to the something inside. It's snoring.
As Critter:
Exit the dungeon.
Take the rubber
chicken hanging by the troll's chair.
Go back up to
Mortroga's throne area. Take the red cushion beside the Black Guard.
Open the barrel and
look through the pictures until Critter takes one picture.
Go left and push the
cannonball. Watch where it rolls to.
Go back down and go
left to the dungeon's window.
Move the stove pipe so
that the left end is inside the window.
Place the red cushion
on the plank protruding from the wall and where the cannonball landed.
Go back up to
Mortroga's throne area again. Push another cannonball and see it land on the
red cushion.
Go down and push the cannonball. The cannonball goes inside the dungeon. If
not, move the stove pipe until another cannonball try does. The cannonball is in the dungeon.
Go back to the dungeon
and give the lit torch, rubber chicken and the picture to Ivo.
As Ivo:
Place the picture on the dungeon door's viewing window.
Use the rubber chicken
on the torture rack.
Pick up the
cannonball. Use the cannonball on the rubber chicken stretch on the rack.
Ivo is waiting for a
target.
As Critter:
Exit the dungeon. Taunt the troll. Critter immediately goes back to the
dungeon.
The troll follows.
Now you have a target.
Ivo fires and the dungeon door is open. They place the troll in the empty
cage.
Release MacGuffin:
As Ivo:
Wake up the something in the cell right of the troll. It is MacGuffin.
The lock is magically
sealed by Mortroga; so only her wand can unlock it.
As Critter:
Go to Mortroga's throne area and hide inside the vase.
As Ivo:
Go upstairs and take the hammer from the Troll's nook.
Use the burning torch
on the banner above the stairs going to the throne area.
The Black Guard checks
the fire.
As Critter:
Take a parchment from the table left of the throne.
Climb back into the
vase. Wait until the Black Guard goes back beside Mortroga.
Go back to the
dungeon. Give the frost spell to Ivo.
As Ivo:
Check the frost spell. Use the freeze spell on the bars of MacGuffin.
She doesn't know how
to cast a spell. Give the freeze spell back to critter.
As Critter:
Use the freeze spell on the bars. The bars are frozen.
As Ivo:
Use the hammer on the bars and they shatter. MacGuffin is freed. He shows
Ivo his lock pick.
Get out
of the castle:
Ask MacGuffin to check
the phone booth. MacGuffin needs a number and coins.
Get coins:
Ask MacGuffin about the lock pick. He gives his lock pick to Ivo.
Go to the throne area.
Use the lock pick on the chest beside the vase and barrel to get coins.
Go back to dungeon.
Give the coins to MacGuffin.
Get number:
Pull the torch holder left of the dungeon door. Ivo asks MacGuffin to pull the
other torch holder.
A secret compartment
at the center opens. Take the phone book.
Give the phone book to
MacGuffin. MacGuffin looks for the number. Wow - 2.
Phone booth:
They all pile in the phone booth. MacGuffin dials and they are outside
the castle.
Playing as Nate:
Nate enters an empty
Orc
camp. There is only the one legged chieftain left. The chief is the referee of the contest. Nate is fighting Ma'Zaz. They can't give Nate to the arch witch because he is a
warrior.
The contest is of
strength, skill and speed. Nate can start the contest anytime. He has to stay
inside the camp or else he is disqualified and is fair game.
Contest of Strength:
Talk to the Orc
chieftain. The contest of strength is to throw the dwarf, a painted tree trunk
as far as he can.
Ma'Zaz throws the
dwarf and the distance is measured by the chief using a measuring tape made of
socks. Ma'Zaz' throw was 12 feet.
Ma'Zaz graciously
gives herself a handicap. Nate can do as many attempts to improve on his
performance until the sun sets.
Watch Nate throw the
dwarf. Okay - cheat.
Find help:
Look around. Look at the termite mound left of the fort gate.
Talk to the termites
and ask for help. They can hollow out the dwarf but in return they want a 1784
Château Latife board.
Go to the right screen
back of the camp. See the biggest tent in the camp.
Enter the tent. See a
hooded stranger exit the tent.
Nate talks to Wilbur
hanging upside down on the totem pole. They talked about heroic valour and
contest. Learn where the artefact is located and see it surrounded by a powerful
spell.
Check the basket at
top of screen. Take the wooden board from the Chateau whatitsname.
Exit the tent. Talk to
Bill, the merchant sitting at right.
Go back to the front
part of the camp and talk to the termites. Nate gives the board.
Use the board with
termites on the dwarf to put the termites on the tree trunk.
Click on dwarf to hit
it a second time. Nate throws the dwarf. Nate won by 6 toes. That looks
shorter though.
Test of skill:
Go right to the back
of the camp. Talk to the Orc chieftain. The contest of skill is archery.
See Ma'Zaz hit dead center of the target. Nate needs a bow and arrow.
Get an arrow:
Enter the chieftain tent and look at the skull of the skeleton by the tent
door twice. Nate takes the
arrowhead sticking from its head.
Go left to the front
of the camp. Look at the tree by middle tent and get a branch-shaft.
In inventory combine
the shaft and arrowhead. Add the feather that was taken from the shaman's tent
earlier to get an arrow.
Get a bow:
Talk to the hooded figure by the gate.
The hooded figure told
Nate to ask the merchant for 98 copper pots.
Talk to the merchant.
Then go back and talk to the hooded figure. He leaves to get a bow.
Go to back part of the
camp and then go back to the hooded figure by the gate. Get a bow.
Archery:
Talk to the Orc chieftain. Learn about the contest. If Nate wins 2 out of 3 of
the tests, Ma'Zaz can choose what she wants for her one win. If they make a
draw, they will split the prize. Nate then has to win all the tests.
Nate shoots and he
is way off.
Get Ma'Zaz to
lose: Go left and talk to the merchant. He's got the
97 copper pots now.
Bill has items that
might be of interest: shrinking ring, magical stone... The magical stone
attracts metal of all kinds. Nate asks if they can play a game to win the
magical stone and bets the warrior set.
The merchant wants a
number game.
Go left and talk to
the hooded figure. The figure gives a crumpled note. Read the note in
inventory. It has 42, 79 and 2.5 written on it.
Talk to the merchant
about the numbers game - magic stone. Nate tells the merchant to write down
the 3 numbers. Nate wins the magic stone.
Go to back of the
camp and place the magic stone at back of the archery target.
Get Nate to win:
Look around the back of the camp and see 4 items hanging on wall that can be
moved: shield by chieftain's tent entryway, the wok at top right screen, the
turtle shell and pan framing the entryway at left of screen.
By trial and error
and shooting the target, learn how to adjust those 4 items.
Each of those 4
items can be moved 3 times: left middle and right.
Move the shield on
the ground right of the chieftain's tent entryway to the middle or second
position to be at slight angle facing up. Original position is the 3rd
position at maximum angle facing up.
Move the wok hanging
at top right at right screen to face the target and be at rightmost
position. Original position is facing the entryway or leftmost.
Move the turtle
shell left of Ma'Zaz to middle position facing the wok across the area.
Original position is facing the entryway.
Move the pan right
of Ma'Zaz to the leftmost position to face the turtle shell. Original
position is middle.
Talk to chieftain to
shoot. Watch Ma'Zaz miss the bull's-eye this time and the path of the arrow
Nate shoots.
If Nate doesn't hit
the target, make slight adjustments.
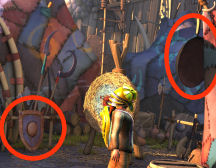

Contest of speed:
Go to front part of
the camp and learn about the third contest.
Ma'Zaz wants the head
of the prize. She withdraws her handicap.
Nate and Ma'Zaz have
to run to peak of mountain and back. Whoever gets back to the camp first wins.
An out of breath Nate
returns back to the Orc gate and is told that he won the race.
Playing as Wilbur:
Wilbur is freed but the chieftain would not relinquish the artefact. Nate
accepts the drink to his victory and leaves Freed Willie in the tent.
Get the artefact:
Look at the artefact -
little box and the magic circle.
Look at the basket and
get a red thread.
Go outside and talk to
the chieftain. Watch Nate. Learn about the magic circle.
Neutralize the
magic circle: The chieftain gives the box that the magic
circle came in because only he knows the password.
Examine the magic circle
package and get instructions and mithril foil. Read the
instructions. The evil eye will be neutralized only by the correct password.
Check the mithril foil
and learn what to do if the password is forgotten. A protection from the evil
eye can be made from wire and mithril foil.
Make evil eye
protection: Look around. Check the target twice and take the
magic stone placed there by Nate.
Go left to front part
of the camp. Look around and see a TV antenna atop the right tent.
In inventory combine
the red thread with the magic stone. Use the thread with magic stone on the
wire-antenna.
Combine the wire and
the mithril foil to get a helmet - head protection.
Get the artefact:
Go back inside the tent.
Use the head
protection. Enter the magic circle and take the little box.
Wilbur learns the
password. LOL.
Try to take the little
box. Wilbur can't take it out of the camp since the chieftain will check him.
Get the artefact
out of the camp: Exit and go to the front part of the
camp.
Look at the termite
mound. Talk to the termites. Wilbur tells them about the box.
Wilbur automatically
carries the termites. Go back to the tent. Wilbur feels someone
is in the tent watching him.
The termites carry
the box.
Watch the mirror.
Wilbur tells Nate that
they are ready to leave. The termites want the power of the amulet. Nate
takes care of that threat.
Wilbur and Nate exit the
Orc camp. Munkus and the shadow army are waiting for them. Munkus takes the box.
Chapter
5:
The Wild Lands again
See Munkus present the
box to Mortroga at her throne place.
Ivo joins Nate and
Wilbur. Using an amulet, Nate and Wilbur leave Mortroga's castle. Ivo
watches as Munkus asks Mother why he should give her the box.
Ivo joins Nate and
Wilbur in front of the Orc camp. Ivo explains that she, MacGuffin and Critter
escaped the castle and met with the real arch mage. She uses Telarion the amulet
that can teleport through space and time.
Down! See Nate arrive at
the Orc camp wearing the kit.
Ivo gives a bag to
Wilbur and asks him to replace what is inside the box with it.
Ivo tells Nate to help
his other self to win the competition and gives him something to put on.
Playing as Nate:
See Nate wearing the
hooded figure outfit. Enter the Orc camp.
The Orc chieftain
mistakes Nate as Kallup, the arch witch's spy.
Help win the contest
of strength:
Look at the display
board. Take the sock measuring tape hanging on the sign.
Overhear the chieftain
and Ma'Zaz talk about what the bounty hunter will do with Nate.
Get the board for
the termites: Go right to back of the camp. See the other Nate
and the merchant. Enter the tent.
Look and click on the
cushion at top of the screen. Nate says that is where the board wanted by the
termites was supposed to go.
Jump to the
crypt. Check the locked gate.
Talk to the undead
ghost jester. Ask for a board from 1784 Chateau Latife.
The jester says to
check the coffins at the graveyard.
Click on all 3 crosses
of the active graves to check the date of expiration <sic>.
Go back and talk to
the jester again. He shows the familiar board for Nate to take. The
request by the termites could be any old board.
Go to the Orc camp and
the chieftain's tent.
Place the bog standard
board onto the cushion in the chieftains' tent.
Leave the tent and
meet the other Nate.
Sabotage the
measuring tape: Go to the shaman's teepee. Look at the
shaman.
Check the open pot.
The water begins to simmer.
Boil the socks. Nate
takes the boiled socks and see that the socks shrunk. Get shrunk sock
measuring tape.
Go back to the Orc
camp. Hang the sock tape measure on the sign.
Exit and then come
back in to watch how the other Nate wins the contest.
Help with the test of
skill:
Now we need an antler
bone bow.
Get antlers:
Go to the shaman at the teepee. Talk to shaman. He wants firewater for his
deer antlers.
The other Nate asks
for bow. This Nate tells him to ask the merchant for copper pots.
The other Nate asks
for something to stop Ma'Zaz from winning. This Nate gives him the crumpled
note.
Go back in and talk to
the merchant about firewater. He will trade for 97 copper pots.
Jump to the volcano.
Talk to the dragon.
Take 97 copper pots
and one nice copper pot for the Mary.
Go back to the
merchant at the Orc camp.
Talk to the merchant
and get precious firewater.
Go back to the shaman
and get the antlers. Learn that firewater is common and costs only few
copper.
Complete the bow:
Jump to the 2 headed ogres.
Go right and check the
cupboard. Get the Zloff's dental floss.
In inventory combine
the string and the antlers to get a bow.
Go back to the Orc
camp. Nate gives the bow to the other Nate.
Go right and see other
Nate win the archery contest.
Help win the speed
contest:
Find someone to
stop Ma'Zaz: Go outside to the front of the Orc gate.
Look at the trash heap
of rubbish and get a gnomish hot air balloon.
Jump to the 2 headed
ogre cave.
Look in the rock
crevice and the ogres ask who's there. Answer Ma'Zaz. Nate gets the ogres
angry at Ma'Zaz.
Talk to the ogres
again as Nate. Nate describes Ma'Zaz to the ogres.
Get the ogres out
of the crevice: Go right and check the camp fire.
Use the gnome hot air
balloon on camp fire.
Nate tries to raise the ogres using the hot air
balloon. It won't work. Blout
is too heavy.
Go back to Orc camp
and talk to the merchant. The merchant gives the shrinking ring.
Go back to the ogres.
Throw the shrinking ring down to the ogres. Grab her boys!
Go back to the Orc
camp and see what happens.
Playing as Wilbur:
See Wilbur play cat
burglar and drop down into the chieftain's tent.
Use Ivo's cloth on the
little box to swap the artefact.
Watch how this Wilbur
does the mirror trick.
The other Wilbur and
Nate are captured by Munkus.
These Nate and Wilbur
are taken up by Ivo. Ivo has to do something else.
Playing as Ivo:
Exit the dungeon and
climb up to Mortroga's throne room.
Ivo picks up the
Amulet of Balthazar.
Watch what happens
when the heroes are atop the former transport dragon and the pixies arrive to save Wuuzaaa.
Watch the gorgeous
artworks during the credits. See the transformed bunny.
Maybe there's
another adventure waiting for us!
This document may not be
distributed without express written permission of the author and the content may
not be altered in any way.
For
Questions or Comments on this Walkthrough,
Please write to:
MaGtRo
Copyright © 10/2011
MaGtRo
 GameBoomers
Walkthroughs and Solutions
GameBoomers
Walkthroughs and Solutions