Tales of Monkey Island
By LucasArts & Telltale Games
Gameplay:
The game manipulations can be either keyboard or
mouse.
To move: Use the keyboard
WASD keys or click-hold-drag the mouse.
To run: Press the shift key or right click while walking.
Inventory: Use the
Tab key or I key or click the scroll wheel or middle mouse button to open the
inventory. You can also move the cursor to right side of the screen to bring
out the inventory panel.
To examine an item, select an item and then click on
the magnifying lens at top left.
To combine, place the items on the spaces at left
and then click the + at the middle.
The space bar pauses the game.
ESC key opens the menu.
The main menu has save & load, new game, settings,
quit and resume game.
The settings option has hint frequency, pop up text
and subtitles.
Chapter 1: Launch of the Screaming Narwhal
Walkthrough by Team Waxman
July 2009
Rock of Gelato:
LeChuck holds the 13th Monkey of Montevideo, whose
sacrifice will bind the ocean to his infernal wish.
See Elaine tied up on her own ship anchored close to
Rock of Gelato.
Guybrush Threepwood the hero comes sailing in to
save the day.
LeChuck starts his chanting to finish the voodoo
ritual.
Elaine tells Guybrush to finish enchanting the sword.
The Cursed Cutlass of Kaflu:
Get recipe: Go left to the
mast and take the voodoo recipe tacked on pole.
Read the recipe and see that the cutlass needs to be
sprayed by an enchanted root beer.
Get root beer: Go
right and climb the stairs to the helm.
Pick up the monkey coffin (Monkey Casket of
Kauai) on the deck at right.
In inventory, take the magnifying lens at top left
and click it on coffin.
The root beer is taken from coffin.
Make it fizzy: Combine
breath mints and root beer.
Place the items on the left side of the inventory
and then click on the + symbol to get fizzy root beer.
Enchant the cutlass:
Combine the cutlass and the fizzy root beer. Guybrush showboats and drops the root beer.
Get more root beer: Tell Elaine to throw the rope. Elaine drops
the mast and Guybrush crawls to Elaine's
ship.
Guybrush's ship drifts away. Look around the deck.
Go left and see Chuck the plant beside Elaine. Use
the cutlass on plant to get Chuck roots.
Go right and use roots on the barrel marked grog
(beer).
Use breath mints on the newly made root grog.
Dip the cutlass in the barrel of root grog.
Use the enchanted cutlass on LeChuck. Wow!
Guybrush's hand changed to LeChuck's hand.
Explosion!
Flotsam Island:
Guybrush washes
ashore Flotsam Island. The poxed hand hits the friendly pirate.
Meet Nipperkin of Keelhauler Gazette. Learn that
the winds blow in everyday here.
Deep Gut is his source of off island news. He wants
pirate mayhem news in town.
Check the town:
Club 41: Go up the stairs
and read the sign right of door of Club 41.
Knock on door and see that they want a card.
Keelhauler Gazette: Check
the latest edition of the gazette. See a vat of ink beside the bulletin board.
Check the door. Only employees allowed.
Talk to Nipperkin - Davey about pirate news.
Jail: Check the windows and
jail carvings on the building. Check the door.
Flier: Take the flier
on the pole by the jail. Learn about Morgan Le Flay, a pirate hunter.
Pillar: Check the pillars at
the side street. They have carvings of mermaids.
Well BlowMe Down Glassworks:
The sign says there's an Alphabet sale. Check the door.
Doctor's house: Climb the
stairs. Knock on door. Guybrush picks up the flower pot.
Screaming Narwhal: Go left
and see the Screaming Narwhal.
Meet Reginald Van Winslow. Talk to him completely.
Anyone that knocks the captain off the deck becomes
the captain. He lost his membership card to Club 41.
Show him the flier of the pirate hunter. Learn
something about Le Flay.
Check the frilly pink underwear and the socks on the
clothesline. Guybrush gets a temporary membership card to Club 41 from
the sock.
Well BlowMe Down Glassworks:
Go back and talk to Gaffer Crimpdigit.
Learn about the crystal reefs around the island. Ask for vowel tube. Get a U tube.
Show him the flier of the pirate hunter. Learn
something about Le Flay.
Keelhauler Gazette: Go back
and talk to Davey again about piracy.
Learn about ship seizing, buried treasure and bar
brawl. If Guybrush makes news, the secret of Deep Gut is his.
Show him the flier of the pirate hunter. Learn
something about Le Flay. None of the stories about the pirate hunter jibe.
Bar Brawl:
Knock on door of Club 41. With Winslow's card,
Guybrush got in and causes mayhem - or his hand did.
Buried Treasure:
Look at the broken
grogatini glass in front of the bulletin board to get grogatini sword with olive.
Jungle: Go to jungle
entrance either by the path between the pillars by the glassblower's shop or
right behind Club 41.
See a map of Flotsam Island. Click on jungle
entrance.
Take the bottom left path and see a pirate beside
some action figure dolls.
D'Oro: Talk to portly
pirate, Joaquin D'Oro a treasure hunter. Learn that he collects Porcelain
Power Pirates. The rarest doll is the Dark Ninja Dave. He gives the worthless
treasure map to Guybrush.
Select the dialogue Look, it's Dark Ninja Dave. Take a pink
action figure from the pile of Pajama Pants Pierre on the ground.
Dark Ninja Dave: Go back to
the gazette building in town.
Use the pink action figure on vat of ink right of
the bulletin board.
Combine the ink stained action figure with grogatini
sword to get Dark Ninja Dave.
Follow treasure map:
Go back to the jungle and the crossroad where
D'Oro is playing with dolls.
In following the map, listen to the sound made by
animals.
If the path is correct, hear bells and sometimes
Guybrush says some assuring statements.
If the path taken is wrong, Guybrush goes back to
the well to start over.
At the crossroad, go to top road. See the well.
Dip the map on the well. The earth shakes and the
map glows.
Take the right path. Hear snort of the boar and bells.
Take a bomb from the ground. Guybrush takes
all the bombs.
Continue to the right. Hear chimps and bells.
Take upper right path above the stone stand. Hear
buzzing bees and bells.
At the crossroad, take the bottom path and hear
monkeys.
At crossroad where D'Oro is playing dolls, go
bottom
right (in front of D'Oro). Hear snorts of the boar and bells.
Take the upper left path. Hear bees and bells at
crossroad with altar.
Take the left path and hear chirping birds.
Go forward and see a dug hole - X marks the spot.
Place Dark Ninja Dave in the hole.
Make news about buried treasure:
Return to jungle entrance and go left to D'Oro. Talk to D'Oro about his map.
D'Oro digs the treasure
with his hand. That is one happy pirate and made for great news too.
Seize the ship:
Click docks in the map. Go left to the ship.
Climb the planks and be stopped by bacon grease.
Climb the anchor chain and be stopped by live coals.
The dock now has grease fire. Use bomb on grease fire.
Use lit bomb on frilly pink underwear. Use crank
right of socks. Ugh!
Use lit bomb on frilly pink underwear. Use
clothesline left of pink underwear.
Here's Captain Guybrush Threepwood. Nipperkin hears
the news.
Deep Gut:
Find Deep Gut: Nipperkin
gives Guybrush all the info he has about deep Gut.
Look at map. See footsteps to the jungle and the
word 'deadline'.
Go to jungle entrance. Follow the map given by
Nipperkin.
Go forward to first crossroad where D'Oro was
earlier.
Take the left path to the stone stand.
Take the top path above the stone stand until the
well.
Take the top path until a circular calendar on the
ground.
Take the top path and forward to a hut.
Knock on door. Give the password - deadline.
Voodoo lady: She wants the
Cursed Cutlass of Kaflu. She needs to dismantle it.
Talk to Voodoo lady completely. Guybrush's hand has
the Pox of LeChuck.
The only cure is the La Esponja Grande. Coronado Da
Cava, a' friend' of the Voodoo lady can help Guybrush.
He can be found at Jerkbait Island. She gives a
locket to show Da Cava.
Look at the locket in inventory. See the pictures of
the Voodoo lady and Da Cava.
Look around and check everything in the room.
Click on the pyrite parrot and Guybrush teaches it
to say his name.
Pick up the pyrite parrot from the floor at left.
Try to leave and the Voodoo lady gives the ancient
scroll in unbreakable bottle left by the Vaycalians former inhabitants
of Flotsam Island or you can pick up the bottle first from the table.
Exit the hut. Pick up the ancient weather vane
from the ground. Go left.
Try to break the
unbreakable bottle:
Automatically be at the docks. Nipperkin comments about the death cloud
hanging over the island - The Pox of LeChuck.
Go to Crimpdigit the glassblower. Talk to Gaffer and
he says he made the unbreakable bottle from the crystals from the reef. He has
the unbreakable bottle breaker but it will cost gold to use it.
Screaming Narwhal: Go left
and climb the anchor chain.
Van Winslow appointed himself as the first
mate.
Go down the steps. Take the cheese wheel left
of the cannon.
Cannon: Fire the cannon.
The island's wind blows the cannon back and it hits the glassblower's
unicorns.
Use the unbreakable bottle in cannon and fire the
cannon again. It hits Crimpdigit.
Exit the ship just before the stairs to the wheel.
Go to the glassblower. Pick up the unbreakable
bottle from ground and the unbreakable bottle breaker from the
bench.
In inventory, combine the unbreakable bottle breaker
and the unbreakable bottle.
The poxed hand prevents this to happen.
Poxed hand:
Marquis De Singe: Go left
and up the stairs to the doctor's door. Knock on door.
At his lab, talk to the doctor - Marquis De Singe. Learn his history.
He studies the hand and decides to amputate.
Guybrush is locked to a chair. He numbs the hand.
He leaves to sharpen his petite guillotine and
leaves the key on the skeleton.
Escape the chair:
The chair turns left and right using the A and D
keys.
The chair also reclines and be in upright position
using the keys W and S.
Show a picture to the monkey. Then feed the monkey
and it will go to the counterpart of that picture in the room.
Free the monkey:
Press D and W keys to turn right and recline. Pick
up the key.
Press A key to turn and face the monkey, Jacques.
Give the key to the monkey.
The monkey opens the cage door and goes out.
Get picture of skeleton hand:
Press A key to face the projector. Use the bell on
the table. The monkey takes a picture and places it on the projector. See a
plan of a mouse in a cage and the monkey's electric antenna.
Press S key to sit up. Use the right pedal and a
banana drops. The monkey happily eats it, studies the picture and goes to
the mouse wheel.
Use the left pedal and this buzzes the monkey.
Jacques
knocks the picture of the hand to the floor.
Press A key to turn to the front. Take the picture
from the floor.
Get the key from skeleton:
Press D and W keys to face the projector and to lie
down. Place the picture on the box of other pictures.
Ring bell and the monkey changes picture. See Guybrush's skeletal hand.
Press S to sit up. Use right pedal to give monkey
a banana. It studies the picture and goes to the skeleton at the corner.
Use the left pedal
to shock the monkey. The key attaches to the magnetized tail.
Give key to
Guybrush:
Press W key to lie
down. Ring the bell. The monkey changes the picture to the pirate's version
of DaVinci's Vitruvian Man.
Press S key to sit up. Use the right pedal to give
a banana. It studies the picture and jumps on Guybrush.
Guybrush frees himself.
Marquis De Singe runs after Guybrush. He reads
the flier that lands on his face about the pirate hunter.
Ancient scroll:
Break the
unbreakable bottle: In
inventory, combine the unbreakable bottle breaker and the unbreakable bottle.
See that the ancient scroll is blank.
Read the scroll:
Go to Hemlock MacGee, the crusty pirate sitting on the steps of the
courthouse.
Talk to him. Find out that he is the MacGee that
owned the scroll before the Voodoo lady.
He has a lens that can read the scroll. Ask and he
will then give his Eye if the Manatee lens.
In inventory, combine the Eye of Manatee and the
ancient scroll. Study the map.
Cheese wheel: Use the cheese
wheel on the jail carvings and get the impressions of eyes.
De Singe: Go left and see De
Singe looking through a telescope. Go to De Singe's house and talk to him.
Follow the Ancient Scroll map:
Go to the Jungle entrance.
Take the upper left path. Use the scroll on the
altar. Guybrush does his dance and the ground shakes.
Turn around and go back to the jungle entrance.
Hear bees and bells.
Take the lower left path. Hear monkeys and bell at
crossroad.
In inventory, use the magnifying lens on the vane.
It turns to the right.
Take the path behind Guybrush or the upper path of
the crossroad.
Be at the well. Use flower pot in well. The
ground shakes.
In inventory, use the magnifying lens on the vane.
It turns to the right.
Take the right path from well. Hear bees,
bells and positive comment.
Go back to the left (or turn around) and see a
different scene.
Place the weather vane on the stand. It points
to the left. Take the vane back.
Take the left path.
See the calendar on the ground. Go around the
calendar several times and see it flashes colors: red, yellow, green and green again. The
ground shakes.
In inventory, use the magnifying lens on the vane.
Take the path above the calendar. Be at Ancient
portal.
See De Singe come out of the door. He has a plan to
take Guybrush's hand.
Ancient Portal:
Open the portal: Check the
clamshell at right and the portal with a manatee on top.
Look at the crystal nose. Use the unbreakable bottle
breaker on the crystal nose.
Pick up weird door face.
Use the pyrite parrot into the nasal cavity.
Return to jungle entrance and then to the dock.
Go to De Singe's house and talk to him about PROOF
that you're up to no good.
Automatically be by the ancient portal. See De Singe
get tricked by the parrot.
Guybrush takes the ancient tool.
Wind control device:
De Singe let out that this is a wind control device
and a wind god is to be summoned to control it.
The wind control device has 4 fingers.
Use the ancient tool on the clamshell closest to the
big device. It activated all 4 wind gods - mysterious idols in the island.
Summon the wind gods:
Mysterious idol closest to the wind control
device:
Go to the right and see the 3 wheels of the
mysterious idol.
Look close at the idol. Place the weather vane on
top of the mysterious idol.
Turn the 3 wheels to match the face on the weather
vane.
Use the ancient tool on the clamshell right of the
mysterious idol.
One finger of the control device moved.
De Singe blows Guybrush to another part of the
jungle.
Enigmatic Idol: Go right
and be at the map. Go to the enigmatic idol.
Look close at the idol. Place the weather vane on
top of the idol.
Turn the 3 wheels to match the face on the weather
vane.
This one is missing a nose. Use the flower pot on
noseless place on the middle wheel.
Use the ancient tool on the clamshell right of the
idol.
2 down, 2 to go.
De Singe blows Guybrush to another part of the
jungle.
Strange Idol: Go back
to jungle entrance. Go to strange idol.
This one is missing a wheel. Use the cheese wheel
with the impressions of the jail house carvings on the empty space.
Look close at the idol. Place the weather vane on
top of the idol.
Turn the 3 wheels to match the face on the weather
vane.
Use the ancient tool on the clamshell right of the
mysterious idol.
3 down, 1 to go.
De Singe blows Guybrush to another part of the
jungle.
Messed up - final Idol: Go
to jungle entrance. Take the upper left path to the altar. Go right from
altar.
Meet De Singe again. Use the dialogue "Look, it's
King Louis."
As soon as he's distracted, use the U tube on the
muzzle of the rifle.
De Singe is stuffed on top of the messed up idol.
Look close. Turn the wheels and listen to sounds
made by De Singe. Select that side of the wheel when he makes a pleasant sound.
Use the ancient tool on the clamshell right of the
mysterious idol.
The pox is blown out of the island by the wind. The wind is
blowing normal now.
Where to now?
Automatically the Screaming Narwhal sails to sea.
Van Winslow asks where to now? The poxed hand stops
Guybrush from answering.
Answer: Climb back to the
wheel.
Turn the wheel and the hand turns it abruptly,
tilting the ship.
The tar barrel rolls to the cannon.
Immediately - go down, pass to the right of the mast
and go to the cannon.
Fire the cannon. That movement crashes the tar
barrel on the mast and tar spills.
Go around the mast and look at the puddle o' tar.
Guybrush vocalized his intention of tarring his
hand.
Click the map to tell Winslow where the destination
is on the map.
The hand socks Guybrush down on the tar.
The hand is tarred.
Make way to Rock of Gelato
See Elaine's ship.
See Elaine in Guybrush's ship. The human LeChuck
courts Elaine.
Chapter 2: The Siege of Spinner Cay
Walkthrough by MaGtRo & Team Waxman
August 2009
Morgan
Le Flay, Mighty Pirate Hunter:
Guybrush
Threepwood is in trouble. He's facing the point of Morgan Le Flay's sword. She
is a fan of Guybrush.
The pirate
hunter was hired by Marquis De Singe to get Guybrush's infected left
hand.
She cuts the hand off. The hand lands on the
railing by the stairs.
Sword Fight:
See the hook Morgan used on the railing in front
of the hand, which in turn is being inspected by a seagull.
Check the barrel o'fish hanging on the mast kept
by Winslow.
Talk-click on Morgan twice until the hook and the
hand at the railing is seen closer.
Take the hook.
Talk-click on Morgan again. Guybrush backs up the
stairs to the bridge.
Use the hook from inventory on the cable strung
across the mast holding the barrel o'fish.
In true pirate fashion, Guybrush uses the hook on
his stump. The fight is now on the mast.
Use the rope holding the barrel o'fish.
Back on the deck, talk to Morgan several times.
Now on the bridge, use the wheel to tilt the ship.
Talk to Morgan again until you are close to the
hand being inspected by the seagull.
Guybrush looks at the fish in the barrel and the
seagull.
Click-shoo the seagull away from the hand. It
lands on the barrel o'fish.
That tilted the good guy to win the sword fight
but loses the hand.
Winslow says the mast has a crack on it because the
barrel o'fish he uses as counterweight is gone.
Go right and click on the map. Click on Jerkbait
Island. Guybrush and Van Winslow sail to Jerkbait Island.
In inventory at right side of the screen are: eye
of Manatee (magnifying lens), locket given by Voodoo Lady,
Pyrite Parrot that mimics Guybrush, ancient tool and hook.
Merfolk at Spinner Cay:
Spinner Cay is the epicenter of the Jerkbait Island.
Winslow says that the island is inhabited by merfolk.
Guybrush looks for his wife, Elaine. Go right to end
of pier.
Vacaylian: Check the raft
on the right side of the pier. Talk to the Vacaylian, a merfolk completely.
Learn that Elaine is at the Royal Chamber and that
LeChuck with his monkeys went to the jungle.
Learn that De Cava known as Crazy Sponge Guy is
looking for a mystical sea urchin. He has a shack at Roe Island.
Learn that a transit pass is needed to use the raft.
Chieftain Beluga can give transit pass.
There's a shop in town that can fix the mast of the
ship. Just follow the cave path to get there.
Elaine: Go forward and see
Elaine at the Royal Chamber. An infected pirate wants the ancient summoning
artifact from the chieftain.
Elaine talks to Guybrush and sees the missing
hand-wedding ring. She gives her diamond ring for Guybrush to wear.
Get a transit
Pass: Climb up to the Royal Chamber. See that Chieftain
Beluga is in a hot tub.
Talk to everyone. Captain McGillicutty wants the
ancient summoning artifact that can help find the pox cure.
The Esponja Grande can soak voodoo curse.
There are 3 golden artifacts: wise turtle,
noble sea horse and cranky fish. These 3 artifacts when combined and with the
ritual words recited can call the legendary sea creatures. The creatures will
rise to lead to the source of the cure. The chieftain is the only one
that knows the ritual words.
Elaine-Laineypoo
gives the transit pass.
Elaine got
Guybrush to agree to get the summoning artifacts and help LeChuck who went to
Spoon Isle.
Click on the
throne - Royal Hot Tub. Check the controls in front of the hot tub. They are
waiting for the parts.
Go down the
stairs.
Statue: Check the statue
below the Royal Chamber.
Guybrush pokes the remaining eye and gets a fish
eye. The statue is now blind.
Library: Go to middle
walkway behind the raft.
Check the historical marker - plaque of the library.
Check the statue beside the raft.
Go to the right and front of the library window.
Talk completely to Tetra, the librarian. Learn that
DeCava once borrows a lot of books.
Bait and Repair: Enter the
cave to the right of the Royal Chamber.
Upstairs, go to the bait and repair and talk
completely to Anemone, same merfolk that 'manned' the raft.
Anemone fixed the mast of the Screaming Narwhal.
Coupons are needed to get bait.
Take the bucket from the floor.
Noble seahorse artifact:
Raft:
Go down to the raft. Talk to Anemone. Climb on the raft.
Spoon
Isle: Click to land on Spoon Isle.
See 2
pirates arguing about who decide where the seahorse artifact is to be buried.
Talk to both
Meerkel Trenchfoot and Killick Hardtack.
They might
sail away and bury the chest somewhere. If so, talk to them again. They will
bring the chest back.
Keep talking
to them. Select dialogues 'settle your argument' and 'cooperating out' and
finally get to 'staring contest' dialogue.
Distract
them with the 'look at baby or look behind you' dialogue. They both look away
from chest.
Immediately
place the pyrite parrot in the chest.
The pirates
sail away to bury the chest with the parrot. They return to wait for the
Captain to pick them up.
Find the
chest: Go back to Spinner Cay. Go to the Screaming
Narwhal.
Click on the
map and select the different isles in the map. Look around at each isle.
Isle of Ewe
has junk and skeleton. Boulder Beach has boulders.
At Brillig
Island at top right of map, hear the pyrite parrot.
Pick up the
coconut. Check the rubber palm tree at right.
Click on the
big rock. Guybrush digs.
Guybrush
takes the seahorse artifact and the pyrite parrot.
Marquee De Singe: De Singe wants Guybrush alive.
Go back to
Jerkbait Islands.
Wise turtle
artifact:
Use the raft
to go back to Spoon Isle.
Check the logs that Anemone mentioned. Check the
cannon at right screen.
Jungle:
Enter the jungle using the path left of the cannon.
See a return
to jungle entrance icon at bottom left of screen.
Fishing
well: From start of jungle go right and see a fishing
well.
Take the
fish egg bait coupon from the rim of the well.
Vacaylian BBQ: From the well, go north (top path) and
then west (left).
See a
machine-structure. Look close and see what Guybrush thinks is a BBQ.
It has a
hole at the bottom and a knob.
LeChuck:
Click the icon at bottom left to get back to start of jungle.
Enter the jungle. Go west
(left), north (top), north (top) and then west (left).
See LeChuck
talking to a monkey.
Look around
and pick up the oyster bait coupon from the ground at left.
See sealed
Vacaylian display altar at left by the cliff's edge.
Clamshell stands: See 2 familiar clamshell stands on
the ground. They look like the ones from Flotsam Island.
Talk to
LeChuck completely. Guybrush tries to show him the ancient tool.
He wants
to figure it out on his own. He wants a hint.
Ask what
he is carrying. LeChuck shows a broken seahorse claw thing similar to
ancient tool but no round end.
Fix the
broken seahorse claw thing: Go back to the raft and
then to Spinner Cay.
Go to the
bait shop and use the oyster bait coupon on Anemone. Get oyster.
In
inventory combine oyster and hook to get pearl.
Give the
fish eggs coupon to Anemone. Get fish eggs.
Go back to
Spoon Isle and then to LeChuck.
Give him
the pearl.
Coach
LeChuck:
LeChuck
wants to find out how to solve the puzzle.
Tell
LeChuck: use... pearl... claw thingie... to get mer-key.
Tell
LeChuck: use... merfolk key... clamshell lock.
Now, use
the ancient tool with the other clamshell lock.
See the
altar by the cliff edge open.
Take
the turtle artifact: Go to the altar and see the gold
turtle in the indentation-mold.
Try to
take the turtle.
Take the
prying tool left of the turtle. Use the prying tool on the turtle.
Swallow
your pride and give the prying tool to LeChuck.
LeChuck
pries the turtle off.
One of
McGillicutty's poxed men sees LeChuck with the artifact.
Watch
Guybrush end up at the bottom of the cliff with the turtle stand.
Look at
the turtle stand and see the turtle shape.
Pick up
the prying tool.
Go right
and meet LeChuck running to help.
He gives
the turtle artifact.
Cranky fish
artifact:
De Cava's shack: Go
back to the raft and sail to Roe Island.
Look around
inside De Cava's shack. Check the books,
submarine scribbles on the floor, Voodoo lady picture, cot and hanging cans.
Check the chart on the wall - the path of the mouth.
Check the
manatee on the wall twice. Nothing happens.
Place the
locket on the hole.
Click on the
manatee again and it opens the mouth. Get a blank paper.
In
inventory, examine mode the blank paper. Hmm...
Combine the
Eye of the Manatee (magnifying lens) and the fish eye taken from the statue
below the Royal Chambers to get Fish Eye of the Manatee.
Combine Fish
Eye of the Manatee and the blank paper to read 101 Fish Jokes.
Library:
Go back to Spinner Cay and then to the library.
Ask Tetra
for a book and then for 101 Fish Jokes.
The offended
Tetra gives the book. Examine mode the book to get a worm bait coupon.
Go fish:
Go to the Bait & Repair shop.
Give the
special worm coupon to Anemone. Get glowy bait.
Go back to
Spoon Isle. Enter the jungle.
Go east
(right) to the fishing well.
In inventory
combine the hook and the glowy bait.
After some
masterful fishing get the fish artifact.
Go back to
jungle entrance and ride the raft to Spinner Cay.
Captain McGillicutty's
blockade:
Spinner Cay
is bombarded with cannon fire by McGillicutty's ships. They have formed a
blockade.
Van Winslow
leaves in the Screaming Narwhal to evade the blockade.
Elaine:
See the statue get hit and fall on Elaine.
Go to Elaine
in front of the library and take the fallen statue off Sea Bunny.
Elaine's
plan is for Guybrush and Elaine's ship to surround the blockade. Guybrush is
to fire the cannon at Spoon Isle as a distraction. LeChuck is to confront
McGillicutty and sink his ship. Guybrush wants to be the one to do so.
Accessories: Use the bucket from the bait shop with the
hot coals on the floor to get bucket o'coals.
Go to the
Royal Chamber and click on the hot tub control in front of the royal
throne. No one saw it.
Inform
LeChuck of his part: Use the raft and go to Spoon Isle.
Enter the
jungle. Go east (right) and north (top).
See LeChuck
fighting with poxed sailors. They want the turtle artifact thinking that
LeChuck still has it.
Turtle
artifact: They want an artifact, let's give them one.
Go left and
see the Vacaylian BBQ.
Place the
bucket o'coals in the opening.
Place the
hot tub control on the insert at center of the BBQ.
Turn the hot
tub control to make a hot BBQ.
Place the
pyrite parrot on the bowl on top.
Guybrush
picks up the bowl of melted pyrite.
Go west
(left), north (top) and west (left).
Be at cliff
edge. Use the bowl of melted pyrite on cliff's edge.
Guybrush
pours it down to the fallen turtle altar.
If the
pyrite solidifies, go back to the BBQ and melt it again.
Retrieve
the fake turtle artifact: Go to the jungle path at
top of screen.
Go south
(down), south (down), south (down) and west (left) to the altar.
Take the
pyrite turtle artifact from the broken merfolk display.
Go back to
LeChuck. Go east (right), north (top), north (top), east (right) and east
(right).
Use the
pyrite turtle artifact with LeChuck. The poxed pirates beat LeChuck and ran
off with the fake artifact.
Guybrush
talks to LeChuck about Elaine's plan. Choose any response. Guybrush will say
what he wants anyways.
Go to the
raft and see LeChuck man the cannon.
Confront
McGillicutty:
Go to the
Screaming Narwhal: Sail the raft to the blockade at
bottom of map.
Guybrush
goes in between the ships manned by Meerkel and Killick.
The pirates are distracted by Elaine. Sail in
between the 2 ships to the Screaming Narwhal.
McGillicutty: Go to the map. Click on McGillicutty's
ship at top of the map.
See
McGillicutty threatens the Merqueen-king. McGillicutty has the fake artifact.
Talk to
McGillicutty. Insult McGillicutty. He breaks the mast with a cannon shot.
Select a
mast: Click on the map and click on Brillig Island at top
right of map.
See the 2
pirates, Meerkel and Killick look for where they buried the artifact.
Remember the
rubber palm tree. Talk to the 2 pirates and tell them to try the tree.
The pirates
loosen the tree. After the dialogue, push the rubber palm tree.
Go to the
boat and set sail to the Jerkbait Island.
Fix the
mast: Go up to the bait and repair shop.
Talk to
Anemone and have him fix the mast with the rubber tree.
Go back to
the ship.
Take care
of McGillicutty:
Sail to
McGillicuty's ship at top of the map. Talk to McGillicutty again.
Insult him
again and he shoots the rubber mast. The cannonball bounces back to his ship
and sinks it.
Point to
Jerkbait Island in the map.
La
Esponja Grande:
Chieftain
Beluga: As a reward, Chieftain Beluga gives the pyrite
parrot back to Guybrush.
Elaine is
coughing with the pox.
Ask Chief
Beluga for help in getting the La Esponja Grande.
The chief
combines the 3 artifact into one ball - summoning artifact. Beluga
recites the summoning words and tells Guybrush that he should be the one to
summon the legendary creatures.
Summon
the legendary creatures: Go to the end of the dock.
Use the
summoning artifact on the ocean. 3 beasties rise from the ocean.
Elaine and
LeChuck arrive. Elaine will stay with LeChuck to help return the monkeys.
The
Screaming Narwhal follows where the legendary creatures lead.
Morgan
Le Flay: She's back.
Talk to her.
While talking, the creatures one at a time are diving down to the depths of
the ocean.
MANATEEEEE!!!
Chapter 3: Lair of the Leviathan
Walkthrough by MaGtRo
September 2009
The Voodoo Lady uses the cards to relate the past Tales of Monkey Island.
The Screaming Narwhal is swallowed by a manatee.
Morgan is knocked out cold by a barrel and is lying outside the ship.
Coronado DeCava:
In inventory are hook, Elaine's ring,
locket and fisheye of the manatee.
Walk to the right and see a hut. Talk completely to
Coronado DeCava.
Locket: Guybrush gives the
Voodoo Lady's locket to DeCava.
DeCava presses the arrow at center of locket that
points to his picture. The magic of the locket causes the Voodoo lady to enter
DeCava's body. She warns Guybrush not to talk to DeCava about her, the La Esponja Grande or where the locket was obtained.
Select any dialogue and Guybrush will do as he
pleases.
DeCava goes on a jealous rampage. I kill you.
Get my wife:
Go back to Winslow and Morgan. Talk to Winslow.
Follow Winslow's instructions:
Click on Morgan's wrist to check her pulse. See GUS tattoo on her arm. She murmurs -
this is for Jugbender.
Pick up Morgan's sword to disarm her. Dante Dragotta
is etched on her sword. Morgan mumbles Gomez, not on the carpet.
Click on Morgan's feet to help her circulation. An
Assassin ledger falls out.
See a To-Do list with subject and payment:
Gustavo free personal
Prince Hipolito de Toro +10000
New ship -10000
Lunch -5
Gideon Gimpleg +300
Funeral payment to Noonie -6000
Guybrush Threepwood
Winslow advises a smelling salt.
Get smelling salt: Go right
and then click on the main mast of the ship.
Guybrush climbs the mast and enters the inner ear of
the manatee.
Check the green cochlea. It is important to the
manatee's sense of direction.
Check the wound on the right. Ah, the wound is where
the missing cochlea was.
Take stinky earwax from the wall of the
Eustachian passage.
Climb down the main mast. Go back to Winslow and
Morgan using the gangplank at right.
The pyrite parrot is gone.
Use the stinky earwax on Morgan.
Winslow's pox attack convinces Morgan to act as Guybrush's wife.
Morgan asks Guybrush to autograph her Guybrush
picture.
Convince Coronado:
Coronado questions them to see if Morgan is
really Guybrush's wife.
They met at work and they had their first date
sailing.
Coronado is 'almost' convinced. He traps the couple
to question them farther.
Coronado states that he has questioned Morgan about
Guybrush and she answered the questions correctly.
Now it is Guybrush's turn to answer about Morgan.
Who trained her in the ways of combat? Remember
Morgan's sword. Choose an answer. Select Dante Dragotta.
What is the name of her first love? Remember
Morgan's tattoo. Choose an answer. Select Gustavo.
Who is her greatest Idol? Choose an answer. Select
Guybrush.
The name of Morgan's first ship; The Knave of...?
Remember Morgan's list. Choose an answer. Select Toro.
What is the name of her favorite pet? Remember
Morgan's second mumble. Choose an answer. Select Gomez.
Death of an Uncle... what? Remember Morgan's first
mumble? Choose an answer. Select Jugbender.
Morgan and Guybrush join as crew. Ask Coronado all the questions.
Learn about the sacred manatee mating ground, the lost of his trained crew and
the internal compass of the manatee.
Coronado is making a new cochlea from skins of throat grubs. He wants Guybrush
to collect the grubs.
The lost crew and the brotherhood:
Meet the crew. Talk to Johnny Depp look-alike - Bugeye.
Learn about their paradise and the brotherhood. They know something about the
missing cochlea.
Moose: Talk completely to Moose drinking ichor at the bar.
Learn about ichor: the orange one that he drinks and the yellow ichor in the pool.
Learn about Jumbo jimbo, the straw-funnel Moose uses
to drink ichor.
Learn that the missing cochlea is a secret for brothers only. To join the
brotherhood, talk to Bugeye.
Check Santino, the skeleton.
Noogie: Go to the bongo player at right.
Talk to Noogie completely.
Click on
the bongos and learn that the bongos are full of manatee's bile.
Take the grub walking on the floor.
Bugeye: Go right and talk to Bugeye punching an uvula.
Admittance to the brotherhood is by unanimous votes of the other members.
Ask Bugeye for his vote. Guybrush will get it if he wins the pirate face off.
Morgan and Moose runs to watch the pirate face off. Bugeye makes a face.
Guybrush has to select eyebrow, eye and mouth expression to out-face Bugeye. Right now there are no choices except the one Bugeye used: Stinky,
lazyeye and meanie (random).
Select Bugeye's expressions.
Guybrush lost due to no originality.
Morgan throws Guybrush's autographed picture in disgust.
Pick up Guybrush's autographed picture from the floor close to Noogie.
Search for eye expression:
Figurehead eye expression: Go down the ramp to Bugeye
or treasure area.
Go left and see a pile of treasure, chest and a painting on one side and a
pirate ship named The Howler Monkey on the other side. There's a festive skull
at the corner of the bridge.
Go to the far left and face the figurehead of the Howling Monkey shipwreck. Guybrush likes the
eye expression of the figurehead.
Protuberances: See 3 protuberances on the left: weird
bump, strange growth and odd protuberance.
Click on weird bump and see Guybrush enter in and goes out beside Noogie.
Enter weird bump beside Noogie and come back to the 3 protuberances.
Enter the strange growth and come out by the bar.
DeCava eye expression: Exit to the mouth behind
Morgan.
DeCava asks for a drink but none of that yellow muck-bile.
Talk to DeCava. Give DeCava the grub and learn how many grubs are needed to
make a cochlea.
Guybrush
takes the empty mug.
Check on Winslow via the portholes at side of the
ship or quarter's door up the deck.
Get
yellow bile: Go far right of DeCava and exit to belly.
Bugeye
warns Guybrush about helping DeCava in getting to the mating ground.
Once in
a while watch Morgan's expressions-actions.
Remember
that Moose says that the yellow bile is potent. Go to the yellow bile pool
left of the figurehead of the shipwreck. Use the strange growth beside
Morgan.
Use the
empty mug on the yellow pool of bile and Guybrush says it is too low to
get a sample.
Use the
weird bump protuberance to exit close to Noogie.
Ask
Noogie to play something more up-tempo. The pool of bile rises.
Use the
weird bump right of Noogie.
Use the
empty mug on the yellow pool of bile to get mug o'bile.
Disguise the yellow bile:
Remember that DeCava doesn't want the yellow bile.
Go back up to DeCava. Stand in front of DeCava. Wait
until he removes his monocular and lays it on the table. Pick up the
monocular.
In inventory, combine the monocular and the fish eye
of the manatee to get fish eye monocular.
Give the fish eye monocular to DeCava.
Now, give the mug o'bile to DeCava. See a good eye
expression.
Painting Expression: Go
back down to the belly and then to the treasure area.
Check the painting at left end of the treasure pile.
See that the painting of Fisheye Alabaster is covered with grime.
Raise the level of the pool of bile again by asking
Noogie to play something more up-tempo.
Use the
weird bump right of Noogie.
Use the
empty mug on the yellow pool of bile to get mug o'bile.
Use the
mug o'bile on the grime covered painting of Fisheye. Check out those
peepers.
Search for
mouth expressions:
Go around to
the different pirates and say ARRR.
Go to Moose
and talk to him using the ARRR dialogue. Get a mouse expression.
Go to Noogie
and talk to him using the ARRR dialogue. Get a mouse expression.
Go to Morgan
and talk to her using the ARRR dialogue. Get a mouse expression.
Get
Bugeye's vote:
Go to Bugeye. Challenge
Bugeye to the pirate face off contest.
Pirate
face-off:
To help
you remember, write down the expressions made by Bugeye.
Select any
expression not made by Bugeye.
Win the
first round.
For the
second round, again write down the expressions made by Bugeye.
Select any
expression not made by Bugeye and not previously used by Guybrush.
For the
third round, Bugeye made the rarely seen bugeye expression.
After the
discussion, Guybrush got pox-sick and made the winning voodoo curse-pox
expression.
Get
Noogie's vote:
Talk to
Noogie about vote into Brotherhood and date with Morgan.
If the date
works out, Noogie will vote for Guybrush.
Noogie gives
a New Member Manual.
Morgan
recon mission:
Go to Morgan and talk to her. Talk to
her again and say it is a recon mission - not a date.
The
three phase operation:
Slyly
interrogate him.
Test his
grip, in case it comes to fisticuff.
Check
for weapons.
Talk to
Noogie. It turned out great.
Elaine:
Talk to Morgan completely. Guybrush misses Elaine. Watch a scene with Elaine and
LeChuck.
Get Moose's
vote:
Go to Moose
at the bar. Talk to him about the vote into the Brotherhood.
He says he
follows whatever Santino goes for.
Treasure
chest: Go to the treasure chest on the pile of
treasures.
Use the hook
in inventory on the locked chest.
See Marquis De Singe doing science on Guybrush's hand.
Open the
chest and take Murray.
Use Murray
on the Festive skull seen across the treasure pile and by the corner of the
bridge to the other side.
Get a
talking Santino: We need to get Santino's vote based on
what Moose said.
Talk to
Moose and propose a toast. While Moose
is drinking from the jumbo jimbo funnel, use the sword on Santino's skull.
Talk to
Moose again about another toast. While Moose
is drinking from the jumbo jimbo funnel, replace the skull with Murray.
Now we can
talk to Santino. Talk to Santino-Murray. Murray is very bloodthirsty.
Get
Santino-Murray's vote: Go to the 3 protuberances.
Enter the
odd protuberance. It's clogged. Use the mug o'bile on the clogged
protuberance.
Now that
it's cleared, jump in the odd protuberance.
Manual: See and open
the iron monkey. Guybrush takes the Torture made easy manual.
In inventory, use the
examine mode on the Torture Manual.
In
inventory, examine the New Member Manual. See that the cover is loose.
Combine the
New Member Manual and the Torture Manual to get Torture Manual with
Member's cover and Member's Manual with Torture cover.
Go back to
Murray-Santino. Show Murray the Torture Manual with Member's cover.
The
initiation ritual is to quarter the incoming member. Looking forward to
Guybrush's initiation and being bloodthirsty, Santino-Murray promises his vote.
Join the Brotherhood:
Now that you have the promises of the 3 pirates, talk to Bugeye. Ask him to
call for a vote to join up.
Noogie, Santino and Bugeye vote yes.
Being the junior member, the main responsibility is to protect the cochlea.
Noogie gives Guybrush the cochlea.
Cure the manatee:
Climb up the ramp to the mouth. One cochlea procured!
Threat: Winslow calls out via the porthole at side of
the ship. A threat was received.
Guybrush eats the sea biscuit and takes the seahorse head
Winslow (Godfather) found on his bed from the
bottom of the gangplank.
Cochlea: Climb the main mast to the inner ear of the
manatee.
Use the cochlea on the wound at right wall.
Uh oh: Guybrush talks to DeCava and then the crew.
Guybrush asks Morgan for help. Talk to Morgan until sword privileges are
restored.
Guybrush talks to the womanhandled crew.
DeCava gives the way out of the manatee - Manatee Lax.
Manatee's Sacred Mating Ground:
The Screaming Narwhal and the Howler Monkey surface from the inside the
manatee.
DeCava says that Santino is their diver. Upon learning that Guybrush can hold
his breath underwater for 10 minutes, he pushes him to the ocean floor.
Ocean floor: Check the giant manatee on the left. It
is the manatee that carried them here.
Look around. Open the treasure chest. Get crown, 6000 doubloons
and a golden wrench.
Check the Warning sign and La Esponja Grande sign.
Go right to the cave. Uh oh!
Ship: DeCava mentions about the guardian of the
Esponja Grande - a giant female manatee.
The crew was trained to understand manatee sounds but only Santino learned.
Talk to DeCava completely. Learn that a scientist at Flotsam Island taught
Santino how to understand manatee but DeCava will not sail back to the island.
Also learn about the tongue of the manatee that can make manatee sounds.
Understand Manatee:
Get to Flotsam Island: Go up to the helm. Talk to
DeCava.
Look close at the locket on top of the barrel. Click on the arrow pointing to
DeCava's picture seen at the center of the locket.
Oh! The Voodoo lady takes over DeCava's body.
Use the golden wrench on the arrow at center of locket so that it points to
the Voodoo lady.
Press the arrow button. DeCava says that he was in the
Voodoo lady's hut.
Use Guybrush's picture over DeCava's picture. Press the arrow at center.
Guybrush enters the body of the Voodoo lady. Hahahahahaha!
Get Marquis De Singe: Look around the hut.
The inventory has the chicken foot back scratcher, severed finger and cocktail
napkin.
Check the Voodoo mat on the table. There are 3 cards: the fracture
card
with the picture of Marquis De Singe, the curse card with the picture of the
Voodoo Lady and the journey picture with the picture of Guybrush.
There are 3 frames on the mat: the actor, the action and the target.
Place the fracture card on the actor frame.
Place the journey card on the action frame.
Place the curse card on the target frame.
Press the Voodoo bell (Hex me now) at top left.
Marquis De Singe arrives. Talk to Marquis De Singe. He has a book about talking
to the manatee. Hex him.
Hex the Marquis De Singe: Work on the voodoo mat
again.
Place the journey card on the actor frame.
Place the curse card on the action frame.
Place the fracture card on the target frame.
Press the Voodoo bell (Hex me now) at top left.
De Singe gets kicked. He brings the book to the Voodoo Lady.
Study the book: Read the Giant Manatee in 12 Easy
Steps. Guybrush learns Manatee.
Return to Guybrush's body: Work on the voodoo mat
again.
Place the journey card on the actor frame.
Place the fracture card on the action frame.
Place the curse card on the target frame.
Press the Voodoo bell (Hex me now) at top left.
Guybrush is back at the ship.
Learn to make manatee sounds:
Learn about the crew: Check the File trunk at left.
Read about Bugeye, Moose, Santino, Noogie and Guybrush.
Noogie's greatest fear is Sister Agnes. Click and
study Sister Agnes' facial expression on the attached picture.
Interrogate the crew: Go downstairs and interrogate
the crew.
Bugeye: Talk to Bugeye. He breaks. He doesn't know
where the tongue of the manatee is.
Take the flopping fish behind Guybrush.
Noogie: Talk to Noogie. Hmm.
Select the ARRR! dialogue. Remember what Sister Agnes looks like and select
the correct eyebrow, eyes and mouth expressions.
Select: stinky, crosseyed and geezer.
Noogie breaks. He doesn't know where the tongue of the manatee is.
Moose: Talk to Moose completely. He doesn't break.
Talk to Santino-Murray. Murray snaps at Guybrush's fingers when he threatens to
throw him overboard.
Talk to Morgan. She gives her insight about the female manatee. Talk to her
again and borrow her sword.
Use the sword on Murray. Murray goes back to the ocean. Ahhh.
Moose breaks. Jimbo, the ichor funnel is the tongue of the manatee. It was
left inside the manatee.
Get Jumbo jimbo, the tongue of the manatee: Walk the
plank across the skeleton of Santino.
Guybrush jumps to the ocean floor. Approach the giant manatee at left.
Remember what DeCava said about the manatee and seahorse. Use seahorse head on
giant manatee.
Guybrush is swallowed. See the ichor funnel-Jumbo jimbo on the pool of bile.
The level of the pool is low to get the funnel. Use Noogie's bongos. Wow,
Guybrush is good!
The level of the pool of bile rises but quickly lowers. Use the flopping fish
on the bongos.
Use the weird bump to go to the pool of bile. Take the ichor funnel-jumbo
jimbo-tongue of the manatee.
Use the Manatee lax on the pool of bile. Out you go.
Talk to the giant male manatee:
Use the tongue of the manatee on the giant male manatee.
Select Courtesy, then May I help you dialogue. Guybrush will help get him a
date.
The 2 males swim to the cave.
Convince the female manatee:
At the cave, the female leviathan-guardian asks questions. Select the
appropriate answers from the list.
She moves forward towards the entrance for every
correct response and back in for every wrong answer.
The travel edition has programmed dialogues:
Courtesy:
Hello, I am very pleased to meet you.
May I help you?
I'm sorry, I don't understand.
Please repeat that.
This is satisfactory.
No, thank you.
Getting Around:
Please call me a taxi.
Where is the bus station?
Do you have a map?
I'd like to visit the theater.
I'd like to visit the aquarium.
I'd like to visit the library.
Money & Customs:
How much is it?
Do you accept traveler's cheques?
Does that include tax?
I have nothing to declare.
This is for my personal medical use.
You really don't want me to remove my shoes.
Hotels & Restaurants:
I would like a room for three nights.
The television does not work.
Please connect me with room service.
The meal was excellent.
No spicy food, please.
I prefer it hot and spicy.
Emergencies:
I've lost my watch.
I've been kidnapped.
Stop, thief!
Where is the bathroom?
Is that blood or ketchup?
Do you know the Heimlich maneuver?
Some conversations:
Would you like me to dye the ocean depths with your blood?
Select Courtesies; No, Thank you.
Select Emergencies; Is that blood or ketchup?
I'm not going to let some lummox buy my love with clever words.
Select Money & Customs; Do you accept traveler's cheques? or How much is it?
Why should I give you the time of day? Select Emergencies; I've lost my
watch.
Let's say I let you keep your pathetic life and I take a swim with you,
where will we go?
Select Getting around; I'd like to visit the aquarium.
Select Hotel & Restaurants; I would like a room for three nights. (What do
you take me for? Some sort of flotsam floozy?)
You're not nervous are you? Select Emergencies; Where's the bathroom?
What will you say when I rip off your head for my collection? Select
Emergencies; Stop, thief!
I don't want anyone with a lot of baggage. Select Money and Customs; I
have nothing to declare.
All you males are imbeciles. Why do I even bother? Select Hotel &
Restaurants; The television does not work.
This mating ground is as dead as my victims. You males are a bunch of cold
fish. Select Hotel & Restaurants; I prefer it hot and spicy.
Watch where you swim. Nobody knows the way to my heart. Select Getting
around; Do you have a map?
You know what I'll say after I devour your bloody heart? Select
Hotel & Restaurants; The meal was excellent.
You think you're clever, don't you. You should know that I detest know it
alls. Select Courtesy; I'm sorry, I don't understand.
Eventually she will say: I think I might like that swim now. Then let's go
hot shot. Mama's been lonely.
My she's big one!
La Esponja Grande: Enter the cave.
Take the teeny La Esponja Pequeno. Guybrush is cured.
Guybrush swims to the ship. DeCava hears Guybrush's intentions.
Escape the cages:
DeCava and his crew got Morgan and Guybrush in cages. They sail away on The
Howling Monkey.
Give Morgan her sword.
Click on the rope above Guybrush's cage. The cage lowers
when he jumps back in.
Talk to Morgan about reaching the rope holding Guybrush's cage. Down he goes.
Fight DeCava:
DeCava realizes that the La Esponja Grande was left at the Narwhal.
Guybrush picks up the La Esponja Grande.
DeCava fires at the Narwhal hitting the rubber mast. The cannon ball bounces
back and destroys DeCava's cannon.
Immediately, use the seahorse head on the cannon. Use the cannon and fire the
seahorse head.
It lands on the water close to The Howling Monkey.
Watch what happens.
Are they holding hands?
Muahahahaha!
Chapter 4: The Trial and Execution of
Guybrush Threepwood
Walkthrough by MaGtRo
October 2009
The Voodoo Lady uses the cards to relate the past Tales of Monkey Island
episode.
Morgan rows back prisoner Guybrush Threepwood to
Flotsam Island.
Morgan is paid by Marquis De Singe.
Guybrush Threepwood is voodoo-summoned to his trial
brought by a group of pirates.
Guybrush is charged:
Judge Wallace P. Grindstump calls the prosecutor
Stan.
Stan charges Guybrush with 4 heinous crimes.
- That during a bar fight the cat of Hemlock McGee
was harmed.
- That during that bar fight nacho sauce burned and
scarred the thigh of bosun K. Krebbs.
- That Guybrush conspired with Joaquin D'oro to sell
counterfeit pirate dolls.
- That X mark of Killick Hardtack, newly arrived
pirate was ruined by Guybrush.
Guybrush on the stand:
Plead Not Guilty.
Choose to represent yourself.
Stan gives Guybrush the court briefs.
Read all of them. Note that Guybrush himself is one of the witnesses.
Go to the bailiff table and look at all the evidence
against Guybrush: X, ninja doll, Elaine's ring,
Esponja Grande, plate of nachos and Hemlock's cat.
Witness K. Hardtack:
Charge: Consonant Abuse
(X).
Witness: Talk to the Judge
and call a witness... Bailiff Hardtack.
Hardtack explains his charge.
Cross examine Hardtack about lying until he breaks
and confesses.
Mistrial was granted. As punishment, Hardtack is told
to wear a wig.
Witness K. Krebbs:
Charge: Thigh Crimes &
Misdemeanors.
Witness: Talk to the Judge
and call a witness... Kathryn Krebbs.
Krebbs shows the thigh scar caused by the nacho
sauce.
Guybrush is given a drawing of the scar. Examine
(mode) the drawing in inventory. It is a purple Jolly Rogers scar.
Recess: Talk to the judge
and ask for a recess to confer with client. Guybrush is brought to jail.
Release: Talk to Hardtack
completely and ask to see your lawyer. Guybrush as the lawyer is released from jail.
Gather ingredient for evidence:
Club 41: Go to the right
until the end of the boardwalk. Enter Club 41.
Overhear De Singe and Morgan talking. De Singe now wants
Elaine as the source of the pox.
Look around completely. Check the dartboard, scary
painting (jungle beast) on the wall, provocative painting above the bar and
the sign at end of the bar.
Talk to Morgan Le Flay completely. She doesn't have
the pox because she is not a pirate.
Blood Island Volcano shot:
Talk to W. P., the barman-judge completely. Order Blood Island Volcano Shots and get
5 empty insulated shot glasses and a full red Blood Island Volcano shot.
Hot wax: Go down to main
floor and look at the skull with blue candle.
Use the empty glasses on the puddle of wax on the
floor to get cup of blue hot wax.
Sack of sugar: Look at
the chandelier and see a sack of sugar.
Manatee oil: Exit the club.
Turn right and check the lamp post beside the seagull on the railing.
Use the empty glasses on the oil leak on the post of
the lamp to get cup of yellow hot manatee oil.
Molten Glass: Walk left on
the boardwalk pass the courthouse and the path to the jungle.
See and check the leg-shaped lamp outside the house.
Use the empty glasses on the puddle on the ground
under the left window to get cup of clear molten glass.
Use cup of molten glass on the leg-shaped lamp to
get the leg lamp with a black, blobby burn.
Caustic fluid: Continue to
the
left on the boardwalk. Climb up to De Singe's mansion.
Use the empty glasses on the weird oozing liquid
right of the mansion to get cup of red mysterious caustic fluid.
See Jacques, the electromagnetic monkey locked in a
cage left of the door.
Hot Grease: Continue to the
left until the end of the boardwalk.
Use the empty glasses on the puddle on the boardwalk
to get cup of hot grease.
Make evidence:
In inventory, combine red caustic fluid and leg lamp
with black blobby burn to get leg lamp red parrot shaped burn.
Then combine leg lamp red parrot shaped burn
with cup of blue hot wax to get leg lamp with violet Jolly Roger shaped
burn.
If a mistake happens, use the leg lamp with hot
molten glass to get original leg lamp.
If hot grease is used, the color of a shape done
turns black.
If red Blood Island volcano shot is used, a red boot
shaped burn is obtained.
If yellow manatee oil is used, a yellow parrot
shaped burn is obtained.
Court in session: Go to the
court house and ask Hardtack to return to court to defend my client.
Talk to the Judge and call a witness... Kathryn
Krebbs.
Use the Leg lamp with violet Jolly Roger shaped burn
on Krebbs.
The case is dropped.
Witness H. McGee:
Charge: Felonious Feline
Frightening.
Recess: Talk to the judge
and ask for a recess to confer with client. Guybrush is brought to jail.
Release: Talk to Hardtack
and ask to see your lawyer. Guybrush as the lawyer is released from jail.
He's not getting any smarter.
Gather items for evidence:
Stan: Go right and talk to
Stan completely. Ask to check the wares.
Check the Frame with iron fillings. Stan throws away the
beard toy because it does not have a magnet.
Pick up the beard toy. In inventory use
examine mode on beard toy and see that it is leaking iron to get iron
leaking beard toy.
Jacques, the electromagnetic monkey:
Go left on the boardwalk. Climb up to De Singe's mansion.
Use the hook on the monkey's locked cage to get
Jacques.
Hemlock McGee:
Go to left end of boardwalk and talk to McGee completely.
See that he is feeding the cat. See his eyes get red
when angry.
Use iron leaking beard toy on bowl of unhealthy
looking cat food. Check that Hemlock feeds the cat.
Court in session: Go to the
court house and ask Hardtack to return to court to defend my client.
Talk to the Judge and call a witness... Hemlock
McGee.
Use Jacques on the catatonic cat on the bailiff's
table.
The case is dropped.
Witness J. D'Oro:
Charge: Counterfeit
Collectibles.
Recess: Talk to the judge
and ask for a recess to confer with client. Guybrush is brought to jail.
Release: Talk to Hardtack
and ask to see your lawyer. Guybrush as the lawyer is released from jail.
He's not getting any smarter.
Get item for bribe:
D'Oro: Talk to D'Oro
completely at right prison cell. He lost an eye.
In return for not testifying, he wants a glass eye.
Not just any glass eye, he wants one with the color like those poxed pirates
have when
they are really angry.
Glassworks factory: Go to
the left pass the court house.
Knock on the door and talk to Crimpdigit. Learn about getting the eye color using the glass
eye he makes.
Get a nearsighted glass eye.
Get eye color: Go to the
court house and ask Hardtack to return to court to defend my client.
Talk to the Judge and call a witness... Guybrush
Threepwood. Ask any question.
The judge undergoes pox rage. Use the glass eye on judge
to get Pox of LeChuck glass eye.
Talk to the judge and ask for a recess to confer
with client.
Guybrush is brought to jail. Talk to Hardtack and
ask to see your lawyer.
Guybrush as the lawyer is released from jail.
D'Oro: Give D'Oro the Pox
of LeChuck glass eye.
D'Oro gives the map.
Court in session: Go to the
court house and ask Hardtack to return to court to defend my client.
Talk to the Judge and call a witness... Joaquin
D'Oro.
Use D'Oro's map on D'Oro.
The case is found in favor of the defendants.
More criminal charges:
Charge: The additional
charge is the creation, incubation, dissemination, proliferation and
mastication of a Pox or Pox-like affliction.
Elaine completely pox ridden arrives as the witness.
Upon smelling Guybrush, Elaine leaves to hunt for the woman that left the
scent on Guybrush.
Elaine is to be called to court using a voodoo
summon.
Serve the summons:
Jail: After placing
Guybrush in jail, Hardtack left to serve the voodoo summons to Guybrush's ball
and chain.
Returning from being rebuffed by Elaine, Hardtack
tells Guybrush to serve the summons himself and releases him.
Club 41: Automatically
enter Club 41 and see Elaine and Morgan in a sword fight.
Talk to the ladies.
Move the sword fight to buffet table:
To move the fight to the lower level, talk to bosun Krebbs completely (Did it
hurt?).
Krebbs hits Guybrush. The sword fighting ladies
get upset at Krebbs and move to the buffet table.
Morgan hits the sack of sugar. Krebbs goes to the
bathroom. Pick up the sack of sugar.
Move the sword fight to the bar:
Pick up the scrap paper (Phuzzy Nostrol recipe)
on the table by the door. It is a simple recipe.
Pick up the recipe at right end of bar. It is the
Scabb Island Sling recipe and it is a simple recipe.
Talk to the judge-barman and order one of the simple
recipe drink. That was fast.
The fight moves to the bar. Anytime a drink is
requested, the fight goes to the bar.
Krebs exits the bathroom. Icky puddle leaks out the
door.
Go to the bathroom right of the room. Look at the
icky puddle on the floor.
Take the scrap of paper stuck to Guybrush's boot. It
is a recipe for Tuna Colada. The recipe looks complicated.
Serve the summons: Move the
fight to lower level by talking to Krebbs.
Give the complicated Tuna Colada recipe to barman.
Then use the voodoo summons on the dartboard.
The ladies move to the bar when the drink is
prepared. Talk to Morgan and
Elaine completely.
Elaine gets summoned. Guybrush talks to Morgan.
Court:
Guybrush cross examines Elaine. This leads to
disastrous result.
Go to the table and take Elaine's ring.
Then take the Esponja Grande. Guybrush uses
the Esponja Grande on Elaine but she was not
cured.
Elaine leaves to hunt for treasures.
LeChuck saves Guybrush from being hanged. LeChuck
reveals that Voodoo lady is behind all of these problems.
Now, LeChuck and Voodoo lady are in the brig.
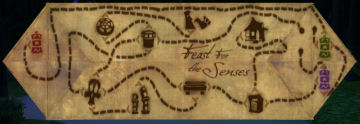
Feed the Esponja Grande to maturity:
Talk to the Voodoo lady about Esponja Grande. She
says it needs to be fed to maturity.
A 6 course Feast for the Senses menu is taken
by Guybrush.
There is a map on the back of the menu. Open the
menu and read the 6 courses.
First Course - eyes:
Garish napkin: Open the
menu and click on the eye.
Put a napkin that's a sight
A garish cloth grotesquely bright
Talk to the Voodoo lady completely especially about the
napkin. So we need a garish napkin.
Talk to LeChuck.
Stan's jacket: Talk to Stan
completely especially about his jacket and souvenirs. LeChuck's doll is very
bright. He doesn't want to let go of his jacket. He sold a treasure map to
Elaine and she left to go to the jungle.
Marquis De Singe's mansion: Go
left on the boardwalk.
See Marquis running away towards the jungle. Climb
and enter the mansion.
See Morgan run through by a sword. She whispers what
Jacques the monkey told her before expiring.
Look Around:
Flotsam moths: Read the
Display Cabinet on the wall and learn about the Flotsam moths.
It likes clothing; has painful bites and rapid
eating.
Flotsam Jungle Fireflies:
Look at the jar of dead fireflies on the table at left foreground.
The fireflies love sugar water.
Picture: Check the picture
projected on the wall. De Singe is using the poxed hand as source of Jus de Vie (Juice of
Life).
Picture projector: Click on
picture projector and see the projected picture of the Vaycalian wind device.
Backroom: Try to enter the
locked backroom (Arret-Stop sign). Use the hook to open the backroom.
Guybrush takes a sack of severed legs from
the backroom. Exit the mansion.
Jungle: Go right and take
the path right of the glassworks house.
See an overhead view of the island. Enter through
the start of the jungle and use the map or click on the Voodoo lady's creepy
shack.
Talk to D'Oro and learn what happened to the
voodoo lady's shack.
Moths: Look at the moths,
shack remains and the rug.
Use the leg shaped lamp on the moths to get leg
shaped lamp with moths. The moths did not like Guybrush's clothes, so they
didn't eat it. Remember the information learned from the display cabinet in
De Singe's mansion.
Go back to entrance of jungle by clicking on the
icon at bottom left. Exit right. Click on dock to get back to town.
Stan: Go to Stan.
Stan's jacket or napkin: Use the
leg shaped lamp with moths on Stan. The lamp's light burned out. The moths
went to the neon sign.
Talk to Stan and ask to look at his geegaws or items
he's selling. Ask about LeChuck doll.
The doll is very bright and attracts the moths. The
moths attack Stan's
jacket.
Take the remains of Stan's jacket from the
floor.
First Course: In
inventory combine La Esponja Grande + Jacket shreds. See a bigger La
Esponja Grande.
Second course - nose:
Stinky feet: Open the menu
and click on the nose.
Antipasta jungle meat
Gives off a smell like stinky feet
Talk to the Voodoo lady about the antipasto. So we
need a stinky feet.
Learn about Jungle Beast:
Club 41: Check the painting left
of the alligator dart board. Learn about the Jungle beast.
Learn also that Hemlock painted it and knows about
the beast.
Hemlock: Go to the left end
of the boardwalk pass De Singe's mansion.
Talk to Hemlock about the jungle beast. It is foul-smellingest
thing. The fleshy sacrifice left on jungle altar disappears.
Pistalibre's skeleton: Go to the
jungle by taking the path right of the glassblower house.
Click on the entrance of the jungle.
Go left and see Elaine looking for the X marked on
the map bought from Stan. De Singe arrives and tries to shoot Elaine.
See a skeleton lying left of the path. Read
the scrap of paper held by the skeleton of Pistalibre.
It states that following the beast's spoor is
difficult because it is indistinguishable from jungle floor. If only the beast
left a path as bright as the jungle fireflies.
Let's collect fireflies to use as guide.
Jungle fireflies:
Remember the information learned from the jar in De Singe's mansion. It likes
sugar water.
Check the map and look for a source of water. Take
the path at top of where the skeleton is located.
See the well. Use the sack of sugar on the well. See
the fireflies swarm.
Use sack of severed leg on sugared well to get
sugar dipped leg.
Find Jungle beast: Based on
what Hemlock said, check the map for the location of the altar.
Go down from well and then go right where the
skeleton is located.
See a bench-altar. Use the sugar dipped leg on
altar. See the fireflies swarm on the sugar dipped leg on the altar.
Hear the beast growl. Guybrush runs away. Go left
and see the leg gone from altar.
The fireflies follow where the sugar dipped leg
went. That's the guide.
Follow the firefly trail:
Go left from altar and then left from skeleton. See
De Singe and Elaine.
Go up-north-top from well.
See the firefly trail go right over the grassy area
and right of the calendar.
Click on the firefly illuminated trail over the
grassy area.
Jungle beast: See a
carnivorous plant-jungle beast. It has a lion paw stuck between its teeth.
Use the burned out leg lamp on the jungle beast.
With the mouth kept opened, take the stinky lion
paw.
Guybrush automatically picks up the burned out
leg lamp left by the beast.
Second
Course: In inventory combine La Esponja Grande +
Lion paw. See a bigger La Esponja Grande.
Third course - mouth:
Taste that hits you like a mallet:
Open the menu and click on the mouth.
Before the main course, cleanse your palate
With TASTE that hits you like a mallet.
Go back to jungle entrance and then to the dock.
Go right and ask the Voodoo lady about the Feast of
the Senses' palate cleanser.
Club 41: The club might have some
food that is a palate cleanser.
Go to club. Check the sign at right end of the bar
- Fugu Jolokia challenge. See the pepper under glass cover left of the sign.
Talk to W. P., the barman-judge about the challenge.
Learn about the hot pepper - Fugu Jolokia.
W. P. lifts the glass case off the pepper. Be sure
that the glass case is raised up from the pepper before doing the rest.
De Singe's mansion: Go to
De Singe's mansion. Morgan's body is gone. Where did it go?
Stand under the curious helmet that is on the
ceiling at center of room.
Click on helmet. It covers Guybrush's head. Use the different buttons
and learn what each of the button does.
SAVE GAME HERE. Use the Auto Trepanation helmet and
press the first left button to numb the tongue.
Club 41: Immediately go
back to the Fugu Jolokia pepper that has the glass case raised already.
While, the tongue is still numb, use the hook on the
pepper. If hands are used, the pepper is too hot to touch. If the tongue is
not numb anymore, go back to saved game and do the helmet again to numb the
tongue and rush back here.
Guybrush places his tongue on pepper to win. The
Fugu Jolokia is obtained.
Third
Course: In inventory combine La Esponja Grande +
Fugu Jolokia. See a bigger and red La Esponja Grande.
Fourth course - brain:
Sixth sense:
Open the menu and click on the brain.
The main course will cause quite a flap
To find the SIXTH SENSE, use your map.
Go to and ask the Voodoo lady about the Feast of the
Senses' sixth sense. She says the Guybrush already holds the answer to that
question.
Jungle: Go to the jungle
entrance.
Check the map to see what is different that is
discernible.
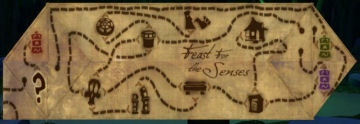
Fold the map #1: Examine
the map.
Fold the top right, top left, bottom right and
bottom left parts.
Then fold the bottom and top flap.
See that there are 3 colored idols. Hear a sound when the map is changed.
Follow the map: From jungle
entrance, go left to skeleton.
Go right to altar. Go right to stand.
Go right to purple idol covered in glass.
Go down to green idol covered in glass.
Go up-top to red idol covered in glass.
Fold the map #2: Examine
the map.
Fold the top right, top left and bottom right.
Then fold the bottom and top flap. See a ?
down of red idol covered in glass.
Hear a sound when the map is changed.
.
Follow the map: From red
idol covered in glass, go left.
See the mysterious chest of foreshadowing from the
Voodoo lady's shack.
Use the hook to open the chest. Take the tarot cards.
Fourth
Course: In inventory combine La Esponja Grande +
tarot cards. See a bigger and red La Esponja Grande.
Fifth course - hand:
Touch: Open the menu and
click on the hand.
Now engorged, a small dessert
A TOUCH so shocking it might hurt
Remember the static while exiting Club 41 and
walking over the rug close to the stairs-door.
Club 41: Exit the jungle,
go to dock and then Club 41.
Enter and look at the no-longer red carpet on the
floor by the
door.
Walk over the no-longer red carpet one way and then
go the other way.
See static go through Guybrush and the no-longer red
carpet is now static charged carpet.
Climb the stairs and exit. A strong shock happens
and Guybrush falls down.
See that La Esponja Grande is static covered.
Sixth course - hear:
Hear the belch: Open the
menu and click on the ear.
Your meal finished, let out a cheer
or belch so loud that all can HEAR
Exit the Club. Hear the Vacaylian Wind machine.
De Singe: See turbaned
De Singe playing with a piano attached to the Vacaylian Wind machine. His
turban has Guybrush's poxed hand on the front.
Elaine arrives but trapped by a clamshell clamp.
Guybrush arrives and also got trapped by a clamshell
clamp.
Use the Esponja Grande on the opening of the
Vacaylian Wind machine.
It hits the pyrite parrot and bounces to be
held by Guybrush's poxed hand on De Singe's turban.
Learn that he intends to spread the particles
of Elaine's body to infect all the pirates and have an endless supply of
Jus de vie to give him immortality.
Elaine was not in favor of that plan. See the
effect of Jus de vie.
Use the sack of sugar on the bucket of water
left of Guybrush's trapped foot. See the fireflies swarm on the sugared
water.
Use Fugu Jolokia pepper on De Singe. Ha!
Guybrush pokes De Singe's eye with the pepper. He soaks his head in the
bucket with sugared water.
Talk to De Singe about Elaine. Elaine hits the
cord connected to the light. The moths that swarm on the light now fly
to De Singe and eat his wig and turban with the napkin covered La Esponja
Grande.
Guybrush's poxed hand pushes De Singe inside
the wind machine and plays the piano. De Singe is spread over the
island.
Time to cure the pirates:
Use the Esponja Grande on the Wind machine again. See the spread of the cure and the effect on the
pirates.
LeChuck arrives.
Oh no!
Bwah ha ha haaaaah!
Chapter 5: Rise of the Pirate God
Walkthrough by MaGtRo & Team Waxman
December 2009
Guybrush
is dead:
Guybrush
is at the gateway to the underworld. Click on the dirt two or three times. See
that you have dirt and a shred of life in your inventory.
Try to
talk to the dog.
Obtain
money for the ferry:
Go to the
ferryman at the docks. Talk to him. The ferry costs 2 gold coins.
The ferry
is very clean. After talking to
him, use the dirt on the boat. While the ferryman is distracted, take money
out of the tip jar.
Go to the
grog machine and get grog. Distract him again with dirt on the boat and
again take money from the tip jar.
Go back
to the grog machine; this time use the money from the tip jar on the slot and
press change to get two gold coins.
Give the
coins to the ferryman. Guybrush is ferried to the crossroad but the ferryman
disappeared.
Learn
about the spell:
When you
get to the crossroads, Galeb takes a picture of Guybrush.
Talk to
Galeb completely. Discover how LeChuck got out of the underworld. He used a
spell.
Check the
circle at the center of the crossroads.
Find
the scroll:
Go back to
the boat. A map pops up.
Sword
fighting area: Go to the sword fighting area.
Go up to
the second floor and then click on the mast to get to the top.
Talk to
Morgan. She is depressed.
Meet the
swordfighter guardian. Get the ghostly sword from the swordfighter's
head.
Use the
sword on Morgan to engage in insult sword fighting with her and the swordsman.
In the fight, select dialogue that encourages Morgan and at the same time
insults the swordsman.
…Barely lift sword (Morgan); Foul smell
(swordsman). In some ways, you're better than me.
…marathon runner (Morgan); nobody draws blood (swordsman). You run that
fast.
…called
greatest pirate hunter (Morgan); want to puke (swordsman). Bet people say
that about you all the time.
…trained by the great swordsman… (Morgan);
Dog is smart (swordsman). He must have taught you everything you
know.
When Morgan has regained her confidence, she beats the
swordsman and becomes the new swordsman guardian.
Exit the area by going down the boom.
Treasure
hunting area: Return to the boat and go to the treasure hunting area.
Talk to
the treasure hunter.
You can
dig at an "X" spot if you want, but only get baby pyrite parrots.
Go to the
sign and click on the skull and crossbones to get a bone.
Gateway:
Use the boat to go to the gateway.
Pick up
the tip jar.
Go to the
dog and give him the bone. Franklin the dog goes into inventory.
Thieves
den: Go to thieves' den.
Explore
by clicking on some of the items. Pick up LeChuck's smelly sock.
Talk to
the thief and use the dialog that will distract him ("Look over there!"). Try
to steal something from one of the piles.
The thief
says that you have to leave. Check your inventory and see that the item you
took was stolen back.
Treasure
hunting area: Go to the treasure hunting area.
Combine
LeChuck's sock with the dog in inventory.
Click the
dog on the ground full of Xs. The dog runs away.
Crossroad: Go back to the crossroads.
See
Franklin facing Galeb. Hmm…
Talk to
Galeb. Give him money to buy the Guybrush’s spirit photo.
Use
LeChuck’s sock on Galeb. Galeb will move back and the dog digs up the
chest. How can we open the chest?
Thieves
den: Go to thieves' den.
Use the
chest on the thief. He opens the chest and steals the scroll/spell from you.
Get
the scroll: Distract the thief by saying there's something behind him.
Use the
dog with the scrolls. Click on the scrolls to give instructions to the dog to
hide.
Steal
something from one of the other piles and the thief escorts you out.
Treasure
hunting area: Go to the treasure hunting area.
See
Franklin at the treasure hunting area. Use him on the ground full of Xs to dig
up the scroll/spell.
Prepare the spell:
Read the
spell. Learn that you need a guide, anchor, courage and sacrifice.
Anchor:
While at the treasure hunting area, talk to the treasure hunter. Ask him how
to treasure hunt and pick up the jeweled anchor while he's
demonstrating his expertise with a shovel.
Go to the
sword fighting area and talk to Morgan about the items for the spell.
Go to the
crossroads and put the grog from grog machine at the gateway (courage),
Franklin the dog (guide), and anchor from treasure hunting area in the center
circle.
Go back
to Morgan at the sword fighting area. Ask Morgan about the sacrifice part of
the spell. Keep talking to her until she goes with Guybrush to the crossroads.
At the
crossroad, Morgan sacrifices her own shred of reputation. Morgan cannot go
through the rip that opened and is left behind.
LeChuck
and his demon bride:
LeChuck
sails here to open the entrance to the crossroads.
Guybrush
drops out of the crossroads and opens it. La Esponja Grande that LeChuck threw
is activated at the crossroad.
He
becomes the Demon Pirate God and now has unlimited source of voodoo power.
Guybrush is held at bay by LeChuck’s skeletal men.
LeChuck
will use the Cutlass of Kaflu to kill the Voodoo Lady that controlled his life
and Guybrush. In deep thought, Elaine asks LeChuck to make her his demon
bride. Plunder bunny... NO!
LeChuck
throws the Cutlass of Kaflu on the main mast. Try to take the sword from the
mast. Guybrush being dead cannot take the sword. Elaine says that the sword
destroys anything it touches in the mortal world.
Elaine
sprays Guybrush with voodoo root beer.
Morgan’s
pep talk:
Guybrush
is sent back to the afterlife. Morgan talks Guybrush to doing the Guybrush
thing. He plans to use the cutlass to kill LeChuck. To do so, he needs his
body. He needs the voodoo lady’s locket. Morgan leaves.
Get
back to Guybrush's body:
Instructions from the Voodoo Lady:
Go to the
sword fighting area.
Crabs
congregate before Guybrush. The Voodoo Lady talks through the crabs.
Find the
body! She says he needs to repossess his body. But getting into his body is
not enough; he has to permanently bind the body with the soul. He needs
MixnMojo. She had some spirit gum when she was in jail.
Find
Guybrush's body:
Go up to
the top and see that Morgan is gone.
Go
through the rip in the sword fighting area.
Club
41: At Club 41, see Guybrush's body holding the dart board.
Look above the corpse and see a barrel of root beer.
Talk to
Grindstump and Bugeye. Look at the monkey on the chandelier. He's still
hypnotized.
Try to
exit and realize you cannot open the door. Enter through the rip again.
Find the
Voodoo Lady's locket:
Go to
gateway and see Galeb. Talk to Galeb and learn how to close the rip. Guybrush
has to sacrifice his shred of life and it will close. But LeChuck will be free
to do what he wants on the other side.
Manatee mating ground: Go through the rip at left.
Talk to
Winslow completely. Click on the pile of rocks and paper on the raft to learn
about his new game.
Check the
hypnotized monkey on the mast.
The
locket was at DeCava's ship the last it was used. Jump into the ocean.
See
DeCava's wreck on the ocean floor. Check things but they cannot be taken.
See the
locket at top of swaying seaweed.
Click on
the clam beside the seaweed. Walk away from clam and see a bubble escape.
Anemone: Go right to the cave. Anemone, the merperson is
hiding in the cave. She's afraid to come out because of LeChuck. Find out her
relationship with Winslow. She'll come out for Winslow.
Swim to
the left until the shipwreck. Swim to the surface by clicking on 'exit'
hotspot by the shipwreck.
Get the
Voodoo Lady's locket:
Manatee mating ground: Talk to Winslow about Anemone. He
wrote a haiku for Anemone and wrapped it in a rock. He drops it in the ocean.
Dive back
down and tell Anemone that Winslow has written to her.
She swims
out and picks up the rock-haiku. She swims back to cave and produces a current
that sways the seaweed that has the locket closer to the clam.
As soon
as you have control, go to and click on the giant clam. Then walk away from it
as soon as you can.
The clam
reopens and the water bubble goes into the fabric with the locket caught into
it. It rises up to the surface. Guybrush automatically follows it up as
Winslow reclaims the locket.
Repossess Guybrush's body:
After the
talk with Winslow, he puts the locket on the crossbar of the raft. Take the
spirit photo out of inventory and click it on the locket.
Ask
Winslow to press the locket button.
Club
41: Guybrush is back at Club 41 and in his body, though
he looks like a zombie. Talk to Grindstump and Bugeye. Bugeye punches Guybrush
outside his body and be with Winslow.
Ask
Winslow to push the button again. Talk to Grindstump and or Bugeye again. This
time choose "I surrender'. Grindstump takes you to jail.
Jail:
Look around. Click on the loose brick on the back wall of Guybrush's cell. Get
Buyeye's diary, which
Guybrush
reads.
If you
have time, click on things in the next cell: gums on the sill, a mug on the
sill and a poster on the wall. Guybrush can't reach them.
Guybrush's body rejects him and he's back on the raft with Winslow.
Bind to
Guybrush's body:
Sword
fighting area: Go to the sword fighting area and go
through the rip to Club 41.
Club
41: Talk to Bug Eye. Now that his diary has been read,
ask him how he got out of the manatee. Select dialogue "he slipped out with
the tongue". Then select "he rode a mer-person to Flotsam". He asks if you are
mocking him. You must duplicate his facial expression -- Stinky, Tweaking and
Meanie. Click on go.
Bugeye
loses his temper and punches Guybrush again. But as a ghost, his punch
connected to Grindstump and Grindstump takes Bug Eye to jail.
Manatee mating ground: Return through the rip to the
sword fighting area and take the boat back to the gateway and step through the
rip to Winslow and the raft.
Ask
Winslow to click on the locket.
Jail
Once back in Guybrush's corpse, talk to Grindstump as a zombie and surrender
again. You'll end up in jail, but in the other cell.
Take-click on the mug as quickly as you can.
If you
have time, click on the gum on the window sill, the gum stalactite hanging
from the top of the window and the poster. (The mug is the only thing you need
at this point, but the other stuff is fun if you have time.) Guybrush's corpse
will reject him again.
Club
41: You're at the gateway. Take the boat to the sword
fighting area and step through the rip as a ghost into Club 41.
Click on
Guybrush's corpse again and click on the mug that he now holds in his hand.
Talk to
Grindstump to scare him. Use any face and he throws the dart but misses the
dart board and hits the barrel instead. Root beer flows into the mug the
corpse is holding. Click on the mug full of rootbeer for Guybrush's comment.
Go back
through the rip; return to the gateway and the raft. Ask Winslow to push the
locket button.
Guybrush
returns to his corpse and puts the mug of root beer into inventory.
Talk to
Grindstump and surrender again.
Jail:
Once in jail, take the mug of root beer out of inventory and click it on the
gum on the windowsill. Guybrush pours the root beer over the gum and eats a
piece. His corpse will no longer reject his ghost, so he can function as a
zombie without having to leave his body.
Click on
the poster on the wall of the cell and go through the hole.
The
confrontation:
Guybrush
is now a bona fide zombie. Guybrush confronts LeChuck. Elaine stalks Guybrush
with the dreaded Cutlass of Kaflu.
His
friends arrive in time. Guybrush was pushed back to the afterlife by LeChuck.
Diet
of the senses:
The
hook and Elaine's ring are now in inventory.
Learn
the spell:
Guybrush
realizes that one way to stop LeChuck's influence on Elaine is to shrink the
sponge. He needs someone who can help him reverse the sponge spell. Who have
we spoken to who claims to know a lot about spells? Galeb!
Caleb:
Return to the gateway and talk to Galeb. Learn that the rips are due to
LeChuck's finding and using the Monkeys of Montevideo to find the crossroad.
That weakened the fabric of the worlds.
He shows
you the reversal spell: Diet of the senses. Apply directly to sponge.
First
sense - Sight:
Like a
sponge, are you bloated in your hips and thighs,
block
out the SIGHT with cover for your eyes.
Club
41: Go to sword fighting area and through the rip.
Take the
blindfold at right end of bar.
Go to the
rip.
LeChuck shows up to push Guybrush back through the rip.
Second
sense - Sound:
The
smallest mouth snacks on a tiny whispered word,
a
SOUND so petite it is barely heard.
Manatee mating ground: Go to gateway and through the
rip.
Dive down
to the ocean and take the fishnet in front of the bones.
Swim to
the left until the shipwreck. Swim to the surface by clicking on 'exit'
hotspot by the shipwreck.
You can
also pick up the deodorant Winslow left on the raft. Go through the
rip.
Treasure hunting area: Go to Treasure hunting area.
Click to
dig on any X mark on the ground. See the baby pyrite parrots.
They fly
back to the sign at right.
Approach
the sign carefully. If Guybrush gets too close, the parrots fly away. If this
happens just dig some more.
Click the
fishnet on the parrots to capture them. In inventory combine the parrots with
the tip jar.
Third
sense - Touch:
A
light TOUCH for an appetizer, stay true and thrive,
a
delicate feather, plucked from a bird half-alive!
Go
through the rip at treasure hunting area.
Talk to
the formerly dead seagull. It is the Voodoo Lady. To complete reanimation out
of being a zombie, the soul must be compelled to reanimate itself. It is out
of the Voodoo Lady's realm.
Pick up
the seagull feather on the ground near the seagull.
Click on
the hypnotized monkey.
Check the
treasure chest. Use Guybrush's hook on the chest. The Voodoo Lady says that
the item in the chest is how LeChuck came close to Elaine. It helped gained
Elaine's trust. Guybrush picks up LeChuck's buckle.
Go back through the rip
-- LeChuck will
probably show up to give Guybrush a push.
Fourth
sense - Sixth Sense:
Your
SIXTH SENSE is bloated with fates not yet dealt,
you'll
find that a Secret will help tighten your belt.
Take the
boat to the thieves' den.
Use the
buckle on the thief. The voodoo spell on the buckle makes him trust Guybrush.
Click on
the Secret box, and the thief lets Guybrush take it.
Check
inventory and note that the thief stole the charm buckle.
Fifth
sense - Smell:
Fight
the SMELL of the after dinner treat,
eliminate odor and the urge to eat.
If you
haven't taken it yet; go to gateway and through the rip.
Take the
deodorant from the raft. Go through the rip again.
Sixth
Sense - Taste:
To
keep off the weight you need food with no flavor,
find a
TASTE so bland there is nothing to savor.
Take the boat to
the sword fighting area and step through the rip to return to Club 41.
Surrender to
Grindstump again to get thrown in jail.
Click on the gum
stalactite hanging on top of the bars.
Go through the
hole-escape tunnel, which this time leads back to Club 41.
Step through the
rip -- LeChuck will probably show up to give Guybrush a push.
Shrink the sponge:
You now
have all the ingredients for the spell.
Take the
boat back to the crossroads.
Check La
Esponja Grande.
Click the
following on La Esponja Grande (order doesn't seem to matter): gum, blindfold,
feather, deodorant, secret, jar of parrots.
LeChuck:
LaEsponja
Grande shrinks and Guybrush falls down on to LeChuck's ship.
Elaine is
back to herself. Winslow and his merfriends attack LeChuck.
Elaine
runs the cutlass through LeChuck. LeChuck throws Guybrush back to the rip.
Morgan
runs her sword through LeChuck. She says that a way must be found to keep
LeChuck both in the mortal and spirit realm.
The
final fight:
The
ending extravaganza has a sequence of timed actions that repeat again and
again if you aren't fast enough the first time. So you'll continually have a
chance to click on what you need to do next.
You start
out in the crow's nest part of the mast. Use the hook on the mainsail to go
down to the deck or let LeChuck punch you to the deck of the ship.
Talk to
Elaine who is fighting off the skeleton men - 'fight LeChuck'.
LeChuck
ties you to a rope and keelhauls you. As you go underwater, Elaine attacks
LeChuck, giving you a couple of seconds to click on the keys held by
the skeleton under the ship.
LeChuck will punch to the quarters and back up to
the crow's nest. Use the
hook on the mainsail or rope to slide down the sail, leaving a big rent in it
or let LeChuck punch you to the deck of the ship.
Use the
keys on the locked gate/grog barrel container, which frees the barrels of
grog.
LeChuck
keelhauls Guybrush again and then smashes him into a door. Click to pick up
the door and use it on the loose barrel just beside the door.
LeChuck
eventually punches you back up to the crow's nest again. Use the hook on the
rope that goes from the crow's nest back toward the wheel part of the ship.
Guybrush will swing down the rope and then drop onto another part of the ship.
Look at
the rip in the sky and Guybrush would want to go there.
Click on
the giant cannon directly beneath your current position. LeChuck punches you
down to the deck.
You
should now be close to the broken door on the barrel. Ask Elaine to light the
cannon.
Click on
the broken door, which has become a seesaw. Guybrush walks onto the door and
LeChuck lands on the other part of the seesaw. If you have previously asked
Elaine to light up the cannon, Guybrush launches himself into the crossroads.
(If you
miss your chance or aren't quite quick enough at the above actions, LeChuck
will eventually punch you back up to the crow's nest. You should again use the
hook on the rope, wait for LeChuck to punch you down to the deck, ask Elaine
to fire the cannon, and then step onto the broken door.)
Close
the rip.
Guybrush
wakes up at the crossroads. Morgan attacks LeChuck. Morgan mentions again to
find a way to trap LeChuck between the worlds.
Use the
shred of life from inventory on the rip.
After the
cutscene, use the ring on the center of the crossroads.
It is
worth waiting through the credits to see the final cutscene.
What's in the jar?
This document may not be
distributed without express written permission of the author and the content
may not be altered in any way.
For Questions or Comments
on this Walkthrough,
Please write to:
MaGtRo
Copyright © 10/2009
MaGtRo
 GameBoomers
Walkthroughs and Solutions
GameBoomers
Walkthroughs and Solutions