| The Story-Tiles | First Time in the Skull | Scheherezade's Tale |
| Weighing the Feathers | The Stone-Age | The Constellations |
![]()
The opening cutscenes: A "Bad Guy" breaks into a chamber with his pickaxe, and finds the Crystal Skull. Now all the power is his, or so he thinks. You are driving in the desert, and a gazelle causes you to have an accident. A Nomad takes care of you. He tells you some bandits have taken over his people's well. You have to see what gives.
| Welcome to the Hoggar. Located in North Central Africa, in Algeria, the Hoggar region is a mountainous area surrounded by the Sahara to the north and the Ténéré Desert to the south. Temperatures can range from 120°F to below freezing, with an occasional snowstorm. A very isolated country, characterized by sparse population and two unique languages; it is difficult to travel, and is well-suited to our story |
Go forward, and find the guard. You may ignore him, which is the best choice. If you decide to speak to him you will have three questions available, but you must ask only one. Do not speak to him twice. If you don't believe his warning (or mine), he will shoot and you will need to replay. Exploring, you can go either right or left from the guard. To the left, there is a path that winds up and around the hill, giving you an overview of the area. Visible across the valley is a cave. Reach the cave by going right from the guard. As you arrive at the hilltop, facing a large rock outcropping, either way you step has the same result. A guard approaches with intent to do you harm, but he is stopped by the Targui. Go through the stone arch to find the cave. Walk right in, there's nobody home. Inside, you discover some scientific equipment (Surprised we didn't have to find a generator and get it going first!) that appears to be monitoring the environment. Video, audio, possibly seismic information. Somebody's studying something, alright.
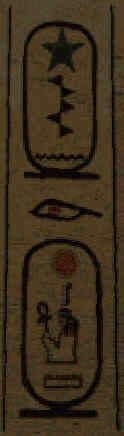
Straight in from the entrance is a round illuminated area featuring a scarab. The cursor indicates you should be able to go through, but you cannot. You have a puzzle to solve first. Look on the floor. A circle with icons at the top representing hands, feed, and head. Think of Leonardo's famous anatomical drawing of a human figure standing in a circle. Look in your inventory to find a disk and a stick. Place one of the items in the circle, then the other. They work together to create a spinning top. Experiment with the top by placing it on one of the icons. The top spins, takes a path that may lead it to one or more of the locations on the circle, until it settles on its own spot and becomes a star. If the top passes by a star that is already present, it extinguishes it. The object of the puzzle is to illuminate all five stars: Head, Right Hand, Left Hand, Right Foot, and Left Foot. Only by choosing them in the correct sequence can you succeed. Click here for the Solution: With all five stars in place, the magic membrane is accessible to you, and you enter an Egyptian-style room complete with sarcophagus.
 |
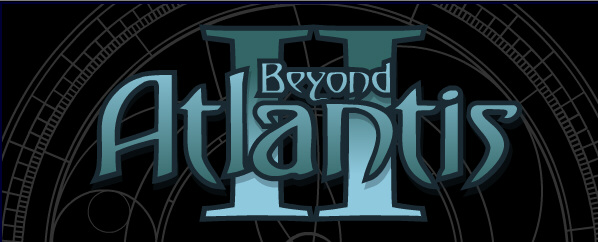
Our First Clue!Looking to the right, we see this pictogram on the wall. As an experienced Egyptologist, you immediately recognize the bottom one. The symbols are familiar. But what is that set of symbols in the top group? The wavy lines at the bottom may mean water, the star is, well, a star, but a pentagraphic star is not commonly found in Egypt. And whatever is that pointy thing in the middle? Let's turn around and go to the opposite wall. Here is a star with the Eye of Horus in the center. Touch one of the side-arms of the star, and the eye rotates. Now does that top pictogram give you any ideas? It would seem to represent our star puzzle, and instructions how to manipulate it. That's it! Left, right, right, left, right. The sarcophagus opens, and Eeek! He needs a facial! He's your personal Psychopomp. |
| Do you recognize that voice? Did you play Beyond Atlantis? (Atlantis II?) That sounds like the guy who played the Mayan King that makes you win the crab-race; and can't tell his twin daughters apart. Guess he's come upon hard times, to look at him now. He gives you a box. Left click to open it, and there's a scarab inside; not too lively. Right-click to put it away for now. |
| Speak to the Psychopomp. Ask him about the passageway, himself, and the scarab. When you try to leave via the passageway, nothing happens. We need a little helper. From where you were standing at the sarcophagus, turn right, and step forward. Then look at the base of the pillar on your right. Find a little wooden bird. Take the bird and release it into the passageway. Up you go, and there's one of those magnificent Atlantean flying boats. I want one of those for Christmas, please! |  |
I certainly hope he hasn't lost his flying skills. After spending three thousand years in a limestone box, I know I'd be rusty! You land at the foot of a great Sphinx. Go into the temple. You get this story: Pharaoh is dying and needs help. We need to find a feather so that he can die and be judged; and the symbol of life (the Ankh) so that the Bennu Bird can die and be reborn. Go back to the Atlantë and speak with the psychopomp about everything. As you get in, the map pops up.
Hovering the cursor over the map reveals five regions: The Temple of the High Priest and the Temple of the Ankh, both in the Sphinx; the Temple of Isis, the Island of Feathers, and the Fisherman's Beach. We have two items to recover. Let's check out the Temple of the Ankh. Just go in, open the chest and take the Ankh. Nothing to it. Now go the the Temple of Isis.
She says the story needs help. Check the tiles on the back wall. You find 12 pictorial tiles, and 12 verbal ones. The only logical way to approach this jumble is to make a list of the quotations, then decide on a sequence that makes sense. Click here to see the quotations in order. Then, with the verbal part of the story assembled, decide which picture goes with which quote. Click here to see the tiles in order. Hey! Don't peek unless you really have to. Whether you cheated, or whether you really figured it out, Isis doesn't care. She is grateful to have her heritage restored, and gives you a lucky talisman.
|
Now go to the fishing beach and talk to the kid. He is having no luck today. Give him the Luck Talisman and change his luck. Check out the net. You don't want a fish, thank you, but that little piece of junk and the pretty stone might come in handy. Now go to the Feather Island. On the island, you find a stone chest, with the same image as on the pretty stone. Use it on the lower section of the chest, and take the feathers. Turn left, go to the pillars, and find the stick projecting from the left pillar. Hang the "junk" (scale) on the stick. Now you can weigh the feathers. Weigh one against the other until you find the heaviest feather. Notice that the scales are out of balance. Do it like this: place any feather on the left tray. Place another on the right tray. If nothing happens, keep changing the feather on the right until you find one that is heavier. Then move that feather over to the left tray. Repeat the process until you cannot find any feather that will depress the right-hand tray. The color was randomly selected just for you when you began the game, so there is no quick answer. You must do the weighing yourself. The Atlantë has a one-feather load limit, so leave all the other feathers in the chest where you found them.
Return to the High Priest's Temple. Place the feather on the stone. If you have the correct one, Pharaoh's soul rises to the heavens. If not, he is doomed, and you are sent back to find the correct feather. Place the Ankh on the other stone and witness the death and rebirth.
Now the trick is to figure out how to leave this domain. Let's see - are there any loose ends? Anything magical out there that might help? Check the scarab in your box. It has been reborn, and turned golden. Does that give you any ideas? Not sure where to go? Click here for the answer.
![]()
You are back in the room where you found the Psychopomp. Exit through the membrane, and go outside the cave, where you will see your Targui friend under arrest. An automatic series of scenes follows, where you meet the guy in charge. We don't know his name ("the chap with the gun") but he seems to enlist our help, whether we really want to or not. Pick up the skull and enter it. You are in a surreal world; the Interdimension. Possibly the scene represents the inner workings of a brain, with connections between nerve cells. Some of the floating globs can be accessed. At one loction, there are several that look like a room with checkered flooring. Enter one, it doesn't matter which, and try some of the doors. Whatever you do, you keep entering a duplicate room. To exit, just turn all the way around and go out the main door. At another node, there is one glob that looks sort of like an eye. It is the room at the Hoggar, where you entered this dimension. The eye-effect is just the round membrane-entrance to that room. This is the exit from the brain-world. At that same node, if you turn all the way around, there is a dolphin floating there.
Speak to her, and she says: "Seek beyond the corridors. Begin by passing through the first door on your left, then the third on your right." If you have not visited the corridors, that's all she says. If you exit back to the Hoggar, and examine the pillar with the human figure, it comes to life and asks" What lies beyond the corridor?" If you have not been in the corridors, you don't know and he turns to stone again. Men!
If you have visited the corridors, then the dolphin has much to say. Ask her about everything. Then exit, and go talk to the man in the pillar. He tells you the history of the skull. Now there is an object floating in the air. It is a magical wind-chime. Touch it, and receive a new object, the remote control. It gives you access to four areas. At the top-left the stones represent the landscape outside, and take you to the beginning. (That segment doesn't work, by the way, if you press it, it will just break.) On the right, the flint arrowhead takes you to the stone age; on the lower left the object that sort of looks like a balloon because it is really upside-down. It's a minaret, and takes you to Baghdad. The center object represents the membrane-eye of the Hoggar complex; where you are now. Let's go back in time to the Palaeolithic age. Press the right-hand triangle.
![]()
CD-users will change to disk one at this point. You are in the stone-age. It also feels like the Ice Age. Your companion decides to try for some elephant-meat. His aim with the spear is less than ideal, and there is one grumpy mammoth coming our way! We manage to find shelter in the cave, and the mammoth has no intention of letting us leave. Let's explore. Ooops! You slip, slide throught the chute, and Thud! We're due for some out-of-body quality-time. If you try to visit your companion upstairs, he can't see you. You realize you are a ghost. Back downstairs (downchute?) walk behind your body's head and into a cave where you find remnants of a fire on the ground. In your inventory is a wooden stick. Use it to rekindle the fire. Voilà: wolf-shadows on the wall. If you click one, it goes into position, ready to fight. If you click another, the fight ensues, and leaves one victorious. Choose alternate sides, leaving the White Wolf for last; establishing him as leader of the pack. He becomes grateful, which will come in very handy in a little while. He also shows you the way out. Follow him through the wall.
Whoooo! Now that was a surprise! We land in another imaginative world, complete with a floating jelly-fish shaped thing. As you might suspect, our goal is to get there somehow. Swimming over is not an option. Walk forward once, look down and to the left, and pick up the tree-stump. (It's a good thing you have deep pockets!) Go to the far end of the island. There is a forward-cursor there, but it doesn't work. Try putting the stump down at the base of the dead tree. Well, there's no going back, I guess. We can't let a lil' old sabre-toothed tiger stop us, can we? Before you move, look down and to the left, and pick up a pebble. Then go forward once, toward the tiger. Look down to the right, and pick up a branch. Don't step forward to the left, or you will be featured on the menu. Don't step forward to the right, or you will find the quicksand. Instead, wait until the tiger is behind the big rock and toss the pebble at him. The tiger loses his composure and forgets to avoid the quicksand. Ta-ta for now, darlin'!
Stay on solid ground, and go to the far end of the island. There is a rock, which you can dislodge with that branch. It provides a stepping-stone to the next island. Tigers and bears, oh my! I don't think we're in Kansas any more. Now it's payback time for your friend, the White Wolf. Go to the left, downhill toward the bear. After you step through the hole, there is a growling sound behind you. You have invaded the territory of the Black Wolf. Go back through the hole, up the hill and toward the White Wolf. Your friend takes care of the Black Wolf, and you may proceed. Go back down through the hole and find a long stick on the beach. Go up the grassy slope, find the spot on the shore to use the long stick, and vault over to the bear's island. Thankfully, the bear is busy fishing, and we can pass behind her without being disturbed. Go to the end, find the dead tree, which is useful as a personal flotation device. Now it's possible to reach the floating world. Up you go. Have a good look around as you climb. Finally, go right up into the center. Isn't that just too, too much? Woah! There's the skull and the spear-launcher. If you pick up the skull first, you don't have the spear-chucker. You wind up in the brain. At the dolphin's node, the bubble to Hoggar is gone, but there is a new one that returns you to the floating thing. Speak to the dolphin, She gives you two more clues to the corridors; fourth door on the left and third door on the left. You could go find some corridors and experiment, but it's not necessary. Go back to the floating place and pick up the spear-thrower now, if you didn't get it before, and exit through the floor. Now make your way down the ramp, nearly to the bottom, looking at the pillar as you go. When you find the image of the White Wolf in the rock, enter it.
You are back in the wolves' cave. Go to the main chamber, where your body is. Walk toward your feet, then look right to see a small stone bridge. Go across, into a chamber where the cave-art animals are running around the perimeter of the room. Find the spear on the ground, and throw it at the animals. You must lead your shot; that is, throw the spear in front of your target. It is easier if you rotate the view as you throw. It is also easier if you wait until the animal is running across the plain wall, rather than the area where there are pillars in the way. Each time you strike an animal, you gain it's heart. There are four in all; the elements Earth, fire, water and air. When you have all four, return to your body and revive it thus: starting at the foot, the closest one you come to, see the element for earth. Place the earth heart there. Going counter-clockwise (the other foot next) the sequence is fire, water, and air. You come to life. Go up to your companion and give him the spear-thrower. He uses it to dispatch the mammoth, and you are free to go. Back at the Hoggar. turn around and use the remote control to change the environment to Baghdad.
![]()
You are in an earthen jar. Step out, and see the cutscene where Sheherezade is telling a story to the Caliph. You assume the role of the thief, who has sneaked into the merchant's house. There is a guard in the courtyard, who will not be friendly if he finds out you are there. See the cat? Cats can be a nuisance, but maybe this one can help. Look to the right and find the jar of fish. Open it, and the cat takes a fish and runs off. Walk forward once, and to the right once, and find a pebble on the ground. Toss it to the far left, distracting the guard. Then you can go farther right and take the ladder. Turn around, go to the balcony and use the ladder to go up. When you arrive, your pal the cat greets you, then proceeds to tip over a large vase, alerting the guard. Immediately go into the door; the maiden's room. She hides you under the bed, saving your life. In return, she wants a beautiful black rose. The thief knows a wizard, and goes to his garden in search of a black rose.
This is a complex area, and difficult to describe. Central to the area is the tall spiral structure, the Serpent Tower. It has steps leading up to it on all four sides. Around the perimeter of the area are several structures: Three (pagodas?) small buildings, red, blue and green, housing a dancing girl. If you try to approach them, your way is abruptly blocked by a burly, sword-wielding guard that looks like a second cousin to Bres, the ogre in Atlantis II. He's missing a chromosome or two, by the looks of it. You will also find a reflection pool, with a stalk of bananas on one side, and a monkey juggling three sticks on the other side. In one corner, there is a stone grotto with a very grouchy Griffin standing guard over a jewel box. Over his head is a cage that looks like it could be lowered. Near the grotto is a decorative device that may have something to do with that cage. Nearby is a gazebo with a pond and some sort of gadget with a circular depression. That's enough sight-seeing. Let's get to work.
Right where you first came in, is a stairway leading up to an L-shaped corridor. Go in there, and find the long stick in the left-hand branch. Go to the reflection pond, and use the long stick to knock down a banana. Take the banana to the monkey, and give it to him, interrupting his juggling. He gives you a smooch, then a funny face, and runs away, leaving his three sticks behind. Take them. Go see the griffin in the corner. If you look down and to the left, there is a nice big white pearl just sitting there. Take it. Go to the gazebo and put the pearl (orb) in the round depression, to open a puzzle. This is the Unicorn's garden, and it is your job to guide him to the exit at the upper left. Use the four jewels found on the bottom edge to coax the unicorn into making the correct turns. Place them just "around the corner" where you want him to turn. Click here to see the solution. After freeing the unicorn, you are rewarded with his horn. Go to the device near the grotto, use the horn on it, and lower the boom on that dratted griffin. Now you can get to the jewel box. Open it, and take the three jewels.
It's time to visit the three dancing-girls. When you approach their dwelling, a guard appears One pops out of a flowerpot (isn't he cute with that daisy stuck to his head?) and the other two seem to fall out of the sky. To get past the guards, use the matching color stick from the monkey. The guards fold up their wares and vamoose. Talk to each girl, give her the correct gem, and receive two keys and a map in return. Now you are able to get into the spiral tower. Go there, and use the brass-colored key on the lock. When you enter, your friendly neighborhood gargoyle appears. He beckons for you to enter. Wait a few seconds and he plants a huge kiss on your screen. Isn't he adorable? Click on him and the game begins. No instant solution, sorry. This is a variation of the old board game "Serpents and Ladders", originally played with dice. (There is a version of it in the Egyptian section of TimeLapse.) The idea is to get to the top before your opponent. If a move lands you on a star, you spring ahead, and your opponent is thrown back. If you land on a snake, you are thrown back and your opponent is advanced. This version is a little different, in that you don't have dice, you have a sub-game, where you are able control (sort-of) the number of steps you want. The monkey climbs, picks a coconut, and slides down. You can decide when the monkey throws the coconut with the red button. Higher up, fewer steps, at the bottom, six steps. Check the map to see where you and the gargoyle are. When you go up, he goes up an equal amount. If you have any control, you can either place yourself on a star and get a jump; or place him on a snake and send him back. You will need to bypass him in order to win. Either skill or luck will prevail. The first time I played this I hadn't found the green girl, and made it to the top on the first attempt without the map. The moral there, is not to try too hard. Just plug away and you'll get it sooner or later.
At the top, use the Silver key to unlock the door. A flying carpet (I always wanted one of those, too!) appears, and takes you to the wizard's hideout. You watch while the Genie gives the wizard the skull, and the wizard visits the Interdimension, and just like the "chap with the gun," can't remember the instructions. (Maybe he should play adventure games, and learn to take notes! Let's not tell the wizard how to find the walkthrough.) Go in, and face the Constellation Puzzle. This, in my opinion, is a toughie! What makes it hard, is not so much the patterns themselves. but the way the 3-D view distorts the layout on the floor while you are trying to match the constellations in the windows with the pattern. You must find the five constellations seen out the windows, in addition to the serpent pattern on the wall behind you. This was a struggle. For a big boost, Click Here to see the individual constellations solved. When you have done them all, there is only one star not included. The rest fade, and you must find the shortest route to the top of the Serpent Constellation Click Here for that one.
You are bounced back to the wizard's hangout, this time without the cobras. Whew! Go upstairs, and turn left to face a puzzle-box. Observe that each column and each row contains one-each triangle: up, down, right, or left. When you select a triangle (up, for example,) another triangle of the same orientation reacts, either by going in or out. Lets's number them 1 to 16, starting at the top left. Notice the four that have mouldings around them. (Numbers 3, 6, 12, and 15. The object of this puzzle is to raise those four symbols, and none others. Click Here for a way to do it.
Solving that one, you hear a click indicating that something is unlocked. At the bottom are four drawers that contain clues to the next puzzle. As you take the last one, the puzzle-box rotates to reveal another puzzle. Sixteen drawers, all empty. What gives? The object here is to open four of them. Not only that, you must open them in the correct sequence. Click here for the answer.
The box opens, and you have a rag, and a Genie's lamp. As you rub the lamp, Genie appears, and gives you your thr . . . oops! One Wish. We started out looking for a black rose, so that is the item you desire. Genie is gone, but isn't that convenient? Here's our trusty skull. In you go. Remember, to not get lost, just turn left to the very next path, and step forward once. Stop there, and turn all the way around to speak to the Dolphin. She gives you the final two clues to negotiate the corridors. Don't go searching for corridors now, they're not accessible. Instead, use the bubble right there to return to the Wizard's room. Exit the room via the door (how quaint!) and arrive at the merchant's house. The girl gets her wish, Scherezade finishes the story, and you wind up back in reality. The Dude in Charge has no sense of direction, so he must send you back into the Skull's territory to seek the treasure. I have no practical way to get you to the corridors; please just ransack, and they will turn up sooner or later. Now, pass through the doors in the sequence the dolphin gave you. If you mess up, just turn all the way around to exit, and begin again. For the six clues, click here. When you succeed, you arrive in a garden. Shambhala maybe? Rhea's Garden? Here, the two gurus are a bit fussy. If you do anything out of the correct sequence, they send you to the beginning. Start by talking with the woman. The whole sequence is presented here:
After completing the sequence of questions, you can jump into the pool and retrieve the Gift. Then, you return to the room at the Hoggar, facing the Chap with the Gun, the Gun aimed at you. You can try various things, but there are not multiple endings. Only one way out. You can click on the sceptre in you inventory to return to Brain-Land. Look for a bubble that takes you to the Hoggar campsite, outside the cave.
Find the Dolphin. Speak to her. Then, to the right are two bubbles. The familiar "eye" on the right, and a new active one on the left. Go there. It's outside at the Hoggar complex. Immediately upon arrival, look at the tent. Halfway down on the back (left) side is a flashlight. Pick it up. Look right to see the guard facing away. Konk him on the head with the (torch) flashlight. Take the keys from his belt, and the knife near his left hand. Then, look up and to the left to find the Targui in bonds. Use the knife to free him. Speak to him; it's essential. Then go to the Jeep and try to start it. You have the wrong keys. The correct keys are hanging on a belt, near the guard's body. Take them and escape. The cutscene suggests only the Camel knows for sure what's coming. By the way, if you try to get clever and take the keys from the belt first, then they turn out to be wrong and you must use the keys from the body. No shortcut here.
|