Some preliminaries:
Following is a message from KarmaLabs, the game's developers:"Opening a saved game using the control panel can cause you to lose objects or have problems freeing the princess from the globe at the end of the game."We've done a lot of testing and it looks like we understand the problem of the disappearing objects. "Basically, there are two ways to open saved games in "Adventure at the Chateau d'Or", you can either start the game and "Load" a saved game from the start game menu, or you can load a saved game using the control panel at any moment during the game."
|
Synopsis: The Duke's niece tells you she
is glad for your help, but she doesn't explain very much. The object of
your gameplay is to retrieve four important objects. In the process
of doing this, you will need to solve some simple puzzles, figure
out how to open some doors, and study the
entire history of France.
Really! No kidding! So put on your thinking cap and head for the Library.
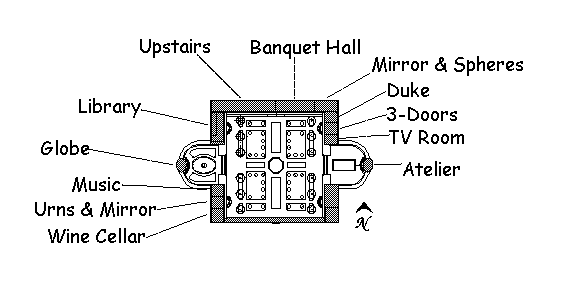
Library
Map
You can enter the Library from the ground floor,
it has its own entrance, or you can get in from the upstairs. Find the
book on the upper level and read. You will get a quiz on this material
later. If you want to cheat, I will be providing all the answers, but if
you want to expand your cerebral cortex (not to mention impress all your
friends and the Duke himself), do your homework; you might even want to
take notes. Go down the spiral stairs and use the laptop. Study the historical
information to build your knowledge.
TV Room
Map
Use the remote to control the television. Study
the information. Your knowledge base expands, so that when the Duke asks
you something, the answer will be available for you to select.
Mirror Room
Map
Go to the mirror and place the spheres in the pockets in the shelf. If they are in the correct place, they expand. (The center one doesn't expand.) Press the red button and observe the images. Across the top you see waves, the moon, a star, a monogram, and the sun. Across the bottom you see a clarinet, a gold cup, a fleur-de-lis, a spray can and a crown. You will want to remember these objects and how they relate to the signs.
Turn right, pull the battle-axe to unlock the door. Enter the Duke's chamber. Go to the color-control panel. Click on the control buttons. This puzzle is randomized. Each time you come back here, the correct settings are different. Change one until the vapor first appears. That setting is correct, leave it alone. Go to another set and cycle the colors until the sound increases (very slightly) and leave it. Do the same for the other two until they are all correct. When they are, the Duke appears. He will ask you some historical questions. If you have not been to the library or used the laptop, you will have no "knowledge" and be unable to provide answers. If you have partial knowledge, that is you have read or seen most, but not all of the information, you can get away with an "I don't know" response, but only once per session. When the Duke asks you a question. the keyword for that question is erased from your knowledge. If you have the difficulty setting on easy, you can 'relearn' the answer, but if it is set to high, the answer disappears forever and you cannot relearn it.
If you simply must, Here's a page with all the possible questions; to help you, some keywords are in bold.
When you have answered enough questions to satisfy
the Duke that you're worthy, he will give you a key. You must exit down
the stairs to your right, and through the "Three-Doors" room. Come back
through the main entrance to unlock the closet and take the Crown.
The Atelier
Map
In the Artist's Studio, you will find an easel,
some spray cans, some brushes, and a locked door. Try the spray cans on
the easel to see an image. Try the brushes to see a symbol. When you use
the correct symbol with its corresponding image, it 'snaps' to the corner.
The images are: the Easel, the Art Gallery, The Mirror, and the Barrel.
The symbols are: the Monogram (Virgo), the Wave, the Sun, and the Moon.
The last spray can depicts the Globe Room. Use any brush on it to complete
the sequence and get the magic Spray Can.
Mirror and Urns Room
Map
Click on the urns to change their color. Certain
color settings will give you access to the doors left and right. To peek
at the answers, click for the Music Room or the
Wine
Cellar. Before you peek, try making them the match to unlock the Music
Room.
Music Room
Map
Press the right-hand button on the stone sphere
to view scenes of modern Paris. Turning towards the exit, you may get a
visit from her highness. Use your key on the chest to find the CD labeled
Sensory Focal Devices. Look at the desk after getting the CD to find a
note. It says the Duke made a security system, and wrote a number on his
notebook: 6793. Write it down, you cannot take the note with you. Go back
to the library and use the CD on the laptop for a clue
to unlocking the wine cellar with the urns.
Wine Cellar
Map
At the foot of the stairs, turn left to find the
Gold Cup. Take it. At the other end of the room is the large barrel, and
to its right, three casks of wine. If you are thirsty, you can drink the
wine. Several cups of wine will send you to the Dungeon. Be sure you have
a saved game handy: you only have about a minute to live in the
dungeon, before you expire.
Dungeon
(Not indicated on Map; it's the unmarked room
on the lower left.)
You have very little time to accomplish your tasks
here. Go to the bench and drag it to the right, toward the door. Look at
the floor, where the bench was previously. Step toward the corner for a
close-up view of the floor. Find the brick (very small hotspot on the upper-left
corner of one of the bricks) and pull it up. Read the message inside, taking
careful note of the sequence of symbols. Look up at the blank wall and
use your magic Spray Can to create a new door. Out you go.
The Art Gallery
Upstairs from the Atelier is the Art Gallery. To
get there, use the magic Spray Can on the easel to depict an open
door. At the far end is the Golden Clarinet, locked by the security system.
The code is in the note found on the desk in the Music Room.
Endgame
Go outside to the place where you began and use the Clarinet on the water. The princess appears and asks for the crown. When you give it to her, she vaporizes, and the crown vanishes with her. You will need to go find the crown again. (It's right where it was before, in the closet where you found it.) Go to the Globe Room. (Map) Don't get confused by the globe in the Music room. This globe is black, and the Princess is trapped inside it.
Place the four items from your inventory in the pockets around the globe. You can do them in any sequence, but they must go into the correct pockets. The order is given on the note in the dungeon. If you didn't go to the dungeon, you missed a good glass of wine and the answer.
There is a possible bug in this sequence: You may actually have all four items, but when attempting to put them onto the globe, the key may reappear, replacing one of the items. Go back to the Crown-cabinet and use the key on it again to get rid of it. To avoid this problem, see the instructions at the top of this page for the correct method to open a saved game.
This document may only be distributed
with the express written permission of the author, Tally
Ho
The content of this document
may not be altered in any way without the permission of the author.
Any proposed changes or additions
to the walkthrough may be submitted to Tally
Ho.
copyright 2001 ©GameBoomers
![]() GameBoomers
Walkthroughs and Solutions
GameBoomers
Walkthroughs and Solutions
 |
Make both urns gold. (five clicks each)
Left urn blue, (four clicks); right urn violet
(six clicks)
Cup, Crown, Clarinet, Spray Can