" . . . I have only one request of you, the player. As you immerse yourself in this amazing world, please take the time to suspend your disbelief completely. Try to imagine what it would really feel like to be a human being exploring, for the first time, an unknown alien spaceship larger than a major world city. Let yourself feel how thrilling it would be, in actuality, to confront engineering marvels created by other intelligences, or to converse, however simply, with beings who evolved somewhere else out there, among the stars. If you allow yourself the luxury of that kind of patient, thoughtful playing, then I believe that RAMA will come to occupy a very special place in your mind and heart as well."-- Gentry Lee, 1996 (co-author of "RAMA II") |
||
You have arrived from earth aboard the Newton, and have boarded a drone shuttle which is taking you to Rama. You get your only look at the exterior of this astounding vessel, a flawless cylinder which is 20 kilometers in diameter and 50 kilometers long!
Upon entering the airlock, you are greeted by Nicole des Jardins, medical officer for the exploration mission. She points out the individual lockers, one of which is yours, and the computer, which you examine to learn about the other crewmembers. Two of the messages are especially important. Michael O'Toole gives you the code to operate the cable car, along with a big hint to one of the numerical problems to come. Richard Wakefield introduces you to his miniature robot creations, Falstaff and Puck, and urges you to take Puck along with you as you explore. Puck knows his way around, and can provide help when you most need it.
Look around the hub. Be alert for a quick glimpse of an Avian creature as you leave the computer. Look in your locker, and take the items. You find your personal wrist computer, and the ISA multi-tool. Activate that little computer by placing it on the Raman eyes at the lower left, or by double-clicking on it. You get some instant messages. Also check out that multi-tool. In the close-up view, you can click on the button to change it from a scissors to a knife to a spoon to a flashlight. Pretty handy little gizmo, huh!
| It is dark inside Rama, and impossible to see beyond the hub. If you look around back of the lockers, however, you see a ladder and decide to climb down. Off to the side there is a sizeable object. What's this? Radioactive? Not armed? Inactive? This must be a bomb. On the far right end is a key. It looks like a locker key, and you decide to snoop. | 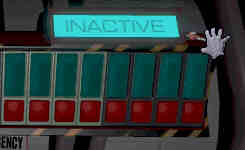 |
At the lockers, someone is knocking. Check Locker 9, and discover Puck, who greets you and hops into your inventory. As he tells you, he is able to give you hints and information throughout the game. Just pick him up and click on what you want to know about. The sound you hear behind you is the cable car returning to the top. The key you found is for No. 6, Francesca's, where you find several items, including the lighter she asked you for, some weird looking tiles, a key, and a data cube. Read the cube, and learn that she is on rather close terms with David Brown. This clues you in that the key might belong to Brown's locker. By now you have seen how an inventory item turns red when it is the correct item to use. Inside locker seven is another data cube and lens of some sort, When you try to read the message, you can see that it is from Heilmann to Yamanaka and Tabori, his security officers, but the message is encrypted. Hang on to it, we'll probably find a way to decode it later.
| You enter the code for the cable car, and ride down to the Base Camp. Don't forget it's ten km from the hub to the outside of the cylinder. On the way down, the lights come on. There is no gradual sunrise in RAMA, when the day begins, the lights turn on abruptly. The light is coming from three long slits that run the length of the hemisphere. | 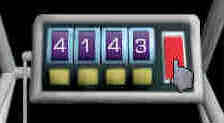 |
The Hub site is designated as the North end of the Raman cylinder. Rama spins around its longitudinal axis, so that when you are standing on the central plains, actually the interior wall of the cylindrical structure, the force generated by the spinning provides a comfortable g-force so you can walk around. There would be no gravitational force at the hub; but the game's designers decided not to incorporate weightlessness in the plan. Halfway between the north and south poles, Rama is divided by a "Cylindrical Sea" that separates the two hemispheres, or rather hemicylinders. The sea is frozen during Rama's long winters. There is a large island in the middle of the Cylindrical Sea that the explorers have named "New York," because it gives the appearance of being covered with skyscrapers.
Over in the corner of the room, there is a table and a refrigerator. There is nothing in the fridge you can take at this time, but there will be later. In the box on the table, you discover more tiles (Two red matrix pieces and another yellow map puzzle piece. If you have Francesca's cigarette lighter, leave it in the box.
Looking around the base camp, you find a table with some objects on it. A note from Nicole explains the nearby data cube. Actually, these two items are optional Easter eggs, intended to promote Arthur C. Clarke's latest book, "3001: the Final Odyssey." I have read all four books in this series, and thoroughly enjoyed them.
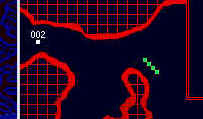
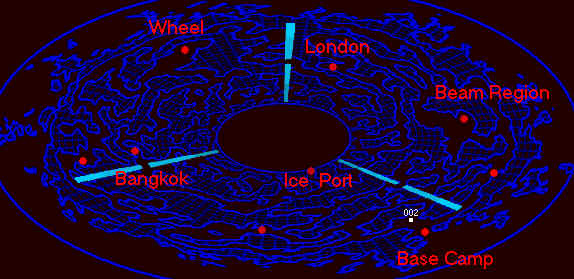
As you leave, Irina Turgeynev gives you her opinion of Brown's plan to capture a crab biot. (Biot means biological robot.) You step out the campsite door, and have your first look at Rama. As you step ahead, you are presented with the Central Plains Radar Map. It's difficult to picture at first, but the map is laid out like this: the black circle in the center represents the Cylindrical Sea, and the outer perimeter of the map represents the juncture where the northern border of the Central Plain meets the flat end of the cylinder. Thus, South is toward the center, and North is toward the edge, East is clockwise, and West is anti-clockwise. The light blue strips represent Rama's lighting system. To navigate around Rama, click on a region of the radar map to preview, and click again to enter the area. You should first go to the Beam Region.
 |
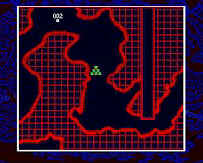 |
The Crab BiotsThis is the preview mode of the radar map, showing that you are about to step into a region where the crab biots are working. Beware! they clean up anything that gets in their way, including Earthlings. To avoid getting shredded, click outside the preview screen and go somewhere else for now. |
|
|
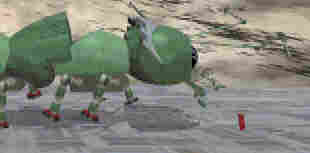
Meet Reggie Wilson. He describes the Trash Biot and Crab Biots, who keep the place clean. He gives you a data cube, which shows the crabs working. They aren't very smart, they just pick up anything that they come across. Look in the trash bin. There is a tile there. Turn left, and find a tile buried in the sand. Turn left again and go forward. Find the yellow puzzle piece. Forward again to the cube. You can't take the tile inside the cube, but you can pick up the puzzle piece next to the base of the cube. The one locked in the cube is probably important, and we'll have to figure out how to get to it. Turn left and find a tile on the ground. Forward once, and left. Forward, right, forward. You see the hangar. Right. There is a red glass dome. Pick up the red shard. Left, forward. See the yellow lens on the ground. Explore the hangar, if you like. Puck will describe the biots. You may postpone this until later. There is one more tile, in the sand underneath the beam. Find it and exit to the Central Plain (radar map). You should have found four red tiles, two yellow pieces, a lens (hard to see, near the hangar door) and a shard of red glass.If you can't find all of the items, or if you mistakenly step outside of the region into the Radar Map, don't despair, you will have a way to get back all the tiles you miss. When you exit the Beam Region, go to London.
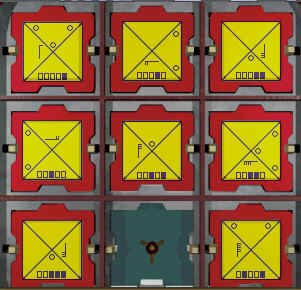
LondonLondon does not appear until you have visited Reggie at the Beam Region. When you enter, you meet Shigeru Takagishi, one of the mission's scientists. He talks to you about the mysterious force field that is flashing before him. He says something about a pattern. If you observe closely, you notice that one of the intervals between flashes is longer than the rest. It seems to come after nine flashes, so you watch for the longer pause and step through. If you count wrong and get fried, Arthur C. Clarke appears and gives you his condolences. You are able to retry. Looking to your left, there appears to be a switch, and some more tiles. When you pull the switch, the force field is shut down. What's that triangular spot there? Nothing happens. Let's explore that large building behind us. Going up to the entrance, there is a post with a glyph on it, to the left of the door. A slide retracts, and gives us the following view: |
This is how we open doors in Rama
|
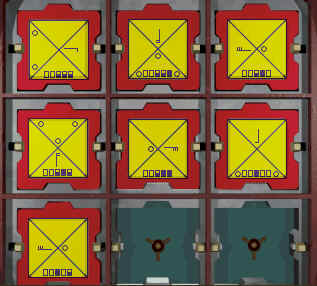
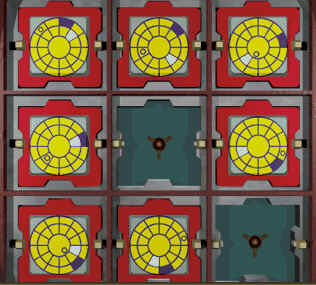
We've started to get the idea that Rama is full of patterns, so it's no surprise that we are expected to deduce the nature of the missing piece by looking at the arrangement of the others. Let's see: All yellow, half-yellow half-green, all green. Then the shapes: a row of triangles, followed by rectangles, then pentagons. Three, four, and five sides. Also notice that the pieces rotate from top to bottom. Three of everything: colors, shapes, rows, columns. Maybe the Ramans do things in threes. So the piece we want would be a yellow and green pentagon, with (don't miss the details) white dots in the yellow half, and black dots in the green. We fully expect that if we solve this simple puzzle, that we will gain access to this building. By now you probably have three pentagon shaped pieces. Be sure to use the one that is "sideways" and has black dots in the green area. Here is the piece we need.
| A word about the puzzle-locks: If you place a wrong piece in the lock, it jumps back into your inventory. The second time you use a wrong piece, the puzzle resets to a different matrix. If you get this first one right on the first attempt, the tile you need for the next matrix will be found inside London's first tier; but if you wind up resetting the matrix, that tile jumps to the box back at the base camp and you will need to return there to retrieve it before you can enter London's second tier. For now if you botched the matrix, just reset it again until it returns to the Number One state. |
Enter the building and look around. Each time you step forward, also turn around This way, you will find all the objects. Here's a step-by step walk through London's first tier. Go F2, pick up the red and yellow tiles. TA (turn around) and find a yellow piece, TA. F1 L1, one red, one yellow. L1, one red. L2 F1, two yellow. TA, L1.
You are looking at a pair of "billboards", actually map puzzles that aren't active yet. Go L2 and approach the pedestal. Turn on the power with the top purple button, and activate the map puzzles with the yellow button. You may examine the other Raman displays (Optional). Go back to the map puzzles. You should have twelve yellow pieces by now. If you are missing any, they should turn up at the campsite, in the box on the table. You can see the difference between the two sets of six map pieces. The oval set represents New York and the hotspots depict its various areas. The squiggly pieces form a map of the Central Plain with images of the areas we visit. Solution to the Plains map.
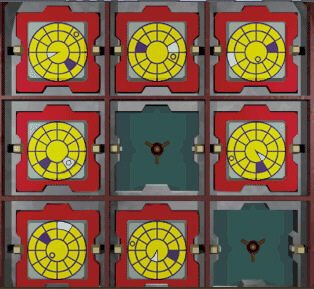
It's time to visit London's Second Tier. Go L1F1 and approach the right-hand door post to find a new puzzle. Here we go again with patterns. It looks like two things are happening: Think of the patterns as having an inner region with its own pattern, and one or more outer regions, either circles or squares. The segments in the inner regions increase (double?) as you go from left to right, while the number of outer regions decreases as you go right, or go down. So - the top right piece should have 16 segments in the inner region and two, one, zero outer regions. The bottom middle piece, then, should have two inner segments if the one to its right has four, and if we take away one outer region from the leftmost piece, we have something that looks like this. If you missed getting the upper piece from the centipede, Nicole will return it to you at the Biot Hangar. If you missed finding the second piece, or if you are doing the second matrix outside London, get it from the box at the campsite.
It's London's Trash Processing Plant! Go F3 and look down to see the sludge pit. Yuck! Notice the device at the right. Come back up. TA, F1, L1 F1, L1, F1. See a movie of a Mantis Biot controlling the lift. We could do that, if only we had a red light. F1, you can see an object against the far wall. Get it and come back to the lift. Your ISA Tool can make light, but it's not red. How about that broken piece of red glass? Flash the control box to call the lift, then step back and flash the lift control. Down we go. Turn left and descend into the pit. Click Here to find out what it smells like. (TeeHee just joking). You must examine the entire pit, turning all around at each node. The may be only four or five tiles or there might be many, depending on how successful you were at finding them the first time through a region. Some of them are lying on the walkways, and some are in the sludge. Eeyuck. They will have to be cleaned somehow. When you have gotten them all, let's go up the lift and look around some more. L2 F1 R1 F2 R1 F2 R1 F1 in other words, as far around the pit to the right you can go. you are watching Rama's automated garbage service in action. Turn left to find another door.
we discover we have those two pieces, and they are clean and usable. We can enter London's Third Tier by putting this piece in the center, and this one in the bottom left. Enter the third tier. This is something of a museum. Save your game before proceeding.
Let's examine the exhibits. I love the centipede cleaning the Trash Biot's eye. The other end of the room contains an object you need, and some other chores, but it is protected by the Spider Biot. If you have saved, go ahead and touch the spider to vies Sir Arthur's fencing Easter Egg. Just delightful. Did he say something about a crane? Hmmm. Let's turn left, away from the spider, and go up the ramp. This looks like controls. Why, it picked up that wee-beastie with no trouble at all. Puck did say it was capable of heavy loads. So, carefully, we pick our way past the spider and pick up the alien medallion and pull the switch on the monitor. (If you have poked around the wheel region, you may have found a similar monitor there, with part of it inoperative. Now that you turned this one on, the monitor in the wheel works.) Time to go outside for some fresh air and visit the Wheel Region. As we turn to leave, Nicole gives us some tragic news and a data cube with the story.
When we go outside, there is a disturbance. (Ramaquake?) Wakefield tells us it's a maneuver. Brown tells us it's on an impact course with Earth.
Enter the wheel region and step forward to the trash biot. Look in the bin. Back away, then R1, F2, R1. The object looks like a metal "ear of corn.". Plant life on Rama is not what we are used to. Turn R2, and find an "important tile" on the ground (hard to see). R1 F1, at the telescope, a tile is on the ground. Open the scope and insert your 2 lenses. Nothing happens; you need the third one. So back away, L1 F1 to the "still". At the left close-up, there is an on-switch on the left, and in the middle, a square receptacle and a corn-shaped hole. Do we have anything that fits? Yes to the corn, no to the square. At the right close-up, a gunky cleaning tray, a gauge with five divisions, and a switch. Nothing happens. Drat! Now think, where have we been taught to look for missing things? Zounds! the campsite. Off we go.
At the campsite, look in the box. Probably nothing is there except Francesca's lighter. Maybe she quit smoking, thank god. Also look in the Fridge. There is something new there. Looks like a container of chemicals. Put it on the 'eyes' and give it a spin. The note on the back is a clue, n'est-ce pas?
Go back to the still and try the container on the square place. Then go to the right close-up to clean your tiles. First, you need to clean the gunky tray, after which you may clean your inventory items. If; (and that's a big if!) you followed this walkthrough to the teeth, you have exactly four gunky tiles to clean. If, on the other hand, you are a true gamer, you have been poking around on your own in various regions and have any number of sludgy things to fix, it's not a problem. You can clean them all. The container's contents are unlimited, and all you need to recharge the machine is a new ear of 'corn'. Every time you need one, another one has grown back. Boy, I haven't had this much fun since I cleaned the oven!
On your way back from the campsite you should poke around. Look for a region that shows you about to meet another cosmonaut (009=Wakefield). When you meet him, he gives you an object he found, a Lens! Ooohh! Did we need a lens or what? You know what to do. Go to the telescope and put that lens in.
Zap! Something actually happened for a change, and we know enough to go to the Beam Region and check out that cube where the tile was sealed. Yesss! Pick it up. Now for the Wheel. (Actually, it's more efficient to get this tile after you are finished with the wheel, but we like to walk around a bit. Good for the legs.)
Go back, and climb up the ramp to the Wheel. The Laser Gun turns.
Go down the ramp. Listen to Puck's comment, the wheel, and go either direction. Whichever direction you prefer, ALWAYS go the same way. If you go back and forth, you could be there forever. Left or right, your choice; it really doesn't matter. Go one step, listen to the wheel turn. Again. A third time. We do things in threes, remember? You can look to the center. When Puck sees the doorway, you can get in. Look at the monitor. The left switch always works, whether you've been here before or not. The right switch triggers a video of a Mantis Biot opening the cages of the Spider Biots back at the Biot Hangar. What? he dropped part of the gate. Maybe it would come in handy. Exit the room, find the ramp to get out of the wheel, and go to the Beam Region to pick up that gate. Come back to the wheel, and use the gate as a ladder to get to that special tile on top.
| After you have set free the spider biots, they are wandering around the Central Plain, along with the centipedes and crabs. If you step into a region with an x-shaped creature in the preview, Do Not Enter. |
Have you heard that squawking on the other side of the region? Go toward the telescope, and to the biot you can see in the distance. It appears to be in a state of disrepair, but there is a birdlike animal trapped in it. Is it dangerous? We don't know, but it appears to be begging for help. You examine the machine, and find a wire which you would like to cut; maybe turning off the power would release the Avian. It turns out there is nothing we can do just yet. You hate to walk away and leave it stuck there, but there's not much choice. Exit the region and go to Bangkok.
Bangkok is a teaching place, sort of a museum on three levels, depicting the culture and artifacts of three different species.
Forward one, and you see a round building, and another object off to the right. You can go forward to either site. Go to the right-hand one. What in the world is that thing? It seems there is nothing to do here. Go back and find the front door. You probably find the matrix we saw before, at London's second tier. It's easy to figure this one out, but if you need help, put this piece in the bottom middle (assuming you cleaned it,) and this one in the bottom right.
You enter, and find straight ahead, a closed door; on the right, arithmetic and number displays; and on the left, three "alien devices." Have a look at those displays first, starting with the one closest to the door. The display on the right teaches us that quantities, as displayed by the . . . uh . . are those golf balls? . . . can be represented by symbols. We earthlings are familiar with those symbols, since they are everyday numerals, in the base ten. Now, don't panic when I say "base ten." it simply means that we do all our math with only ten symbols, the numbers from zero to nine. When we need numbers larger than that, we just add a column. That gives us ten-times-ten new quantities, the numbers from zero to 99. Enough of that technical stuff. Don't you suspect that we humans developed the decimal system by using our fingers to keep track of quantities? And look at the abacus, which seems to be a base-five device, would have been originated by people using one hand to count? Makes sense to me. The Latin word for 'ten' is 'decem' which, I suspect is the root of our English word 'digit' which can mean fingers, or toes, or numbers, all of which we have ten.
Look at the middle display. This one allows us to try out our numbers for practice. Although there is room on the board for 240 to be displayed, we only have two columns for input, thus we can only show up to 99. This board is for practicing. The display on the left teaches us the meaning of addition and subtraction, and the symbols commonly used for those operations.
Now, sit back, take a deep breath, and drag out a calculator. You won't really need it on this level, but you will want it on the next two. I suggest you use the calculator that came with windows, and put it in the "scientific" mode.
Turn around and go to the alien devices, starting with the one closest to the door. It is related to the first display, because it tests to see if we recognize the symbols. Simply imitate the numbers it presents. You need to get five correct answers. After you succeed. The device opens, and you look down to turn a lever. You hear a door opening. (If you go back to this device you can repeat the test for practice; the door stays open.)
The middle device is for counting. Count the number of jewels on the screen and input the answer. As before, five right answers will open the slide. Unfortunately, whatever was in there has crumbled. On to the third device. This one gives you math to do. Solve the problems and retrieve the ruby from the tray.
As you enter the Human Museum, turn around and pick up the tile to the right of the door. You will need this one to open the next level. Huh? A human museum on Rama? For an explanation of how this is possible check on some.
Turn back around and go to the center of the room. Turning left once, you see two human figures. In the close-up view, you can activate them, and get a tiny sample of the way earthlings communicate. Turning left again, we see a musical instrument, some artwork, and a computer. Turning left again, we are facing the entrance.
Left again, we can see a lamp, a chair and a pair of clippers. Ooh! we were looking for some clippers. But these are a hologram, and we can't take them with us. Rats! Left again, and we find a helmet, a spaceship, and a globe representing human's home planet. Left again, and it's time to undo another door.
 |
Bangkok, second levelAnother door that's fairly easy to figure out. The 'flags' go one, two, three across the top; two, three, four across the middle; so we can expect three, four, five across the bottom. The 'bubbles' would be three, and the binary thing on the bottom would be 8 (fourth block from the right). But we have TWO tiles that match this description. The only difference between them is the direction the flag is pointing. Pick the one that matches the left-middle piece. See the Solution. |
The hatch covering the controls to the lift flips open and we can go upstairs to the next level. Richard Wakefield stops by and tells us that we are being tested, but that once you figure out the paradigms, it's easy. Easy for him, maybe. He's only got an IQ of about a gazillion. Okay, let's look at those displays. Upon examining the right-hand board, we see that the symbols represent 16 numbers, from zero to fifteen. A mathematician will tell you that this is base sixteen, or "hexadecimal." Now, there's an odd word. "Hex" means six (in Greek) and "Decem" is the Latin word for ten. So, six-ten or sixteen! The aliens using this system do it the same way we do. Remember how we added a column to go from 10 to 99 because we ran out of symbols? In this system, we can count from one to fifteen, then we need to add a column. The new column means 16, not 10. Now don't go gettin' all flustered on me! First, grab a pencil and draw those symbols and identify them using our familiar numbers. When you get to 10, label them two ways: 10=A, 11=B, 12=C, 13=D, 14=E, and 15=F. You need this chart so you can interpret the sixteen symbols and do the problems on the machines. It's a good idea to go to the middle display and practice inputting the symbols. You find out that single digits (hexits?) have to be preceded by a zero. How do we show 16? By putting a one in the left column and a zero in the right column. Try it. Now look at your calculator in the scientific view, and put in 16. Then choose the "hex" switch and see the display change to 10 (which means 16.) Hit the "Dec" switch again; put in any number, and switch to hex to see the answer. The display board is able to display all of the two-digit hexadecimal numbers, right up to 256, but the testing device only goes up to 121 (11 x 11). Look at the math board on the left to learn the plus and minus sign. You can remember which is which if you think about the minus being hollow. Something has been "taken away."
Do the leftmost machine first. Don't bother thinking about quantities, or what the numbers mean. Just imitate them and get five right answers in order to open the door. If you are slow, the machine beeps to urge you on. Ignore the beeps and take as much time as you want. The next device expects you to count. Here's where you can use the calculator to translate. The second machine wants you to count the items and input the answer. Thus, if you see four jewels on the screen, push the button with the symbol that means four. Remember the first one is zero. Up to fifteen is easy. You can just count across the symbols to get the right one. For larger numbers, use the calculator as described above.
Let's do a problem one step at a time:
Go to the calculator and make sure it is in the scientific mode. (To do that, click on View)
The calculator will automatically startup in the decimal mode, so put in the number you want to translate.
Where you see Hex Dec Oct Bin, select hex.
The answer you are looking for is displayed. For example if you see 23 jewels on the screen, you input 23 in decimal mode. When you switch to hex mode it says 17.
To give the answer 17,
press the symbol for 1 ![]() followed by the symbol for 7
followed by the symbol for 7![]() . It's that
easy.
. It's that
easy.
| Some common errors in the hex
counting test are: -- Mistaking the zero key for a one; -- Forgetting that there are eleven jewels in each full row, not ten; -- Mixing up the eleven (B) and fourteen (E) symbols (they are very similar to each other and shaped a little differently on the TV than they are on the buttons); -- Hurrying (Don't let the machine rush you -- take all the time you want) |
A Cheat-SheetHere are the symbols identified for you, just in case you don't feel like making that nice little chart. I |
 |
The layout of displays is similar to the Human Museum. As you first turn left, the alien creatures are displayed. The one on the left is a mature Avian, similar to the one still trapped outside in that mean machine. Press the button to hear him communicate. The middle one is a Myrmicat. Very active and very intelligent, these are the second of three symbiotic forms of the same species. It also talks to you. The third one on the right is the most mysterious of all. It is the "sessile" stage (means 'sitting') of this complicated life form. The display is indicating that it's fibrous mass is protecting, perhaps incubating something. It does not talk, nor move.
The next diorama shows a musical instrument, a display of the various stages in the life cycle of Myrmicats, Avians and Manna Melons and the computer will show you three displays. Off to the everyday objects. We find a lamp, a chair, and clippers again. Wait a minute - these clippers are real. They look strong enough to cut through that nasty wire. Finally, we see as before, a helmet, a spaceship and a globe. Let's solve the last door puzzle and go upstairs.
Bangkok, Third LevelThis is the last lock of this type we will encounter. Because it is, it resets to the same matrix. So you can either use your wonderful brain power to deduce which tiles are the key to opening it, or you can just keep guessing until it opens. I won't tell. Now: if you are still having trouble with this lock, it it probably because you partially solved it before, and you need This Tile now. |
 |
Looking at the teaching displays, we find that the numbers are represented by color. There is a large block of color, with a blue-red-yellow-white band on the left side. That band signifies that the main color is a number. Otherwise, in this alien language, it would be a word, or a qualifier like 'noun' or whatever. Make yourself a chart, willya, so you won't be e-mailing everybody how to figure this stuff out. These eight colors are White, Red, Orange, Yellow, Green, Blue, Violet and Indigo. Now since there are only eight of them (zero through seven) when it comes to eight, we need a new column. Thus, to write eight in this language, we write 10, or in this case, Red-White. Go practice on the middle board while I get a glass of water. This walkthrough is a lot of work.
Use the same principles you used on the other two levels. The first machine is for recognition only. Just imitate the colors. The second, counting machine works just like the others. Figure out how many jewels are on the screen and input the answer. This time, when you go to the calculator, start in decimal mode and select Oct to see the answer. An example would be, you see 66 jewels, put in 66 decimal, change to octal and it says 77. When it says 77, you press the Indigo button twice. Don't whine. If you made it this far, you can do it. If you made it this far by peeking at the complete spoiler, you can do that too.
Enter the museum and turn left, as usual. Be sure to pick up the jewel sitting on the ledge. Examine the octospiders. There are three. This species manifests itself in several sizes, The one on the left is one queen-mother of an octo. She speaks in color, and makes no sound. All members of the species are deaf. The middle one also speaks. The simpler display shows how they simplified their language so it can be seen and understood by humans. The fancy display is their native language, utilizing colors from infra-red to ultra-violet, and largely invisible to us. Octospiders are by far the most intelligent species travelling on Rama, and they are non-violent. We earthlings don't know that yet. On the right is the smallest member of the group. It also talks to you.
Next are displayed the musical instrument, which understandably works in color; an informational panel, and a computer. Again, numbers are colors.
The remaining exhibits are all as expected: lamp, chair, clippers, helmet, spaceship (very advanced!) and the globe. It's time to step outside and free up that poor bird. Back to the lift. Wait - what's that new area on the lift door? Looks like those three large gems would fit there. Well. A number translator. Where was it when we really needed it? Not to worry, you'll be needing it still.
Go back to the wheel region and visit the Avian. It pleads with you to help set it free. Look under the machine at the wire. Cut the wire with the clippers and the machine stops working. The bird is still trapped. To release it, pry open the clamp with the bent rod. The Avian steps out, removes a ring from its neck and urges you to pick it up. When you do, it flies away. Finally, it's time to visit the Iceport. If you tried to get there before, you were told in no uncertain terms to keep out. Before you actually go there, you can poke around the Central Plains region looking for Otto Heilmann (007). He gives you his paranoid version of Rama.
Walk into the iceport and find Commander Brown. You converse, Francesca shows up, then goes to talk privately with David Brown. They don't want to be interrupted, so poke around, examine the icemobile, and read the three vidmails that Brown gave you. You can see into the Southern Hemisphere, and down on the 'dock', if you look around you can see the 5-meter-high cliff where the Central Plains and the Cylindrical Sea meet. The sea is frozen now, but it can thaw. If is is liquid when Rama accelerates, the Southern Hemisphere could be flooded, except that the cliff on the south side of the sea is much higher.
If you go back to where Nicole and Brown are talking, she asks you to look around. So, you can't exit into the central plains now. On the upper level at the port, you can go around behind the structure and examine another nuclear bomb. Huh? I distinctly remember the other one was not armed. This one is armed. Once you have done that, Nicole will be waiting for you in the icemobile. Off to New York. See you in Part Two.
This document may only be
distributed with the express written permission of the
author,
Tally Ho.
The content of this document may not be altered in any way
without the permission of the author.
Any proposed changes or additions to the walkthrough may be
submitted to Tally Ho.
copyright 2001© GameBoomers