You arrive at the city gates. Have a good look around. You are standing on the frozen sea. Up the stairs is a locked gate. To the left of the gate is a hexagonal area that reminds you of one of your inventory objects.
| Speaking of inventory, this would be a good time to organize things. Unfortunately you can't leave behind the things you won't be needing any more. You could have as many as 19 tiles; only the plain black one is still needed. I suggest you put all the others at the bottom of your inventory, along with the clippers, the note from Nicole, the bent rod, and the keys. What you do need are your wrist computer, Puck, the two medallions from Bangkok, your ISA multi-tool the indigo-green jewel, and the neck-ring. |
Put the hexagonal plaque in place and enter the gates to the Avian Plaza. F1, there is a data cube on the floor. Don't you think Heilmann would be more careful with those things? He is head of security, after all. This one contains an important clue for the ending puzzle. Go forward to the center of the Plaza. Looking up, you can see the far side of the Cylindrical Sea overhead. Step forward to the tetrahedron. Look to the left, at the Avian statue, and observe that one of its neck-rings is missing. Place the ring on the statue's neck. A handle has appeared above the door. Unfortunately, you are not tall enough to reach it. If you want to pull that handle, you will have to figure out a way to get up there.
Looking around the plaza, you find a couple of alleys. One leads to the maze gate control. Push the buttons. It is inactive. The black tile you are carrying will fit in the slot. Now the device works. If you cycle the piston back and forth, you hear three different tones, and in the far right position you hear all three tones at once. Each tone sounds when a gate is open, thus in the right-hand position, all three gates are open. You are now free to wander the halls of the maze. Don't fret about the maze. I Hate Mazes! This one is not really a maze at all, just a set of bent hallways that encircle New York, and connect the three plazas. To find the exit to the hallways, face the Tetrahedron and turn left once go forward and enter the halls. As you proceed, Puck will point out "something interesting on the floor over there." You will find five such objects. In order to find all f ive, you must walk the halls in both directions. They are tuning forks. (Don't panic, there is no musical puzzle in Rama.) If you examine them closeup, you can see wavy lines on the handle, and a button which rings the fork. They each make a different tone, and show a different color. You are looking for the one-line and four line (blue and red) forks. (the musical tone of the one-line one is A-440, and the four-line one is C#, if anybody cares.) The others can all go at the bottom of your inventory.
Ater finding the tuning forks, come back tot he Avian Plaza. Facing the tetrahedron, the alley off to your right leads to a jagged pillar and a ramp leading up to raised ledge with five windows, one of which is open. To the right of the ramp is an area with a tuning fork-shaped recess. Well, well. what should we try here? Put one of the forks in, and see the result. When it rings, we either see two colors (red and something) and hear two tones, or we see all red and hear one tone. When that happens, he hear something move. Back away, and see that the ramp has turned one position to the right. Do it again five more times to bring the ramp to the open window. Up we go. There is another window you can look out of, but can't get across the gap. We see a set of perches, one of which is tipped over. Looking around the room, facing the door, there is an object to be picked up. Examine it closeup. It resembles the piston in the gate control. You can even push the button and see it extend. It should come in handy for pushing something.
Go down the ramp and over to the jagged pillar. Look at the bottom. Maybe if we use that piston, something good will happen. (Notice that if you extended the piston it will not fit under the pillar. It needs to be in the retracted state.) Activate it, and it tips the pillar over. Now you can go up the "steps", turn right, and pick up that perch. Right again to go down. F1, R2, F2 and observe the mural depicting the Myrmicats revering the manna melon.
Go to the tetrahedron and place the perch on it. Now you can reach the handle. Give it a good tug, and the tetrahedron opens. Inside, there is a device for selecting patterns, and a lever which is activated by the correct pattern. Have you seen any of these patterns recently? Of course. Pick the melon, pull the lever, and hear something open. From the center of the plaza, facing the exit to the sea, turn right once, forward and left, to find a yellow filter sitting on the ledge. (Hard to see, watch for the hand icon.)
That's all for now in the Avian Plaza, unless you want to go see what opened. Actually, the cover to the Avian Lair has moved, but the entrance is still closed. Let's go through the halls to the Octospider Plaza.
| We have some work to do here and in the Human Plaza, because later on we will be operating under a deadline once a timer starts. Be sure to learn your way around the halls and plazas now, because you will not be able to blindly explore when the countdown is running. |
Go to the center of the Plaza, R1, and
forward into the alley. Find two objects a green-green
jewel and a blue filter on the floor.
![]()
Go back to the center of the plaza. Turn left to face the alley with the repeating geometric pattern in the stones. Enter that area, turn left and find Takagishi's camera. Examine the camera closly, and find the datacube in the handle. Playback the data on your computer. Go back to the center, turn right and F1. R1, find the alley. Into the alley and left, is the indigo-yellow jewel.
![]()
| Beware: After you have made the Avian Lair accessible and found the video camera, the Avian lair can be entered. DO NOT go there until all the other tasks have been completed in the Octospider and Human Plazas. |
Turn right twice, down the alley and left into the Artifact Museum. Examine the various exhibits.There is a matrix tile (like we need another one of those, right?), O'Toole's anniversary photo, and a prism, among other things. Let's get that card. After all, we are adventure gamers, and have learned to spot a clue, right? The little plaque thing above it is green and jewel-shaped. Anything come to mind? Turn the card over and notice a number written in the upper left corner. Make a note of it, because it is variable from game to game. It will be either 19, 20, 21, or 22. How to get that prism? The jewel inset is yellow-orange, and we don't have such a jewel. Try shining your flashlight on the prism, which splits white light into its component colors, and we remember that yellow and orange are adjacent in the spectrum. The first attempt doesn't work but the table rotates if we give it a push. Five pushes, actually. Collect the prism when it is released.
Go back out to the octohedron door, and find the prism-lock. The prism goes into the lock, and your light activates ths lock to open the door. Inside you find a device with three monitors and controls. Turn the power on and play with the levers. You find that they are Red-Green-Blue controls, and can produce any color from black to white (except that they 'snap' into position, so the possibilities are not infinite.) When you reproduce the first one, it locks up, and you move to the second, then the third. That done, you hear something open. Go out and return to the alley with the geometric stones. Now the doorway to the Octospider Lair is exposed, but you still can't get in. It seems this door requires two keys. Put the Octospider key in, it'll be one less thing to drag around, and one less thing to do when we are in a hurry. We are missing the second key for now. Back to the halls and off the the Human Plaza.
After entering, if you look right, you can see the entrance to the Human Lair. Go there, and discover a chasm you cannot cross. (There is a 'down' view.) From the plaza center, face the area with vertical rectangles, F1 to find a blue-yellow jewel. Back to the center, R2 and forward into the alley to find the red-green jewel.
Back to the center, R2 to see the pyramid. F1, R1, to see the tuning-fork statue. Use Fork 1 (Blue tone) and turn left. Watch the Mantis Biot flash the sensor and enter the subway. It uses a blue light. We know how to do that, right? If you've gotten this far into the game, you are already an expert at combining your ISA flashlight with a colored filter.
Into the subway. Before you get into the tram, turn around and see the 'bar graph' on the wall. It indicates that we will be sorting something from least to most. Most what, we don't know, but it could be anything from intelligence, to size, to speed, to . . . whatever.
So -- step into the subway and press the button. The map indicates we have gone to the next station. Step out and have a look around. We find nine monitors on the wall, with three pictures below. Well, now -- these seem to be species familiar to Earth. What gives?
| The way this puzzle works is this: When you click on a blank screen, the topmost of the three animals displayed below will be entered. The next click will place the middle animal, and the third click will place the bottom one. You are expected to figure out where each animal fits into the heiarchy, according to size. Arrange them with the smallest on the left, largest on the right. Your choices cannot be undone (for now), so just put them somewhere. The amoeba is probably the smallest, so put it far left. When you travel to the next station, the correct answers will stay in place, the wrong ones will disappear. |
Play around. This is a fun puzzle to solve. Give up? Click Here.
When they are all correct, there will be a new subway car open, where you previously saw a closed door. Go there, "take the A-train," and find the switch that raises the bridge to the Human Lair. (there is an "up" view.)
Go back to the Plaza. find the door to the Human Lair, and place the human icon on the lock. Believe me when I say every second counts in the endgame, and you don't want to have to do, or look for, anything when the clock is running. We are missing the second key to open this door for now.
It's time to return to the Avian Plaza and see Big-Bird descend into the hole. Look down, and he beckons you to follow. Enter the Avian Lair, only to discover their 'security system' -- the ledges retract after you enter, and you can't get out. Uh-Oh, what next? Hope these creatures are friendly. Your first view of the Lair may be confusing. When the Avian flies across the gap, Ledges appear which you can climb down. After you do, your view is still downwards. Use the Up-view arrow to become level, and if you wish, use it again to look up and see that the ledges you used to enter have been retracted. Looking level, is a doorway across the gap. Turn around and enter the doorway. (Above the door is a counter with the first of four lights indicating the first level.)
Go in. F1, and you can see a doorway. If you examine it, it's locked. L1, takes you to the Cistern. F1, L1, F1, and pull the switch. R1, F1, L2, and you see water dripping into the Cistern, and hear an Avian squawking different sounds for each Myrmicat number displayed. Another teaching device. (You are of course, expected to listen to Big-Bird and memorize the sounds before you can proceed.) Otherwise you might set off the bomb. (Just kidding, folks!) As you exit this area, notice the three-digit numbers above the doorway.
Go out and down one level. You can see a door across the chasm, but you can't get there. Turn around and enter the Great Hall. If you turn around and try to exit, an Avian says "No, Stay Here." Now how did I know that? " Squawk squawk! I speak Avian. Don't ask. If you don't believe me, go listen to him again.
Go forward and watch the bird offer you a Melon. Take it, examine it in the closeup view. Now what? It's a melon, isn't it? We haven't had anything to eat since crossing the Cylindrical Sea, and we are famished! Well, grab your ISA Multi-Tool and have at it. It needs to be sliced in half before you can eat it with your spoon. When you eat the melon, you can see ultra-violet, and examine the murals in the room. Don't worry about what they mean, but remember how to see things beyond your vision. You may need to do that later.
One spoonful is enough for you, Big-Bird wants some. Share the melon with him, and you will be invited up to the Ruler's quarters. Go up when invited, and accept the gift Prince Charming offers you. It's a "Squawk-Box" that enables you to speak Avian numbers if you need to. Be sure to turn around and see all the Avians on their roosts. Descend, and go to the melon dispenser, and take at least three melons with you. Exit and go down one level to enter the Theater, taking note of the numbers above the door.
Find the oil-filled gourd. Go right and enter the backstage area. Watch the Avian actor strut around, and fly up to the window. Find the pendant on the Octospider costume. This is the second key to the Octospider Lair. Exit, noting the numbers above the door. If you go down another level, you find an open door across the chasm, and a locked door on your side. Examine the wheel mechanism. It is stuck because it is corroded. Oiling it doesn't help. Go back up to level three and try the wheel there. Oil it, and it works, extending a bridge you can cross. Go across, and up to level two and enter the Hatchery.
Look all around this large room. There are some murals that can be enhanced by melon-vision, but nothing very informative. Find the "jungle-gym" bars behind and to the right of the central column, and climb up. Look around and find the alien cable with the grapple attached. Examine everything with Puck, to learn about the hatching process. Exit, noting the numbers over the door, and go down to level four.
The four large murals in this room all contain more than meets the eye. Use the melon to see better. The one on the far left shows an astronomy lesson. The next one is a clue to a future puzzle. Notice how there is one segment where all the numbers are equal, the "three o'clock" position where the teacher is pointing. The two murals on the right show what happens to Avians if they get careless and forget to retract the ledges when they are home. The other one shows what happens to the invaders if the ledges are safely retracted. Each ledge mural shows a code number, one to extend the ledges, one to retract them.
Go around the lecture podium and find a pair of ramps, one of which is retracted. We need to find a way to extend this ramp. Exit the school, noting the numbers over the door. Go up to level three, cross the bridge, and climb up to level one.
Go to the security room, the door with the green glass. Put the "squawk box" in the holder on the door. If you have played with the squawk box in the closeup view, you found that you can speak three avian numbers at a time. Use the code above this door to open it.
Go to the security chief's monitoring station. Perhaps you can control the ramps in the school from here. Turn the power control wheel on the left, twice to activate the monitor. Notice that a room code displayed by the monitor matches the room on the screen. Use the number keypad to enter room codes. Have a look in the school room, and try the lever to the right of the keypad. Set it so both ramps are extended. Leave the security area (by unlocking the door again) and go down, across the bridge, and down to the school. Now you can go up the ramp. Try the lighting control on the podium. It works briefly, then fails. Not to worry, if you need to examine the walls some more, you can go get more melons. Turn around, use the cable on the left side of the shaft, and descend.
Turn left, enter the room and look left to pick up the bowl. Go to the other end of the hallway and observe the three pools. One is empty, two contain caustic liquid, and one of them has an object on the stand in the middle. How to get it without being dissolved?
Find the walkway and examine the controls. More gunk, yuck! How about dissolving that gunk with some caustic liquid? Use the bowl in one of the filled pools, and pour it on the controls to clean them. Now you can experiment with the controls, and empty the pool where the object is. Lower the lever, and turn the pointer towards the filled pool you can see. Raise that lever, press the button and see the pool drain. Now you know how to drain the other pool. Retrieve pendant, which is the second key to the Human Lair. Climb back up the cable, exit the school and go up two levels to the hatchery. Around the back of the central column is an area where you can go closeup and use the two pendants to open the compartment. Take the security card. Exit the Hatchery, down to the bridge and across, up to Security.
Let yourself in again, take note of the number above the entrance to the lift, and enter it. Look down to find the acoustic control. Use the proper code, and ride the lift to the high security area, the ledge controls. Put your ID card in the slot, enter the Ledge Code. Exit, ride the lift again, exit security and look upwards. The ledges will allow you to climb out.
S T O P ! ! SAVE YOUR GAME RIGHT HERE. |
| As soon as Richard Wakefield stops talking, the six-hour countdown begins. The clock does not run at a constant rate, however. When you are standing still, or working within one room, it keeps approximately normal time. However, it takes into account that whenever you change locations, it takes time to travel. Because of this effect, wandering back and forth can use up your time before you can finish all the tasks. In addition, if you have not completed all of the other tasks before entering the Avian Lair, your clock will last only a few minutes. You will probably have to play this section and learn it well, then return to this point in order to do everything smoothly and promptly. Check the remaining time with your wrist computer. |
TIP:Rama's countdown timer stops ticking whenever you minimize the window or jump to another application (such as this walkthrough.) This technique gives you time to write down notes, and figure out tough things like the code to shut off the bomb. |
Proceed directly to the Octospider Lair entrance. Do not meander around the hallways. >From where you are standing after Wakefield gives you Fallstaff, R2 F L F takes you to the maze. R F2 R F2 L F2 takes you through the gate. R F L F2 L takes you the center of the Octo Plaza. F2 R F L takes you to the locked entrance. Use the "costume pendant" on the lock to enter. Go down the ramps and step on the pressure plate. Puck notices something. Look up to see a circle of Octo symbols. One of them (at the three o'clock position) is labeled as a number. When you step of the plate and back on, the number is different. More about this device later. Turn right until you see an open gate and enter. Follow it to the room where two opctospiders are dancing to some of their "music" (colored lights.) When you step in, they see you and exit through the far gate. Look around there is a piece of clothing on the floor, a locked panel on the wall and two keyboards. The colored keyboard is just for practice, and serves to remind you which colors stand for which numbers. The White keyboard will control the locked panel. Press the third key from the left. The panel is open, and you can unlock the inside panel with your indigo-yellow jewel. Inside are five more jewels, some of which may be duplicates of ones you already have. The duplicates are there in case you missed some in the earlier scenes. Take at least the ones you don't have.
| Look at the gate where the octos exited, and examine the bottom left side of the gate. You can see a jewel in there, but you can't pick it up. Do you think Falstaff could fit through there? Sure enough, he picks up the blue-orange jewel. |
| Go back to the atrium, step on the pressure plate and look up. Make a note of the colors on the right. The image is in grey-scale here, because the colors are different each time you step on the plate. Just write it down. If you have to go back for another look it costs you about an hour of time on the countdown! You'll never finish. | 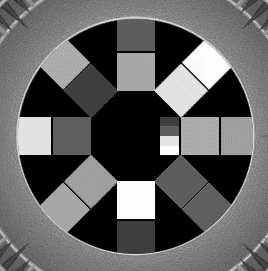 |
 |
Now go to the second gate clockwise from the ramp. (Indigo-green jewel) Go through the hall to the locked gate and enter the gallery on the left. Examine all the exhibits, especially the 'peepholes' on the wall. One of them is a vital clue for the bomb code. The numbers are not visible in the pictureat the left because they change from game to game. |
| You will find this exhibit in the gallery, similar to the clue in the Avian school. Examining both number-wheels closely, se find that the right hand set is the only possible case where the numbers are the same in all three languages. On the right, we see the human number 17, the hex number 11 (which means 17) and the octal number 21 (also 17.) Observe the gate with an inactive lock. | 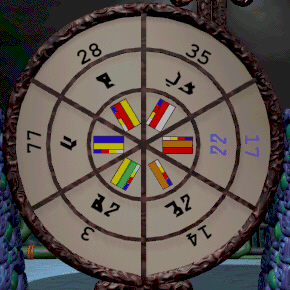 |
Exit the gallery and turn left to unlock the gate (violet-blue) to the Pit Room. Go see the pit and watch the spikes retract when you approach. You need to reset the spikes so they are retracted, and therefore will extend when you approach. Turn around, and unlock the right hand gate (green-red). F2 L to find the spike controls. The number you dutifully wrote down is the key to the spikes. The control screen shows the state of the spikes (extended) on the left, and the current number selected. You need to change the selected number by going to the Octal Abacus in the closeup view and selecting the number of bars that equals the number from the ceiling that you so very dutifully wrote down (and translated into decimal so you can count the bars.) Actually, it isn't necessary to translate anything at all. If you practice with the abacus and wheel display a little, you find that you can input the number/colors directly. Say, for example your colors are white-blue. White=0, and blue-5 so just go down 5 bars on the first (left hand) column. (This isn't really an abacus; they start from the right.) Or say your colors are orange-red. Orange = 2, and red=1. So that means you count through two whole columns and one more, so first bar at the top of the third column. Give up? Check out this chart for a spoiler.
Okay, after you have set the spikes so they are retracted, go to the pit, and they will extend, allowing you to climb down. Uh-oh. There's a Crucifix on the floor. Sure hope nothing bad has happened to Michael O'Toole. To the right is another spike control. That's for later, when we need to go back up.
Go to the room on the left, with a pressure-plate on the floor, and a map on the wall. The map is of the Octospiders' domain. Press the switch on the map. You have activated the gate in the gallery above. There is more to explore down here, but for efficiency's sake, let's go back up the spikes to the gallery and into the new room. Get the spike number from the ceiling, and enter it in the control. Climb the spikes and go through the gallery to the gate (orange-red) and go see the Octospider. She's a teacher, and gives you a lesson in counting. Then comes a math test. Your question is: what's the color that means 7? You will need to turn the answer board in order to get to the indigo block. You pass the test, and the teacher gives you O'Toole's catechism card. I really hope nothing's happened to Michael. Take two more items: the munchie in the spidey-bowl, and the unknown item from the top of the answer board. Go back down the spikes.
Go to the room beyond the pressure plate. You find a subway entrance on the right, but it is inactive. You find another subway on the left, but it's waay too small. Who do we know that's small Puck gives us good advice, but Falstaff gets the deed done. First, put the munchie in the car. Then put Falstaff in the car. You are looking through his view now. Ride to the end and see the three tiny Octos having lunch. The Octo on the right is justly upset when its munchie is stolen by a big bully. He retreats to the side and sulks. Behind him is something you could use, but the Octo is having a tantrum and you can't get past. What would appease him? A new munchie in his bowl, of course. Now you can pick up O'Toole's ID card. I'm starting to worry here just a teeny bit. ("Brog teeny bit scared" -- remember that?) So you have another clue. We'll get to those in due time. For now, turn around and get the laser from the wall. Back into the subway and ride. Back to the domed room, and write down the number from the ceiling. Set the spikes, and go up. Into the halls, and directly to the human plaza.
Go to the lock where you placed the medallion, and unlock the entrance with the "pool pendant". On the wall is a wheel similar to the two others we have seen, in the avian school and in the octo gallery. The idea is to find which number is common to all three languages and turn the dials until those three similar numbers are on the right. In English, the number is 9. The door opens, and here's the bomb, and here's our old friend, the spider biot. To the left, is another crane, like the one that helped us back in the Beam Region. Remember, light activates the crane, but his controls are hidden from view. Could that mirror on the wall be any help? And we do have a portable laser. Zap, the spider is put out to dry. Nowww - it's up to our hero - you, to unravel the code.
Click here for a wordy explanation of the
bomb code
|
This document may only be
distributed with the express written permission of the
author,
Tally Ho.
The content of this document may not be altered in any way
without the permission of the author.
Any proposed changes or additions to the walkthrough may be
submitted to Tally Ho.
copyright 2001© GameBoomers