
Written by Bert Jamin (www.gamesover.com)
August 2001
Written by Bert Jamin (www.gamesover.com)
August 2001
Click at one of the images to go directly to that part of the
walkthrough.


Or click at the image of Hannah and Sam at the bottom of this page to go to
the next part.
Matia Island, Part Three
Sam:
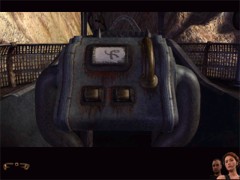
Enter the elevator and pull the lever two clicks to go to the second floor. Exit the elevator and walk straight ahead until you're standing next to the first metal door. Face the door and zoom in on the safety lock. Turn the dials to the same combination as you just discovered at the hoses. You must be curious what's behind this door!
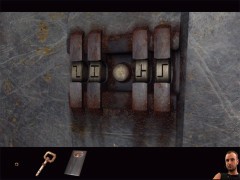
The correct combination of the first door
Push the circular button to open the door. Enter the tunnel. Turn to the left and go forward. Zoom in on the device. Great... building bridges again!!! The only difference with the other railroad bridge puzzle is that now the computer begins first. No need to tell you again how to solve this one... Good luck once more!
When you solved the puzzle twice again, turn around and go forward one time. Turn to the right and go through the tunnel. Turn to the left and walk all the way to the rails. Turn to the right and push the button to call the trolley. Enter the trolley and push the steering device. Turn the big dial down once to get the next image on the display. Also make a note of this sign, just in case of...
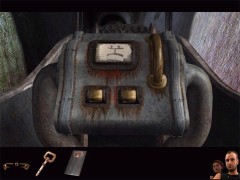
Remember this sign
Push the right button. You now should go forward through the tunnel. Exit the trolley. Go forward one time. Turn to the left and walk towards the house. At the right side of the house you'll see a big pipe with eight buttons. Wait a minute! Aren't these the "bottles" you saw on top of the dam near the houses you had to enter twice and leave once!?
You don't know what to do right now, so ignore them for now. Turn around and walk towards the opposite house passed the path. Notice the same kind of pipe and buttons. Turn around and go forward one time. Turn to the right.
You'll now see a path leading to the left and one leading to the right. It makes no difference which one you choose. I presume you take the path to the left. Go forward one time and turn to the right. You'll see a platform. Go forward to step on the platform.
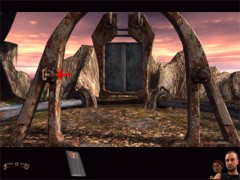
Turn to the left and you'll see the same kind of arch construction you saw at the very beginning when you docked your air ship. Place your key on the left side of the arch. Turn the key and zoom in on the opened panel.
The key again
You'll see a new set of combinations for your air ship. Make a note of them. Zoom out
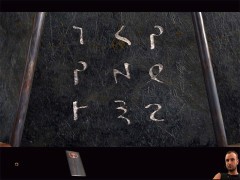
A fresh set of coordinates...
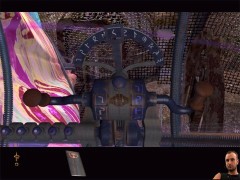
Turn around and push the button at the center of the pipes. You'll get a close up of the oval structure above the platform. You'll hear some noises but nothing happens.
Head back for the trolley. Push the button to call the trolley. Enter the trolley and push the steering device. Pull up the dial one position to get the correct sign on the display and push the right button.

Exit the trolley and walk all the way back to the elevator. Enter the elevator and go all the way down. Exit the elevator and walk towards the wheel to shut down the water once more. When you shut down the water, switch over to Hannah.
Hannah:
Turn around. Enter the cave with the prison cell. Walk to the cell and listen to what the scientist has to tell you this time. He tells you that there have to be done two actions in the Bosh Tunnels. He's speaking of OSSA and DISSA. These words sound familiar. Remember you pushed the big wheel with the directions of the compass!
Turn around and exit the cave. Enter the elevator. Pull up the lever two clicks to go to the second floor. Exit the elevator and walk all the way to the trolley. Enter the trolley and push the steering device. Turn the dial two signs up to get the correct image on the display. This should be the image you saw when Hannah entered the trolley for the very first time. Push the right button.
The correct sign
Exit the trolley and walk towards the hanging chair. Use the chair to cross the ocean. Turn around and climb down the path. Enter the elevator and push the up button. Exit the elevator and walk to the hand sign. Zoom in and push the middle green highlighted button. Push the hand sign.
You'll be taken back to the Bosh Tunnels now. When docked, zoom out, turn to the right and enter the elevator. Push the down button. Exit the elevator and climb up the path. Turn to the left and use the hanging chair to cross the ocean.
Walk to the end of the footbridge. Inside the temple, go forward one time. Turn to the left and walk straight ahead until you can't go any further. Turn to the left and climb up the ladder next to the "organ". Turn to the left and go forward one time. Turn to the right and zoom in on the organ.
Now the buttons on top of the device look familiar. Remember those "bottles" on top of the dam again. Number these buttons from the left to the right as number 1 up to and including 12. Now pull up number 1, 5, 7, 8, 10 and 12.
After that, push the button with sign for West (OSSA). The machine now starts making dirty noises. After the machine stops, push the button with the sign for North East (DISSA). Again the machine starts making these noises. When it's finished, make a note of the highlighted and sticking up buttons at the bottom of the keyboard. Number the highlighted buttons 1 and the other buttons 0 (zero). You should have the next combinations:
the left row of buttons: 00101011
the right row of buttons: 10001001
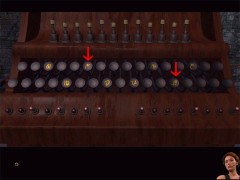
The "organ" all set up. The first arrow points to the sign for OSSA
and the second one to the sign for DISSA
Zoom out and turn to the right. Go forward one time and climb down the ladder. Turn to the right and go forward until you can't go any further. Turn to the right and walk towards the tunnel. Enter the tunnel. Cross the footbridge and use the hanging chair to cross the ocean. Turn to the right and climb down the path. Enter the elevator and push the up button. Exit the elevator and walk to the hand sign. Zoom in and push the third highlighted button from top. Push the hand sign.
When docked, zoom out and turn to the right. Enter the elevator and push the down button. Exit the elevator and climb up the path. Use the hanging chair to cross the ocean.
Enter the trolley and push the steering device. Pull down the dial three positions to get the next sign on the display and push the right button.
The correct sign again
Now you'll be taken to the part of the island with the big oval shaped device. Exit the trolley and go forward one time. Turn to the left and walk towards the pipes with the strange buttons. Zoom in and number the buttons from the left to the right as number 1 up to and including 8. Push the buttons in the order:
3, 5, 7 and 8.
Zoom out and turn around. Walk towards the pipes near the opposite house. Zoom in and push the buttons in the order:
1, 5 and 8.
Zoom out and turn around. Go forward one more time. Go forward across the path at the left one time. Turn to the right and go one time forward to step on the platform. Turn around and push the button in the middle of the big pipes. The oval device opens and......closes again. After that you've another close encounter. Step down the platform and go back to the trolley.
Push the button to call the trolley. Enter the trolley and push the steering device. Move up the dial one sign and push the right button.
The correct sign again
Exit the trolley and walk all the way to the elevator. Enter the elevator and go all the way down. Exit the elevator and walk towards the cave with the prison cell. Don't enter it yet. In stead of that, switch over to Sam.
Sam:
Sam is still standing near the wheel that shuts off the water. Turn to the left and enter the elevator. Go all the way up this time. Turn around and open the fence. Enter your air ship and go to the steering device. Zoom in and enter the new coordinates.
The pointer and steering wheels in correct position...
Now you have to make the next combination of signs. So don't touch anything else yet!!!
Pull the left steering wheel into the next position (the sign looks like a P). Move the pointer of the graduation arc to the correct position. Pull the right steering wheel into the correct position.

...and again...
Now you have to make the last combination of signs. So again, don't touch anything else yet!!!
Pull the left steering wheel into the next position (the sign looks like an r). Move the pointer of the graduation arc to the correct position. Pull the right steering wheel into the correct position.

...and again. Now you may push the big blue button!!!
After you did all three combinations push the big blue button between the steering wheels. If you done well your vessel will take off to your new destination. Now the ship heads for the oval shaped device. The device opens and the ship's hook is picking up something from the device. After that it sets sail to the floating island and drops whatever it took from the oval shaped device.
Exit the ship when it stopped. Open the fence and enter the elevator. Go all the way down. Exit the elevator and walk towards the big wheel that shuts off the water. Shut off the water to drain the water from the prison cell once more. Switch over to Hannah.
Hannah:
Enter the cave and walk to the prison cell. After your meeting with the imprisoned scientist, exit the cave. Switch over to Sam.
Sam:
Enter the elevator and pull the lever two clicks to go to the second floor. Walk all the way to the trolley. Switch over to Hannah.
Hannah:
Enter the elevator and pull the lever two clicks to go to the second floor. Walk all the way to the trolley. Push the button to call the trolley. Enter the trolley and pull up the dial two times to get the correct image on the display. Push on the right button. Exit the trolley and switch over to Sam.
And the correct sign again
Sam:
Push the button to call the trolley. Enter the trolley and pull up the dial two times to get the correct image on the display. Push on the right button. Exit the trolley and use the hanging to cross the ocean. Turn to the right and climb down the path. Enter the elevator and push the up button. Exit the elevator and walk towards the big wheels. Switch over to Hannah.
And again
Hannah:
Use the hanging to cross the ocean. Turn to the right and climb down the path. Enter the elevator and push the up button. Exit the elevator and walk towards the big wheels until you get another close encounter with the priest. When he's finished he points to the device next to him.
When the priest has gone, zoom in on that device at your right. It has a golden flower at the center now. Push the flower for your very last close encounter. Now the three(!?) of you can go home...
Push the flower and it all will be over...
End...