Tomb Raider 1: Greco-Roman Levels - Walkthrough by Stella
Levels 5 thru 9
LEVEL 5: ST. FRANCIS' FOLLY
Kills: 23 Items: 19, including 4 keys Secrets: 4
First, a movie: Lara breaks into the Natla Technologies building in the middle of the night. Rifling through a filing cabinet, she locates a leather-bound book. In it, Lara reads of the tomb of Tihocan, one of the three legendary rulers of the lost continent Atlantis. According to the book, the tomb lies beneath the ruins of a monastery that the writer--presumably a monk--refers to as "St. Francis' Folly." The book also reveals that with Tihocan lies his piece of the Scion, a powerful object divided among the three rulers.
Next, Lara travels to St. Francis' Folly, apparently somewhere in Mediterranean Europe. She scales a mountain to reach the building. Outside she finds a campsite. Picking up an empty can, she remarks, "Pierre, you litterbug."
Objectives: In the first part of the level, you need to open a door to access the switch that opens the way into the second area. In this part, you need to locate four switches to open four doors. Behind each of these doors is a key. All four keys are used to open the exit door.
Walk-through: Upon entering the level, draw weapons, since
2 lions immediately charge from ahead near the square blocks. I like the shotgun here, but it takes several shots to bring down each beast, so you do need to fire as soon as Lara gets a lock on the first lion. You can also immediately jump up on the low platform at the right and take out the lions from there.Continue straight ahead and to the right. You'll see a
movable block in a groove with two omegas (the Greek letter, omega (W), which looks like a horseshoe) on the floor. Slide (pull) the block once onto the nearest omega. You'll see a camera's-eye view of the door at the top of the balcony behind you. (You still need to pull a switch to open that door, but it won't work unless you've moved this block first.) Then push the block twice onto the other omega. This opens the door at the top of the landing ahead. Push the block once more to position it next to the rectangular block on the left. (You'll be climbing up here later.)Go to the door you just opened--at the back of the room on the low landing. Ready weapons and step just into the doorway. Don't go all the way in yet. Stepping on the
pressure pad with the omega on it will close the door behind you. You'll hear gorilla sounds from within. You can probably kill one of the 2 gorillas from the doorway if you wait for it to come down the stairs on the left. Now enter the room. If you hop over the pressure pad, the door will remain open. Kill the second gorilla as it comes down from the platform on the right.If you stepped on the pressure pad and the door closed, climb the stairs to the platform on the right. Throw the
switch to open the door.Pull the
switch at the center of the lower level to open the door above the far end of the big room beyond. This also causes another gorilla to appear out of nowhere on the landing above and to the left. Kill it as it comes down the stairs.Now exit cautiously to the room with the blocks. Draw pistols and prepare to fire on
Pierre DuPont, who'll be lurking among the blocks. It's important to use only pistols to save ammunition and to avoid taking much damage, since Pierre can't be killed at this time. You can use the door for cover, emerging every so often to get his attention. If you run after him shooting, you may lose a little more health, but he'll disappear more quickly. He'll reappear from time to time and later, at the end of Level 9 (Tomb of Tihocan), you'll finally be able to finish him off.When he's gone, go to the
movable block and climb up on it. (First make sure you've pushed it as far as it goes toward the gorilla/switch room.) Take a standing jump to grab the stone block next to it. (The controls for this jump can be a little temperamental if you're not practiced. Be sure to walk Lara right up to the edge then press Action + Jump + Forward in rapid succession, holding Action so Lara keeps her grip on the block.) Pull up.Turn to the left, walk to the edge, hop back once and take a running jump to grab the next pillar. Pull up. Walk to the far left corner and line Lara up facing the ledge in front of the doorway beyond. Hop back and take another running jump to the ledge.
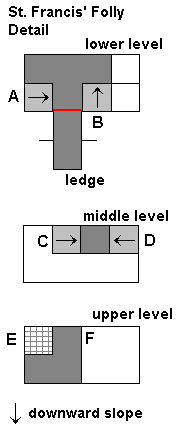
Inside are several angled blocks with an opening above. You need to do a tricky jump combination to get up there. To make it easier, I've included a diagram (below). I refer to the I refer to areas marked with letters in the descriptions that follow. You can probably do it without the picture, but a visual aid may help. (See stfrancis.gif, available online at http://tombraiders.net/stella/images/stfrancis.gif if you downloaded the walk-through without diagrams.)
Here's how: As you enter the room, there's an angled block that meets the floor on the left (A). Stand Lara in the doorway facing the angled block, with her left foot on the line of tiny triangles that spans the doorway. (This is the red line in the diagram.) Walk forward as far as possible toward the angled block. Hop back then press and hold Action. Press Jump + Forward, then release forward while holding both Action and Jump. Lara will jump forward onto the angled block (A), back flip off it onto the angled block behind her (B), turn to face down the slope and jump to grab the ledge above. Release Jump and press Forward to pull up to the middle level.
Here you'll find 2 more angled blocks--a lower one on the left (C), a taller one on the right (D). Position Lara facing the middle of the lower block with her back against the higher block. Hold Action and press Jump + Forward. Release Forward while holding Jump and Action, and Lara will jump forward onto the angled block (C), back flip onto the higher block (D), then jump forward to grab the ledge above (F). Pull up to the upper level.
This is
SECRET #1, which includes a large med-pack and shotgun shells. Avoid the break-away tiles in the corner (E). To get down, safety drop from the ledge where you climbed up (F).Exit to the ledge and take a running jump back to the nearest square pillar to the right. From there, turn to the right and take a standing jump back to the next lower pillar. Turn to the left and walk to the edge of this pillar. (The movable block should be behind you now.) Take a standing jump to grab the taller pillar beyond. Pull up and pick up the
large med-pack. Now take a running jump to the brownish-gold ledge beyond.From here you need to make your way over the ledges at the edge of the room to the balcony with the door at the end, which you opened earlier. Enter and continue to a long slide.
There's a secret room opposite the bottom of the slide, which is rather difficult to get to. There are two ways of doing this. I haven't found one to be much easier than the other. If you're playing on the PC, save your game here. Then (1) Slide down the slope facing forward. Just before reaching the end press Jump so Lara hops up and lands on the shorter ramp below. Slide and, just before the end, press Jump and Action, so Lara jumps off the short ramp and grabs the door sill of the room opposite. Pull up. Or, (2) slide down the slope facing uphill. Hold Action so Lara grabs the end of the slide. Release action to drop to the smaller slide below. Then do a forward jump and Lara will back flip off the ramp into the secret room behind her.
Pick up the
small med-pack and shotgun shells, SECRET #2. Go to the small alcove ahead and drop down into the room below. DON'T USE THAT SWITCH YET. Instead go to the opening over the water and shoot the crocodile below. Jump in the water, turn around and swim forward to a small opening in the ceiling. Climb out and pick up some shotgun shells. This is SECRET #3. Return underwater to the room where the switch is. Use the switch to drain the water and drop down.(If you decide getting secret #2 isn't worth the aggravation, slide down the ramps into the water then swim forward to the small square opening. Get secret #3 and either kill the croc through the small opening or swim on to the larger room where the switch is. Now shoot the crocodile from there or use the switch to drain the water, drop down and shoot the croc on dry land.)
Head to the end of the now-dry passageway and go up the stairs on the right. You'll emerge at the top of a 6-story room with many ledges and landings. This section of the level is all about finding four switches to open four different doors--named after Thor, Atlas, Neptune and Damocles. (If you're not familiar with the myths involved, you might want to do a little research.) Behind each door is a trap or hazard, along with one of the four keys needed to open the exit.
In case you get disoriented or forget to throw a switch, you can always climb up and down between the different levels. Here's how the room is laid out: The switches are all on the central structure, the doors around the perimeter. Sixth (top) level = Neptune door. Fifth level = Thor switch. Fourth level = Damocles switch and Atlas door. Third level = Thor door. Second level = Neptune switch and Damocles door. First (bottom) level = Atlas switch and exit.
Take a running jump to the structure at the center, where you'll meet
3 bats. Kill them and cross to the other side. Drop down and find and use the THOR SWITCH. Hop across the small square opening and kill 2 more bats. Now hop back to the switch.On a ledge across the gap, is a gray
pressure pad. (It's on the right when you're facing the Thor switch.) This opens a secret door on the bottom level, which is timed to close after a little while. (Before going for it, make sure Lara is at full health and save your game if you can.)Walk to the edge facing the pressure pad opposite. Hop back and take a running jump to land on the right side of it. Turn to the left, then take two hops back, holding Action to drop and hang from the edge. Let go and fall to the ledge below. Hop back once, then back flip down to the next lower level. Draw pistols and kill the
2 bats that attack, while continuing to run (or run/jump to cover more ground) straight ahead along the long ledge. Keep running as you fall down to the next lower level and run through the timed door. Inside is SECRET #4, a large med-pack and magnum clips. (NOTE: You can skip killing the bats on the way down, but they'll be waiting when you come out.)Exit the secret room and go around to the far side of the central structure to find the
ATLAS SWITCH. Pull it. Go up the steps to the end. Jump straight up to grab the ledge above and pull up. Walk to the end of this ledge. On the ledge across and to the right you should see some magnum clips. Ready weapons, jump across, kill the bat, then pick up the clips.Turn around, jump back to the ledge on the right, and from there jump and grab the edge of central structure. Pull up, then go to the left to find and pull the
NEPTUNE SWITCH.Take a standing jump from the central structure to the top of the steps on the right of the
DAMOCLES DOOR (which is still closed). On the ledge above the door is a large med-pack. Get this now, since later on when you return, Pierre will probably be lurking about. Then return to the top of the steps and turn to face the central structure. Walk to the edge and take a standing jump to grab the edge. Pull up.Go to the far right side of the platform and take a running jump across to the ledge. Roll, drawing weapons, and kill
2 bats. Jump back to the central structure and go forward and to the right. Take a standing jump from the edge to grab the ledge opposite. Pull up, turn right and climb up on the next ledge. Kill 2 more bats. Turn and jump back to the central structure.Climb over a block to the other side where you'll find the
DAMOCLES SWITCH. Kill the bat that tries to mess with Lara's hairdo, then pull the switch. Turn to the left. Across the gap you'll see a small med-pack on a ledge. Jump over to get it then jump back to the switch.Climb back over the block. Jump up to grab the edge of the opening in the central structure and pull up to the next level (the fifth). From here take a running jump to the bottom of the L-shaped stairs below and to the left of the door through which you entered this area. (It's the brightly lit one high above.) Kill
another bat when you land, then go to the top of the stairs.Across the way you'll see the
NEPTUNE DOOR. Make your way over to it and go inside. (Save your game if you can.) Jump into the pool and swim downwards as the strong current carries you that way. There's a gate ahead, but don't go there yet. Instead, look for an opening on the left a little bit above the bottom. In this alcove is a lever. Pull it to open the gate and shut off the current. If you have plenty of air, turn around and swim down and to the left. Grab the NEPTUNE KEY, turn around and swim forward then up to the pool to surface. If you're low on air after pulling the lever, turn around and swim down and to the right, then up to the pool for air. Then dive down again, swim forward to get the key, then return to the top.Exit the Neptune room, jump back to the central structure and drop down two levels. Now that you've started getting the keys, your favorite sniper,
Pierre, will start to shoot at Lara as she makes her way from door to door. Try and stay under cover as best you can, and if you do shoot back, remember to use just the pistols, so as not to waste ammo. There are also 2 lions roaming around down there with him, so avoid dropping down to the ground until after you've killed them.Approach the
ATLAS DOOR with weapons drawn. Kill the gorilla lurking inside. Step on the pressure pad to open the gate then run through. Grab the small med-pack in the pit to the left. Climb out of the pit and WALK up the ramp. A boulder will start to roll down toward you. Back flip into the hole where you got the med-pack and run forward to the front edge. The boulder will roll past you into the pit. Climb out, go up the ramp, then climb onto the ledge on the left. Pull up to the next ledge and take the ATLAS KEY. Drop down and exit the room.Take a running jump back to the central structure. Go to the left and drop down to the level below. Enter the
THOR DOOR. Proceed slowly down the steps until the disco ball on the ceiling begins to shoot bolts of lightning. Note that the lightning only strikes the darker squares on the floor. To get through without taking any damage, walk to the right, staying close to the back wall. Then turn left to face the rightmost dark floor tile. Walk toward it then dive and roll (Walk + Jump + Forward) over the dark square and run into the next room. (Thanks to Ivans Chou for this tip.)Now comes phase two. Above is an
enormous hammer. On the floor is a pressure pad. Stand on the pad until you hear a crack, then hop back. The hammer will crash to the ground, along with a couple of large movable stone blocks. Go to the block near the hammer and push it over to the ledge so you can climb up. Follow the ledge to the next movable block. Pull it three times, then get on top of it. From here, take a standing jump to grab the tall pillar. Pull up and take the small med-pack. Turn to the left and take a running jump to grab the ledge beyond. Pull up, enter the alcove and get the THOR KEY. Return to the ledge, jump back to the pillar, and drop down to the lower ledge, then the floor. Repeat the dive-and-roll move to pass the lightning trap, and exit the room.Go back across the walkway to the central structure and drop down to the level below. Jump over to the steps near the
DAMOCLES DOOR and run inside quickly, so as not to be an easy target for Monsieur DuPont.The
swords hanging from the ceiling of the Damocles room are not a hazard, yet. Pass through the outer room into the chamber beyond and take the DAMOCLES KEY. Climb onto the platform above and get the shotgun shells and small med-pack. Now drop down and WALK very cautiously out through the sword room. To some extent, you can use the shadows of the swords on the ground to tell where they'll fall. However, because of the lighting, this isn't exact. Take a step at a time, listening for the tell-tale "swoosh" of the falling swords, and stay close to the walls and pillars, and you'll make it through.When you emerge,
Pierre will be ready for some action. Shoot at him with the pistols, staying under cover as best you can, until he disappears. Then kill the 2 lions from above before dropping down. Use your 4 keys in the locks on the wall and exit the level.LEVEL 6: COLOSSEUM
Kills: 26 Items:14, including Magnums and 1 Key Secrets: 3
Objectives: In the first stage you need to get inside the Colosseum proper. Once you do, you must then find the switches to open each of the corner rooms in turn until you get the key to unlock the exit, which is in the royal box (that room with the furniture and balcony above the arena).
Walk-through: Follow the passage until it opens into a cave with a pool. Shoot the
crocodile, then jump in and swim down along the right side, then to the left. Surface in the next area--a large cave with a building, presumably the entrance to the Colosseum.A
lion is waiting near the building. If you can see it from the water, wait for it to go behind the building before climbing out, then kill it as it charges. Head toward the left side of the building and kill another lion. Then go inside. The stairs on the right lead to a dead end. When you start up the stairs on the left, a third lion charges down at you, so back flip out shooting.The gate at the top of the stairs cannot be opened yet. Instead, go around to the back left side of the building where you'll find a pile of rocks you can climb on. From the top of the rocks, jump over to the ledge that runs around the building. Walk along the lower ledge all the way around the front of the building to the far side and pick up a
large med-pack.Follow the ledge back to the rear of the building. Climb on the low block, turn around and jump straight up to grab the higher ledge. Pull up and follow the ledge around to the front. Take a running jump across the gap in the ledge and continue to the end. Then jump diagonally to the flat spot ahead and to the right.
Down and to the left you'll see a well-lit cave opening. You'll be going here in a moment, but first a pick-up. Look straight ahead and a little to the right. See the square cave opening on the opposite wall? This is where you're headed. Slide down the rocks ahead and walk forward to the far right corner of the flat area. Now you should see a square flat block just ahead and below, a steeply angled block ahead and to the right, and beyond that to the right another flat spot. Take a running jump over the corner of the steeply angled block to the flat spot beyond. Walk forward to the right corner then take a standing jump to land near the doorway. Enter and pick up some
shotgun shells, SECRET #1.To return to the well-lit cave, first walk out onto the block in front of the door. Turn to the right and climb up onto the higher block. From here, take a running jump to the flat block near the cave entrance. If you miss and slide down the rocks, climb up the building again at the back corner and follow the top ledge back to the end. Drop down into the cave.
Go to the edge of the pit and shoot the
2 crocodiles from above. Drop down into the pit to get the small med-pack. Climb back out at the right corner where there's a low block for a boost. Turn to the right and locate the crevice in the wall just above Lara's head. Jump up to grab the crevice, then traverse to the right. About halfway across the pit, pull up into a cave. This is SECRET #2, the reward more shotgun shells. Go back to the ledge, drop back and hang, then continue to traverse to the right until you reach the other side.Follow the tunnel until you can drop back down into the Colosseum. You're now on the other side of the gate you came up against at the beginning of the level. The switch here opens the gate, but unless you need to get back to the beginning for some reason, you needn't use it.
Go up the stairs and get ready for another confrontation with
Pierre. When you've driven him off, look down into the arena. You should be able to pick off the gorilla and 2 lions lurking down there before you descend.(NOTE: If you don't mind missing a few kills and one pick-up, you can skip the next two rooms. Resume the walk-through below at the *.)
Drop down to the floor of the arena and head for the northeast corner, where you'll find a doorway leading to a ramp. Ready weapons, slide down and kill the
2 lions at the bottom. Pull the 2 switches. One opens the exit, the other a gate elsewhere. Follow the passageway to a pit inside the arena. Three more lions will have been released above. You can kill at least one or two from the pit by waiting for them to approach. If necessary, climb out to lure them near, then jump back down. Then jump straight up and down to get a pistol lock on one of them and continue jumping and firing until it's dead. When the odds are a bit more in your favor, climb out and kill the last lion or two.Cross to the brown rock pile in the southeast corner. Another
lion will charge, so take it out then go behind the rocks to the gate you just opened.(NOTE: Read ahead now in order to decide whether you want to take the easy or difficult way through the next area.)
Enter and slide down a ramp into a room with two gates and a door. In order to exit, you'll need to do a complicated series of steps. But first retrieve a prize. Go into the alcove on the far left with the gray
pressure pad on the floor in the corner. Stand on the pad. This opens the outer gates. Once you leave the pad, a timer starts and the gates will close shortly. Immediately run/jump forward and through the gate on the right. Take the small med-pack. Step on the pressure pad in there to open the gate and run out.Now the speed dash. Here's the sequence: Save your game if you can. Stand on front of the first pressure pad. When you're ready, run/jump forward and to the left through the gate. Throw the
switch to open the third gate inside the other room. Press Look to get Lara's perspective back, then Roll, and run out and to the left, through the other gate. Keep going through the third gate into the passageway. Now you can take your time. Pull this switch to open the exit door. Now step on the pressure pad to open the gate and head for the exit. (If you get stuck in either room, just step on the pressure pad to open the gate, run out and start again. Or reload the game if you saved here.) Continue to the spiked pit, walk carefully through the spikes and climb the rocks to the top.(*NOTE: There is a way to bypass this gauntlet. In fact, you won't need to do the room with the slide and 2 lions at the bottom either. Instead of sliding down into the room with the gates, go to the far (south) edge of the spiked pit and drop and hang over the spikes. Traverse to the left. Lara will get about halfway across but won't be able to go any further because of the rocks. You should be able to see her shadow on the ground between spikes. Drop down safely and continue. Thanks to Dracman for this tip.)
Once at the top of the brown rock pile, climb up the back to find a box of
shotgun shells. Climb back down and go to the front of the rock heap. Take a running jump across to the other pile of rocks. Walk up to the flat rock at the corner of the building and take a running jump from there to grab the edge of the balcony beyond. Pull up and ready weapons.Kill the
2 gorillas inside. Note the keyhole and fence on the right, and the steps down to a closed door at the rear. You'll be back later. At the left rear of the room is a gray, movable block. Pull it out twice, pick up the small med-pack behind it and throw the switch, which opens the door to the room in the southwest corner of the arena. Take a standing jump from the balcony back to the rock pile, then slide down to the ground.Go to the southwest corner of the arena and climb up to the spectator area using the stone block for a boost. Climb up the steps to the corner room. Kill
2 bats in the anteroom, then go through the door you just opened. Run forward into the pit, and a boulder will pass by overhead. Climb out and jump over the pit. Go to the room at the top of the ramp and throw the switch to open the door in the room at the northwest corner of the arena. Slide down the next ramp backwards, grab the edge and drop back into the anteroom below.Exit the room and get ready for another shoot-out with
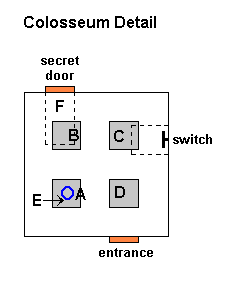
Pierre. This time he's got a lion with him. When the lion is dead and Pierre has fled, proceed to the northwest room, near the collapsed seating area. Kill 2 more bats in the anteroom, then follow the passage to the lit room beyond.At the top of this room behind a timed door is a secret room. It's another tricky series of jumps to get there. I've included a diagram, which I hope will make it a little easier. I refer to areas marked with letters in the descriptions that follow. You can probably do it without the picture, but a visual aid may help. (See colosspic.gif, also available online at http://tombraiders.net/stella/images/colosspic.gif.)
First, make sure the sound effects volume is up so you can hear the door open and close above. Position Lara next to the first pillar on the left with her back to the entrance and her left foot against the middle of the base of the pillar (A). Stepping on this spot causes the door to open above. Hop back once. Adjust Lara's angle so she's facing squarely toward the right side of the low square platform ahead (B). (Save your game if you can.) Now, take a running jump over the spot that opens the door to land on the low platform (B). As Lara jumps, release the forward key, but continue holding the Jump key. As she lands, press Right, then Back, then Left, then Forward (while holding Jump the whole time). If you've lined it up correctly she'll side flip off the low platform to land on the platform above and to the right (C), back flip from there to the platform above and behind (D), side flip from there to the platform to the left and directly above where you began (E), then jump forward to land on the ledge in front of the secret door (F). If you've done the jumps in one fluid sequence, the door will still be open and you can run through.
This is
SECRET #3, which consists of the MAGNUMS, 2 large med-packs and some Uzi clips. Pick up everything and exit. (The door opens automatically.) Before descending, take a running jump to the platform on the left, where there's a switch. Use this to open a door in the northeast corner room.To get down, take a running jump back to the platform by the door. Walk to the front edge, hop back and take a STANDING jump to the platform below (E). Turn left, walk to the edge, hop back and take another STANDING jump down to the next platform (D). Hang and drop to the ground.
Go to the room at the northeast corner of the arena. Vault up into the doorway you just opened. Use the
switch to open the door at the back of the room with the balcony and the gorillas. Jump into the pool and follow the underwater passage until you can surface. Climb out and pick up the small med-pack. Find the movable block and push it twice. Go around to the right side and pull it once to open up an alcove. Inside is a RUSTY KEY. Take it and swim back to the previous room, then exit.There's now another
gorilla down on the arena floor. Kill it, drop down, and make your way back to the room with the balcony. Go to the back, through the door you just opened, and get another small med-pack. Return to the main room with the furniture. If you want all the kills, you can shoot 2 more gorillas that are now running around down in the arena. When you're ready to move on, use your key in the lock to open the gate.Jump into the water and swim down, then forward and up to a small square opening where you can climb out of the water. Go quickly to avoid the
crocodile, which you can then kill from inside this small room. Pull the switch to open the gate at the other end of the underwater tunnel. Swim through to exit the level.LEVEL 7: PALACE MIDAS
Kills: 43 Items: 23*, including 3 lead bars Secrets: 3
(*NOTE: One of these pick-ups can only be had by cheating. See the note at the single asterisk.)
Objectives: Use the five switches in different combinations to open four doors in turn. Three of the doors lead to areas where you'll find lead bars. The three lead bars must then be turned into gold, by a magical process which you must discover. The fourth door you'll open using the five switches leads to the exit. Use the three gold bars to open the final door.
Walk-through: Keep swimming, surface in a lovely pool decorated with dolphins and climb out. Draw weapons and head through the doorway on the left. (You can go forward, but here you'll find a number of
gorillas. If you go left instead, you can kill from above later on.) A crocodile waits in the hallway. Kill it and continue to the base of a stairway. Don't go up yet. Instead turn right and follow the passageway to a high building with many alcoves.Advance slowly to the left with weapons drawn. Give yourself room to back up while shooting at the
2 lions that emerge from one of the alcoves. When they're dead, advance farther to the left to the dark back alcove. Kill 4 bats there and pick up a small med-pack. (Hear the running water? This structure is actually an aqueduct. You'll get to the top later on from above.) Turn around and head back toward the hallway where you entered. Pass it and continue to the far end of the room. There is a narrow alley there with a gorilla and 2 sets of magnum clips in it. When you've got them, return through the passage to the base of the stairs.Go up, turn left and advance to the large room.
Three more gorillas there need your attention. You can probably shoot them from the doorway by advancing to draw them out then backing up. When all the apes are dead, enter the room.Room with 5 switches: Here you see a number of tall square pillars, a high platform with
5 switches, plus several doors. Note the inscriptions above the doors. Each has a series of five Greek letters--a different combination of omegas (W), which look like horseshoes with the round end up, and upsilons (U), which look like capital Y's, for each door. (NOTE: If these symbols look like 'W' and 'U' in this document, try converting them to Symbol font.) Five symbols, five switches. Omega points up, Upsilon points down. Get it?Now to get up to those switches. Cross to the far right side of the room from the entrance. Here you'll find the lowest pillar, which you can climb on. Take a running jump to the next pillar, then another running jump to the ledge above the door on the left. Follow the ledge to the far end and take a running jump to grab the ledge opposite. Pull up and retrieve some
magnum clips and a small med-pack. Safety drop down.Return to the shortest pillar, climb up, jump to the second pillar, then take another running jump to the third. From here, take a running jump to grab the top of the next pillar. Pull up and take a standing jump to the fifth and a running jump to grab the last pillar.
Now the switch platform should be on your immediate right. Before jumping to it, look up to the top of the white stone structure ahead. (*)See that
large med-pack way, way up there? Well, you can't get it without cheating.Here's how: Jump over to the white stone ledge. Turn around and walk to the edge. Sidestep so Lara's left shoulder is against the white block and her toes are at the edge. Then turn about 45 degrees toward the switch platform. Jump straight up and down in place repeatedly and Lara will creep forward. At a certain critical point, she'll suddenly pop up to the top of the block above. Why? As Lara creeps forward, the program interprets her position as being INSIDE the block. It knows this can't be true, so it "corrects" by repositioning her on top of the block. This is a bug in the game, but apparently the programmers meant it to be exploited, or they wouldn't have put goodies up there. (Thanks to Jeff Reid and others for this tip.)
(NOTE: If you can't get this trick to work, check out the for tips, or download a savegame from http://tombraiders.net/stella/zip/midasmed.zip with Lara on top of the white structure.)
Drop back down, jump over to the square pillar and from there to the platform with the switches. You can explore the areas behind the doors in any order you like. I suggest you try the most difficult first. Then, if at first you don't succeed, you can always go on to the other rooms and try this one again later.
Lower the leftmost switch so you have, from left to right: Down, Up, Up, Up, Up (
UWWWW). The door below near the lowest pillar opens. Go down the stairs in the middle of the platform and use the switch to open the gate. Now you don't have to do the pillar hop next time.Torch room (first lead bar): Enter the door you just opened. You're now facing a pool and five square pillars with
torches on top. Stepping on the floor in front of the first torch turns off the flames. You then have about 10 seconds to get to the other side. Here's how:First, kill the
3 rats swimming in the pool. Then if you fall in--and you probably will at least a couple of times-they won't start nibbling as you swim back to the steps. Save your game. Position Lara's feet on the brown line in front of the first pillar, squarely facing the middle of the next pillar. The timer doesn't start until you pass the line, so take your time getting set up. Now, press Forward, then Jump, and hold both keys to take a smooth series of running jumps from pillar to pillar. Use the left and right arrow keys to turn Lara in the air so she lands on each pillar facing in the direction she needs to run. At the fourth pillar keep holding Forward and Jump until take-off then press Action in the air to grab the edge of the last pillar. Pull up and run across the burner as quickly as possible.If you make it to the point where you grab the last pillar and the flames come on as you're about to pull up, try this trick: Traverse to one corner before pulling up, run across the edge of the pillar and, if Lara has caught fire, immediately save your game. Reload and Lara will have taken some damage, but she'll no longer be on fire. (MAKE SURE YOU SAVE IN A NEW SLOT in case this doesn't work for you, but it has worked for me and others playing the PC version.)
(NOTE: If you absolutely can't manage this sequence for whatever reason, you can download a savegame with Lara on the other side of the burners at http://tombraiders.net/stella/zip/firepillar.zip.)
Pick up the
lead bar--the first of three you'll need to find to finish the level. Jump in the water, swim back to the steps and exit the room. Another gorilla will be lurking about. Kill it and return to the switch platform.Spike room (second lead bar): Now arrange the
5 switches to match the inscription over the door to the right of the entrance: WWUWU--left to right, Up, Up, Down, Up, Down. Descend and enter the room, taking care to walk through the spikes. Go through the opening on the right and locate the movable block behind the ramp. Pull it twice then go behind it and use the switch there to raise the gray pillars in the room with the spikes.Climb onto the ramp and go to the top. Jump across to the nearest pillar. Jump from pillar to pillar counterclockwise around the room (running jumps all) until you're facing the opening to a small room. Walk to the edge of the pillar, take a standing jump into the doorway and immediately back flip out onto the pillar. Kill the
gorilla from safety and jump back over to retrieve the second LEAD BAR. Jump back to the pillar, then take a running jump over the spikes to a clear spot on the floor. Return to the switch platform.Sand room/long detour to temple (third lead bar): Arrange the
5 switches to match the inscription over the door to the left of the entrance: WWUUW--from left to right Up, Up, Down, Down, Up. Go through the door, around the pillar at the center of the room and through the doorway at the back of the room. Turn right and go down the stairs. Find the movable block and pull it once to cause the ceiling to collapse in the room above. Go back up the stairs then straight ahead up the second flight of stairs to an opening above the now sand-filled room.Take a standing jump from the doorway to the flat spot below and to the right. From here take a running jump to grab the broken pillar. Pull up then take another running jump to the slightly raised flat spot to the right. Two more standing jumps will get you to the flat spot to the right of the door, then into the doorway.
Climb up the rocks on the right until you come out in a doorway across from a water-filled aqueduct. Kill
2 bats and 2 gorillas from the doorway. You can probably also kill another gorilla running around in the room below from the ledge. Jump across to the walkway around the aqueduct. (When you look down, you'll notice you're now high above the area where you killed the lions earlier.)There are also
2 crocodiles in the water at the far right. You may need to take a dip to draw them out. When the crocs are out of the way, swim through the underwater tunnel at the end of the aqueduct and surface in a small cave. Climb out of the water on the right, turn to the left then climb up on the rocks. Walk forward (with the pool on your left) until Lara won't walk farther. Jump over the angled block and immediately jump again to land on the rocks ahead. From here, you'll slide down to a flat spot in the corner.Turn to the left and walk/slide down to the
magnum clips and small med-pack, which are SECRET #2.Return to the north end of the aqueduct where you entered this area. Safety drop down into the hole with the
small med-pack, shotgun shells and Uzi clips. This is SECRET #3. If you didn't kill the gorilla from above, do it now by jumping up and down until you get a pistol lock on it, then continuing to jump and fire until it's dead. Then take a standing jump out of the pit.Go around the corner, past the two openings on the right, and pick up another
small med-pack in one of the dark alcoves beyond. Return to the openings and jump from the left one to the building on the left. Two more gorillas wait here--one in the second alcove, another in the farthest. Take care of them then walk to the edge facing the rock wall opposite. Position Lara facing the right side of the crevice near the large med-pack. Take a running jump to grab the flat part of the ledge, pull up and take the med-pack. Then drop back to grab the ledge and traverse all the way to the left. Drop to the flat block and roll, drawing weapons, to kill 2 bats.Take a running jump back across the gap to the dark hallway that is lit at the far end. Follow this twisty passage, running up a series of ramps, then climbing up blocks until you emerge in a cave with a section of
break-away floor. Run across the tiles to the niche with the large med-pack. Then take a standing jump diagonally to the right to land on the solid ground beyond. If you fall through the floor, you'll land in the pool at the end of the aqueduct and have to climb all the way back here.Slide down the ramp ahead, drop down into the area below, then climb down the rocks to emerge on a ledge above the pool at the level entrance. Follow the ledge around the pool, shooting the
lion that gets in your way. Enter the cave at the end of the ledge. Continue to an opening on the left side where you can climb up then out onto a ledge.Be careful not to fall down or you'll have to reload or come all the way back to this point from the switch room. Kill the
2 gorillas from above. Turn to the right and take a running jump to the next ledge. Enter a cave with a pool. Swim forward quickly, avoiding the crocodile, until you can surface and kill it.Turn around, go to the back of the cave and climb the rocks to an opening. Kill
2 bats then jump across to the roof of the temple ahead. Cross the roof and pick up the third LEAD BAR.Now you should be able to kill
2 lions and 2 gorillas from the roof before climbing down. If you don't want to wait for the gorillas to show, you can dangle from the roof to draw them near, or drop down then jump on the rocks at the side of the temple to kill them from safety. When all is clear, approach the temple, pick up the large med-pack and enter (the door opens automatically). Follow the passageway to a switch and use it to open the gate to a garden near the pool at the entrance.Exit the passageway and continue down to the next room. Jump up on one of the blocks to kill the
3 gorillas running around in here. Continue on through the far doorway, turn right at the pool where you entered the level and go down to the gate you just opened.Garden/Midas:
Two more gorillas lurk in the garden. Kill them then find a switch on the left wall behind a small tree. Use it to open the gate ahead, also on the left side of the garden. Enter slowly. When you turn the corner a pair of chomping blades begin to work. Walk Lara up to about arm's length from the blades. Listen to the sounds they make. There are two "clangs" as the blades clamp together, then they begin to separate. Take a standing jump past the blades just as you hear the second clang. On the other side is SECRET #3. Pick up the goodies from around the room--magnum clips, shotgun shells and a small small med-pack. Exit past the blades the same way you came in.Cross the garden to the far back corner. Climb on the low ledge, turn around and walk to the edge. Then take a standing jump to grab the edge of the roof. Pull up, take the
large med-pack and enter a passageway at the back of the roof. Here you'll find the statue of King Midas, now in pieces. If you want to, save your game first. Then, just for fun, jump onto Midas's hand. Reload and this time use the magic hand to change those lead bars you've collected into gold. (Face the side of Midas's palm and "use" the lead bars as you would use a key.)Take your gold bars and return through the garden, to the left and up the ramp, then back upstairs to the switch room. Reset the switches to match the inscription over the last door:
UWWWU--from left to right, Down, Up, Up, Up, Down. Go to that door, which is below the right side of the balcony. Enter with weapons drawn and kill the charging lion.Climb to the top of the stairs and go out onto the balcony to pick up some
shotgun shells. Then come halfway back down the stairs to the doorway. Enter, place your gold bars in the niches in the alcoves and exit the level.LEVEL 8: THE CISTERN
Kills: 34 Items: 28, including 5 keys Secrets: 3
(Note that one of the regular pick-ups here will be the Magnums if you didn't get them earlier.)
Objectives: Locate two rusty keys. Use one in one of the doors in the main room with the pool. Through this door you'll find the first of two silver keys. Flood the room using a switch you'll find. You'll then be able to obtain the second silver key. Use the second rusty key on another of the doors in the main room, and from there obtain a gold key. Use the silver keys and the gold key to get to the exit.
Walk-through: Safety drop into the room below and kill a big, nasty
rat. Find the movable block and push it twice into the next room. Go around to the side and push it under the switch. Climb up and throw the switch to open the trapdoor below, as well as the silver door, releasing 2 more rats. Kill them from above, then hop down and retrieve a large med-pack from the small room behind the silver door.Drop down through the trapdoor and exit the room below onto a ledge jutting out into a huge room with a pool. Don't drop down yet. First get your bearings. Ahead on the far (north) side of the room is a tiered balcony with railings on both sides. At ground level on the same wall is a small metal door. To the left (west) are two ledges with locked metal doors. Below and beyond them, also on the west side, is another small metal door at ground level. On the right (east) side is the highest balcony, below which is a U-shaped walkway with a square pillar at one corner. On the same side, there's also an opening with a ramp below it that leads down to the pool and is flanked by two gargoyles. In the southeast corner (to your immediate right) is an L-shaped ledge with a crevice below. Where to start....
Walk out to the end of the ledge you're. You can probably kill
2 rats on the ground below from here. Jump across to the short walkway ahead, from which you can kill the 2 crocodiles in the pool. Return to the ledge near the entrance. (You don't have to do this first, but it will save you some difficulty later on when you enter the pool through an underwater tunnel.)Take a running jump from the end of the ledge to the raised platform to the left (if you're facing the entrance). Kill the
rat lurking there, then walk down the step and to the right. Grab the crevice ahead and traverse to the left until you can drop down onto a block with some shotgun shells on it. Turn and grab the crevice on the other side of the corner and keep going to the left until you can pull up. Turn right, climb up to the top of the ledge and follow it back toward the entrance. At the end you'll find a RUSTY KEY.Go all the way back to the other end of the L-shaped ledge, jump down to the gray area, then drop down to the ledge below. Follow it forward and to the right (above the ramp) then climb onto the square pillar at the corner. From here, take a standing jump onto the high balcony. Go up the stairs with pistols drawn. Your buddy
Pierre is waiting inside on the left. Try and get behind him as quickly as possible, and he'll run out the door and disappear. (Don't forget to use only the pistols on him during this level, since you can't do any real damage until the end of the next level.)DON'T PULL THE
SWITCH YET. It floods the cistern, and you still need to do a few things above water.(NOTE: If you are coming to this walk-through after flooding the cistern too soon, it's all right. Just pull this switch again to drain it, go on about your business and re-flood it again when you're ready. Others might want to do this just for fun to see the interesting effect of the floating crocodile corpses. They rise with the water but forget to sink when it recedes again.)
Climb on the block in the near right corner (when Lara's back is to the entrance). Turn around and take a standing jump to grab the raised arch at the middle of the room. Pull up and, from there, take a running jump to grab the next higher ledge. Pull up and collect a
large med-pack and some shotgun shells.Return the way you came to the other side of the room. Climb up into the inverted arch. Pick up the
small med-pack, go to the top of the low ramp and climb into the barely visible opening on the left. This is SECRET #1. Climb up three blocks to find more shotgun shells. Continue to the slope. Slide forward and jump at the last moment to grab the ledge ahead. Pull up, pick up 2 more boxes of shells, then slide back down into the room below.Climb over the low wall. Before jumping into the water, get rid of the
2 rats lurking below. To do this, jump over the hole above the water at the middle of the room once or twice. This should draw out the rats. Shoot them through the opening. Then jump in and swim through the tunnel until you can surface. Climb out and kill another rat.Go to the top of the stairs. Take a running jump to grab the gray block opposite. Pull up, then another running jump to grab the ledge where the second
RUSTY KEY is.Continue forward to a pit with
2 rats in it. Kill them from above. You can ignore the green steps below on the left and the crevice on the right. Simply drop down, walk to the right to the ramp and slide back down to the main room.Once on the ledge outside, turn left and take a standing jump to grab the ledge above. Climb up to the top of the L-shaped ledge and follow it around the southeast corner to the spot where you picked up the first rusty key. Drop down, go up the steps where you killed the rat and jump back to the ledge near the entrance. Walk to the end and jump across to the short ledge. From there take a running jump to grab to the ledge in front of the first locked door on the left. Pull up and use one of the rusty keys to unlock the door.
Two gorillas
await in the side alcoves toward the back. Advance and draw them out, then back up shooting. Or, enter, turn around and climb up on the ledge above the door to kill them.From the ledge above the door, take a running jump to the next higher ledge.
Pierre returns again at this point. You can either shoot it out from up here or drop down and try and chase him out. Eventually he'll run off.If you've dropped down, return to the second ledge. From there take a running jump to grab the third, where you'll find a
large med-pack. Take another running jump to grab the fourth and highest ledge. Pull up and walk towards the edge. Turn around so Lara's back is to the alcove with the magnum clips below. WALK backwards to the edge. Then WALK one step forward. Back flip and Lara will land on the ledge. (Or walk to the edge facing forward, take one step back, and swan dive onto the ledge. Ouch! Thanks to LordGroghe for that.) Pick up the clips. (NOTE: If you didn't find the MAGNUMS in the Colosseum, you'll get them now instead of the clips.)Now use a running jump and grab to get back to the highest ledge. Turn around and this time take a running jump to grab the narrow crevice above the alcove where you got the clips. Traverse to the right until you can drop down safely.
Follow the passageway, hop down onto the gray ledge, then go down and around to the left, sliding down until you're on the flat spot above the final short slide. Kill the
crocodile from above. Slide down to the floor and immediately jump or climb on the low block in the far left corner to kill another crocodile. A third croc lurks in the passageway behind the slides. Go in on the right side and back out shooting. When it's dead, go all the way into the passageway, kill a rat and pick up a large med-pack.Return to the room, climb up the two blocks in the corner, turn around and take a standing jump to grab the small ledge in the middle of the room. Pull up and take a running jump to grab the corner ledge. Turn right and take a running jump to the next ledge. Jump down to the ledge below. Now turn to face the crevice in the wall. Grab it and traverse to the left until you can pull up into the doorway.
Throw the
switch to open the door. Enter cautiously--there are spikes and a couple of rats below. One rat won't come out until you drop down, so kill the first one from above, hop across the spike pit and drop down on the other side beyond the spikes. Then kill the other rat.Continue until you can drop down onto a block in a mossy room. Kill the
rat below from the block if possible. Hop down, enter the next room and kill another rat. Climb the green stairs and from there climb to the ledge, then to the higher ledge on the right. Go to the end of this ledge, turn right and take a running jump to the ledge below. Pull up to the next ledge, turn right and take a running jump to the ledge beyond. From here, it's a standing jump into the alcove with the switch. Use it to open the door below.Climb down and take the
SILVER KEY. Immediately roll and draw your pistols for another shoot-out with Pierre. (Does this guy walk through walls, or what?!) When he's gone, jump into the pool and swim through the underwater passage to the next room where you can surface.High up on the ledges are a
couple of rats. You'll be back in a bit, but to make your job easier then, you can kill one of these guys now. Jump straight up with pistols drawn until you get a lock on it. Keep jumping and firing until it's dead. (Note the location of the high lever and the small door with the other SILVER KEY behind it. You'll return here soon.) Now jump back in the pool and follow the other, twisty passage back to the pool in the main area.If you haven't killed those
crocodiles yet, climb out quickly and do it. If you have, keep swimming to pick up SECRET #2: Swim into either of the openings on the west side. They connect in a U shape. In the middle of the underwater tunnel, in a shallow depression, is a set of magnum clips.Climb out of the pool at the base of the ramp (on the east side between the two gargoyles). Climb/jump up to the walkway above, and from there back onto the balcony and into the room with the grating floor. Now pull that
switch to flood the area.Return outside and swim down to the north end of what was the pool, through the small opening where you came out earlier. Follow the passageway back to the room with the two rat-infested ledges and the silver key. If you killed at least one of the rats earlier, climb out on the ledge with the dead rat (duh!) and kill the other from there. Pick up a
small med-pack on one ledge, a large med-pack and shotgun shells on the other. Jump back in the water and pull the lever to open the door below. Swim down, pick up the second SILVER KEY and the exit door opens automatically. Swim back to the surface. Climb out of the water on the ledge near the right door of the two that look alike (on the west wall).Unlock the door with the second rusty key. Jump in the water and swim down through the
spikes. (They're safe now that you're in the water.) Take a right, then swim down and turn around. There's a small opening ahead and to the left. Go through it, pick up a small med-pack and the GOLD KEY then exit. (The door opens automatically.)Surface and climb out pronto, since there's now a third
crocodile swimming nearby. Kill it and head for the ornate balcony (on the north side).Climb up but before entering find a
movable block to the left of the entrance. Push it once and enter the room behind, SECRET #3. Walk underneath the balcony to the far side of the ramp. Position Lara with her back to the ramp. Hop back to make sure she's as close to the ramp as possible. Then back flip onto the ramp and continue to hold Jump to bounce up to the balcony. Pick up 2 sets of magnum clips and a large med-pack.Return to the locked doors and use the 2 silver keys to unlock them. Go in and climb on the square pillar on the right. Turn around and take a standing jump to grab the ledge above the door. Pull up. Take a running jump to the ledge with the gold keyhole. Immediately safety drop back to get out of the way of the angry
gorilla. Climb back to the ledge above the door and kill it from there. Jump back across and use the gold key to unlock the door below.Don't drop down until you've killed the
2 lions that emerge. (You can jump back to the other ledge to get a better shot if necessary.) When the coast is clear enter the next room. Advance cautiously. The checkerboard floor has a number of broken tiles, some with spikes beneath. The far left break-away tile conceals a small med-pack, so be sure to drop in and pick it up.At the rear is a
switch. It opens the door to the right releasing 3 lions. You can pull the switch and jump on the block to kill the lions. Or, don't pull the switch and wait to get them from above in a moment. Or, you can skip the lions altogether, since there's no reward in that room.Go around to the right of the switch and find the
movable block. Pull it twice. (Behind it is the exit, but don't go yet.) Go around to the side and pull the block out toward the big room. When you can't pull any further, go around the back and push it once more. Now you can use it to climb up to the balcony.Draw weapons and go to each end of the platform to lure out
2 rats. While you're at it, pick up the large med-pack and 2 sets of magnum clips. If you like, go to the well-lit doorway and kill the 3 lions from above. Drop down either into the lion room or onto the block you moved. If you go into the lion room, there's a switch to open the door.To end the level, jump into the green water-filled pit that was behind the movable
block.
LEVEL 9: TOMB OF TIHOCAN
Kills: 17 Items: 26, including 4 keys and a piece of the Scion Secrets: 2
(Note that one of the regular pick-ups here will be the magnums if you didn't get them in one of the earlier levels.)
Objectives: Find your way through a series of rooms and passageways to the tomb itself. The path is fairly linear, but you will need to take a few detours and flood/drain several areas to proceed. When you find the tomb, you can finally kill Pierre DuPont and take his piece of the Scion (the second of three). Lastly unlock the tomb to find clues to your next destination.
Walk-through: Swim down and forward. When you reach the silver grate, swim down towards it, turn around and swim forward until you reach a
lever. Pull it to lower the water level, turn around and swim back up to the surface. Climb out on the ledge and use the switch to open the door to the right.Draw weapons and proceed along the hallway and through the door you just opened. Kill the
crocodile in the next room. Notice the block that looks like it should move but doesn't? It actually moves UP. Here's how: Climb the green steps to the top and hop down on the other side. Take a running jump from here to the greenish ledge next to the square block at the top center of the room. Pull up onto this block on the right side, taking care to avoid the darts that begin to shoot out from the walls and across this block.Turn to the right and take a standing jump from the corner of the block to the ledge ahead. From here, take a running jump to the ledge just beyond the dart pipe. Climb into the alcove and use the
switch to raise the water level again. Now that immovable block has floated up to the opening above. Swim down to where the block was and retrieve a small med-pack, then climb onto the block and enter the passageway there.Follow the passage to an opening and swim down and forward, down again towards a silver grate, then forward to the underwater
lever. Pull this to lower the water level once again and speed up the water current. Return to the opening above to breathe, then swim down and forward along a very long passageway. With the current working in your favor, Lara will be swept along to a room where she can surface.Climb out of the water and kill a
rat. Pull the movable block out once and use it to climb up to the ledge above. Then climb onto the square ledge above, then the rectangular gray block. There are 2 doorways at the top of this room. Jump to the square block near the doorway on the right, and from here jump into that doorway. Draw pistols and proceed into the passageway. Pierre DuPont will be waiting there ready to do some damage. Shoot him a few times then back up into the doorway. He should vanish when you do. If not, try the same again. (You'll get to kill him at the end of the level, but for now conserve your expendable ammo.)Continue down the passageway, but don't run. You'll soon reach a pair of
chomping blades. Stand as close to them as you can without getting chomped. Listen to the sounds they make and on the second "clang," take a standing jump through them.Continue down the stairs and kill a
crocodile at the bottom. Pick up some magnum clips and 2 boxes of shotgun shells. Now take a close look at the floor. There are 3 squares that look different from the others--two in the northeast and southwest corners and one near the steps. Step on all three pressure pads in any order to open a concealed door, SECRET #1.Inside is a small room with a low ramp, 3 angled blocks and a small ledge above. Position Lara with her back to the ramp and her chest against the side of the lowest angled block. Back flip onto the ramp and hold the Jump key, and Lara will spring off the ramp then jump forward onto each of the 3 angled blocks in turn, landing on the ledge at the end. Pick up the reward: a
large med-pack and a box of shells. Drop down and return back up the stairs, past the blades, to the doorway above the small pool.Hop down to the square block and from there take a running jump across the gap to grab the edge of the alcove. Pull up and pick up the
shotgun shells. Jump past the blade to the ledge on the right. The blade will now begin to swing. Turn and face it. Stand Lara toward the right side of the ledge, just forward of the faint line between the two floor blocks nearest the blade. As soon as the blade begins to swing to the left, take a running jump past it to grab the door sill ahead. Pull up.Follow the passage to a gap above a mossy room. Turn around and drop back to grab the edge of the floor. Traverse to the right until you can pull up. Go down the short passageway to a
switch and pull it to flood the room below. Drop down into the water and surface right there. (Don't swim ahead to the opening near the stairs where you killed the crocodile earlier.) Swim to the other end of the rectangular opening, climb out of the water and kill a rat.Go to the end of this short hallway and jump into the water again. Swim down, then up again through a twisty passage until you can climb out of the water in a room with
spikes on the floor. Stay on the step at water level until you've killed the lion lurking in the room. In the U-shaped passageway on the side of the room opposite the spikes you'll find a switch. Pull it to open a door above and awaken 2 gorillas. Return to the spike room and climb into the alcove and onto the step. From here you should be able to kill the apes.When they're dead, take a standing jump to grab the floor above and pull up. Cross to the gap above the spikes. Take a standing jump to grab the crevice to the left of the doorway and traverse right until you can pull up. Enter the room and pick up a
large med-pack and a GOLD KEY. Take a standing jump from the doorway over the spikes. Then drop down into the room below.Climb into the alcove then out the other side, where you'll find the keyhole your gold key fits. Use it to raise the blocks in the pool. Take 3 running jumps and a standing jump to get across. Pick up the
small med-pack to the right of the door before going in.Here you'll see a locked door with two keyholes straight ahead, two closed doors on the left and another room to the right beyond some square pillars. Inside this room are two more closed doors at floor level and a higher door. There are also 4 dark squares on the floor with writing on them (
pressure pads) and a movable block between two of the pillars. Pull the block twice to position it on top of one of the dark squares. Hop back and jump onto the block. One of the doors in the other room opens, releasing a gorilla. Kill it from the block then go to the room you just opened to get some magnum clips and shotgun shells.Pull the block twice more until it is on the dark square below the high door. Again, jump on the block. The door high on the wall opens, along with the second door in the other room, which lets out another
gorilla. Shoot it from the block. When it's dead, turn and take a standing jump from the edge of the block to grab the doorway. Pull up and enter cautiously. Another chomping blade trap is in the way. Go past it as you did the last one, and take the large med-pack and RUSTY KEY. Coming back you won't be able to jump through the blades without banging Lara's head, so run through instead.Drop down and go around the other side of the block. Pull it twice onto the dark square, hop back and jump on top of the blocks to take out the
4 rats that come swarming out of the room on the left. Jump down and enter to find a small med-pack.Go back to the block and move it onto the last dark square. This opens the remaining door. Walk forward to the edge of the door sill. Then take a running jump across and into the alcove to avoid being flattened by a
pair of rolling boulders. Pick up the second RUSTY KEY, then the small med-pack in the boulder path, and return to the far room with the locked door.Don't forget to go into the other small room you opened to get some more
shotgun shells. Then use the two rusty keys to unlock this door. Here you'll find a long ramp leading down to an underground lake.Before sliding down, pick up a secret. Save your game if you can. Then position Lara at the right side of the doorway facing down the ramp. Turn her about 30 degrees to the left then take a standing jump forward to the spot just beyond the high angled block. Keep holding the Jump key, and she'll take a series of 5 jumps off the rocks flanking the ramp to land in a doorway.
Ahead is a rectangular room with
5 break-away tiles jutting out from the two sides--two on the right, three on the left--and an alcove at the far end opposite the entrance. Stand in the middle of the doorway nearly at the edge then do the following series of jumps to land on the tiles: standing jump forward, side flip to the right, jump forward, jump forward, side flip left, and jump forward to land in the alcove. If you fall through you can climb out easily, but you'll have to reload a saved game to try for the secret again.Once in the alcove, pick up
SECRET #2, clips for the magnums and Uzis. Drop down, cross the room, climb out and continue down the slide to the lake.Swim forward without hesitating. On the far side of the lake is a square gray ledge on which you can climb out. Kill the
crocodile in the water below, then turn around and enter the passageway. Climb up the rocks until you reach a gap high above the lake. On the far side you'll see a switch. To the left is a flat block with slopes on two sides. Walk up this block, turn around, slide down the back and grab the edge. Pull up and immediately back flip to land on the square ledge behind. Turn around and pull up near the switch. Use it to open an underwater door.Slide or dive down into the water, reverse and swim to the right through a twisty tunnel to the other side of the lake. Surface and face the temple door, which is flanked by two centaur statues. Swim down and around the right side of the underwater column that holds up the walkway in front of the temple. Here you'll find a well concealed underwater passage. Swim into it, through the door you just opened, to a room where you can surface. Pull the
switch here to open the temple door. Swim back to the lake but don't climb out right at the entrance. Instead, go to the left side and climb out onto the sand.Draw weapons and cautiously approach the door. The
centaur statue on the left comes to life and begins to hurl fireballs. Back flip onto the flat sandy area. When you see it launch a fireball, side flip out of the way. Keep shooting and eventually it will explode. Alternately, run past the statue into the building. It will animate as you pass, then you can kill it from inside, using the doorway for cover.If you haven't already done so, enter the temple now. (The other statue won't animate yet). Prepare for your final showdown with
Pierre. This time you can use the magnums, if you've got them, to take him down fairly quickly. When he's dead, relieve him of a GOLD KEY, the SECOND PIECE OF THE SCION that he took from the pedestal at the center, and his MAGNUMS. (You won't have two sets of magnums if you've already got them, but the pick-up will be added to your total.)Now, if you like, you can go back outside and take on the
second centaur. Once you awaken it, it's easy enough to kill it from the safety of the doorway. It won't come inside. Just get a lock on it, hold that Action key and be sure to side flip whenever it launches a fireball.Lastly, use the square blocks to boost Lara up to the ledges on the side of the Scion room to pick up
2 sets of magnum clips. Then jump over to the balcony at the back of the room. Pick up a large med-pack. Then use the key you lifted from Pierre in the lock up here to open the door below. Drop down and enter Tihocan's tomb to finish the level.A cut scene ensues: Lara enters the crypt. She examines the hieroglyphics on the wall and reads aloud: "Here lies Tihocan. One of the two just rulers of Atlantis, who, even after the curse of the continent, had tried to keep rule here in these barren other lands. He died without child, and his knowledge has no heritage. Look over us kindly...Tihocan."
Back to levels 1 thru 4 The Peru Levels To Levels 10 thru 12 The Egypt Levels
Copyright © 1998-99 - Stellalune. Special thanks are given to the participants in the alt.games.tombraider newsgroup, without whom some parts of this walk-through couldn't have been written. Feel free to copy, distribute and quote this walk-through, but please include this credit line so people can send me their corrections, comments and suggestions. Also, if you'd like to offer this on your own web site, kindly ask permission first.
Stella's PC and MacIntosh
Saved Games