|
Written
by Dr. Hugh and Danny Kriestanto With
Team: Anna,
Bert, Diane, Jean
|
|
Written
by Dr. Hugh and Danny Kriestanto With
Team: Anna,
Bert, Diane, Jean
|
Click on one of these images to go to that Level
 |
 |
 |
 |
 |
 |
 |
 |
 |
 |
 |
 |
 |
 |
Or click on the image at the bottom of this page to go to the next Level
© June 2004
Bert Jamin (www.gamesover.com)
This walkthrough may not be sold and may not be used for any commercial
purposes. Neither is it permitted to publish this walkthrough in any way without
the written permission of the author. Feel free to place this walkthrough on
your web site or on your home page, on condition that no part of this
walkthrough is changed and that the name of the author (Dr. Hugh), the URL of
the owner of this site (www.gamesover.com) and his E-mail address (gamesover@planet.nl) are mentioned unchanged. For the most up to date walkthroughs always visit
www.gamesover.com.
If you have any suggestions to improve this walkthrough, let me know by sending me an email: gamesover@planet.nl .
LEVEL
10
FINAL
EXAMS – Part 2
Fifth
Challenge: Draconifors–Lapifors finals
Challenge
Shields: 5
Mission:
Complete the Draconifors-Lapifors Final Exam
[10.1]
I
hope you’ve prepared for your final exam, Miss Granger?
Absolutely,
Professor McGonagall – thanks to the Time-Turner you lent me. You
may find this a bit more challenging than our previous exercises. Collect all
five Challenge Shields to earn a perfect score on your exam. You may begin.
Cast
Lapifors on the rabbit statue in front of Hermione. As a rabbit, on your right
there is an overgrown hole behind a digging mound. Dig for a Spongify tile and chew
the vegetation. Inside follow the track of Beans between the roots until a
Pumpkin Pastie appears in front of another hole. Chew to exit here and enter the side of
the room behind the fence. Dig a mound at the end in front of the cauldron.
Turn
around and chew your way into a third hole. Follow the path of Beans and should
you drop down in the side gaps the rabbit will turn into the statue again and
you’ll have to start all over. Jump to an island on your left for a Cauldron
Cake and hop back to the main track for the Pumpkin Pasties.
Hop with care on this path and don’t tumble down
Chew
your way into the fourth hole and follow the Beans in between the tree roots until
you find a Pumpkin Pastie and chew your way out of the fifth hole. Go
left and dig the mound for a second Spongify tile. You’ll
get the controls over Hermione. Spongify the tile and hop over the fence where
you’ll be attacked by two Bundimuns. Cast Rictusempra, jump onto their back
and get a couple or three Pumpkin Pasties.
Cast
Depulso on each Cauldron and get twice a full load of Beans. Spongify the tile
and hop over the fence and meet another Bundimun. Get the 3 Pasties out of that
blob. Spongify
the tile under the balcony and catch your 1st Challenge
Shield. Save
by the Book.
[10.2]
Enter a room with 4 tin cans in niches and a grated hole in the floor above a
Challenge Shield.
Start
casting Depulso on the Suits of Armor as quickly as you can. They will lower
down. However, keep turning around casting Depulso on risen Suits until
eventually all four are simultaneously down. Then, the central floor will rise
with 4 Pumpkin Pasties and your 2nd Challenge
Shield.
Cast
Alohomora on the padlocks on the door and enter the next room. You’re
entering a huge puzzle room with 4 floor switches and 2 Save Books (strange...) There
are 4 tiles on the wall by the Books and an empty alcove in the middle. Also
there are three grated entrances with a Shield visible behind each.
Stand
on a floor switch and a Depulso sign will open on the corresponding plaque on
the opposite wall. You can’t cast Depulso from this distance, but the Depulso
sign will close in seconds. This is the trick: step on a switch (walking
backward facing the plaques), immediately jump forward from the switch and cast
Depulso on the open sign.
When
all four wall tiles are turned into shield plaques, a dragon statue rises from
the niche floor. Cast Draconifors and let the dragon fly up, pick up the Black
Fireball and land on the dragon platform grabbing a Cauldron Cake. Light
the bowl and the grated hole on the opposite wall will open.
Pick
up another Black Fireball, fly through the hole and a clock starts ticking
(watch the upper right corner for the progress bar). If you don’t reach your
destination in time you’ll change into Hermione saying: this
could be a challenge. Then, you’ll have to start all over.
The
clock will be reset to zero again each time you fly through a fully circular
hole and the hole will then be sealed so you can’t backtrack through that hole
(how clever!). This won’t happen with half circular holes on ground level
though.
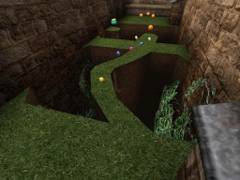
Land in the next room and walk through a half hole with a Pastie. Fly through the opposite hole for a reset and enter the garden where you go left and then turn around at the next corner. Fly up to the roof and collect all goodies walking around the rooftops.
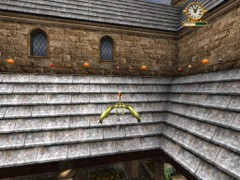
The rooftops are full of goodies all around
Then
fly to the dragon’s ledge with the Pumpkin Pastie and light the bowl. That opens
the alcove on Hermione’s right in the switch room. Take the beans and your 3rd
Challenge Shield.
[10.3]
Cast Draconifors for a second time and return to the point where you started
flying up to the roof.
This
time, run through the garden (it is a zigzag path) until you reach a hole with a
Pumpkin Pastie. Fly through for a reset. In this greenhouse with 4 walls fly
along a track of 4 Pumpkin Pasties and turn right at the end to pass a low hole
with a Pumpkin and a clock reset. Land and run through a half hole with a Pastie
on your left.
In
the next room there is another similar half hole with a Pastie on the opposite
side. Run through. Now you’ll have to fly through 3 walls that go up and down.
There are 3 Pumpkin Pasties between the walls. Fly through a next hole with a
Pastie and a reset.
End
up in a circular greenhouse with a rotating carrousel on top that has two
openings. Collect the circle of Beans under the carrousel before flying up
through an opening. The easiest way
is to fly close to the wall and in opposite direction of the sense of rotation.
Up there here take all Beans of the two circular distributions, and the 5
Pumpkin Pasties around the Black Fireball, before time elapses (if it does,
you’ll just start over and go there again).
Pass
through the high hole with the Pumpkin Pastie for a clock reset. You’ll reach
another circular room flying above a double rotating carrousel. Gather
the circle of Beans and fly through the next hole on your left into a room with
a dragon statue. Land on the platform with the Pumpkin Pastie and lit the bowl. Now
the alcove on your left will open up in the switch room. Take
the Beans and your 4th Challenge
Shield. Save now by the second Book.
[10.4]
Cast Draconifors and go for a third round.
Follow
the same track till the second cylindrical greenhouse, but this time fly through
an opening of the upper carrousel to collect the circle of Beans between the two
carrousels. Then fly down through the second carrousel and get the circle of
Beans and 5 pumpkin Pasties underneath.
Fly
through the low hole with a Pastie, get a reset and turn left following a track
of Pasties. At the end turn left, land on the floor by the corner to pick up a
Cauldron Cake, then fly up and turn right through a narrow opening. Turn right
again and follow the Pasties track further between walls that slide from left to
right. Then turn right through two narrow openings and by the Pastie turn left
for another row of sliding walls.
Fly
through an opening with a Pumpkin Pastie where you see a Challenge Shield, fly
up following the track of Pasties (there is also a Black Fireball in case you
would have forgotten one) to the Dragon platform with a Cauldron Cake and lit
fire to the bowl. That will open the middle entrance in the switch room.
Enter
the room and take your 5th and final Challenge
Shield. The grated
door will lock behind you and the door on your left will open. Go in and Prof.
McGonagall enters the room: You scored
one hundred percent, Miss Granger. Exactly what I expected of you. Thank
you Professor McGonagall. I do wish the term wasn’t over so soon...
There’s so much more I like to learn. Peace
yourself, Miss Granger. If not for yourself...
for the rest of us.
A
window will appear asking you to replay or exit Final Exam? Select Exit and the
game will load with a new save point.
Sixth
Challenge: Glacius Finals
Challenge
Shields: 5
Mission:
Complete the Glacius Final Exam.
[10.5]
Harry runs into the Glacius Final Challenge area where Prof. Flitwick is giving
instructions.
Are
you ready for the Glacius final exam, Harry? Ready,
Professor Flitwick! Splendid.
You know the rules then. Pick up all five Challenge Shields to earn a perfect
score. Got
it. Five Challenge Shields.
Oh...
and Harry? This exam’s a bit more difficult than our usual Glacius exercises.
Good luck to you!
Cast
Glacius on the well and turn the track into ice. So here we go for another
slide. Make sure to take the middle of the track at a spot where the Pumpkin
Pasties and Cauldron Cakes lie. After a jump you’ll land on three pipes in
front of a room with your 1st Challenge
Shield. Enter the room and
pick it up.
Cast
Glacius and Rictusempra on each of both Salamanders and chop them into icy
chunks. There are two Choc Frogs in niches on the side. Eat the ones you need to
restore to full stamina, when needed. Proceed
to your first Save Book.
[10.6]
In the side niches of the stairs there are two other Frogs.
Leave
them if you don’t need them. On top there is a Skull in each corner and a
Challenge Shield is seen in the second next room. Cast
Depulso on the Skulls for their final Beans. Enter
the first room and it will be sealed off. A number of one to three Imps will
keep appearing that throw their blasted fire crackers at Harry. Remember to use
you strafe keys to avoid them and then pick up a fire cracker and have it devoured by the
little devil(s). When these gangs of buggers are all blown up, a Challenge Shield
will appear. Jump up and conquer your 2nd
Challenge Shield. But Harry must have
gained some weight from eating chocolate throughout this game, so when he comes
down, the floor will drop like an elevator.
Harry
ends up in a cross shaped room with 4 holes on each side. A Fire Crab will
appear in front of some hole. Get it in its hole with some blasts of Rictusempra.
Then a second Fire Crab will appear near another hole and when that has tumbled in its
hole, a third and then fourth will have to be dealed with.
And
then... 4 new Crabs will simultaneously appear! Go for another round but eat
that Chocolate Frog first if you’re hurt. The 3rd Challenge Shield
will then pop up in the middle of the room. Go jump and grab it. Surely the
floor will drop again ending up in a similar room with... 4 Fire Crabs and
holes. Flip them onto their back again and push them into their holes. A chest
will now lower down in each hole. All four will open up from their own and all
spit loads of Beans, and... each a Pixie as well! These Pixies fly high up, hard
to reach with Rictusempra and you’ll faint in seconds. Keep a good eye on that
stamina meter and when it gets critically low, go for the Frog.
If
you
faint you have to start from the beginning of this block all over
again... Best tactics are: as soon as the chests have spit their goodies
and baddies
stand in a corner, already aiming with your wand at the ceiling. Get a
Rictusempra on the nearest Pixie and keep strafing from left to right
while
losing the button. Keep running around and repeat this until they’re all
gone
with a puff.
Next
your 4th Challenge Shield will appear. First collect all shattered
Beans, jump up to the Shield and... there you go for another down ride. Twice a
pack of Imps will appear and you only have a limited time to defeat them before
4 Salamanders come to life from 4 fires burning in the corners.
You
have to take care of the Salamanders AND meantime quickly extinct the fires or
more will constantly show up. Keep in motion! That is most important here! When
all are turned into ice cubes and the fires are extinct a platform with a
Spongify tile will rise from the floor. Look up first... wonder where that will
bounce you?
Let’s
find out: Spongify and … land on a new tile on the upper floor where you had
to fight the Pixies. Spongify, jump up and land on a tile where the Fire Crabs
were. It seems like you are going all the way up again! Spongify
and land in the first room with the Imps. You you’ll get SOME bonus here now!
The 4 air pipes on the ceiling will spit out a burst of Beans and Pumpkin
Pasties!
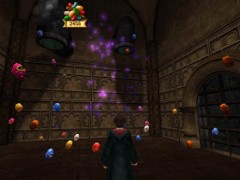
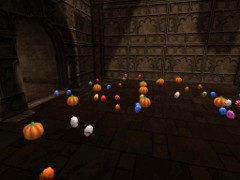
It is literally raining Beans
and Pumpkin Pasties!
Go
and collect all these fine goodies. Moreover, the door to your 5th
and final Challenge Shield has opened up.
Well
done, Harry! A perfect score! Wow...
I can hardly believe it myself. It
was a pleasure having you in Charms Class this term, Harry. You have a great
deal of natural ability, my boy! A great deal indeed.
A
window will now ask you if you want to replay or exit Final Exam. If you select
EXIT, the game will be loading and save point made.
So...
let's