|
Written
by Dr. Hugh and Danny Kriestanto With
Team: Anna,
Bert, Diane, Jean
|
|
Written
by Dr. Hugh and Danny Kriestanto With
Team: Anna,
Bert, Diane, Jean
|
Click on one of these images to go to that Level
 |
 |
 |
 |
 |
 |
 |
 |
 |
 |
 |
 |
 |
 |
Or click on the image at the bottom of this page to go to the next Level
© June 2004
Bert Jamin (www.gamesover.com)
This walkthrough may not be sold and may not be used for any commercial
purposes. Neither is it permitted to publish this walkthrough in any way without
the written permission of the author. Feel free to place this walkthrough on
your web site or on your home page, on condition that no part of this
walkthrough is changed and that the name of the author (Dr. Hugh), the URL of
the owner of this site (www.gamesover.com) and his E-mail address (gamesover@planet.nl) are mentioned unchanged. For the most up to date walkthroughs always visit
www.gamesover.com.
If you have any suggestions to improve this walkthrough, let me know by sending me an email: gamesover@planet.nl .
LEVEL
2
CARPE
RETRACTUM
First
Challenge: Carpe Retractum
Secrets:
5
Challenge
Shields:
10
Mission:
Complete the Carpe Retractum Challenge. Collect all ten Challenge Shields to
enter the Beans Bonus Room.
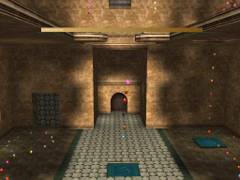
[2.1]
Professor Lupin provides instructions to Ron:
Welcome
to the Carpe Retractum Challenge, Ron. There are 10 Challenge Shields scattered
throughout the Challenge. Some are well hidden. Find all 10 Shields to earn a
visit to the Beans Bonus Room. If you don’t find all the Shields your first
time through, you can always come back. Complete the Challenge by collecting the
final Shield.
Carpe
Retractum has two primary uses – to pull yourself towards something, or to
pull something towards you. See if you can find a statue to cast the Spell at.
Then watch what happens …
After
the cut scene, cast Carpe Retractum on the Blue Ball on top of the statue in
front of you. You will be dragged to the platform. Now, use the Depulso spell on
the pattern on the left side. Another statue bearing a Blue Ball will appear.
Use Carpe Retractum on it.
Prof.
Lupin continues giving instructions: You
can also use Carpe Rectractum to pull certain levers. See if you can find one on
a wall and
try it out. On the right side there's a Carpe
Retractum statue higher up. Charm it, and then a Spongify tile will appear in
front of Ron.
First,
cast Spongify on the tile to make it bouncy. Jump
to the tile, or stand on the tile and press jump. Ron will jump high up
to a ledge. Jump down into the trench. Carpe
Retractum can
also be used to pull things towards you.
So,
cast Carpe Retractum on the symbol in front of you. You'll be pulling out a
block. Proceed to the left side. There's another block here. Pull it out, then
go up and take your first Challenge
Shield. Turn right into a passage with
paintings. Cast
Depulso on the Suit of Armor. Some Beans will pop out. Turn right and continue
until you see a pit. You can jump over
pits like this one, Ron.
Run
and jump to the opposite side (don't forget to use the Jump button). Hit the
Suit of Armor on your right side with Depulso to shake out some Beans, and then
go through the door on the opposite side. Immediately on your left there is
another Suit of Armor. Cast Depulso and it will retreat into an alcove. Go in
and turn right. You’ll notice a Depulso sign on the wall. Charm it.
Go
out and turn left. A new Carpe Retractum sign has been formed on the statue on
the opposite side. Use Carpe Retractum on it and open the chest on your right
for some Beans and your Vampire Card # 1: Sir Herbert Varney (1858-1889 –
Short-lived (by undead standards) Victorian Vampire who preyed upon women in
London during the 1880s. Was subsequently captured and killed by a special squad
from the Department for the Regulation and Control of Magical Creatures. This
counts as your
1st Secret
too!
Use
Carpe Retractum again to move on to the next platform. Carpe
Retractum can also be used on certain ropes. Now give it a go. Cast
Carpe Retractum on each of both signs hanging on the ropes and two ledges will
appear. Run and jump from one to the other and then to the platform with your 2nd
Challenge Shield. This last run and jump is tricky!
Jump
back to the first ledge and turn right. Jump to the dark portal, ascend the
stairs and save by the Book.
[2.2]
Move up and you’ll enter a room featuring a weird looking creature.
Ron:
Erm...
Professor Lupin? That thing doesn’t look very friendly.
Lupin:
That is an Imp, Ron. Beware – it might
throw exploding wizard crackers. Spells may not be effective in this situation.
Try not to
let the wizard crackers touch you while they’re in the air. When they land,
you can pick them up. But be careful: if you’re not quick enough the crackers
will explode.
Run to the nearest cracker and Ron will automatically pick it up. Turn towards the Imp and press your wand key to throw it at the Imp. Then two more will emerge from the left side. When they’re sent to hell you’ll get a new kind of reward:
Ron:
All
right! Pumpkin Pasties! These are worth a lot more than Beans!
Pick
up the three Pasties and cast Alohomora on each of two cabinets that are facing
opposite one another. You’ll get lots of Beans and 3 Chocolate Frogs. Spongify
the tile in the middle of the room and jump up through the hole in the ceiling
to the next floor.
You
will be getting 3 Pixies coming into the scene that throw exploding bullets at
Ron. Avoid the bullets and cast Rictusempra on each of them to be rid of these
annoying butterflies. Then, 3 more will appear. When they’re all snuffed
you’ll get another new kind of reward:
Ron:
Whoa!
A Cauldron Cake! I’ll bet they’re worth loads more than Beans in Fred and
George’s shop.
Pick
up the Cauldron Cake and cast three times Alohomora on the chest in front of the
window. Each time you’ll get a Chocolate Frog.
Move
on to the other room and shake 4 Suits of Armor to get those Beans out of those
buggers. Then the platform in the center will be raised carrying your 3rd
Challenge Shield. Enter the giant Hall and cast Alohomora on the chest in front
of you. That contains more Beans and a Choc Frog.
Cast
Carpe Retractum to pull you up to the left platform. Hit the Use Wand
button again to release the spell so you'll jump down. From this platform, turn
around. Behold your 2nd Secret Room! Cast Carpe Retractum on the Blue
Ball to get you into the Room. Cast Alohomora on the Chest and take out the
Beans and the Vampire card # 2: Amarillo Lestoat (1776-1977) – Flamboyant
American Vampire. Author of “A Vampire’s Monologue” – intended to bore
the reader into a stupor making him easier prey for Vampires. (Hmm... reminds me
a bit of Tom Cruise and his “interview”.)
Carpe
yourself back to the previous platform and look at the moving platforms on your
right. Cast Carpe Retractum on the nearest Blue Ball and remember to release the
spell only when the platform is below you, in order to safely land on it.
Continue left, and then right.
Before
jumping on the lower ledge by the wall, turn left and notice another Blue Ball
near the wall. Use Carpe Retractum on it to lower the door turning it into a
ledge. Carpe the upper Ball to enter this area and seize your 4th
Challenge Shield. Alas... not a Secret Room. Go out and from the edge of the
ledge cast Carpe Retractum to the lower Ball on your left. You’ll be retracted
to the balcony and a door will open up. Go inside and meet a Save Book on your
right.
[2.3]
Use the Depulso Charm on both Suits of Armor, then cast Carpe Retractum on the
sign situated on the other side of the gap.
A
block will emerge. Take a running jump to the block. First Cast Depulso on the
Suit of Armor on your right to shake out some Beans. Now stand by the edge of
the gap and look at the Suit of Armor in front of you. Cast Depulso on it for
more Beans and look up to watch a wall on top of him sliding upwards. A Blue
Ball is now visible there. Cast Carpe Retractum and pull yourself up. This is
your 3rd Secret
Room, with a chest inside. Cast Alohomora on the
chest. A whole bunch of Beans will be spit out, including 3 Cauldron Cakes and a
Collector’s Card!
Take
all goodies and your Vampire Card # 5: Count Vlad Drakul (1390 – unknown) –
Notorious Vampire who inspired the fictional Count Dracula created by Bram
Stoker. Father of Vlad the Impaler.
Jump
out of this room and turn right. Cast Carpe Retractum to the sign on the other
side of the gap to see a block emerge. Jump to the block, go down the stairs and
turn right. Cast
Alohomora on the lock and open the door.
You
will now encounter some kind of a Crab creature. That’s
a Fire Crab, Ron. Be careful. It can shoot fire out of its... um... well,
out of it’s backside. Cast Rictusempra to turn it onto its back. Then cast
again, as needed, to knock the Fire Crab into the trap.
Push
the Fire Crab into the trap and that will open the door on your left. Then
proceed to fight two more Fire Crabs. Cast Alohomora twice on the chest and each
time extract a Chocolate Frog. Turn around and head to the next large room with
the floor full of blue mist.
Use
Carpe Retractum on the Blue Ball on the right hand side, jump down to the moving
platform, and have a ride to the other part of the room, where two Pixies will
try to attack you with exploding bullets. Try to catch at least one of them
while on the ride and then jump to the ledge on your right side to finish off
the other one. Cast Carpe Retractum on the block on the opposite side and jump
and run to the chest. Open it with Alohomora and get some Beans and two
Chocolate Frogs.
Turn left and watch another floating platform going from left to right. Cast Carpe Retractum on the Blue Ball above and get to the platform. This will bring you under the 5th Challenge Shield. Jump up to grab it and ride backward. Turn right at the end and cast Carpe Retractum on the Blue Ball on top of the opposite ledge. Catapult Ron to that ledge and turn left: there you’ll see your next Save Book! Cast Carpe Retractum to the sign on the opposite side of the gap and another block will emerge. Run and jump to the block and save by the Book.
[2.4]
Open the door casting Alohomora on the padlock.
You’ll
see a platform with a Fire Crab that will immediately start attacking Ron. Cast
Alohomora to push it off the platform and it will drop into the deep with a loud
scream. Ha! Now a Blue Ball is hanging on a rope above the platform. Before
jumping there look around to your right and there you’ll notice another
platform with a Fire Crab sitting on it. From this position you can knock it
into the void too.
Now
cast Carpe Retractum on each of the two successive Blue Balls at the end of the
platform on your right. Pull out the 3 Carpe Retractum blocks in front of you to
make a staircase and climb up to the third block and turn left to jump up into a
room with two Suits of Armor and a Depulso sign on the wall. Cast Depulso on the
tin cans and get the Beans into your sack. Cast Depulso on the sign and a short
cut will show how a grated door on the opposite side will go up and a statue
with a Blue Ball will slide out onto the ledge. Turn around and cast your Spell
to get Ron onto that ledge. Don’t enter that room yet! You’ll get an
autosave as soon as you enter and the door will be locked behind your back.
Instead
cast Carpe Retractum on the Blue Ball on the left wall and a door will rotate
down and form a ledge. Run and jump to the ledge and go inside and capture your
6th Challenge Shield. Now jump back to the previous ledge and enter
the room. An autosave will be made.
[2.5] Turn right and get that Fire Crab into the hole with multiple Rictusempra.
The
grated door on your left will slide upward. Don’t enter yet but look left and
notice a descending passage. Follow the passage to your right and cast Carpe
Retractum on the Blue Ball hanging on a rope. You’ll watch a short cut showing
how a bridge is sliding towards a Challenge Shield and hear the sound of a Bell.
Turn around and look up. You’ll see a blue banner. Cast Depulso twice on it
and get two Cauldron Cakes out of that per Spell. You’ll hear a sound too.

Depulso on the
blue banner
Go
out to the previous room and look up. That bridge is right there! But now …
how to reach it? Look up higher and you’ll notice a Blue Ball hanging there.
Cast Carpe Rectractum and pull yourself up to the bridge. Drop down, turn around
and seize that 7th Challenge
Shield. On each side of the bridge you
see alcoves each containing a chest. You can’t reach them, but just cast
Alohomora on each of them. They will literally shed Beans onto the floor. Drop
down and collect the whole stack.
Now
enter the ledge in the next room and cast Carpe Retractum on the first Blue
Ball. Drop down when the floating ledge is underneath Ron. Then pull Ron up to
the other ledge with a Save Book. Now don’t save yet! Instead, turn right and
notice another Blue Ball above a platform. Get Ron there and then turn right to
see a Blue Ball hanging on a rope. Pull that rope by casting Carpe Retractum.
You’ll hear that Bell again while other ropes bearing Balls appear from the
ceiling. Hit the first Ball and land on the platform with the star dodecagon.
Then cast Carpe Retractum on the second Ball higher up and land on a ledge in
front of an entrance.
Enter
the room and turn right. Cast Depulso three times on the left Suit of Armor and
with each hit it will retreat further into an alcove (Depulso on the right Suit
of Armor won’t have any effect). Go inside and turn left. Enter the dark
passage, turn right, ascend the stairs and enter your 4th Secret
Room. Open the chest with Alohomora, get loads of Beans, a Pumpkin Pastie and
your Vampire Card # 3: Lady Carmilla Sanguina (1561 – 1757) – Bathes in the
blood of her victims to retain her youthful beauty.
Go
down and turn left. A door has also opened at the end of the corridor giving
access to a ledge with your 8th Challenge
Shield. Return all the way
to the ledge with the Save Book by casting Carpe Retractum on the three Balls in
a row and save.
[2.6]
Go inside, turn right and cast Alohomora on the chest on your left.
You’ll
get a Choky. Enter the large room on your left. You’ll be attacked by 4 Imps,
so hit them with their own fire crackers. The Chest contains a Hershey Frog, but
you can open it three times. One Frog is enough for now. Cast Depulso on the
left Suit of Armor and get out the Beans. It will turn around 90° revealing a
new one. Cast Depulso and get out more Beans and 2 Pumpkin Pasties. Grab the
goodies and cast Depulso for a third time. Now you’ll get a whole stack of
Beans. Boy, this tin Suit cubed is like Santa Claus! Go for a fourth round and
you’ll get 5 Pumpkin Pasties and your final Vampire Card # 3: Blodwyn Bludd
(1923 – unknown) – Known as the “Vampire from the Valleys”. Famous for
singing to his victims with a sonorous bass baritone, before biting their necks.
**
note: sometimes a goodie will tumble into the central grilled square. You’ll
pick these up soon.
Now
you’ve obtained all 5 Vampire Cards! Cast
Depulso on that second tin can, the one near the chest. Boy... this isn’t
looking so good: a bunch of Beans and a Cauldron Cake alright, but 4 Pixies on
top of that! A bit of speed and Rictusempra will send them one by one to the
place where they belong. Now get those two other Frogs out of that golden chest
with a couple of Alohomora Spells.
In the middle of the room there is that grilled square. Can you see a Challenge Shield below? Ignore that for now and leave through the other exit. Turn right and enter a Portrait Gallery. There is a Blue Ball on a statue right in front of the last painting on your left (wonder why that Ball is there?). The last painting on your right looks suspicious. Doesn’t that look like the portrait of a Gargoyle? Cast Alohomora on it and the painting will slide upward revealing a REAL Gargoyle! Cast Lumos on the Gargoyle, and the floor of the Portrait Gallery will be charmed opening access to a lower floor. Jump down near the Blue Ball and enter your 5th Secret Room.
Turn
around and cast Alohomora on the chest. There are your 4 Pumpkin Pasties! Go
down the passage and turn left to find a Spongify tile. When you approach the
tile you’ll hear a strange sound. Look up and... yes, there is that Challenge
Shield you just saw from above. If things from the Suits of Armor fell through
the grilled square, well here they are, so pick them up. Spongify the tile, jump
up and grab your 9th Challenge
Shield.
You’ll
end up in the room with the two Suits of Armor again. Return to the Portrait
Gallery with the charmed floor and cast Carpe Retractum on the Blue Ball on the
opposite side to launch Ron across the gap (Aha! That’s why that Blue Ball was
on that location!).
Turn
left and find an opened door giving access to a ledge overlooking a spectacular
room while listening to dramatic music! On your right you’ll notice two blocks
with the Carpe Rectractum sign on them. Use the Spell to pull them out. Run and
jump to the lower one and climb to the next floor over the second block.
There
are tin Suits on your left and right. Depulso on these will reward Ron with some
Beans and a Frog. There are lots of Blue Balls hanging here. Cast Carpe
Retractum on any of the three Blue Balls in front of you and the final Challenge
Shield will appear in the far distance. Cast Carpe Retractum on any second Ball
and a central platform will rise. Charm the last Ball and a Fire Crab on each
side will appear, each on a platform. Mercilessly kick them into the abyss
below. Run and jump to the middle platform and look up. Cast Carpe Retractum on
the Ball in front of you above a second platform and drop down on it. Cast
Carpe Retractum on the Blue Ball left of the final Challenge Shield and take the
10th and final Challenge Shield.
The
Beans Bonus Room
This is fun! Collect as many Beans as you can and follow any track. Golden tip: Cast Spongify on as many tiles as you meet and go up along a track of Beans to a next Level. Pass the Suits of Armor and they will shed extra Beans. Time is limited!
So this is the Beans Bonus Room!
Meet
Fred
Ron
meets Harry and Hermione in a room where the doors will let you back into any
Spell Challenge you’ve completed. There are two Suits of Armor that you can
shake 5 times each with Depulso to get out more Beans. Go down two steps and
when you reach the next Suit of Armor on your right the game will load without
making a save point.
Now you’re in control of Harry again and a cut scene will show Fred coming in through one of the paintings from the side room. Boy, he looks different now. He will give an early Christmas present to Harry:
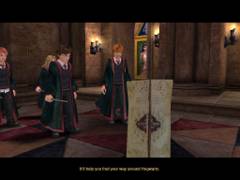
The Marauder’s Map
It’ll
help to find your way around Hogwarts. You can press the TAB key on your
keyboard to bring up the Map at any time.
Fred
will ask you to follow him to the shop, but before doing that turn around and
shake that third tin can 5 times to extract another full load of Beans.
Now
return and pass the Save Book in the middle of the side room.
So...
let's