|
Written
by Dr. Hugh and Danny Kriestanto With
Team: Anna,
Bert, Diane, Jean
|
|
Written
by Dr. Hugh and Danny Kriestanto With
Team: Anna,
Bert, Diane, Jean
|
Click on one of these images to go to that Level
 |
 |
 |
 |
 |
 |
 |
 |
 |
 |
 |
 |
 |
 |
Or click on the image at the bottom of this page to go to the next Level
© June 2004
Bert Jamin (www.gamesover.com)
This walkthrough may not be sold and may not be used for any commercial
purposes. Neither is it permitted to publish this walkthrough in any way without
the written permission of the author. Feel free to place this walkthrough on
your web site or on your home page, on condition that no part of this
walkthrough is changed and that the name of the author (Dr. Hugh), the URL of
the owner of this site (www.gamesover.com) and his E-mail address (gamesover@planet.nl) are mentioned unchanged. For the most up to date walkthroughs always visit
www.gamesover.com.
If you have any suggestions to improve this walkthrough, let me know by sending me an email: gamesover@planet.nl .
LEVEL
7
GLACIUS
Third
Challenge : Glacius
Secrets:
5
Challenge
Shields:
10
Mission:
Complete the Glacius Challenge. Collect all ten Challenge Shields to enter the
Beans Bonus Room.
[7.1]
Take two middle escalators down to the 3rd floor and head for the
Charms Class on the 2nd floor.
Go
left of the Gargoyle and the Class is on your right. Hello,
Class I am Professor Flitwick. Welcome to Charms! Today we will learn a useful
freezing Charm called Glacius. Harry
is called for a demonstration. If you’d like to step through this door, we can begin the Glacius
Challenge. Harry
enters the Challenge area. The game is loading and a save point made.
[7.2]
Glacius
is useful for freezing a number of things, Harry.
Let’s
begin with an Amazonian Salamander, shall we? Harry
runs to the next room with a burning Salamander – almost like a Dinosaur. Take
care now, Harry. You need to eliminate both the creature and
its fire. Give it a try.
Run
down to the Salamander and extinguish its fire with a shot of Glacius.
Immediately cast Rictusempra and it will explode into a thousand pieces. If
you don’t stop the fire, Salamanders will forever keep appearing out of that
fire. Cast Glacius on the fire and your 1st Challenge
Shield will
rise from the ashes.
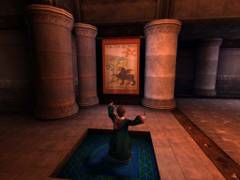
Turn
left and notice a Tapestry hanging on the left wall. Cast Alohomora to roll it
up and unveil a room with a chest. Climb
up the stairs and enter the 1st Secret
Room. Open the chest with
Alohomora and get a full load of Beans and your Goblin Card # 1: Eargit the Ugly
– Goblin representative at 14th century summit of Wizard’s
Council. Go
out left to a room with a fountain and a canal.
Now
Harry, see if you can use the Glacius Spell to freeze this flowing water. Cast
Glacius on the well sign and the water flow will stop. Also the channel has
turned into solid ice. Here’s
the best bit Harry, go for a slide!
Wow...
it’s Roller Coaster time! Just use the left and
right arrow keys to turn. Press the up arrow to go faster...
and the down arrow to slow down. Off you go, I’ll see you at the end of
the Challenge.
Jump
on the ice track and there you go on this fun ride. When you tumble down from
the track you’ll start again from the start and can collect the remaining
Beans. Harry will have to jump at the end following a track of Beans in the air
and end up on a Spongify tile and a Save Book. Save first.
[7.3]
Look down into the next room and you’ll see two fires and two Salamanders
running around.
Be
quick here and get that first Salamander, and extinguish the fire. Nail that
second one too and freeze the fire. A Spongify tile will appear in the center of
the floor. Also a door will be opened left of the cauldron in the corner and
you’ll get fire crackers thrown out of this place. There are two Imps in
there. Send them to hell and enter the 2nd Secret
Room. Cast
Alohomora on the chest and obtain a bunch of Beans, a Chocolate Frog or two, and
your Goblin Card # 2: Alguff the Awful – Foul-smelling goblin nuisance. Well
known throughout the goblin world for trying to sell vials of his sweat to a
Dungbomb manufacturer.
Back
in the large room cast Depulso on that cauldron and get out the Beans. Look up
and notice a track of Beans in the air leading to a higher floor with a
Challenge Shield. Spongify the tile and bounce up there. Catch your 2nd
Challenge Shield and prepare for a wild ride down the ice track. Slow down as
much as you can and try to go for the Cauldron Cakes. You’ll automatically
jump a few times and when you drop down that’s not too bad because you’ll
start over from the Spongify tile and can catch more Pumpkin Pasties and Beans
on your next slide down. Finally you’ll jump into a small cylindrical palace
catching your 3rd Challenge
Shield. You will be attacked by a swarm
of Pixies. Destroy these caricatures of butterflies with Rictusempra and a
Spongify tile on the floor will show up along with a track of Beans above a
spiral staircase leading down. Do not use this tile for a jump because it leads
to a short cut glide and you’ll miss a Collector’s Card and a Challenge
Shield! Go from the stairs and look down. There is another Shield floating below
you. Go
all the way down around and keep an eye on that Shield. No way to catch it...
Turn
around and cast Alohomora at the padlock on the door. Enter your 3rd
Secret Room, catch all the Beans in a circle and cast Alohomora on the chest.
You’ll get loads of Beans, two Pumpkin Pasties and your Goblin Card # 3: Ug
the Unreliable – Notorious goblin confidence trickster. Organized the infamous
Demiguise Derby and absconded with the takings.
Go
out here and... surprise! Watch how a Spongify tile has appeared under the
Shield!
Spongify
the tile and bounce up to grab your 4th Challenge Shield but...
you’ll be catapulted onto another icy track down and land on a large balcony
with two Salamanders. Slice them into pieces and extinguish both fires.
Walk
up the stairs on either side and eat the Chocolate Frog. There is your next Save
Book on top of a Spongify tile, but first take care of both tin warriors and
shake everything out of them. They each throw up lots of Beans and 3 Pumpkin
Pasties (after hitting a first one the Shield will rise from the floor). Seize
your 5th Challenge Shield and save by the Book.
[7.4]
Notice a track of Beans in the air leading to the next slide.
Spongify
the tile and up in the air you go. This track has a switch. We’d
suggest taking the right hand track first and along the way there are
Cauldron Cakes and a Challenge Shield. Snatch your 6th Challenge
Shield and if you miss it jump out on a bend and start the slide all over. When
you have collected everything along the right track drop down again and this
time take the left hand track with all the Pumpkin Pasties. Where both tracks
meet, proceed gliding down and land in a room where the game will be loaded with
an automatic save point.
[7.5]
Proceed and Harry will be attacked by 3 Pixies.
Blow
them away and a bridge to the next Save Book will be formed. Go down some steps
and eat a Chocolate Frog. When ascending the stairs to the Book a track of Beans
will be formed on your left. Don’t save yet, but rather avoid the Book. Follow
the Beans and enter a room.
First
send that Salamander on your right to Kingdom Come and extinguish the fire. A
Spongify tile has now appeared near the entrance and the door has closed.
Standing on the tile, notice a Tapestry on each side of the walls. Cast
Alohomora on the left one and it will roll up. Enter the 4th Secret
Room and cast Alohomora on the chest. You’ll be rewarded with a whole set of
Beans, 3 Cauldron Cakes and 5 to7 Pumpkin Pasties!
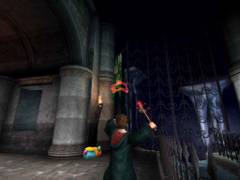
Don’t
forget this Tapestry
Cast
Spongify on the tile and bounce up to the floor with the Chocolate Frog. The
floor will lower down and in a cut scene a new section will be added to the
bridge in the previous room. In front of Harry is a small room with a chest. Not
a Secret! Cast Alohomora on the chest for a stack of Beans and 3 Pumpkin
Pasties. The
door to the bridge has now opened. Avoid the Save Book again and run
straightforward into the opposite room.
Immediately
on your right there is a fire with a Salamander (just like in the previous room)
that you’d better blow up first. Ice the fire with Glacius too. Also here a
Spongify tile appears on the identical spot and the door shuts down as well. Go
stand on the tile and notice two banners hanging from the ceiling (very dark
though!) with the Slytherin Snake symbol on them.
Cast
Depulso on each. The
left one will shed a number of Beans and the right one two Cauldron Cakes and 3
Pumpkin Pasties. Spongify
it and jump to the higher ledge that will lower down. Now part of the bridge
will rotate. Cast
Alohomora on the chest in the room in front of you and take plenty of Beans and
your Goblin Card # 4: Urg the Unclean – Rebel leader in the 18th
century goblin rebellions. Save
by the Book now.
[7.6]
Go left of the bridge and jump over the gap.
Here
you will be attacked by two packs of Imps in a row. Avoid their fire crackers by
strafing from left to right and throw them back to blow up all the Imps. You’ll
notice a Challenge Shield hanging in the air. A Spongify tile has also appeared
behind the now closed entrance to this section.
Spongify,
jump up, catch your 7th Challenge Shield in the air, then land on a
passage with a Save Book. Cast Alohomora on the chest and extract many Beans and
3 to 4 Pumpkin Pasties. Cast
Alohomora on the Tapestry and have it roll up. Enter your 5th and
last Secret Room and cast Alohomora on the Chest. Get a few Beans, 2 Cauldron
Cakes and 9 Pumpkin Pasties! Go out and save by the Book.
[7.7]
Enter a room with a fountain and a canal, similar to the one in the beginning of
the Level.
First
turn left and look up. Notice a Slytherin Banner hanging from the ceiling. Cast
Depulso on it and get Beans, a Cauldron Cake and 4 Pumpkin Pasties. Cast Depulso
on the Banner for a second time and get the same load again.
Cast
Depulso twice on the green banner
Cast
Glacius on the well sign and turn the channel into an icy slide. Jump up and
start the ride of your life! There’s a switch too. Select the right hand track
first. Make sure to get all Cauldron Cakes in the air and seize your 8th
Challenge Shield on a jump. Further on the track catch a Collector’s Card.

Catch
this Collector's Card!
This
is your Goblin Card # 5: Gringott – Founder of Gringotts Wizard Bank.
When
you have caught everything on this track get off at the bend after the merging
of the two tracks, start over and now take the left track. Remember with each
drop Harry will lose part of some stamina, so watch out. Catch the
9th
Challenge Shield
in the air far after the paths have merged (this is the hardest
one, because it is moving from left to right!). On the end you’ll safely land
where you can take the
10th and final Challenge
Shield!
Excellent
job, Harry. You’ve completed the Glacius Challenge. Not only that … you’ve
managed to get all the Challenge Shields. You know what that means.
The
Bean Bonus Room: third round
Again,
Spongify as many tiles as you can and follow tracks of Beans and Cauldron Cakes
in the air. On the upper floor jump over gaps with Cauldron Cakes and pass as
many Suits of Armor as possible who will all spit Pumpkin Pasties and more
Beans.
After
time has elapsed Harry will meet Ron and Hermione in the Challenge Access Room.
Once again, someone stocked the two tin cans with Beans, so shake them each 5
times well with Depulso. Go
out here and the game will be loaded without a save point.
Despite
the dangerous visitor lurking around Hogwarts, Harry insisted on going to visit
Hagrid. He was anxious to hear the outcome of Buckbeak’s trial. Our friends
suspect they’ve already carried out his execution.
Suddenly Scabbers comes into the scene. They all run after the rat... but they’re watched by that giant black dog from the game’s opening scene. Ron finally catches Scabbers but is attacked by the dog, which is dragging him to the Whomping Willow. Harry: If that dog can get in, we can!! The game is now loaded with a save point.
So...
let's