|
Written
by Dr. Hugh and Danny Kriestanto With
Team: Anna,
Bert, Diane, Jean
|
|
Written
by Dr. Hugh and Danny Kriestanto With
Team: Anna,
Bert, Diane, Jean
|
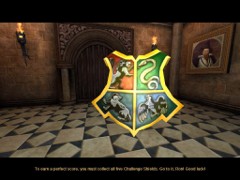
Click on one of these images to go to that Level
 |
 |
 |
 |
 |
 |
 |
 |
 |
 |
 |
 |
 |
 |
Or click on the image at the bottom of this page to go to the next Level
© June 2004
Bert Jamin (www.gamesover.com)
This walkthrough may not be sold and may not be used for any commercial
purposes. Neither is it permitted to publish this walkthrough in any way without
the written permission of the author. Feel free to place this walkthrough on
your web site or on your home page, on condition that no part of this
walkthrough is changed and that the name of the author (Dr. Hugh), the URL of
the owner of this site (www.gamesover.com) and his E-mail address (gamesover@planet.nl) are mentioned unchanged. For the most up to date walkthroughs always visit
www.gamesover.com.
If you have any suggestions to improve this walkthrough, let me know by sending me an email: gamesover@planet.nl .
LEVEL
9
FINAL
EXAMS – Part 1
Hogwarts
Castle: Purchase Time
Mission:
Go to the Defense against Dark Arts Classroom to start Ron’s final exam
[9.1]
You’ve got enough BB, CC and PP to buy lots of goodies now.
The
black girl against the wall sells Collector’s Cards. Get from her the following
Cards:
PP 60 – Wizard Card # 8:
Glanmore Peakes (1677 – 1761) - Famous slayer of the Sea Serpent of Cromer.
PP 10 – Witch Card # 8:
Ignatia Wildsmith (1227 – 1320) – Witch who invented Floo powder.
BB 200 – Witch Card # 5: Jocunda Sykes (1945 – present) – Famous for
flying across the Atlantic on a broomstick – the first person to do so.
PP 50 – Witch Card # 14: Morgan le Fay (Medieval, dates unknown) – King
Arthur’s half sister. Dark sorceress. Enemy of Merlin.
BB 50 – Wizard Card # 11: Mungo Bonham (1560 – 1659) – Famous Wizard
healer. Founded St. Mungo’s Hospital for Magical Maladies and Injuries.
BB 125 – Wizard Card # 6:
Norvel Twonk (1888 – 1957) – Died saving a Muggle child from a runaway
Manticore. Posthumously awarded the Order of Merlin, First Class.
BB 225 – Wizard Card # 5:
Oswald Beamish (1850 – 1932) – Pioneer of Goblin Rights.
And
we’re done for now because the next Card costs 70 Pumpkins Pasties. Go down to
Hogwarts Side Chamber and look at the Marauder’s Map – it is the first on the
left down the Monumental Staircase. Take painting # 7 (Starshine) straight to
the 7th floor and enter the Portrait of the Living Lady to Fred and
George’s shop.
Now
it is time to purchase all Cards from the shop.
BB 150 – Beast Card # 9:
Mountain Troll – Frequents mountainous regions. Very powerful, but stupid, the
troll will attempt to bludgeon anyone who come near it.
BB 100 – Witch Card # 15:
Gunhilda of Gorsemoor (1556 – 1639) – One-eyed, hump-backed Witch famous for
developing a cure for Dragon pox.
And
the Card on the side chests go for:
BB
25 – Witch Card # 13: Mirabella Plunkett (1839 – unknown) – Famous for
falling in love with a merman in Loch Lomond while on holiday. When her parents
forbade her to marry him, she transfigured herself into a haddock and was never
seen again.
BB 200 – Beast Card # 10:
Streeler – A large, orange snail with a poisonous shell that should only be
handled when wearing protective gloves.
Finally,
the Card on the tall middle chest at:
BB
125: Witch Card # 11: Hesper Starkey (1881 – 1973) – Witch who studied the
use of phases of the moon in potion-making.
Now
go for the Portrait Passwords:
CC
12 – Derwent Shimpling Portrait Password.
CC
12 – Mopsus Portrait Password.
CC
15 – Tilly Toke Portrait Password.
CC
15 – Glover Hipworth Portrait Password.
CC
20 – Hesper Starkey Portrait Password.
Harry
does not have enough Cauldron Cakes for the next purchase. Pumpkin Pasties go for
BB 30 and Cauldron Cakes for BB 50, so better wait with those. Your business is
done here, so head for the 3rd floor for Ron’s final exam.
Take
two central escalators down to the 3rd floor and enter the classroom.
Well,
here we are, Ready to take that final exam, Ron? Erm...
do I look a bit feverish to you? Harry
and I will meet you outside in the courtyard after the exams. Bye.
Nice knowing you. Ron meets Prof. Lupin in the classroom: Ready
to start your final exam, Ron? The game will load with a save point.
Fourth
Challenge: Carpe Rectractum finals
Mission:
Complete the Carpe Retractum final exam.
[9.2]
Prof. Lupin and Ron are entering the Challenge area.
I
must warn you, Ron. This exam is fairly difficult... and also a bit dangerous.
Umm...
dangerous? To
earn a perfect score, you must collect all five Challenge
Shields. Go to it,
Ron! Good luck!
Ron
is standing in a window of a high tower with a central pillar. In front of his a
two-blade stone fan is spinning slowly. Cast Carpe Retractum on the Blue Ball above
the blades and lift yourself up. Wait losing the Spell until one of the blades
is under Ron and lower yourself on that beam. Look up here: this is a high tower
with nothing more to do. Stay on the beam until you see an opening with a
similar tower with spinning blades.
Cast Carpe Retractum on the Blue Ball and enter the second tower. Lower to the beam. Have a full round and notice a second opening to a third similar tower that is accessible. Stand on the edge of the blade always making sure to face the wall and jump into a room as soon as it comes in sight. Cast Alohomora on the chest and get out a stack of Beans. Jump back to one of the blades. Right on top there is another Blue Ball. Cast Carpe Retractum and get on an upper blade.
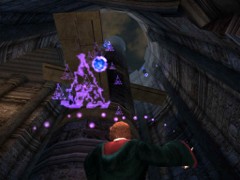
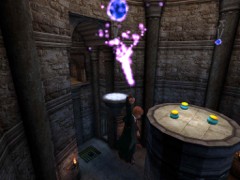
Carpe Retractum on a higher Ball
Don’t
stand too close to the central pillar but keep a small distance or you’ll fall
from the blade. See a Blue Ball hanging on a rope near the wall? Cast Carpe
Retractum and will open a grate in the central pillar.
When
passing, jump in the opening and seize you 1st Challenge Shield
(watch out – this is a very tricky jump). Go one blade up and this is the
highest you can climb on, so now cast Cast Carpe Retractum on the Blue Ball in the
next tower and pull Ron up there.
Jump
inside the central hole but there is nothing in there. In the next tower there are
spinning Blue Balls. Try to catch one when passing by. Before casting Carpe
Retractum on that go stand on the edge of the beam and jump into a room as soon
as you pass that. Land on a ledge with an alcove containing a Suit of Armor and
cast Depulso twice for some Beans.
[9.3]
Pull yourself up on a Blue Ball as soon as possible because a Skeleton will appear behind
the grated door and throws bones at Ron, decreasing his stamina fast!
Land
on the next platform where you will see a Challenge Shield behind a grated door.
Turn around, jump into the room and cast Alohomora on the chest for a load of
Beans. Cast Carpe Retractum on the Blue Ball on the rope.
The
door with the Skeleton will open up! You’ll have to go in there again, so catch a
Blue Ball and ride the carrousel until you land on that ledge. Inside, the
Skeleton is standing by the chest on the right with its back turned to Ron. Cast
Rictusempra twice and scatter its dead bones. Open the chest with Alohomora and
extract its Beans.
Now
turn
left and run around the central pillar. That damned Skeleton has come
to life again (or is it a second one?), so you’ll have to cast
Rictusempra twice
again, and this time act fast before it comes back again. Turn all the
way around and catch the 2nd Challenge
Shield. Open the chest with
Alohomora for 4 Pumpkin Pasties. Turn around, Spongify the tile and jump one
floor higher inside the middle tower. You can cast Depulso thrice on each of
both Suits of Armor and each time obtain a Chocolate Frog. That makes 6 in
total. Eat until your stamina is full and leave the others.
Cast
Alohomora on the chest twice for a double bunch of Beans. Look up on the console
between the two tin men and you’ll notice a Challenge Shield. Go stand in the
Window where a few Beans are lying and jump to a small ledge with Beans on your
left (you have to do a running jump). Jump always to the ledges from left to
right.
Now
get in on the other side of the fence and quickly blow up two Skeletons, again
by casting Rictusempra twice. Open the chest on your left for 4 Pumpkin
Pasties. Spongify the tile and jump up to your
3rd Challenge
Shield.
Cast
Depulso thrice on the Tapestry for Beans and it will roll up. Leave through the
second window with Beans and start running and jumping zigzagging again to the
ledges with the Beans on top until you enter a room with your second
Save Book.
[9.4]
Cast Alohomora on the door lock.
Proceed
through a second (open) door and the third door will open giving access to a
room with 4 Fire Crabs. Quickly cast multiple Rictusempra on them and push them
into the opposite holes which will then close and a door on your left will open
showing a Challenge Shield.
You
can cast Depulso 3 times on the first Suit of Armor on your right and twice on
the second Suit for Beans. Cast Depulso
on the first Suit of Armor on the left to provide a Chocolate Frog and two Pumpkin
Pasties. A second and third hit on him will give you a Frog and 3 Pasties. Cast Depulso twice
on the Tapestry and get out each time Beans and 4 Pumpkin Pasties. The
carpet will roll up.
Then
take the bridge to the Shield but first turn right and do a running jump to the
window ledge with the Beans. Jump back and collect your 4th Challenge
Shield. Do a running jump to the window ledge on your left for some more Beans.
Jump back to the bridge and enter the next room. One tin can in there is worth
two Depulso blasts, the other only one and each of them sheds Beans.
Go out on the ledge and cast Alohomora on the large H in front of you on the wall. A double door will open unveiling a Depulso sign. Cast Depulso and a grilled door will slide up on the right side of this ledge.
Cast Depulso on the sign behind the hatches
Turn
right and enter the hall. Cast Alohomora on the chest in the room on your right
and get 8 Pumpkin Pasties. The chest in the room on your left contains 8
Cauldron Cakes. Return to the left side of the ledge and watch three spinning
double blades. Act fast here! Jump from one to the other before they disappear
in the wall. From the third blade cast Depulso on the sign on the wall and a
statue with a Blue Ball will arise.
Quickly
cast Carpe Retractum on the Blue Ball and pull yourself up to this ledge. Go to
the other side, look up and spot another carrousel of 4 Blue Balls. Retract
yourself to one of the Balls and make sure you make a full turn to land on the
front floating ledge.
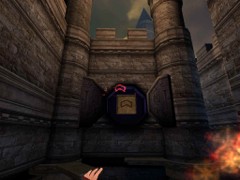
Ride to the front floating ledge
Land
and it will come down. Turn around and walk to the wall. 4 Skeletons will attack
you. You’ve got to be really fast here! When they’re blown to Kingdom Come
the grate on top of the floor tile will slide open. Go inside the central tower
and cast Depulso on the sign in there.
Spongify
the
tile and you’ll be back on the previous ledge. Pick up a Blue Ball and
this time land on the opposite floating platform. From the air you see
about 6 Imps down below. When they’re all defeated another Spongify tile
is accessible
on the floor. First open each chest in the corner with Alohomora and get
a
double load of Beans.
Spongify
the tile and land on the middle platform where you’ll get 3 Cauldron Cakes.
Cast Carpe Retractum on the Blue Ball on the opposite side and retract yourself
to that ledge. You’ll land in a Portrait room with the 5th and
Final Challenge Shield.
The final Challenge Shield
Prof.
Lupin enters the room. Fantastic
work, Ron! A perfect Score. You have clearly mastered the Carpe Retractum spell.
Thanks,
Professor Lupin. A
window will now appear requesting if you’d like to replay the Final Exam or
not? If you haven’t found all 5 Challenge Stars you may do so now. If you got
them all, better Exit Final Exam. A game load and save are made.
So...
let's